
Groups, Gangs, and Factions
Brotherhood of Steel
Due to its considerable strength and unyielding conviction, the Brotherhood of Steel is one of the Commonwealth’s most feared factions. Through the acquisition and preservation of prewar technology, the Brotherhood aims to ensure the future of the human race. However, this means that individual humans are often ignored or sacrificed if doing so can further the Brotherhood’s goals.
Although the Brotherhood seeks to eradicate Ghouls and synths, its members don’t generally attack humans without cause. However, any hostile action or open defiance is sure to result in bloodshed.
Scribes
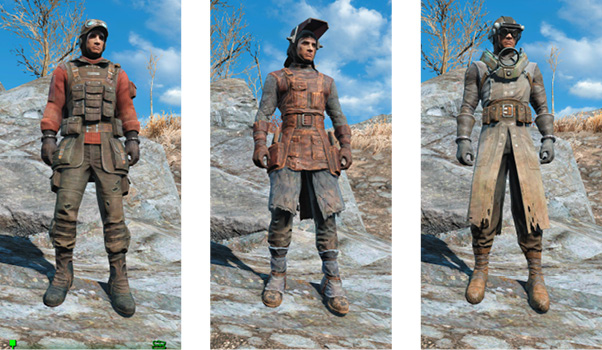
Scribes are tasked with cataloging and preserving any information considered valuable to the Brotherhood of Steel. When it comes to combat, Scribes lack the impressive skills and equipment of their front-line comrades. While they do have access to a small variety of armor and accessories, even the most effective combinations offer very little protection.
| Name | Level | Inventory | Perception | Base Health | Standard Armor | Standard Weapons | XP |
|---|---|---|---|---|---|---|---|
| Brotherhood Scribe Initiate | 1 | — | 4 | 40 | Scribe | Laser pistols | 4 |
| Brotherhood Scribe | 6 | — | 4 | 80 | Scribe | Laser pistols | 11 |
| Brotherhood Senior Scribe | 15 | — | 5 | 120 | Scribe | Laser pistols | 23 |
Lancers
| Name | Level | Inventory | Perception | Base Health | Standard Armor | Standard Weapons | XP |
|---|---|---|---|---|---|---|---|
| Brotherhood Lancer-Initiate | 1 | — | 4 | 40 | Bomber jacket | Laser rifles | 4 |
| Brotherhood Lancer | 7 | — | 5 | 70 | Bomber jacket | Laser rifles | 12 |
| Brotherhood Lancer-Knight | 14 | — | 6 | 185 | Bomber jacket | Laser rifles | 21 |
| Brotherhood Lancer-Sergeant | 21 | — | 6 | 150 | Bomber jacket | Laser rifles | 31 |
| Brotherhood Lancer-Captain | 28 | — | 6 | 170 | Bomber jacket | Laser rifles | 40 |
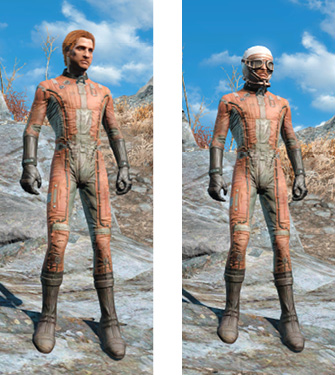
Lancers are responsible for providing transportation and air support for the Brotherhood of Steel. With gear like bomber jackets and flight helmets, Lancers aren’t particularly formidable, but every Lancer carries some sort of laser rifle in case a firefight breaks out.
Soldiers
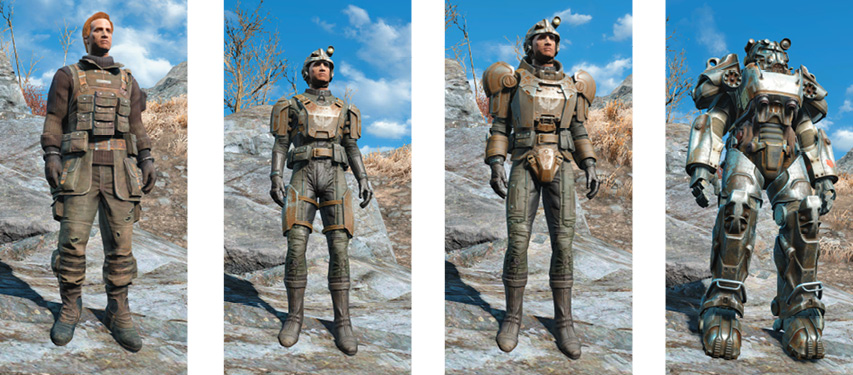
Soldiers are responsible for gathering technology and enforcing the will of the Brotherhood. Individuals who demonstrate exceptional loyalty and valor are promoted up the ranks, gaining more formidable gear along the way. Most Brotherhood of Steel soldiers rely on various laser rifles, but heavy guns such as miniguns, Gatling lasers, and missile launchers are sometimes used to overwhelm the opposition.
| Name | Level | Inventory | Perception | Base Health | Standard Armor | Standard Weapons | XP |
|---|---|---|---|---|---|---|---|
| Brotherhood Initiate | 2 | — | 4 | 50 | Brotherhood fatigues | Laser rifles | 6 |
| Brotherhood Aspirant | 9 | — | 4 | 115 | Brotherhood fatigues | Laser rifles | 15 |
| Brotherhood Knight | 17 | — | 5 | 200 | Combat armor | Laser rifles | 25 |
| Brotherhood Knight-Sergeant | 25 | — | 5 | 300 | Combat armor | Laser rifles | 36 |
| Brotherhood Knight-Captain | 33 | — | 6 | 375 | Combat armor | Laser rifles | 47 |
| Brotherhood Knight-Commander | 41 | — | 6 | 480 | Combat armor | Laser rifles | 58 |
| Brotherhood Paladin | 49 | — | 6 | 560 | Combat armor | Laser rifles | 70 |
| Brotherhood Paladin-Commander | 57 | — | 7 | 670 | Combat armor | Laser rifles | 81 |
| Brotherhood Star Paladin | 67+ | — | 8 | 800+ | Combat armor | Laser rifles | 96 |
Higher ranking soldiers sometimes employ T60 Power Armor, allowing them to absorb huge amounts of damage. Use powerful explosives, rifles, or heavy guns to engage from a safe distance, or equip a suit of Power Armor to even the odds in close combat.
Vertibirds
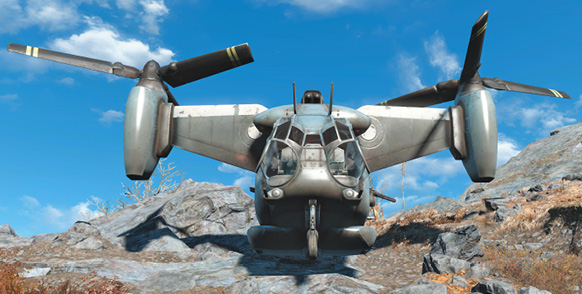
Vertibirds are essentially mobile weapon platforms, providing air support to Brotherhood ground forces. Passengers can use the side-mounted miniguns to tear through enemy forces, and each Vertibird is also equipped with two front-mounted 5-mm cannons. Each projectile does relatively little damage, but even the toughest targets can be overwhelmed by a Vertibird’s hail of bullets.
| NAME | LEVEL | PERCEPTION | BASE HEALTH | DAMAGE RESISTANCE | ENERGY RESISTANCE | RADIATION RESISTANCE | POISON RESISTANCE | DAMAGE | SPECIAL ATTACK | SA DAMAGE | XP |
|---|---|---|---|---|---|---|---|---|---|---|---|
| Vertibird | 20 | 10 | 910 | 60 | 60 | Immune | Immune | 108/sec | Minigun | 8 | 30 |
| Vertibird | 30 | 10 | 910 | 90 | 90 | Immune | Immune | 108/sec | Minigun | 8 | 43 |
| Vertibird | 40 | 10 | 1310 | 112 | 112 | Immune | Immune | 198/sec | Minigun | 8 | 75 |
| Vertibird | 50 | 10 | 1510 | 135 | 135 | Immune | Immune | 288/sec | Minigun | 8 | 71 |
If you find yourself in a Vertibird’s crosshairs, check the area for any nearby structures that might offer cover. Target the pilot or use a missile launcher to quickly down one of these vehicles. Otherwise, chip away at its health with the most powerful weapon you have. During battle, a Vertibird tends to move in and out of any weapon’s effective range. Monitor your ammunition and choose your shots wisely. A disabled Vertibird will stay in the air for several seconds before crashing down to the ground—use this time to get clear of the impending explosion.
Children of Atom
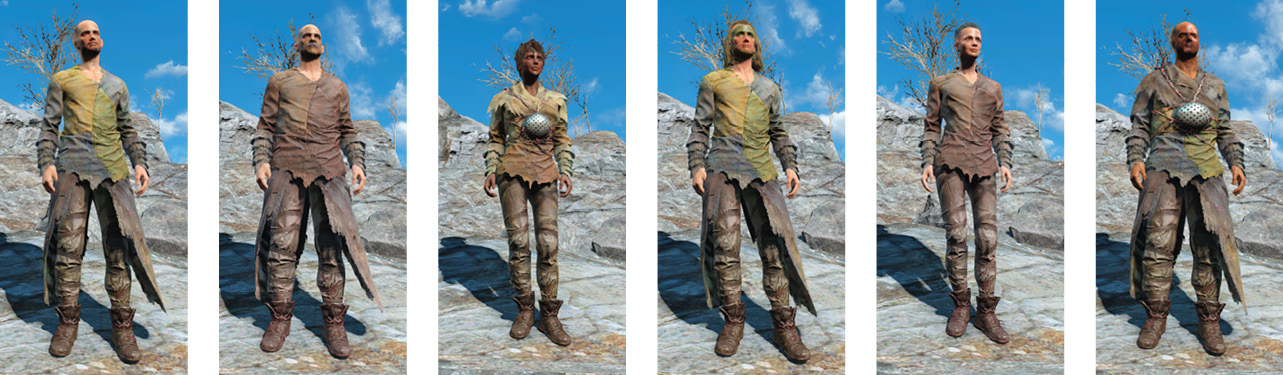
Considered a cult by most outsiders, the Children of Atom worship nuclear material and the radiation it emits. While most members are compelled to spread the word of Atom, Children of Atom are wary of strangers and generally attack trespassers on sight. Unless important business takes you into their territory, approaching a Child of Atom will trigger a firefight.
Children of Atom congregate in the Crater of Atom, but smaller groups can be found throughout the Commonwealth.
| Name | Level | Inventory | Perception | Base Health | Standard Armor | Standard Weapons | XP |
|---|---|---|---|---|---|---|---|
| Child of Atom | 10 | — | 9 | 280 | Child of Atom rags | Gamma guns, pipe guns | 16 |
| Child of Atom Cultist | 20 | — | 9 | 400 | Child of Atom rags | Gamma guns, pipe guns | 29 |
| Child of Atom Preacher | 30 | — | 9 | 500 | Child of Atom rags | Gamma guns, pipe guns | 43 |
| Child of Atom Zealot | 40 | — | 9 | 600 | Child of Atom rags | Gamma guns, pipe guns | 57 |
| Child of Atom Reborn | 50 | — | 9 | 700 | Child of Atom rags | Gamma guns, pipe guns | 71 |
Children of Atom wear rags that offer very little protection, but prolonged exposure has left them immune to radiation and able to withstand a considerable amount of punishment. Although some Children of Atom rely on a variety of handmade pipe guns, others favor the radiation damage offered by gamma guns. Whenever possible, equip armor that offers radiation resistance or stock up on RadAway before engaging these fanatics.
Diamond City Security
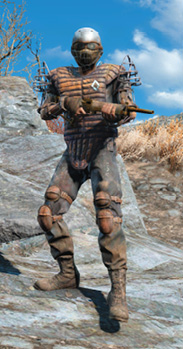
Diamond City Security is responsible for keeping hostiles out of the city and maintaining order within its walls. Law-abiding visitors and residents have nothing to fear from Diamond City Security, but infractions like theft and violence are generally met with overwhelming force.
| NAME | LEVEL | INVENTORY | PERCEPTION | BASE HEALTH | STANDARD ARMOR | STANDARD WEAPONS | XP |
|---|---|---|---|---|---|---|---|
| Diamond City Security | 20-50 | Stimpak | 7 | 285-435 | DC Guard | Pipe rifles, baseball bats | 30 |
For the most part, Diamond City Security uses repurposed baseball equipment to keep the peace. Their standard-issue armor favors damage resistance over energy resistance, and all guards carry some sort of baseball bat. Each guard also carries a pipe rifle and at least one stimpak, relying on superior numbers and emergency healing to overwhelm better-equipped enemies. Luckily, it’s fairly easy to prevent confrontations with Diamond City Security—avoid committing criminal acts (or make sure such acts go unwitnessed) to ensure that these guards leave you in peace.
Drifters
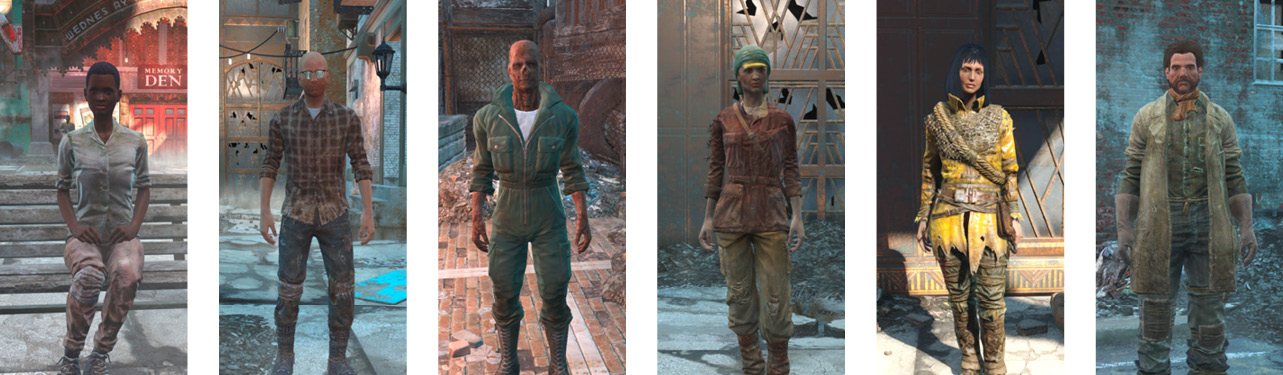
Most of the people living in Goodneighbor are Drifters who have grown weary of wandering the wilderness. They aren’t particularly aggressive, but they’re quick to swarm on visitors who threaten the relative safety of their community.
| Name | Level | Inventory | Perception | Base Health | Standard Armor | Standard Weapons | XP |
|---|---|---|---|---|---|---|---|
| Drifter | 6 | — | 4 | 190 | Clothing | Pipe guns | 0 |
Wrapped in simple clothing and armed with only handmade pipe guns, Drifters aren’t particularly effective in combat. However, attacking a Drifter will draw all of Goodneighbor into the skirmish. Considering that Drifters never carry anything of real value, there’s not much to be gained from provoking them.
Forged
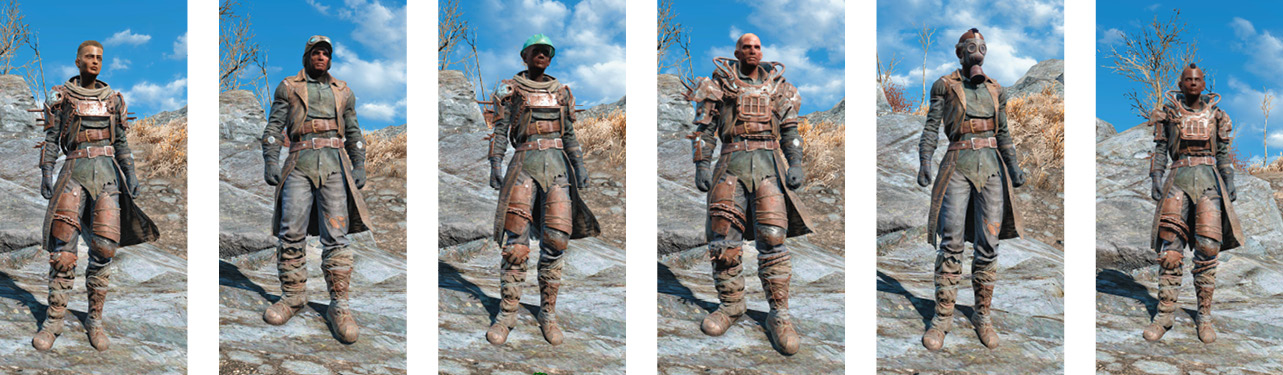
The Forged are similar to Raiders, set apart only by their small numbers and fanatic obsession with the destructive power of fire. These enemies can only be found in and around the Saugus Ironworks, and they’ll attack any and all trespassers on sight.
| Name | Level | Inventory | Perception | Base Health | Standard Armor | Standard Weapons | XP |
|---|---|---|---|---|---|---|---|
| Forged | 1 | — | 4 | 30 | Wastelander | Ballistic guns, melee weapons, flamers | 5 |
| Forged | 4 | — | 4 | 45 | Wastelander | Ballistic guns, melee weapons, flamers | 8 |
| Forged | 9 | — | 4 | 70 | Wastelander | Ballistic guns, melee weapons, flamers | 15 |
| Forged | 14 | — | 4 | 125 | Wastelander | Ballistic guns, melee weapons, flamers | 21 |
| Forged | 30 | — | 4 | 390 | Wastelander | Ballistic guns, melee weapons, flamers | 43 |
| Forged | 39 | — | 4 | 540 | Wastelander | Ballistic guns, melee weapons, flamers | 55 |
Most Forged wear some form of cage armor, spiked armor, or Drifter outfit. Even when combined with a piece of headgear, a typical Forged has fairly low resistances. However, the Forged do carry a wide variety of weapons. Those who favor melee weapons tend to use baseball bats, sledgehammers, and even the occasional super sledge. They also have access to a large selection of pistols, rifles, and flamers, and most Forged carry a supply of Molotov cocktails.
Because Forged are limited to a single location, there’s no need to engage them until you’re adequately prepared. Forged are most effective at short to medium range, so it’s usually best to pick them off from a distance. When that’s not an option, be sure to watch for incoming Molotov cocktails as you deal with incoming Forged.
Gunners
Gunners claim to be soldiers for hire, but throughout the Commonwealth, they have a well-earned reputation as being a highly militarized gang of thugs. Aggressive and fiercely territorial, Gunners are guaranteed to attack anyone who wanders into an area they’ve claimed as their own. They’re well equipped and well organized, and a group of Gunners almost always includes at least one combat-ready robot.
Gunners can be found in Mass Bay Medical Center, Hub City Auto Wreckers, and many other locations throughout the Commonwealth.
Gunner Humans
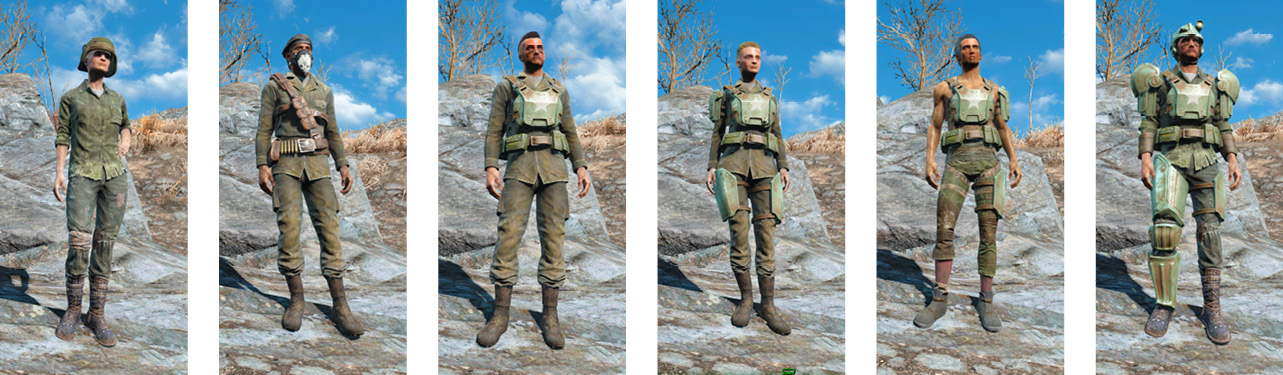
Low-ranking Gunners are usually limited to the protection offered by simple clothing, accessories, and the occasional piece of leather armor. Gunners who have reached the rank of Private sport a few pieces of combat armor. Further promotions grant Gunners better-quality pieces of combat armor. Gunners also enjoy a vast arsenal of weapons. Combat rifles and laser rifles are popular choices—and no Gunner would ever be caught relying on a handmade pipe gun—but virtually any projectile weapon weapon has a chance of appearing in a Gunner’s hands. Even valuable plasma weapons can be found on high-level Gunners. Batons and rippers are sometimes used, as are fragmentation grenades, Molotov cocktails, and a variety of heavy guns.
| Name | Level | Inventory | Perception | Base Health | Standard Armor | Standard Weapons | XP |
|---|---|---|---|---|---|---|---|
| Gunner | 8 | — | 4 | 120 | Clothing | Pistols, rifles | 13 |
| Gunner Conscript | 14 | — | 4 | 150 | Clothing | Pistols, rifles | 21 |
| Gunner Private | 22 | — | 4 | 240 | Combat armor | Pistols, rifles | 32 |
| Gunner Corporal | 30 | — | 5 | 400 | Combat armor | Pistols, rifles | 43 |
| Gunner Sergeant | 38 | — | 5 | 540 | Combat armor | Pistols, rifles | 54 |
| Gunner Lieutenant | 46 | — | 5 | 660 | Combat armor | Rifles | 65 |
| Gunner Captain | 58 | — | 6 | 780 | Combat armor | Rifles | 83 |
| Gunner Major | 70 | — | 6 | 890 | Combat armor | Rifles | 100 |
| Gunner Colonel | 82 | Stealth Boy | 6 | 1070 | Combat armor | Rifles | 118 |
| Gunner General | 94 | Stealth Boy | 7 | 1300 | Combat armor | Rifles | 137 |
Gunner Robots
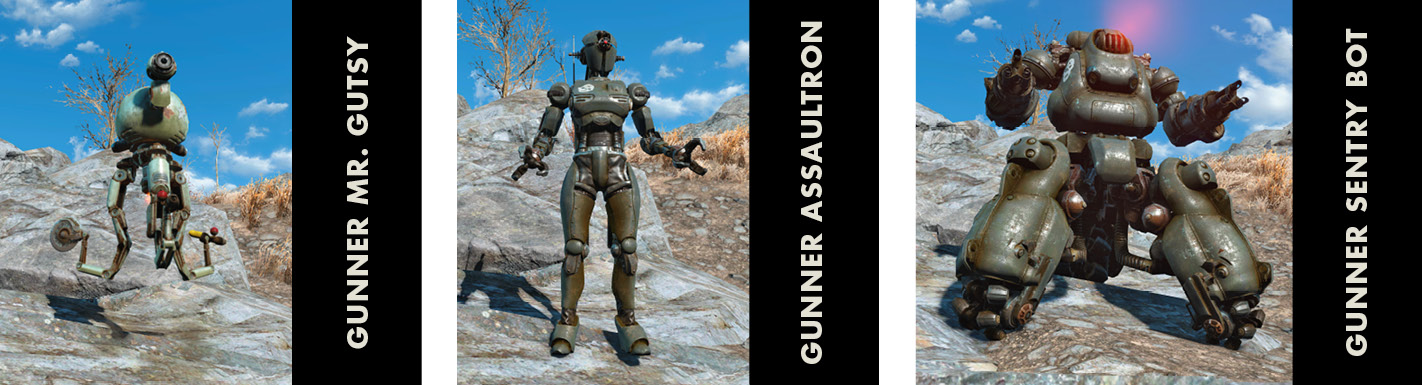
With the exception of custom paint jobs, Gunner robots are identical to their standard counterparts. When fighting a Mr. Gutsy, check its arms to estimate its offensive capabilities, then attack its eyes and torso. It’s often best to slow an Assaultron by crippling its leg. Simply using your most powerful weapons against a Sentry Bot is usually your best option.
| NAME | LEVEL | PERCEPTION | BASE HEALTH | DAMAGE RESISTANCE | ENERGY RESISTANCE | RADIATION RESISTANCE | POISON RESISTANCE | DAMAGE | SPECIAL ATTACK | SA DAMAGE | XP | ||
|---|---|---|---|---|---|---|---|---|---|---|---|---|---|
| Gunner Mr. Gutsy | 22 | 6 | 250 | 60 | 40 | Immune | Immune | Varies | -- | -- | 32 | ||
| Gunner Lieutenant Gutsy | 32 | 7 | 350 | 75 | 50 | Immune | Immune | Varies | -- | -- | 51 | ||
| Gunner Major Gutsy | 50 | 8 | 550 | 90 | 60 | Immune | Immune | Varies | -- | -- | 83 | ||
| Gunner Colonel Gutsy | 52+ | 8 | 655+ | 110 | 70 | Immune | Immune | Varies | -- | -- | 130 | ||
| Gunner Assaultron | 24 | 5 | 300 | 75 | 40 | Immune | Immune | 60 | Head laser | 100 | 35 | ||
| Gunner Assaultron Invader | 36 | 5 | 400 | 105 | 60 | Immune | Immune | 90 | Head laser | 150 | 51 | ||
| Gunner Assaultron Dominator | 46 | 6 | 500 | 130 | 75 | Immune | Immune | 120 | Head laser | 200 | 65 | ||
| Gunner Sentry Bot | 30 | 10 | 750 | 125 | 85 | Immune | Immune | 109/sec | -- | -- | 43 | ||
| Gunner Siege Breaker Sentry Bot | 40 | 10 | 850 | 150 | 100 | Immune | Immune | 136/sec | Missile Launcher | 169 | 57 | ||
| Gunner Annihilator Sentry Bot | 50 | 10 | 1000 | 175 | 125 | Immune | Immune | 202 | -- | -- | 71 | ||
| Gunner Annihilator Sentry Bot Mk. II | 60+ | 10 | 1045+ | 135 | 125+ | Immune | Immune | 135 | Rocket Cluster | 5x30 | 86 | ||
Mercenaries
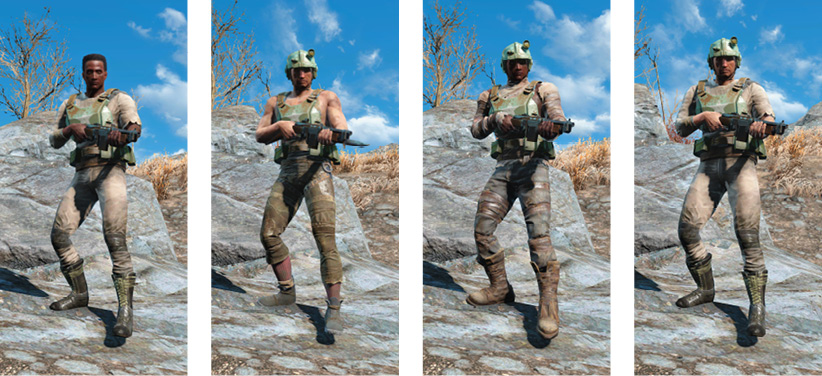
Mercenaries lack the Gunners’ numbers and resources, but the two groups are similar in most respects. These enemies have been charged with guarding Parsons State Insane Asylum, which is the only place Mercenaries can be found in the Commonwealth. They take their work very seriously and are guaranteed to attack anyone who encroaches on their territory.
| Name | Level | Inventory | Perception | Base Health | Standard Armor | Standard Weapons | XP |
|---|---|---|---|---|---|---|---|
| Mercenary | 8 | — | 4 | 120 | Combat armor | Combat rifles | 13 |
| Mercenary | 14 | — | 4 | 150 | Combat armor | Combat rifles | 21 |
| Mercenary | 22 | — | 4 | 240 | Combat armor | Combat rifles | 32 |
| Mercenary | 30 | — | 5 | 400 | Combat armor | Combat rifles | 43 |
Each Mercenary is equipped with at least a few pieces of combat armor and some type of combat rifle. This means all Mercenaries enjoy a good balance of damage resistance and energy resistance, and they all deal reliable damage from a decent range. Many Mercenaries also carry fragmentation grenades or Molotov cocktails to flush their targets out of cover. When battling a group of Mercenaries, try to keep track of enemy locations and keep an eye out for reinforcements that enter the skirmish.
Minutemen
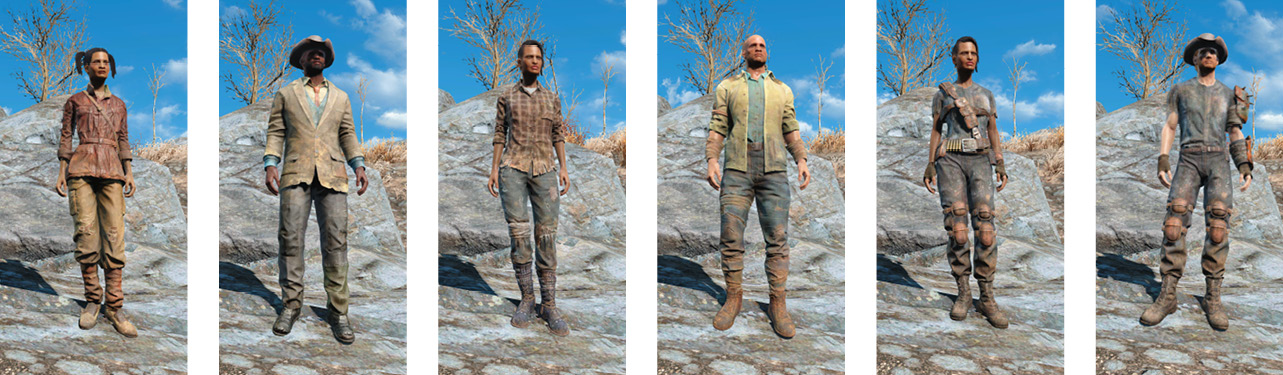
The Minutemen were once a formidable and rather popular faction in the Commonwealth. Due to significant losses and internal squabbles, however, this people’s militia has struggled to survive in recent years. By defending their friends and neighbors at every opportunity, the few remaining Commonwealth Minutemen hope to bolster their numbers and bring some measure of peace and comfort to the average men and women scattered throughout the region.
Each Minuteman relies on whatever gear he or she can salvage, so the group’s strength is determined by the allegiances it manages to forge. You first encounter Preston Garvey—who has spent years believing he’s the last of the Commonwealth Minutemen—in the Museum of Freedom. With enough allies, however, Preston believes he can reestablish the Castle as the Minutemen’s base of operations.
| Name | Level | Inventory | Perception | Base Health | Standard Armor | Standard Weapons | XP |
|---|---|---|---|---|---|---|---|
| Minuteman | 1 | — | 4 | 30 | Clothing | Pistols, rifles | 5 |
| Minuteman | 9 | — | 4 | 70 | Clothing | Pistols, rifles | 15 |
| Minuteman | 14 | — | 4 | 125 | Clothing | Pistols, rifles | 21 |
| Minuteman | 22 | — | 4 | 240 | Clothing | Pistols, rifles | 32 |
| Minuteman | 30 | — | 5 | 400 | Clothing | Pistols, rifles | 43 |
| Minuteman | 39 | — | 4 | 540 | Clothing | Pistols, rifles | 55 |
| Minuteman | 46 | — | 5 | 660 | Clothing | Pistols, rifles | 65 |
| Minuteman | 58 | — | 6 | 100 | Clothing | Pistols, rifles | 83 |
Most Minutemen are limited to whatever protection is offered by simple clothing and headgear, but some members have managed to salvage a few pieces of leather armor or metal armor. The laser musket is the signature weapon of the Minutemen, but the average Minuteman is forced to rely on whatever weapons he or she has managed to salvage before joining. This means that patrolling Minutemen can be found carrying anything from humble pipe guns to heavily modified combat rifles.
While some of its members can seem a bit self-righteous, Minutemen never attack without provocation. In fact, because the group’s strength is determined by the support of its allies, Minutemen are generally eager to lend a hand to anyone who doesn’t pose a direct threat.
Neighborhood Watch
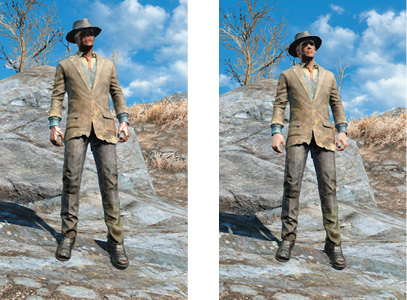
The Neighborhood Watch is responsible for keeping order in Goodneighbor. Acts of theft or violence are answered with a hail of bullets, but visitors who stay out of trouble have nothing to fear from these local guards.
Wearing only patched three-piece suits and worn fedoras, members of the Neighborhood Watch aren’t particularly well protected. The group does include both humans and Ghouls, however, so some members are immune to radiation damage. Most of these guards are surprisingly friendly, but they’re always quick to deal with misbehaving visitors.
| Name | Level | Inventory | Perception | Base Health | Standard Armor | Standard Weapons | XP |
|---|---|---|---|---|---|---|---|
| Neighborhood Watch | 1 | — | 7 | 40 | Patched three-piece suit | Submachine guns, assault rifles | 5 |
| Neighborhood Watch | 7 | — | 8 | 100 | Patched three-piece suit | Submachine guns, assault rifles | 12 |
Pillars of the Community
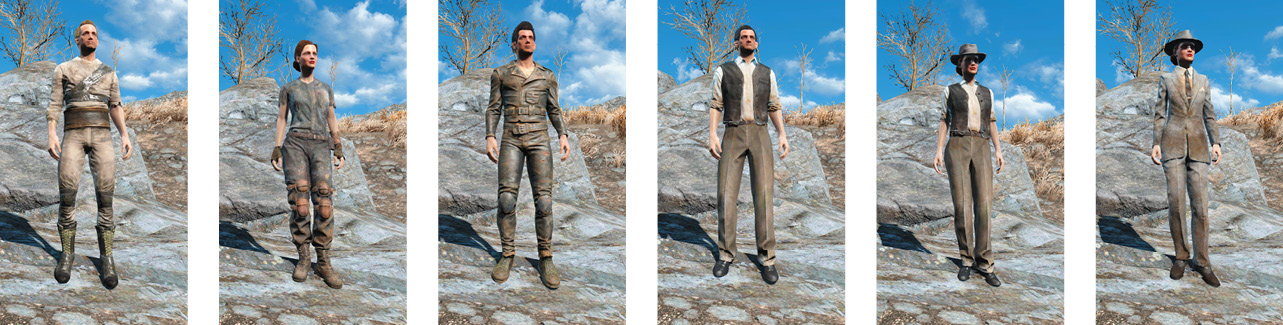
The Pillars of the Community is a new movement based in the Charles View Amphitheater. Its leader claims to have discovered a path back to the prosperity of a prewar Commonwealth, and he’s managed to gather a small flock of followers since founding the organization. The Pillars of the Community aren’t initially hostile, but they’re easily provoked.
| NAME | LEVEL | PERCEPTION | BASE HEALTH | STANDARD ARMOR | STANDARD WEAPONS | XP |
|---|---|---|---|---|---|---|
| Initiate | 3 | 4 | 50 | Clothing | Melee weapons | 7 |
| Mercenary | 6-25 | 4 | 130-320 | Clothing | Pipe guns | 12 |
Pillars of the Community members have fairly unimpressive gear, but as a group, they can still be a handful. Missionaries carry pipe guns, but Initiates are limited to a variety of simple melee weapons. If you choose to engage this group in combat, keep moving to avoid being surrounded as you thin their numbers.
Raiders
Raiders are plentiful, ruthless, and extremely aggressive—luckily, they’re not particularly bright. Large groups can be a handful, and some gangs contain particularly strong members, but most Raiders are poorly equipped and all too accustomed to preying on the Commonwealth’s most vulnerable residents. Raiders are predominantly human, but there are some Ghouls among their numbers. Many Raider gangs also include one or more attack dogs.
They’ve managed to maintain a strong presence throughout the Commonwealth, but check locations like Hardware Town, Combat Zone, and Dunwich Borers when you’re itching to find a gang of Raiders.
Common Raiders
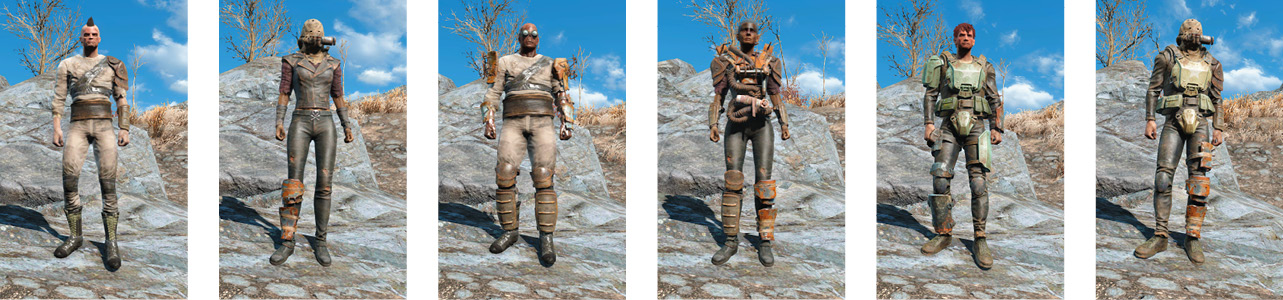
Most Raiders possess at least one piece of Raider armor, but leather armor and metal armor are also quite common. More powerful Raiders even sport pieces of combat armor, so any two Raiders can have wildly different resistances. Because the weapons they carry are equally varied, it’s just as difficult to gauge a specific Raider’s offensive capabilities.
| Name | Level | Inventory | Perception | Base Health | Standard Armor | Standard Weapons | XP |
|---|---|---|---|---|---|---|---|
| Raider | 1 | — | 4 | 30 | Raider armor | Ballistic guns, melee weapons | 5 |
| Raider Scum | 4 | — | 4 | 45 | Raider armor | Ballistic guns, melee weapons | 8 |
| Raider Psycho | 9 | — | 4 | 70 | Raider armor | Ballistic guns, melee weapons | 15 |
| Raider Scavver | 14 | — | 4 | 125 | Raider armor | Ballistic guns, melee weapons | 21 |
| Raider Waster | 21 | — | 4 | 175 | Raider armor | Ballistic guns, melee weapons | 31 |
| Raider Survivalist | 30 | — | 4 | 390 | Raider armor | Ballistic guns, melee weapons | 43 |
Most Raiders are limited to low-quality ballistic guns and melee weapons, but they will use any weapon they can salvage. Fragmentation grenades are also very popular with Raider gangs, so expect to dodge at least a few explosives when battling larger groups.
Unnamed Raider Bosses
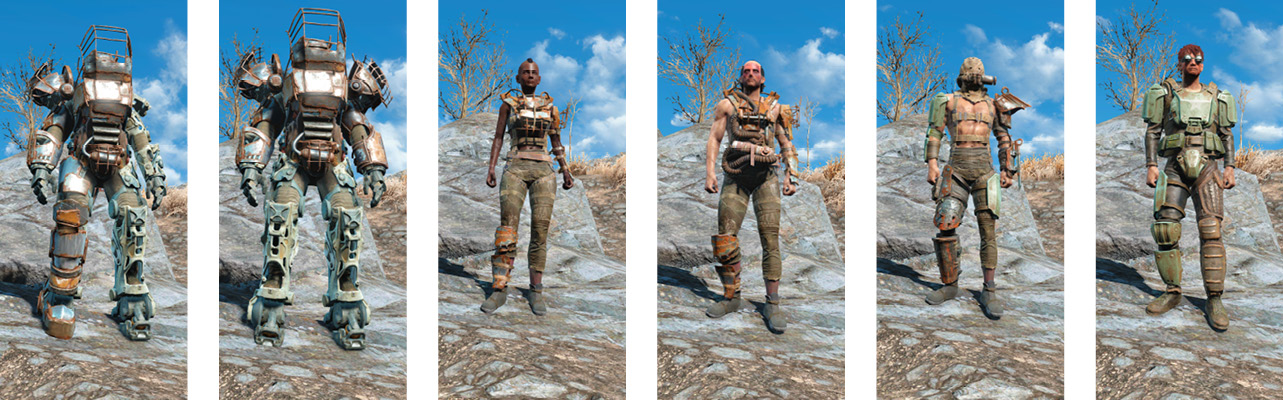
Like other groups and factions, Raiders have their share of Legendary members and infamous bosses. However, some groups contain at least one particularly powerful Raider who may not stand out from the pack. Raider Psychos equipped with Power Armor are easy enough to spot, but Raider Veterans often appear wearing gear you might find on any of their comrades. When in doubt, do a bit of reconnaissance before engaging a group of Raiders.
| Name | Level | Inventory | Perception | Base Health | Standard Armor | Standard Weapons | XP |
|---|---|---|---|---|---|---|---|
| Raider Psycho | 9 | Stimpak | 4 | 80 | Raider Power Armor | Rifles | 15 |
| Raider Veteran | 10 | Stimpak | 4 | 85 | Raider armor | Rifles | 16 |
| Raider Veteran | 39 | — | 4 | 540 | Raider armor | Rifles | 55 |
Raider Dogs

Raiders tend to equip their Attack Dogs with accessories and armor. These items may make their animals look more intimidating, but they offer no protection. Two Attack Dogs of the same level can have different strengths and weaknesses, but a quick look is usually all it takes to tell them apart. Dogs with full coats of fur have higher Perception and less Health than mangier Attack Dogs.
| Name | Level | Inventory | Perception | Base Health | Damage Resistance | Energy Resistance | Radiation Resistance | Poison Resistance | Damage | Special Attack | SA Damage | XP |
|---|---|---|---|---|---|---|---|---|---|---|---|---|
| Attack Dog | 1 | — | 10 | 30 | 5 | 5 | 0 | 0 | 5 | — | — | 5 |
| Attack Dog | 1 | — | 7 | 40 | 5 | 5 | 0 | 0 | 10 | — | — | 5 |
| Attack Dog | 7 | — | 10 | 80 | 10 | 10 | 0 | 0 | 15 | — | — | 12 |
| Attack Dog | 7 | — | 10 | 100 | 15 | 10 | 0 | 0 | 20 | — | — | 12 |
| Attack Dog | 14 | — | 10 | 120 | 15 | 15 | 0 | 0 | 20 | — | — | 21 |
| Attack Dog | 14 | — | 10 | 140 | 25 | 15 | 0 | 0 | 25 | — | — | 21 |
| Attack Dog | 21 | — | 10 | 170 | 20 | 20 | 0 | 0 | 25 | — | — | 31 |
| Attack Dog | 21 | — | 10 | 210 | 30 | 15 | 0 | 0 | 32 | — | — | 31 |
Railroad Agents
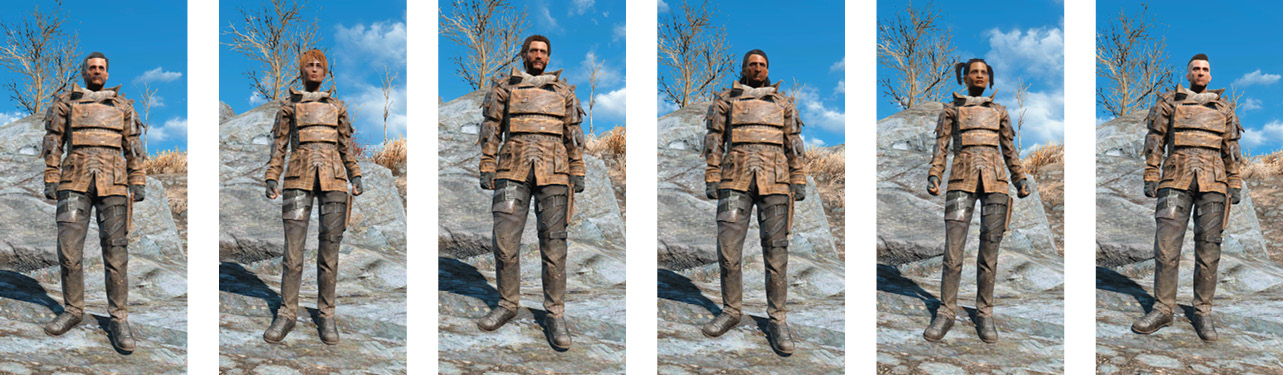
The Railroad isn’t the most powerful faction in the Commonwealth, but through the work of dedicated Railroad Agents, it has managed to gain a foothold in the Commonwealth.
Members of the Railroad offer aid to fugitive synths and hope that one day all synths will be free to live whatever life they please. These goals have put the Railroad at odds with both the Brotherhood of Steel and the Institute. The Railroad relies on secrecy and subterfuge to survive, but Railroad Agents won’t hesitate to attack anyone who stands with their enemies.
| Name | Level | Inventory | Perception | Base Health | Standard Armor | Standard Weapons | XP |
|---|---|---|---|---|---|---|---|
| Railroad Agent | 1 | — | 4 | 40 | Railroad armored coat | 10-mm pistols | 5 |
| Railroad Agent | 9 | — | 4 | 70 | Railroad armored coat | Hunting rifles | 15 |
| Railroad Agent | 21 | — | 4 | 175 | Railroad armored coat | Combat rifles | 31 |
| Railroad Agent | 30 | — | 4 | 390 | Railroad armored coat | Assault rifles | 43 |
| Railroad Agent | 38 | — | 5 | 540 | Railroad armored coat | Gauss rifles | 54 |
| Railroad Agent | 46 | — | 5 | 660 | Railroad armored coat | Gauss rifles | 65 |
Considering its simple appearance, Railroad armored coats offer fairly impressive resistances. All versions of this armor favor energy resistance over damage resistance, but the wearer even gains a small amount of radiation resistance. Each Railroad Agent carries some type of ballistic gun, but the most experienced operatives are issued Gauss rifles.
Robots
Robots are essentially tools, relying on their programming to determine friend from foe. Those designed for combat are equipped with particularly formidable weapons, but even those meant for more utilitarian tasks have some offensive capability. Any robot will take steps to protect itself from hostile actions. If a robot’s weapons are destroyed during the skirmish, it will initiate a self-defense sequence and charge its target for a final attack.
Robots charged with defending specific locations tend to attack all trespassers, but others have been programmed with allegiances to groups or individuals. Additionally, many of the robots scattered throughout the Commonwealth have suffered malfunctions brought on by centuries of neglect—even seemingly friendly robots can turn hostile without warning. Whenever you encounter an unknown robot, regardless of the type, it’s best to approach with caution.
Robots can be found in the General Atomics Galleria, Hester’s Consumer Robotics, and various other locations throughout the Commonwealth.
Eyebots
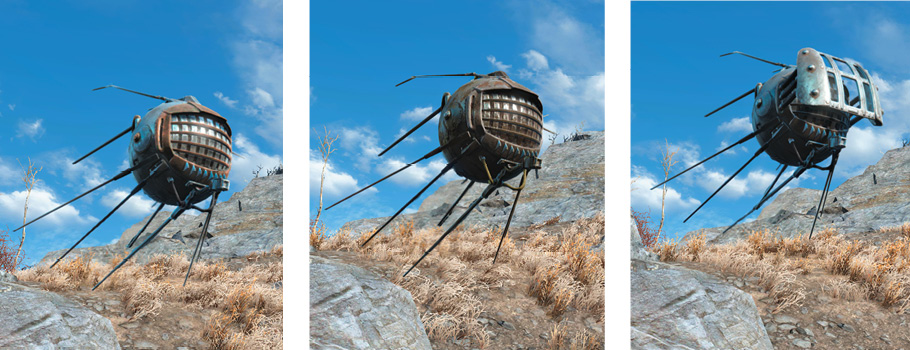
Eyebots are designed for reconnaissance and surveillance, but they’re often used to broadcast information and propaganda to remote areas. The Minutemen and the Brotherhood of Steel sometimes utilize Eyebots for such reasons. Before you engage an Eyebot, consider any affiliated factions that might take offense. It’s rare for an Eyebot to attack without provocation, but it does happen. Each Eyebot is equipped with a small laser weapon, but they’re not particularly formidable enemies.
| Name | Level | Inventory | Perception | Base Health | Damage Resistance | Energy Resistance | Radiation Resistance | Poison Resistance | Damage | Special Attack | SA Damage | XP |
|---|---|---|---|---|---|---|---|---|---|---|---|---|
| Eyebot | 1 | — | 10 | 100 | 0 | 0 | Immune | Immune | 10 | — | — | 5 |
Protectrons
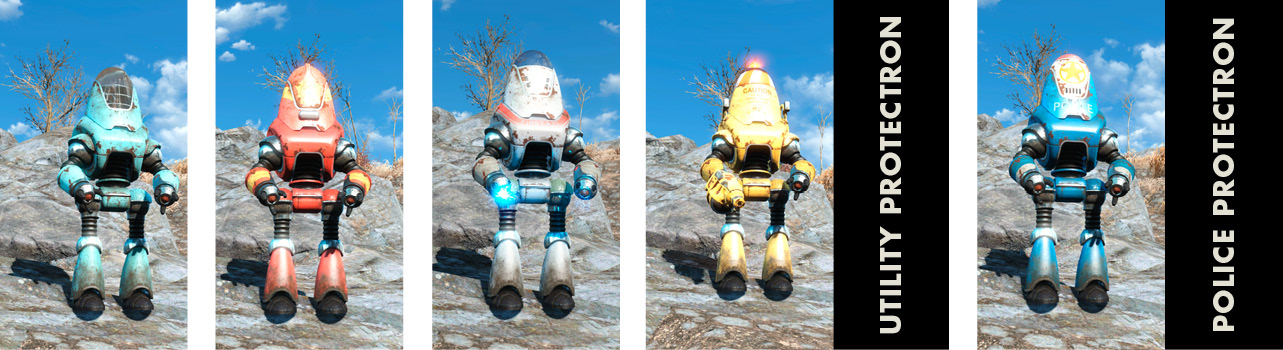
Protectrons were designed to fill a variety of roles. Some are programmed for customer service, while others are responsible for maintenance, emergency response, or building security. Many Protectrons are linked to terminals through which you can issue basic commands or assign new protocols. While most Protectrons are equipped with some sort of energy weapons, many are limited to rudimentary melee strikes.
| Name | Level | Perception | Base Health | Damage Resistance | Energy Resistance | Radiation Resistance | Poison Resistance | Damage | XP |
|---|---|---|---|---|---|---|---|---|---|
| Protectron Steward | 5 | 10 | 20 | 40 | 25 | Immune | Immune | Varies | 9 |
| Protectron | 5 | 10 | 100 | 40 | 25 | Immune | Immune | 22 | 9 |
| Utility Protectron | 14 | 10 | 190 | 75 | 50 | Immune | Immune | 15 | 10 |
| Protectron Watcher | 14 | 10 | 150 | 75 | 50 | Immune | Immune | 31 | 21 |
| Police Protectron | 14 | 10 | 190 | 75 | 50 | Immune | Immune | 22 | 21 |
| Protectron Guardian | 26 | 10 | 240 | 75 | 50 | Immune | Immune | 35 | 37 |
Protectrons move very slowly, and they’re not particularly durable, but they can often be used to clear an area of vermin or distract more formidable enemies.
Mr. Handy
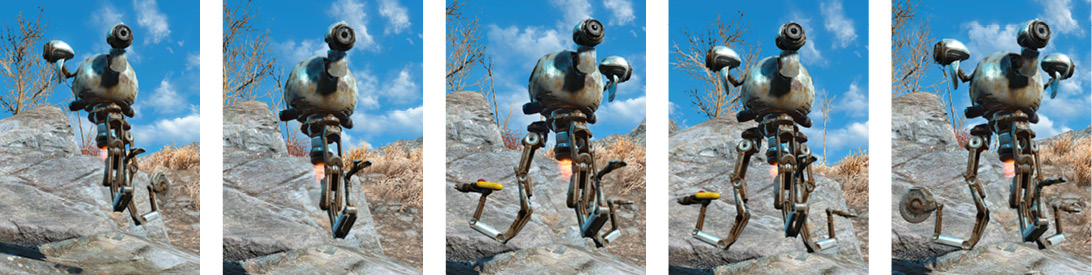
A Mr. Handy’s offensive capabilities are determined by the tools attached to its arms. Options include pinchers, saws, and miniature flamers. Each Mr. Handy can have up to three arms, so weapon combinations vary.
| Name | Level | Inventory | Perception | Base Health | Damage Resistance | Energy Resistance | Radiation Resistance | Poison Resistance | Damage | XP |
|---|---|---|---|---|---|---|---|---|---|---|
| Mr. Handy | 7 | — | 0 | 150 | 30 | 0 | Immune | Immune | Varies | 12 |
Mr. Handy was designed as a consumer-model robot, so it’s comparatively rare to encounter one that’s outwardly hostile. If a fight does break out, though, it’s usually best to simply overwhelm these robots. Most moderately powerful weapons can make short work of a Mr. Handy.
Mr. Gutsy
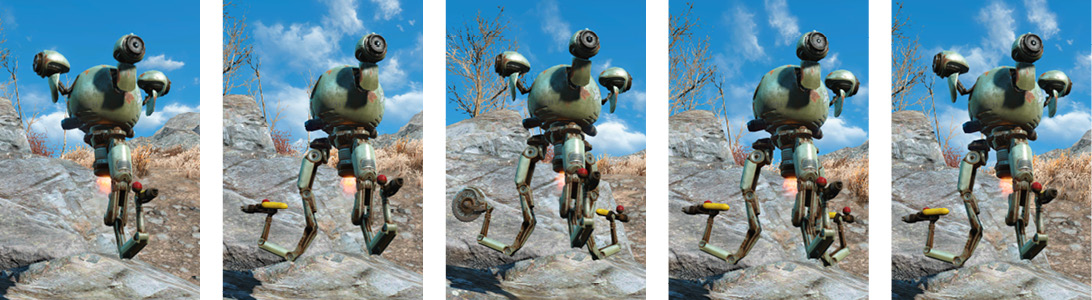
Mr. Gutsy robots may look similar to the consumer-model Mr. Handy, but they boast a more durable design and more powerful weapons. Possible attachments include .44 pistols, combat rifles, laser guns, and saws. Each Mr. Gutsy can carry up to three attachments. All projectile-weapon attachments share a standard appearance, however, so it’s impossible to determine a Mr. Gutsy’s offensive capabilities until it opens fire.
| Name | Level | Inventory | Perception | Base Health | Damage Resistance | Energy Resistance | Radiation Resistance | Poison Resistance | Damage | XP |
|---|---|---|---|---|---|---|---|---|---|---|
| Mr. Gutsy | 22 | — | 6 | 250 | 60 | 40 | Immune | Immune | Varies | 32 |
| Lieutenant Gutsy | 32 | — | 7 | 350 | 75 | 50 | Immune | Immune | Varies | 51 |
| Major Gutsy | 50 | — | 8 | 550 | 90 | 60 | Immune | Immune | Varies | 83 |
| Colonel Gutsy | 52+ | — | 8 | 655+ | 110 | 70 | Immune | Immune | Varies | 130 |
These robots are most effective at short to medium range, so long-range weapons are usually your best option. In close combat, try to target a Mr. Gutsy’s eyes before focusing your attacks on its torso. Destroying all of its eyes will compromise its accuracy without triggering a self-destruct sequence.
Assaultrons
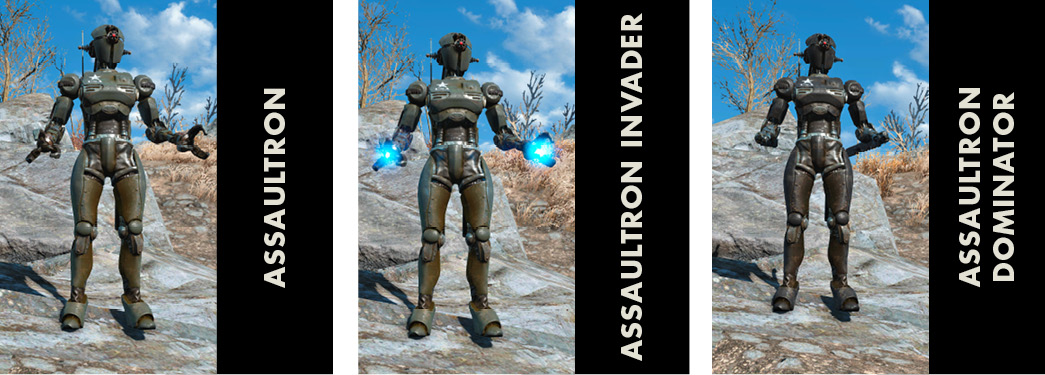
Assaultrons are formidable combatants. These agile robots use powerful melee strikes to batter their enemies, but they can also fire charged laser blasts from the energy weapons hidden within their heads. Additionally, Assaultron Dominators can generate stealth fields, making them difficult to track in a firefight.
| Name | Level | Perception | Base Health | Damage Resistance | Energy Resistance | Radiation Resistance | Poison Resistance | Damage | Special Attack | SA Damage | XP |
|---|---|---|---|---|---|---|---|---|---|---|---|
| Assaultron | 24 | 5 | 300 | 75 | 40 | Immune | Immune | 60 | Head Laser | 100 | 31 |
| Assaultron Invader | 36 | 5 | 400 | 105 | 60 | Immune | Immune | 90 | Head Laser | 150 | 51 |
| Assaultron Dominator | 46 | 6 | 500 | 130 | 75 | Immune | Immune | 120 | Head Laser | 200 | 65 |
It’s best to engage a hostile Assaultron from a distance. Target one of its legs with a long-range weapon and attempt to cripple it before it reaches you. Once you manage to down an Assaultron, keep moving to minimize the chances of being hit with a laser blast, and continue attacking until the robot is destroyed.
Sentry Bots

Sentry Bots are well armed and extremely durable. Armed with miniguns, missile launchers, and even custom shoulder launchers, these robots can be devastating in combat. Bait a Sentry Bot into moving while it attacks. Heavy activity eventually causes a Sentry Bot to overheat, leaving it temporarily incapacitated. When this happens, move behind the enemy and focus your attacks on its exposed Fusion Core to deliver greatly increased damage. It takes about six seconds for an incapacitated Sentry Bot to recover, so move quickly.
| Name | Level | Perception | Base Health | Damage Resistance | Energy Resistance | Radiation Resistance | Poison Resistance | Damage | Special Attack | SA Damage | XP |
|---|---|---|---|---|---|---|---|---|---|---|---|
| Sentry Bot | 30 | 10 | 750 | 85 | 80 | Immune | Immune | 109 | -- | -- | 43 |
| Siege Breaker Sentry Bot | 40 | 10 | 850 | 150 | 100 | Immune | Immune | 136 | Missile Launcher | 169 | 57 |
| Annihilator Sentry Bot | 50 | 10 | 1000 | 175 | 125 | Immune | Immune | 202 | -- | -- | 71 |
| Annihilator Sentry Bot Mk. II | 60+ | 10 | 1045+ | 175+ | 125+ | Immune | Immune | 135 | Rocket Cluster | 5x30 | 86 |
Turrets
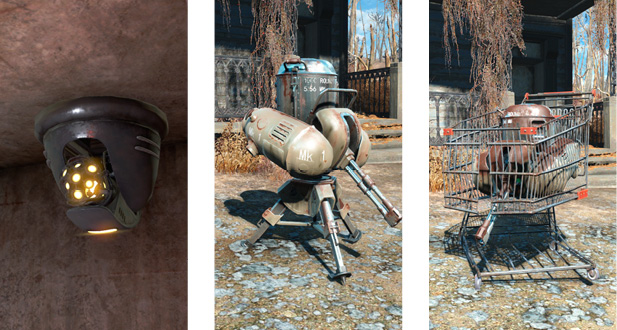
Turrets are utilized by nearly every gang, faction, and organization in the Commonwealth. Connected terminals can sometimes be used to control nearby turrets, but that’s not always an option.
Turrets that are mounted on walls or ceilings are protected by a shell of impenetrable armor. While they’re inactive, these turrets can’t be damaged. When one of these turrets opens fire, however, the exposed gun can be destroyed. Turrets mounted on tripods or resting in shopping carts are always vulnerable to attack.
Once alerted, it usually takes a moment for a turret to acquire its target. Use this time to destroy it or seek cover and wait for it to reset.
| Name | Level | Inventory | Perception | Base Health | Damage Resistance | Energy Resistance | Radiation Resistance | Poison Resistance | Damage | XP |
|---|---|---|---|---|---|---|---|---|---|---|
| Machine-Gun Turret | 6 | — | 10 | 10 | 0 | 0 | Immune | Immune | 10/sec. | 10 |
| Machine Gun-Turret | 28 | — | 10 | 90 | 40 | 60 | Immune | Immune | 15/sec. | 40 |
| Laser Turret | 6 | — | 10 | 10 | 0 | 0 | Immune | Immune | 10/sec. | 10 |
| Laser Turret | 16 | — | 10 | 60 | 25 | 40 | Immune | Immune | 38/sec. | 24 |
| Laser Turret | 40 | — | 10 | 150 | 60 | 90 | Immune | Immune | 60/sec. | 57 |
| Machine-Gun Turret Mk. I | 6 | — | 10 | 80 | 20 | 10 | Immune | Immune | 10+/sec. | 10 |
| Machine-Gun Turret Mk. III | 16 | — | 10 | 125 | 35 | 25 | Immune | Immune | 10+/sec. | 10 |
| Machine-Gun Turret Mk. V | 28 | — | 10 | 160 | 50 | 35 | Immune | Immune | 10+/sec. | 10 |
| Machine-Gun Turret Mk. VI | 40 | — | 10 | 210 | 60 | 40 | Immune | Immune | 10+/sec. | 10 |
Scavengers
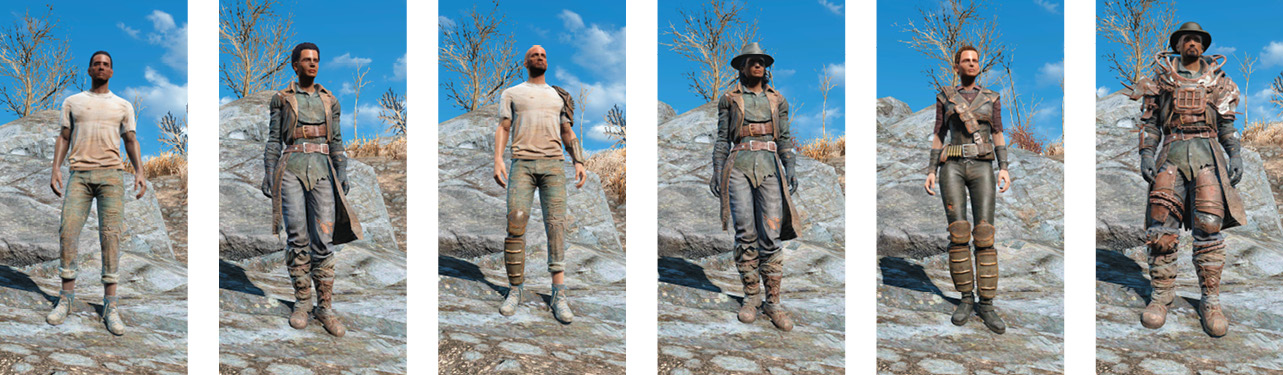
Scavengers roam the Commonwealth, generally looking to salvage anything of value. They aren’t always hostile, but some Scavengers can be fiercely protective of areas they claim as their own. Give these anxious Scavengers their space, or use superior weaponry to clear them from your path.
Scavengers tend to move from spot to spot, so most Scavenger encounters happen at random locations in the Commonwealth’s less populated areas.
| Name | Level | Inventory | Perception | Base Health | Standard Armor | Standard Weapons | XP |
|---|---|---|---|---|---|---|---|
| Scavenger | 2 | — | 4 | 110 | Wastelander | Pipe guns | 6 |
Most Scavengers are limited to basic clothing, but they sometimes wear cage armor or a few leather armor pieces. With little protection and relatively shoddy weapons, hostile Scavengers aren’t as formidable as they’d have you believe. They can make for easy prey out in the wilds, but Scavengers don’t often carry much worth taking.
Settlers
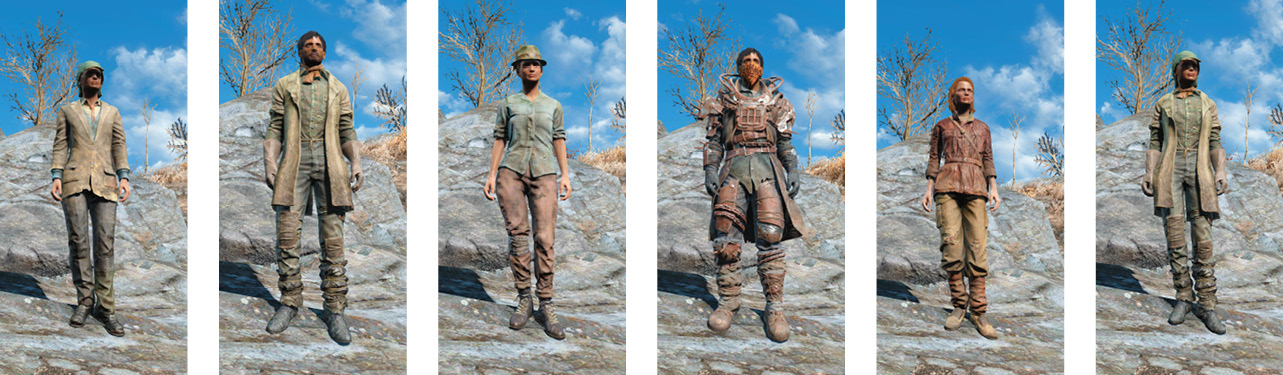
Settlers are ordinary men, women, and Ghouls looking for a place to call home. When these folks arrive at one of your workshop settlements, they’re happy to take orders. Those you encounter in the wilds are usually on their way to your nearest workshop settlement. Either way, they’ll only turn hostile if you attack them.
| Name | Level | Inventory | Perception | Base Health | Standard Armor | Standard Weapons | XP |
|---|---|---|---|---|---|---|---|
| Settler | 2 | — | 4 | 110 | Wastelander | Pipe guns | 6 |
There isn’t much to be gained by attacking your settlers. They’re perfectly willing to give you anything they own, and they’re crucial to the productivity of your workshop settlements. Additionally, attacking one settler draws the entire community into the fray. If you do choose to pick a fight, however, you will gain a small amount of XP for each settler you kill.
Super Mutants
Super Mutants are massive, muscle-bound creatures with a natural immunity to radiation damage and an inherent hatred of humans. Most Super Mutants carry fairly crude gear, but they do have their share of powerful weapons, and many Super Mutant groups use trained Mutant Hounds to chase down trespassers. Super Mutants aren’t particularly intelligent, but their physical strength and natural aggression have allowed them to establish a significant presence throughout the Commonwealth.
Super Mutants can be found in Fallon’s Department Store, Fort Strong, and many other locations—most of which can be identified by the human remains and hanging meat bags scattered around the area.
Standard Super Mutants
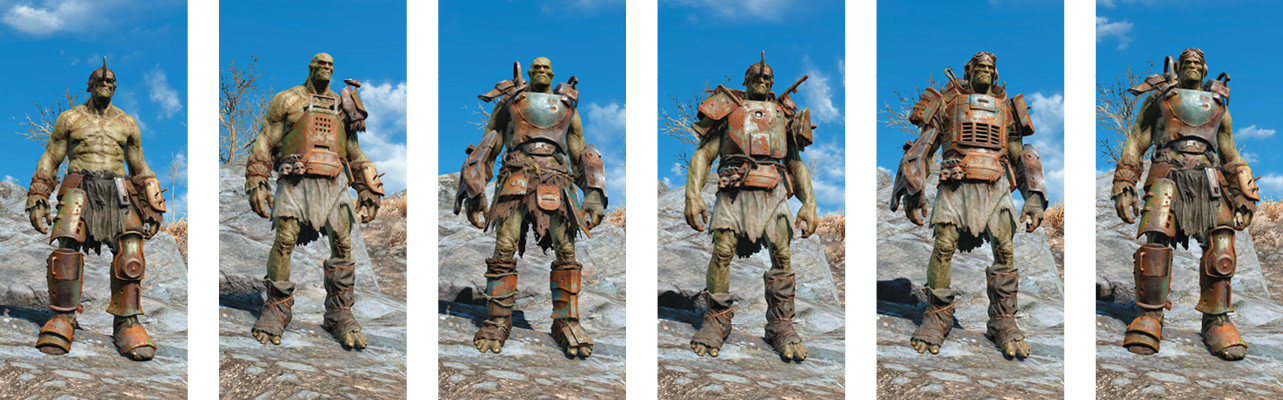
Super Mutant armor is fairly crude, but Super Mutants are inherently durable. Even the least powerful Super Mutants have natural damage, energy, and poison resistances, and these values increase significantly in high-ranking Super Mutants. Specifics vary based on equipped armor, but Super Mutants tend to prioritize damage resistance.
Melee weapons and fragmentation grenades are popular among Super Mutants. For ranged combat, they tend to favor pipe rifles, assault rifles, and laser rifles. When it comes to heavy guns, miniguns and missile launchers are fairly common.
| Name | Level | Inventory | Perception | Base Health | Standard Armor | Standard Weapons | XP |
|---|---|---|---|---|---|---|---|
| Super Mutant | 10 | — | 7 | 120 | Super Mutant armor | Rifles, melee weapons | 7 |
| Super Mutant Skirmisher | 16 | — | 8 | 200 | Super Mutant armor | Rifles, melee weapons, heavy guns | 19 |
| Super Mutant Brute | 22 | — | 9 | 275 | Super Mutant armor | Rifles, melee weapons, heavy guns | 27 |
| Super Mutant Enforcer | 28 | — | 10 | 375 | Super Mutant armor | Rifles, melee weapons, heavy guns | 36 |
| Super Mutant Butcher | 35 | — | 10 | 500 | Super Mutant armor | Rifles, melee weapons, heavy guns | 46 |
| Super Mutant Master | 42 | — | 10 | 600 | Super Mutant armor | Rifles, melee weapons, heavy guns | 54 |
| Super Mutant Overlord | 48 | — | 11 | 750 | Super Mutant armor | Rifles, melee weapons, heavy guns | 63 |
| Super Mutant Primus | 59 | — | 11 | 950 | Super Mutant armor | Rifles, melee weapons, heavy guns | 77 |
| Super Mutant Warlord | 68+ | — | 12 | 1535+ | Super Mutant armor | Rifles, melee weapons, heavy guns | 91 |
Due to sensitive ears and a keen sense of smell, Super Mutants have relatively high Perception and a considerable amount of health. In most cases, it’s best to target a Super Mutant’s arms. This compromises their accuracy and improves your chances of surviving the encounter.
Super Mutant Suiciders
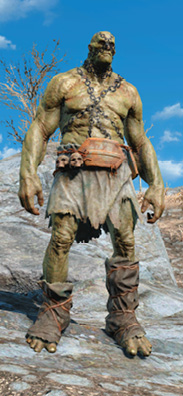
A Super Mutant Suicider’s strategy is simple but effective. Upon identifying a threat, a Suicider charges the target and detonates a Mini Nuke.
To identify these high-priority targets, look for the blinking red glow that appears near a Super Mutant Suicider’s hip. If you have a sufficiently powerful weapon, try to eliminate these enemies before they detect your presence. An instant kill preserves the Mini Nuke, allowing you to collect it from the Suicider’s corpse. Otherwise, focus your fire on a charging Suicider’s right arm—this should allow you to detonate its Mini Nuke before it reaches you.
| Name | Level | Inventory | Perception | Base Health | Standard Armor | Standard Weapons | XP |
|---|---|---|---|---|---|---|---|
| Super Mutant Suicider | 10 | Mini Nuke | 7 | 120 | Super Mutant armor | Mini Nuke | 7 |
| Super Mutant Suicider | 16 | Mini Nuke | 8 | 200 | Super Mutant armor | Mini Nuke | 19 |
| Super Mutant Suicider | 22 | Mini Nuke | 9 | 275 | Super Mutant armor | Mini Nuke | 27 |
| Super Mutant Suicider | 28 | Mini Nuke | 10 | 375 | Super Mutant armor | Mini Nuke | 36 |
| Super Mutant Suicider | 35 | Mini Nuke | 10 | 500 | Super Mutant armor | Mini Nuke | 46 |
| Super Mutant Suicider | 42 | Mini Nuke | 10 | 600 | Super Mutant armor | Mini Nuke | 54 |
Mutant Hounds
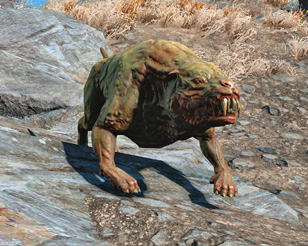
Compared to a Super Mutant’s lumbering gait, Mutant Hounds move very quickly. They also have powerful jaws and an impressive amount of health. Aim for the head to take them out as quickly as possible, or focus your fire on their legs to slow them down.
| Name | Level | Inventory | Perception | Base Health | Damage Resistance | Energy Resistance | Radiation Resistance | Poison Resistance | Damage | Special Attack | SA Damage | XP |
|---|---|---|---|---|---|---|---|---|---|---|---|---|
| Mutant Hound | 8 | Mutant Hound Meat | 7 | 120 | 15 | 10 | Immune | 0 | 35 | ? | ? | 13 |
| Glowing Mutant Hound | 28 | Mutant Hound Meat | 8 | 325 | 40 | 30 | Immune | 0 | 50 | ? | ? | 40 |
Super Mutant Behemoths
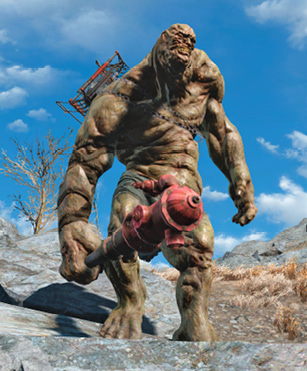
Behemoths are by far the most powerful Super Mutants, but they’re incredibly dumb—even by Super Mutant standards. They attack by tossing boulders at distant enemies, and they use massive fire hydrant bats to smash anything foolish enough to approach them. Your best option is to stay back and attack with a Fat Man and a few Mini Nukes.
If you’re determined to find a Behemoth, check the area to the east of Sunshine Tidings Co-op.
| Name | Level | Perception | Base Health | Damage Resistance | Energy Resistance | Radiation Resistance | Poison Resistance | Damage | Special Attack | SA Damage | XP |
|---|---|---|---|---|---|---|---|---|---|---|---|
| Behemoth | 50 | 6 | 1000 | 135 | 100 | Immune | 100 | 125 | Throw Boulder | 75 | 100 |
| Glowing Behemoth | 65 | 6 | 1300 | 150 | 110 | Immune | 100 | 156 | Throw Boulder | 94 | 125 |
| Epic Behemoth | 80 | 6 | 1600 | 165 | 120 | Immune | 100 | 187 | Throw Boulder | 112 | 150 |
| Ancient Behemoth | 95 | 6 | 1900 | 180 | 130 | Immune | 100 | 187+ | Throw Boulder | 112+ | 175 |
Synths
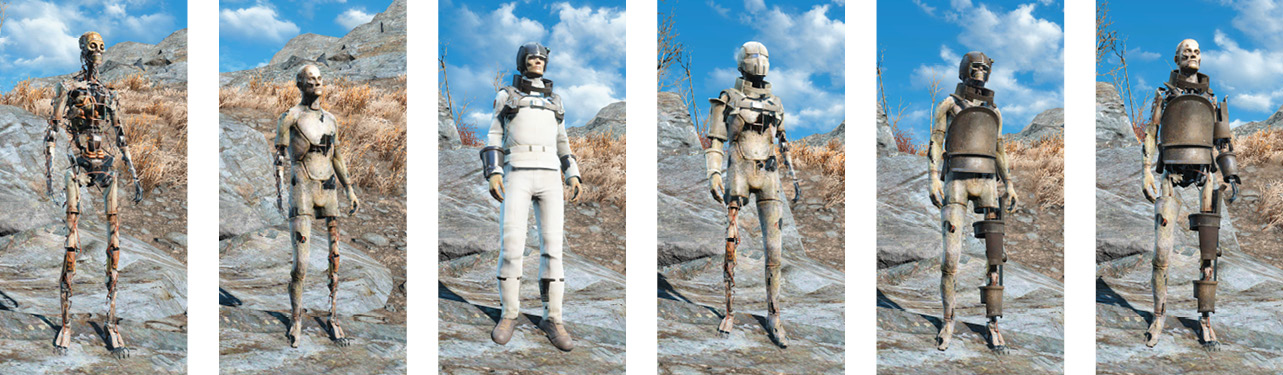
Synths are synthetic humanoids manufactured by the Institute, and most of the synths you encounter are still controlled by this faction. However, there are plenty of renegade synths scattered throughout the Commonwealth. As such, even those who ally themselves with the Institute are sure to encounter hostile synths. Combined with the shroud of mystery surrounding the Institute, stories of their unpredictable behavior have made synths hated and feared by most humans.
| Name | Level | Inventory | Perception | Base Health | Standard Armor | Standard Weapons | XP |
|---|---|---|---|---|---|---|---|
| Synth | 5 | — | 4 | 120 | Synth armor | Institute Laser guns, batons | 9 |
| Synth | 28 | — | 4 | 180 | Synth armor | Institute Laser guns, batons | 10 |
| Synth Strider | 13 | — | 4 | 140 | Synth armor | Institute Laser guns, batons | 20 |
| Synth Patroller | 21 | — | 4 | 265 | Synth armor | Institute Laser guns, batons | 32 |
| Synth Seeker | 29 | — | 4 | 300 | Synth armor | Institute Laser guns, batons | 42 |
| Synth Trooper | 39 | — | 4 | 425 | Synth armor | Institute Laser guns, batons | 55 |
| Synth Assaulter | 49 | — | 4 | 500 | Synth armor | Institute Laser guns, batons | 55 |
| Synth Stormer | 61 | — | 5 | 635 | Synth armor | Institute Laser guns, batons | 87 |
| Synth Eradicator | 71+ | — | 6 | 760+ | Synth armor | Institute Laser guns, batons | 102 |
Like Super Mutants, synths use armor to augment their natural resistances. While numbers vary, most synths maintain a balance between damage resistance and energy resistance, and all synths are immune to radiation and poison. However, synths do share many of the weaknesses found in human enemies. Headshots deal extra damage, and crippled limbs greatly reduce their effectiveness in combat.
Most synths carry some type of Institute pistol or Institute rifle, but shock batons are also fairly common.
Institute Coursers
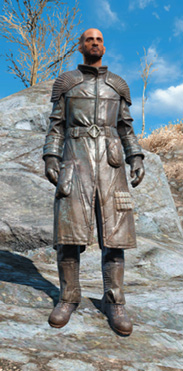
Institute Coursers are advanced synths used to carry out a variety of covert operations. Their primary duties include eliminating rogue synths, so they’re considerably more formidable than the Institute’s standard models. Coursers utilize relatively light armor, a variety of Institute laser pistols, and grenades that summon synth reinforcements. Each Courser also carries at least one Stealth Boy and one stimpak, making them particularly effective in prolonged battles. However, scoring a quick kill on an Institute Courser allows you to collect these items for yourself.
| Name | Level | Inventory | Perception | Base Health | Standard Armor | Standard Weapons | XP |
|---|---|---|---|---|---|---|---|
| Institute Courser | 15 | Stealth Boy, stimpak | 8 | 250 | Courser uniform | Institute pistols | 23 |
| Institute Courser | 21 | Stealth Boy, stimpak | 8 | 300 | Courser uniform | Institute pistols | 31 |
| Institute Courser | 28 | Stealth Boy, stimpak | 9 | 375 | Courser uniform | Institute pistols | 40 |
| Institute Courser | 36 | Stealth Boy, stimpak | 10 | 475 | Courser uniform | Institute pistols | 51 |
| Institute Courser | 44 | Stealth Boy, stimpak | 10 | 550 | Courser uniform | Institute pistols | 63 |
| Institute Courser | 52 | Stealth Boy, stimpak | 10 | 675 | Courser uniform | Institute pistols | 74 |
| Institute Courser | 60 | Stealth Boy, stimpak | 10 | 750 | Courser uniform | Institute pistols | 86 |
| Institute Courser | 70 | Stealth Boy, stimpak | 10 | 750+ | Courser uniform | Institute pistols | 100 |
Triggermen
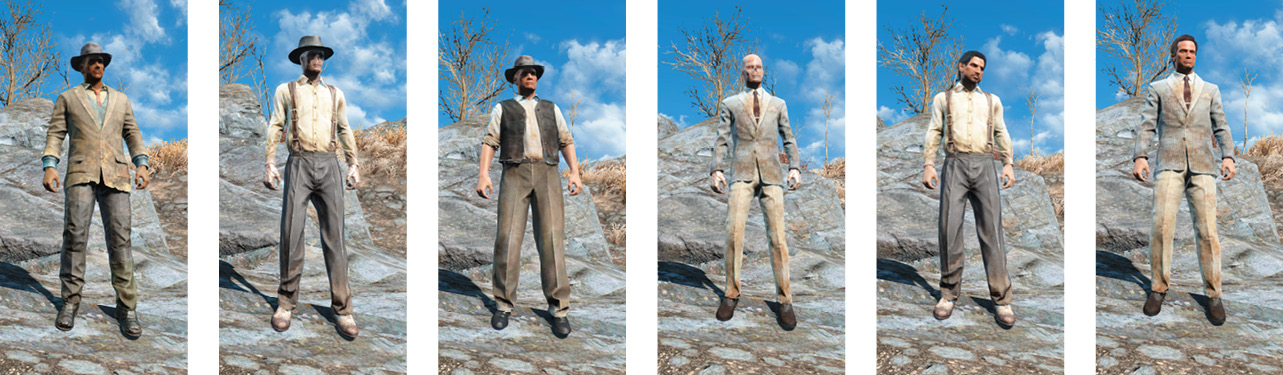
The Triggermen are a loosely organized group of thugs and criminals. Although some particularly enterprising individuals have hatched profitable schemes of their own, many Triggermen act as hired muscle for the various gangs and crime lords. Triggermen generally attack strangers on sight, but they aren’t particularly formidable in small groups.
| Name | Level | Inventory | Perception | Base Health | Standard Armor | Standard Weapons | XP |
|---|---|---|---|---|---|---|---|
| Triggerman | 1 | — | 3 | 40 | Clothing | Pistols, automatic rifles | 5 |
| Triggerman | 7 | — | 4 | 100 | Clothing | Pistols, automatic rifles | 12 |
| Triggerman | 13 | — | 5 | 125 | Clothing | Pistols, automatic rifles | 20 |
| Triggerman | 19 | — | 6 | 170 | Clothing | Pistols, automatic rifles | 28 |
| Triggerman | 25 | — | 7 | 185 | Clothing | Pistols, automatic rifles | 36 |
| Triggerman | 31 | — | 7 | 200 | Clothing | Pistols, automatic rifles | 44 |
| Triggerman | 37 | — | 7 | 215 | Clothing | Pistols, automatic rifles | 53 |
Favoring style over substance, Triggermen don’t have much in the way of armor. Aside from the natural radiation immunity enjoyed by Ghoul members, Triggermen are vulnerable to most attacks.
Submachine guns are particularly popular among Triggermen, but some members favor assault rifles or semiautomatic pistols. A single Triggerman is rarely dangerous, but large groups can deal significant damage fairly quickly. During heavy firefights, seek cover and pick off the Triggerman one at a time.