
Creatures of the Commonwealth
Animals
Mongrels

Mongrels are fast and aggressive, but most varieties aren’t particularly durable. They do tend to hunt in packs, however, and their quick attacks can deal significant damage. Be particularly wary of Alpha variants—they look just like standard Mongrels, but they’re much more formidable.
| Name | Level | Inventory | Perception | Base Health | Damage Resistance | Energy Resistance | Radiation Resistance | Poison Resistance | Damage | Special Attack | SA Damage | XP |
|---|---|---|---|---|---|---|---|---|---|---|---|---|
| Wild Mongrel | 3 | Mongrel dog meat | 7 | 50 | 4 | 1 | Immune | 0 | 10 | — | — | 7 |
| Alpha Wild Mongrel | 12 | Mongrel dog meat | 8 | 140 | 25 | 15 | Immune | 0 | 25 | — | — | 19 |
| Vicious Mongrel | 12 | Mongrel dog meat | 8 | 140 | 25 | 15 | Immune | 0 | 25 | — | — | 19 |
| Alpha Vicious Mongrel | 20 | Mongrel dog meat | 8 | 210 | 30 | 15 | Immune | 0 | 35 | — | — | 29 |
| Feral Mongrel | 20 | Mongrel dog meat | 8 | 210 | 30 | 15 | Immune | 0 | 35 | — | — | 29 |
| Alpha Feral Mongrel | 30 | Mongrel dog meat | 8 | 275 | 40 | 20 | Immune | 0 | 50 | — | — | 43 |
| Albino Mongrel | 30 | Mongrel dog meat | 8 | 275 | 40 | 20 | Immune | 0 | 50 | — | — | 43 |
| Alpha Albino Mongrel | 40 | Mongrel dog meat | 8 | 380 | 50 | 25 | Immune | 0 | 65 | — | — | 57 |
| Rabid Mongrel | 40 | Mongrel dog meat | 8 | 380 | 50 | 25 | Immune | 0 | 65 | Poison | 10 | 57 |
| Alpha Rabid Mongrel | 40 | Mongrel dog meat | 8 | 500 | 60 | 35 | Immune | 0 | 75 | Poison | 10 | 71 |
| Glowing Mongrel | 50 | Mongrel dog meat | 8 | 425 | 60 | 35 | Immune | 0 | 80 | Rad Field | 3 rads/sec | 71 |
| Alpha Glowing Mongrel | 50 | Mongrel dog meat | 8 | 425 | 60 | 35 | Immune | 0 | 90 | Rad Field | 3 rads/sec | 80 |
Deathclaws
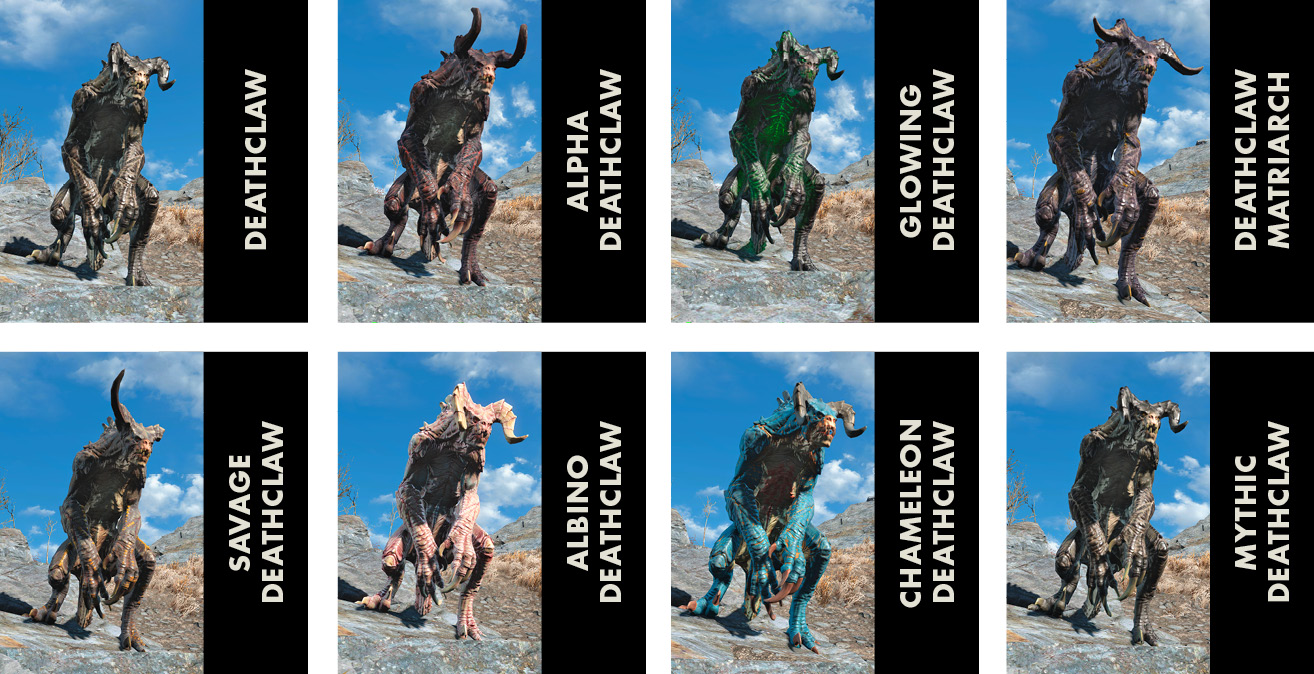
Deathclaws are among the most dangerous foes you’re likely to encounter. They’re incredibly fast, well armored, and capable of dealing tremendous damage. A Deathclaw’s belly is the closest thing it has to a weak spot, but it’s very difficult to target once the beast gets up to speed. Deathclaws can throw clods of dirt from a distance, but they’re far more dangerous up close. In addition to their powerful melee strikes, Deathclaws will lift their prey into the air before slamming them into the ground.
| NAME | LEVEL | INVENTORY | PERCEPTION | BASE HEALTH | DAMAGE RESISTANCE | ENERGY RESISTANCE | RADIATION RESISTANCE | POISON RESISTANCE | DAMAGE | SPECIAL ATTACK | SA DAMAGE | XP |
|---|---|---|---|---|---|---|---|---|---|---|---|---|
| Deathclaw | 22 | Deathclaw hand, Deathclaw Meat | 10 | 510+ | 100 | 250 | Immune | 250 | 60 | Rubble throw | 40 | 35 |
| Alpha Deathclaw | 31 | Deathclaw hand, Deathclaw Meat | 10 | 800+ | 150 | 300 | Immune | 250 | 75 | Rubble throw | 40 | 48 |
| Glowing Deathclaw | 41 | Deathclaw hand, Deathclaw Meat | 10 | 1000+ | 200 | 350 | Immune | 250 | 90 | Rubble throw / Rad field | 40, 5 rad/sec | 64 |
| Deathclaw Matriarch | 51 | Deathclaw hand, Deathclaw Meat | 10 | 760+ | 225 | 375 | Immune | 250 | 105 | Rubble throw | 40 | 80 |
| Savage Deathclaw | 61 | Deathclaw hand, Deathclaw Meat | 10 | 910+ | 250 | 400 | Immune | 250 | 120 | Rubble throw | 40 | 96 |
| Albino Deathclaw | 71 | Deathclaw hand, Deathclaw Meat | 10 | 1060+ | 275 | 400 | Immune | 250 | 135 | Rubble throw | 40 | 112 |
| Chameleon Deathclaw | 81 | Deathclaw hand, Deathclaw Meat | 10 | 1210+ | 300 | 400 | Immune | 250 | 150 | Rubble throw | 40 | 129 |
| Mythic Deathclaw | 91+ | Deathclaw hand, Deathclaw Meat | 10 | 1360+ | 300 | 400 | Immune | 250 | 175 | Rubble throw | 40 | 145 |
Deathclaws have very high energy resistance, so it’s usually best to stick with heavy guns and powerful ballistic rifles. Try to cripple one of the creature’s legs, then concentrate your fire on its belly as it limps toward you.
Feral Ghouls
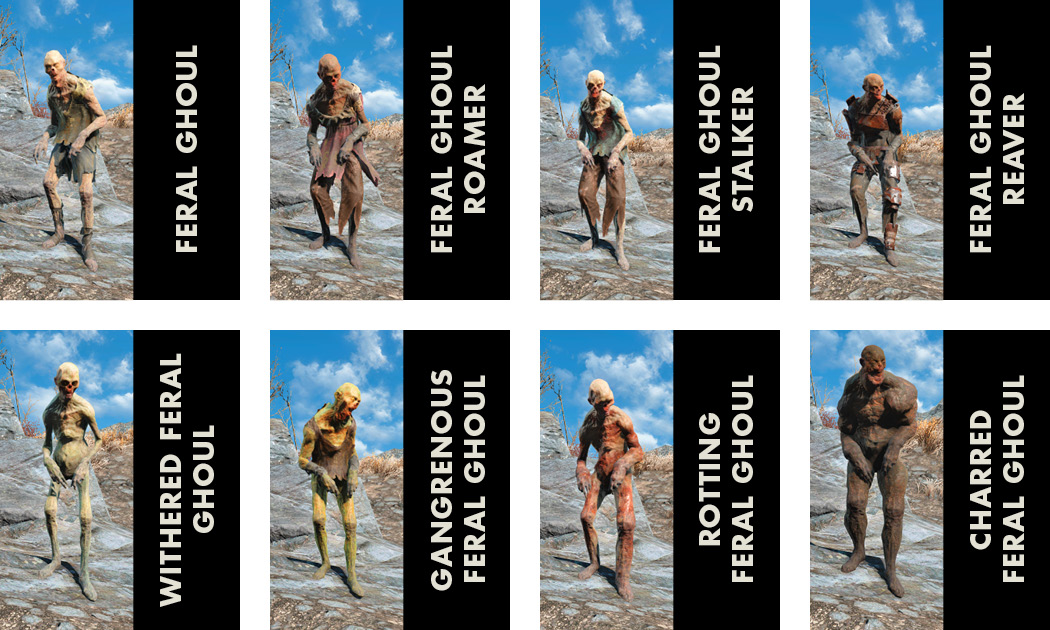
Feral Ghouls come in a variety of sizes and shapes, but they all share a singular purpose: to attack and consume any available prey. From a distance, these shambling creatures can seem almost docile—in fact, you’ll often find them lying motionless or partially buried. Once Feral Ghouls spot a potential target, however, few enemies can match the pure ferocity shown by a swarm of these foes.
Feral Ghouls use lunging strikes to deal direct damage, but each successful hit also inflicts a small amount of radiation damage. A suppressed long-range weapon is often the safest way to thin a group of Feral Ghouls. If you find yourself surrounded by multiple targets, it’s generally best to use the most powerful rapid-fire weapon in your arsenal. But avoid using weapons that deal radiation damage, as each successful hit will heal a wounded Feral Ghoul.
| Name | Level | Inventory | Perception | Base Health | Damage Resistance | Energy Resistance | Radiation Resistance | Poison Resistance | Damage | Special Attack | SA Damage | XP |
|---|---|---|---|---|---|---|---|---|---|---|---|---|
| Feral Ghoul | 3 | — | 2 | 35 | 10 | 20 | 1000 | 200 | — | Radiation Damage | 10 | 5 |
| Feral Ghoul Roamer | 9 | — | 2 | 120 | 15 | 30 | 1000 | 200 | 15 | Radiation Damage | 10 | 13 |
| Feral Ghoul Stalker | 15 | — | 2 | 200 | 30 | 45 | 1000 | 50 | 30 | Radiation Damage | 20 | 22 |
| Feral Ghoul Reaver | 22 | — | 2 | 290 | 40 | 60 | 1000 | 200 | 40 | Radiation Damage | 30 | 32 |
| Withered Feral Ghoul | 32 | — | 3 | 350 | 50 | 75 | 1000 | 200 | 50 | Radiation Damage | 40 | 47 |
| Gangrenous Feral Ghoul | 42 | — | 3 | 500 | 60 | 90 | 1000 | 200 | 65 | Radiation Damage | 50 | 61 |
| Rotting Feral Ghoul | 52 | — | 4 | 700 | 70 | 100 | 1000 | 200 | 75 | Radiation Damage | 60 | 76 |
| Charred Feral Ghoul | 62+ | — | 5 | 855+ | 75 | 110 | 1000 | 200 | 85 | Radiation Damage | 70 | 90 |
Glowing Ones
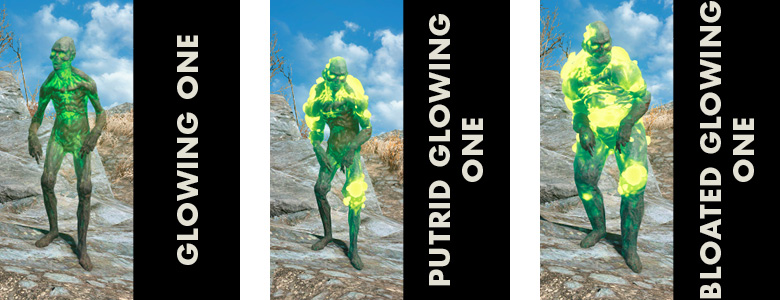
Glowing Ones are particularly dangerous Feral Ghoul variants. In addition to their lunging strikes, these creatures emit enough radiation to damage vulnerable targets from several feet away. This radiation also heals nearby Feral Ghouls, and Glowing Ones can even revive recently killed allies. Like Feral Ghouls, Glowing Ones are healed by radiation. Focusing your attacks on a Glowing One’s legs can help you keep your distance, but it’s best to finish them off as quickly as possible.
| Name | Level | Inventory | Perception | Base Health | Damage Resistance | Energy Resistance | Radiation Resistance | Poison Resistance | Damage | Special Attack | SA Damage | XP |
|---|---|---|---|---|---|---|---|---|---|---|---|---|
| Glowing One | 22 | — | 3 | 350 | 40 | 80 | 1000 | 200 | 40 | Radiation Damage | 35 | 32 |
| Putrid Glowing One | 40 | — | 4 | 650 | 75 | 150 | 1000 | 200 | 75 | Radiation Damage | 60 | 57 |
| Bloated Glowing One | 58 | — | 5 | 400 | 40+ | 80+ | 1000 | 200 | 35 | Radiation Damage | 75 | 83 |
Mirelurks
Standard Mirelurks
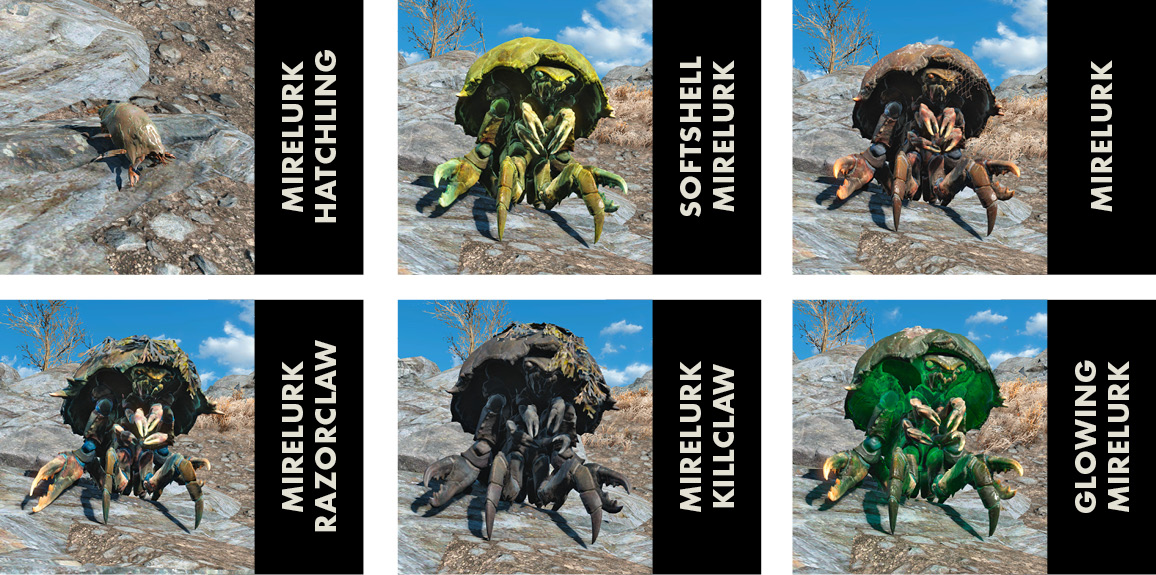
Standard Mirelurks are large, crablike creatures with thick armor and powerful claws. They can sometimes be out in the open, but they’re often lurking underwater or partially buried along the shoreline. A headshot is the best way to damage a Mirelurk, but due to their posture, it’s often difficult to land a successful hit. In many cases, it’s best to equip a powerful shotgun, wait for a Mirelurk to charge, then fire as many shots as you can manage as the creature raises it’s head. Otherwise, focus your fire on a Mirelurk’s legs. Above all, avoid targeting a Mirelurk’s back—this protective shell can absorb massive amounts of damage.
| Name | Level | Inventory | Perception | Base Health | Damage Resistance | Energy Resistance | Radiation Resistance | Poison Resistance | Damage | Special Attack | SA Damage | XP |
|---|---|---|---|---|---|---|---|---|---|---|---|---|
| Mirelurk Hatchling | 1 | — | 4 | 3 | 0 | 0 | 0 | 0 | ? | — | — | 2 |
| Softshell Mirelurk | 5 | Mirelurk Meat | 3 | 100 | 45 | 40 | Immune | 0 | 25 | — | — | 9 |
| Mirelurk | 12 | Mirelurk Meat | 3 | 160 | 60 | 50 | Immune | 0 | 40 | — | — | 19 |
| Mirelurk Razorclaw | 18 | Mirelurk Meat | 3 | 215 | 100 | 85 | Immune | 0 | 65 | — | — | 27 |
| Mirelurk Killclaw | 26 | Mirelurk Meat | 3 | 380 | 125 | 100 | Immune | 0 | 75 | — | — | 37 |
| Glowing Mirelurk | 34 | Mirelurk Meat | 3 | 500 | 150 | 125 | Immune | 0 | 100 | Rad field/Rad damage | 1/sec, 15 | 48 |
Mirelurk Hatchlings only appear when you step on their eggs. They’re extremely weak, but they can be a nuisance in the heat of battle. Whenever possible, shoot nearby eggs to prevent Mirelurk Hatchlings from joining the battle.
Mirelurk Hunters
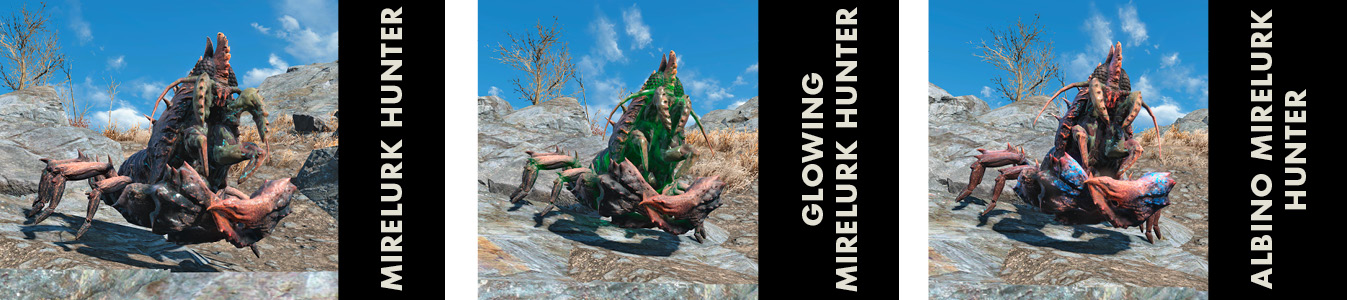
Mirelurk Hunters have fairly powerful melee strikes, but the acid they spit is a much greater threat. These projectile attacks can be difficult to anticipate, but you have a decent chance of avoiding them as long as you keep moving. Mirelurk Hunters have less armor than the standard Mirelurks, but their claws are difficult to damage. Focus your attacks on a Hunter’s head or legs to chip away at its health.
| Name | Level | Inventory | Perception | Base Health | Damage Resistance | Energy Resistance | Radiation Resistance | Poison Resistance | Damage | Special Attack | SA Damage | XP |
|---|---|---|---|---|---|---|---|---|---|---|---|---|
| Mirelurk Hunter | 24 | Mirelurk Meat | 9 | 410+ | 85+ | 85+ | Immune | 200 | 60 | Poison / Spit | 8 / 25 (Rad) | 35 |
| Glowing Mirelurk Hunter | 34 | Mirelurk Meat | 9 | 510 | 95 | 95 | Immune | 200 | 70 | Poison / Spit / Rad field | 8 / 50 (Rad) / 4 rad/sec | 48 |
| Albino Mirelurk Hunter | 46+ | Mirelurk Meat | 9 | 410+ | 90+ | 90+ | Immune | 200 | 90 | Poison / Spit | 8 / 75 (Rad) | 65 |
Mirelurk Elites
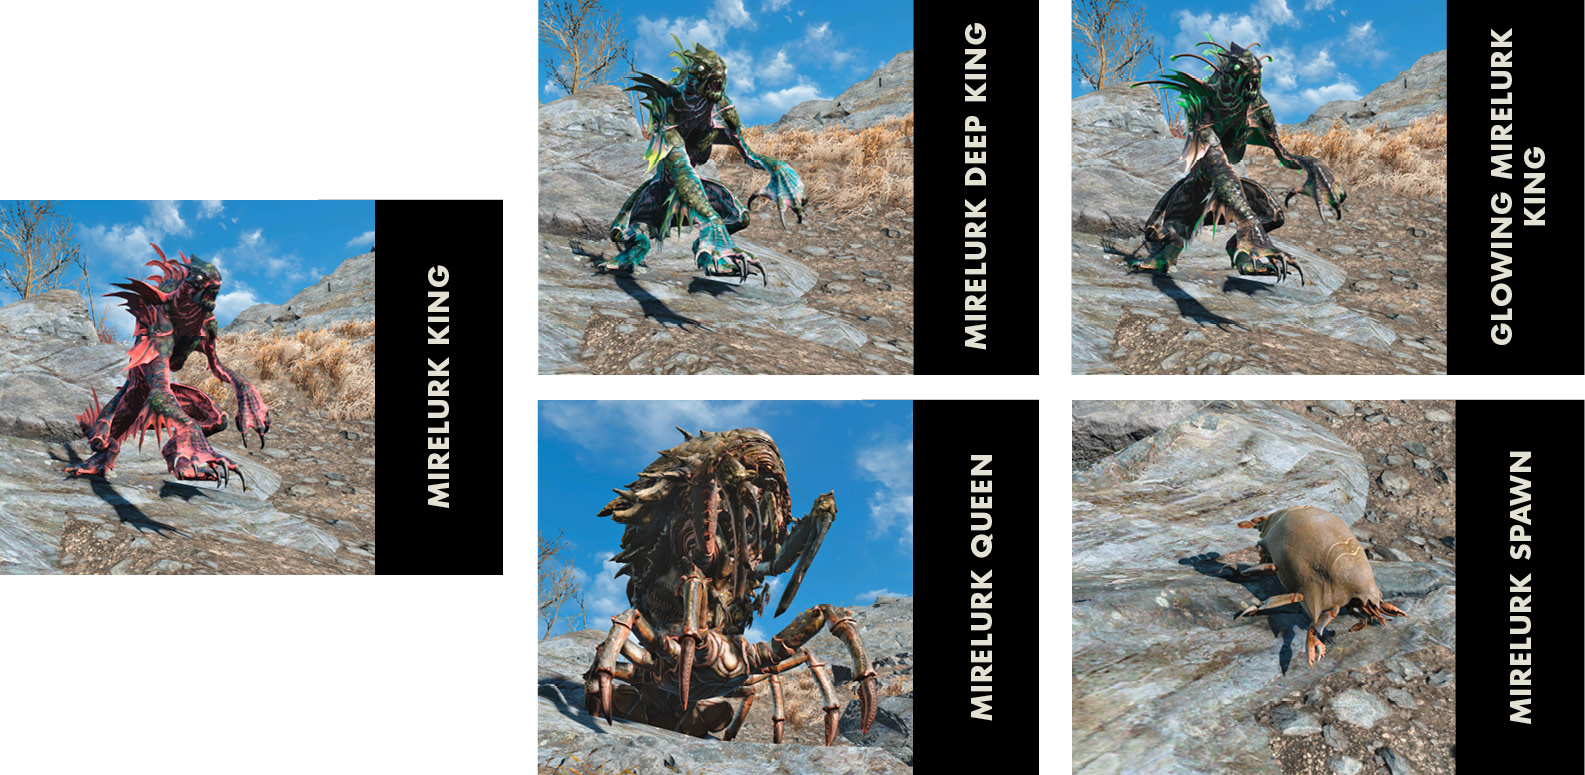
Mirelurk Kings can deal significant damage, but it’s their devastating Sonic Attack that makes them truly dangerous. Luckily, these shriekers are relatively easy to sidestep. Mirelurk Kings also have the ability to vanish. The effect only lasts a short time, but it can be difficult to keep track of your target. Aim for a Mirelurk King’s head to deal maximum damage.
| Name | Level | Inventory | Perception | Base Health | Damage Resistance | Energy Resistance | Radiation Resistance | Poison Resistance | Damage | Special Attack | SA Damage | XP |
|---|---|---|---|---|---|---|---|---|---|---|---|---|
| Mirelurk King | 30 | -- | 7 | 350 | 95 | 250 | Immune | 250 | 75 | Sonic / Poison | 75 (Energy) / 30 | 43 |
| Mirelurk Deep King | 40 | -- | 8 | 400 | 110 | 275 | Immune | 250 | 35 | Sonic / Poison | 75 (Energy) / 35 | 57 |
| Glowing Mirelurk King | 50+ | -- | 9 | 400+ | 110+ | 275+ | Immune | 250 | 45 | Sonic / Poison / Rad Field | 75 (Energy) / 40 / 6/sec | 71 |
| Mirelurk Queen | 50 | Mirelurk Queen Meat (5) | 10 | 1000 | 150 | 200 | Immune | Immune | 150 | Spit / Rad Field | 80 (Poison) / 10/sec | 200 |
| Mirelurk Spawn | 1 | -- | 4 | 3 | 0 | 0 | 0 | 0 | 10 | -- | -- | 2 |
Mirelurk Queens are massive, and their acid spray makes them effective at a fairly long range. Sidestepping usually allows you to dodge the initial attack, but make sure to avoid stepping in the resulting acid puddles. Additionally, Queens release swarms of Mirelurk Spawn during combat. It’s generally best to simply bombard a Mirelurk Queen with your best heavy weapon. Each time a new wave of Mirelurk Spawn appears, clear them out with an automatic weapon before resuming your attacks on the Queen.
Mutated Animals
Mole Rats

Mole Rats are among the weaker creatures you’ll encounter in the wild, but they can be surprisingly dangerous in groups. These pests burrow underground, relocate, and spring up for a sudden attack. This behavior not only hinders your ability to target a Mole Rat, but it also makes it difficult to gauge the extent of a Mole Rat infestation.
| Name | Level | Inventory | Perception | Base Health | Damage Resistance | Energy Resistance | Radiation Resistance | Poison Resistance | Damage | Special Attack | SA Damage | XP |
|---|---|---|---|---|---|---|---|---|---|---|---|---|
| Mole Rat | 1 | Mole Rat Meat | 4 | 15 | 0 | 0 | Immune | 0 | 5 | -- | -- | 5 |
| Rabid Mole Rat | 7 | Mole Rat Meat | 4 | 50 | 10 | 10 | Immune | 0 | 1 | Poison | 10 | 11 |
| Glowing Mole Rat | 14 | Mole Rat Meat | 4 | 100 | 15 | 15 | Immune | 0 | 20 | Rad Field | 3 rads/sec | 21 |
| Mole Rat Brood Mother | 21 | Mole Rat Meat | 4 | 230 | 25 | 25 | Immune | 0 | 35 | -- | -- | 31 |
Bites from Rabid Mole Rats fester, causing damage over time. Glowing Mole Rats emit hazardous radiation fields, and Mole Rat Brood Mothers are the most powerful of the bunch, but all Mole Rat variants are vulnerable to headshots. When facing these enemies, keep moving to avoid being surrounded and improve your chances of dodging surprise attacks.
Radstags
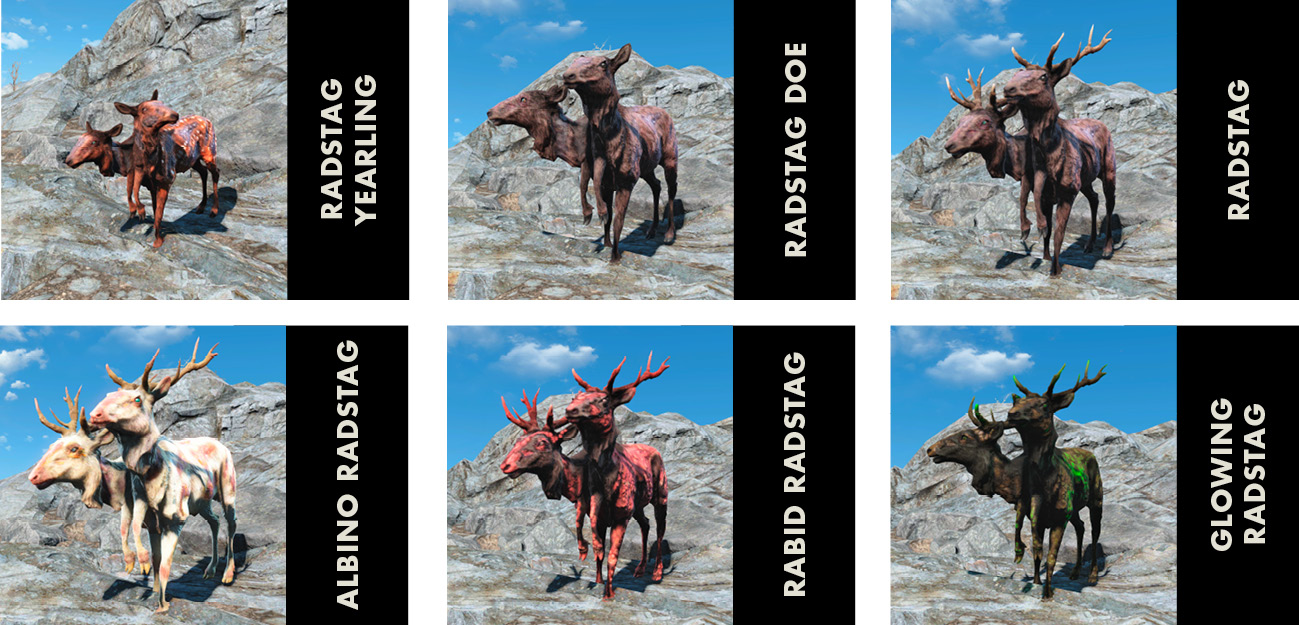
Lesser Radstags flee at the first sign of danger, but Albino Radstags, Rabid Radstags, and Glowing Radstags are considerably more aggressive. Radstags use their hooves and antlers to deal the bulk of their damage, but each hit that lands also inflicts a small amount of radiation damage.
Radstags are far from the fiercest creatures you’ll encounter, and most of them are easily avoided. They are, however, a reliable source of Radstag Meat and Radstag Hides. Use a long-range rifle to take them by surprise, and aim for a Radstag’s right head to inflict maximum damage.
| Name | Level | Inventory | Perception | Base Health | Damage Resistance | Energy Resistance | Radiation Resistance | Poison Resistance | Damage | Special Attack | SA Damage | XP |
|---|---|---|---|---|---|---|---|---|---|---|---|---|
| Radstag Yearling | 1 | Radstag Mear, Radstag Hide | 10 | 40 | 10 | 20 | Immune | 0 | 5 | -- | -- | 4 |
| Radstag Doe | 4 | Radstag Mear, Radstag Hide | 10 | 60 | 10 | 20 | Immune | 0 | 10 | -- | -- | 8 |
| Radstag | 10 | Radstag Mear, Radstag Hide | 10 | 100 | 10 | 20 | Immune | 0 | 20 | -- | -- | 16 |
| Albino Radstag | 16 | Radstag Mear, Radstag Hide | 10 | 150 | 20 | 40 | Immune | 0 | 30 | -- | -- | 24 |
| Rabid Radstag | 24 | Radstag Mear, Radstag Hide | 10 | 250 | 30 | 60 | Immune | 100 | 45 | Poison | 10 | 35 |
| Glowing Radstag | 32 | Radstag Mear, Radstag Hide | 10 | 325 | 35 | 70 | Immune | 0 | 60 | Rad Field | 5 rads/sec | 46 |
Yao Guai
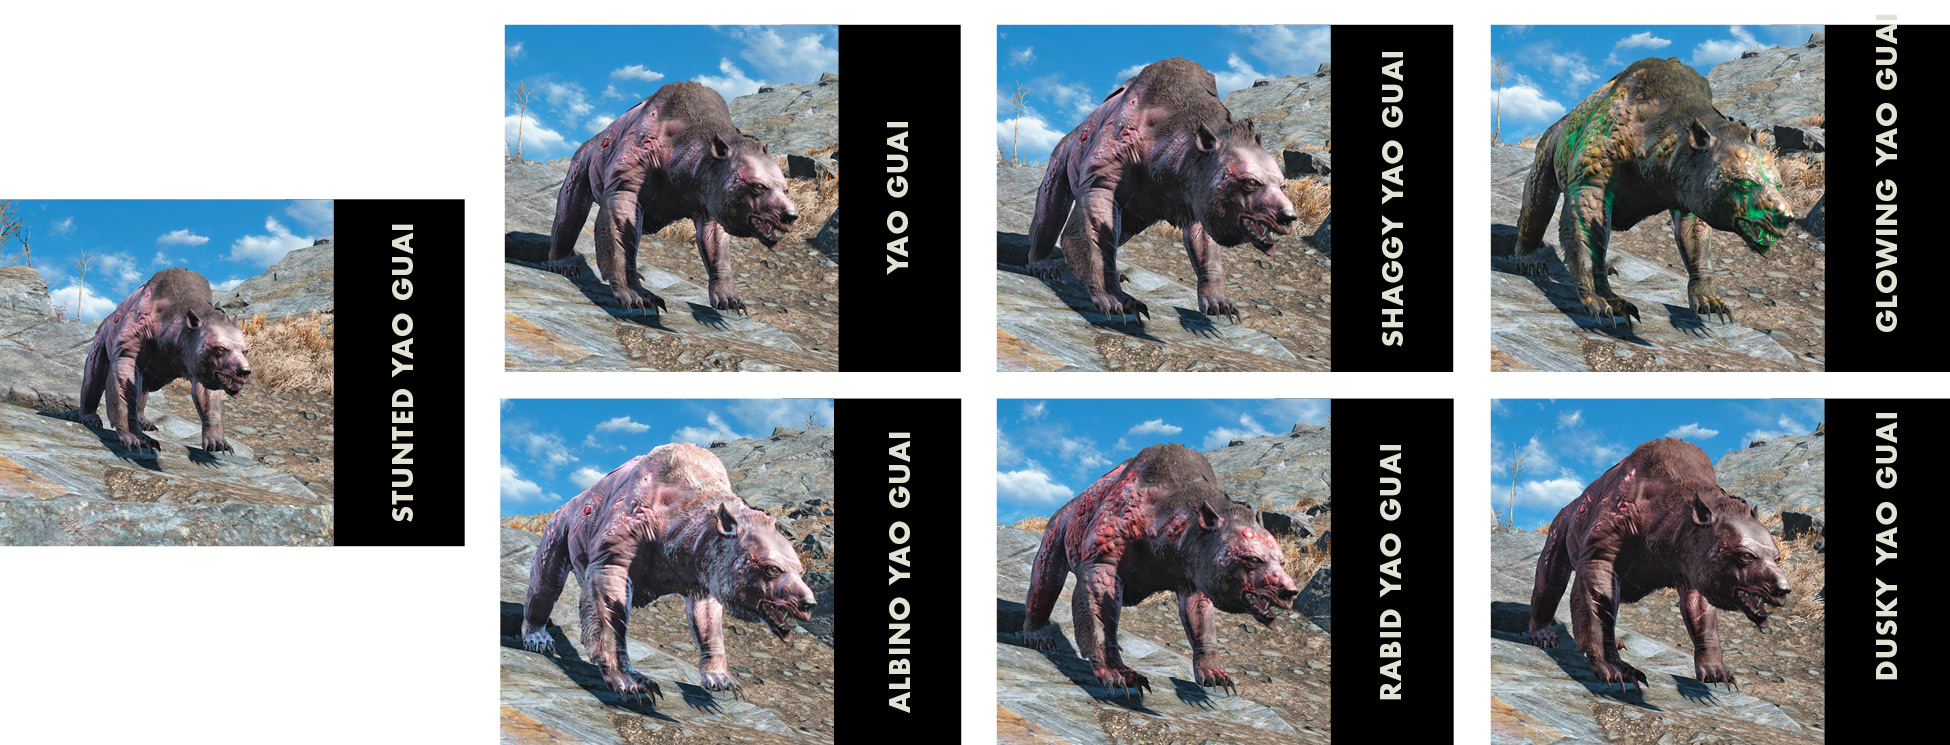
Yao Guai are strong, durable, and fiercely territorial. They’re capable of absorbing massive amounts of damage, and their powerful strikes can be difficult to survive. These bearlike creatures are also surprisingly fast. Mines can be effective if you have a chance to prepare for a Yao Guai encounter. Otherwise, ready your most trusted weapon and prepare for a tough fight. Aiming for the head will grant a minor damage boost, but it’s often best to focus your fire on a Yao Gaui’s legs.
| Name | Level | Inventory | Perception | Base Health | Damage Resistance | Energy Resistance | Radiation Resistance | Poison Resistance | Damage | Special Attack | SA Damage | XP |
|---|---|---|---|---|---|---|---|---|---|---|---|---|
| Stunted Yao Guai | 16 | Yao Guai Meat, Yao Guai Hide | 14 | 350 | 40 | 25 | 0 | 55 | 50 | — | — | 24 |
| Yao Guai | 26 | Yao Guai Meat, Yao Guai Hide | 13 | 550 | 60 | 40 | Immune | 60 | 100 | — | — | 37 |
| Shaggy Yao Guai | 36 | Yao Guai Meat, Yao Guai Hide | 15 | 700 | 75 | 55 | Immune | 70 | 130 | — | — | 51 |
| Glowing Yao Guai | 46 | Yao Guai Meat, Yao Guai Hide | 13 | 900 | 90 | 60 | Immune | 80 | 165 | Rad Field | 4 rads/sec | 65 |
| Albino Yao Guai | 56 | Yao Guai Meat, Yao Guai Hide | 13 | 1000 | 100 | 70 | Immune | 90 | 175 | — | — | 80 |
| Rabid Yao Guai | 66 | Yao Guai Meat, Yao Guai Hide | 14 | 1100 | 100 | 85 | Immune | 100 | 185 | — | — | 94 |
| Dusky Yao Guai | 76+ | Yao Guai Meat, Yao Guai Hide | 15 | 1175+ | 100 | 100 | Immune | 125 | 200 | — | — | 109 |
Mutated Insects
Bloatflies

Bloatflies are among the few wild creatures that use ranged attacks as their primary source of damage. They’re not very durable, but their small size and erratic movements can make them troublesome. Whenever possible, use VATS to improve your chances of landing effective shots.
In addition to standard damage, each Bloatfly attack inflicts a small amount of radiation damage. Sidestepping should allow you to avoid the bulk of a Bloatfly’s attacks, but doing so also makes it more difficult to keep your weapon aimed at such a small target.
| Name | Level | Inventory | Perception | Base Health | Damage Resistance | Energy Resistance | Radiation Resistance | Poison Resistance | Damage | Special Attack | SA Damage | XP |
|---|---|---|---|---|---|---|---|---|---|---|---|---|
| Bloatfly | 1 | Bloatfly Meat, Bloadfly Gland | 3 | 10 | 6 | 15 | Immune | 20 | 7 (Rad) | — | — | 5 |
| Black Bloatfly | 9 | Bloatfly Meat, Bloadfly Gland | 3 | 50 | 20 | 35 | Immune | 20 | 7 (Rad) | — | — | 15 |
| Festering Bloatfly | 17 | Bloatfly Meat, Bloadfly Gland | 3 | 25 | 25 | 45 | Immune | 20 | 7 (Rad) | Poison | 25 | 25 |
| Glowing Bloatfly | 27 | Bloatfly Meat, Bloadfly Gland | 3 | 195 | 30 | 55 | Immune | 20 | 7 (Rad) | Rad Field | 4 rads/sec | 39 |
Bloodbugs

Despite their frail appearance, Bloodbugs can withstand a considerable amount of damage. They’re also fast and extremely aggressive, making them particularly dangerous in large groups. Short-range strikes account for the bulk of a Bloodbug’s damage, but these creatures will occasionally latch on to you and drain a fair amount of blood. Once this happens, there’s a good chance the Bloodbug will spit the blood back in your face, temporarily obscuring your vision. Consider using VATS whenever you face these flying insects.
| Name | Level | Inventory | Perception | Base Health | Damage Resistance | Energy Resistance | Radiation Resistance | Poison Resistance | Damage | Special Attack | SA Damage | XP |
|---|---|---|---|---|---|---|---|---|---|---|---|---|
| Bloodbug Hatchling | 2 | Bloodbug Proboscis | 10 | 20 | 5 | 5 | Immune | 0 | 8 | Poison | 15 | 5 |
| Bloodbug | 10 | Bloodbug Proboscis | 10 | 120 | 15 | 15 | Immune | 0 | 25 | Poison | 15 | 16 |
| Red Widow Bloodbug | 18 | Bloodbug Proboscis | 10 | 240 | 30 | 30 | Immune | 0 | 35 | Poison | 15 | 27 |
| Infected Bloodbug | 26 | Bloodbug Proboscis | 10 | 350 | 40 | 40 | Immune | 0 | 45 | Poison | 15 | 37 |
| Glowing Bloodbug | 34 | Bloodbug Proboscis | 10 | 400 | 40 | 60 | Immune | 0 | 40 | Rad/Rad Field/ Poison | 20/3 rads/sec/15 | 48 |
| Vampiric Bloodbug | 42+ | Bloodbug Proboscis | 10 | 450+ | 50 | 50 | Immune | 0 | 60 | Poison | 15 | 60 |
Radroaches
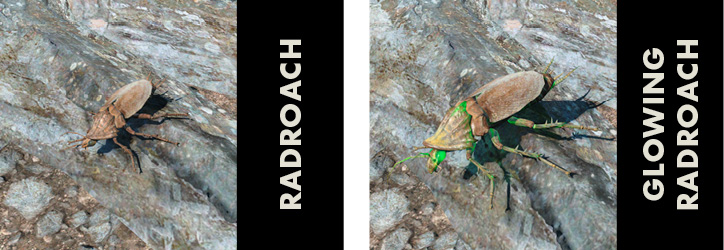
Even in groups, Radroaches don’t pose much of threat. Each hit a Radroach lands does inflict a bit of radiation damage, but they’re relatively slow and extremely fragile.
| Name | Level | Inventory | Perception | Base Health | Damage Resistance | Energy Resistance | Radiation Resistance | Poison Resistance | Damage | Special Attack | SA Damage | XP |
|---|---|---|---|---|---|---|---|---|---|---|---|---|
| Radroach | 1 | Radroach Meat | 4 | 3 | 0 | 0 | Immune | 0 | 2 | — | — | 5 |
| Glowing Radroach | 5 | Radroach Meat | 4 | 15 | 0 | 0 | Immune | 0 | 3 | Rad Field | 3 rads/sec | 9 |
Radscorpions
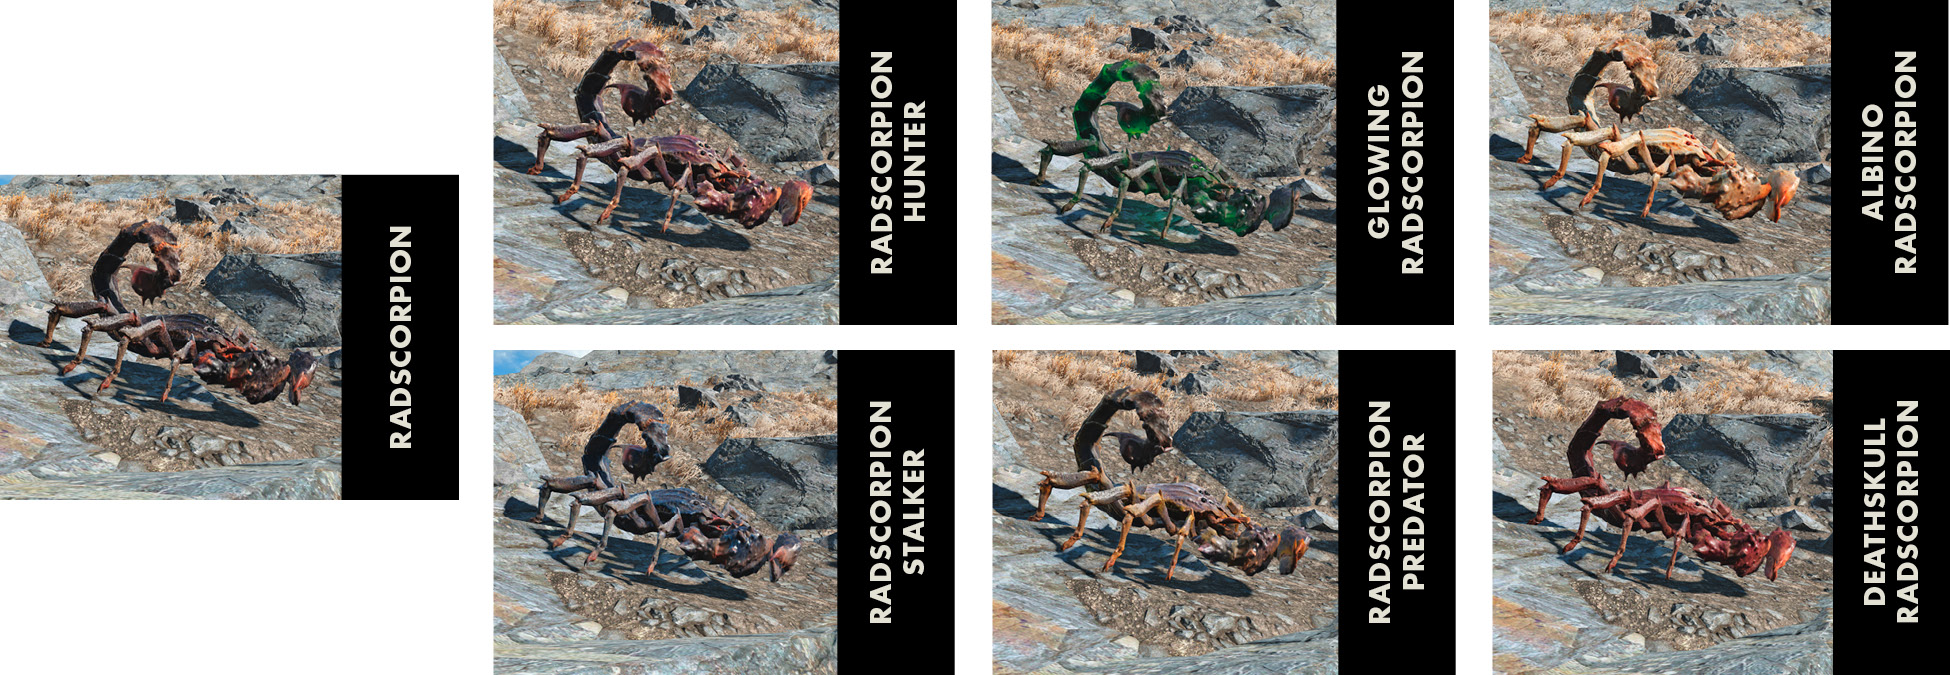
A single Radscorpion is formidable, but these creatures often hunt in packs. Radscorpions are able to burrow underground, usually hiding for several seconds at a time. Their powerful strikes inflict bonus radiation damage, and stingers at the end of their tails can inject foes with poison. They move very quickly for creatures of their size, and they boast a considerable amount of health.
| Name | Level | Inventory | Perception | Base Health | Damage Resistance | Energy Resistance | Radiation Resistance | Poison Resistance | Damage | Special Attack | SA Damage | XP |
|---|---|---|---|---|---|---|---|---|---|---|---|---|
| Radscorpion | 14 | Radscorpion Meat | 9 | 250 | 35 | 20 | Immune | 200 | 30 | Poison | 15 | 21 |
| Radscorpion Hunter | 22 | Radscorpion Meat | 9 | 350 | 45 | 25 | Immune | 200 | 35 | Poison | 20 | 32 |
| Glowing Radscorpion | 30 | Radscorpion Meat | 10 | 450 | 75 | 45 | Immune | 200 | 45 | Poison/Rad Field | 25 / 3 rads/sec | 44 |
| Albino Radscorpion | 38 | Radscorpion Meat | 11 | 675 | 100 | 60 | Immune | 200 | 60 | Poison | 30 | 55 |
| Radscorpion Stalker | 46 | Radscorpion Meat | 11 | 850 | 120 | 85 | Immune | 200 | 90 | Poison | 35 | 67 |
| Radscorpion Predator | 54 | Radscorpion Meat | 11 | 950 | 135 | 100 | Immune | 250 | 100 | Poison | 40 | 78 |
| Deathskull Radscorpion | 64+ | Radscorpion Meat | 12 | 1115+ | 150 | 120 | Immune | 300 | 115 | Poison | 45 | 96 |
Radscorpions are vulnerable to headshots, but it takes a powerful weapon to finish even a low-level Radroach with a single shot. At short range, combat shotguns and powerful melee weapons are both good options.
Stingwings

Stingwings tend to circle their targets, darting in to inject them with poison every few seconds. Using VATS is often the best way to deal with these flying insects.
| Name | Level | Inventory | Perception | Base Health | Damage Resistance | Energy Resistance | Radiation Resistance | Poison Resistance | Damage | Special Attack | SA Damage | XP |
|---|---|---|---|---|---|---|---|---|---|---|---|---|
| Stingwing | 10 | Stingwing Meat | 9 | 50 | 20 | 30 | Immune | 200 | 20 | Poison | 20 | 15 |
| Stingwing Darter | 18 | Stingwing Meat | 10 | 65 | 30 | 45 | Immune | 200 | 30 | Poison | 25 | 26 |
| Stingwing Skimmer | 30 | Stingwing Meat | 10 | 110 | 40 | 60 | Immune | 200 | 40 | Poison | 30 | 44 |
| Glowing Stingwing | 42 | Stingwing Meat | 10 | 140 | 50 | 75 | Immune | 200 | 50 | Poison/Rad Field | 35/5 rads/sec | 61 |
| Stingwing Chaser | 54+ | Stingwing Meat | 11 | 265+ | 60 | 90 | Immune | 200 | 70 | Poison | 40 | 78 |