
Power Armor
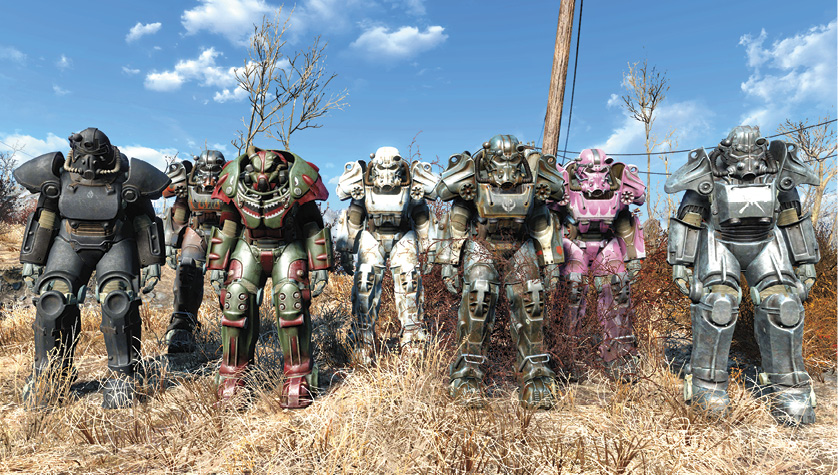
When it comes to damage mitigation, no collection of conventional apparel items can match a functioning suit of Power Armor. More vehicle than clothing, Power Armor makes even the most fragile combatant a powerhouse on the battlefield. You’ll find a variety of interchangeable, highly customizable parts scattered throughout the Commonwealth.
It takes considerable resources to modify such complex components, but with the right perks and materials, you can assemble a suit of Power Armor that provides unbeatable protection and impressive utility. Here are just a few of the benefits Power Armor enthusiasts enjoy:
- Entering a basic suit of Power Armor automatically grants you a Strength rating of 11. Equipping Strength-boosting mods can increase the effect. This bonus lasts as long as you remain in the suit.
- Even the simplest suit of Power Armor offers excellent Radiation Resistance. Lead plating mods improve the effect.
- Power Armor negates all falling damage. In fact, falling from a significant height triggers an Impact Landing. This powerful attack damages all targets located near the point of impact.
- Most models of Power Armor can accommodate jetpack mods. Some items and locations can only be reached with a rocket-assisted jump.
- Perks like Pain Train and Nuclear Physicist make Power Armor even more effective in combat, and Hot Rodder magazines unlock custom Power Armor paint schemes.
Of course, the benefits of Power Armor come at a cost. If you plan on using and maintaining even one suit of Power Armor, there are a few things you should keep in mind:
- Power Armor is fueled by Fusion Cores. These valuable items are hard to come by, but you’ll need to maintain a good supply of them to keep your Power Armor battle-ready. When you’re wearing Power Armor, anything that consumes Action Points also depletes the installed Fusion Core.
- Power Armor can be damaged. Unlike other apparel items, Power Armor parts need frequent repairs. The required materials vary from part to part, but you’d do well to keep your Power Armor station stocked with plenty of steel, aluminum, copper, and plastic.
- While you’re inside a suit of Power Armor, you lose any benefits granted by other apparel items.
- Power Armor can be stolen. Whenever you leave your Power Armor, remove the Fusion Core to prevent any unauthorized users from commandeering your valuable equipment.
- Punching weapons can’t be used with Power Armor. Power Armor is capable of delivering impressive unarmed damage, but it’s too bulky to accommodate knuckles, gloves, or wrist-mounted weapons.
- Crafting Power Armor mods takes a good supply of rare materials and considerable know-how. You can earn customized parts by completing quests or defeating appropriately equipped enemies, but you’ll need to invest in all available ranks of the Science!, Blacksmith, and Armorer perks if you want to craft your own advanced Power Armor mods.
Power Armor Frames
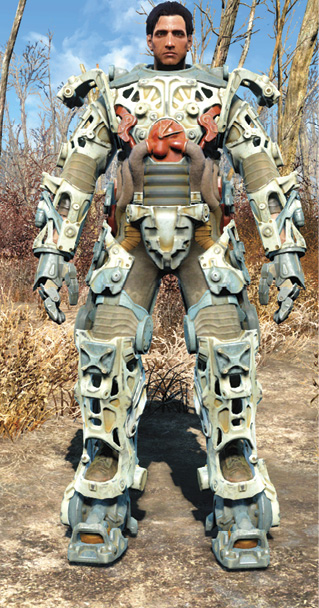
Power Armor frames can’t be carried—and therefore never appear in your Pip-Boy’s Apparel tab—but you can’t build a suit of Power Armor without one. A bare Power Armor frame provides 60 Damage Resistance and 60 Energy Resistance. Attach and modify parts to create your ideal suit of Power Armor.
When not in use, a Power Armor frame acts much like a container—simply transfer parts from your inventory to mount them in place. While you’re inside a frame, use the Pip-Boy to equip Power Armor parts the same way you’d equip clothing and armor. You can only equip Power Armor parts that are in working order; badly damaged parts must be repaired at a Power Armor station before they can be used.
If you’re interested in owning and maintaining multiple suits, you’ll need to collect multiple frames. You’ll find several Power Armor frames scattered across the Commonwealth, but additional frames can be purchased from vendors or earned by completing quests.
Power Armor Frames: Recommended Locations
| Location | Notes |
|---|---|
| Crashed Vertibird (Covenant Lake) | Located in the water, near the Vertibird wreckage. |
| Crashed Vertibird (Elevated Freeway) | Near the Vertibird wreckage at the edge of the overpass. |
| Crashed Vertibird (Near Robotics Disposal Ground) | Located near the Vertibird wreckage. |
| Diamond City | Purchased from Arturo. |
| Fiddler’s Green Trailer Estates | Located in a locked trailer (Master). |
| Mass Pike Interchange | Located in the Gunner camp on the overpass. |
| Military APCs (near Poseidon Energy Turbine #18-F) | Located near the crashed plane beside the APCs. |
| Military Armor Transport (Lexington) | Located behind a security door. Hack the terminal (Advanced) in the nearby train car. |
| Military Armor Transport (North Wilderness) | Located behind a security door. Hack the terminal (Advanced) in the nearby train car. |
| Military Checkpoint (Cambridge Outskirts) | In a locked cage. Use the nearby terminal (Advanced) to open the security door. |
| Military Convoy (Training Yard) | Located inside the convoy trailer. |
| Museum of Freedom | Located on the roof. Plays a key role in The Minutemen Quest: When Freedom Calls. |
| National Guard Training Yard | In the locked (Master) National Guard Armory. Use the terminal (Novice) to unlock the security door. |
| Revere Satellite Array | Located atop one of the dish towers. |
| The Prydwen | Purchased from Teagan. |
Power Armor Parts
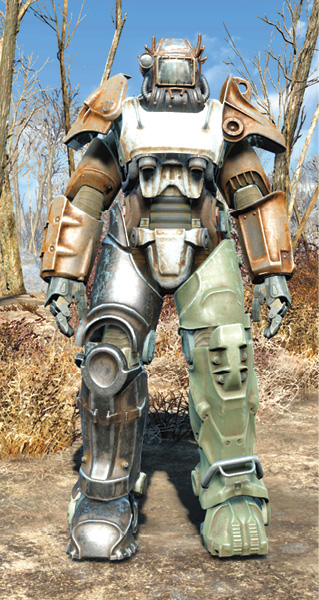
Every piece of Power Armor you find belongs to one of five sets. Raider Power Armor is the least advanced, X-01 Power Armor is the most advanced, and everything else falls somewhere in the middle. This hierarchy makes it fairly easy to determine whether a newly acquired part is an upgrade. A modified Raider Power Left Arm can offer more protection than a standard T-45 Left Arm, but barring bonuses granted by unique items, a more-advanced part can always be modified to outperform a less-advanced part.
Although most Power Armor parts offer identical customization options, it’s important to note that each mod is set-specific. All Power Armor sets can accommodate rad scrubbers, but rad scrubbers pulled from a T-51 Helm can only be applied to another T-51 Helm. Luckily, there’s no need to commit to a specific model of Power Armor. Simply equip the parts that seem most useful at any given time.
Raider Power Armor
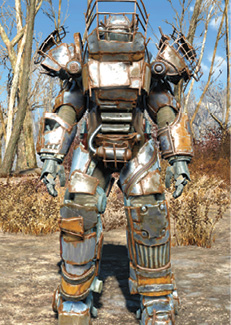
Raider Power Armor offers far fewer customization options than other Power Armor sets—most notably, the Raider Power Torso doesn’t support jetpacks or Stealth Boy mods available on more advanced Power Armor. Still, even the most basic suit of Raider Power Armor provides far more protection than standard apparel.
Any Raider clad in Power Armor is likely to have several of these parts equipped.
Raider Power Parts
| Name | Damage Resistance | Energy Resistance | Radiation Resistance | Weight | Value | Mods |
|---|---|---|---|---|---|---|
| Raider Power Helm | 100 | 50 | 150 | 14 | 50 |  |
| Raider Power Left Arm | 50 | 25 | 150 | 16 | 75 | |
| Raider Power Left Leg | 50 | 25 | 150 | 17 | 75 | |
| Raider Power Right Arm | 50 | 25 | 150 | 16 | 75 | |
| Raider Power Right Leg | 50 | 25 | 150 | 17 | 75 | |
| Raider Power Torso | 200 | 100 | 300 | 22 | 100 | |
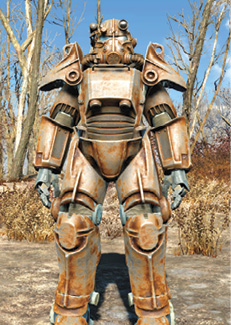
T-45 Power Armor
T-45 Power Armor can’t match the protection offered by more advanced models, but it supports a full complement of mods. This Power Armor isn’t widely used, but you’ll find a complete set atop the Museum of Freedom.
T-45 Parts
| Name | Damage Resistance | Energy Resistance | Radiation Resistance | Weight | Value | Mods |
|---|---|---|---|---|---|---|
| T-45 Helm | 100 | 60 | 150 | 12 | 60 | |
| T-45 Left Arm | 50 | 30 | 150 | 15 | 100 | |
| T-45 Left Leg | 50 | 30 | 150 | 15 | 100 | |
| T-45 Right Arm | 50 | 30 | 150 | 15 | 100 | |
| T-45 Right Leg | 50 | 30 | 150 | 15 | 100 | |
| T-45 Torso | 200 | 130 | 300 | 20 | 140 | |
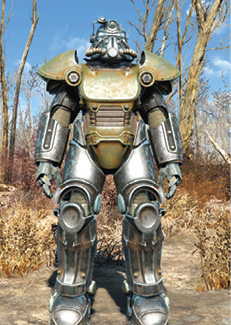
T-51 Power Armor
T-51 Power Armor offers better protection than the T-45 model. These parts aren’t favored by any particular group, but you can find bits and pieces scattered throughout the Commonwealth.
T-51 Parts
| Name | Damage Resistance | Energy Resistance | Radiation Resistance | Weight | Value | Mods |
|---|---|---|---|---|---|---|
| T-51 Helm | 140 | 90 | 150 | 12 | 80 | |
| T-51 Left Arm | 90 | 60 | 150 | 15 | 130 | |
| T-51 Left Leg | 90 | 60 | 150 | 15 | 130 | |
| T-51 Right Arm | 90 | 60 | 150 | 15 | 130 | |
| T-51 Right Leg | 90 | 60 | 150 | 15 | 130 | |
| T-51 Torso | 240 | 160 | 300 | 20 | 180 | |
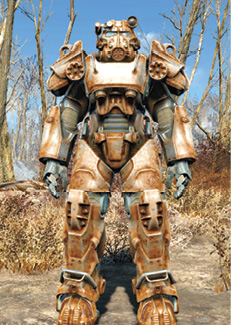
T-60 Power Armor
T-60 Power Armor is favored by the Brotherhood of Steel and the Atom Cats, so these durable parts are relatively easy to find. You can take them by force if you’re so inclined, but searching military bases and Vertibird crash sites tends to be just as effective.
This model’s popularity also means you’ll find T-60 parts that feature custom paint jobs. Atom Cat parts, in particular, offer a paint scheme you can’t find anywhere else.
T-60 Parts
| Name | Damage Resistance | Energy Resistance | Radiation Resistance | Weight | Value | Mods |
|---|---|---|---|---|---|---|
| T-60 Helm | 180 | 120 | 150 | 12 | 120 | |
| T-60 Left Arm | 130 | 85 | 150 | 15 | 160 | |
| T-60 Left Leg | 130 | 85 | 150 | 15 | 160 | |
| T-60 Right Arm | 130 | 85 | 150 | 15 | 160 | |
| T-60 Right Leg | 130 | 85 | 150 | 15 | 160 | |
| T-60 Torso | 280 | 185 | 300 | 20 | 200 | |
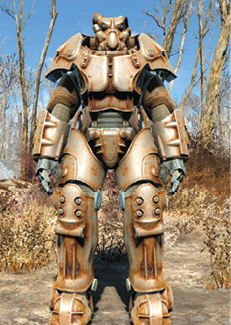
X-01 Power Armor
The X-01 is the most advanced Power Armor available. It’s also the rarest. This makes it extremely difficult to assemble a complete set of X-01 Power Armor, but it’s well worth using any parts you’re lucky enough to find.
X-01 Parts
| Name | Damage Resistance | Energy Resistance | Radiation Resistance | Weight | Value | Mods |
|---|---|---|---|---|---|---|
| X-01 Helm | 220 | 140 | 150 | 12 | 140 | |
| X-01 Left Arm | 170 | 110 | 150 | 15 | 200 | |
| X-01 Left Leg | 170 | 110 | 150 | 15 | 200 | |
| X-01 Right Arm | 170 | 110 | 150 | 15 | 200 | |
| X-01 Right Leg | 170 | 110 | 150 | 15 | 200 | |
| X-01 Torso | 320 | 210 | 300 | 20 | 280 | |