
Mass Effect: Andromeda Collector's Edition Guide Game Mechanics Combat Concepts
Ryder “Builds”
Powers and skills are categorized into one of three specializations: combat, biotic, and tech. Powers in these specializations have distinct strengths and weaknesses, outlined here. While you’re encouraged to experiment with Ryder’s wide array of skills and profiles, included in this section are sample power loadouts for you to try in Single-Player.
Combat
The combat specialization is associated with firearm proficiency, superior physical prowess, and explosive munitions expertise.
Strengths:
- Combat specialists generally do not rely on power use, so they can deal consistent and sustained damage with their increased proficiency with guns.
- Since guns use a “hard aim” targeting system, landing shots on enemy weak points greatly rewards a player’s accuracy.
- Weapon specializations do not take up valuable power slots.
- Cell-consuming combat powers are exceptionally strong when used in appropriate situations.
- The combat specialization is extremely flexible, especially with proper consumables usage, thanks to cryo/incendiary/disruptor ammo.
- Skills and passives in the combat group greatly increase survivability.
Weaknesses:
- Burst damage is low if specializing in weapons only.
- Most combat powers are limited in usage because of their power cell requirements.
- Shields can be difficult to destroy, although using disruptor ammo easily eliminates this weakness.
- Effective use of weapons requires precise aiming from the player.
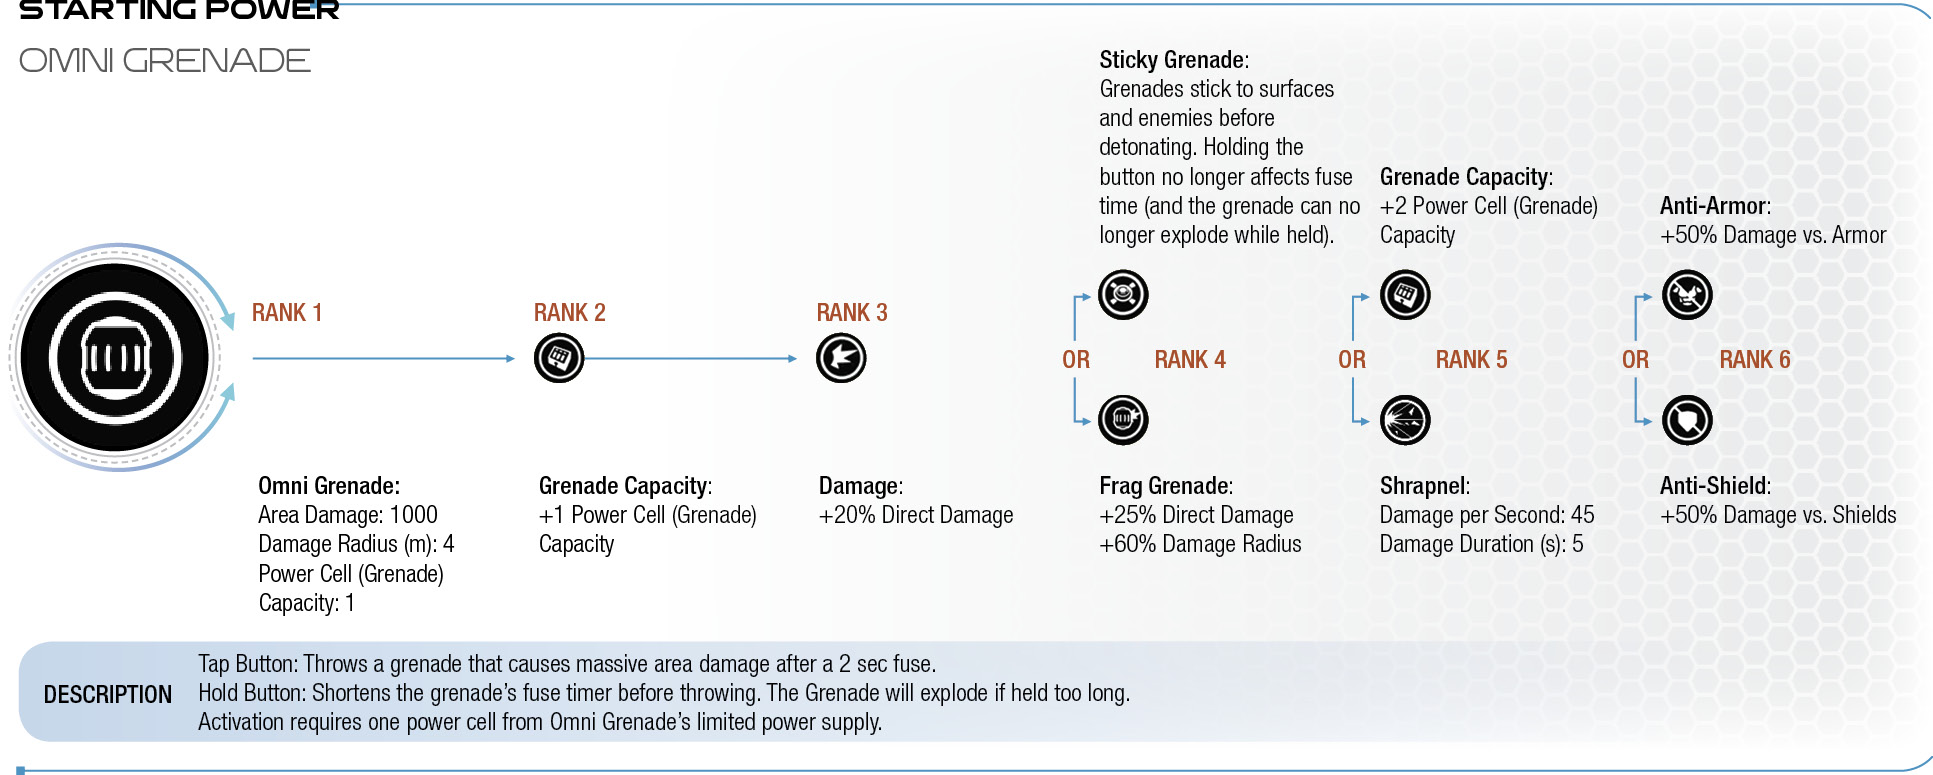
Omni Grenade
Description
Tap Button: Throws a grenade that causes massive area damage after a 2 sec fuse.
Hold Button: Shortens the grenade’s fuse timer before throwing. The Grenade will explode if held too long.
Activation requires one power cell from Omni Grenade’s limited power supply.
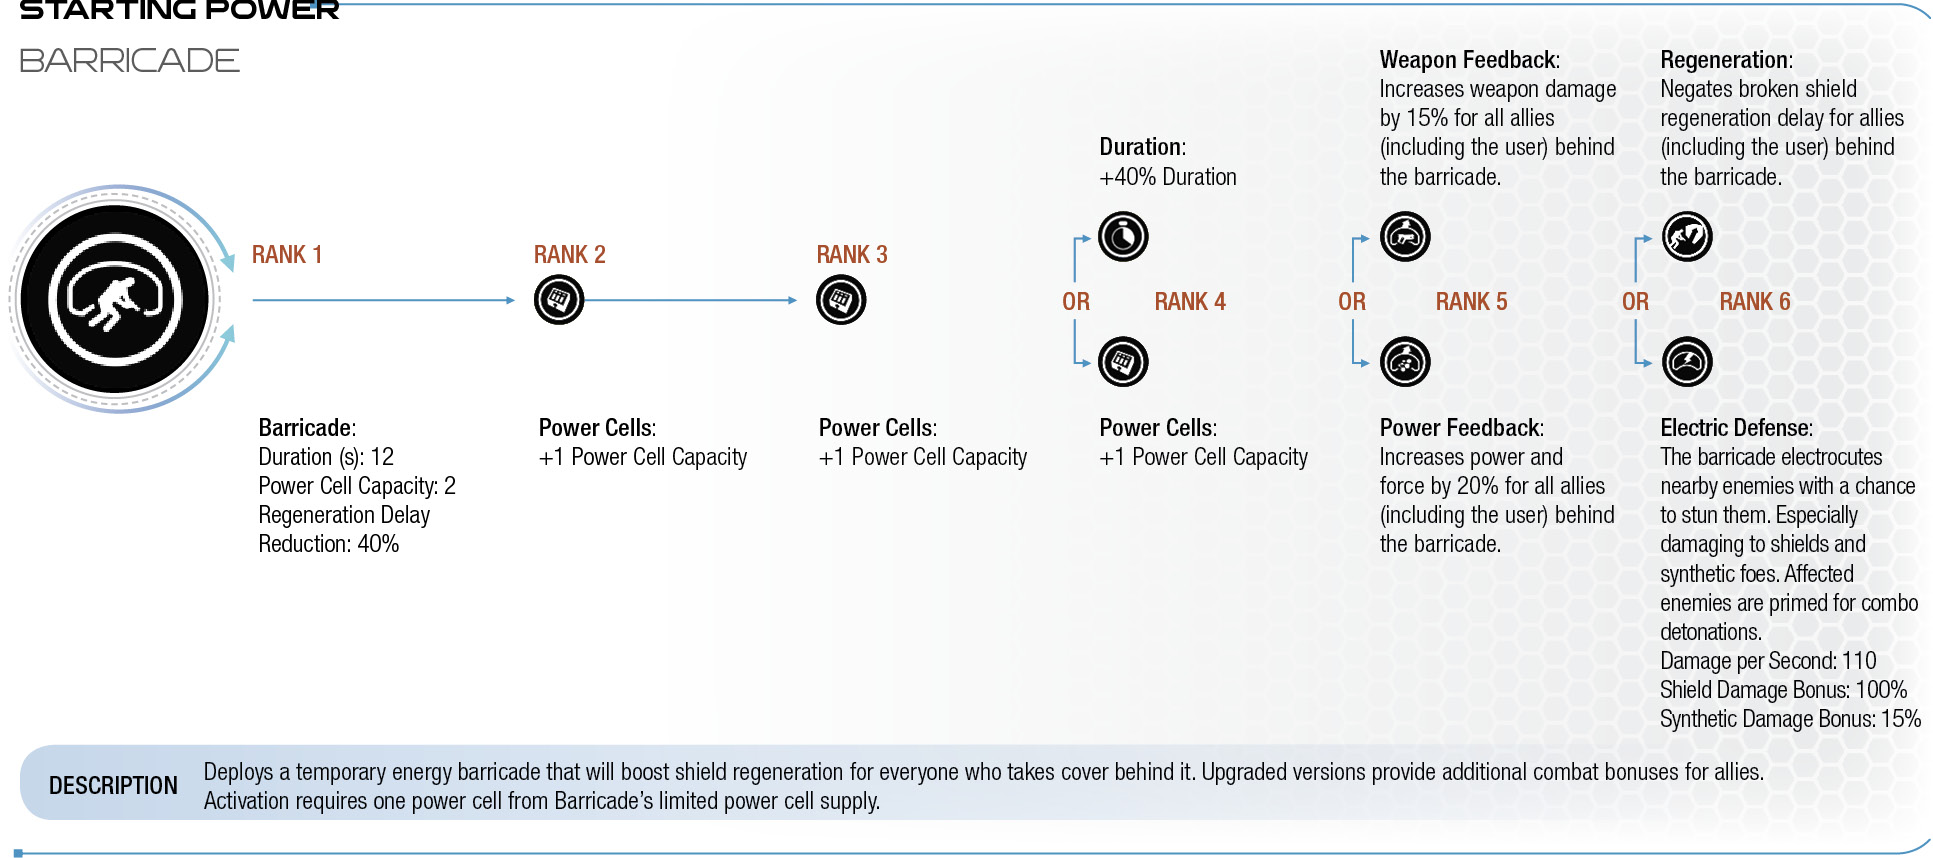
Barricade
Description
Deploys a temporary energy barricade that will boost shield regeneration for everyone who takes cover behind it. Upgraded versions provide additional combat bonuses for allies.
Activation requires one power cell from Barricade’s limited power cell supply.
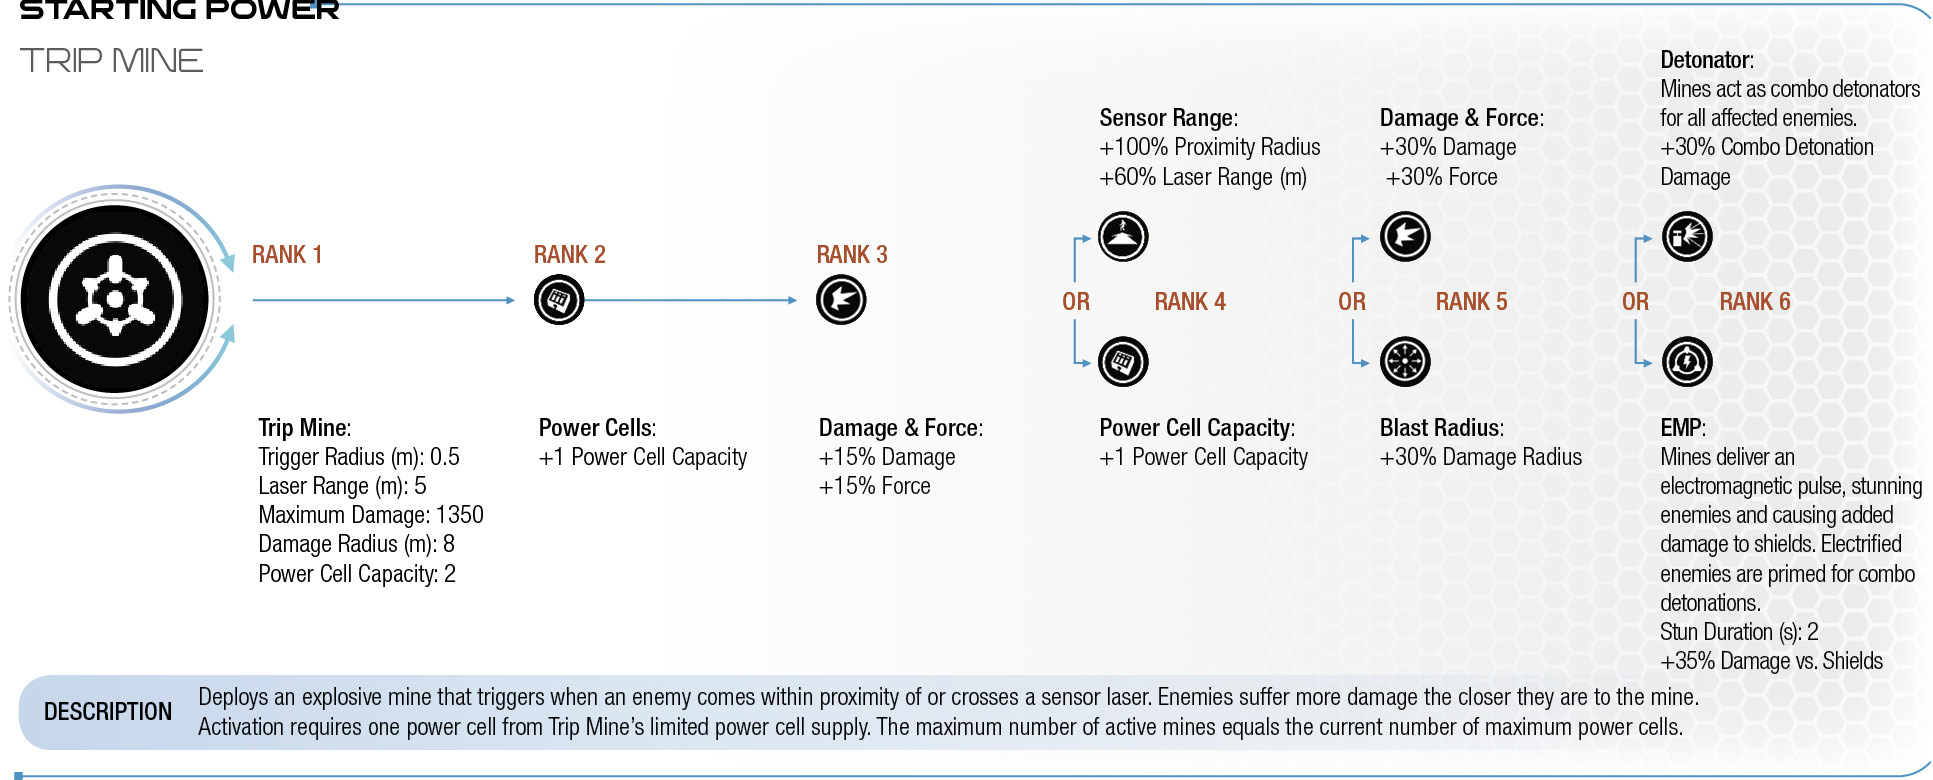
Trip Mine
Description
Deploys an explosive mine that triggers when an enemy comes within proximity of or crosses a sensor laser. Enemies suffer more damage the closer they are to the mine.
Activation requires one power cell from Trip Mine’s limited power cell supply. The maximum number of active mines equals the current number of maximum power cells.
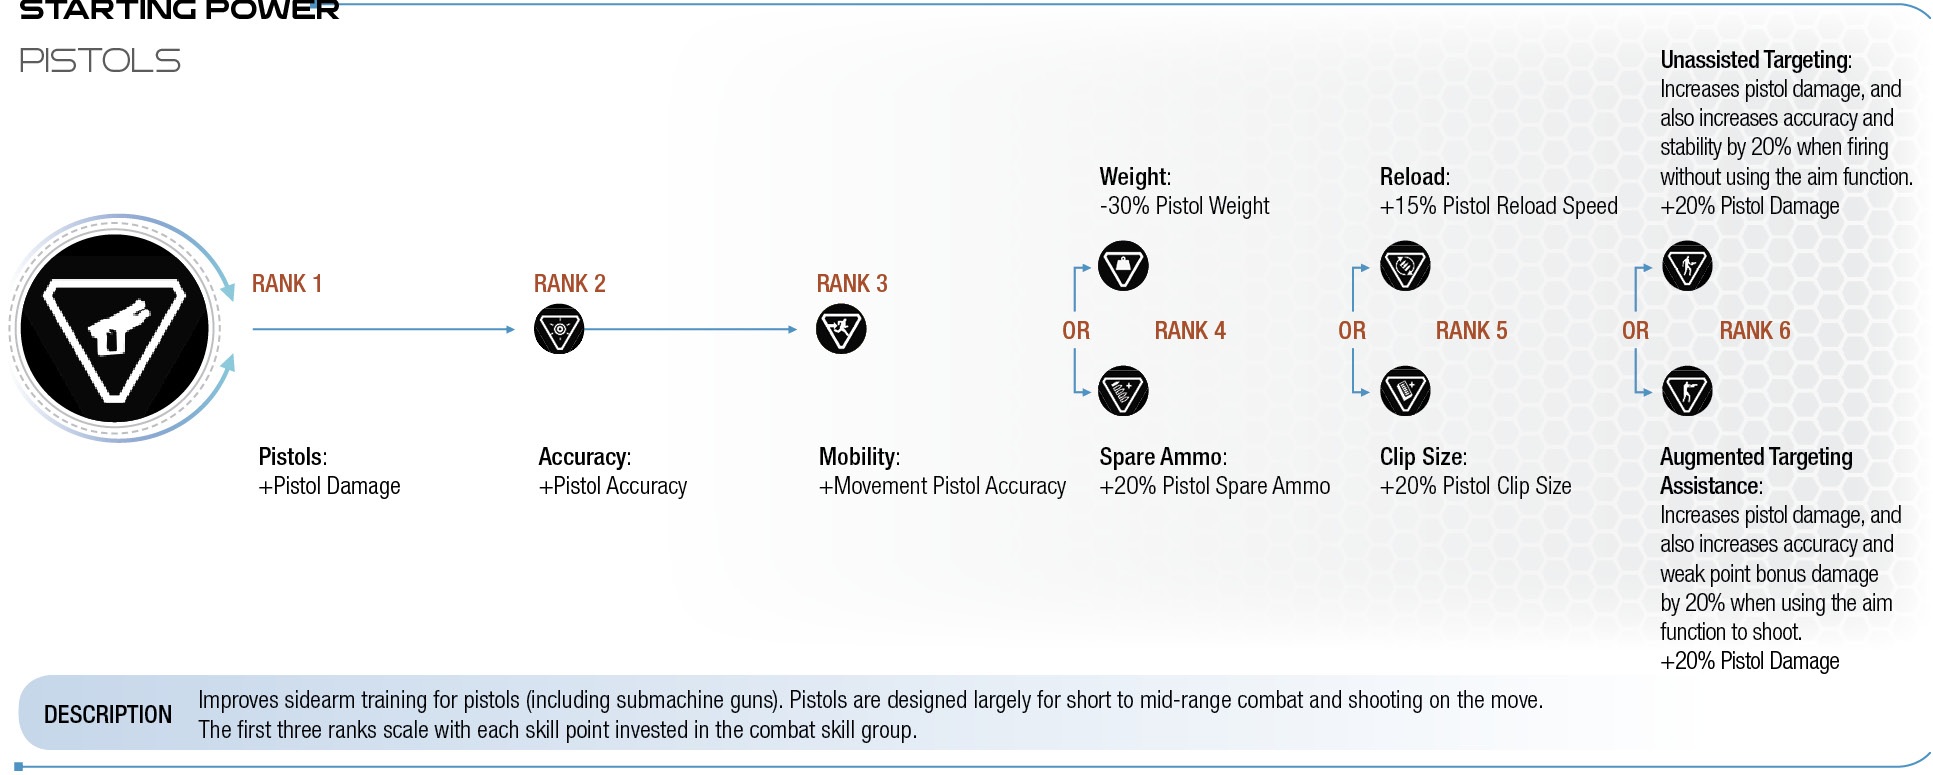
pistols
Description
Improves sidearm training for pistols (including submachine guns). Pistols are designed largely for short to mid-range combat and shooting on the move.
The first three ranks scale with each skill point invested in the combat skill group.
Assault Rifles
Description
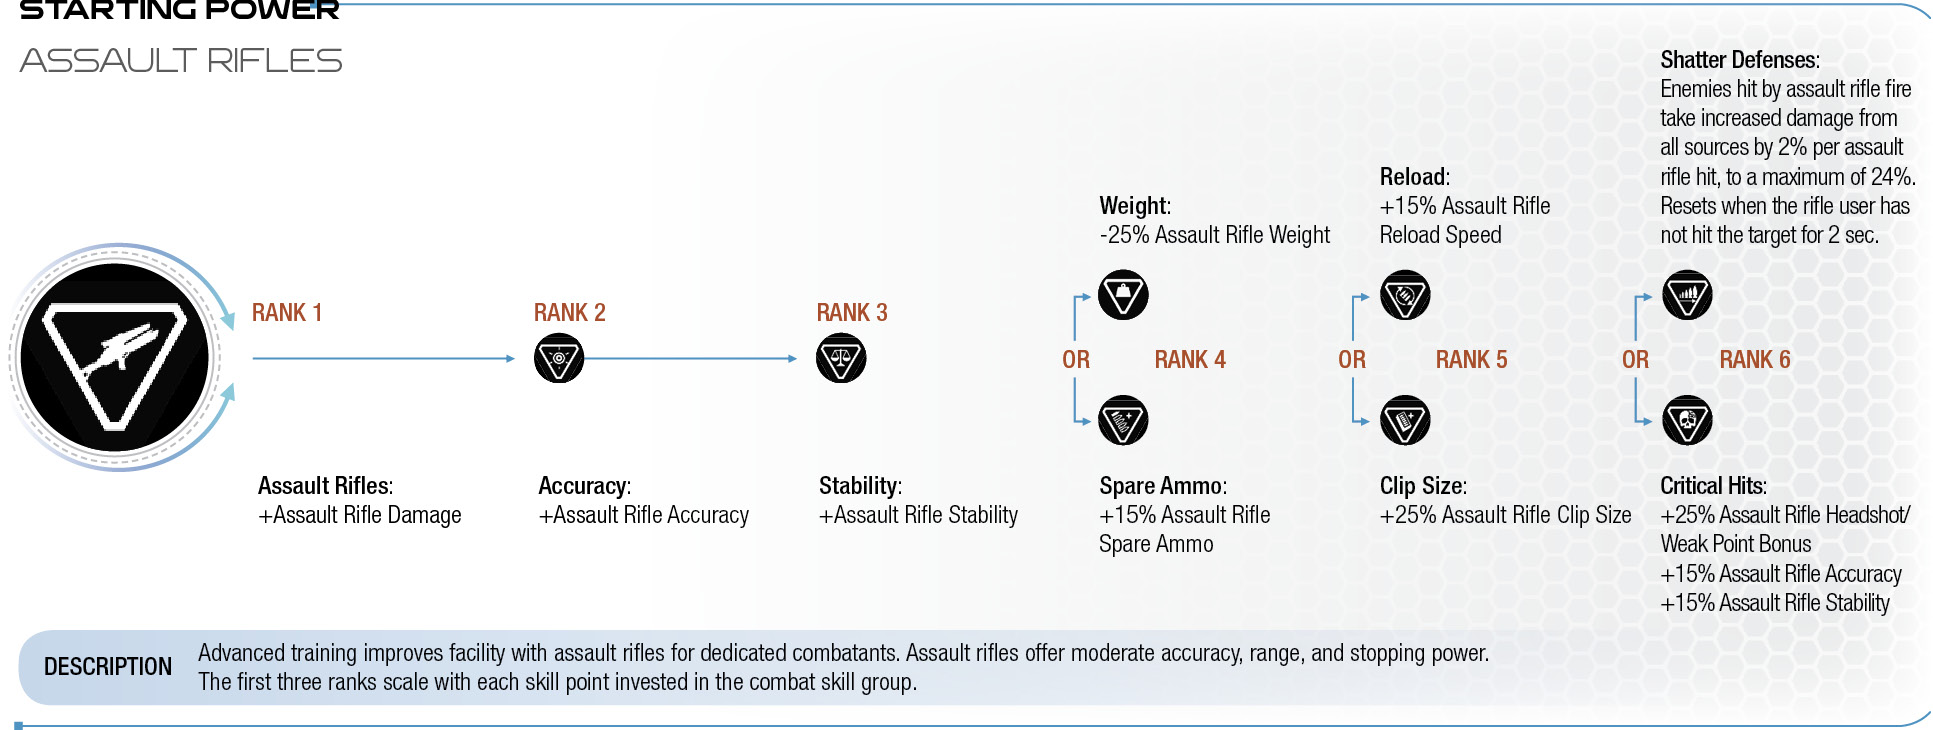
Advanced training improves facility with assault rifles for dedicated combatants. Assault rifles offer moderate accuracy, range, and stopping power.
The first three ranks scale with each skill point invested in the combat skill group.
Shotguns
Description
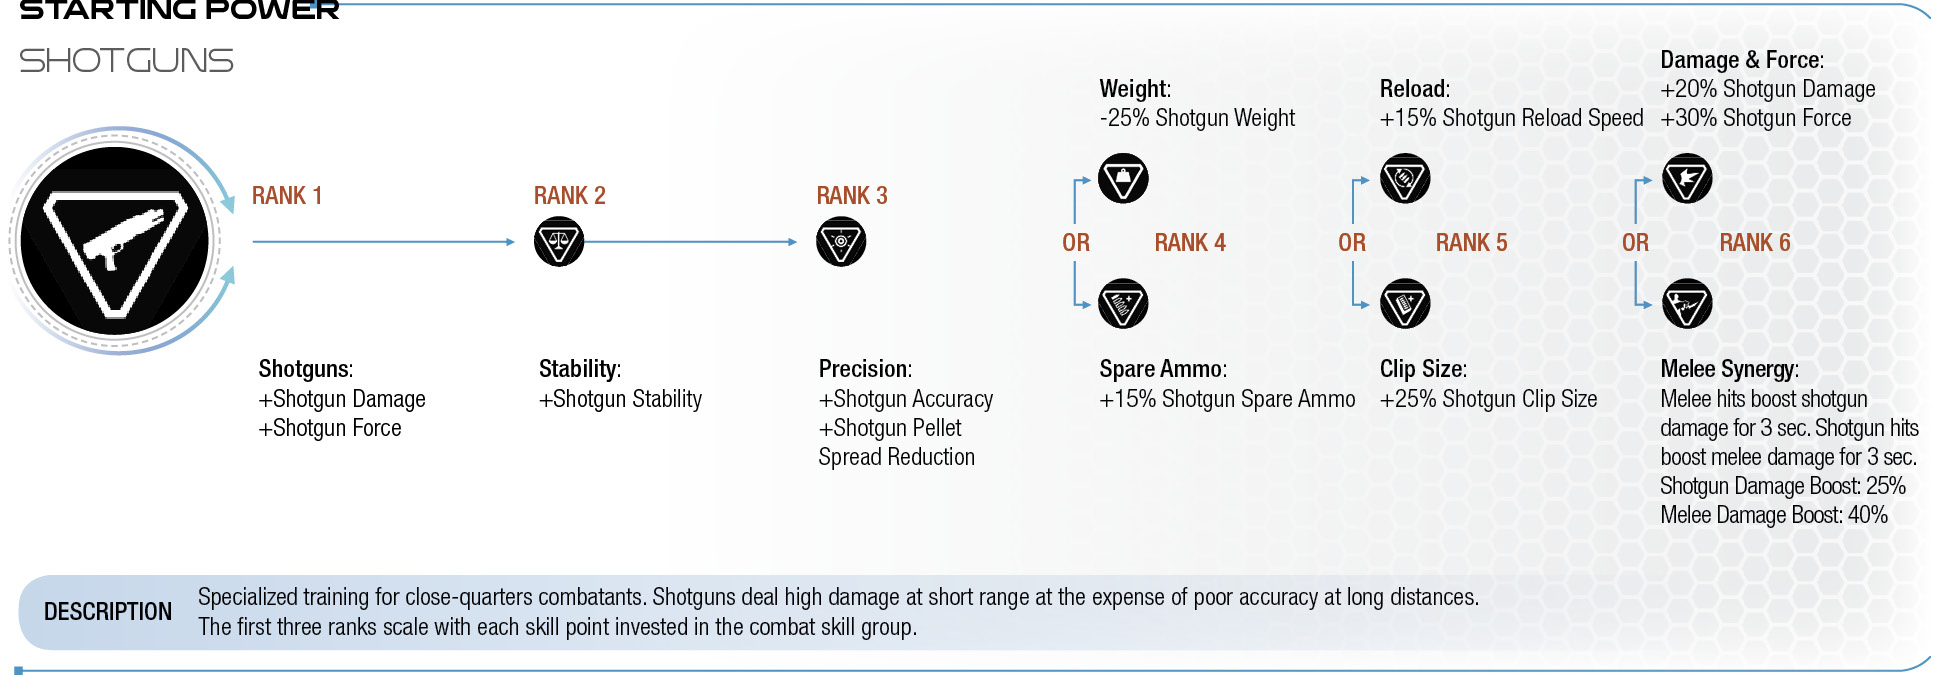
Specialized training for close-quarters combatants. Shotguns deal high damage at short range at the expense of poor accuracy at long distances.
The first three ranks scale with each skill point invested in the combat skill group.
Sniper Rifles
Description
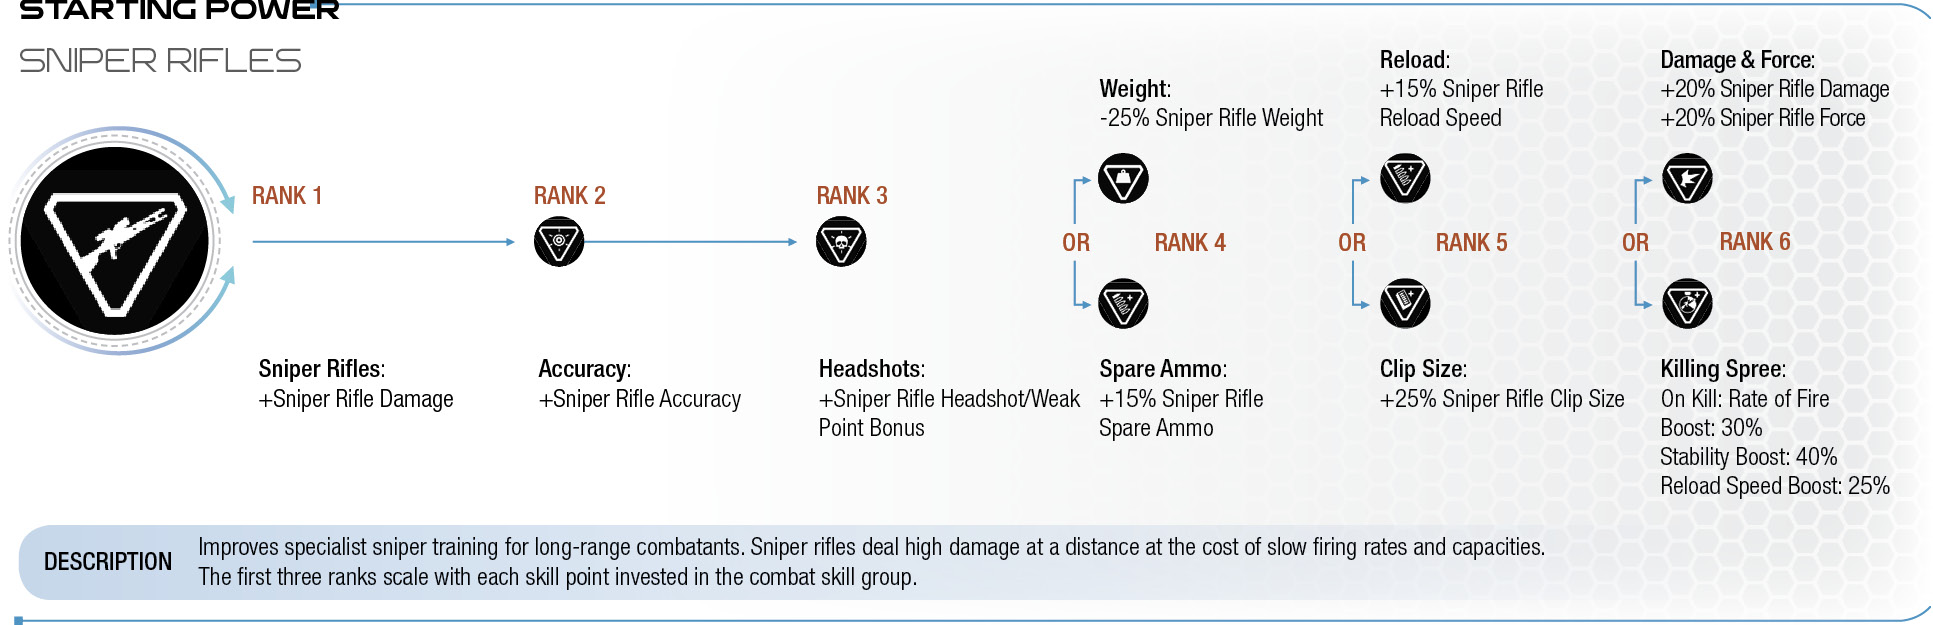
Improves specialist sniper training for long-range combatants. Sniper rifles deal high damage at a distance at the cost of slow firing rates and capacities.
The first three ranks scale with each skill point invested in the combat skill group.
Combat Tools
Description
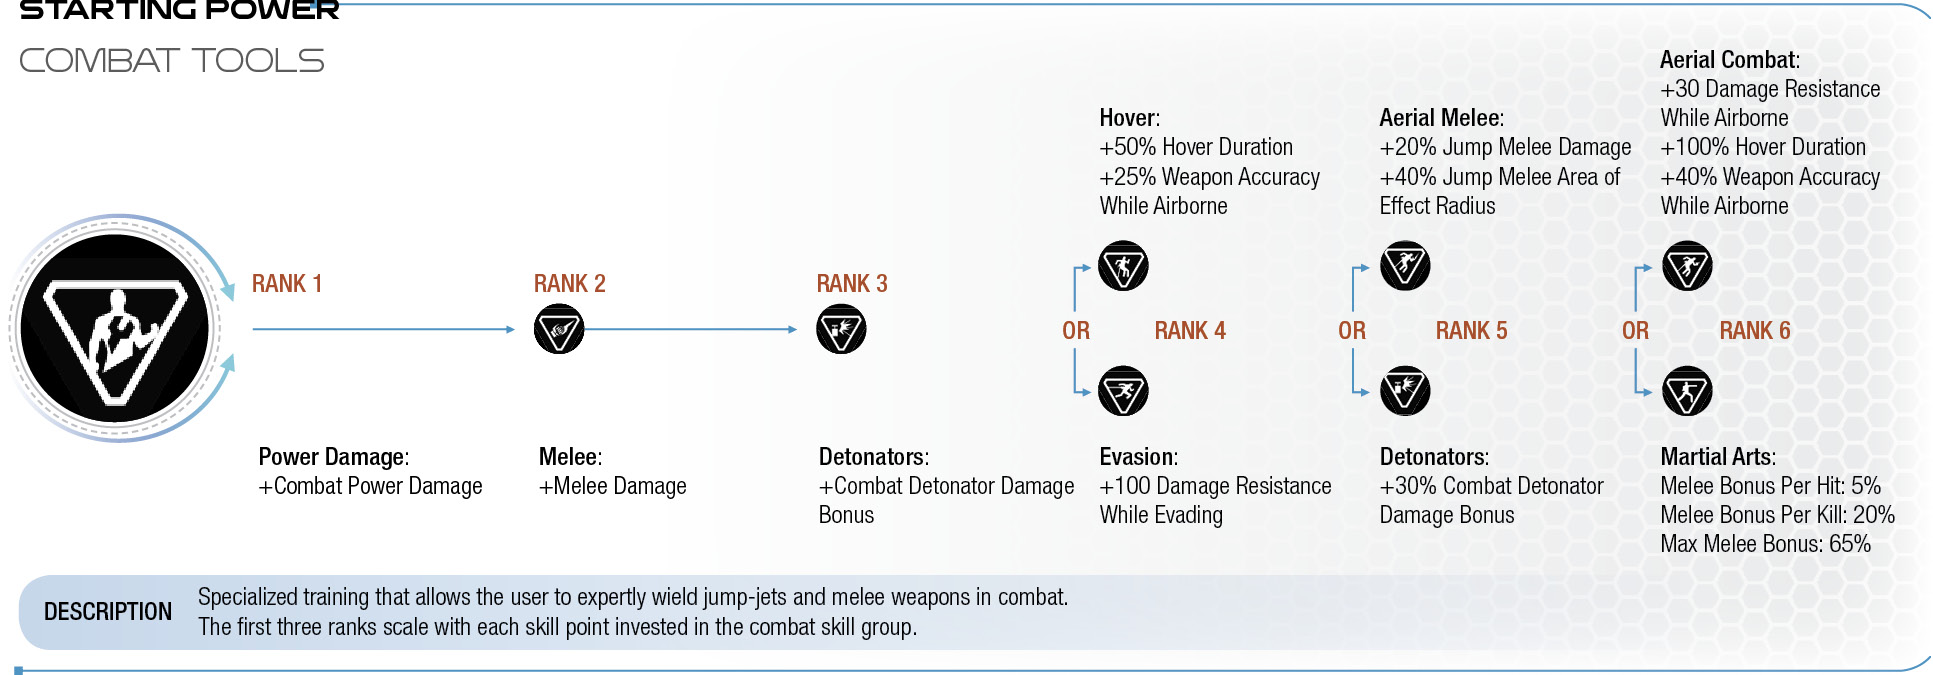
Specialized training that allows the user to expertly wield jump-jets and melee weapons in combat.
The first three ranks scale with each skill point invested in the combat skill group.
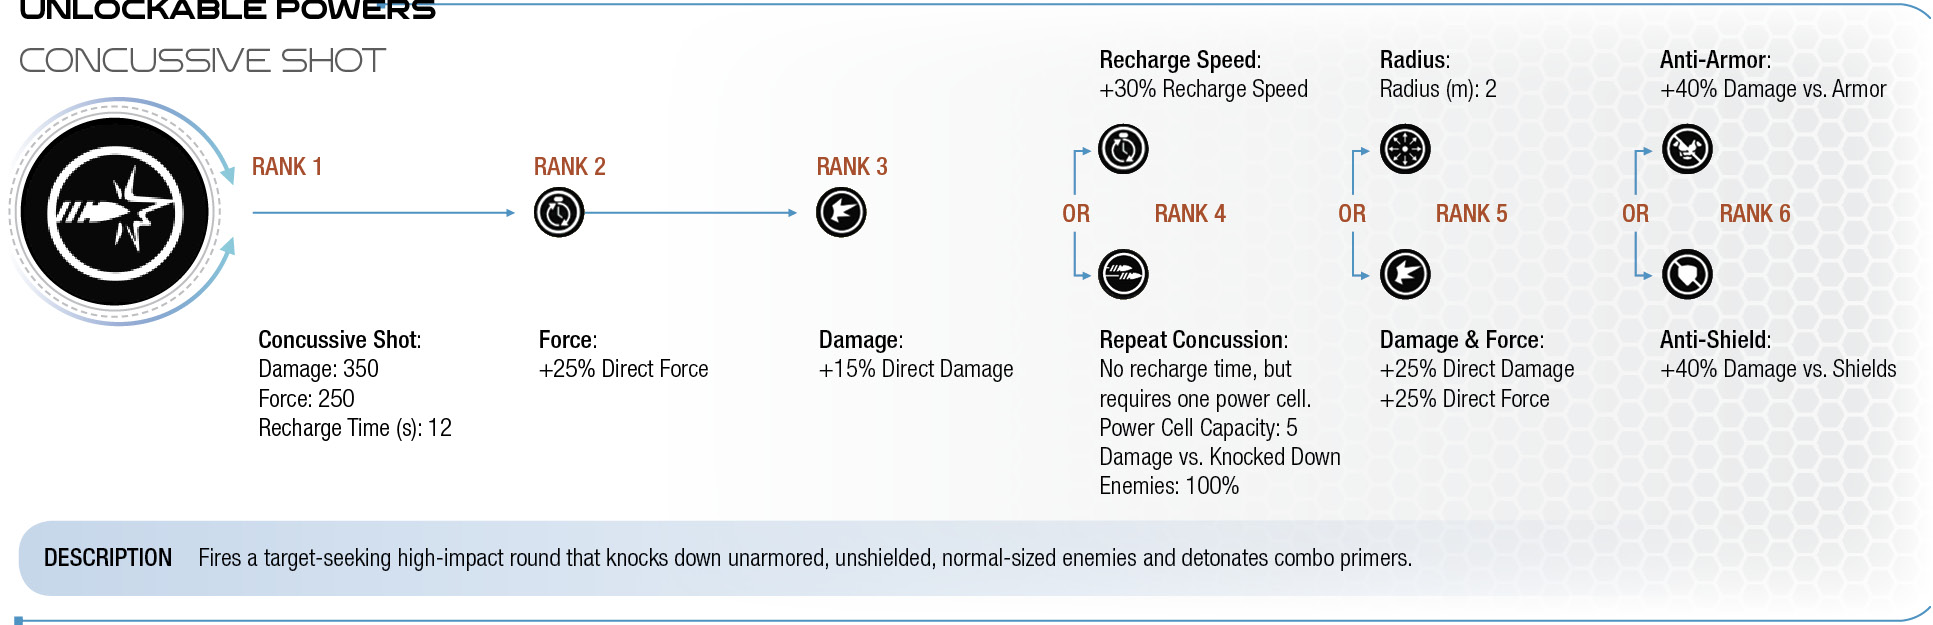
Concussive Shot
Description
Fires a target-seeking high-impact round that knocks down unarmored, unshielded, normal-sized enemies and detonates combo primers.
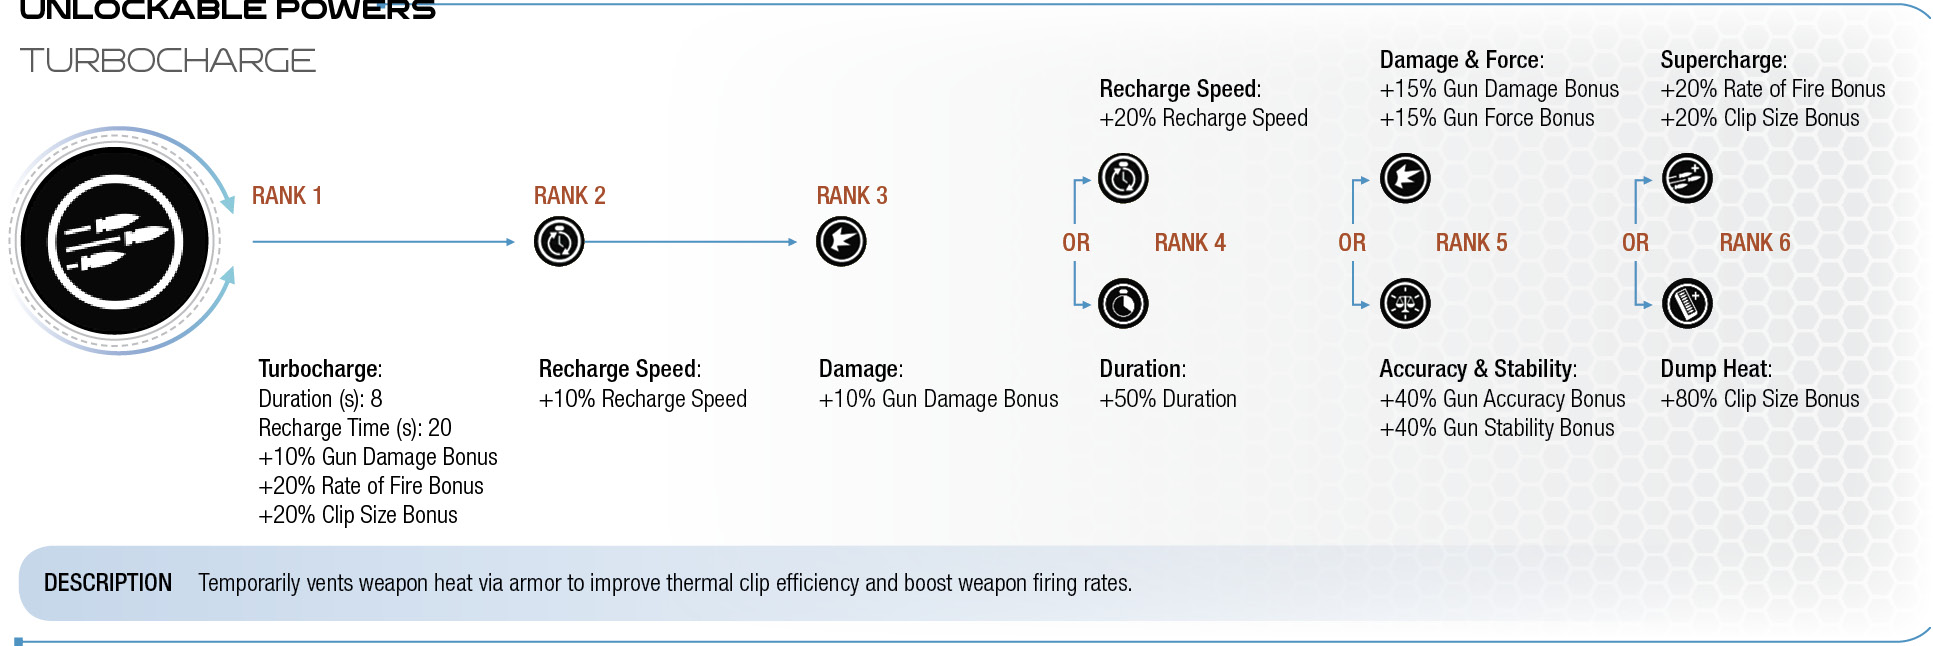
Turbocharge
Description
Temporarily vents weapon heat via armor to improve thermal clip efficiency and boost weapon firing rates.
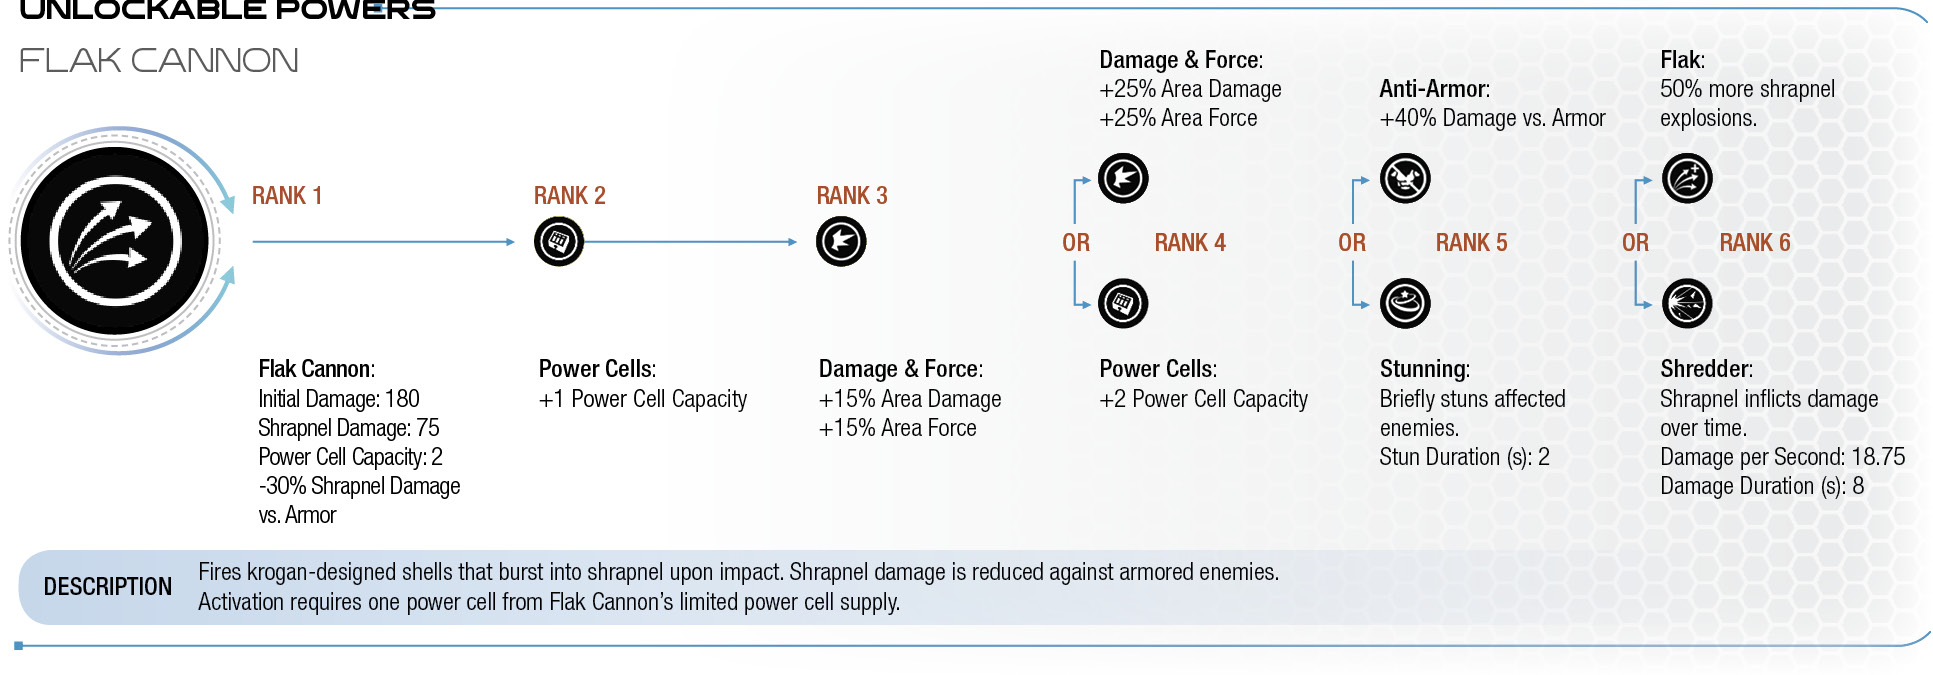
Flak Cannon
Description
Fires krogan-designed shells that burst into shrapnel upon impact. Shrapnel damage is reduced against armored enemies.
Activation requires one power cell from Flak Cannon’s limited power cell supply.
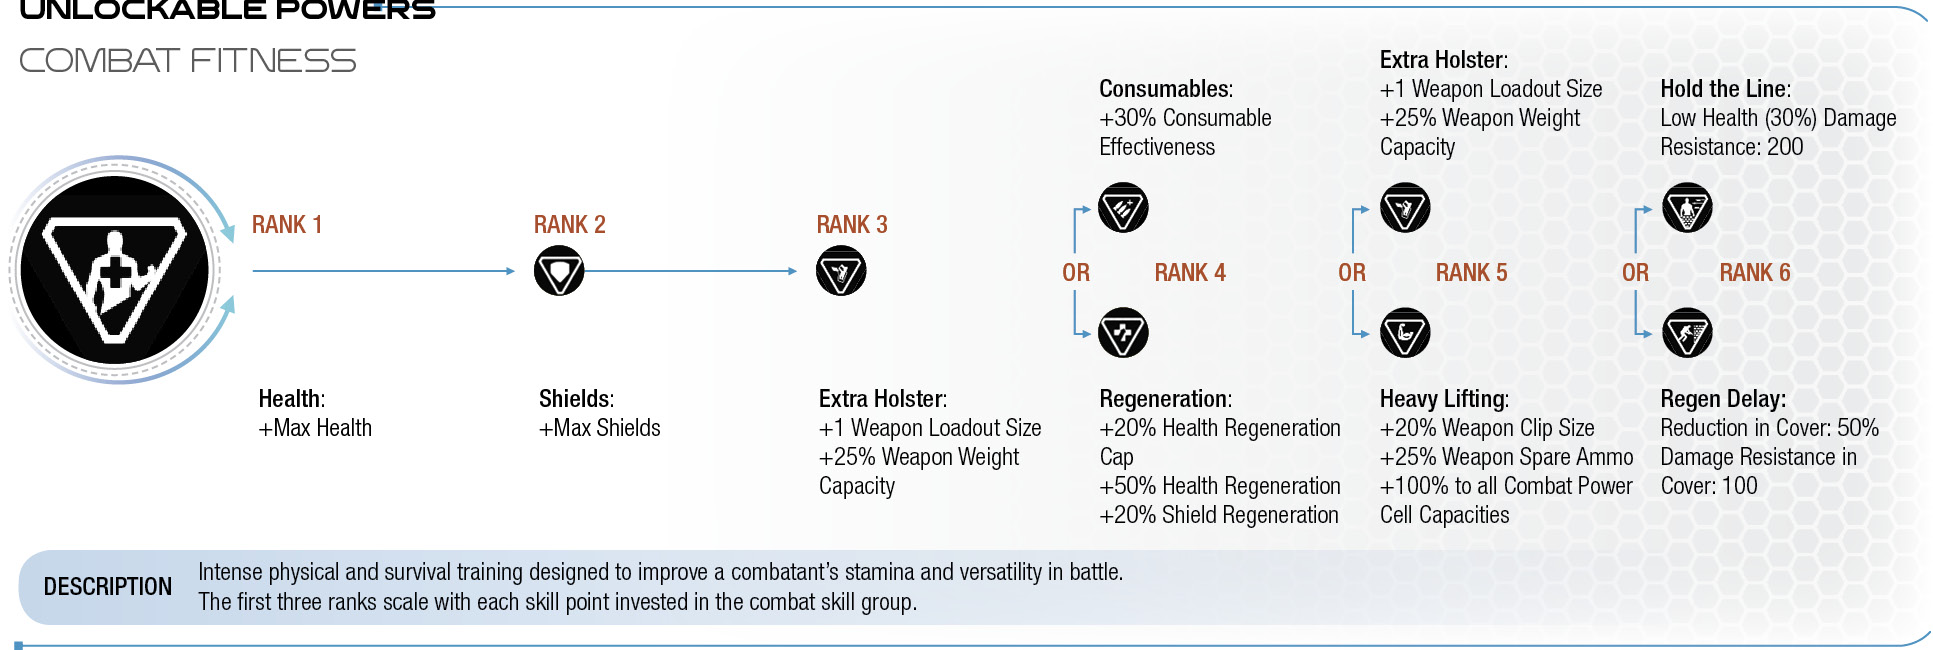
Combat Fitness
Description
Intense physical and survival training designed to improve a combatant’s stamina and versatility in battle.
The first three ranks scale with each skill point invested in the combat skill group.
example builds and play styles
Gun Nut
- Training History: Security Officer
- Core Skills: Turbocharge, Assault Rifles OR Pistols, Barricade, Combat Fitness (Rank 3 only), Sniper Rifles
- Power Loadout: Turbocharge, Barricade, Overload OR Energy Drain
- Recommended Weapons: Assault Rifles OR Pistols, Sniper Rifles
- Recommended Profiles: Soldier
Heavily spending points into a mid-range weapon type (Assault Rifles or Pistols) and using Turbocharge to amplify damage output cultivates a play style that revolves around precise aim, smart ammo management, and proper timing with weapon reloads. This build is recommended for players who like to deal consistent damage while having the ability to score well-placed critical hits on weak points. To further optimize weapon efficiency, remember to keep a sufficient stock of all three “elemental ammo” consumables.
This type of gun-focused play style excels at dealing single-target damage and burning down individual foes from cover.
Bomb Lobber
- Training History: Operative OR Security
- Core Skills: Omni Grenade, Trip Mine, Flak Cannon, Tactical Cloak OR Concussive Shot
- Power Loadout: Omni Grenade, Trip Mine, Flak Cannon, Tactical Cloak OR Concussive Shot (profile swap when necessary)
- Recommended Weapons: Assault Rifles, Shotguns, Sniper Rifles
- Recommended Profiles: Soldier
This is an explosive build, both figuratively and literally. It’s designed to deal huge amounts of damage in large areas in a short amount of time with Trip Mine, Omni Grenade, and Flak Cannon. Additionally, starting with the Operative training history through the Character Creation launcher gives you the Tactical Cloak tech power without requiring an investment into the tech group (usually requires a hefty investment to unlock). Alternatively, you can start with Security training, sacrificing Tactical Cloak and gaining Concussive Shot.
You can use this demolitions tool kit in a couple of ways, depending on what the situation calls for. You can opt to frontload all your area-of-effect damage if you absolutely need to clear out a group of tough enemies (with the significant drawback of expending cell resources). Ideally, though, you can follow up your carpet bombing with projectile spray from a strong assault rifle to finish off survivors. (Worth noting is that cell-consuming powers practically have no recharge time, giving you the luxury of carrying heavy guns.)
For lengthy missions like kett base infiltration operations where you can’t resupply at a forward station, ration out your cell usage by swapping in Tactical Cloak to get the jump on enemies, luring them into a well-placed Trip Mine.
Biotic
Biotic powers are based on the ability to create and manipulate mass effect fields. All biotic powers have a recharge time, but none require the use of power cells.
Strengths:
- Biotic specialists can control the battlefield by disabling and knocking around enemies, making large-scale battles more manageable.
- Pull and Singularity are excellent crowd-controlling skills.
- Several biotic powers can deal damage over a large area, taking a toll on multiple enemies at once.
- Biotic powers do not require power cells and generally have shorter recharge times than tech and combat powers.
- A few biotic powers drastically increase the user’s survivability by regenerating lost shield strength or increasing maximum shield capacity.
Weaknesses:
- Certain biotic specialists are light on defenses.
- Biotic powers do not handle shielded enemies well; not only do biotic powers deal meager damage to shields, but shielded enemies are immune to gravitational effects, such as Pull and Throw.
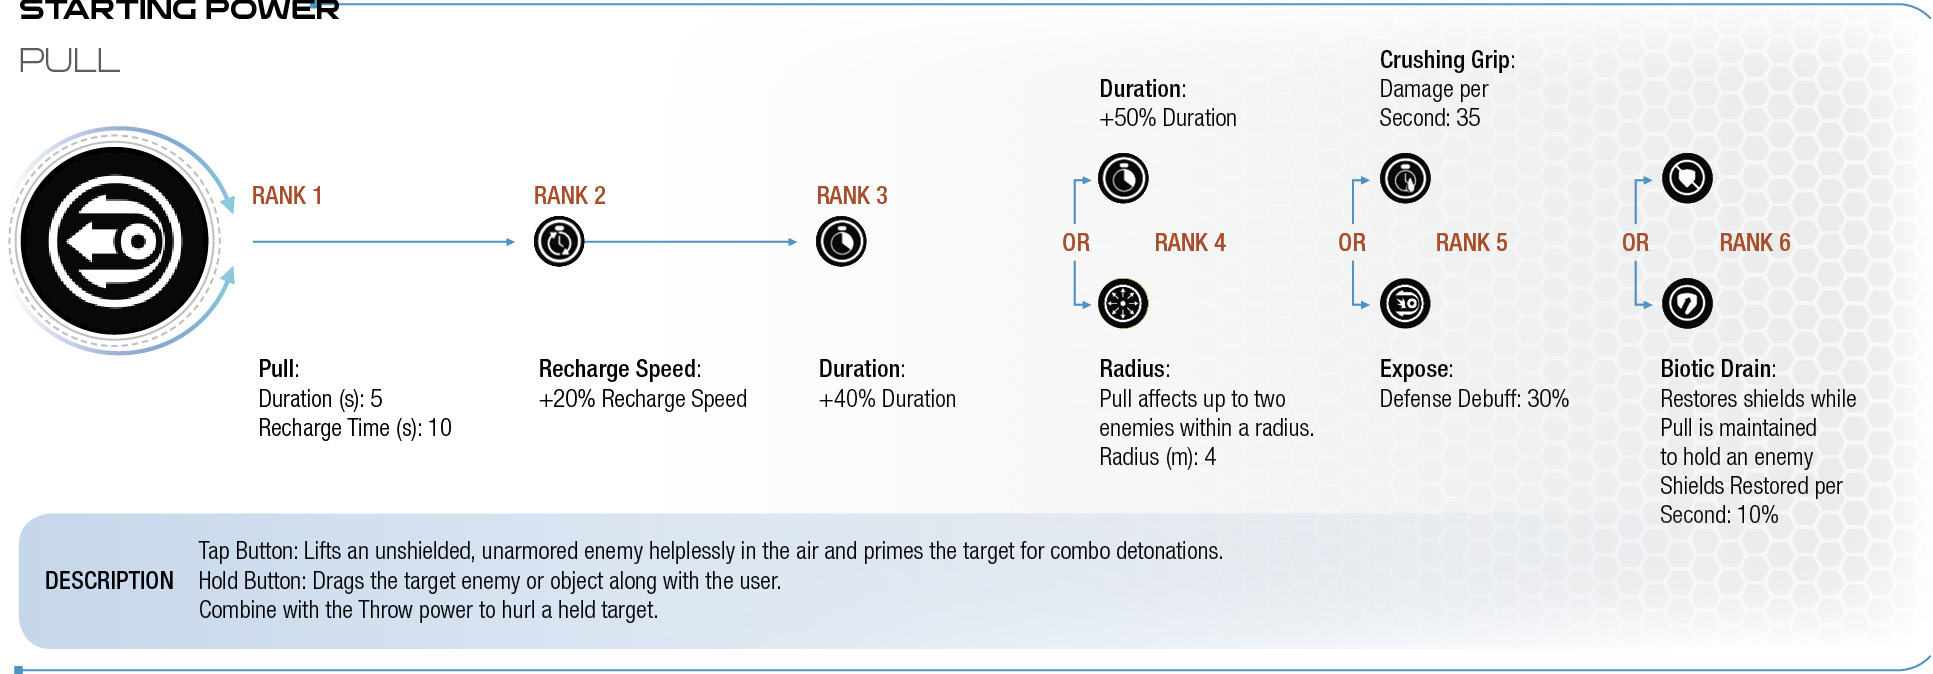
Pull
Description
Tap Button: Lifts an unshielded, unarmored enemy helplessly in the air and primes the target for combo detonations.
Hold Button: Drags the target enemy or object along with the user.
Combine with the Throw power to hurl a held target.
Throw
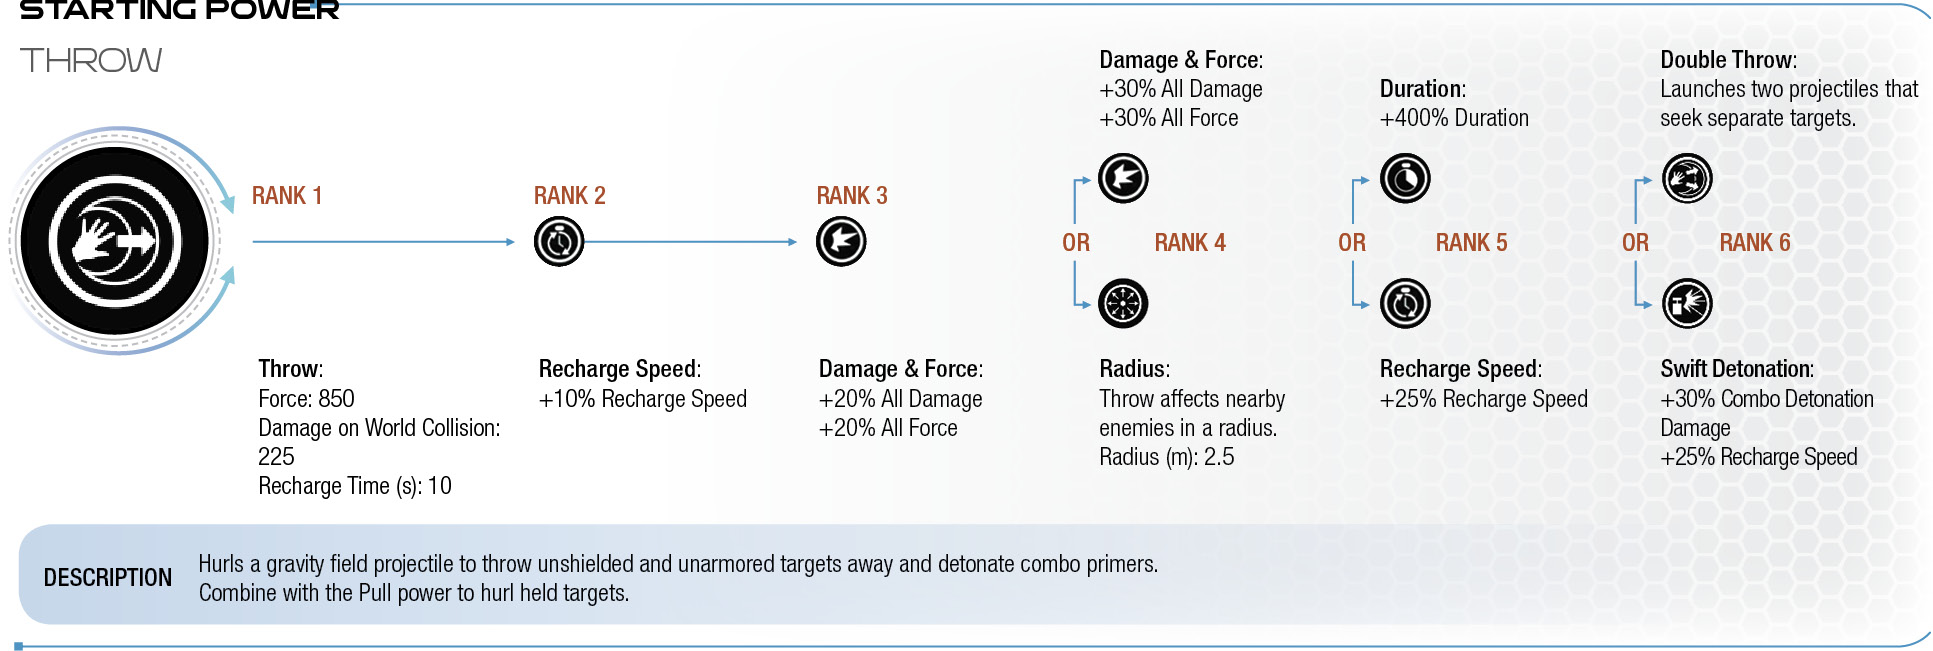
Description
Hurls a gravity field projectile to throw unshielded and unarmored targets away and detonate combo primers.
Combine with the Pull power to hurl held targets.
Nova
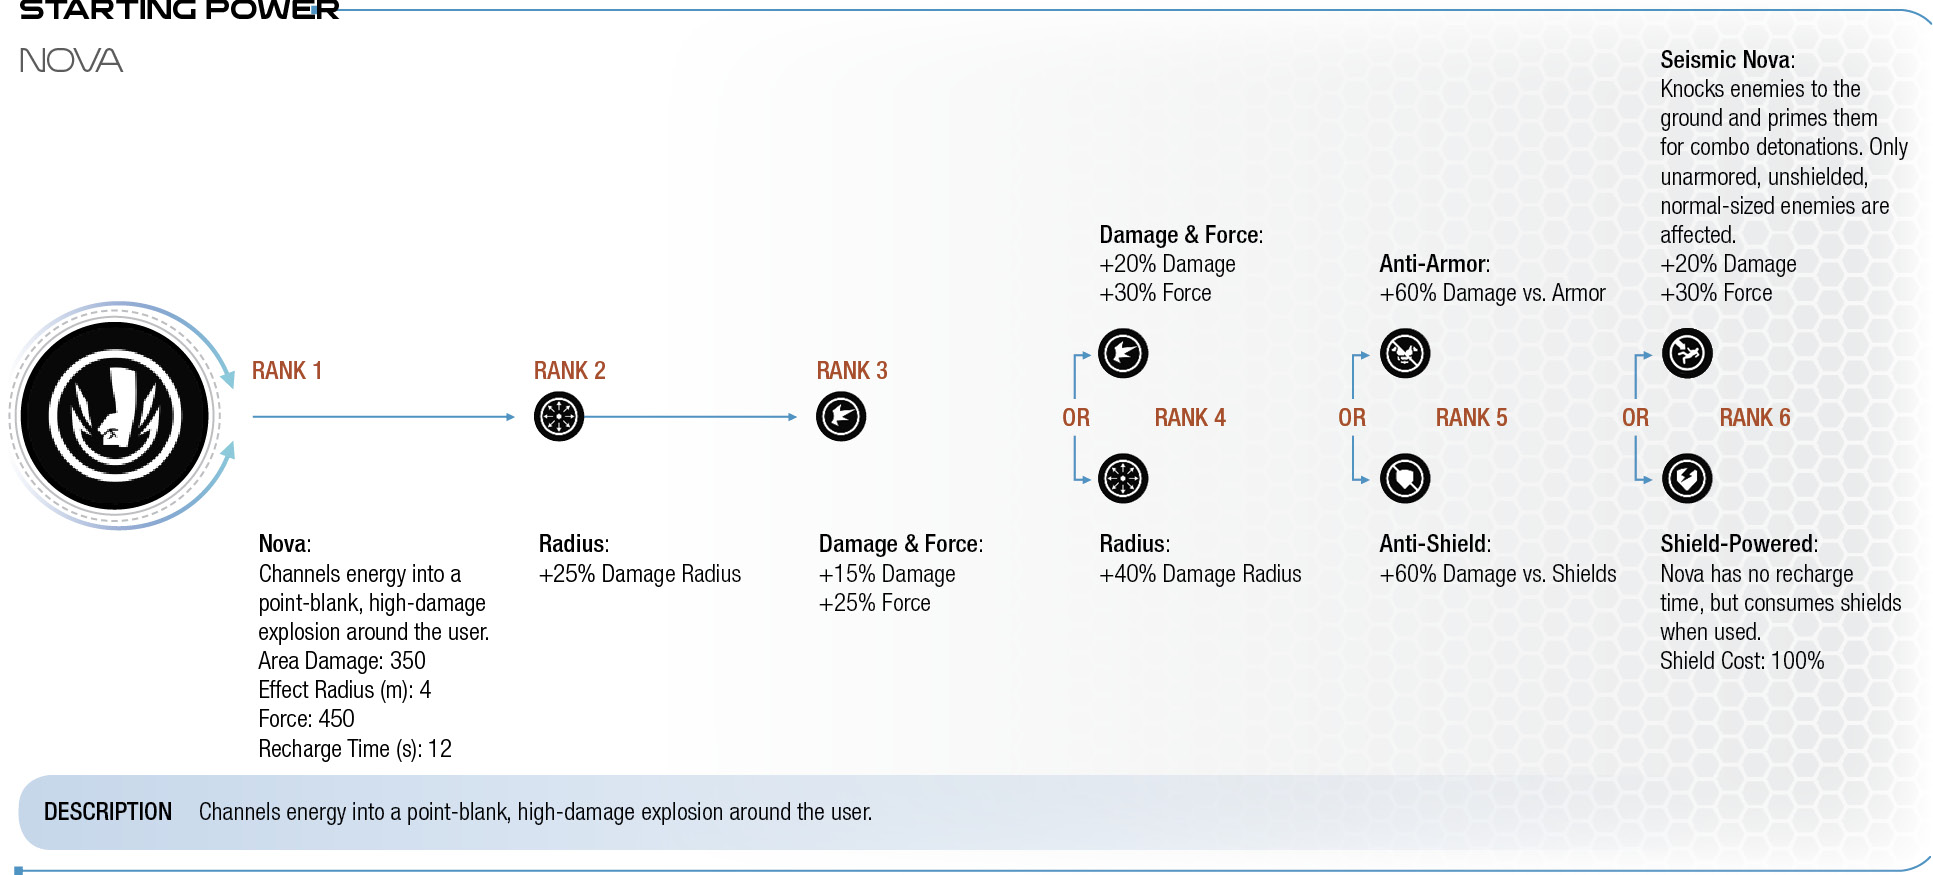
Description
Channels energy into a point-blank, high-damage explosion around the user.
Shockwave
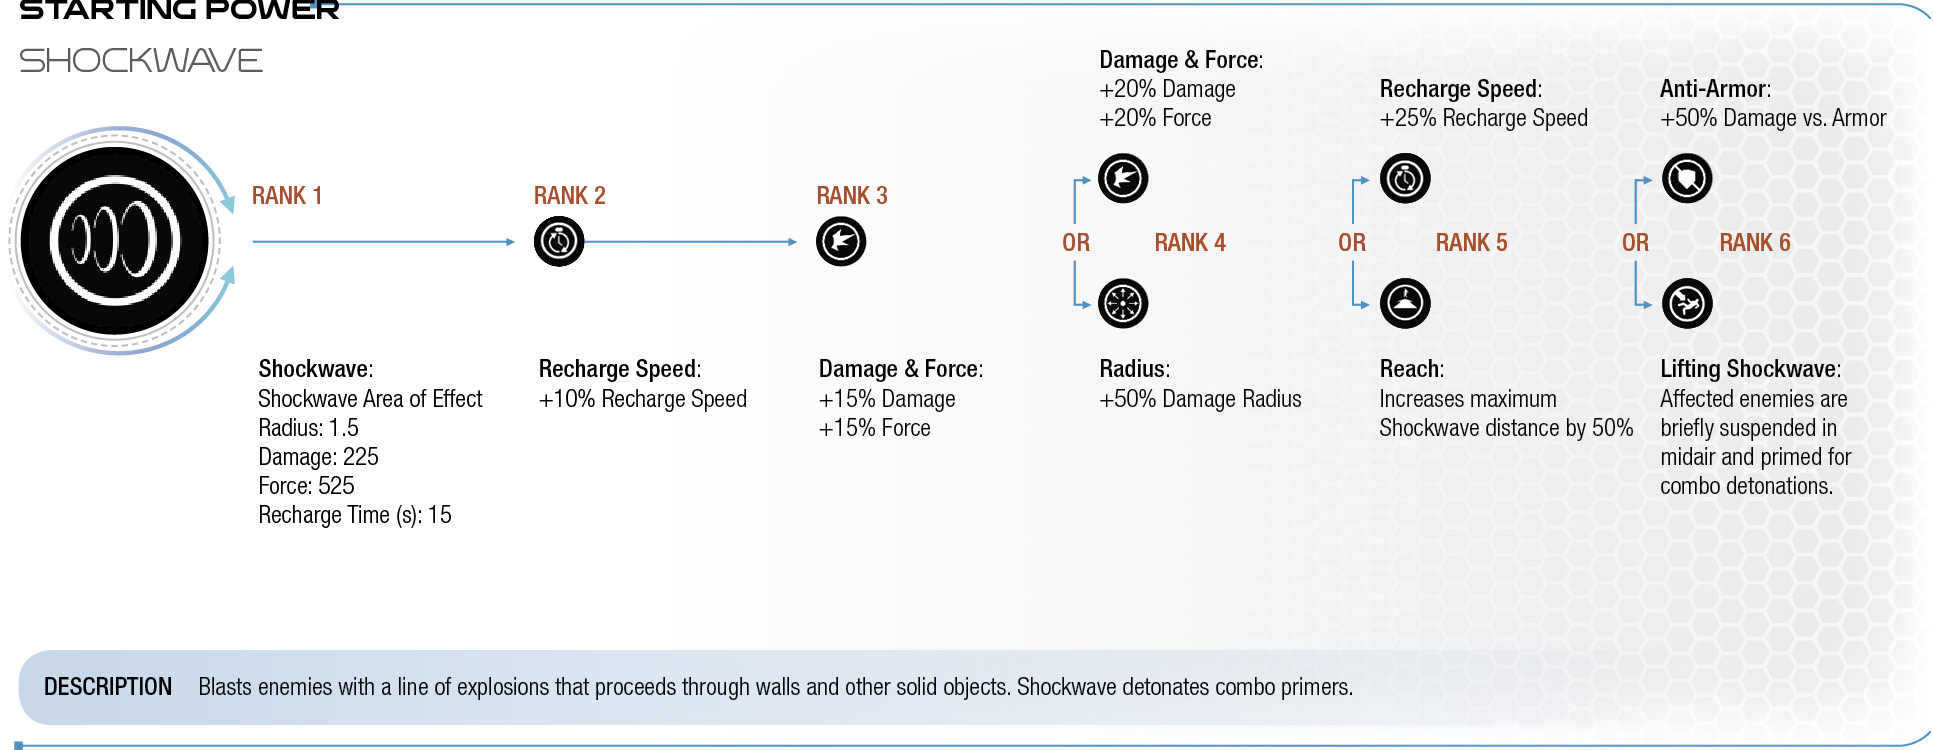
Description
Blasts enemies with a line of explosions that proceeds through walls and other solid objects. Shockwave detonates combo primers.
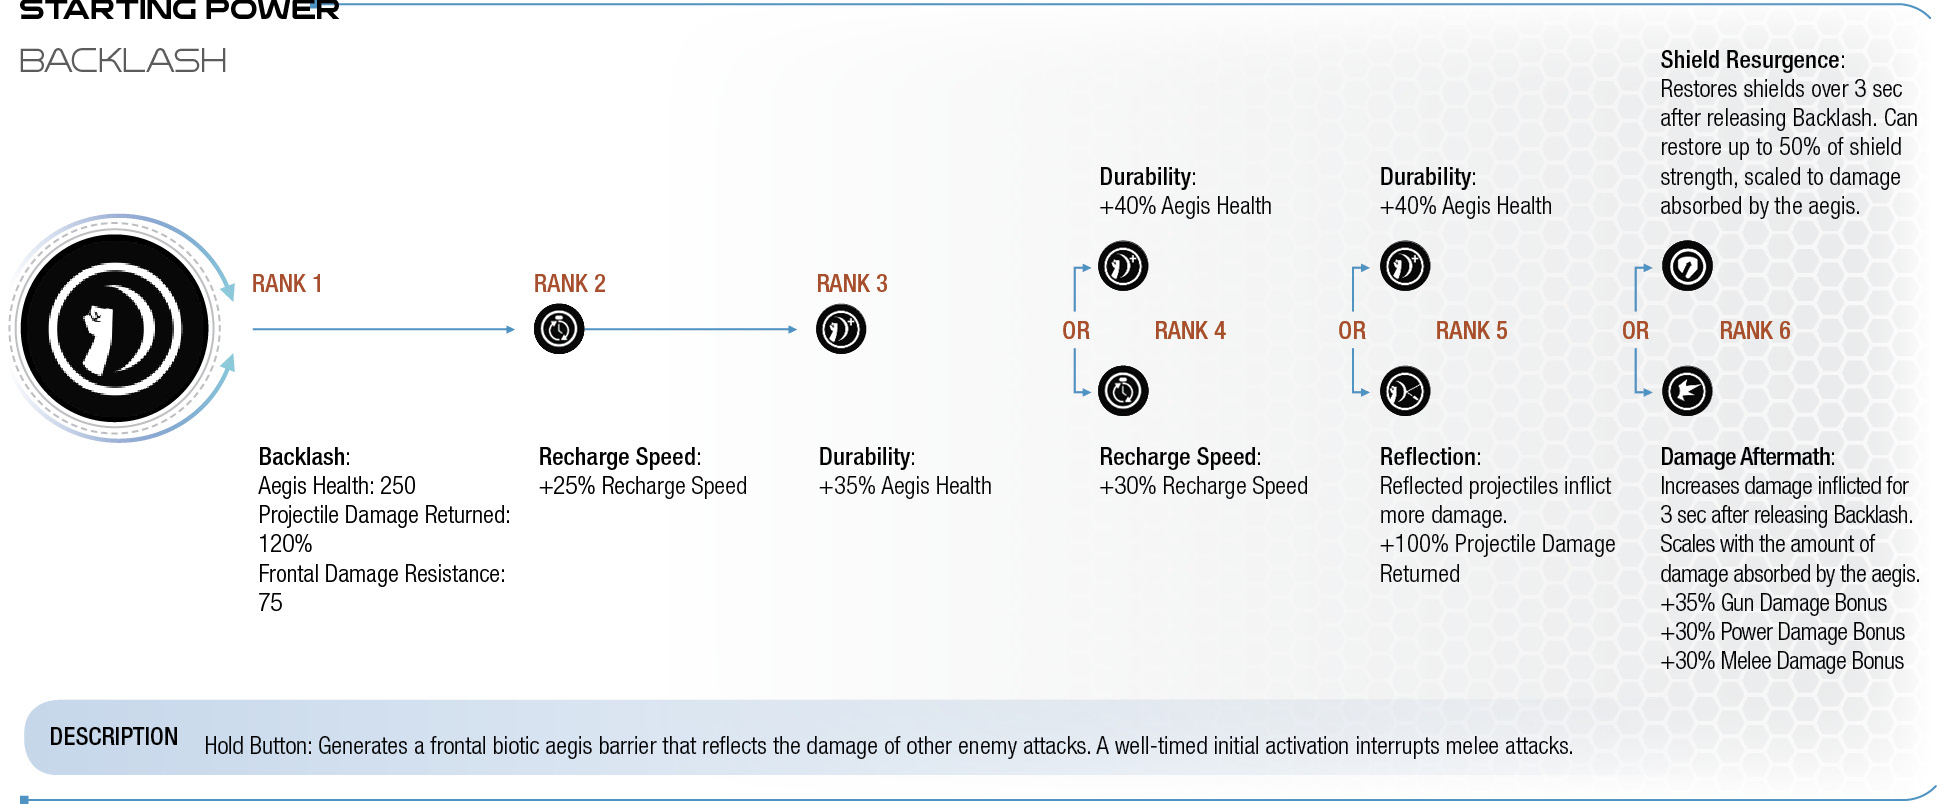
Backlash
Description
Hold Button: Generates a frontal biotic aegis barrier that reflects the damage of other enemy attacks. A well-timed initial activation interrupts melee attacks.
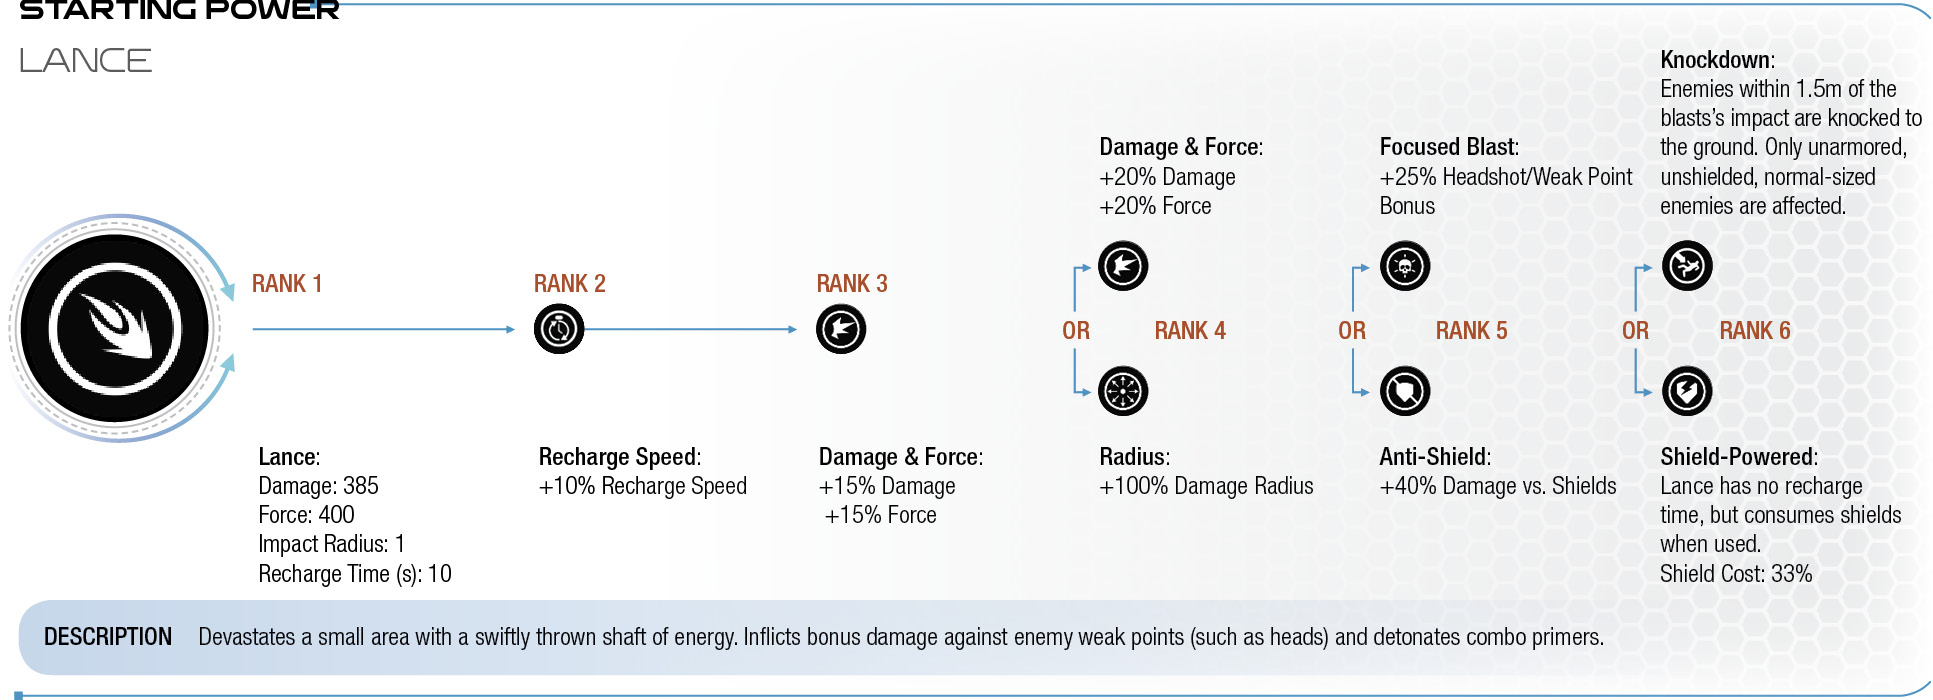
Lance
Description
Devastates a small area with a swiftly thrown shaft of energy. Inflicts bonus damage against enemy weak points (such as heads) and detonates combo primers.
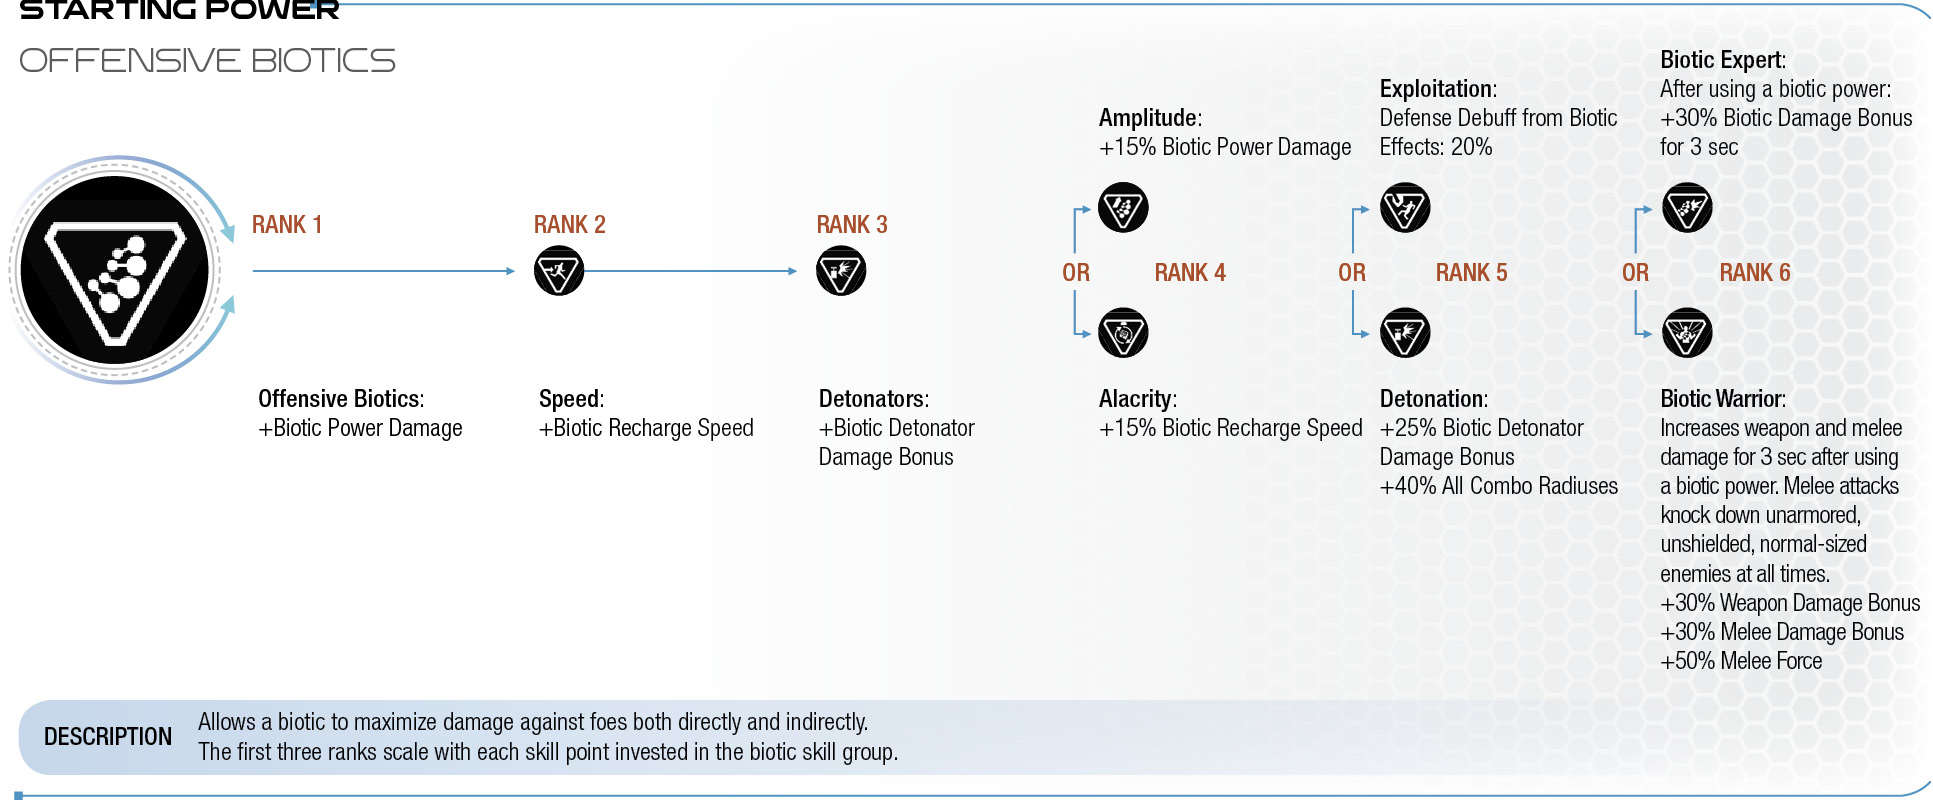
Offensive Biotics
Description
Allows a biotic to maximize damage against foes both directly and indirectly.
The first three ranks scale with each skill point invested in the biotic skill group.
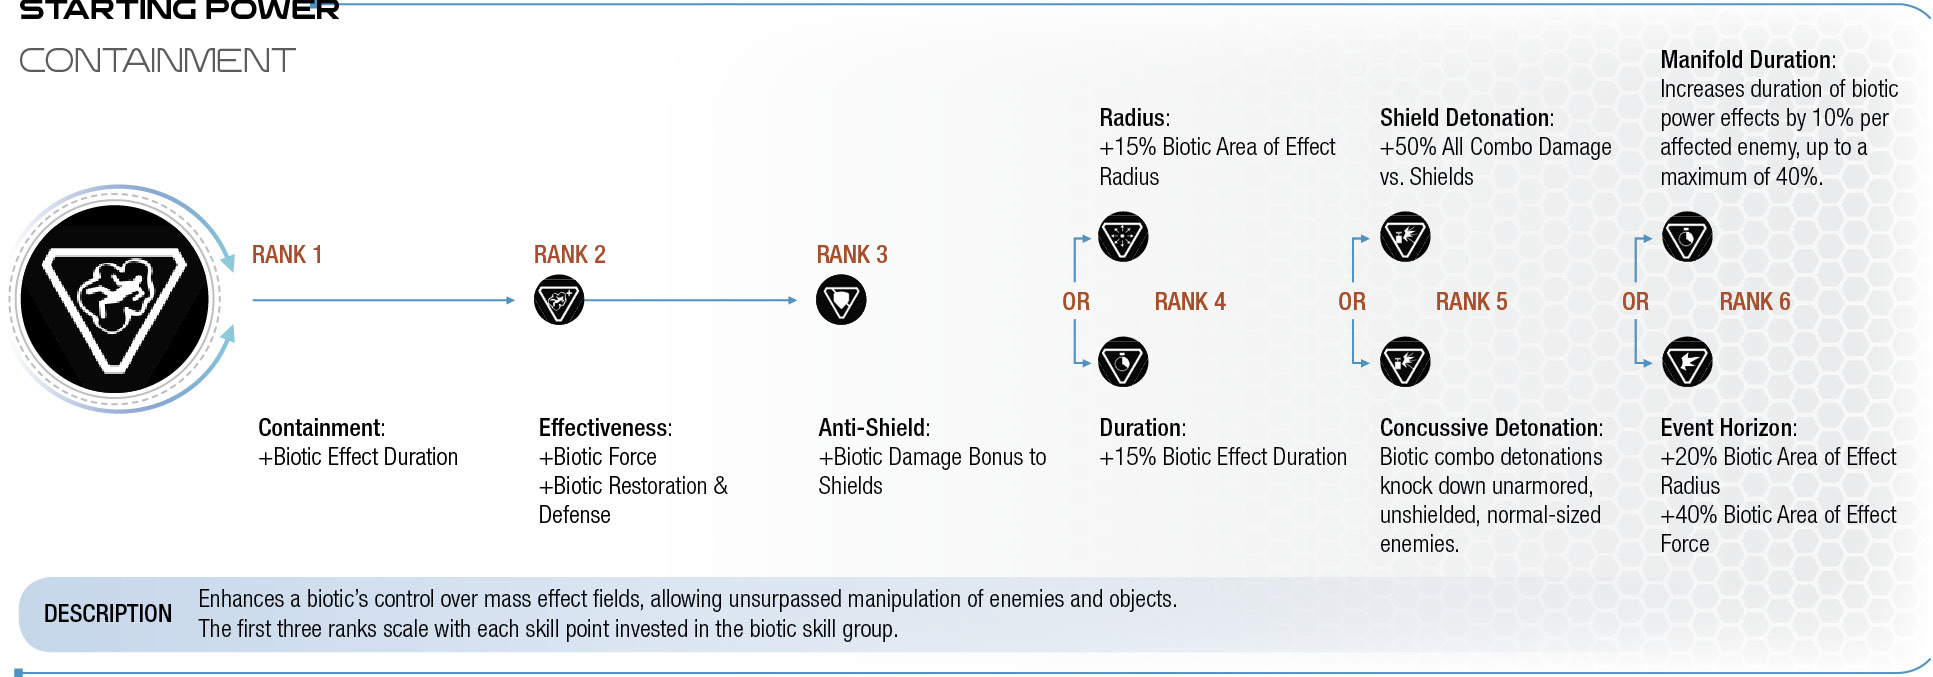
Containment
Description
Enhances a biotic’s control over mass effect fields, allowing unsurpassed manipulation of enemies and objects.
The first three ranks scale with each skill point invested in the biotic skill group.
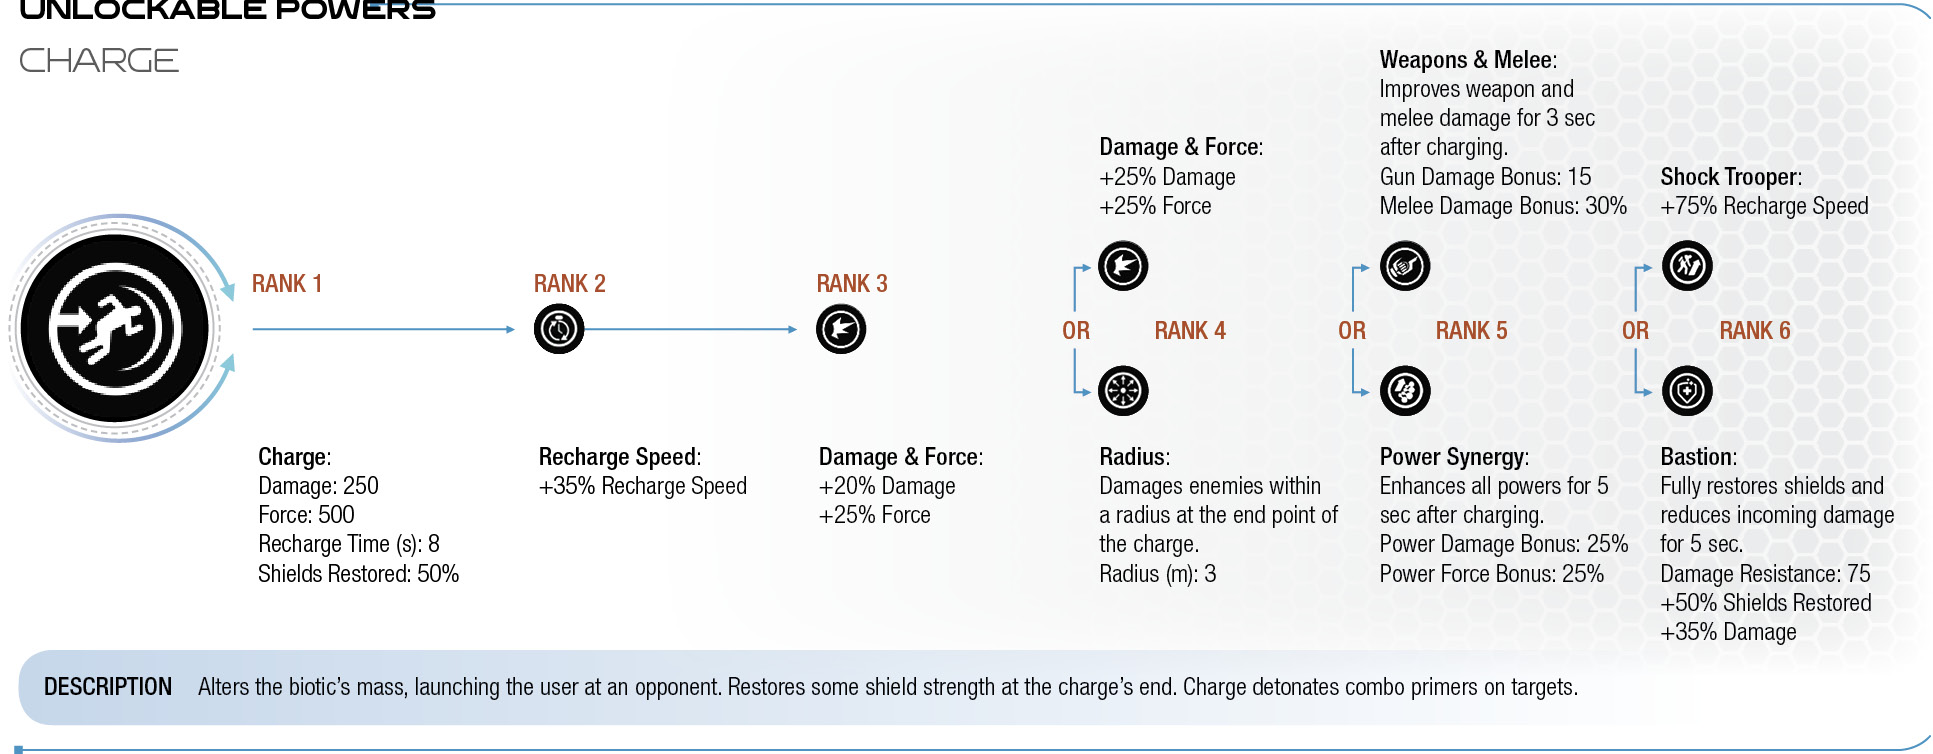
Charge
Description
Alters the biotic’s mass, launching the user at an opponent. Restores some shield strength at the charge’s end. Charge detonates combo primers on targets.
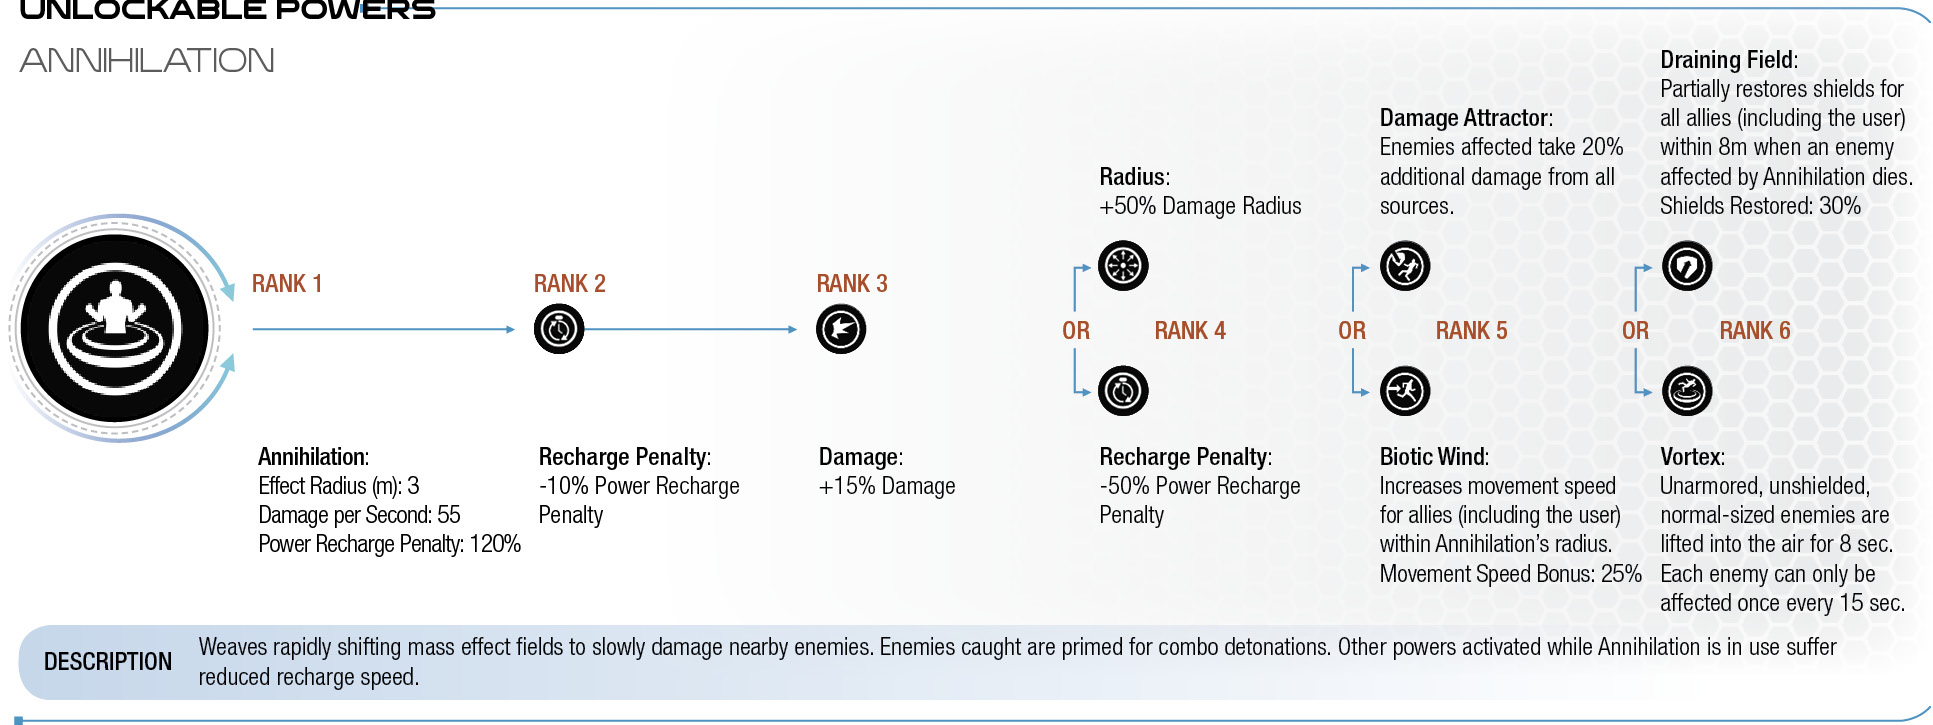
Annihilation
Description
Weaves rapidly shifting mass effect fields to slowly damage nearby enemies. Enemies caught are primed for combo detonations. Other powers activated while Annihilation is in use suffer reduced recharge speed.
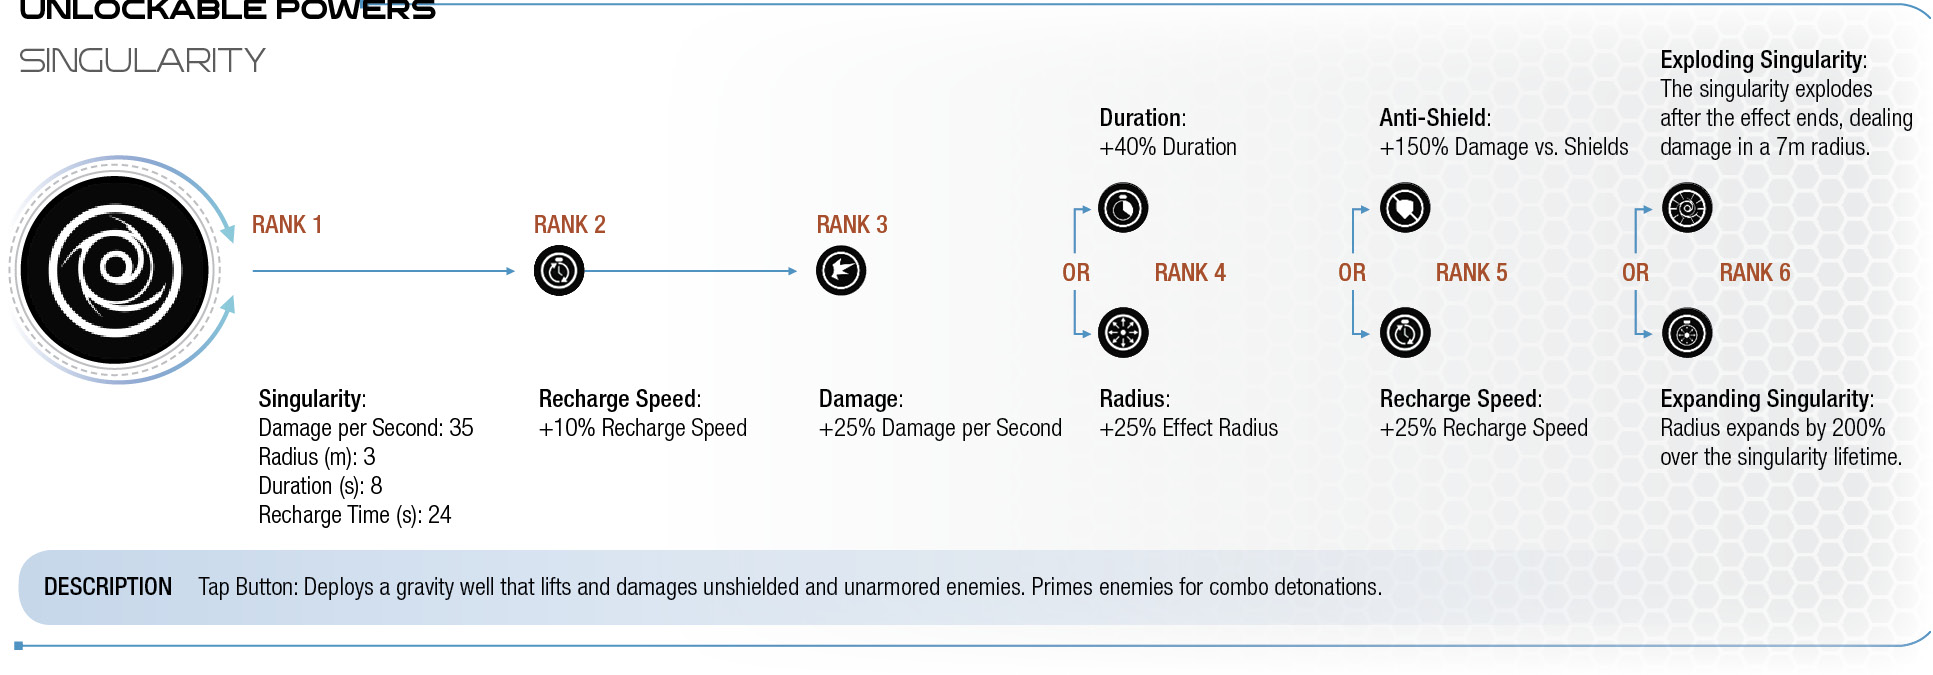
Singularity
Description
Tap Button: Deploys a gravity well that lifts and damages unshielded and unarmored enemies. Primes enemies for combo detonations.
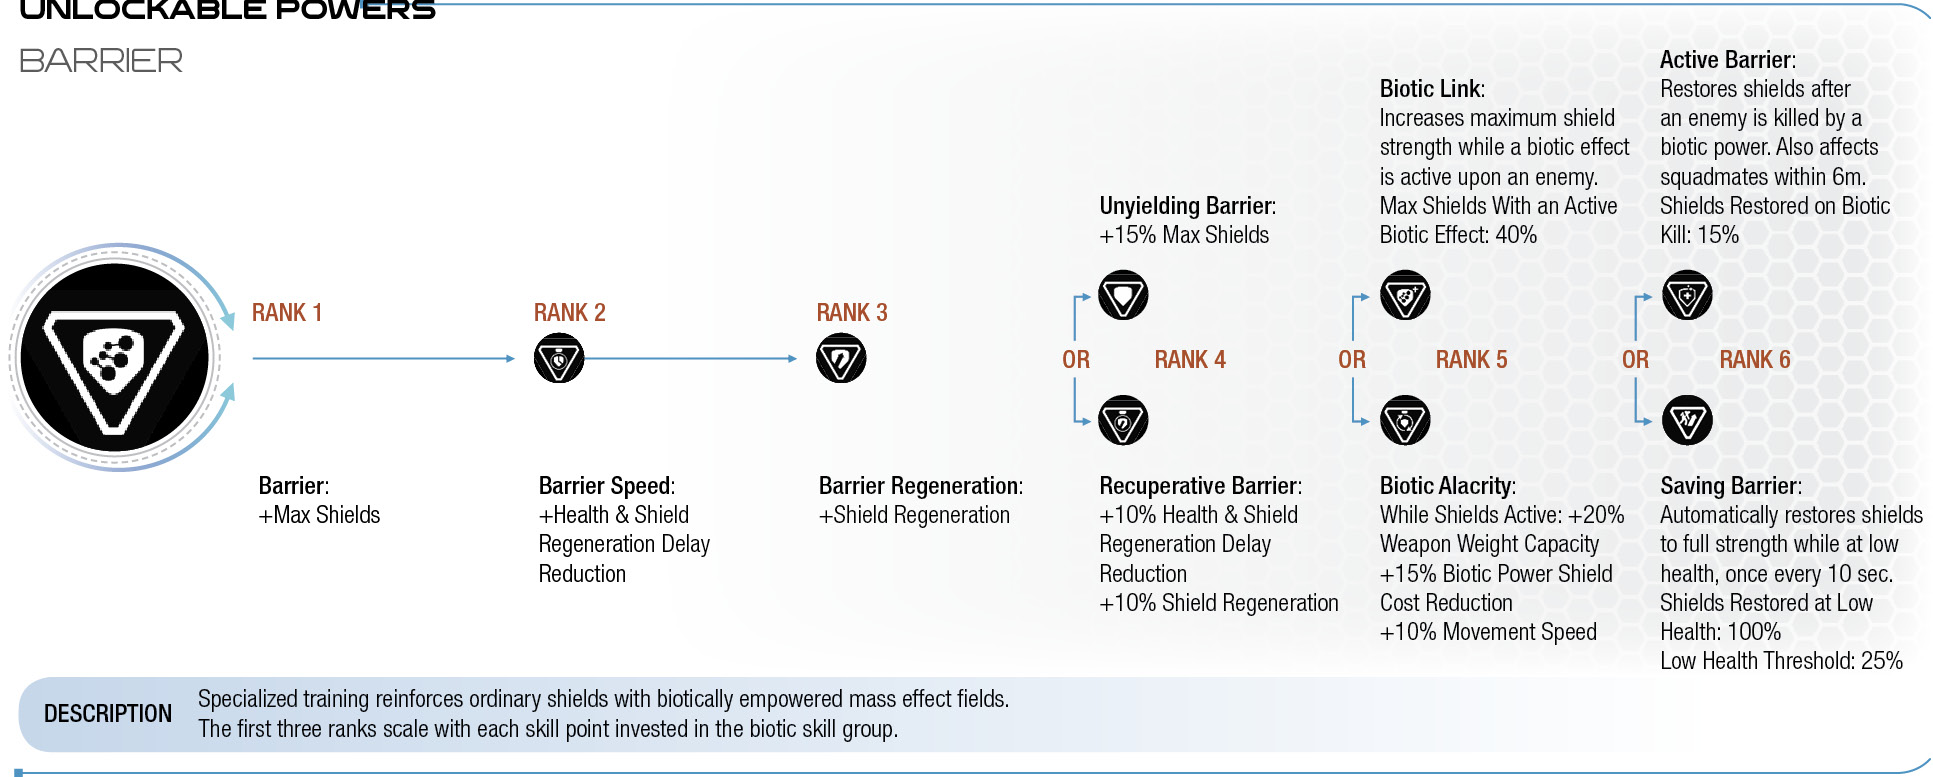
Barrier
Description
Specialized training reinforces ordinary shields with biotically empowered mass effect fields.
The first three ranks scale with each skill point invested in the biotic skill group.
example builds and play styles
Skywalker
- Training History: Biotic
- Core Skills: Pull, Throw, Singularity, Containment
- Power Loadout: Pull, Throw, Singularity
- Recommended Weapons: Lightweight Pistols Recommended Profiles: Adept
All the core skills listed have natural synergies with each other. This build is designed to make you a master of crowd control with each power inflicting some kind of displacement effect. The active power loadout provides flexibility as well. You can either detonate your own biotic combo by using the Pull (tap) into Throw sequence, or you can use the powers methodically to remove specific foes from combat, affording your team some breathing room.
This build is recommended for those who like to set up their squadmates for success as you leave enemies dangling in the air, priming them for a detonator finish from your allies. The Radius upgrade for Pull is highly recommended for Hardcore and Insanity difficulty settings since it allows you to disable multiple unshielded foes at once to prevent becoming overwhelmed. As you accrue skill points, unlock Singularity as soon as possible to put your last power slot to use. Singularity expands your incapacitation ability and gives you another primer for Throw detonations.
Since this is a power-reliant build, limit your weapon encumbrance by carrying only one or two of your most powerful pistols. Every second of recharge speed matters!
HAM-Fisted
- Training History: Scrapper
- Core Skills: Charge, Nova, Barrier, Shotguns, Trip Mine OR Omni Grenade
- Power Loadout: Charge, Nova, Trip Mine OR Omni Grenade
- Recommended Weapons: Melee, Shotguns
- Recommended Profiles: Vanguard
Charge and Nova are made for each other and allow for an extremely aggressive (and perhaps dangerous) style of play. Barrier is essential here since you can expect to take heavy fire as you draw attention to yourself with Charge. You can opt to put a point into Omni Grenade early on to fill in your third power as a solid cover-flushing tool.
Your approach with this setup is cut-and-dry: Go in hard with Charge, then follow up with an explosive Nova, damaging and dispersing enemies around you. Alternatively, you can stay within range to maul your victims with an omni-blade or krogan hammer (if you’re lucky enough to find one). Additionally, unlocking the Vanguard profile greatly increases your survivability, providing a shield-siphoning effect to your melee weapon.
While it’s a fun and exciting way to play, this build can be challenging to use on Hardcore and Insanity difficulty settings because of the amount of bonus damage enemies inflict. You can work around this with good positioning, patience, and vigilant squad management. Try to lure out and isolate enemies before committing to a Charge. You may also need to use defensive consumables like Shield Capacitor.
Tech
Tech specializations can vary since the active powers significantly differ from one another. The unique elemental properties of the primary tech powers (e.g., Incinerate, Overload, and Cryo Beam) make them attractive complementary powers to include in combat- and biotic-focused builds. Taking the Overload power is a no-brainer when playing on Hardcore and Insanity, considering how frustrating it is to tackle shielded enemies without it.
Strengths:
- Tech specialists are suited for taking down specific enemy types with ease.
- Overload is extremely powerful against synthetics and shielded enemies.
- Incinerate and Flamethrower can swiftly eliminate dangerous armored foes such as Fiends.
- Tactical Cloak and Energy Drain offer high survivability, allowing for stealthy sniper play.
- Tech is the only specialization with the ability to create an additional target for enemies to deal with.
Weaknesses:
- Tech powers feature long recharge times, exacerbated by weapon choice.
- Tech specialists require careful positioning without Tactical Cloak.
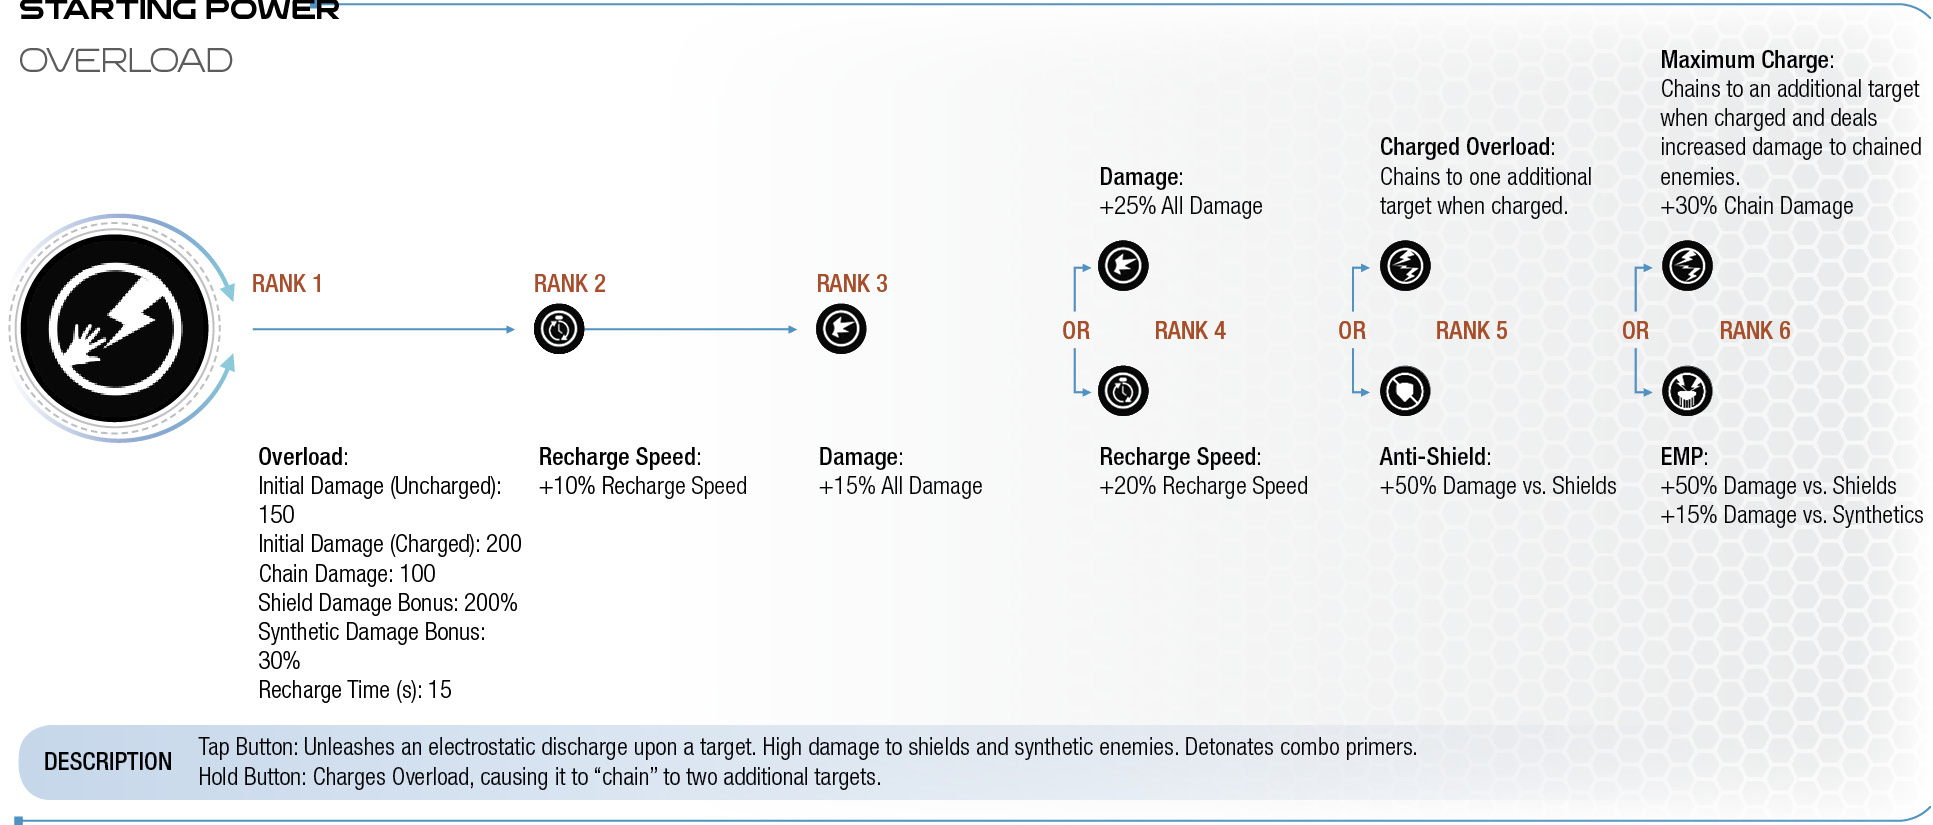
Overload
Description
Tap Button: Unleashes an electrostatic discharge upon a target. High damage to shields and synthetic enemies. Detonates combo primers.
Hold Button: Charges Overload, causing it to “chain” to two additional targets.
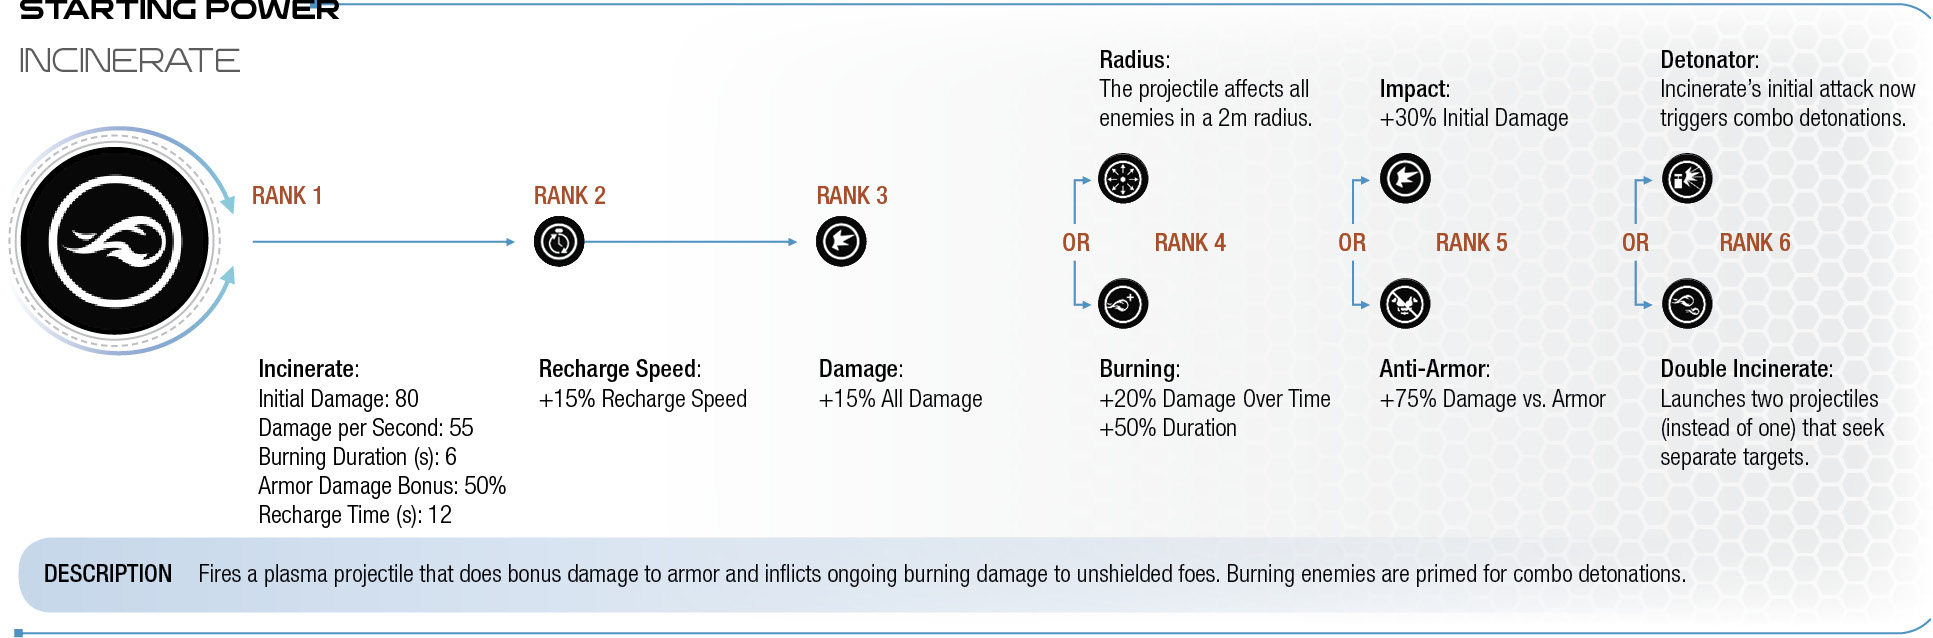
Incinerate
Description
Fires a plasma projectile that does bonus damage to armor and inflicts ongoing burning damage to unshielded foes. Burning enemies are primed for combo detonations.
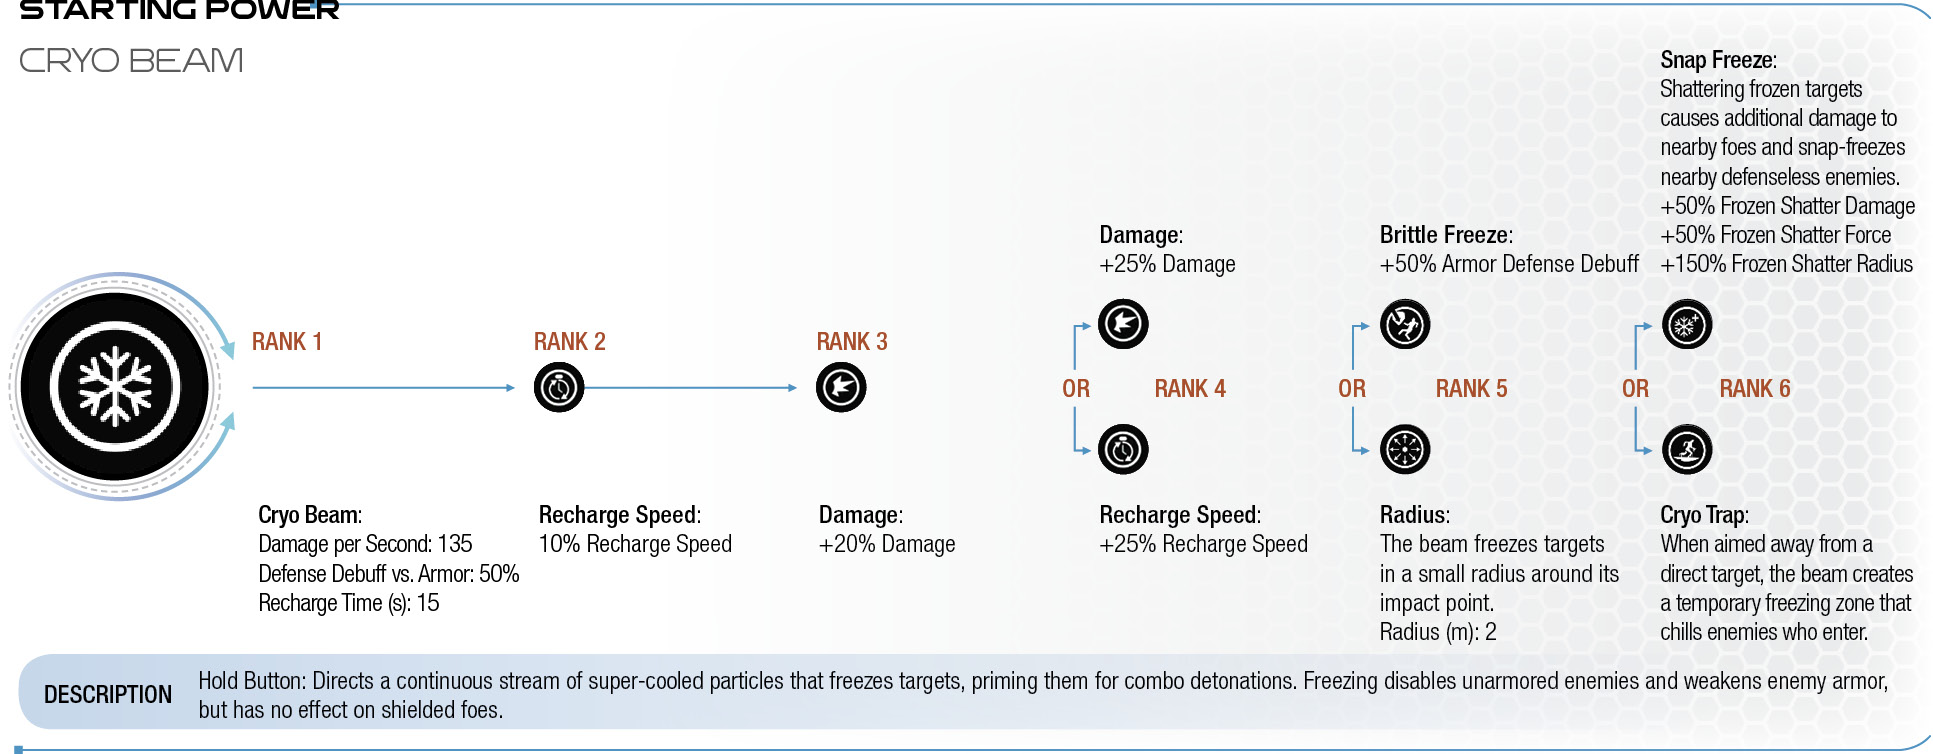
Cryo Beam
Description
Hold Button: Directs a continuous stream of super-cooled particles that freezes targets, priming them for combo detonations. Freezing disables unarmored enemies and weakens enemy armor, but has no effect on shielded foes.
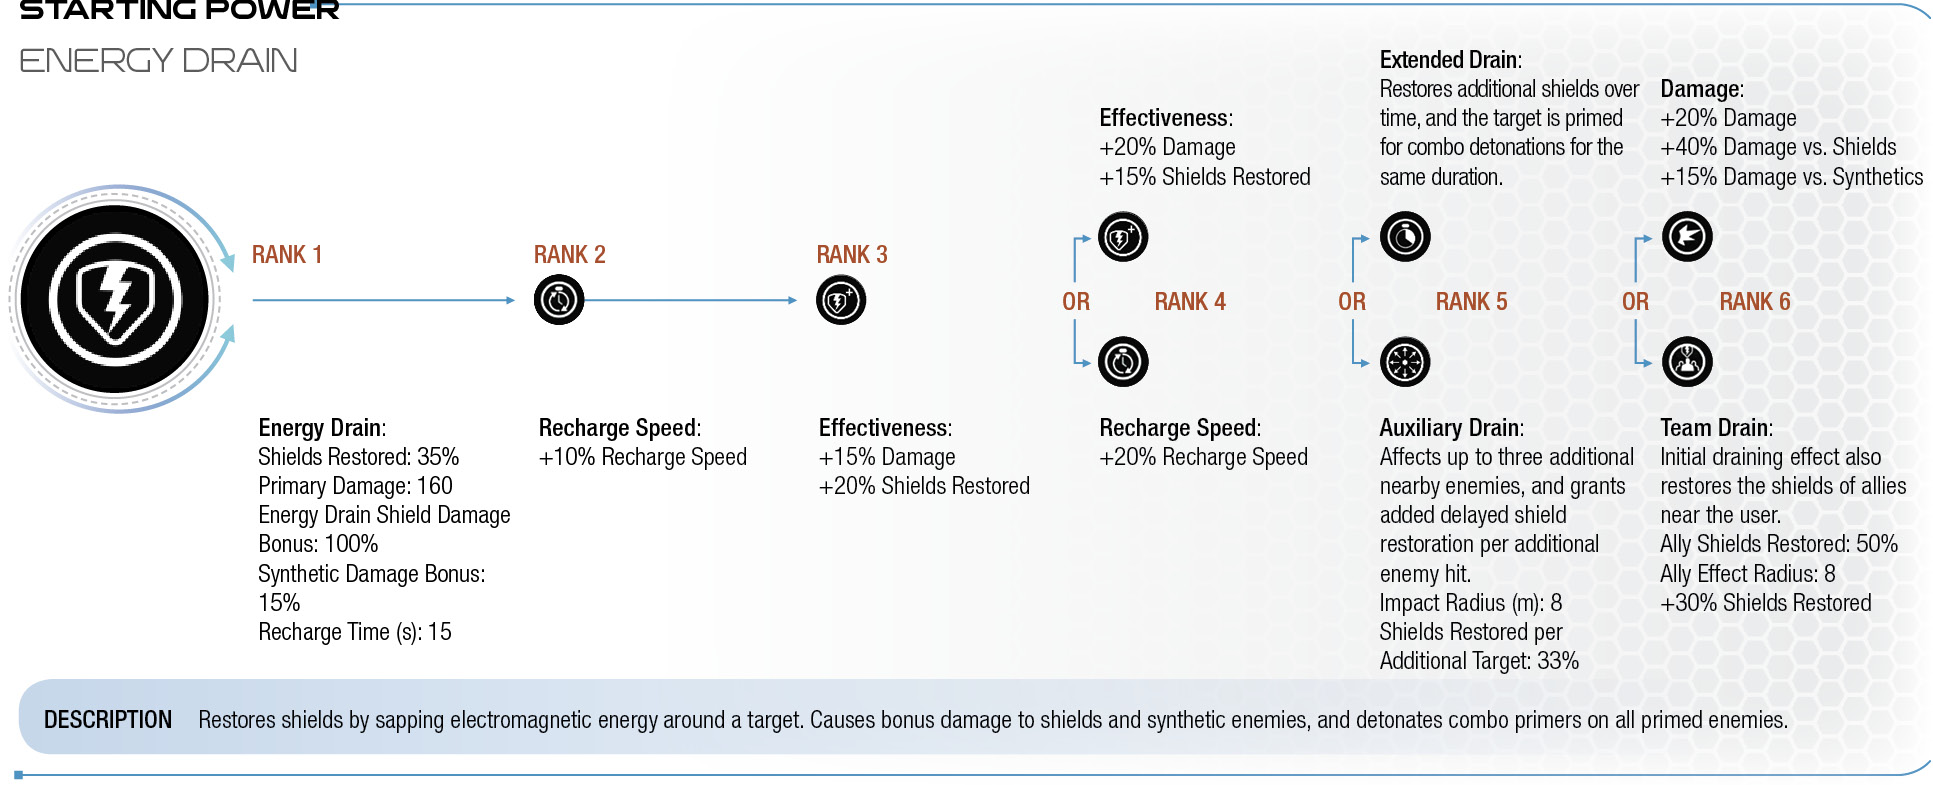
Energy Drain
Description
Restores shields by sapping electromagnetic energy around a target. Causes bonus damage to shields and synthetic enemies, and detonates combo primers on all primed enemies.
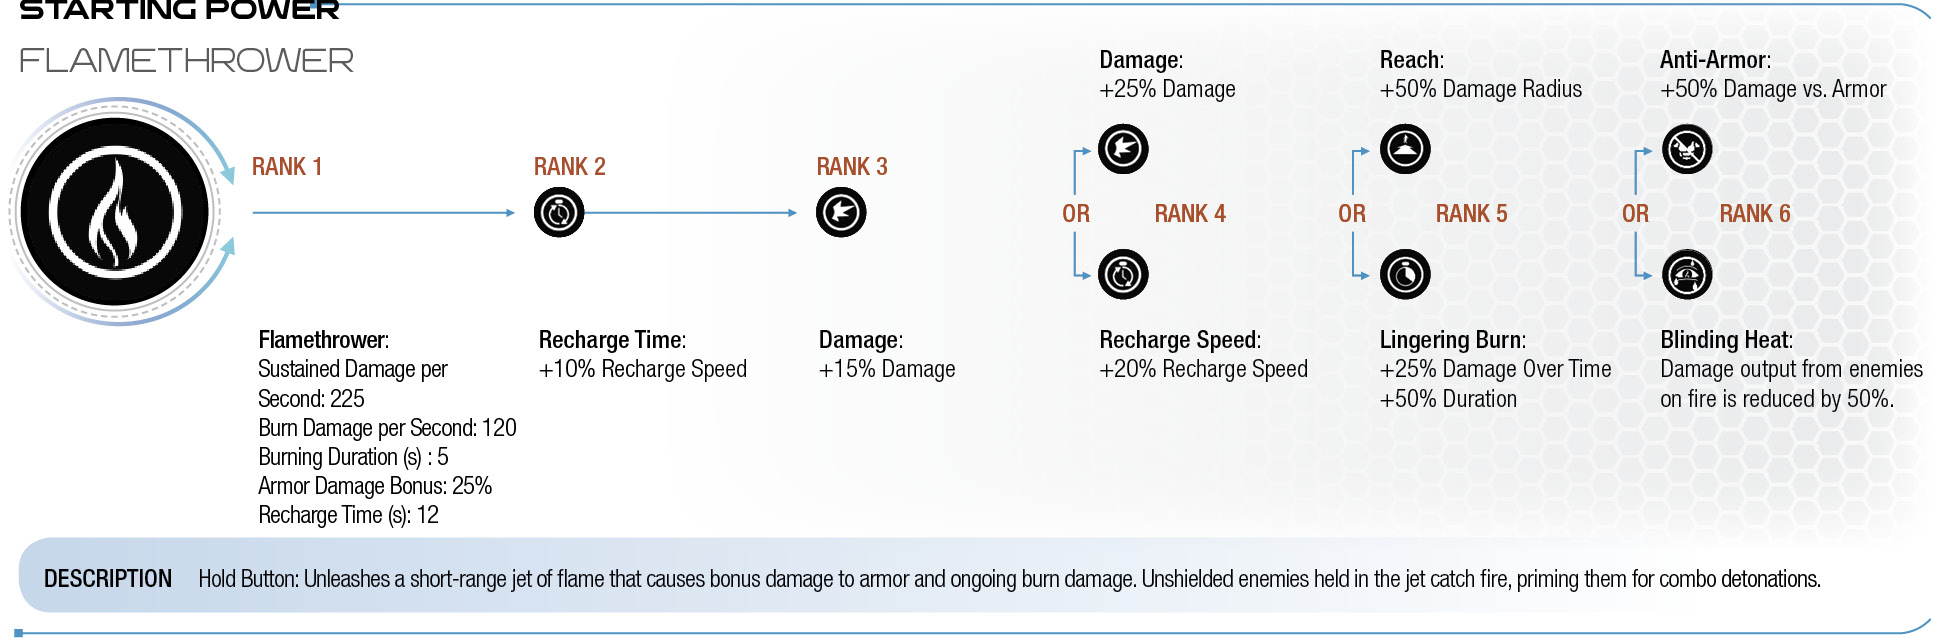
Flamethrower
Description
Hold Button: Unleashes a short-range jet of flame that causes bonus damage to armor and ongoing burn damage. Unshielded enemies held in the jet catch fire, priming them for combo detonations.
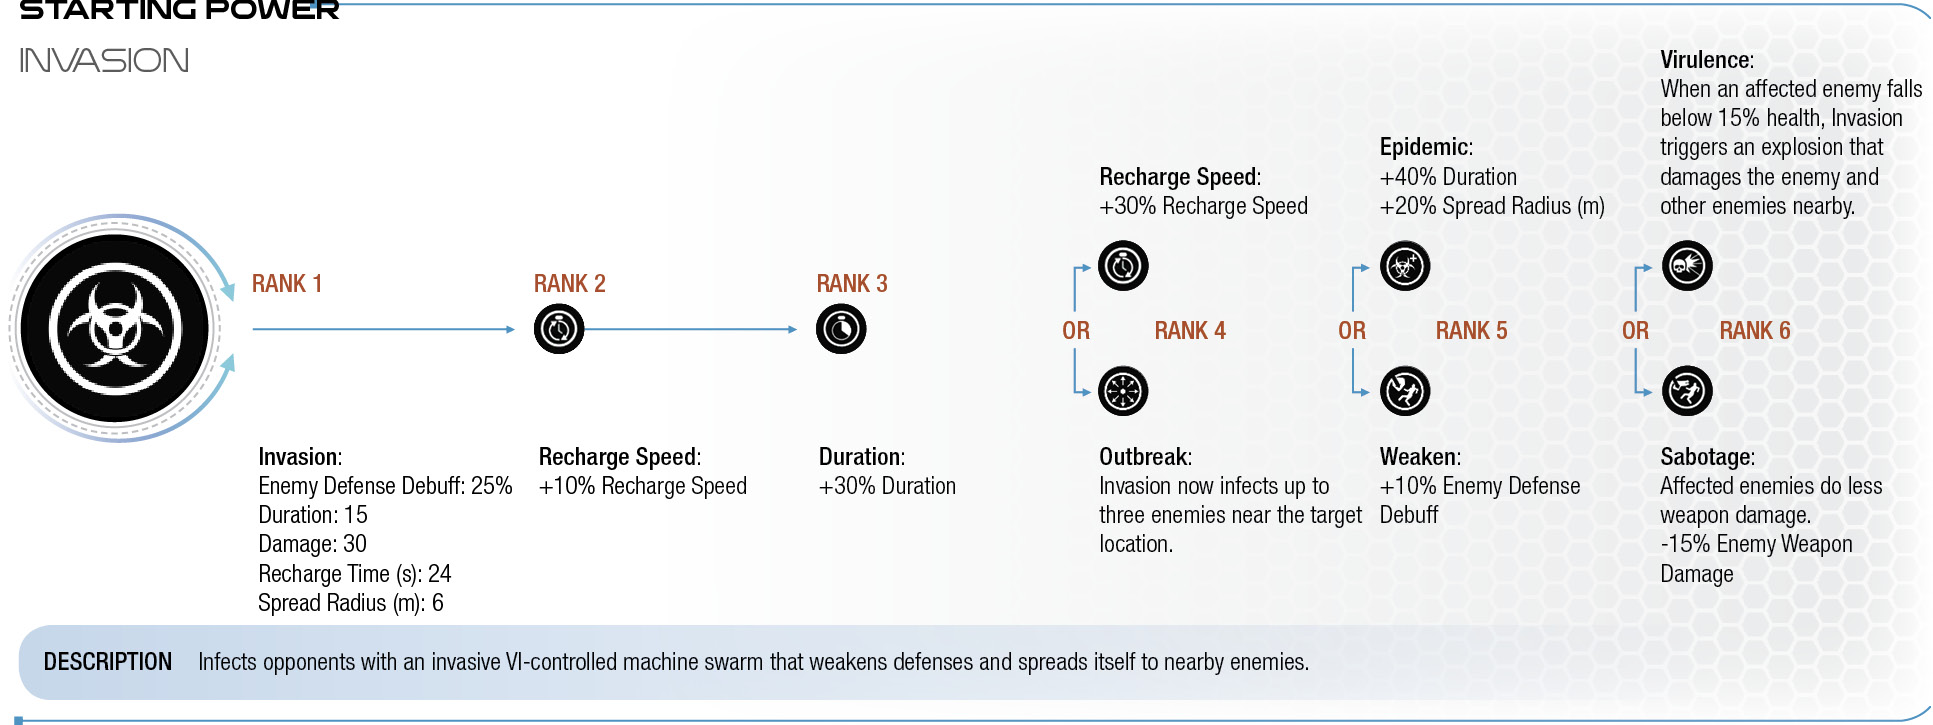
Invasion
Description
Infects opponents with an invasive VI-controlled machine swarm that weakens defenses and spreads itself to nearby enemies.
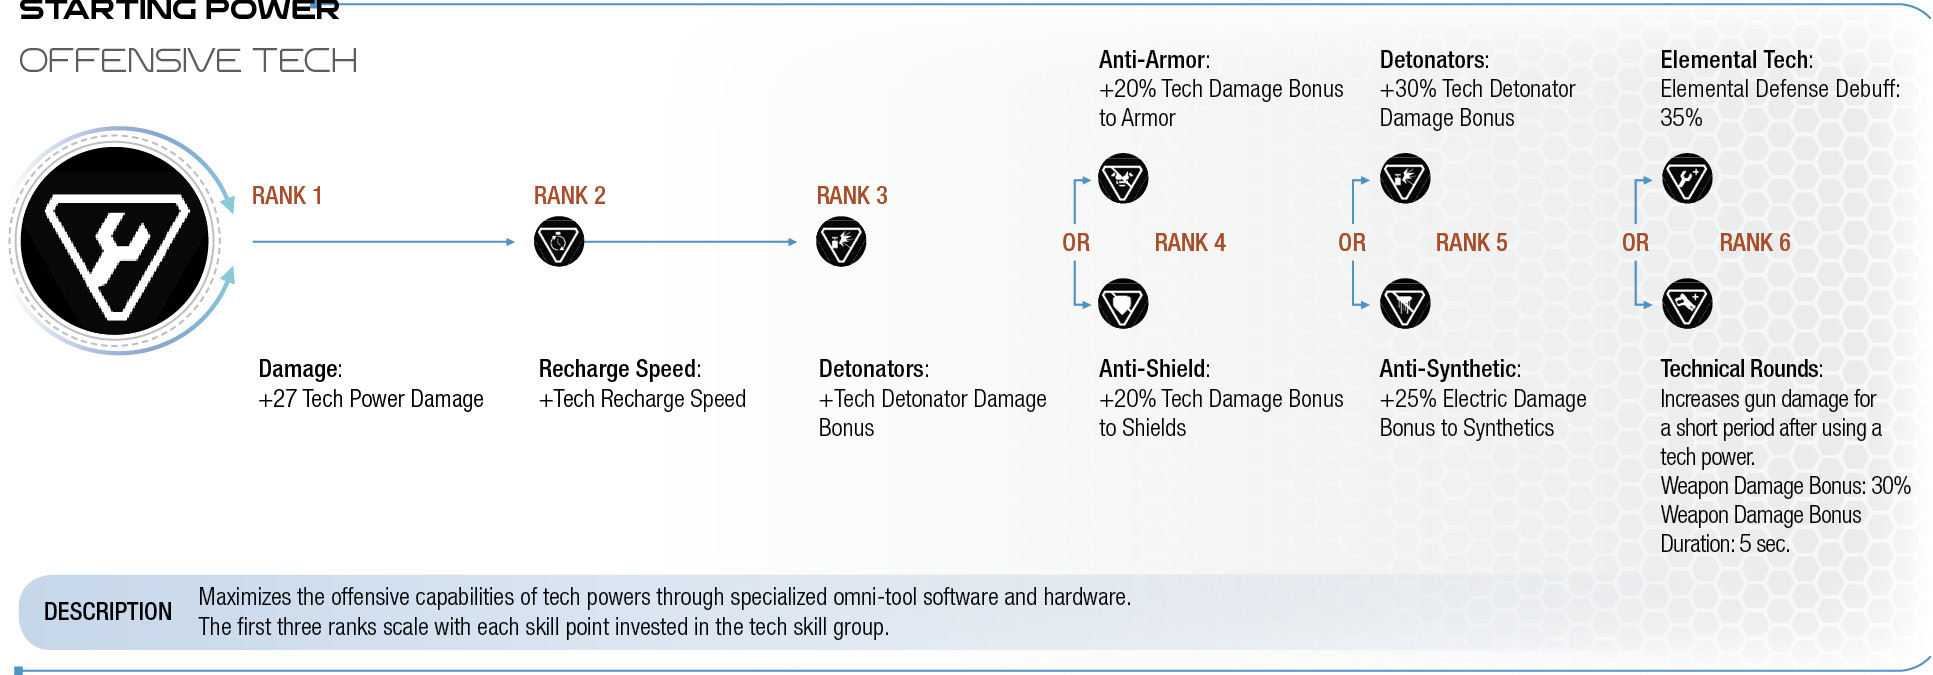
Offensive Tech
Description
Maximizes the offensive capabilities of tech powers through specialized omni-tool software and hardware.
The first three ranks scale with each skill point invested in the tech skill group.
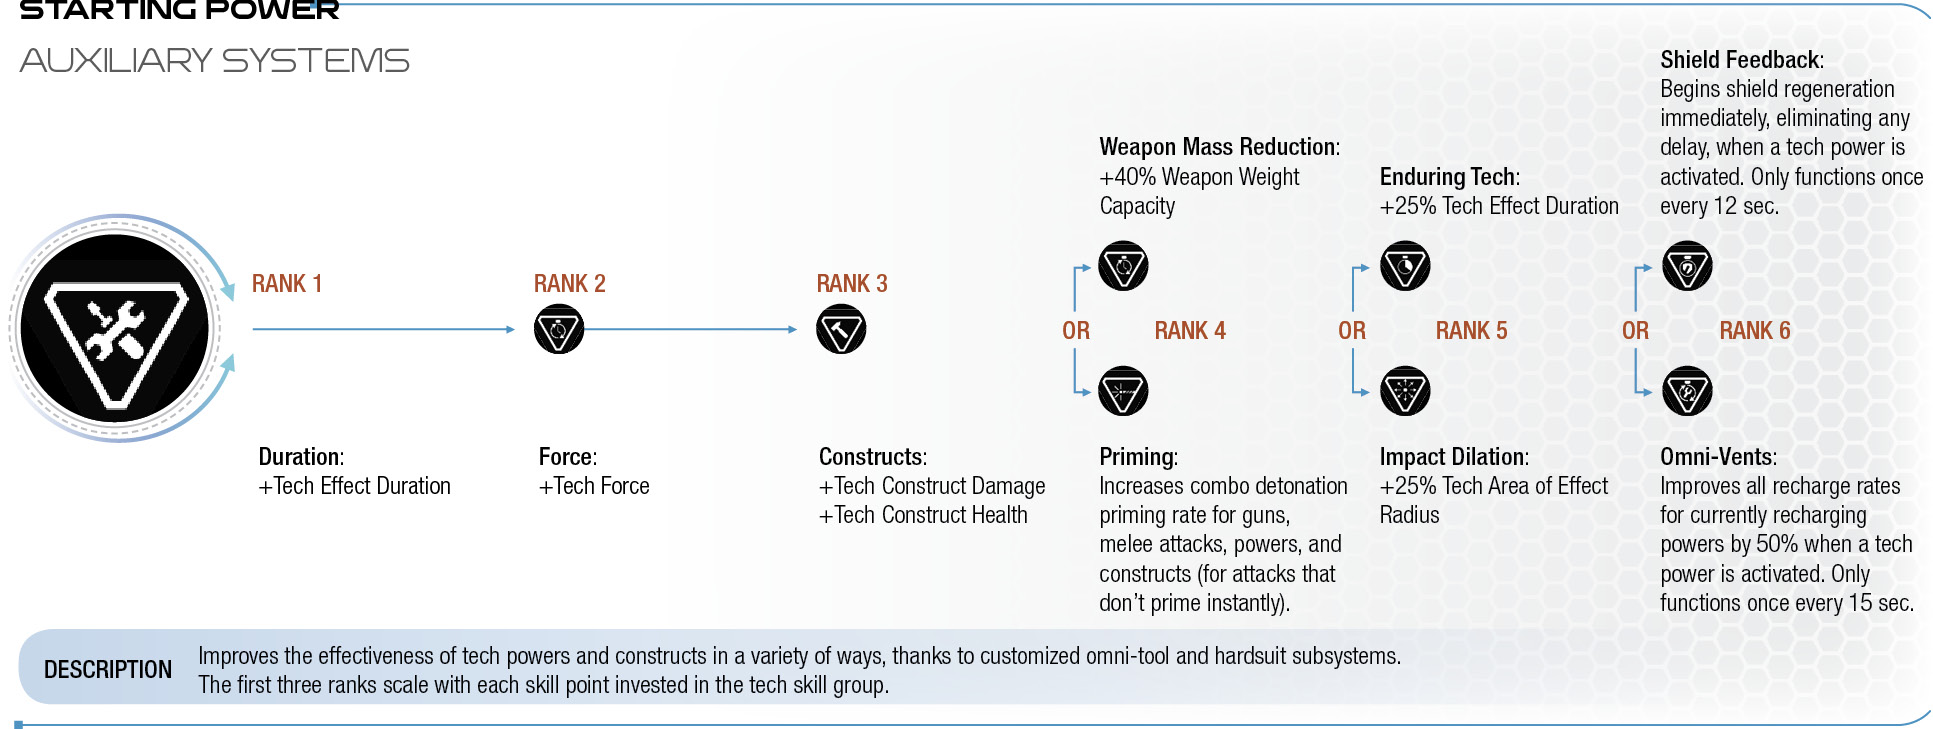
Auxiliary Systems
Description
Improves the effectiveness of tech powers and constructs in a variety of ways, thanks to customized omni-tool and hardsuit subsystems.
The first three ranks scale with each skill point invested in the tech skill group.
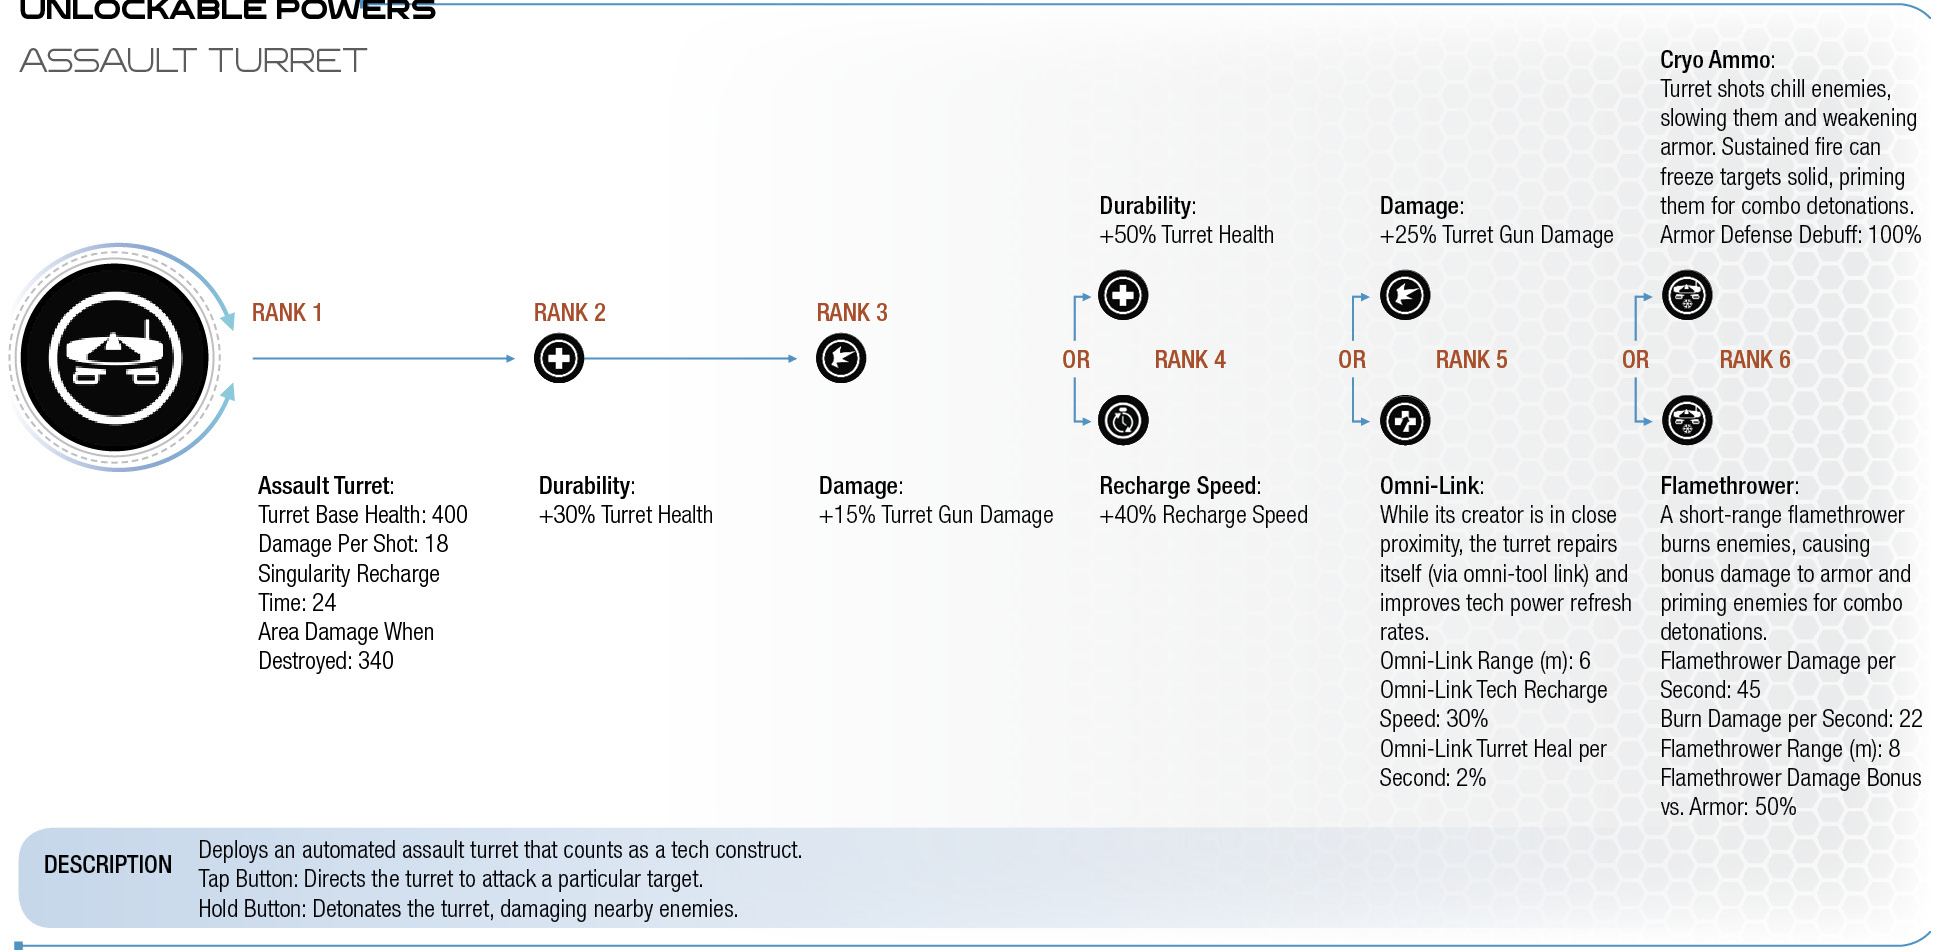
Assault Turret
Description
Deploys an automated assault turret that counts as a tech construct.
Tap Button: Directs the turret to attack a particular target.
Hold Button: Detonates the turret, damaging nearby enemies.
Tactical Cloak
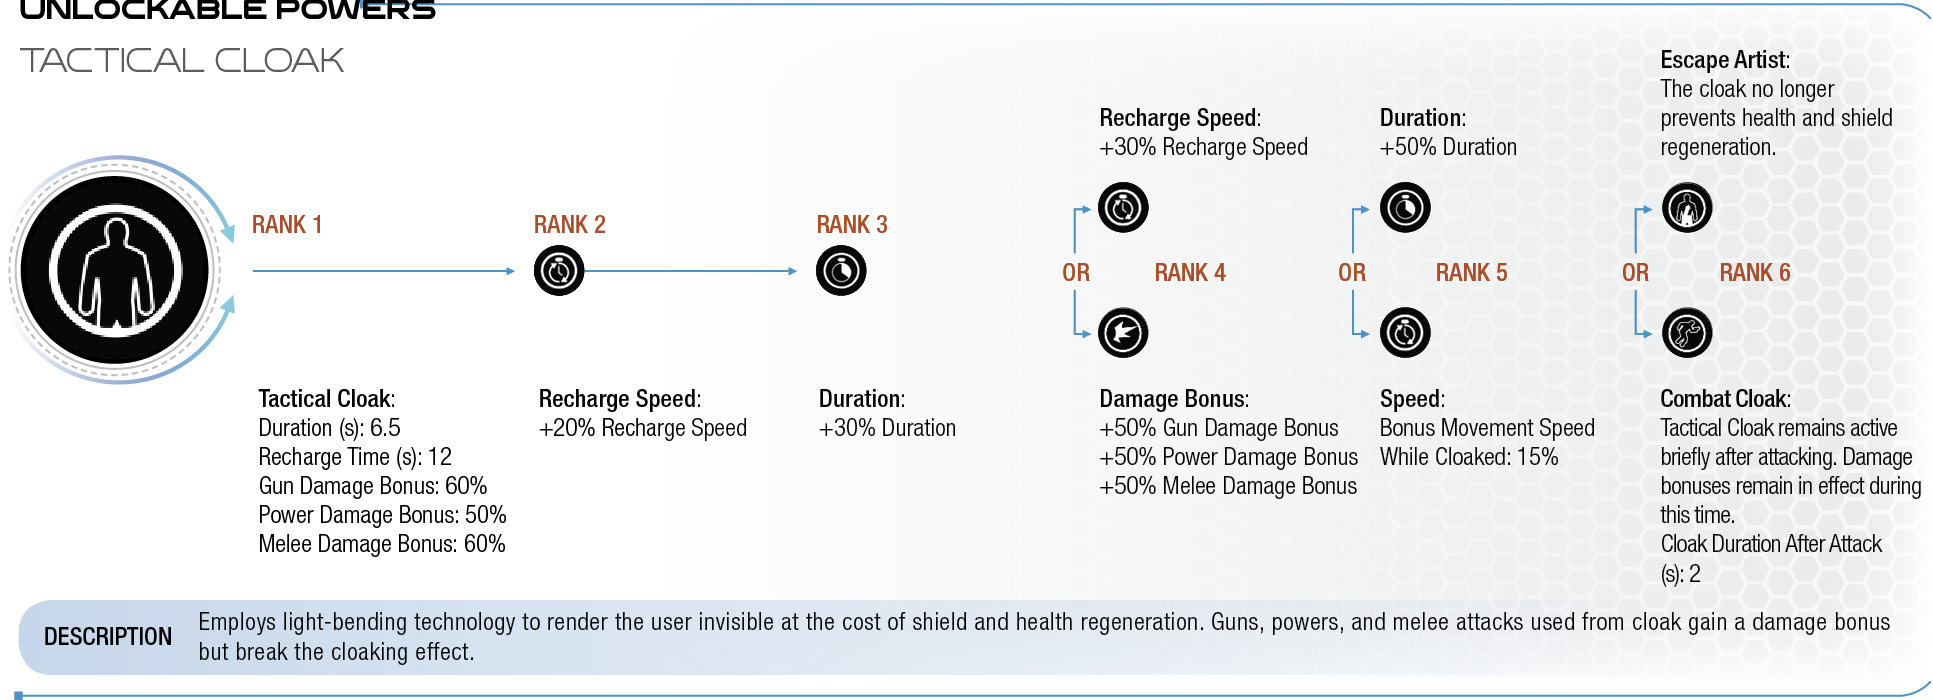
Description
Employs light-bending technology to render the user invisible at the cost of shield and health regeneration. Guns, powers, and melee attacks used from cloak gain a damage bonus but break the cloaking effect.
Remnant VI*
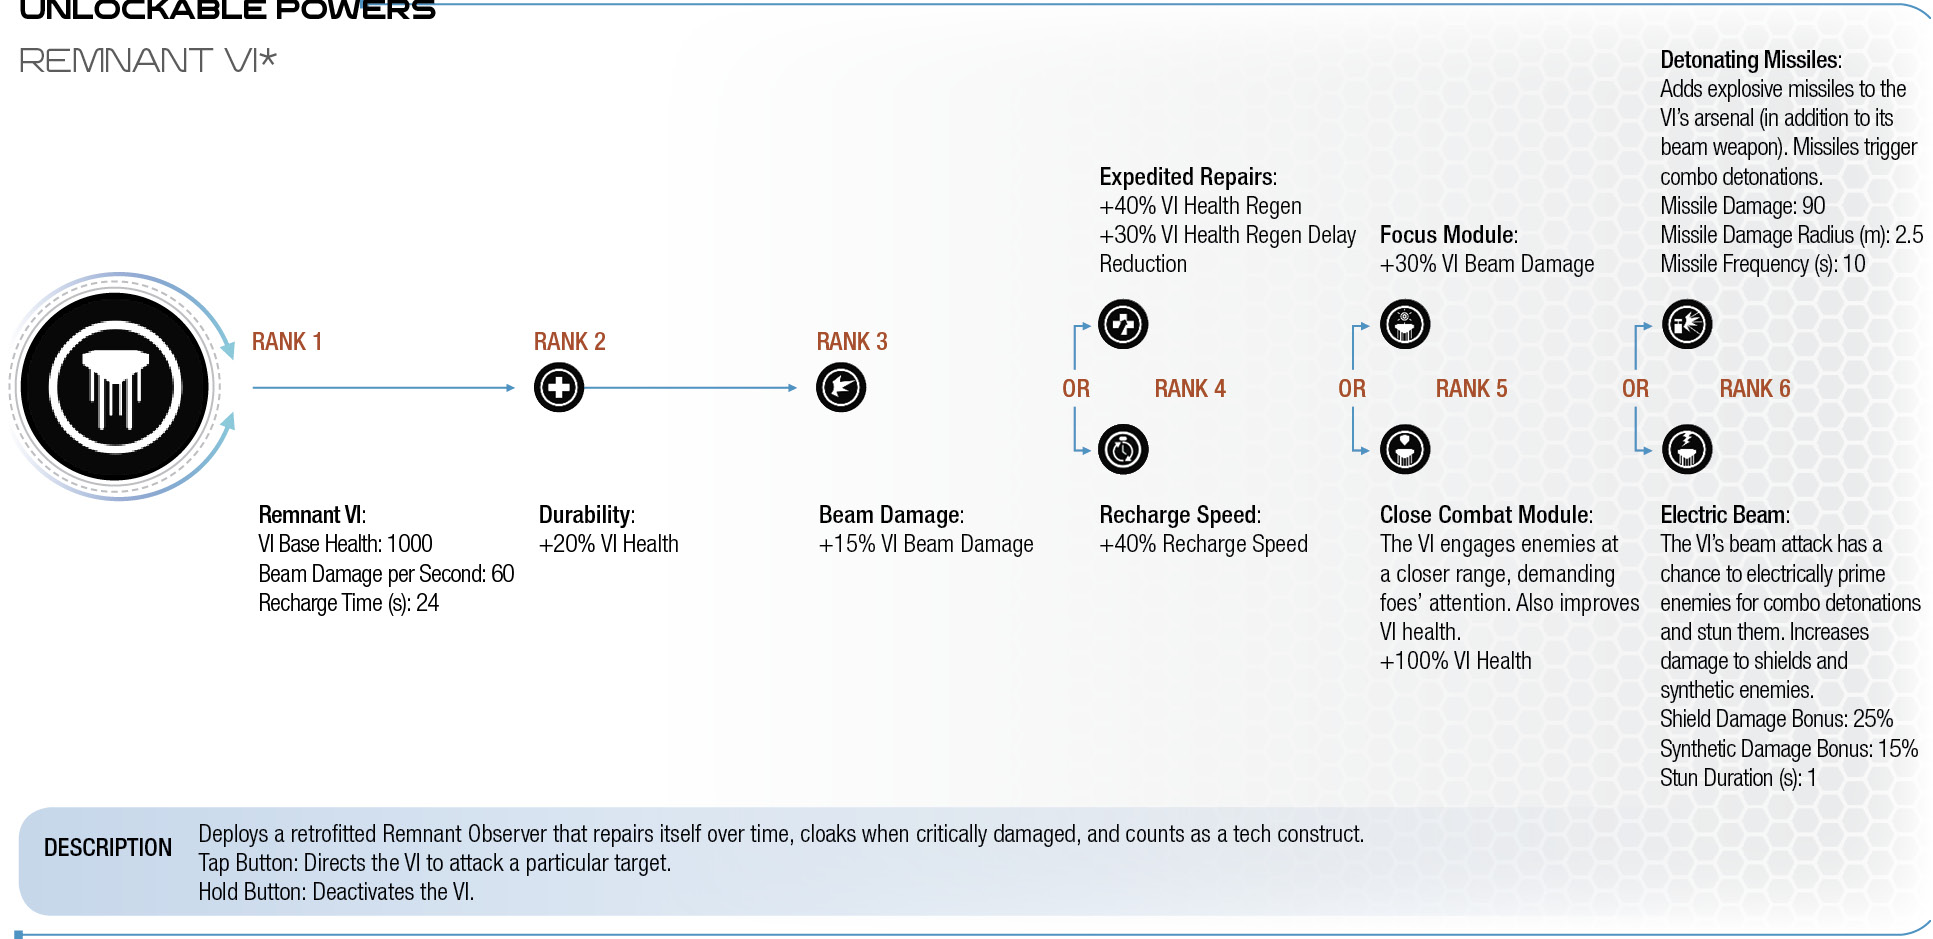
Description
Deploys a retrofitted Remnant Observer that repairs itself over time, cloaks when critically damaged, and counts as a tech construct.
Tap Button: Directs the VI to attack a particular target.
Hold Button: Deactivates the VI.
Team Support
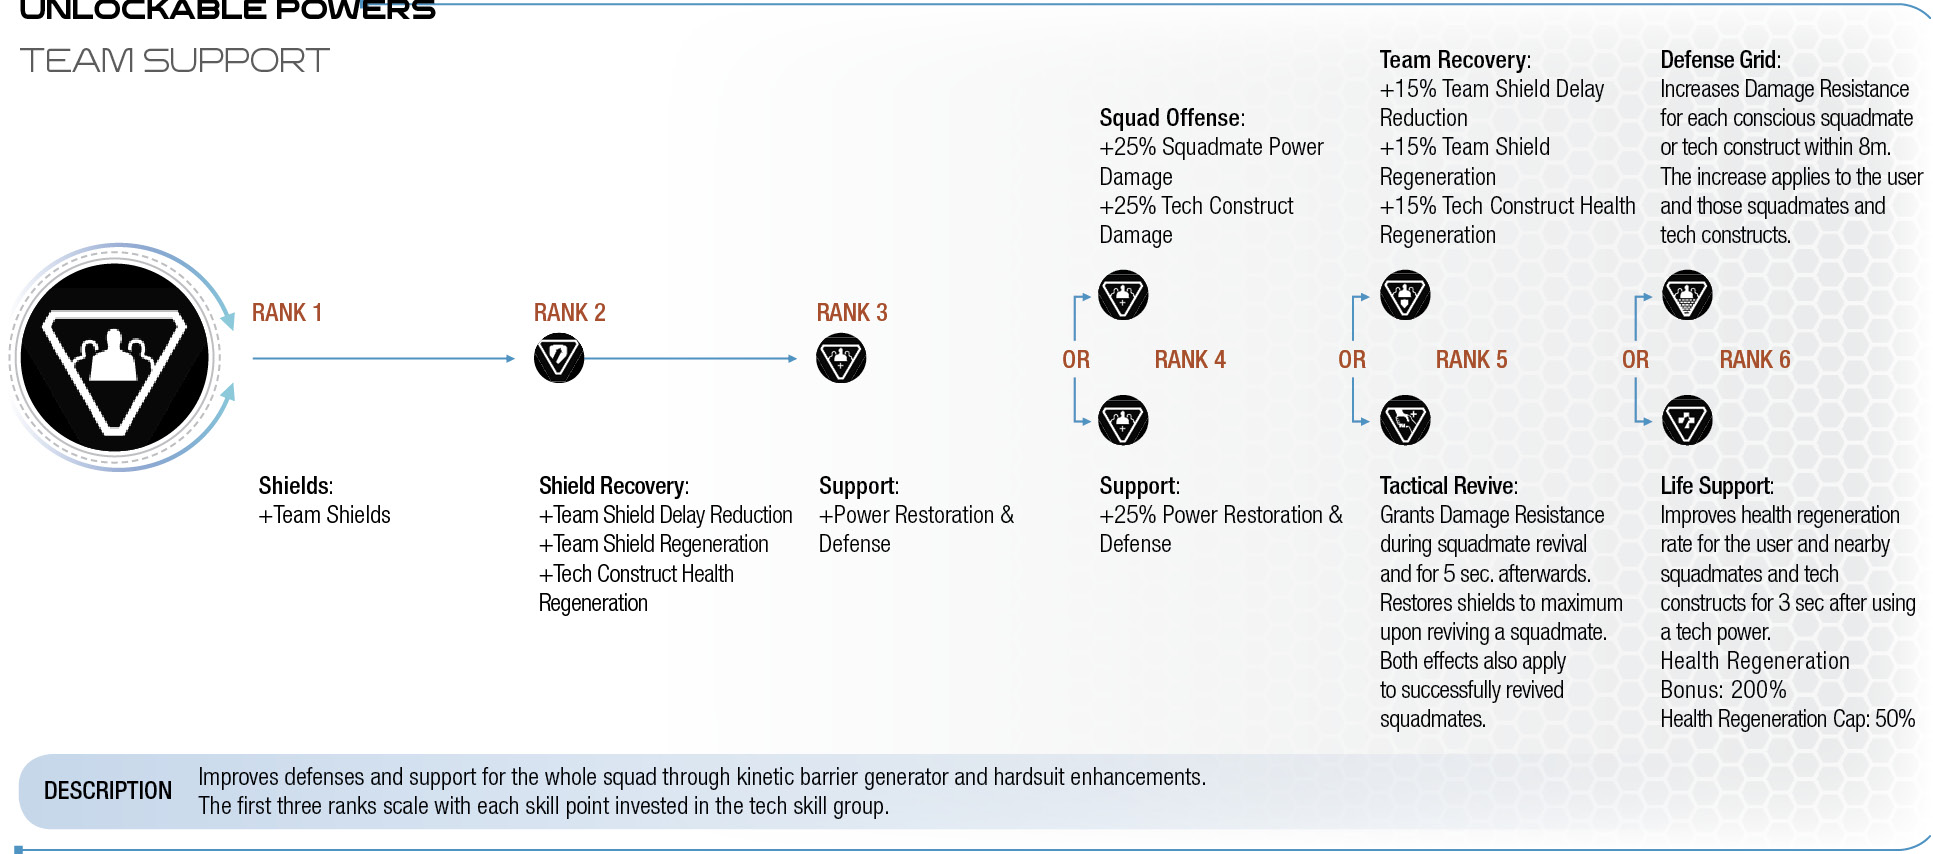
Description
Improves defenses and support for the whole squad through kinetic barrier generator and hardsuit enhancements.
The first three ranks scale with each skill point invested in the tech skill group.
example builds and play styles
Bird of Prey
Training History: Operative
Core Skills: Tactical Cloak, Energy Drain, Sniper Rifles, Trip Mine
Power Loadout: Tactical Cloak, Energy Drain, Trip Mine
Recommended Weapons: Sniper Rifles, Pistols (Scoped)
Recommended Profiles: Infiltrator
Tactical Cloak not only gives you invisibility and a large damage multiplier to your next attack, it also mutes all sound you would otherwise generate, including from your jump-jets! With this in mind, you can create a “high-ground” advantage almost any time by cloaking and going airborne with your silent jump-jets.
In conjunction with a scoped weapon, you can easily recon the area using this technique. Look for high-priority targets, then aim for a critical hit. Your critical hit is further amplified by Tactical Cloak bonuses.
For your second power, investing points into Energy Drain is recommended for its shield-restoration effect. It’s best saved to stretch out your shield health while Tactical Cloak is recharging. Recharge-timer management is key with these tactics, so practice juggling your defensive powers with hiding behind cover.
High-damage, single-shot weapons are optimal with this build, so consider investing into a sniper rifle early on. Alternatively, you can go with single-shot pistols (like the Outlaw-based Sidewinder) equipped with a scope mod.
Tri-Disaster
Training History: Technician
Core Skills: Overload, Incinerate OR Flamethrower, Cryo Beam, Invasion
Power Loadout: Overload, Incinerate OR Flamethrower, Cryo Beam
Recommended Weapons: Lightweight Pistols
Recommended Profiles: Engineer
Three power slots allow for three separate damage types. This setup is designed to make Hardcore and Insanity difficulties much more manageable, as it specifically targets the notoriously difficult foes known to cause headaches.
One such enemy is the Anointed, commonly encountered in Priority Ops missions. These kett heavies are equipped with regenerating shields and high rate-of-fire blasters, making them both durable and deadly. If these hulking gunners aren’t taken out promptly, they can easily mow down you and your teammates if you’re caught out of cover, so it’s vital that you save Overload recharge speeds specifically for these shielded enemies.
Fiends and Eiroch can also be problematic. Even though they’re primarily melee-based threats, you don’t want to mess around with these guys for too long—let them get close and it might be game over if you’re overwhelmed by their brute force. Take them down by ordering your squad to focus on them while you melt away their armor with a burning effect.
For firearms, lightweight pistols are recommended, particularly because tech powers have higher recharge times.
Raiden
Training History: Operative
Core Skills: Tactical Cloak (Speed, Combat Cloak), Annihilation (upgraded to Vortex), Energy Drain OR (any combo detonator)
Power Loadout: Tactical Cloak, Annihilation, Energy Drain
Recommended Weapons: Electric Firaan, Shotgun
Recommended Profiles: Sentinel
This build is for “late game” (when you’re at a reasonably high level). Use the Re-Spec Station to refund your points and reallocate them to invest into the three core skills listed for an extremely effective ninja-like play style. Tactical Cloak lets you dive into the enemy back line safely where you can then activate Annihilation, disabling all unshielded enemies (with the Vortex upgrade, enemies within range levitate helplessly). Follow this up with a biotic combo using Energy Drain (or the combo detonator of your choice, although Energy Drain provides more survivability). Rank 6 Tactical Cloak, Combat Cloak, is highly recommended as well, since you need every second post-cloak attack to execute your combo and get away safely.
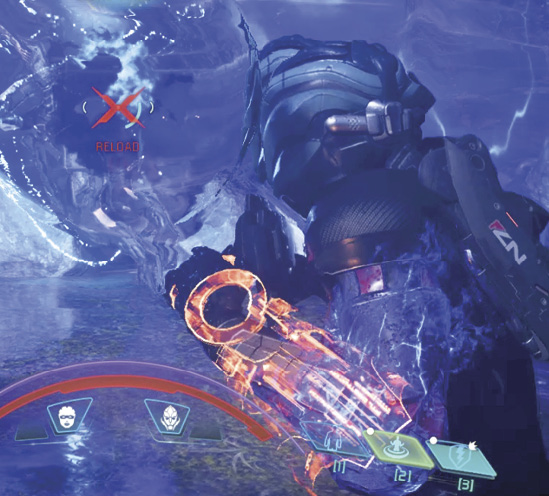
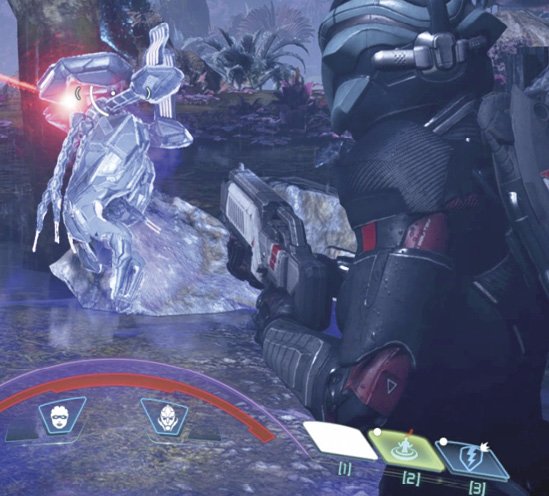
Optimal armor and skill rank choices should include anything that increases power recharge speed—activating Sentinel profiles is recommended for this reason.
Note that activating Tactical Cloak while Annihilation is active automatically disables Annihilation (and vice versa), so only one of these two effects can be active at any time. Additionally, Annihilation’s power recharge penalty only applies to Tactical Cloak’s recharge speed if you activate Annihilation while cloaked, and not the other way around.