
The Elder Scrolls Online: Morrowind Guide Training Attributes
Overview
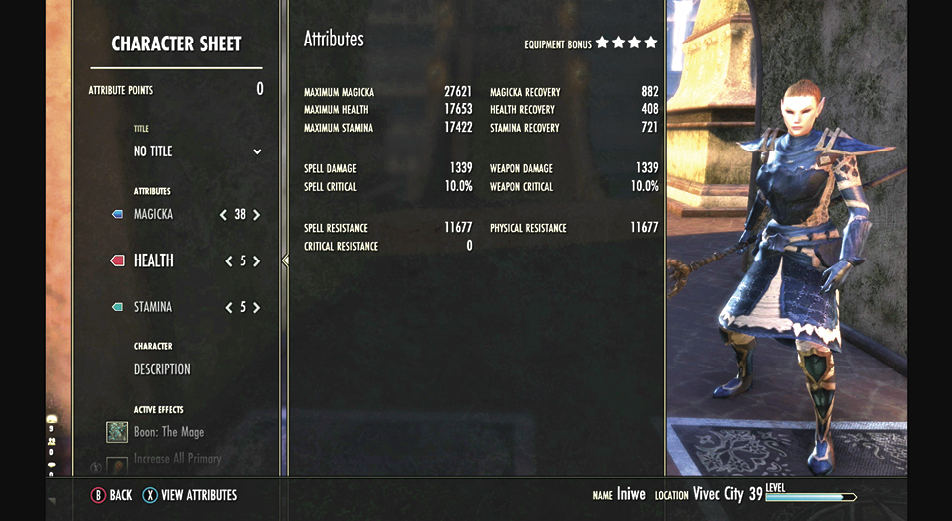
Attributes are qualities that determine your character’s effectiveness in combat. Virtually every action a character takes is affected by one or more of these values, making proper Attribute management an essential part of character development.
Primary Attributes
Leveling up always grants at least one Attribute Point that can be spent in one of three primary Attributes:
Magicka: Each point invested raises Maximum Magicka by 111.
Health: Each point invested raises Maximum Health by 121.
Stamina: Each point invested raises Maximum Stamina by 111.
How you choose to invest Attribute Points goes a long way toward determining how well your character performs its intended role.
It’s common for players to invest all 64 Attribute Points into a single resource, relying on the bonuses granted by equipment, consumables, and Mundus Stones to boost neglected Attributes. This allows for a highly specialized character, but it also supports experimentation and flexibility; it’s easier to swap out gear and Active Effects than it is to redistribute spent Attribute Points.
Of course, some players prefer a more balanced approach. Don’t hesitate to invest in any Attribute that might improve your character’s performance. Reclaiming spent Attribute Points can be costly, but finding your most effective playstyle often takes a good deal of trial and error.
Secondary Attributes
Secondary Attributes, or “stats,” affect various aspects of a character’s offensive and defensive capabilities:
Maximum Magicka: Affects how many Magicka abilities you can cast and how effective those abilities will be. It also determines damage done by staff weapons.
Maximum Health: Affects the amount of damage you can take before dying.
Maximum Stamina: Affects how many Stamina abilities you can use and how effective those abilities will be. It also determines damage done by bows and melee weapons.
Magicka Recovery: The amount of Magicka you recover every two seconds while in combat.
Health Recovery: The amount of Health you recover every two seconds while in combat.
Stamina Recovery: The amount of Stamina you recover every two seconds while in combat.
Spell Damage: Affects how much damage or healing your Magicka-based abilities and weapons cause.
Weapon Damage: Affects how much damage or healing your Stamina-based abilities and weapons cause.
Spell Critical: Gives your Magicka-based abilities and weapons a chance to do Critical Damage.
Weapon Critical: Gives your Physical Attacks a chance to do Critical Damage.
Spell Resistance: Decreases the amount of damage you take from Magical Attacks.
Physical Resistance: Decreases the amount of damage you take from Physical Attacks.
Critical Resistance: Decreases the damage you take when you are the victim of a Critical Strike.
Augmenting Attributes
Aside from primary Attributes, which are only affected by Attribute Points, all character stats can be augmented by some combination of equipped gear, enchantments, Passive Abilities, consumable items, and Active Effects.
Depending on your preferred playstyle, finding the right balance of Attributes can be a challenge. In the end, it’s all about building a character that suits your particular needs. While there’s no “best” way to develop a character, new players looking for a bit of advice might consider the following:
Your character’s listed stats include any boosts granted by the game’s Battle Leveling mechanic. Because this bonus decreases as your character levels, rapid progression can actually hinder your combat effectiveness. To counter this, it’s important to use level-appropriate gear, enchantments, and consumables.
The Character menu includes an Equipment Bonus rating that approximates the overall bonus granted by currently equipped gear. Try to maintain a minimum three-star rating during character progression. It’s possible to achieve a five-star rating by filling every available slot with Legendary equipment (applied enchantments must also be of Legendary quality).
Enchantments are 60% less potent when applied to pieces that cover the waist, hands, feet, or shoulders. Only legs, headgear, and chest pieces receive the full benefits of an Armor Glyph.
Don’t underestimate the importance of Active Effects. It’s well worth seeking out a useful Mundus Stone boon as early as possible, and an appropriate food/drink effect makes a big difference in any combat situation.
Remember to invest in Passive Abilities. A few well-spent Skill Points can make a big difference in your character’s Attributes and overall performance. In fact, it’s often worth progressing an otherwise unused skill line to gain access to its Passive Abilities.
Attributes like Spell Resistance and Physical Resistance can prevent a maximum of 50% damage from a single attack. When and if your character reaches this threshold, additional mitigation will require ability use. Improving survivability doesn’t always mean focusing on Maximum Health or donning heavy armor. All characters can sprint, block, bash, and dodge roll; the game also contains a wide variety of damage shields, healing effects, and crowd-control abilities. Determine if your character is best suited to absorbing damage, avoiding damage, or repairing damage, and then invest in Attributes that support the appropriate abilities.
Don’t be afraid to experiment. Seek out Mundus Stones to try different boons, sample a variety of Provisioning recipes, and note changes in your performance each time you equip a new piece of gear. During group events, pay attention to the effects of group buffs and Synergies. Before long, you should have a good idea of which Attributes most benefit your character.