
Elder Scrolls V: Skyrim Special Edition Guide The Atlas Solstheim: Southern Ash Lands
[S.S14] Nchardak
[S.S14] Nchardak
Related Quests
- Dragonborn Main Quest: The Path of Knowledge
- Solstheim Side Quest: The Challenges of Kagrumez*
Recommended Level: 25
Dungeon: Dwarven City
- Dwarven Ballista
- Dwarven Centurion
- Dwarven Sphere
- Dwarven Spider
- Krosulhah
- Neloth
- Reaver
Special Area
- Black Book: Epistolary Acumen
Dangers
- Danger! Dart Trap
- Danger! Dwarven Fire Pillar Trap
- Danger! Dwarven Piston Trap
- Danger! Dwarven Thresher
- Danger! Swinging Wall Trap
Puzzle
- Dwarven Puzzle
Collectibles
- Kagrumez Resonance Gem [DB3/5]
Miscellaneous
- Area is locked
- Chest
- Loose Gear
Exterior
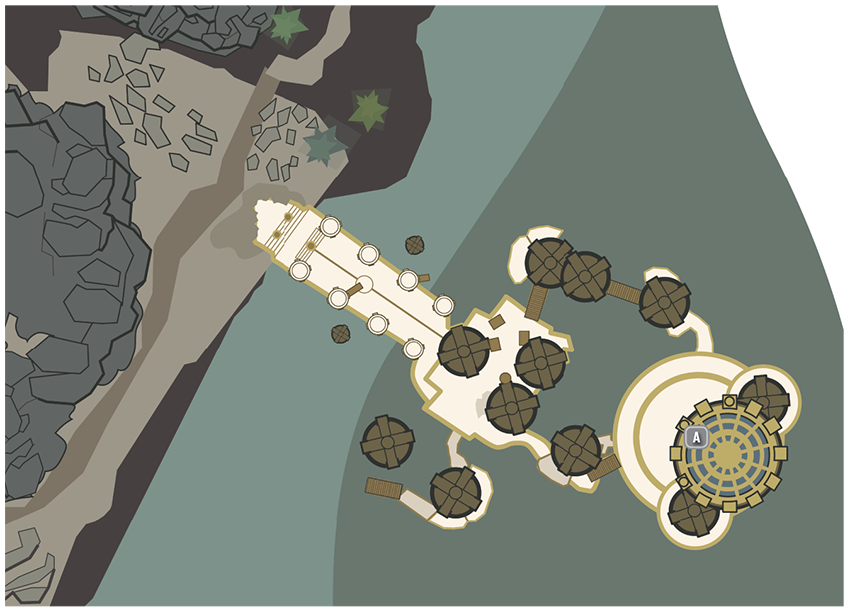
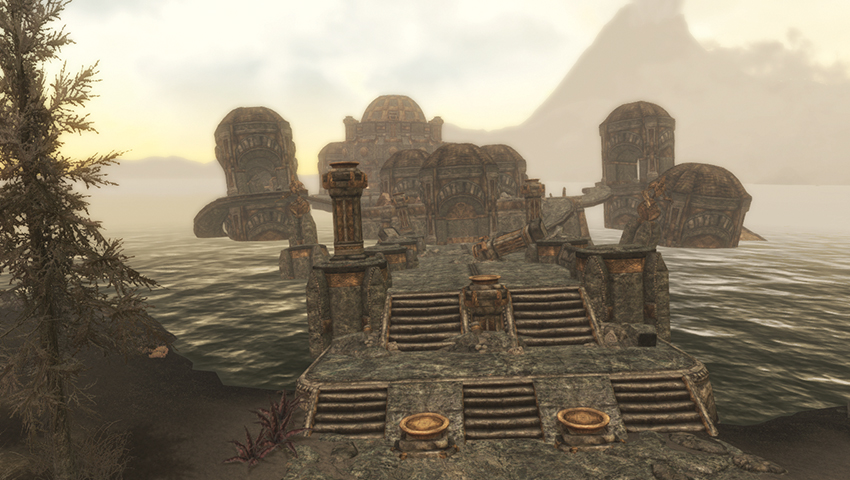
The Dwarven city of Nchardak was built on a series of platforms extending out into the Sea of Ghosts. Thousands of years of disuse, not to mention the cataclysmic Red Year, have decimated the ruin, causing most of it to sink into the sea. Only the tops of a few towers and the walkways connecting them still rise above the waterline. Many are tilted at precarious angles or have been ruined entirely, but a few, such as the domed Reading Room, remain intact.
Joined by Neloth, you can walk across the platforms that wind from the shore to the Reading Room, fending off some nuisance Reavers. Watch for long-range bowmen from upper platforms as you go. You can head to the left or right series of walkways (check one tower to the south for a Chest [Novice], and one underwater to the north [Expert]). Although they look precarious, they both lead to the main domed platform where the Reaver leader awaits. Inspect the control switch to the left of the door.
- Reaver
- Chest (2) [1 = Novice, 1 = Expert]
- Crafting: Cooking Pot, Tanning Rack (2)
- Loose gear
 To Nchardak Reading Room
Interior: Nchardak Reading Room
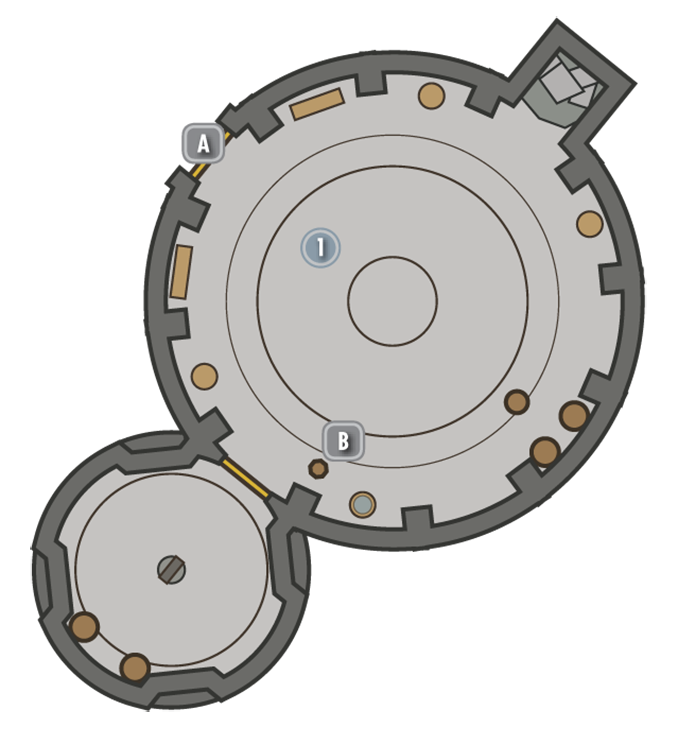
Door to Solstheim
Neloth opens this door during Dragonborn Main Quest: The Path of Knowledge.
 Reading Room Repository
First Visit: The Black Book is located in the center of this circular chamber. You can only retrieve it once you have solved the puzzle below and restored the steam to this room. The button on the gold pedestal opens the gold and glass cage and raises the book up.
Return Visit: If you’ve correctly placed the cubes, Neloth tells you it worked and that the steam is once again flowing to this room. He presses the button (unless you beat him to it) and four shafts of light illuminate the complex lock, releasing the tome!
- Black Book: Epistolary Acumen
 Elevator to Nchardak Great Chamber
Neloth will use his Control Cube to unseal this door, allowing you to descend into the Great Chamber.
Interior: Nchardak Great Chamber
 Elevator to Nchardak Reading Room
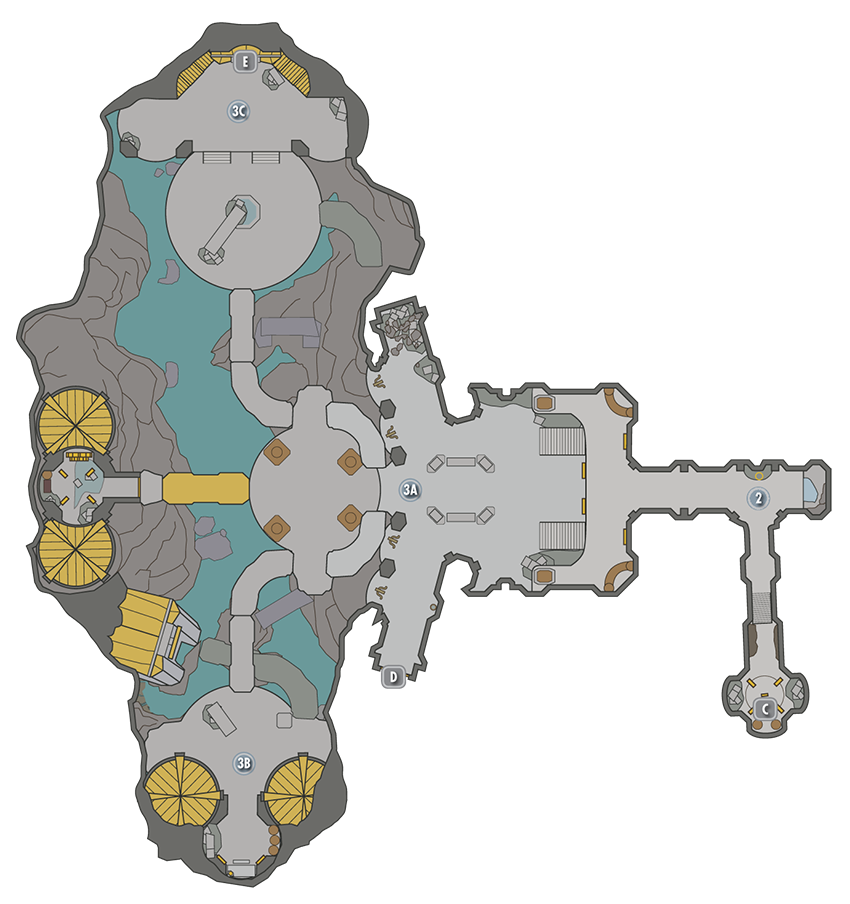
 Fallen Passage
This sloped corridor and ramp leads to the main section of the Great Chamber. Check under one ramp for a partly submerged chest [Expert].
- Chest [Expert]
3A) Great Chamber (Promontory)
3B) Great Chamber (South)
3C) Great Chamber (North)
First Visit: The promontory you reach has a view of a vast, waterlogged chamber. In front of you are two blue-colored control switches. When Dwemer Cubes are placed on these pedestals, the water level falls. You only have Neloth’s Cube, so you must investigate the Nchardak Workshop before you can proceed.
Second Visit: You now have a total of four cubes. The fifth cube is beyond a door to the north, but to access it, you must drain the entire room. Place a cube on each of the blue pedestals and leave them there. Retaliate as a small group of Dwarven Automatons attacks, then follow Neloth down into the drained Great Chamber.
Second Visit (Location 3B): Great Chamber (South): To the south is a Sphere to battle, a chest [Novice], and a blue control pedestal. Slot in a cube, lowering the water still more, and head down a curved platform to a door and red pedestal to the west. Open the door via the pedestal, claim the items from a chest inside, and optionally wander the floor of the chamber for a second chest [Apprentice]. Then return and grab the cube to continue.
Second Visit (Location 3C): Great Chamber (North): As you reach the northern part of the chamber, work with Neloth to defeat the two ballistas. Then place a cube into the red control switch, opening the gate to the Nchardak Aqueduct.
- Dwarven Spider
- Dwarven Sphere
- Dwarven Ballista
- Chest (3) [1 = Novice, 1 = Apprentice]
- Malachite Ore Vein (4)
- Loose gear
Third Visit (Location 3C): Great Chamber (Boiler Control Pedestals): Retrieve one cube from the blue pedestal on the overlook, then place the remaining four into the Boiler Control pedestals. The giant gold drawbridge lowers. Face the Centurion here or use the huge chamber to drop it from afar. The Centurion was guarding a small alcove with a treasure chest. Make sure all four boiler pedestals are still active (you shouldn’t be carrying any cubes) and return to the Reading Room.
- Dwarven Sphere
- Dwarven Centurion
- Chest
- Loose Gear
 Door to Nchardak Workshop
 Door to Nchardak Aqueduct
Interior: Nchardak Workshop
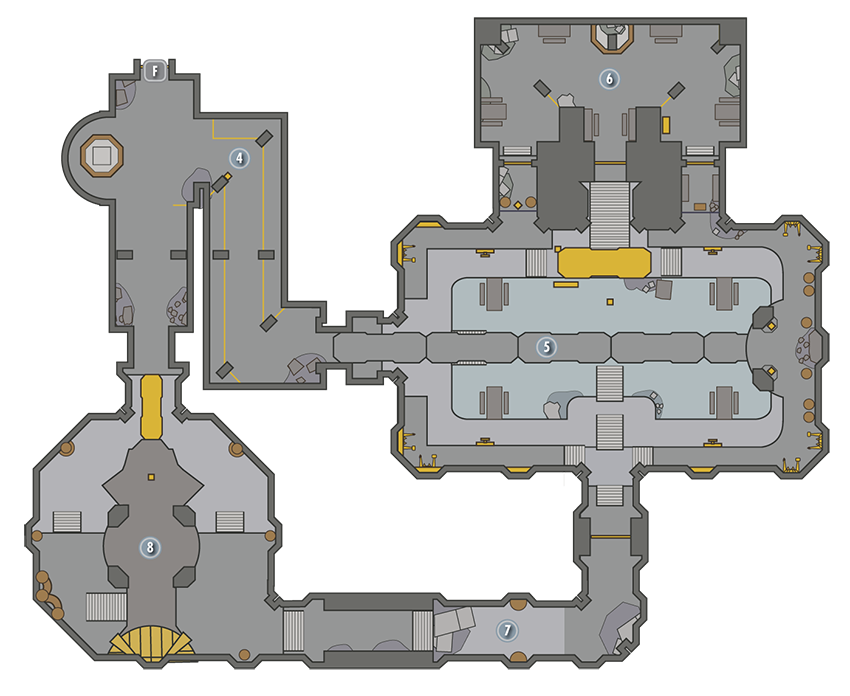
 Door to Nchardak Great Chamber
 Dwemer Fire Corridor
A few paces down the winding corridor to the left (southeast) is a pedestal with a second Control Cube. Take the cube, and the blasting fire trap ahead of you subsides, but Dwarven Spiders and Spheres are released.
- Dwarven Spider
- Dwarven Sphere
- Dwemer Control Cube
- Danger! Dwarven Fire Pillar Trap
- Loose gear
 The Great Workshop
Check the half-flooded chamber. To the left (north) behind a barred wall is another cube. You can’t reach it yet, so stay on the bridge and move to the opposite (eastern) side where there are two blue pedestals. Slot one (not both) of your cubes into either pedestal; they lower the water level, exposing the waist-deep water of the ground floor.
Head down to the ground floor, and locate the red pedestal in the water on the northern side, below the small gold bridge. Place your only cube into this pedestal (you automatically remove it again), and a set of stone steps behind the bridge grind into place. Climb up to the gold bridge, optionally dealing with the Centurion who awakens if you step on the western platform. You can ignore the second red pedestal (as this simply raises and lowers the bridge), and bound up the steps you just created to reach the gold door in the north wall.
- Dwarven Spider
- Dwarven Sphere
- Dwarven Centurion
- Loose Gear
 Workshop Annex
A small, reasonably wide chamber with two secondary areas around and to the right (north, leading to a door and chest [Adept]), and left (south), leading to a new Control Cube (behind the barred wall you couldn’t get to earlier). Take the cube, slay the Dwarven Spiders that emerge, and retrieve the Control Cube from one of the two blue pedestals you left earlier. This raises the water level still more, which is handy, as this is the only way to traverse the next chamber. Head south toward the gold door.
- Dwemer Control Cube
- Dwarven Spider
- Dwarven Sphere
- Chest [Adept]
- Loose Gear
 Collapsed Passage
The only way to reach the other end of this passage is to retrieve all three of the cubes in this area, which raise the water level high enough for you to swim across to the other side.
 Ballista Balcony and Bridge
Beware of Spheres and hardy Dwarven Ballistas. Find your next Control Cube in a rubble-filled alcove to the north. As expected, the Centurion behind you clanks into life when you take it. Hurry up and around the steps to the balcony atop the flooding room. Place a cube in the red control switch, lowering a bridge and allowing you to escape this chamber.
- Dwemer Control Cube
- Dwarven Sphere
- Dwarven Ballista
- Dwarven Centurion
Interior: Nchardak Aqueduct
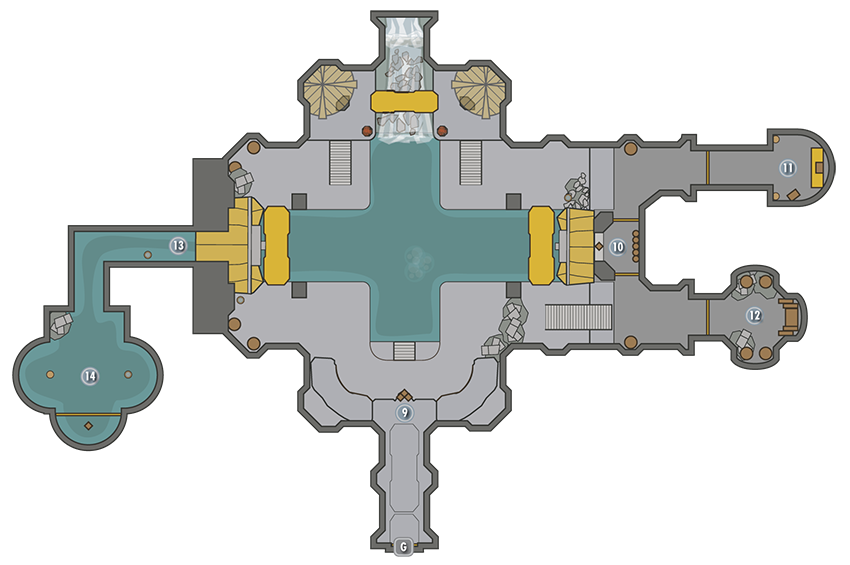
 Door to Nchardak Great Chamber
 Aqueduct Bridge Controls
All three gold bridges must be lowered to reach a pump activator. Locate the three red pedestals above the entrance corridor, and activate the left and right pedestals to lower all three bridges. There’s a chest [Apprentice] behind the stone-surrounded waterfall, by the middle bridge.
- Dwarven Sphere
- Chest [Apprentice]
 Aqueduct Overlook
This balcony overlooks the entire chamber. Place (and leave) a cube in the blue pedestal here, lowering the water level below.
 North Side Chamber
You can reach this side chamber by carefully climbing across the roof of the Overlook or by swimming up once you have retrieved the final cube. Insert a cube into the control switch here to open the door. The room beyond contains a lone Ballista and a Kagrumez Resonance Gem, which is necessary for Solstheim Side Quest: The Challenges of Kagrumez*.
- Dwarven Ballista
- Chest
- Loose Gear
- Kagrumez Resonance Gem [DB3/5]
 South Side Chamber
The gate to this chamber is sealed, and there’s no Control Switch nearby. So how do you open it? It actually opens only when the bridges are in their initial positions. Unless you used Whirlwind Sprint to reach the Overlook (instead of solving the bridge puzzle), don’t bother with it for now. Instead, wait until you retrieve the final cube, then swim up to the bridge controls and reset them. You can then swim over to this chamber and claim the chest within.
- Chest
 Aqueduct Waterlogged Corridor
The gold door at the chamber’s far (west) end is accessible now that the water has drained. Open it using the red control switch.
 Aqueduct Sunken Chamber
Beware of floor plates so you aren’t stabbed by the wall trap and rotating blades in the next room. Activate the red control switch to open the gold gate, and claim your last cube. Stand to the side when you do, or you’ll be pierced by numerous darts.
- Danger! Swinging Wall Trap
- Danger! Dwarven Piston Trap
- Danger! Dwarven Thresher
- Danger! Dart Trap
- Dwemer Control Cube
- Loose Gear