
Elder Scrolls V: Skyrim Special Edition Guide The Atlas Hold 9: The Rift
[9.12] Ruins of Bthalft
[9.12] and  [DG.17] Ruins of Bthalft: The Aetherium Forge
Related Quests
- Side Quest: Lost to the Ages
Recommended Level: 20
Faction: Bandit Camp/Dwarven Forge
- Bandit
- Dwarven Centurion
- Dwarven Sphere
- Dwarven Spider
- Forgemaster
Dangers
- Hanging Rattles
- Lava!
Puzzle
- Kinetic Resonators
Collectibles
- Unique Item: The Aetherial Crown [DG1/17]
- Unique Item: The Aetherial Shield [DG2/17]
- Unique Weapon: The Aetherial Staff [DG7/7]
- Miscellaneous
- Chest
- Loose gear
Exterior
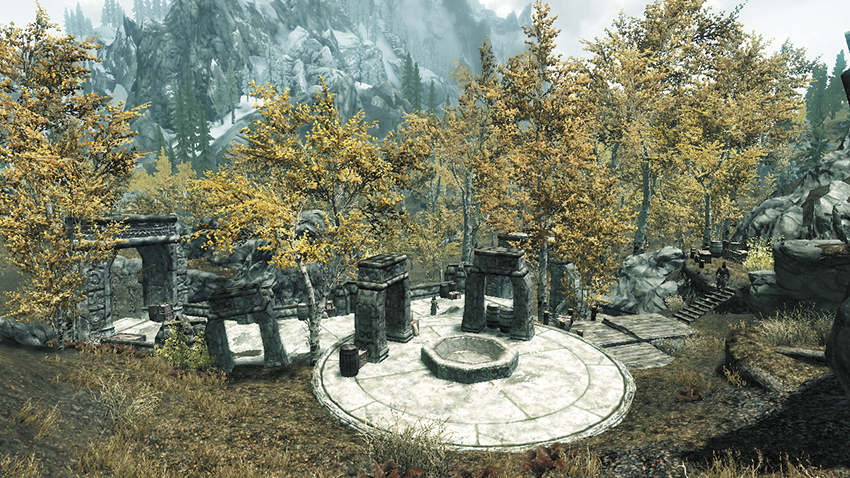
This small collection of open-air ruins lies in the Rift’s southwestern wilds. Cut down a handful of bandits here, then scale the narrow northern wooden stairs to locate a chest on a ledge. If Side Quest: Lost to the Ages is active and you have all four Aetherium Shards, Katria will meet you here. Insert the four Shards into the Dwarven Mechanism, fusing them into a single crest.
- Aetherium Crest
Take the Crest and retreat from the platform, and the flagstones rise up, forming the roof of a giant, circular tower and elevator entrance. This is the entrance to the Aetherium Forge.
Interior: The Aetherium Forge
 Elevator to Skyrim
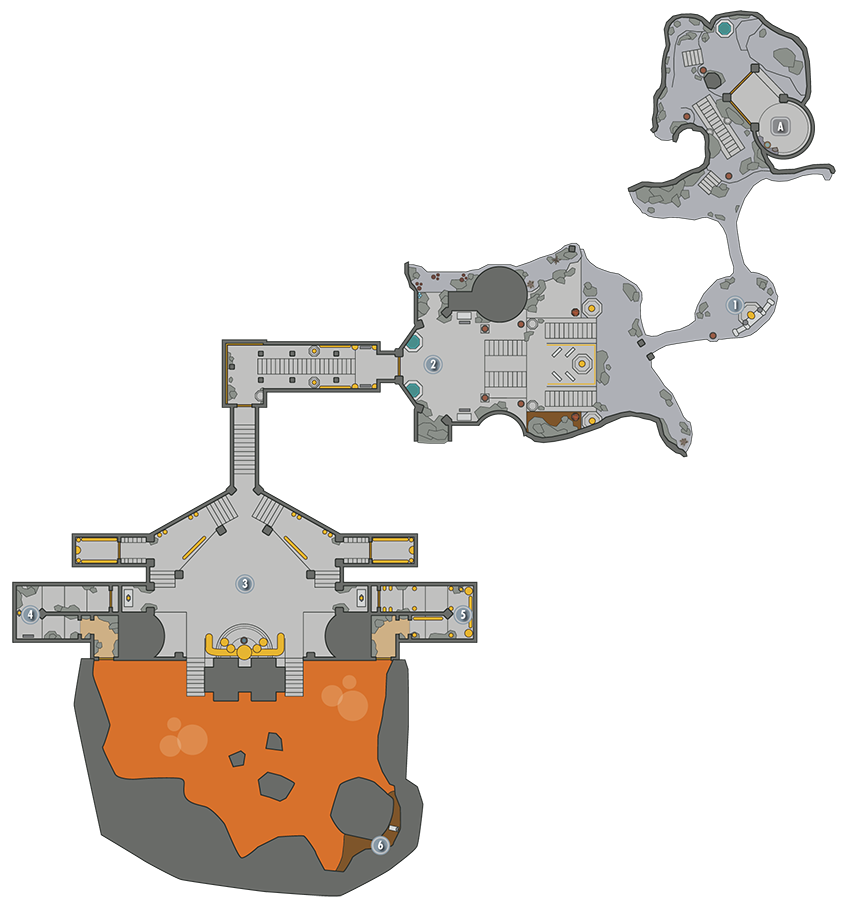
As you emerge from the elevator, jump over the railing to your right and skirt around the rubble to locate a chest. Then pull the lever to open the gate leading out to the Lantern Chamber.
- Chest [Locked: Apprentice]
 Torchlit Chamber and Juniper Tree Treasure
This giant subterranean chamber is deeper than any other dwarven structure in Skyrim. Stay on the path as the torches alight ahead of you. Cross the first rock bridge out to the main “island” in the center of the lake.
If you like, you can take this opportunity to go hunting for treasure. Peer over the ledge behind the low wall on the island, and you can spot a lower ledge with a chest. Drop down to claim it, then dive into the water and swim behind the waterfall to find another small chest on a ledge. When you’re done, return to the island and continue across the second bridge leading up to the main ruin.
Before heading up the stairs, climb out onto the narrow ledge to your left, where a lone tree has found purchase among the rocks. There’s an enchanted battle-axe on the rock shelf behind it.
- Chest [Locked: Adept]
- Chest [Locked: Apprentice]
- Loose gear
 Torchlit Ruins
Climb the grand staircase and enter the plaza in the center of the ruins. The gate ahead of you is sealed; to open it, simply fire an arrow at both of the resonators in the alcoves above (the order in which you shoot them doesn’t matter). If you forgot your bow or arrows, a Dwarven Bow and small quiver rest on the stone table to one side of the plaza.
Before heading down the passage and into the forge proper, there’s some more treasure to grab. The rubble-filled passage (to your left as you face the door) contains a chest. The archway opposite it leads out to the river that feeds the falls, where you can claim another chest and some loose Soul Gems in the streambed. And finally, there’s some silver to be mined on the rocky ledge that separates the streambed from the ruins.
- Chest [Locked: Adept]
- Chest [Locked: Expert]
- Loose gear
 Forge Entryway and Aetherium Forge
When you’re ready to continue, head through the gate you opened earlier and continue down the stairs. Before opening the door at the end of the passage, make sure to claim the potions and loose gear on the low platform to the left.
- Loose gear
- Potions
The Forge proper is guarded by numerous Dwarven Automatons and the giant Forgemaster himself. Tactics on dealing with the enemies you will encounter here are detailed in the quest. When combat is done, you have just enough raw Aetherium to forge one of three unique items. Hunt through the rest of the chamber for additional items:
- Chest (2)
- Loose gear
- Potions
- Unique Item: The Aetherial Crown [DG1/17]
- Unique Item: The Aetherial Shield [DG2/17]
- Unique Weapon: The Aetherial Staff [DG7/7]
 and
and  Hidden Lava Passage (East and West)
You may have noticed two inaccessible gates set high in the wall of the forge chamber, overlooking the two chests. Both of these are at the end of a U-shaped corridor whose entrance is out over the lava, at the extreme east and west ends of the forge cavern. To enter these passages, you’ll need some special skills.
The Ethereal Form Shout is the easiest way to reach them. Simply use the Shout to protect yourself from the lava, then swim out to the gates and head up the passages beyond. If you lack Ethereal Form, you may still be able to make it with a bit of luck and careful aim. Use your Bats (Vampire Lord) or Whirlwind Sprint (Shout) powers to dash out onto one of the low-lying rocks in the lava, then turn and dash again to reach the gate. Use any Resist Fire potions or similar gear you may have before trying this, as failure is usually fatal.
If you manage to reach these passages, you’ll find that each contains a chest and some dwarven scrap.
- Chest (2)
 Molten Forge Chest
A large chest is hidden behind a pillar in the far left (southeast) corner of the lava pool. Use the Ethereal Form Shout or your Bats or Whirlwind Sprint powers to reach it. The latter is especially tricky, requiring extreme precision as you try to land on the rocky outcroppings along the way.
- Chest