
Elder Scrolls V: Skyrim Special Edition Guide The Atlas Solstheim: Southern Ash Lands
[S.S04] Kolbjorn Barrow
[S.S04] Kolbjorn Barrow
Related Quests
- Solstheim Side Quest: Black Book: Filament and Filigree
- Solstheim Side Quest: Unearthed
Recommended Level: 50
Dungeon: Draugr Crypt
- Ahzidal
- Albino Spider
- Draugr
- Miner
- Poison Spider
- Ralis Sedarys
Special Area
- Black Book: Filament and Filigree
- Word Wall: Cyclone [DB3/3]
Crafting
- Cooking Spit
Dangers
- Battering Ram Trap
- Magic Caster Trap
- Rockfall Trap
- Swinging Blade Trap
Puzzle
- Nordic Puzzle Pillars
- Rotating Walls
Services
- Follower: Ralis Sedarys [DB5/7]
Collectibles
- Unique Item: Ahzidal (Mask) [DB21/31]
- Unique Item: Ahzidal’s Armor of Retribution [DB22/31]
- Unique Item: Ahzidal’s Boots of Waterwalking [DB23/31]
- Unique Item: Ahzidal’s Gauntlets of Warding [DB24/31]
- Unique Item: Ahzidal’s Helm of Vision [DB25/31]
- Unique Item: Ahzidal’s Ring of Arcana [DB26/31]
- Unique Item: Ahzidal’s Ring of Necromancy [DB27/31]
- Unique Item: Skull (Runic) [DB28/31]
- Unique Weapon: Hoarfrost [DB5/11]
Miscellaneous
- Area is locked
- Chest
- Potions
- Loose gear
Exterior
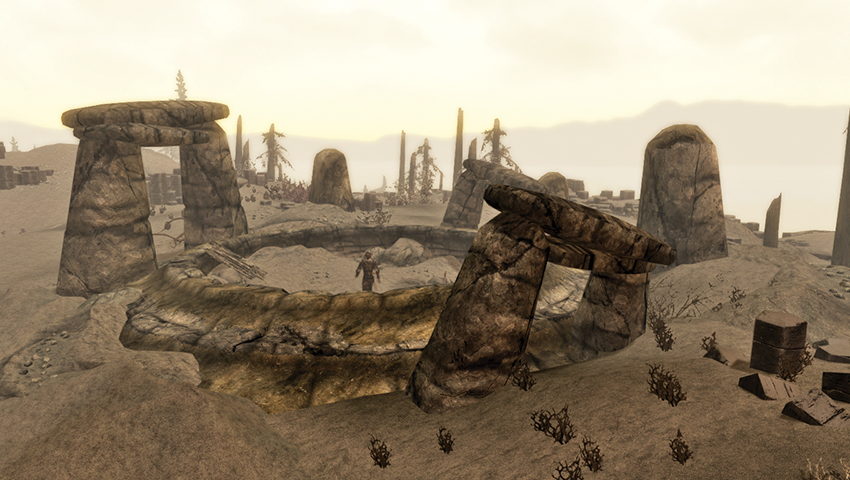
This location constantly changes throughout Solstheim Side Quest: Unearthed. The first time you arrive, a Dunmer named Ralis Sedarys is digging at a half-buried barrow entrance. The Journal of Ralis Sedarys, volume 19, is near a hay pile.
Phase 1: There are a few miner tents and Ralis is on-site, moaning about Draugr.
Phase 2: There is a cooking spit, two more tents, and Ralis lamenting the constant Draugr threat.
Phase 3: There are more tents, at least one living miner, and Ralis in one of his moods again.
Phase 4: The camp is more like a small settlement now, with numerous tents and several murdered miners. Optionally make a point to enter Ralis’s tent, and read some of his journals. Volume 23 is most illuminating.
- Crafting: Cooking Spit
- Chest
- Kolbjorn Guard
- Miner
- Ralis Sedarys
- The Journal of Ralis Sedarys, volumes 19–23
Interior
 Door to Solstheim
Accessible from Phase 1 onward.
 Entryway and Initial Burial Chamber
Phase 1: Expect at least six Draugr to contend with, both in the entryway and from the four raised corners of the burial chamber. Locate the main altar in the center of the burial chamber, and study the red skull. Lift it from its pressure plate, and a rotating wall arch ahead of you grinds open.
Phase 2: In the entryway, take the first right to claim a chest at the dead end. Expect another Draugr ambush as you enter the burial chamber, including archers firing down at you from the four raised corners of the chamber.
Phase 3: Be prepared for two Draugr to rush you just inside the entrance. A third, more powerful foe awaits you in the chamber below.
Phase 4: Unchanged.
- Chest (3) [1 = Novice, 1 = Adept]
- Loose gear
- Draugr
- Unique Item: Skull (Runic) [DB28/31]
 Central Chamber
Phase 1: This chamber has almost completely collapsed and is filled with ash and rubble. However, a set of unique boots awaits you on the pedestal in the center of the room.
Phase 2: It looks like Ralis and the miners have made some progress here. A tough Draugr archer attacks from the circular platform in the center; strike with ranged spells or attacks to take him down quickly.
Phase 3: By now, most of the room has been excavated, although the Word Wall is still inaccessible (you can hear it but not reach it). Another Draugr awaits you on the central bridges.
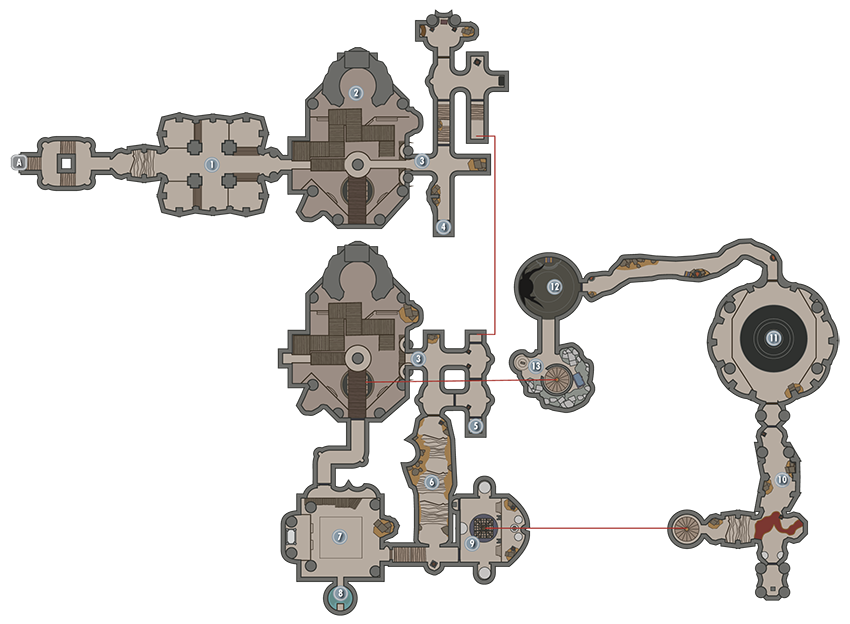
Phase 4: Descend and approach the Word Wall, learning the Word of Power before continuing and optionally taking the short route back to the sacrificial chamber (Location [7]).
- Draugr
- Unique Item: Ahzidal’s Boots of Waterwalking [DB23/31]
- Word Wall: Cyclone [DB3/3]
 ,
,  , and
, and  Draugr Crypt
Phase 1: Inaccessible.
Phase 2: You must search these crypts for the corpses of two dead miners, Bradyn and Mireli. Bradyn is found on the lower floor to your left (west). He’s quite dead. Kill three Draugr and then venture farther (northwest) into the crypt, yanking the pull chain on the candlelit alcove ahead of you. This opens a rotating door to your right (east), exposing a tough Draugr to tackle. Pull a second chain in this new chamber’s alcove, which opens a rotating door to the southwest, behind you. This leads to the upper crypt and another Draugr to tackle. Optionally, step on the tripwire to trigger the battering ram trap (which often kills the Draugr), or slay it yourself. Avoid the pressure plate that sets off the magic caster trap, pluck the Soul Gem from the pedestal, then move to the portcullis puzzle with four handles to the right of it.
Puzzle Solution: The top handle releases only the first portcullis. The second releases darts, so ignore it. The third and fourth handles release the remaining portcullises, so pull them and continue up.
As you enter the upper crypt, the portcullis slam shut, trapping you in a small crypt with four Draugr. Deal with them, then examine the splattered remains of Mireli. Take the letter to her mother if you wish. Locate the seeming dead end to the northeast (Location [4]), hunting for a low handle to your right, which slides open a secret alcove allowing you to pick up Ahzidal’s Ring of Necromancy!
Phase 3: Bring death to the Draugr inside this now fully excavated crypt. Head to the middle level where a sarcophagus has been uncovered (a Draugr bashes its way out to meet your blades), and an iron door [Expert] has been unsealed. Pick this lock to reach a hidden antechamber with spiders to crush and a chest to pilfer. Continue down the stairs (avoiding the traps if you didn’t deal with them earlier), then continue back around to the chamber where you found Bradyn on your first visit. A new tunnel has been opened here, leading to a room with an iron door. Instead of continuing through it, kill the dormant Draugr in this room, then locate a wall chain in the alcove nearby. Yank it to expose a hidden room to the northeast (Location [5]) where Ahzidal’s Gauntlets can be found. Taking them sets off a dart trap, so step back quickly to avoid being hit. Then head back and continue through the iron door.
Phase 4: Unchanged.
- Draugr
- Albino Spider
- Poison Spider
- Bradyn (Deceased)
- Mireli (Deceased)
- Mireli’s Letter to Mother
- Potions
- Emerald Geode
- Chest (2)
- Loose Gear
- Danger! Battering Ram Trap
- Danger! Dart Trap
- Danger! Magic Caster Trap
- Unique Item: Ahzidal’s Ring of Necromancy [DB27/31]
- Unique Item: Ahzidal’s Gauntlets of Warding [DB24/31]
 Grand Staircase and Corridor
Phase 1: Inaccessible.
Phase 2: Inaccessible.
Phase 3: Just inside the stairwell, hit the tripwire, then stop, allowing the rockfall trap to remove Draugr threats ahead of you. At the intersection, turn southeast, then continue up the steps and into a large sacrificial chamber.
Phase 4: After passing through the sacrificial chamber, descend the steps back to the intersection, where the other end of the corridor has been unblocked. Continue into the Throne Chamber (Location [9]).
- Draugr
- Danger! Rockfall Trap
 ,
,  Sacrificial Chamber and Antechamber
Phase 1: Inaccessible.
Phase 2: Inaccessible.
Phase 3: Expect to face about five Draugr in this chamber, with several bursting out of the sarcophagi on the walls. Before you leave, check the room for dead miners and guards, then look to the left (northeast), into a small antechamber with a pedestal (Location [8]), upon which rests a ring. You can use the Telekinesis spell to pull the ring to you, or open the portcullis by running across the central pressure plates so they all activate. You have only a few seconds to do this before they reset, so aim carefully and make sure to sprint. Claim Ahzidal’s Ring of Arcana from the pedestal, then optionally swim down into the water for some minor loot. To leave, head up the side steps in the sacrificial room and yank a chain to open the portcullis, watching for a subsequent blade trap and another chain that opens a quicker way back to the central chamber.
Phase 4: On your final visit to Kolbjorn Barrow, cross the Central Chamber’s bridge and approach the hallway with the blade traps. A pair of Draugr will charge at you; pull the chain above the door to trigger the trap and cut them down. Then pull it again and proceed into the Sacrificial Chamber, where three more Draugr await you. Deal with them, then continue down the stairs into the corridor (Location [6]).
- Draugr
- Danger! Swinging Blade Trap
- Unique Item: Ahzidal’s Ring of Arcana [DB26/31]
 Throne Chamber
Phase 1: Inaccessible.
Phase 2: Inaccessible.
Phase 3: Inaccessible.
Phase 4: Head down to a throne chamber with three Draugr to slay as they rise from their seats. After that, ponder a small puzzle:
Puzzle Solution I: A suit of armor rests behind a barred arch. Face north and south and pull each chain to rotate the wall so a whale petroglyph is exposed in opposite alcoves. Behind the two thrones are rotating pedestals. Shift both of them to Whale and pull the lever between them. The bars retract, allowing you to grab Ahzidal’s Armor.
Puzzle Solution II: Your progress is stalled. To continue, you must open the central trapdoor. In front of it is a carving with two Hawk petroglyphs. Turn the pedestals so they are both Hawks, pull the lever, and the trapdoor opens.
- Unique Item: Ahzidal’s Armor of Retribution [DB22/31]
 Lower Crypts
Phase 1: Inaccessible.
Phase 2: Inaccessible.
Phase 3: Inaccessible.
Phase 4: Descend the spiral steps, passing the scattered potions on the ceremonial table, then move into the lower crypts. Remove a Draugr to the right of the entrance before setting the floor ahead ablaze (via magic or a falling oil lamp shot by your bow). This helps remove the four Draugr in the main corridor and minimizes the damage from the forthcoming puzzle if you make a mistake. Turn right (north east).
Puzzle Solution: Ahead is a portcullis with a chain and two petroglyph pedestals. If you pull the chain, a fire trap engulfs you. Instead, turn the pedestals so the Serpent petroglyph points at the ground marking on each pedestal. This is the third of the puzzles, and two Serpents is the only remaining pair that hasn’t been chosen. Pull the chain and claim Ahzidal’s Helm. Watch for another fire trap as you take it!
Pass the sarcophagus with the Stalhrim deposit and move to the door opposite (southwest).
- Potions
- Loose gear
- Stalhrim deposit
- Unique Item: Ahzidal’s Helm of Vision [DB25/31]
 Ahzidal’s Chamber
Phase 1: Inaccessible.
Phase 2: Inaccessible.
Phase 3: Inaccessible.
Phase 4: You enter the chamber just as Ralis finishes his dark ritual and the Dragon Acolyte Priest Ahzidal rises from the seal in the center of the room. Expect a constant stream of Draugr to pour from the wall crypts, with Ahzidal raising them to fight anew as combat progresses. Concentrate your attack on Ahzidal, countering his fire-based attacks and using the columns around the chamber as cover. When the fighting is over, check the ashes for his mask.
- Draugr
- Ahzidal
- Follower: Ralis Sedarys [DB5/7]
- Unique Item: Ahzidal (Mask) [DB21/31]
- Unique Weapon: Hoarfrost [DB5/11]
 Hermaeus Mora’s Chamber
Phase 1: Inaccessible.
Phase 2: Inaccessible.
Phase 3: Inaccessible.
Phase 4: Leave Kolbjorn Barrow via the gap in the sarcophagus to the southwest, passing a large chest in the tunnel before reaching a pull chain and allowing access into a strange and terrible chamber. Here you find an effigy of Hermaeus Mora, another huge chest and assorted items, and a fabled Black Book. This begins Solstheim Side Quest: Black Book: Filament and Filigree.
- Chest (2)
- Loose gear
- Potions
- Black Book: Filament and Filigree
 Rotating Staircase
Phase 1: Inaccessible.
Phase 2: Inaccessible.
Phase 3: Inaccessible.
Phase 4: Exit to the northeast, checking a Stalhrim deposit before activating a lever to summon a rotating staircase up to your level. Ascend, emerging in the central chamber.
- Stalhrim deposit