
Elder Scrolls V: Skyrim Special Edition Guide The Atlas Hold 3: The Pale
[3.31] Irkngthand
[3.31] Irkngthand
Recommended Level: 12
Related Quests
- Thieves Guild Quest: Blindsighted
- Thieves Guild Additional Quest: Larceny Targets*
- Dungeon Activity
Dungeon: Dwarven City
- Animal
- Bandit
- Dwarven Sphere
- Dwarven Spider
- Dwarven Centurion
- Falmer
- Mercer Frey
Crafting
- Alchemy Lab
- Tanning Rack
Dangers
- Bear Traps
- Bone Alarm Trap
- Dwarven Fire Pillar Trap (proximity)
- Dwarven Thresher (proximity)
- Dwarven Thresher (lever)
- Flail Trap (door)
- Flamethrower Trap (proximity)
- Flamethrower Trap (pressure plates)
- Spear Trap (pressure plate)
Underground Connection: Bronze Water Cave [3.29]
Quest Items
- Skeleton Key
- Right Eye of the Falmer
Collectibles
- Larceny Target: Left Eye of the Falmer [2/7]
- Unique Item: Skeleton Key [25/112]
- Area Is Locked (quest required)
- Chest(s)
- Potions aplenty
- Loose gear
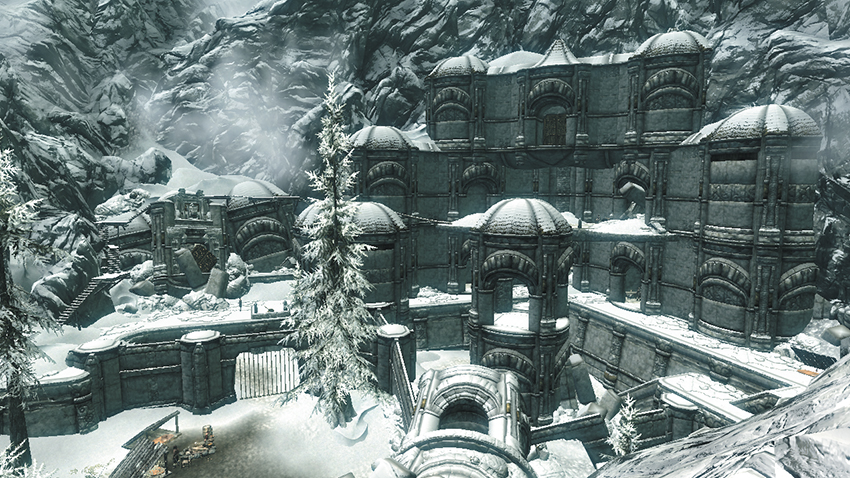
This massive dwarven city remains largely sealed off until you venture here as part of Thieves Guild Quest: Blindsighted. Only the exterior ruins can be explored until then. Use stealth whenever possible here.
Exterior
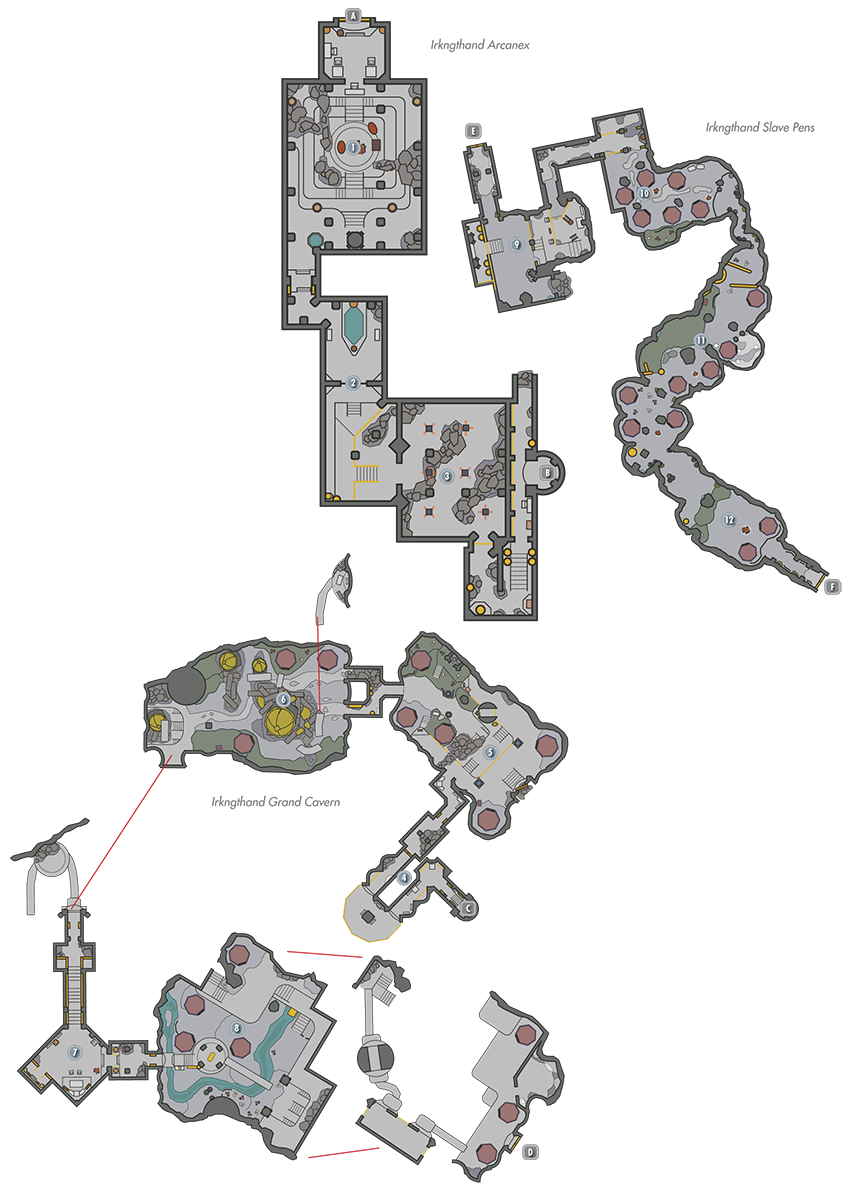
Bandits have established a campsite at Irkngthand’s exterior ruins. The front gate is sealed, so go west, pillaging a chest and swiping some potions from a wooden table. Go left and scale the stone steps, skirting bear traps and swiping some potions from a lean-to found at the top. Find a chest tucked away beneath another wooden table near some bedrolls, then avoid a pressure plate trap in the tunnel-like passage that follows. Pull the lever beyond the tunnel to open Irkngthand’s front gate. Scale a series of narrow wooden stairs afterward to locate the bandits’ leader. Loot two more chests that the chief guards. Scale the following ramps to reach the high door that leads to the Irkngthand Arcanex—these last few ramps appear only when the “Blindsighted” quest is active.
- Danger! Bear Traps, Spear Trap (pressure plate)
- Chests (2)
- Chest (Locked: Apprentice)
- Chest (Locked: Adept)
- Potions
- Loose gear
 Exit to Skyrim
 Entry Chamber
Bandits lay slain near a firepit in this first chamber—likely the work of your quarry, Mercer Frey. Loot the large nearby chest if you’re able to pick its tricky lock—an even more challenging dwarven chest sits nearby, tucked away near the middle of the west wall. Beware of a patrolling Dwarven Sphere as you make your way to [2].
- Chest (Locked: Expert)
- Chest (Locked: Master)
 Pipeworks Passage
Sneak through this passage to reduce the odds of alerting reinforcement sentries. Find two small dwarven chests at the far south end of the passage—one on the lip of the outside wall, the other near the foot of the nearby stairs.
- Chest
 Gate Chamber
Keep as close to the outside wall as possible to avoid this wide chamber’s spinning Flame Pillars. Sneak or you’ll alert Dwarven Spiders, which stand too short to be harmed by the traps. You can just barely circle past the final spout without being seared. Open the gate beyond and navigate a passage that leads up to a high east balcony, raiding a couple of chests as you go. Use the Alchemy Lab if you wish before taking the elevator down to the Grand Cavern.
- Danger! Dwarven Fire Pillar Trap (proximity)
- Crafting: Alchemy Lab
- Chests (Locked: Apprentice) (2)
- Potions
 Elevator to Irkngthand Grand Cavern
 Elevator to Irkngthand Arcanex
 Entry Passage
After meeting up with Karliah and Brynjolf, stand back after opening the door here—Mercer has left it trapped, and a mace will come swinging your way. (Alternately, you can try and disable the trap’s hinge.) Unlock an Expert-level gate a few paces farther to claim a chest and some potions. Continue out onto a balcony overlooking a huge cavern and you can spot Mercer offing a pair of Falmer. You cannot get to him yet, so continue down a sloping passage.
- Danger! Flail Trap (door)
- Chest
- Potion
 Cavern A
Turn left as you enter this first massive cavern and creep across a pile of debris to locate a lever. Pull the lever, then creep back the way you came and loot a grotesque chest that sits near a Falmer tent with several potions. Continue sneaking around the balcony and, if possible, unlock an Expert-level gate so you may fire a ballista down at the dangerous Falmer below. Raid a chest at the balcony’s other end and find the second lever there. You must pull one of the levers, then race to the other side to pull the other lever to open the gate below or the levers will reset. You can tell that the gate is open when the dwarven lamps on either side are both lit. Make your way downstairs, looting the chest that’s tucked away near the steps. Avoid the road that follows—it’s trapped with lethal spinning blades. Hop up and navigate the earthen ledges instead, finding a chest stashed near the north wall. Use stealth or you will alert the Sphere Centurions here.
- Danger! Dwarven Thresher (proximity)
- Crafting: Tanning Rack
- Chests (2)
- Chest (Locked: Novice)
- Chest (Locked: Adept)
- Potions
 Cavern B
This second cavern is as big as the first. Sneak through here to avoid alerting the roaming Falmer. Scale a ramp as you enter to visit a small balcony with a few ingredients, as well as a good sniping position. Search the ledge to the left of the central road to discover a Falmer chest. A dwarven chest lies in the rubble at the trail’s end. Follow a looping walkway around to reach the hallway that leads to the third cavern.
- Chest
- Chest (Locked: Apprentice)
 Connecting Hallway
Mercer Frey has been here, looted the place, and scribbled a taunting message on the wall. Three scrolls of Detect Life can be found here, which can make the fight with Mercer much easier, so be sure to grab them.
- Danger! Bear Traps
- Loose gear
 Cavern C
The third cavern is the largest of all, and it’s teeming with powerful Falmer and a Dwarven Centurion. Do your best to avoid detection, and optionally jump off the bridge’s right side, which you start on when entering the area. Press the button at the base of the entry stairs to unleash the Dwarven Centurion on the unsuspecting Falmer. Scale the east steps and cross a long walkway to advance toward the cavern’s south end, where more Falmer and a nest of Frostbite Spiders threaten you. Watch out for Bear Traps left by Mercer along the way. Loot the two chests near the Falmer tents before proceeding through the door to the Slave Pens.
- Danger! Bear Traps
- Chest
 Door to Irkngthand Slave Pens
 Door to Irkngthand Grand Cavern
 Entry and Torture Room
Ignore this area’s locked gate—there’s little of interest behind it. Check the south rubble to discover a chest, then sneak down and pull the lever on the east balcony to slice up the unsuspecting Falmer below. Go downstairs and collect an array of potions from a table. Search an unfortunate thief to discover his last words, which hint at riches ahead. Beware of the pressure plates in the passage that leads to [10].
- Danger! Bone Alarm Trap, Dwarven Thresher (lever), Flamethrower (pressure plates)
- Chest
- Potions aplenty
- Loose gear
 Falmer Camp
Several powerful Falmer are camped here, making this a dangerous area. Sneak through by keeping close to the west wall. Two of their tents contain chests.
- Chests (2)
 Chaurus Den
Stick close to the west wall to slip past the Falmer in this area, raiding a chest as you go. Beware of two hulking Chaurus that lurk to the south. A chest with a difficult lock sits in one of the southern tents, and a potion lies on the ground where the passage bends southeast. Pipes span the ceiling above the area with the Chaurus. Sneaking along here should allow you to bypass the enemies below or give you a great vantage to snipe them. A health potion can also be found at the opposite end of this cave.
- Chest (Locked: Apprentice)
- Chest (Locked: Expert)
 Sanctuary Access
Loot one last chest—an ornate dwarven chest with an intricate lock—as you make your way through the Slave Pens’ final stretch. Proceed through the nearby gate to reach the door to the Irkngthand Sanctuary.
- Chest (Locked: Master)
 Door to Irkngthand Sanctuary
Irkngthand Sanctuary
You finally catch up with your quarry in the sanctuary. Slay Mercer Frey in an epic battle (see Thieves Guild Quest: Blindsighted for complete strategies), then loot his body to obtain vast wealth, including the priceless Right Eye of the Falmer and the quest-related Skeleton Key. The cavern soon begins to collapse and fill with water. Exploit the rising tide to make your escape, but the way will open to you only if you possess the Skeleton Key. You will eventually emerge in Bronze Water Cave [3.29].