
Elder Scrolls V: Skyrim Special Edition Guide The Atlas Hold 8: Falkreath Hold
[8.28] Pinewatch
[8.28] Pinewatch
Related Quests
- Thieves Guild Radiant Quest: No Stone Unturned
- Thieves Guild City Influence Quest: Silver Lining
- Dungeon Activity
Recommended Level: 6
Dungeon: Bandit Camp
- Bandit
- Rhorlak
- Rigel Strong-Arm
Crafting
- Grindstone
- Tanning Rack
- Workbench
Dangers
- Battering Ram Trap (pressure plates)
- Bear Traps
- Bone Alarm Trap
- Dart Trap (pressure plate)
- Flail Trap (trapped door)
- Spear Trap (pressure plate)
- Swinging Blade Trap (pressure plate)
- Trapped Chest
Quest Items
- Endon’s Silver Mold
Collectibles
- Skill Book [Sneak]: The Red Kitchen Reader
- Unusual Gem: Stone of Barenziah [22/24]
- Chest(s)
- Potions aplenty
- Loose gear
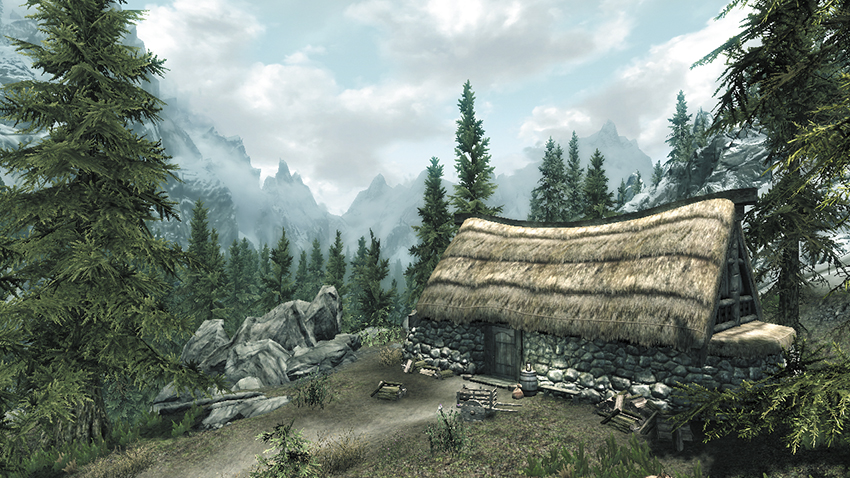
Follow the main road east out of Falkreath’s capital to locate this small cabin. Use the simple crafting stations around back if you like, then pick the Adept-level door lock to enter and raid the cabin.
 Exit to Skyrim
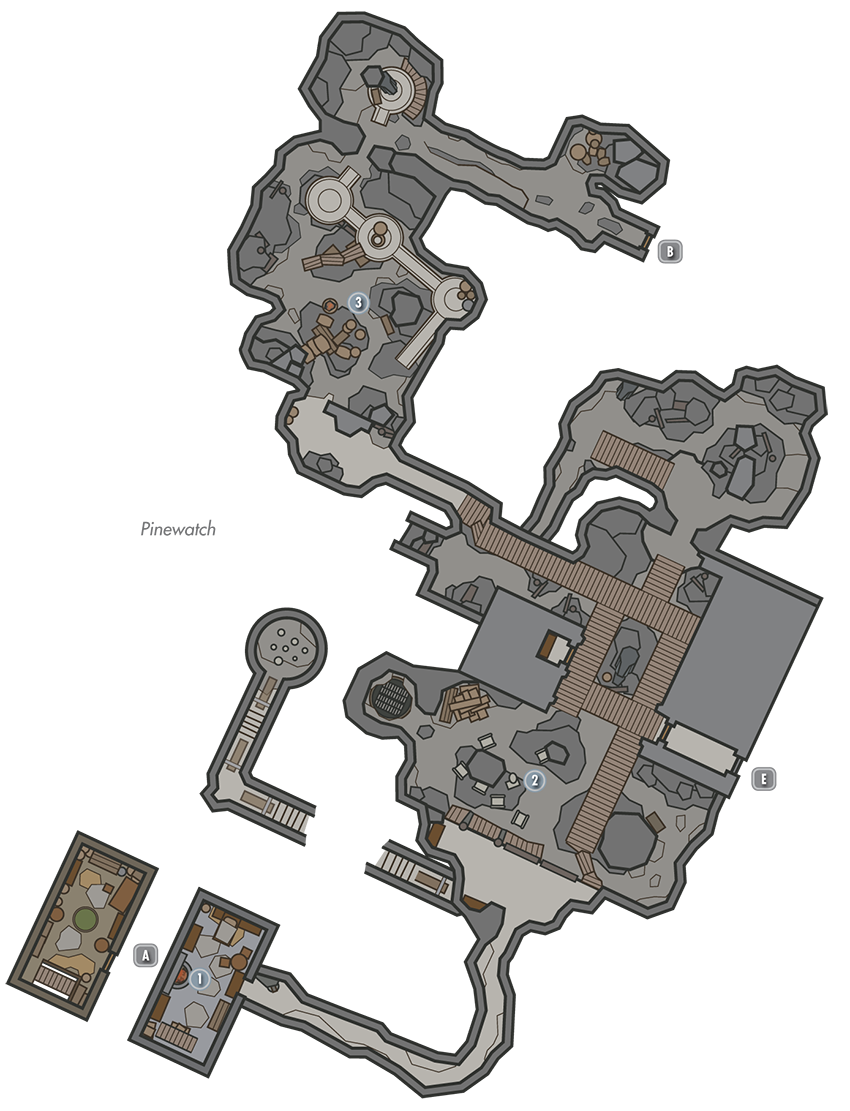
 Cabin
Cabin
Find a note in the cabin’s basement that reveals the existence of a hidden passage. Spy a shelf with wind gusting out from its base, then locate a button on the nearby wall and press it to shift the shelf and expose a secret passage.
 Body Disposal
Claim some potions and a Skill Book from a shelf to your left as you enter this first wide cavern. Slay the two guards who patrol the wooden walkways and see if you can open the Expert-level wooden door to access a potion-filled closet. Beware of bear traps on the ground floor, and raid a locked chest to the east. Enter the south tunnel to visit a gruesome pit with several lootable corpses.
- Danger! Bear Traps
- Skill Book [Sneak]: The Red Kitchen Reader
- Potions aplenty
- Loose gear
 Crumbling Cavern
Cross the wooden walkways to visit this chamber, which is guarded by a few more bandits. Secure the place and then loot the lopsided chest on the central rubble. Scale a winding ramp to find another chest up north before proceeding through the east door to the Bandit’s Sanctuary.
- Crafting: Grindstone
- Chest
- Chest (Locked: Novice)
 Door to Pinewatch Bandit’s Sanctuary
 Door to Pinewatch
 Sanctuary Entry
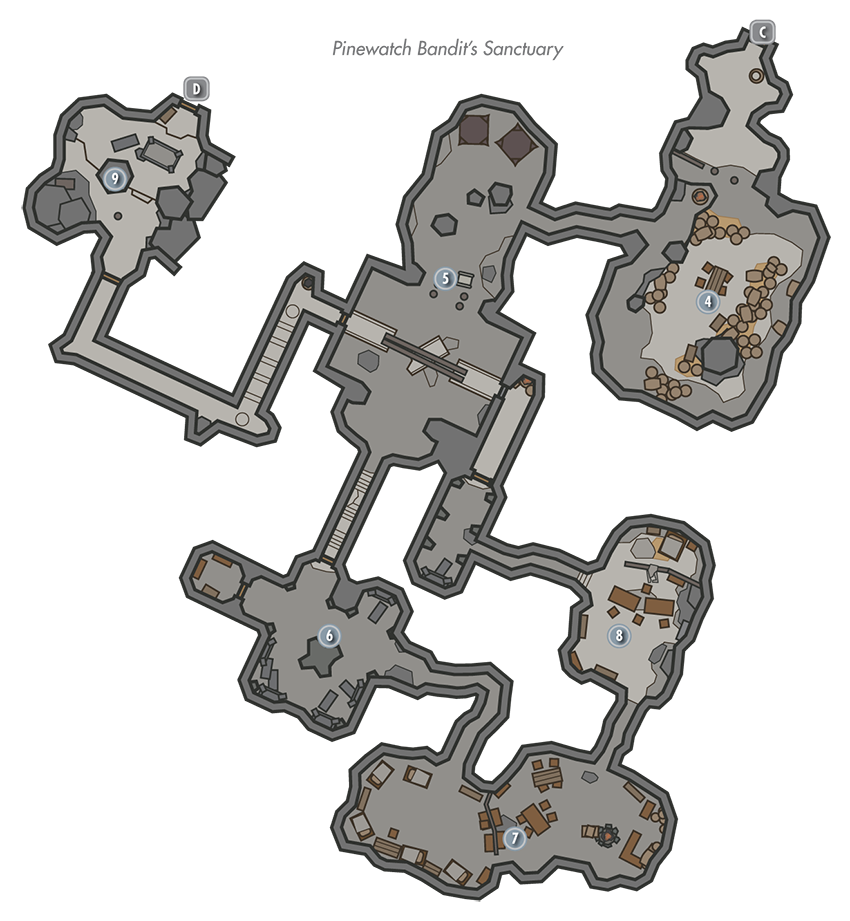
Hug the southeast wall to sneak past the bandits that are gathered around a table in the sanctuary’s first chamber, but beware of bear traps. If you fight the men, you’ll find that each possesses a letter that hints of treachery. Unfortunately, none of them carry keys for the two locked chests here.
- Danger! Bear Traps, Bone Alarm Trap
- Chest (Locked: Novice)
- Chest (Locked: Expert)
 Cage Cavern
Slay or pickpocket the lone patrolling guard here to obtain a key that unlocks one of the nearby cages.
- Danger! Bear Traps
- Pinewatch Key (Bandit)
 Sarcophagi Room
Cut down another bandit here, then open the Adept-level locked door to access a treasure nook with a plethora of valuables. Stand to one side of the chest when opening it to avoid being impaled. The Unusual Gem you find here pertains to Thieves Guild Radiant Quest: No Stone Unturned.
- Danger! Trapped Chest
- Unusual Gem: Stone of Barenziah [22/24]
- Potions
- Loose gear
 Sleeping Area and Bar
Read one of the many notes that are pinned to the wall on your way to this area—it confirms the treachery hinted at before, as does another note on a table here. Silently dispatch a sleeping bandit, then kill the group of ruffians to the east, near the bar. Find worthy gear and a few potions behind the counter.
- Potions
- Loose gear
 Rigel’s Quarters
Rigel Strong-Arm, leader of the bandits, sleeps behind this room’s wooden wall—dodge the hanging rattles or you’ll wake her. Loot the chest near Rigel’s bed and see if you can pickpocket a few useful keys off of her without being caught. Try sneaking away if she wakes up. Open the far Master-locked door with the Pinewatch Treasure Room Key.
- Danger! Bone Alarm Trap
- Crafting: Workbench
- Pinewatch Key (Rigel Strong-Arm)
- Pinewatch Treasure Room Key (Rigel Strong-Arm)
- Chest (Locked: Apprentice)
- Potions
- Loose gear
 Treasure Room
Due to the attempts by her crew to steal her plunder, Rigel has placed a large amount of traps blocking the path to her treasure room. Watch out for a pressure plate on either end of the narrow bridge, as they will trigger a wide volley of darts traps. A set of blade traps cover the hall just after this. Find the rhythm of their swings, then sprint through, but stop just short of the next hall—there is a pressure plate there that will trigger a battering ram to slam into the side of your head if you are not careful! Crouch and stand back while opening the room’s door to avoid being struck by a mace that swings through. Beware of another pressure plate near the table that holds Endon’s Silver Mold, among other valuables. Raid the large nearby chest before exiting through the door to return to Pinewatch’s entry chamber.
- Danger! Battering Ram Trap (pressure plates), Swinging Blade Trap (pressure plate), Spear Trap (pressure plate), Flail Trap (trapped door), Dart Trap (pressure plate)
- Endon’s Silver Mold
- Chest
- Potion
- Loose gear
 Door to Pinewatch
 Door to Pinewatch Bandit’s Sanctuary