
Elder Scrolls V: Skyrim Special Edition Guide The Atlas Hold 2: Hjaalmarch
[2.24] Labyrinthian
[2.24] Labyrinthian
Related Quests
- Side Quest: Masks of the Dragon Priests*
- College of Winterhold Quest: The Staff of Magnus
Recommended Level: 24
Dungeon: Dragon Priest Lair
- Draugr
- Dremora
- Enthralled Wizard
- Estormo
- Frost Troll
- Ghost Mages
- Ice Wraith
- Morokei
- Skeever
- Skeletal Dragon
- Skeleton
- Slaughterfish
- Spectral Warhound
- Troll
- Wisp
- Wispmother
Crafting
- Alchemy Lab
- Arcane Enchanter
Dangers
- Rune Trap (floor)
- Magic Caster Trap (Frost)
Collectibles
- Dragon Priest Mask: Konahrik [2/10]
- Dragon Priest Mask: Morokei [3/10]
- Dragon Priest Mask: Wooden Mask [3/10]
- Skill Book [Conjuration]: Liminal Bridges [C1/10]
- Unique Item: Ancient Helmet of the Unburned [9/112]
- Unique Weapon: Drainblood Battleaxe [8/80]
- Unique Weapon: Drainheart Sword [9/80]
- Unique Weapon: Drainspell Bow [10/80]
- Unique Weapon: Staff of Magnus [11/80]
Special Objects
- Word Wall: Dismaying Shout [1/3]
- Word Wall: Slow Time [1/3]
- Chest(s)
- Potions
- Loose gear
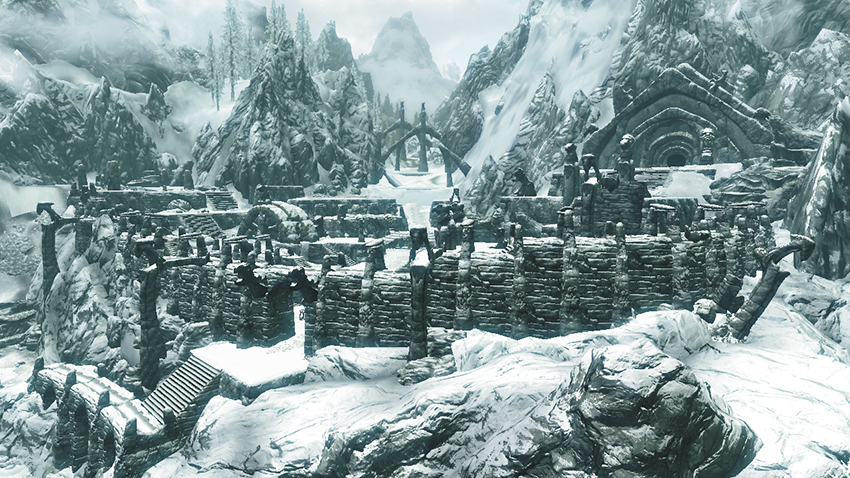
This vast network of ruins lies in the mountains southeast of Morthal. It was said to have been built by a mage named Shalidor, although in truth its history is much longer than this implies. Taken together, Labyrinthian may well be the largest network of ruins in all of Skyrim.
During the end of College of Winterhold Quest: The Staff of Magnus, you will obtain the unique Staff of Magnus.
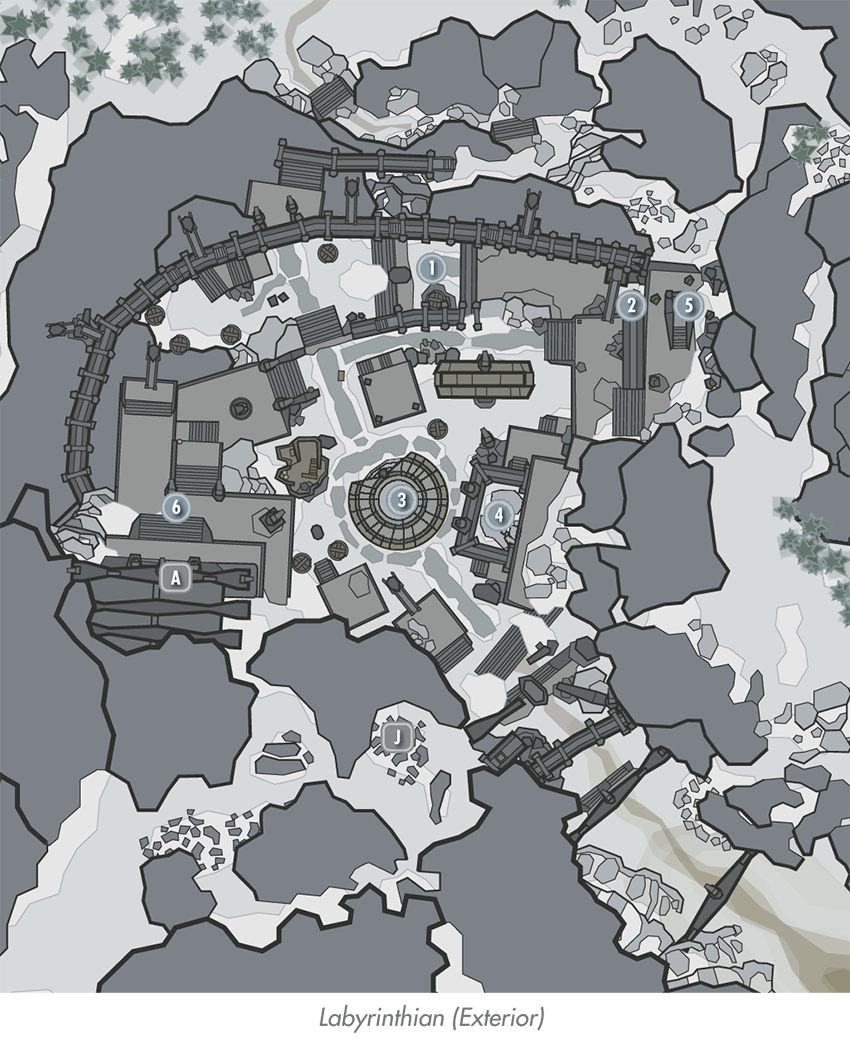
 Chest Nook A
Though intimidating in size, Labyrinthian’s exterior ruins are simple to navigate. Slay a Frost Troll here and raid a chest.
- Chest
 Chest Nook B
Scale some steps and slaughter another Frost Troll to secure a chest over here.
- Chest
 Central Dome
Duck into this central dome-shaped structure to discover an informative note near a skeleton. Collect the nearby Wooden Mask and put it on—you’ll find yourself standing in a sacred chamber. It’s actually the same room; you’ve simply been whisked back to the past. Slay special named Dragon Priest adversaries that lurk at the end of dangerous dungeons throughout Skyrim to obtain special Dragon Masks, then bring these masks to this chamber and place them onto their corresponding busts. Once all eight masks have been restored to the shrine, an immensely powerful Dragon Mask will be yours. This is a unique quest that will never appear in your quest log. Remove the Wooden Mask to return to the present.
- Dragon Priest Mask: Konahrik [2/10]
- Dragon Priest Mask: Wooden Mask [4/10]
 Shalidor’s Maze Entrance
You may enter Shalidor’s Maze at any time—see the “Shalidor’s Maze” section at the end of the main Labyrinthian walkthrough. Or simply raid the chest near its entry door and continue exploring these exterior ruins.
- Chest (Locked: Novice)
 Lost Valkygg Entrances
Two entrances to a side area named Lost Valkygg [2.24] are found in Labyrinthian’s northeast corner. Use the higher entrance to fully explore this space.
 Ceremonial Door
Progress through the College of Winterhold quest line until you acquire the College of Winterhold Quest: The Staff of Magnus. Then make your way up a series of steps that lead to this strange door. Fit the Torc of Labyrinthian onto the door so you may enter and begin your exploration of this massive place.
 Door to Labyrinthian (Interior)
 Exit to Skyrim
 Entry Chamber
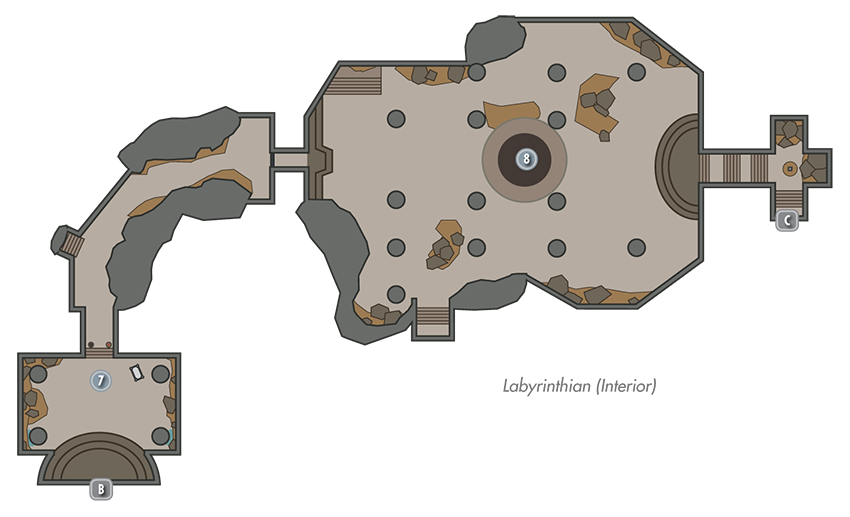
Labyrinthian’s sizable entry chamber hints at the magnitude of this epic dungeon, and the vast number of skeletons hints at the danger that lies ahead. Proceed through the far door and wide corridor that follows, looting urns along the way.
- Potion
- Loose gear
 Skeletal Dragon Chamber
A horde of skeletons guards this huge chamber, and a massive skeletal dragon rises from the room’s center as you enter. Fortunately, these undead enemies are somewhat fragile, though the dragon’s attacks are fierce. Loot a few urns after the battle, then proceed to the far staircase to venture onward and downward, optionally stopping to check the carved tablet here.
 Door to Labyrinthian Chasm
 Door to Labyrinthian (Interior)
 Chasm Entry
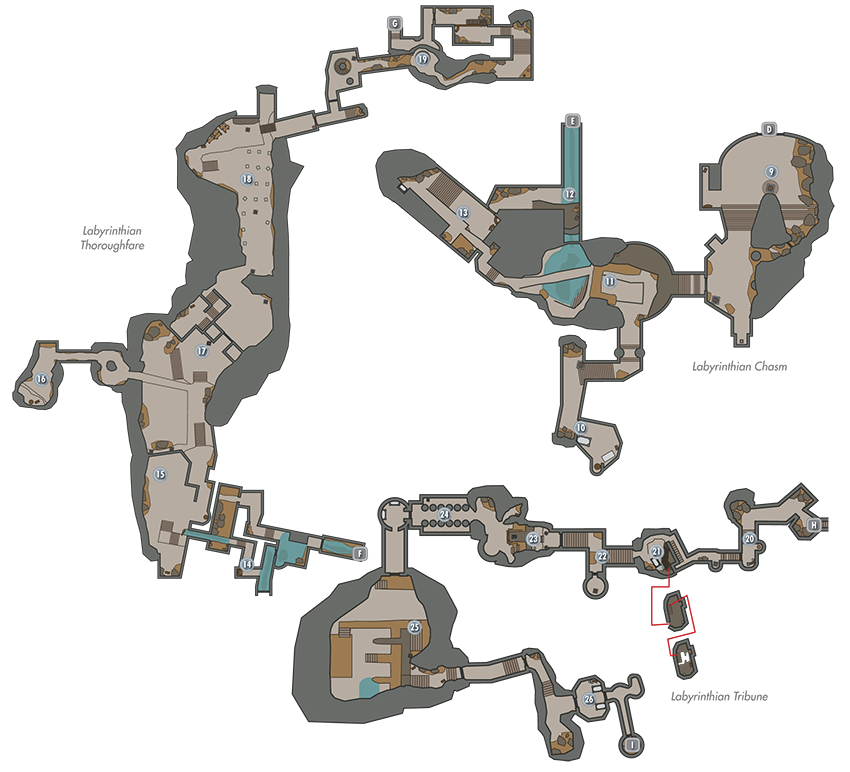
Before descending the Chasm’s entry steps, discover a chest that’s tucked away near the west wall. Go downstairs afterward and use any fire-based attack to thaw the door that has magically frozen. The Spell Tome that sits on a nearby pedestal can provide you with the means to advance.
- Chest
- Loose gear
 Study
Study
Dispatch powerful Draugr as you descend some narrow ramps, then duck into the south side passage to battle more undead on your way to a room filled with crafting stations and valuables. Don’t miss the Spell Tome: Equilibrium, a unique alteration spell that can only be obtained here.
- Crafting: Alchemy Lab, Arcane Enchanter
- Spell Tome: Equilibrium
- Chest
- Loose gear
 Narrow Ramp Cavern
Backtrack out from [10] and continue descending the sloping narrow ramps here, slaying a few more deadly Draugr on your way to the cavern’s watery bottom.
 Passage to Thoroughfare
Take the north passage from the bottom of [11] to locate the door that leads to the Labyrinthian Thoroughfare. Before heading through, venture up the west passage toward [13], doubling back at one point to scale a narrow trail that leads to treasure.
- Chest
- Loose gear
 West Chamber
Optionally visit this side area to battle a powerful Draugr and nab a bit of loot. You may access this area by taking the high west passage at [11], or the low west passage from [12].
- Potions
 Door to Labyrinthian Thoroughfare
 Door to Labyrinthian Chasm
 Plunder Passage
Slay a skeleton as you enter the thoroughfare, then unlock a Novice-level gate to access this side passage, where treasure awaits.
- Chests (2)
 Thoroughfare Access
Discover a chest tucked away against the south wall here, and beware of a vicious troll that lurks in the north passage that leads into the main thoroughfare.
- Chest
 Troll Den
Lowly skeletons roam the spacious thoroughfare, while a pair of dangerous trolls lurk in this side cavern, which you may optionally access by crossing the thoroughfare’s first elevated footbridge. Best the trolls to secure the blood-soaked treasure they guard.
- Chest
 Thoroughfare
Throw a lever to gain entry to the main thoroughfare. Loot a few urns and scale the west steps to discover a chest on a ledge.
- Chest
- Potion
 Wisp Sanctum
A trio of captivating wisps drift about a collection of short stone headstones here, and a formidable Wispmother soon rises from the ground to attack. A Wispmother in danger will spawn duplicates of herself—focus on slaying the real enemy and ending the fight so you may loot the chest. Use any form of cold spell to douse the burning door that follows so you may proceed to [19], but stand back and beware: a Ghostly Mage appears and attacks you relentlessly as you consider this magical barrier.
- Chest
 Trapdoor Chamber
Dispatch more foes as you loop around a winding passage to reach this lower chamber—or bypass the passage by opening a large trapdoor to drop straight down to the lower chamber, using a pipe to break your fall. Loot a few urns here before proceeding through the nearby door that leads to the Labyrinthian Tribune.
 Door to Labyrinthian Tribune
 Door to Labyrinthian Thoroughfare
 Entry Passage
Slay a couple of dangerous Draugr that patrol the Tribune’s entry passage. Loot a chest and claim a Spell Tome that can help you navigate the next segment, which features several rune traps. If you’re no good with wards, you may do best to sprint and pray. Remove the soul gem from the pedestal to deactivate the first trap, then trigger the rune trap on the floor with a ranged attack from a safe distance.
- Danger! Rune Trap (floor), Magic Caster Trap (Frost)
 Tower
Tower
Slay lowly Draugr as you descend this crumbling tower in search of loot. There’s Malachite Ore at the bottom of the exterior pool, and a small stash of hidden loot in an upper area of the tower.
- Chests (2)
 Locked Gate Hall
Unlock an Adept-level gate as you move through here to access a south treasure nook that contains valuable gear, including a unique helmet.
- Unique Item: Ancient Helmet of the Unburned [9/13]
- Potions
- Loose gear
 Word Wall Cavern
Beware the mighty Draugr who sleeps upon this cavern’s central throne. Raid a chest that’s tucked away near the north wall before approaching the nearby Word Wall to gain new power.
- Word Wall: Slow Time [1/3]
- Chest
 Pillar Passage
Use the large pillars to help you slip through this passage, avoiding its undead sentries.
- Potion
 Grand Cavern
The staff you seek is housed in this cavernous chamber. Disturb nothing and you are safe for the moment. Dive into the far pool to raid a chest, then make your way upstairs. Two Enthralled Wizards are channeling their power to sustain a shield around the Dragon Priest Morokei. Interrupting these will break the shield, bringing the wrath of Morokei upon you. Slay Morokei afterward to obtain his precious mask, along with the Staff of Magnus. Scale the steps and head for the cavern’s door afterward, looting a large chest and then doubling back to locate a smaller chest that’s tucked away near the stairs.
- Staff of Magnus (Morokei)
- Dragon Priest Mask: Morokei [3/10]
- Chests (3)
 Exit Passage
Estormo ambushes you as you make your way out of Labyrinthian. Slay him, then loot a nearby chest before taking your leave of this forboding place.
- Chest
 Exit to Skyrim
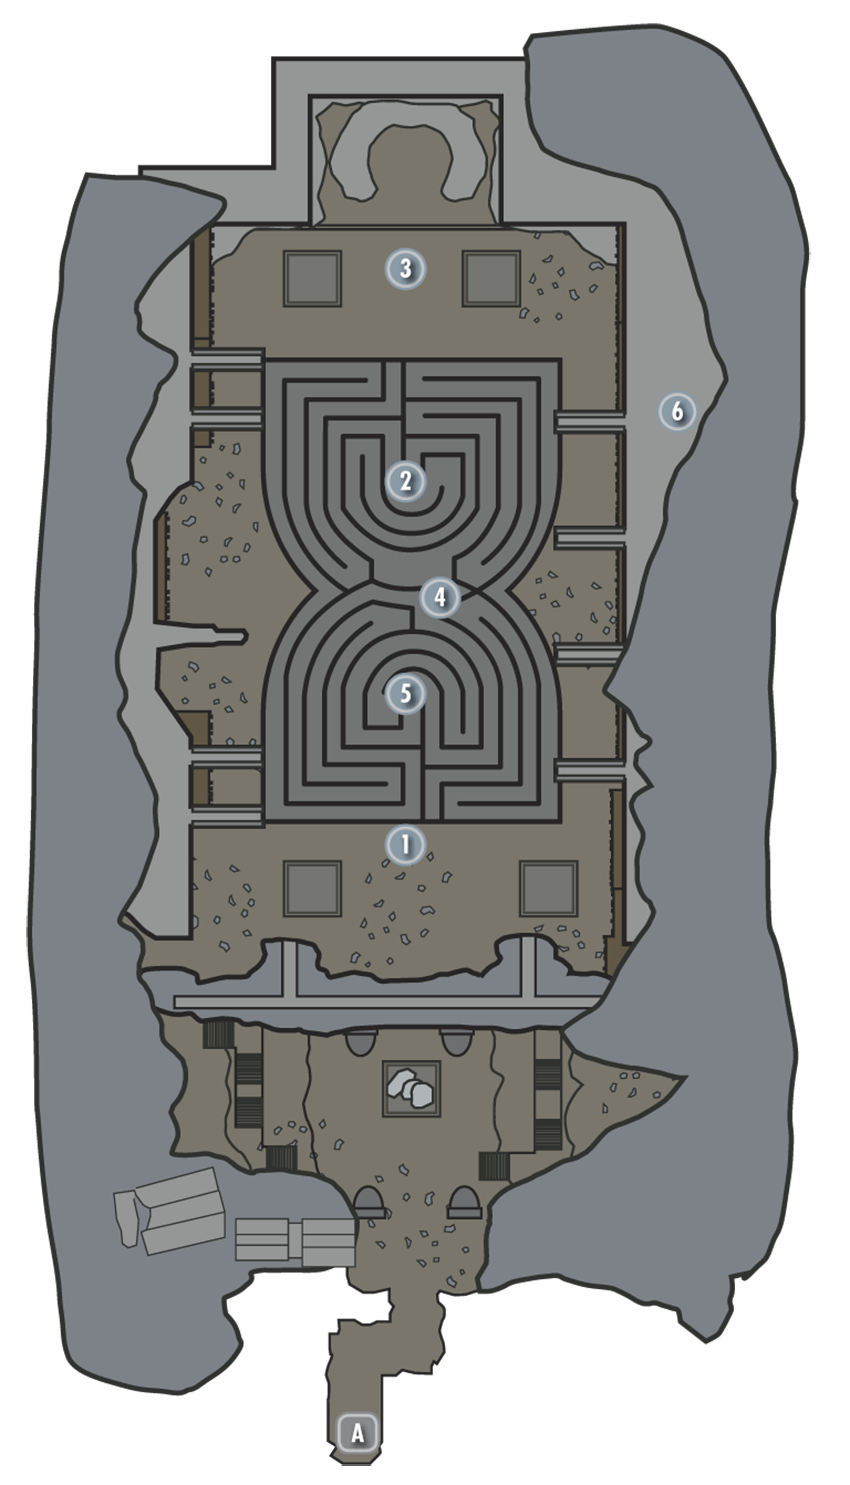
Shalidor’s Maze
Shalidor’s Maze is a separate subsection of Labyrinthian, and you may enter and fully explore this curious place at any time. Collect all four staves that hover in soft light at the entrance, then enter the maze and use the Staff of Magelight or any ranged Alteration spell you may possess to activate the Alteration Sigil so you may advance. Open special shutters to expose hidden valuables as you navigate the linear maze. Leave each shutter open to mark your progress.
Activate the next sigil, again by hitting the sigil with a ranged spell of its matching school, to drop into a short network of underground passages. Simply go west and take a spiral staircase back up to the surface. You’re now outside the maze again; loop around and enter from the north this time. Stop and obtain a new Word of Power from the wall nearby, then activate the next sigil and open the north gate. Find your way toward a Skill Book, and then activate the fourth and final sigil to be whisked away to a battle against a Daedric warrior called a Dremora and its two Atronach minions.
After slaying the Dremora, liberate the unique “Diadem of the Savant” from its corpse and try leaping from the high southern ledges to reach the snowy wooden platforms that run the length of the cavern’s west wall. Loop around the wooden ledge to eventually discover valuable gear near a skeleton. Drop to the ground floor afterward and approach the north Word Wall if you haven’t already claimed your new Word of Power.
- Skill Book [Conjuration]: Liminal Bridges [C1/10]
- Word Wall: Dismaying Shout [1/3]
- Diadem of the Savant
- Loose gear
Exit to Skyrim
Staves and South Maze Entrance
Collect all four staves that hover in soft light here, then enter the maze and use the Staff of Magelight (or any ranged Alteration spell you may possess) to activate the Alteration Sigil so you may advance. Open special shutters to expose hidden valuables as you navigate the linear maze. Leave each shutter open to mark your progress.
Destruction Sigil
Activate the next sigil here, again by hitting the sigil with a ranged spell of its matching school (use the Staff of Firebolts if you like), to drop into a short underground passage. Simply go west and take a spiral staircase back up to the surface.
North Maze Entrance and Word Wall
You’re now outside the maze again; loop around and enter from the north this time. Stop and obtain a new Word of Power from the wall nearby, then activate the Illusion sigil with the Staff of Fear and open the north gate.
- Word Wall: Dismaying Shout [1/3]
Skill Book Nook
Find your way toward a Skill Book that’s found in this small nook, lying near a skeleton. You can only reach this Skill Book when you enter the Maze from the north.
- Skill Book [Conjuration]: Liminal Bridges [C1/10]
Restoration Sigil
Again, dart through the linear maze until you find andactivate the fourth and final sigil with the Staff of Repulsion. Fall into the pit and step into the portal to be whisked away to a battle against a Daedric warrior called a Dremora, and its two Atronach minions. After slaying the Dremora, liberate the unique “Diadem of the Savant” from its corpse.
- Diadem of the Savant
Long-Lost Loot
After the Dremora battle, try leaping from the high southern ledges to reach the snowy wooden platforms that run the length of the cavern’s west wall. Loop around the wooden ledge to eventually discover valuable gear near a skeleton here. Drop to the ground floor afterward and take your leave of this unusual place.
- Diadem of the Savant
- Loose gear