
Elder Scrolls V: Skyrim Special Edition Guide The Atlas Hold 9: The Rift
[9.45] Forelhost
[9.45] Forelhost
Related Quests
- Side Quest: Masks of the Dragon Priests*
- Dungeon Quest: Siege on the Dragon Cult
- Dungeon Activity
Recommended Level: 24
Dungeon: Dragon Priest Lair
- Animal
- Captain Valmir
- Dragon Cultist (ghost)
- Draugr
Rahgot Crafting
- Alchemy Labs (2)
- Arcane Enchanter
Dangers
- Battering Ram Trap (pressure plate)
- Dart Trap (pressure plates)
- Flamethrower Traps (pressure plates)
- Oil Lamp Traps
- Oil Pool Traps
- Rising Floor Trap
- Rune Traps (wall/floor)
- Spear Trap (pedestal pressure plates)
- Swinging Blade Trap
- Swinging Wall Trap (pressure plates)
- Trapped Chests
Puzzles
- Claw Door
Quest Items
- Rahgot’s Mask
- Skorm Snow-Strider’s Journal
Collectibles
- Dragon Claw: Glass Claw [9/10]
- Dragon Priest Mask: Rahgot [9/10]
- Skill Book [Restoration]: The Exodus
- Unique Weapon: Dragon Priest Staff [71/80]
Special Objects
- Word Wall: Storm Call [2/3]
- Chests
- Potions aplenty
- Loose Gear
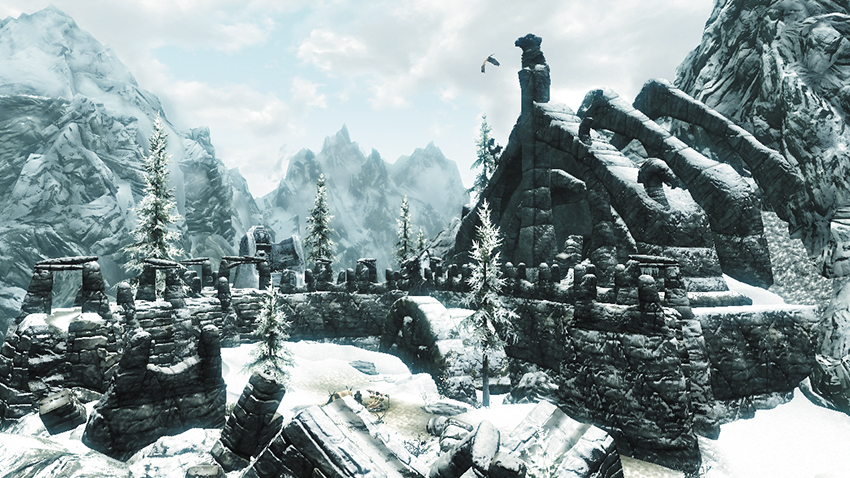
This massive stronghold stands in the snowy peaks of the mountains that lie southeast of Riften—a bit of climbing is required to get here. Forelhost is the tomb of one of eight fearsome Dragon Priests whose masks are part of a special quest.
Exterior
Speak with an soldier named Captain Valmir, who has made camp just outside the stronghold, to gain a new Side Quest that involves clearing the stronghold. (If you accidentally killed Captain Valmir before speaking with him, the key can be found on his body.) Don’t let the captain catch you plundering his campsite before heading into the stronghold.
- Chest
- Potions
 Exit to Skyrim
 Entry Hall
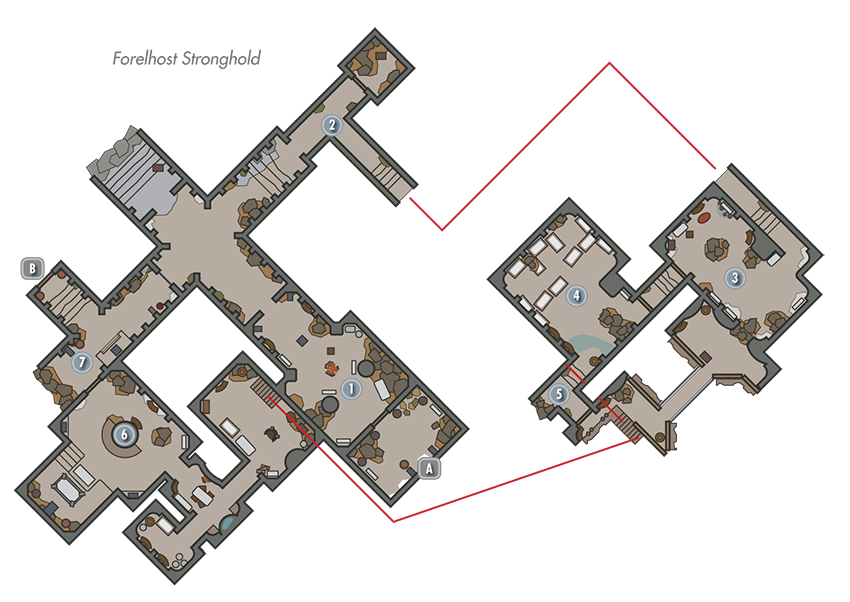
Dispatch the ghost of a Dragon Cultist in this first wide chamber. Carefully sidestep a pressure plate as you enter the north passage on your way to [2].
- Danger! Battering Ram Trap (pressure plate)
 Swinging Blade Passage
Slay a few more Dragon Cultist ghosts on your way to this passage of swinging blades. Raid the chest in the nearby nook before carefully darting past each swinging blade in turn.
- Danger! Swinging Blade Trap
- Chest (Locked: Novice)
- Loose Gear
 Journal Chamber
The informative journal that Captain Valmir hinted about is found in this quiet chamber. Collect it to complete an optional objective. If you return to Captain Valmir at this point, he’ll give you a rundown of what he learns from the journal.
- Skorm Snow-Strider’s Journal
- Chest (Locked: Apprentice)
- Potions aplenty
 Sleeping Quarters
The poisons that the Dragon Cultists used to kill themselves long ago are still potent. Collect them as you pass through here.
- Potions
 Entry Hall/Smithing Area: West Side
Explore the Entry Hall’s upper walkways to discover a chest, then double back and descend into its western half, where a Dragon Cultist ghost awaits. Progress through the Smithing Area into a small kitchen.
- Crafting: Anvil, Grindstone, Workbench
- Chest
- Chest (Locked: Adept)
- Potions
- Loose gear
 Worship Chamber
Swipe a few valuables from the kitchen on your way to this large chamber, which features a central stairwell. Slay a few powerful Draugr here, and skirt the pressure plate atop the central platform to avoid triggering a trap. Avoid standing directly in front of the room’s chest when opening it—spikes will stab up from the floor below! Try disabling the chest’s trigger hinge if you’re skilled at lockpicking.
- Danger! Dart Trap (pressure plate), Trapped Chest
- Potions
 Fire Trap Passage
Beware of a pair of pressure plates in this final passage—they trigger nasty fire traps. Slay another mighty Draugr here and throw a lever to open a gate so you may quickly exit this place later. For now, go downstairs and through a door to delve deeper into the keep.
 Door to Forelhost Crypt
 Door to Forelhost Stronghold
 Well
Well
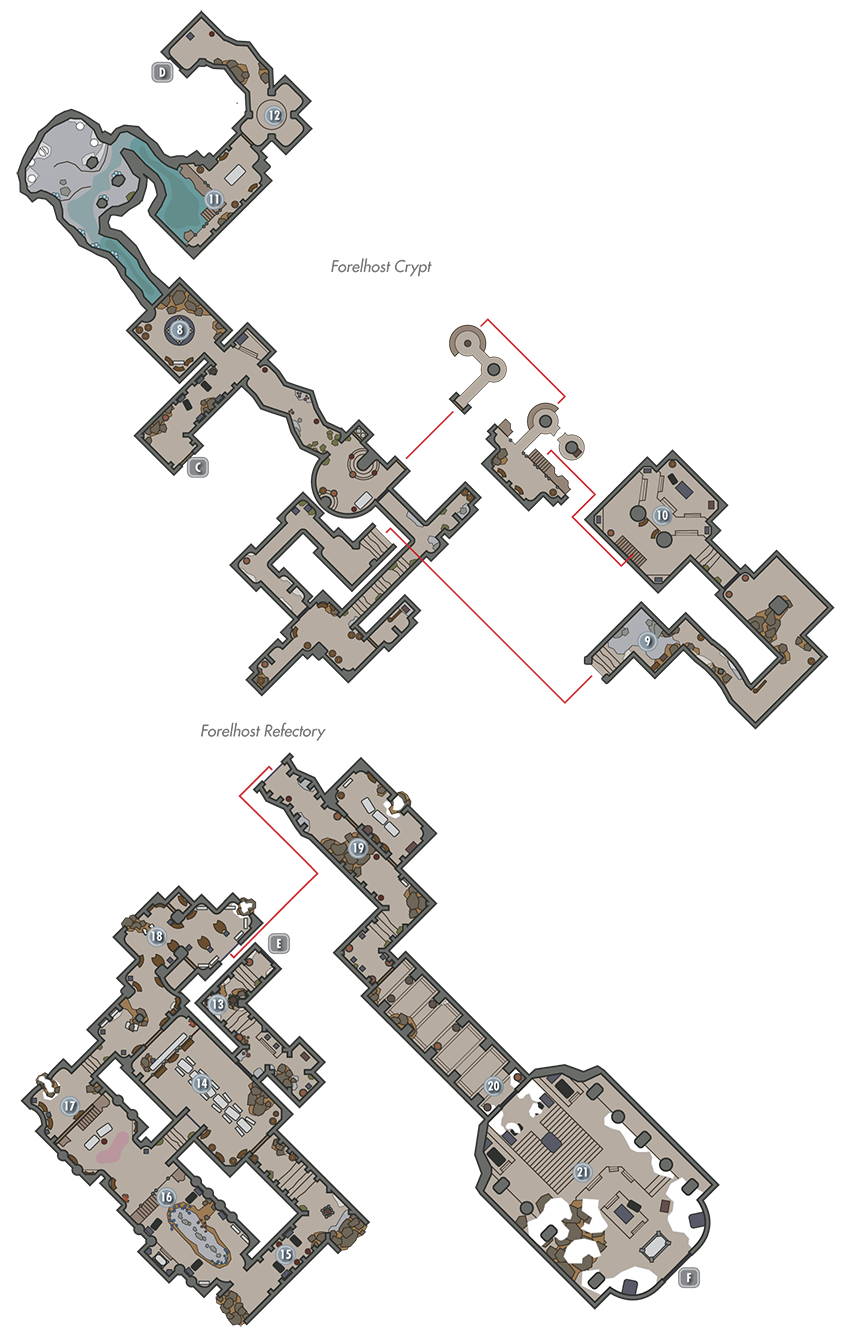
Collect a few potions in this room, then see if you can pick the Master-level cage door in its center. Doing so allows you to skip areas [9] and [10], which you only need to visit to search for the key that opens the cage door. The watery passage beneath the trapdoor leads to [11].
- Potions
 Burial Passages
Loot plenty of urns and slay a host of Draugr as you navigate this long, winding passage. Beware of removing items from pedestals, which triggers traps, and move with caution to avoid a variety of other traps along the way.
- Danger! Dart Trap (pressure plates), Rune Traps (wall/floor), Swinging Blade Trap, Spear Trap (pedestal pressure plates), Swinging Wall Trap (pressure plates)
- Chest (Locked: Master)
- Potions
 Overlord’s Tomb
A vastly powerful Draugr warrior rises from a central sarcophagus as you enter this large cavern. Slay it, along with its minions, to secure a needed key from a chest. Go upstairs and leap to a second chest afterward, then scale a winding ramp to reach a high door that leads back to the start of the burial passages, but watch out for the magic casting trap at the top! Dodge when it fires, then run across to loot the Soul Gem, or knock it off the pedestal with an arrow.
- Forelhost Well Key (chest)
- Danger Magic Trap
- Chests (2)
- Potions
- Loose Gear
 Poison Chamber
Kill a few Skeevers on your way to this cavern, where the cultists who once lived here poisoned their water supply—don’t worry, it’s had several hundred years to dissipate. Collect a selection of leftover poisons and swipe a Skill Book off a shelf.
- Danger! Oil Pool Trap
- Skill Book [Restoration]: The Exodus
- Potions aplenty
 Rising Floor Passage
The bend in this passage features a nasty trap—stepping in the middle causes a large section of floor to rise, slamming you into long spikes on the ceiling. Avoid the center of the passage while rounding the corner.
- Danger! Rising Floor Trap
 Door to Forelhost Refectory
 Door to Forelhost Crypt
 Entry Passage
Dispatch powerful Draugr in the very first passage, and find a chest tucked away in the corner. Stand to one side of the pedestal near the chest when removing the item from it to avoid being shot by arrows.
- Danger! Dart Trap (pedestal pressure plate)
- Chest
 Dining Area
This dining hall turned makeshift embalming area was used by the Cultists to hastily embalm their members after they destroyed the hallway during the siege. Loot a host of urns to pad your coin purse before taking the south passage to [15].
 Oily Tunnel
Ignite the oil on the ground in this passage to help you kill the powerful Draugr that lurks here.
- Danger! Oil Lamp Traps, Oil Pool Trap
 Open-Air Chamber
Dispatch more Draugr in this wide room, and loot the chest that lies beneath the wooden stairs. A large amount of deadly flowers can be harvested here, and the half-buried bodies of several Draugr can be looted as well. Go upstairs afterward and throw a lever in the east passage to open a portcullis, allowing for faster navigation of the floor. Backtrack out afterward and head north to [17].
- Chest (Locked: Adept)
- Potions
 Lab
Lab
Lure a mighty Draugr toward the oil slick on the ground in this chamber, then knock down the overhead lamp to set the undead warrior ablaze. Read the informative note on the table near the Alchemy Labs and collect a host of potions before proceeding upstairs.
- Danger! Oil Lamp Trap, Oil Pool Trap
- Crafting: Alchemy Labs (2)
- Potions aplenty
 Library
As you move into the Library, watch out for the magic casting trap that sits across the room. Either snipe the gem with a bow or time your movement and run from cover to cover to cross the room. Swipe a special Glass Claw off a pedestal as you move through this cluttered area. Stand back and to one side of other pedestals before removing their contents to avoid traps. Unlock Master and Expert-level doors here to access a small, potion-filled closet and a little alcove with a Soul Gem. Loot a locked chest on your way to [19].
- Danger! Spear Trap (pedestal pressure plate)
- Dragon Claw: Glass Claw [9/10]
- Chest (Locked: Apprentice)
- Potions aplenty
- Loose Gear
 Arcane Workroom
Slay a deadly Draugr in this small chamber, then stand back and to one side when opening the far chest to avoid being stabbed by spears (or simply disable its trigger wire). Dodge a pressure plate in the south passage that follows, collecting a few potions on your way to [20].
- Danger! Flamethrower Trap (pressure plate), Trapped Chest
- Crafting: Arcane Enchanter
- Potions
 Claw Door Passage
Inspect the Glass Claw you found back at [18] and notice three symbols on its palm. Rotate the three concentric rings of this passage’s far door to imitate the same sequence of symbols, then inspect the central keyhole to insert the Glass Claw and gain access to the tomb’s final chamber.
 Rahgot’s Tomb
An immensely powerful Dragon Priest named Rahgot rises from this chamber’s central sarcophagus when you enter. Fight hard to slay the deadly villain, then obtain a valuable staff, key, and Dragon Priest Mask by sifting through Rahgot’s remains. Use Rahgot’s key to open the large door and head outside.
- Dragon Priest Mask: Rahgot [9/10] (Rahgot)
- Unique Weapon: Dragon Priest Staff [71/80]
- Forelhost Balcony Key (Rahgot)
- Chest
 Exit to Skyrim
Exterior (Balcony)
Back outside, cross a few snowy ramparts to locate an ancient Word Wall. Learn your new word of power, then descend to the fort’s main courtyard to find Captain Valmir speaking with an enemy soldier. It turns out that Valmir is an imposter. Kill him to complete your quest, then inspect his corpse to discover an informative letter. Your work here is complete.
- Word Wall: Storm Call [2/3]