
Elder Scrolls V: Skyrim Special Edition Guide The Atlas Hold 1: Haafingar
[1.16] Statue to Meridia and Kilkreath Ruins
[1.16] Statue to Meridia and Kilkreath Ruins
Related Quests
- Daedric Quest: The Break of Dawn
Recommended Level: 24
Dungeon: Draugr Crypt
- Corrupted Shade
- Malkoran
- Malkoran’s Shade
Crafting
- Arcane Enchanter
Dangers
- Swinging Blade Trap (tripwire/lever)
- Spear Trap (door)
Quest Items
- Dawnbreaker
Collectibles
- Skill Book [Block]: Battle of Red Mountain
- Unique Weapon: Dawnbreaker [4/80]
Special Objects
- Word Wall: Elemental Fury [1/3]
- Area Is Locked (quest required)
- Chest(s)
- Potions
- Loose gear
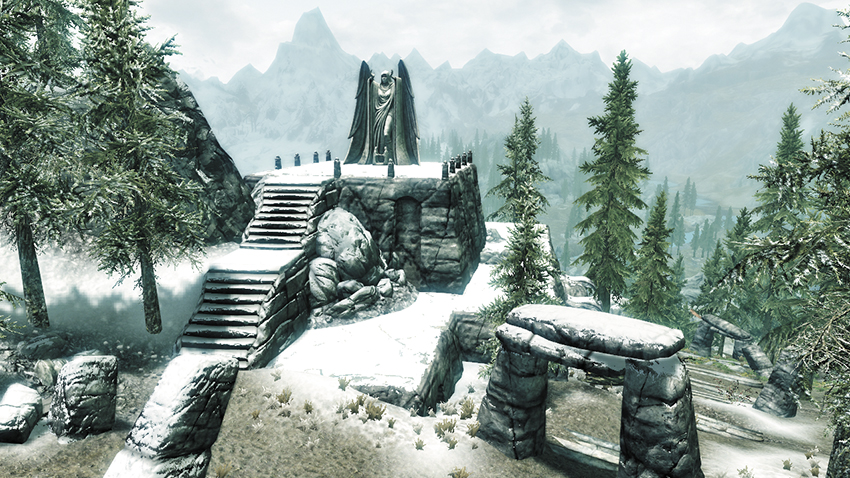
Located atop Mount Kilkreath, near the heart of Haafingar, a majestic statue in the form of the goddess Meridia stands at the top of ancient, defiled ruins. A special object called Meridia’s Beacon, which appears randomly inside of special chests, steers you toward this site—insert the Beacon into the statue’s hands to initiate a vertigo-inducing dialogue with Meridia in the heavens, then go downstairs and venture into Kilkreath Temple at the goddess’s command.
 Exit to Skyrim
 Entry Passage
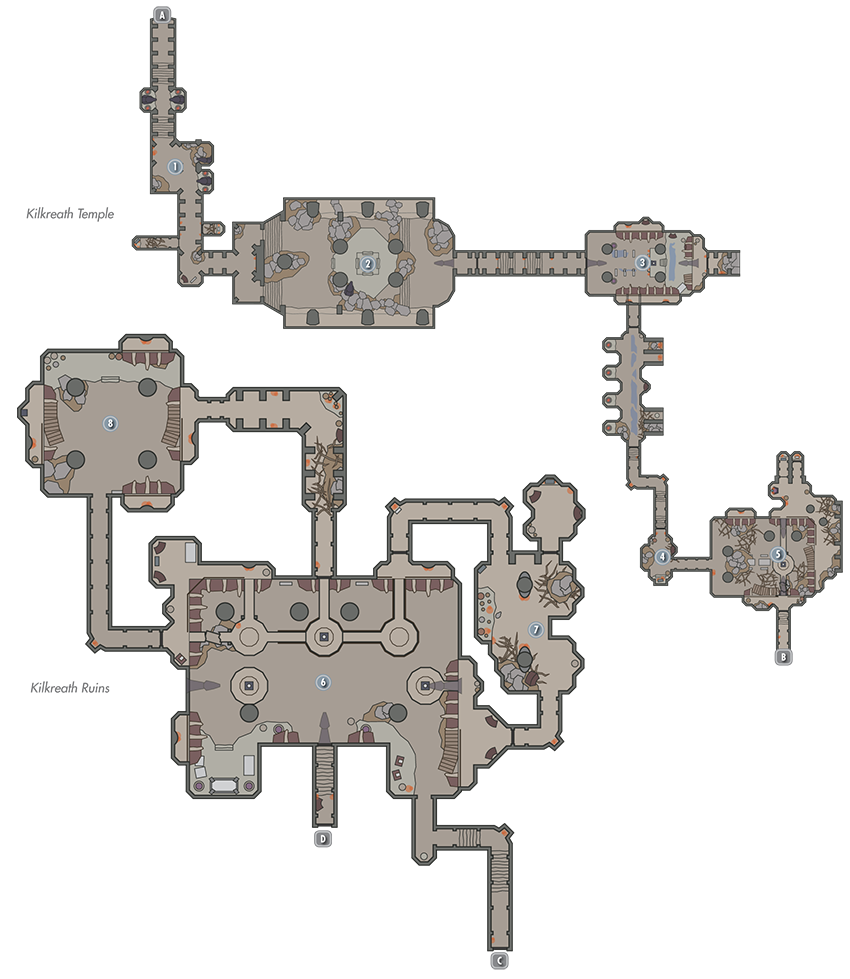
Loot corpses and burial urns as you navigate the Temple’s entry passage. Unlock an Adept-level door along the way to access a lever that raises the west portcullis, exposing a chest.
- Chest
- Burial Loose gear
 Pedestal Chamber A
Activate this wide chamber’s central pedestal to open the way forward with a potent ray of Meridia’s magical light. Be careful not to step into the light ray or you’ll suffer damage.
 Pedestal Chamber B
Slay three Corrupted Shades in this chamber, then activate another pedestal to open a door above, allowing a ray of light to shine through. Proceed through the lower south door to visit [4].
 South Passage and Chest Nook
Raid a chest here after navigating a long passage guarded by Corrupted Shades.
- Chest
- Potion
 Pedestal Chamber C
Slay a few more Shades in this large chamber, then go upstairs and activate a third pedestal to open another door. Before going through, cross the walkway and unlock an Expert-level door (if possible) to discover a lever that raises the nearby portcullis. Raid the chest beyond, then backtrack across the walkway and proceed through the door to exit out to an exterior balcony.
- Crafting: Arcane Enchanter
- Chest
- Burial
 Exit to Kilkreath Balcony
Kilkreath Balcony
Sprint east to locate a locked chest on the freezing exterior balcony, then scale the nearby stairs and enter the Kilkreath Ruins to continue your quest.
 Exit to Kilkreath Balcony
 Pedestal Chamber D
Cut down the Corrupted Shades that guard this giant chamber’s ground floor. Backtrack to the entry and go upstairs afterward to find a few potions. Activate the pedestal up here to open the nearby door.
 Traps and Treasure
Raid a chest in this area, then stand back when opening the northeast wooden door—spikes stab up from the floor before the door when you open it. (Alternatively, you may attempt to disable the trapped door’s activation hinge.) Loot another chest in the nook beyond before making your way back to [6], dodging a tripwire on your way to avoid triggering a nasty trap.
- Danger! Swinging Blade Trap (tripwire/lever), Spear Trap (door)
- Chests (2)
- Potions
- Loose gear
Pedestal Chamber D Revisited
Follow the caged walkway, then leap over to a pedestal and activate it to open the west door. Jump back across and slay the shades that emerge from behind the door; then cross over, looting a chest and claiming a Skill Book from a dark corner on your way to [8].
- Skill Book [Block]: Battle of Red Mountain
- Chest (Locked: Novice)
- Potions
- Loose gear
 Trapped Pedestal Chamber
Lay more Corrupted Shades to rest in this sizeable chamber, then go up the west stairs and stand to one side of a pedestal before removing its tantalizing potion—spears stab out from the wall when you collect the item. Scale the east stairs afterward and take the east passage back to [6], activating yet another pedestal to finally open the ground floor’s east door. Carefully drop down and proceed through the door to visit Kilkreath’s final area.
- Danger! Spear Trap (pedestal pressure plate)
- Potion
 Door to Kilkreath Catacombs
Kilkreath Catacombs
Raid a chest in the Catacomb’s entry chamber before activating the central pedestal to open the way into the final chamber, where a mighty foe awaits. Defeat a powerful mage named Malkoran in the final room, then slay Malkoran’s Shade, which emerges from his corpse, to at last free Kilkreath from the villain’s grip. Search the room thoroughly before taking Dawnbreaker from the glowing pedestal, completing your quest.
- Unique Weapon: Dawnbreaker [4/80]
- Chest
- Potions
 Pedestal Chamber E
Raid a chest here before activating the central pedestal to open the way into the final chamber, where a mighty foe awaits.
- Chest
- Burial Potions
 Malkoran’s Chamber
Defeat a powerful mage named Malkoran in this final room, then slay Malkoran’s Shade, which emerges from his corpse, to at last free Kilkreath from the villain’s grip. Search the room thoroughly before taking Dawnbreaker from the glowing pedestal, completing your quest.
- Unique Weapon: Dawnbreaker [4/80]