
Elder Scrolls V: Skyrim Special Edition Guide The Atlas Hold 4: Winterhold Hold
[4.13] Alftand
[4.13] Alftand
Related Quests
- Main Quest: Elder Knowledge
- Daedric Quest: Discerning the Transmundane
- Dungeon Activity
Recommended Level: 16
Dungeon: Dwarven City
- Animal
- Dwarven Centurion
- Dwarven Sphere
- Dwarven Spider
- Falmer
- J’darr
- Sulla Trebatius
- Umana
Crafting
- Alchemy Lab
- Blacksmith Forge
- Tanning Rack
- Workbench
Dangers
- Bone Alarm Trap
- Dwarven Piston Traps
- Dwarven Thresher Trap (pressure plates)
- Falmer Claw Trap (trip wire)
- Flamethrowers
- Flamethrowers (button)
- Oil Pool Traps
- Spear Trap (pressure plates)
- Swinging Wall Trap (pressure plate)
Underground Connection: Blackreach [10.02]
Collectibles
- Skill Book [Lockpicking]: The Locked Room [D2/10]
- Unique Item: Targe of the Blooded [35/112]
Special Objects
- Dwarven Mechanism
- Chest(s)
- Potions
- Loose gear
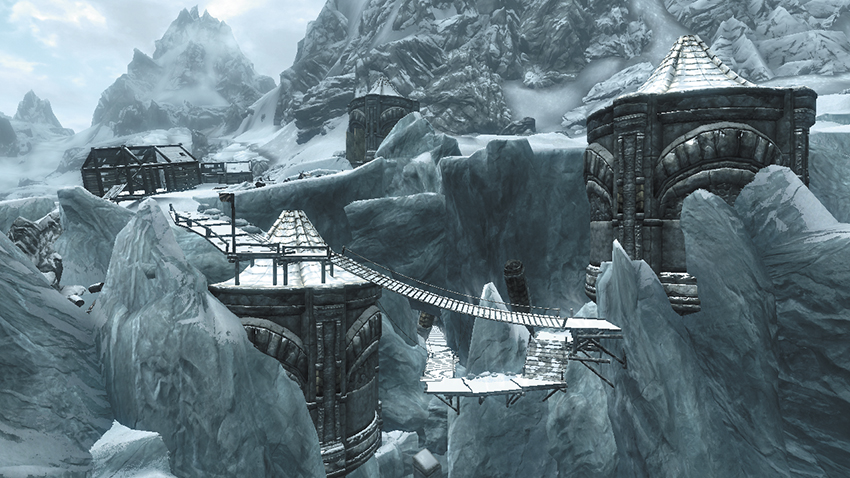
This collection of Dwarven ruins has been exposed by the splitting of a massive glacier in the mountains southwest of Winterhold’s capital. Navigating a ruined tower grants passage up to a high excavation site.
Exterior (Lower Glacier)
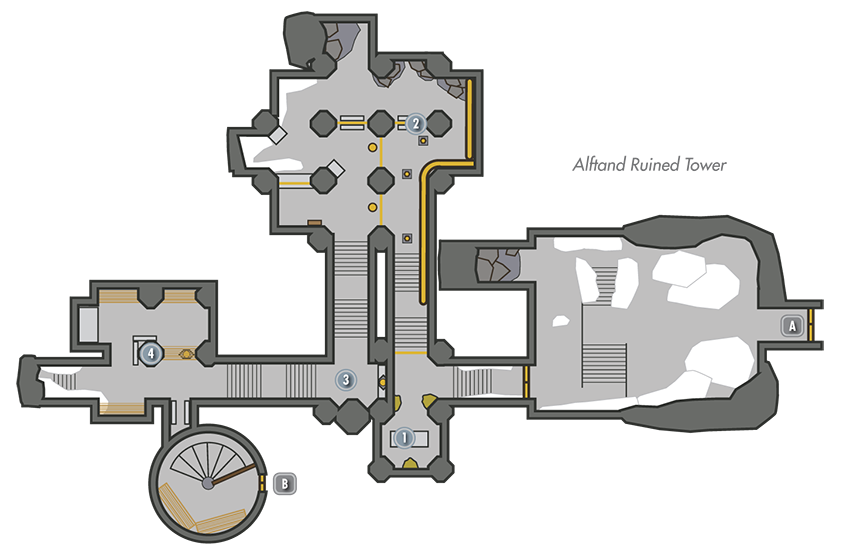
Slay the odd animal as you sprint south along the base of the glacier’s wide fissure. Enter the ruined tower at the fissure’s far end to navigate an interior passage that leads you high atop the glacier.
 Exit to Skyrim
 Chest Nook A
Sneak through the ruined tower, or you risk alerting Dwarven Spiders and Spheres that quickly emerge from small portals in the walls. Find a chest here, and push a button to open the nearby gate. This also activates several flamethrowers near the gate, which you must sprint through. Read the nearby book to learn the Lesser Ward spell, which can help reduce the flamethrowers’ harmful effect.
- Danger! Flamethrowers (button)
- Chest (Locked: Apprentice)
- Potion
- Loose gear
 Trapped Stairwell
Beware of pressure plates in this passage as you head upstairs. If Dwarven Spheres sense your presence, try using these traps against them by looping around and pressing the buttons on the other side of the thin metal gate.
- Danger! Spear Trap (pressure plates)
 Chest Nook B
If possible, unlock a challenging chest here to claim worthy loot.
- Chest (Locked: Expert)
 Storage
Swipe some potions from the metal shelves here, and unlock another chest that sits on the ground. Make your way up a spiral stairwell and exit the tower.
- Chest (Locked: Adept)
- Potions
 Exit to Skyrim
Exterior (Upper Glacier)
Head south after passing through the ruined tower, scaling a snowy hill. Sprint east to finally locate the Alftand excavation site. Search some open-air cabins here to discover a chest and an informative journal, then descend a series of wooden planks to discover a cave that leads into Alftand’s glacial ruins.
- Chest
 Exit to Skyrim
 Glacial Ruins’ Entry Passage
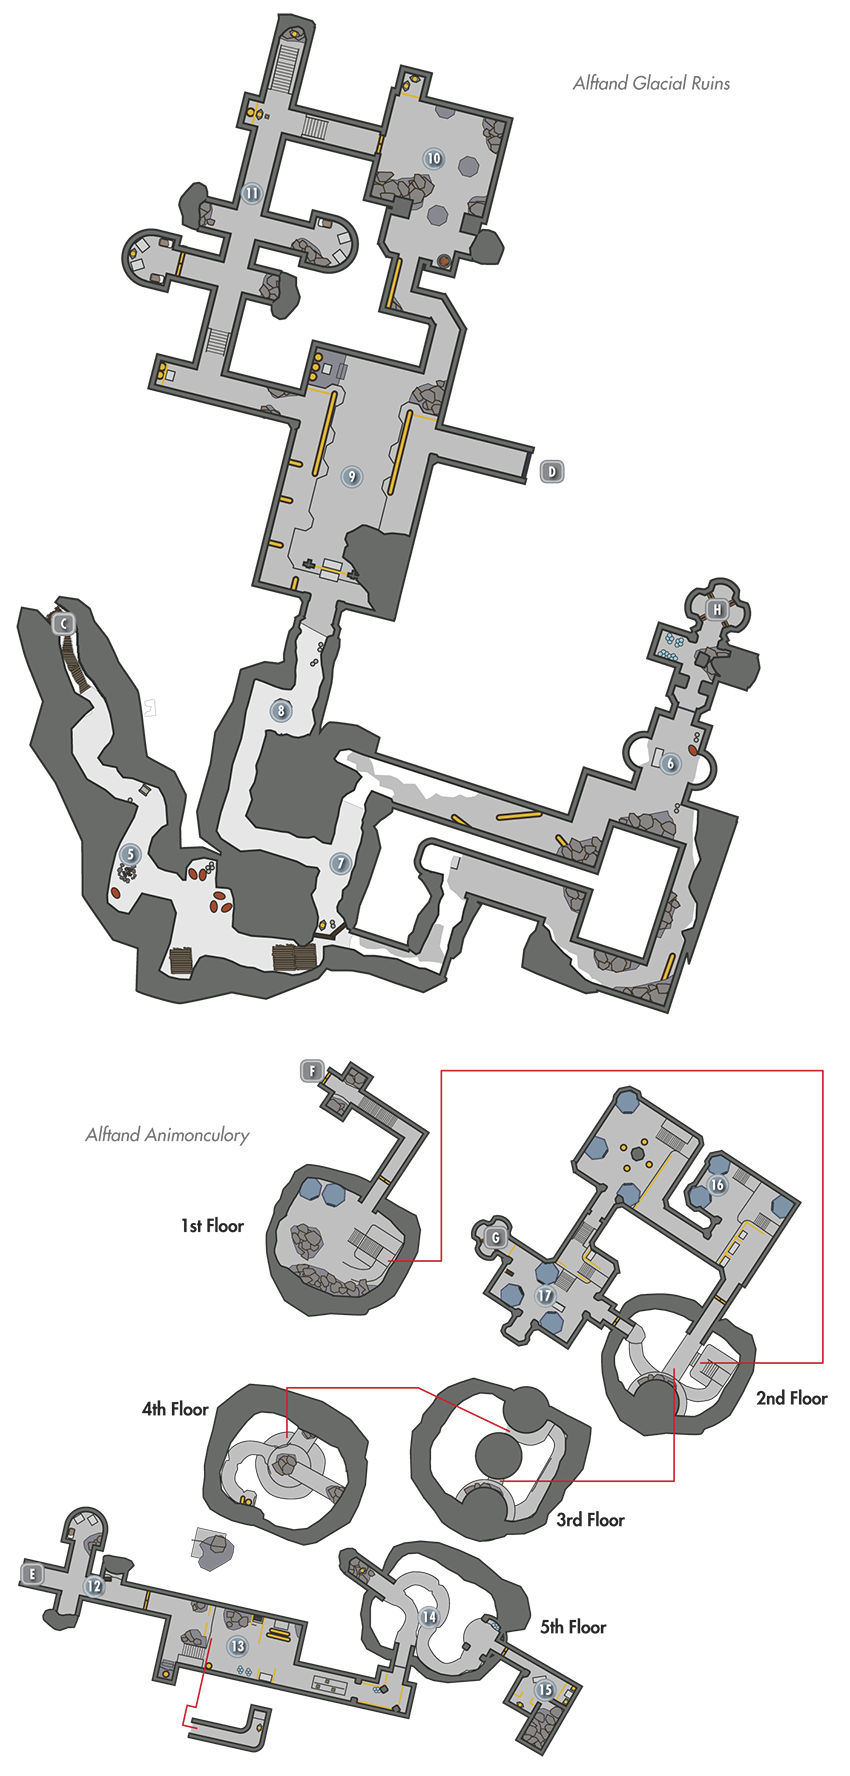
Thumb through Sulla’s Journal, which lies on a barrel in the Glacial Ruins’ first passage, for a bit more insight into the expedition. Raid a nearby chest for plunder as well. As you pass a boarded off section by a dwarven tower, you can catch a glimpse of a deranged Khajiit searching the ruins and muttering to himself.
- Chest
 Workstation
Trek through the frigid passages that lead to this work area. Inspect a book on the table here to learn more about the ill-fated excavation effort, and loot a chest that lies in the nearby snow. You can’t open the nearby gate for now, so continue following the snaking passage as it doubles back on itself. Be wary as Dwarven Spiders start to pop out of hiding.
- Chest (Locked: Novice)
- Loose gear
 Chest Nook C
Find a chest and potion tucked away in this snowy corner, along with a coin purse and Apothecary’s Satchel.
- Chest
- Apothecary’s Satchel
 J’darr Encounter
You encounter one of the expedition’s laborers in this icy passage. J’darr has gone quite mad and relentlessly attacks you on sight. Search around to find a pack, several potions, and an insightful journal afterward.
- J’zhar’s Pack
- Potions
- Loose gear
 Oily Chamber
Flip through yet another journal as you enter this sizable chamber. Beware of Dwarven Spheres that emerge from portals in the room’s center. Ignite the oily floor to burn them up. Ride a trio of vertical dwarven piston traps in the room’s northwest corner to reach loot on a high ledge
- Danger! Oil Pool Traps
- Chests (2)
- Potions
 Forge
Forge
Exploit this chamber’s oily floor as well to help you defeat its Dwarven Spiders. Use a crafting station here and unlock the Novice-level northwest gate to raid a small treasure nook.
- Crafting: Blacksmith Forge
- Chest (Locked: Apprentice)
- Chest (Locked: Adept)
 Trapped Chest Corridor
Avoid the pressure plate that lies in front of this passage’s tantalizing chest, and loot another chest that lies among the nearby north rubble. Collect a few potions as you explore the passage’s southern alcoves, and pick an Apprentice-level gate to access a small room with yet another chest. Several Dwarven Spiders can be seen working through here, which can be bypassed if you are very stealthy.
- Danger! Spear Trap (pressure plate)
- Chests (2)
- Chest (Locked: Adept)
- Potions
Oily Chamber Revisited
You soon return to [9], entering at a high balcony. Loop around the room, jumping or slipping past rows of dangerous dwarven piston traps that threaten to knock you down. Destroy a few more Dwarven Spiders on your way to the door that leads to the Animonculory.
- Danger! Dwarven Piston Traps
 Door to Alftand Animonculory
 Door to Alftand Glacial Ruins
 Animonculory Entry
Raid two chests in this first passage, one of them dark and made of bone and Chaurus hide.
- Chests (2)
 Connecting Corridor
First, explore this wide corridor’s lower tunnel to discover the remains of another member of the dig team, along with his personal journal. Loot a locked chest before backtracking out and heading upstairs to discover another chest and some potions in the oily passage above. Avoid the pressure plates on the slope that follows—they trigger a lethal trap.
- Danger! Oil Pool Trap, Dwarven Thresher Trap (pressure plates)
- Chest
- Chest (Locked: Adept)
- Potions
 Grand Cavern
Pull a lever to open the way into this tall chamber, then follow the first elevated walkway to its end to discover a chest and a few potions among debris. Descend the central winding ramp, and pick an Apprentice-level door to visit [15] before making a long drop down to a bloodstained platform, where the body of another excavation team member lies pierced with arrows on the rubble. Dispatch Dwarven Spiders and avoid pistons as you continue to descend the winding ramp, sprinting past a flamethrower when it momentarily deactivates to reach the door to [16].
- Danger! Flamethrower Trap, Dwarven Piston Traps
- Chest (Locked: Novice)
- Potions
 Treasure Room
Unlock a gate to visit this chamber and raid a chest. Unlock an Expert-level gate here to access a second chest with even more plunder.
- Area Is Locked (Apprentice)
- Skill Book [Lockpicking]: The Locked Room [D2/10]
- Chests (2)
- Chest (Locked: Master)
- Potions
 Falmer Den
Vicious Falmer have erected tents in these chambers. Slay the foul creatures, seeking to exploit oil spills when possible. Some ingredients and an alchemy workbench can be found in a corner, as well as some ingots and dwarven scrap on the shelves. The second room contains a blacksmith forge, as well as an armor workbench. Shelves to the left of the stairs can be used to sneak past the Falmer and traps here or to provide a good sniping position.
- Danger! Bone Alarm Trap, Flamethrower Trap, Oil Pool Trap
- Crafting: Alchemy Lab, Blacksmith Forge, Workbench
 Torture Room
The Falmer have turned the tools of their dwarven captures to their own uses, and the body of yet another excavation team member lies on a torture table. If you’ve had enough adventuring, ride the northwest elevator back to the start of the Glacial Ruins (behind the barred-off area you found before). You can quickly return to this point later. When you’re ready to delve deeper into Alftand, go through the southeast door to return to [14] and take a winding ramp down to the Grand Cavern’s bottom.
- Crafting: Tanning Rack
Grand Cavern Revisited
Slaughter a host of Falmer and Frostbite Spiders at the Grand Cavern’s bottom, then pass through a door and avoid a trap in the short hall that leads to the cavernous Alftand Cathedral.
- Danger! Falmer Claw Trap (pressure plate)
 Door to Alftand Cathedral
 Door to Alftand Glacial Ruins
 Door to Alftand Animonculory
Alftand Cathedral
Dodge a few pressure plates as in the cathedral’s entry passage. If you’re lucky, the patrolling Falmer may trigger them for you. Open a door and slay or sneak past more Falmer in the cavernous chamber. Loot three grotesque chests in and around the surrounding Falmer tents, then scale the east stone steps to find two dwarven chests, along with a lever that opens the west gate. Loot another two dwarven chests beyond the gate as you head upstairs, then defeat a mighty Dwarven Centurion to obtain a useful key. Raid one final dwarven chest at the top of the stairs before opening a gate and confronting the final two members of the expedition.
Slay the remaining expedition members while they are busy attacking each other, then either use the nearby Dwarven Mechanism to visit Blackreach [10.02], or use the key you found on the Centurion to open the nearby gate and take an elevator back up to the surface. Don’t forget to take the Targe of the Blooded off of Umana’s corpse. This unique shield causes bleeding damage to enemies when you bash them with it.
- Danger! Swinging Wall Trap (pressure plates)
- Unique Item: Targe of the Blooded [35/112] (Umana)
- Key to Alftand Lift (Dwarven Centurion)
- Chests (4)
- Chest (Locked: Novice)
- Chests (Locked: Apprentice) (2)
- Chest (Locked: Adept)
- Potion
- Loose gear