
The Witcher 3: Wild Hunt The Complete Edition Guide Training Witcher Archetypes Signs-focused Archetypes
Archetype 6: The Incendiary Agitator
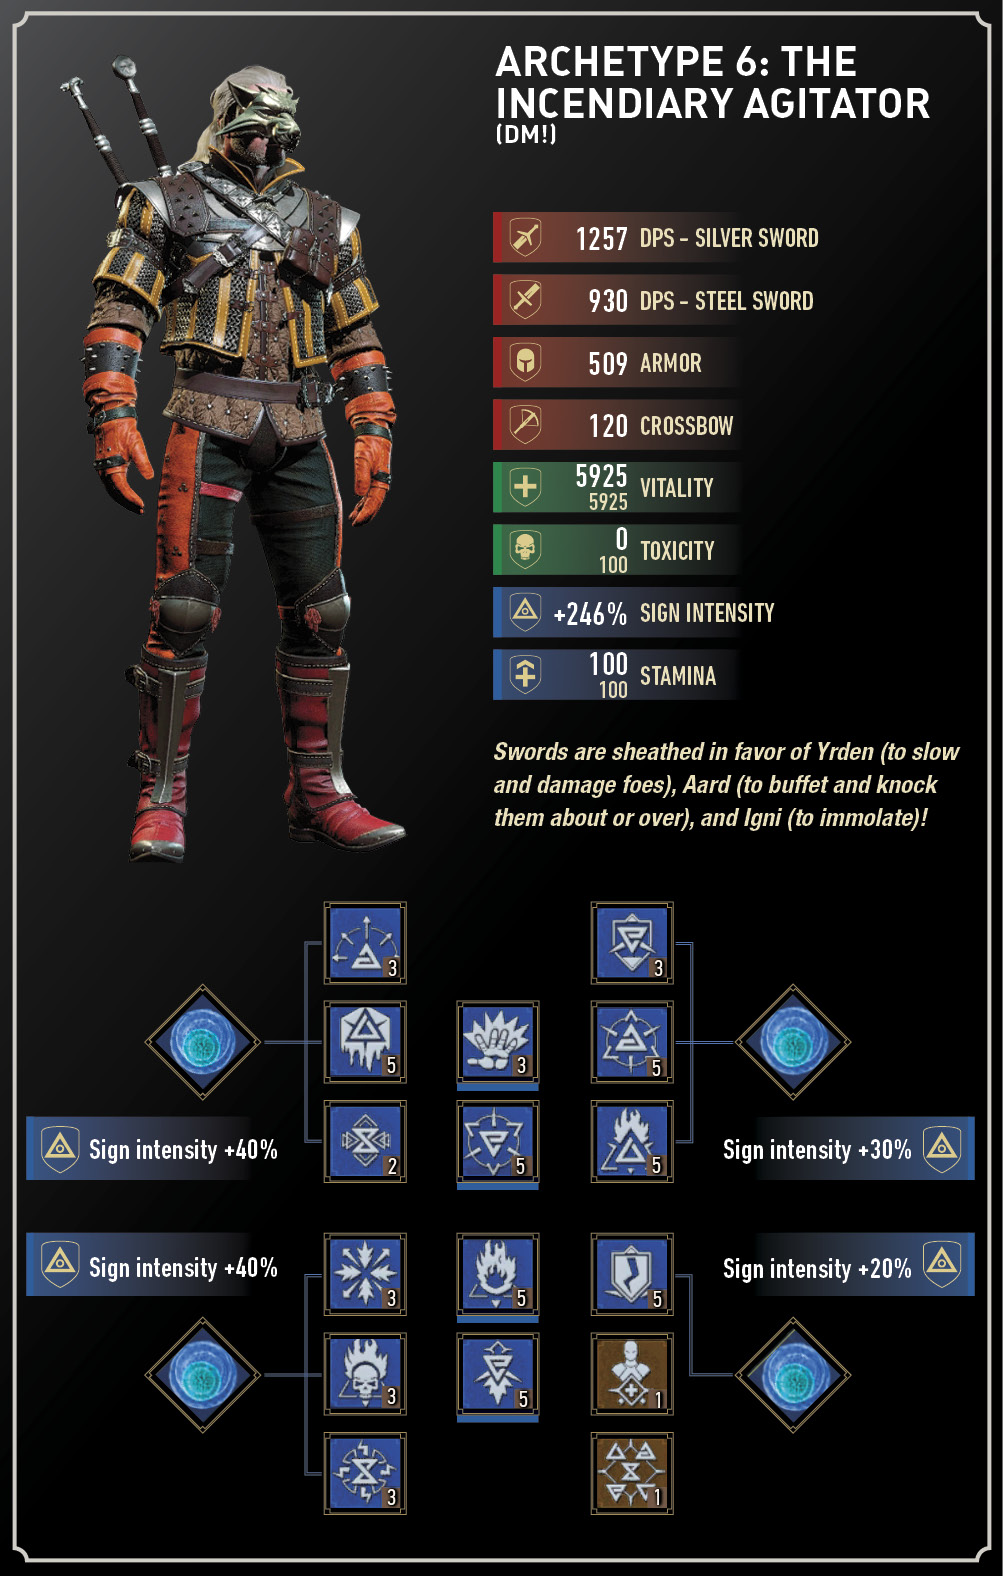
| Points to Unlock | Levels | Branch and Ability Name |
|---|---|---|
|
0 |
3 |
Aard Sign: Far-Reaching Aard |
|
0 |
5 |
Igni Sign: Melt Armor |
|
0 |
2 |
Yrden Sign: Sustained Glyphs |
|
0 |
3 |
Quen Sign: Exploding Shield |
|
0 |
3 |
Axii Sign: Delusion* |
|
6 |
3 |
Igni Sign: Firestream |
|
6 |
3 |
Yrden Sign: Magic Trap |
|
6 |
3 |
Quen Sign: Active Shield |
|
18 |
5 |
Aard Sign: Aard Intensity |
|
18 |
5 |
Igni Sign: Igni Intensity |
|
18 |
5 |
Quen Sign: Quen Intensity* |
|
28 |
5 |
Igni Sign: Pyromaniac* |
|
28 |
5 |
Yrden Sign: Supercharged Glyphs |
|
28 |
5 |
Quen Sign: Quen Discharge* |
|
0 |
1 |
Griffin School Techniques |
|
0 |
1 |
Rage Management |
| Total Ability Points Needed | ||
| 12/16* Abilities | 39/57* Points | |
(* Additional Abilities as 16 Slots are unlocked through Mutations)
Swords: Wolven Steel Sword, Wolven Silver Sword
Crossbow: Any
Bombs: Dragon’s Dream
Potions: Petri’s Philter, Tawny Owl, Swallow
Decoctions: Ancient Leshen, Ekhidna, Ekimmara, Foglet
Glyphs: Aard, Igni, Yrden, Quen
Runestones: Perun, Veles
Glyphwords: Depletion, Entanglement, Eruption, Ignition, Protection, Rotation
Runewords: Dumplings, Placation, Replenishment
Mutations: Magic Sensibilities (2 Research Points), Piercing Cold (5 Research Points), Euphoria (5 Research Points), Conductors of Magic (10 Research Points)
The purpose of this Archetype is to buffet and burn enemies into submission from range, and using a combination of Aard and Igni attacks, along with Yrden to slow them down, and Quen to damage them even if they manage to reach you. As Igni damages foes continuously once they are set on fire, but sword strikes put out the flames, you are encouraged to stay at range, continuously utilizing Igni until the protesting enemies are flailing on the ground in a raging blaze.
To begin with, Griffin School Techniques are learned to make the most out of your Medium Armor, which in this case is Wolven. Griffin is the obvious choice, but as you’re being more offensive in your combat, the other bonuses granted by Wolven gear and blades, the fact your Sign Intensity is likely to be good enough without adding even more potency, and the fact you should choose Rage Management (which allows Signs to be cast using Adrenaline Points, which Wolven armor increases), gives you a little more flexibility in combat. Don’t like this plan? Then switch to Griffin gear instead.
Your focus is more offensive attacks before Yrden and Quen, though slowing your foes and protecting yourself is almost as important. Pick Far-Reaching Aard and Aard Intensity to really knock a foe around, and should they fall to the ground you can finish them with an easy sword skewering. However, your main plan is lighting anything you’re battling on fire, after slowing them with Yrden first (so they are easier to hit, and using Magic Trap and eventually Supercharged Glyphs to damage foes even before Aard or Igni are utilized). Melt Armor, Firestream, and Igni Intensity, along with your other Sign Intensity bonuses, can really roast your foes, no matter what their protective clothing. Then leave them to burn while attending other adversaries.
Should anything get through this Aard-blasting, Yrden-slowing, Igni-igniting dance of death, you have Quen to protect you, using Active Shield along with Rage Management to help you use Adrenaline Points to maintain it, if your Stamina is low. Though it’s better to spend points unlocking Mutations, you may also wish to purchase superfluous Signs Abilities just to add to your Stamina regeneration in combat.
In most other respects, the type of secondary gear and augmentations you choose to adorn this Archetype with follow the similar plans as the previous Signs-related builds. Any Crossbow you choose is fine. When lobbing Bombs, Dragon’s Dream (after you slow foes with Yrden) is excellent to deploy just before a roasting with Igni.
Your lack of Toxicity resistance is an issue, forcing you to choose carefully when supping on potions and decoctions. Petri’s Philter (increasing Sign intensity) is a must-use potion, and Tawny Owl keeps your Stamina from sapping (though Rage Management helps this problem). If it’s cloudy out, take a swig of the Foglet decoction (Sign intensity increases in overcast conditions). Otherwise, the Ancient Leshen decoction is an almost automatic Stamina regenerating buff.
When it comes to Glyphs, Aard, Igni, and Yrden are great picks, as well as Quen if you’re finding foes are getting too close for comfort. Runestones are usually straightforward; Veles gives you extra Sign intensity, while Perun gives an Adrenaline Point gain; useful as you’re employing Rage Management.
Glyphwords should focus on your Igni ability. Eruption is a Level 3 enchantment that causes foes to explode when they die, igniting others, if you set them on fire. The other Igni-related Glyphwords (Rotation and Ignition) are good choices. Don’t overlook Depletion (enemies struck by Aard have their Stamina halved) and Entanglement (augmenting your Yrden Sign). Or you could utilize Protection (automatically get a Quen shield at the start of combat). Using the Runeword Placation (Adrenaline Points drain, giving you Vitality and Stamina) helps maintain Sign availability, though Rage Management does this for you. Otherwise, try Dumplings (for extra nourishment) or Replenishment (which consumes an Adrenaline Point after you cast a Sign, before imbuing your sword with the power of that Sign on your next sword attack).
When looking at Mutations, other Signs archetypes tend to use Conductors of Magic (increasing your Signs intensity if the weapons you wield are of high quality) and Magic Sensibilities (Signs have a critical hit chance which scales with the power of the Sign, exploding the enemy upon death). However, don’t overlook Euphoria if you’re constantly using Potions and Decoctions; as your Toxicity level rises quickly, the increased Attack Power and Sign Intensity can be incredible (though you’ll have difficulty placing all 16 Abilities as the Euphoria slots are Alchemy-only). Another option? Piercing Cold, to really take advantage of Aard!