
The Witcher 3: Wild Hunt The Complete Edition Guide Training Witcher Archetypes Signs-focused Archetypes
Archetype 4:The Signing Survivalist
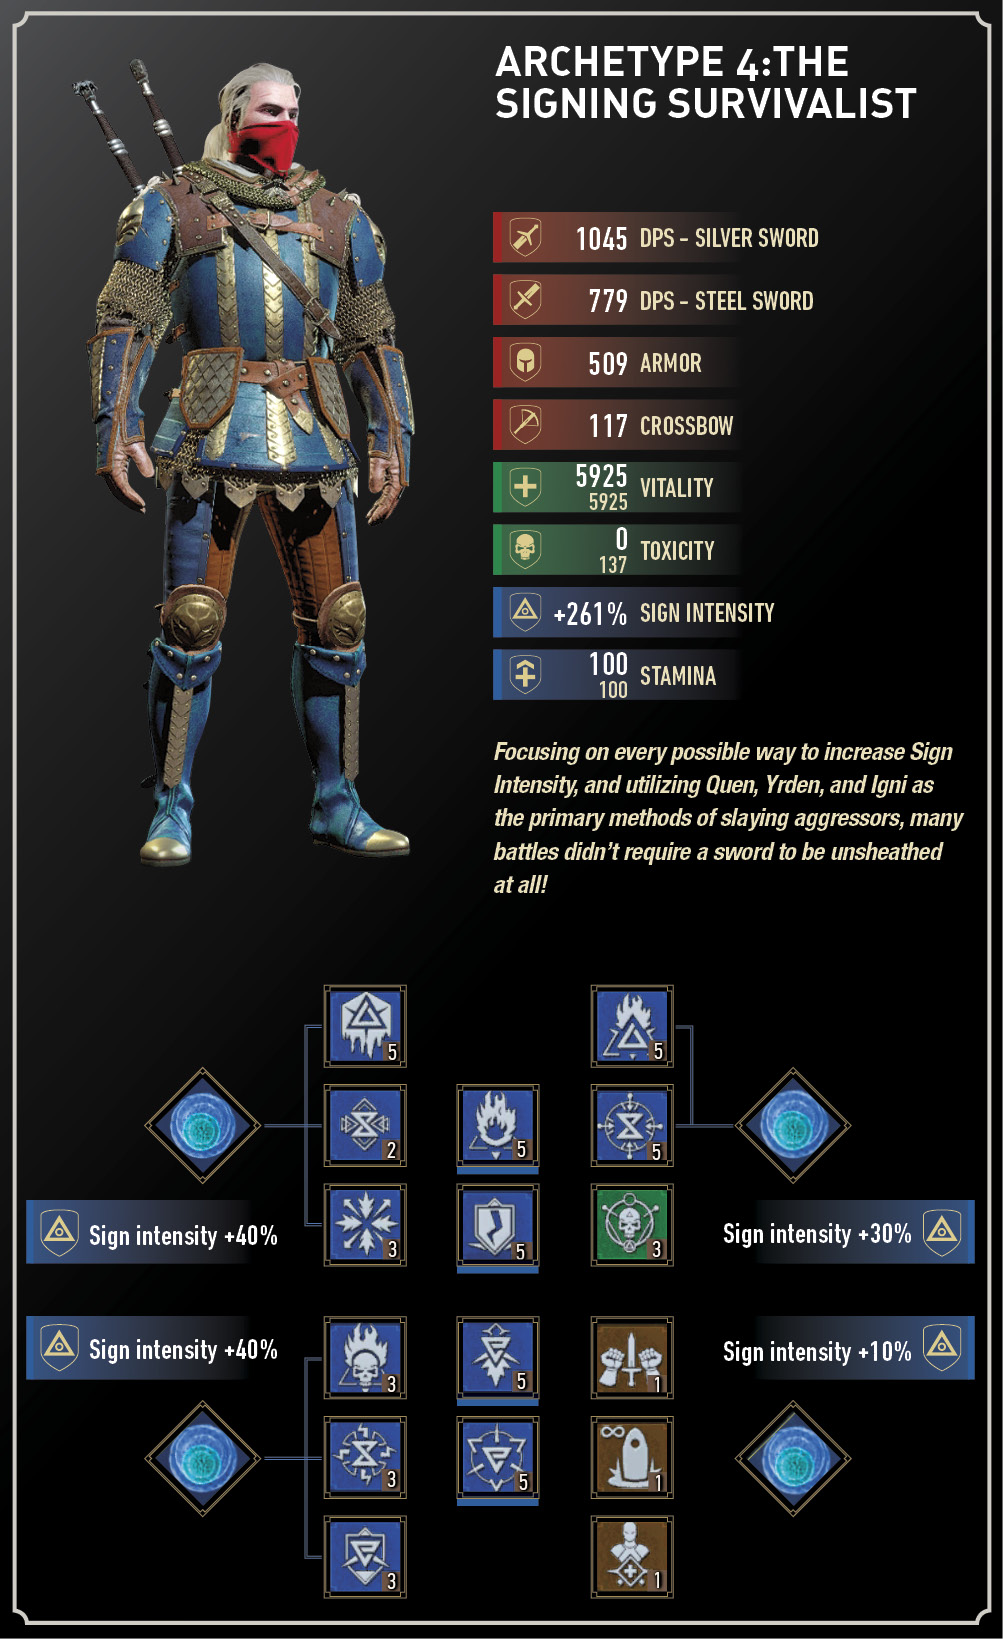
| Points to Unlock | Levels | Branch and Ability Name |
|---|---|---|
|
0 |
5 |
Igni Sign: Melt Armor |
|
0 |
2 |
Yrden Sign: Sustained Glyphs |
|
0 |
3 |
Quen Sign: Exploding Shield |
|
6 |
3 |
Igni Sign: Firestream |
|
6 |
3 |
Yrden Sign: Magic Trap |
|
6 |
3 |
Quen Sign: Active Shield |
|
18 |
5 |
Igni Sign: Igni Intensity |
|
18 |
5 |
Yrden Sign: Yrden Intensity |
|
18 |
5 |
Quen Sign: Quen Intensity |
|
28 |
5 |
Igni Sign: Pyromaniac* |
|
0 |
5 |
Igni Sign: Melt Armor |
|
0 |
3 |
Quen Sign: Exploding Shield |
|
0 |
3 |
Acquired Tolerance* |
|
0 |
1 |
Adrenaline Burst* |
|
0 |
1 |
Gorged on Power* |
|
0 |
1 |
Griffin School Techniques |
| Total Ability Points Needed | ||
| 12/16* Abilities | 45/53* Points | |
(* Additional Abilities to swap in, or insert as 16 Slots are unlocked through Mutations)
Swords: Griffin Steel Sword, Griffin Silver Sword
Crossbow: Any
Bombs: Dragon’s Dream, Northern Wind
Potions: Petri’s Philter, Tawny Owl, Swallow
Decoctions: Ancient Leshen, Ekhidna, Ekimmara, Foglet
Glyphs: Igni, Yrden, Quen
Runestones: Stribog, Veles, Zoria
Glyphwords: Eruption, Entanglement, Ignition, Protection, Rotation
Runewords: Replenishment
Mutations: Magic Sensibilities (2 Research Points), Conductors of Magic (10 Research Points)
Begin with lessons from the Griffin School Techniques, allowing each piece of medium armor to increase your Sign intensity by five percent and Stamina regeneration by five percent. Then find some medium armor to wear before choosing either Griffin or Wolf School gear (the latter is useful if you intend on augmenting your Signs with a few combat abilities much later into your adventure, but the Griffin increases your Sign intensity instead of Adrenaline, making this the go-to armor for Sign-specialists). To start with though, spend your points within the Sign branches, focusing on the boosting of Stamina regeneration in combat.
Notice the heavy emphasis on Yrden and Quen in this archetype. Advancements in Yrden turn this trap from a quagmire (Sustained Glyphs, which increases the duration and allows for alternate mode charges and more traps) to a highly-damaging circle, allowing you to coax enemies into this ring of purple death! Magic Trap starts this nasty damage, and allows you to stop worrying about projectiles heading your way. Yrden Intensity bolsters this Sign by up to 25 percent. But the real damage is caused with Supercharged Glyphs, which can drop groups of lesser foes in seconds without your lifting a sword!
For additional protection you have the full gamut of Quen Abilities, giving you some of the best protection from physical damage outside of armor. Quen Discharge can deliver a punishing shock to attacking opponents, so long as you have the Stamina to hold up Quen in Active Shield Mode. When you need to take a more offensive posture, Igni is powered up a great deal through the Intensity boosts (the ‘innate’ skill of each Signs branch Ability), as well as through Melt Armor, which maintains effectiveness throughout your adventure. Firestream allows you to weaken entire groups of enemies before setting upon them with your blades or bombs.
The one drawback to this Archetype is the time it takes to build up the most effective defensive capabilities. You don’t reach Quen Discharge until you’ve spent 28 points in the Signs Branch of the Ability Tree. This leads to a more deliberate and defensive plan in combat, focusing the maximizing of Quen and Yrden to stay alive. Griffin School Techniques, combined with the bugs for wearing medium armor, can help make this Archetype shine. Once you’ve purchased all 12 initial abilities, you can choose what you like, though maximizing your Igni skills, and perhaps choosing Gorged on Power (which allows a bonus from one Place of Power to last indefinitely and applying that to your favorite Sign) are good options.
When picking a Crossbow, the best for your level is fine to choose, as this isn’t the focus of this archetype. For Bombs, Dragon’s Dream needs Igni to reach maximum effectiveness, and coupled with Igni attacks, this can be devastating. Northern Wind freezes foes, which is helpful if Yrden isn’t slowing all of your enemies, or you need a stationary target to immolate with Igni.
Petri’s Philter makes your Signs more powerful, an obvious bonus to such a focused build. Tawny Owl is your other key potion, as Geralt needs to have as much Stamina regeneration as possible if you want to survive. When consuming Decoctions, Foglet decoction has a strange requirement to be effective, but if it is cloudy in the world, you receive a significant Sign Intensity boost. The Ekhidna decoction is another fine bet for increasing your survivability, restoring Vitality whenever you use Stamina. The Ancient Leshen decoction increases Stamina regeneration for every Sign cast for the duration of a given fight. Since you will be using Signs often in this Archetype, you can work Geralt into many repeated uses of a Sign over the course of a long fight. Finally, Ekimmara decoction is another good choice for survivability; 10% of the damage he deals to an enemy goes toward his Vitality.
Glyphs are straightforward. You are imbuing those with a Sign intensity you utilize most often: Igni, Yrden, and Quen. Feel free to focus on multiple Glyphs of a single Sign, if you require extra Intensity at the expense of your secondary Signs. Runestones are also easily picked; Veles grants you extra Sign intensity, and is your main focus. Also think about Stribog and Zoria; causes a chance to stagger or freeze respectively, helping you prevent an enemy charge so you can attack back with magic.
There are many Glyphwords to help your progress: Eruption, Ignition, and Rotation all augment your Igni Sign attacks in different ways. Protection enables a “free” Quen shield when entering combat, and Entanglement sets another Yrden trap when Yrden first hits them. You’re spoilt for choice here! However, Runewords don’t have the same help to your Signs Intensity, but Replenishment (which consumes an Adrenaline Point after you cast a Sign, before imbuing your sword with the power of that Sign on your next sword attack) is a great idea; the flaming sword of Igni is always a favorite!
When you finally think about an active Mutation, Conductors of Magic increases your Signs damage with the level and quality of your swords (and your blades should be by this time in your adventure!). Or, try Magic Sensibilities, for Signs that have a critical hit chance which scales with the power of the Sign, and have the wonderful added effect of exploding enemies upon death! Fortunately, you’re likely to be thriving instead of simply surviving long before this point.