
The Witcher 3: Wild Hunt The Complete Edition Guide Appendices and Compendiums Bestiary
Insectoids
The varieties of insectoid described here are notorious for the terror they have wrought upon unsuspecting humans and nonhumans across the land. The Arachasae are regular contracts for Witchers, due to their propensity for blending into a forest and preying on travelers, farmers, and the animals they tend to. Arachnomorphs increase the fear those have for a simple spider, now one hundred times the size. Giant Centipedtes have mandibles that can crush a goose. Kikimores are armored cave-dwelling monsters whose eggs must be destroyed. Endrega are the worst of the lot, possessing massive size and strength, and worse yet, organization.
ARACHASAE
ARACHASAE, ARMORED
Arachase Danger Alert

Frequency

Arachase, Armored Danger Alert

Frequency

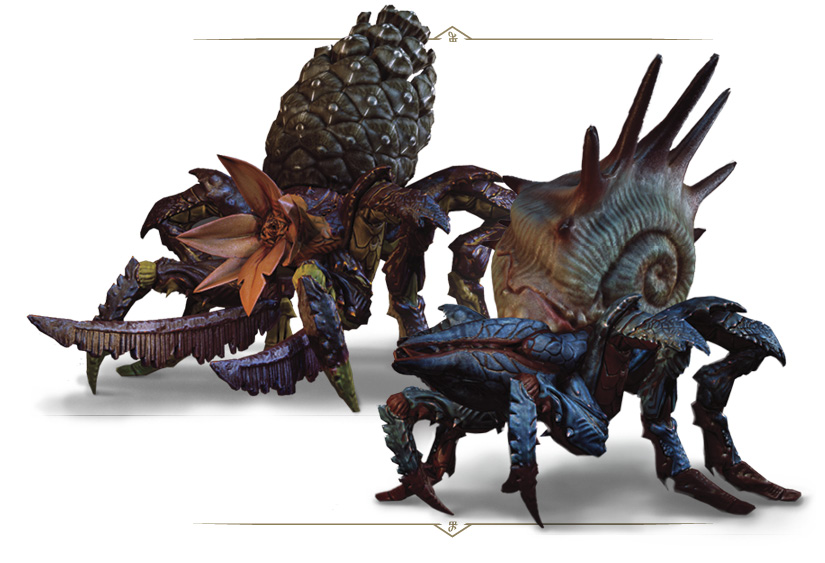
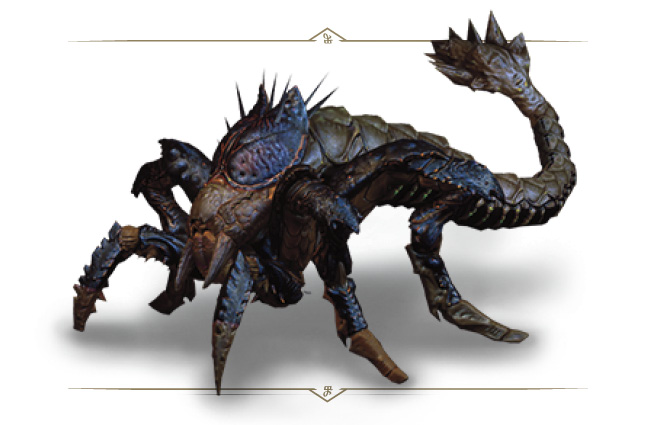
At first glance, a stationary Arachas often looks like a part of the forest undergrowth, a fact it uses to deadly advantage when hunting. An armored Arachas is a true behemoth, using its enormous mass to knock over and trample its victims, before devouring their crushed remains.
|
Loot: Arachas eyes, Arachas venom, Chitin scale,Arachas mutagen |
|
Sub-Species or Named Variants: Arachas, Armored Arachas |
|
Environments: Arachasae stalk the caves and forests throughout the known world. Velen in particular has seen dangerous nests of this species take up residence in recent years. |
|
Specific Encounter (Armored Arachasae): Guarded Treasure just north of the Cavern, in Gustfields (northeast of Novigrad City). |
Vulnerable Against

Enemy Attacks
Powerful pincers, a maw filled with razor-sharp teeth and venom glands packed with deadly toxins constitute the Arachas’ deadly arsenal. Since people and farm animals make up an important part of these creatures’ diet, contracts on Arachasae in turn constitute an important source of Witcher coin.
An Arachas’ only weakness is its soft, sensitive abdomen. Some Arachasae hide this under hollow tree stumps, while other, “armored” varieties exist which have grown a thick carapace that covers all the more delicate parts of their bodies. These usually protect the lesser Arachasae in their nests, and are tougher and larger than their otherwise identical Worker brethren.
(Jump and) Lashing Foreclaws: In close combat an Arachas is brutal and fast, its sharp foreclaws lashing out at incredible speeds, sometimes after it leaps to close the distance. Skilled Witchers can actually parry these strikes and temporarily stun them.
Rearing Bite: If both forelegs are raised and its mouth is exposed, the Arachas strikes with such force that no man, or Witcher, alive can hope to stop it. This happens with such speed that the attack may still strike true even if the victim knows it’s coming. A dodge or roll is the safest option here.
Venomous Bite: Golden Oriole is a must against all insectoids. Bites from an Arachas are inherently poisonous.
The Best Battle Tactics
Once provoked, Arachasae of both varieties quickly attempt to close the gap between them and their prey, either by skittering across the ground, leaping at their victim, or by spitting a sticky secretion. Fortunately, Arachas Workers have minimal defenses to you just wading in with two or three quick attacks, and are usually of minimal threat (unless encountered in groups).
Yrden can slow Arachasae down just enough that melee combat is made simpler. Aard also causes the creature to drop for a second, allowing some follow-up strikes. Good bolts for a crossbow can be of great help against Arachasae, particularly when they open their mouths wide.
The armored variety of Arachasae can resist sword strikes even more than the other species. The carapace surrounding their abdomens are particularly problematic. Fortunately, all of the beast’s attacks can be parried or countered, even if you’re being attacked from the sides. Simply beware that their attacks are poisonous (so swigging down decoctions can quickly cause your toxicity levels to spike). Quicken your slaughter of any Arachas by employing weapons with armor-piercing capabilities.
ARACHASAE, VENOMOUS
ARACHASAE, VENOMOUS Danger Alert

Frequency

Harrasi Danger Alert

Frequency

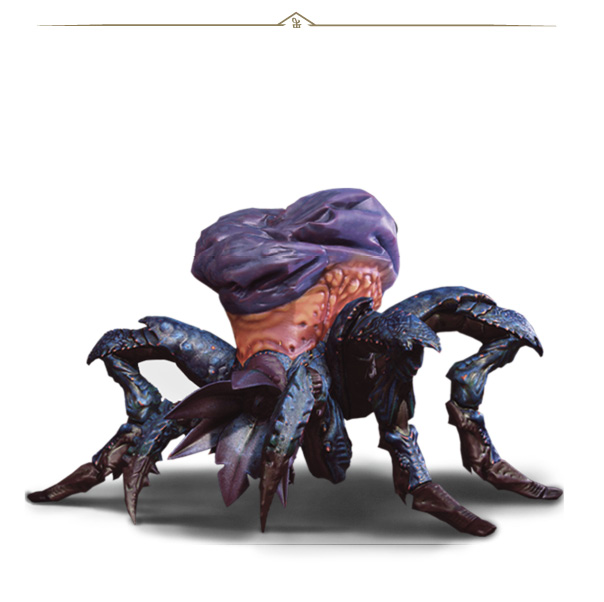
hough all Arachasae are highly venomous, this breed produces an especially strong toxin.
|
Loot: Endrega chitin plates, Endrega heart, Glyphs, Endrega embryo, Mutagens, Venom extract, Chitin scale |
|
Sub-Species or Named Variants: Venomous Arachas, Harrisi |
|
Environments: Venomous Arachasae, like other members of the species, favor caves or forests. |
|
Specific Encounter (Arachas, Venomous Arachas): Hermit’s Cave, southwest of Harviken, on the isle of Faroe (Skellige) |
|
Specific Encounter (Harrasi): Contract: Missing Brother (see page 509). |
Vulnerable Against

Enemy Attacks
The named Arachasae (known as Harrasi), is a toughened variant of the usual Venomous Arachasae you encounter.
Venomous Arachasae produce colossal amounts of this toxin and deploy it during combat in many ways. Before striking, a venomous Arachas will cover its pincers and teeth with a thick coating of this deadly liquid. It will then squirt the venom at its to its opponent to weaken it, and once locked in direct combat, will continue spraying the noxious ooze all around itself, meaning every breath brings its victim closer to death.
(Jump to) Lashing Foreclaws: In close combat an Arachas is brutal and fast, its sharp foreclaws lashing out at incredible speeds (sometimes after a jumping charge to close the distance). Skilled Witchers can actually parry these strikes and temporarily stun them.
Rearing Bite: If both forelegs are raised and its mouth is exposed, the Arachas strikes with such force that no man, or Witcher, alive can hope to stop it. This happens with such speed that the attack may still strike true even if the victim knows it’s coming. A dodge or roll is the safest option here.
Webbed Spittle: The Arachas, when it spots you from a distance, may unravel a large stringy ball of webbed spittle that coats you, and drags you to its mouth maw. A dodge or roll prevents this.
Poisonous Spittle: The Arachas can gob a large horizontal fan of poisonous spittle, this is highly dangerous if you aren’t prepared to react to venom, though it can be rolled under if you’re quick enough.
Poison Cloud: If you’re attacking or close to the Venomous Arachas, it sometimes deflates the giant poison sac on its back, clouding the area around it in thick poison. This is obviously detrimental to your health, so utilize Golden Oriole, have a great toxicity constitution, and roll or dodge when you see the sac puff up before it deflates.
Poisonous Bite and Clouds: Bites from an Arachas are inherently poisonous, but the additional poisonous clouds and sprays make these variants very dangerous to the unprepared.
Venomous Arachasae usually have additional drones to help guard it, usually Arachasae but sometimes Endrega.
The Best Battle Tactics
Like other members of this species, venomous Arachasae use prehensile feelers to grab and immobilize their prey. When attempting to fight such a creature a Witcher should drink Golden Oriole, which will reduce his body’s vulnerability to poison, and then attack from a safe distance with crossbow or bombs before dealing the finishing blows with a silver sword enhanced with a coating of insectoid oil.
The poison a venomous Arachas secretes during combat is so toxic, simply breathing the fumes around it is enough to kill the average man and threaten the life of a Witcher. Therefore, fighting this variety of Arachasae up close requires Golden Oriole.
Venomous Arachasae are best engaged from afar, leveraging bombs and the highest quality crossbow bolts to weaken the threat. Engage with a silver sword only when the gas sac on the back of the Arachas is emptied to avoid a spray of poison. They’re also fond of spitting venom at distant targets. Otherwise, employ the same techniques utilized during Arachas and Armored Arachas combat, with Yrden to slow the beast down, and Igni to set it ablaze, which can cause it to struggle temporarily. Quicken your slaughter of any Arachas by employing weapons with armor-piercing capabilities.
 ARACHNOMORPHS

ARACHNOMORPHS COLOSSI
ARACHNOMORPHS Danger Alert (groups)

Frequency

ARACHNOMORPHS COLOSSI Danger Alert (groups)

Frequency

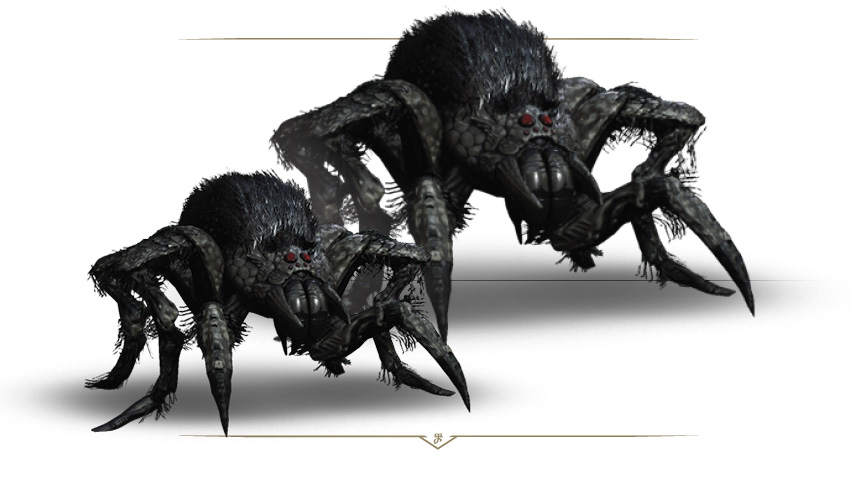
Arachnomorphs, as distant, post-Conjunction cousins of common spiders, strongly prefer deep, dark caves and unfrequented sodden swamps.
|
Loot: Monster Blood; Monster Hair; Monster heart; Venom extract; Chitnous shell; Lesser Green Mutagen, Lesser Blue Mutagen; Lesser Glyph (Colossi only). |
|
Sub-Species or Named Variants: Arachnomorph, Arachnomorph Colossi |
|
Environments: Discovered in subterranean, and usually soggy cave systems underneath the farmlands, woods, and hills of Gustfields, in northeast Novigrad. |
|
Specific Encounter (Arachnomorphs and Colossi): Bloodrot Pit (unmarked cave), southeast of Hunter’s Cottage in Gustfields. |
Vulnerable Against

Enemy Attacks (Arachnomorphs)
Arachnomorphs rely primarily on their speed and their superior numbers when encountered in a group. Arachnomorphs are almost impossible to catch up to. They usually attempt to surround you, and as soon as one Arachnomorph manages to entangle you with its web attack, the others quickly move in to cause you harm as you struggle.
Ranged Web Spittle (Ranged): Projectiles of disgusting, sticky web are spat from the central maw, and can entangle you, causing you to become temporarily immobilized. React with some swift dodging or rolling to prevent becoming incapacitated. While entangled, enemy attacks can still be parried; just hold down the parry button while caught in the web.
Bite and Pounce (Melee): Swift knocks with their front legs, or quick darting bites and butting are normally inflicted when you’re entangled, or when this foe is out of your viewing range (if you’re surrounded, expect these attacks from behind). Parry or dodge and roll to avoid these.
Retreat: An Arachnomorph can move more quickly than you and uses this to aggravate you into charging after it as it dashes backward, allowing others in the group to aim their sticky webs at you. Be patient and less aggressive so you don’t fall for this trick more than once!
The Best Battle Tactics (Arachnomorphs)
When facing down these overgrown spiders, three types of attack should be at the forefront of your aggressive tendencies: Yrden, freezing attacks, and burning. An Arachnomorph affected by Yrden will be completely paralyzed, and applying freezing (via imbued weapons or bombs like Northern Wind) or burning (via Igni, bombs, or items) to a spider will slow or stop it long enough for you to reach it. Additionally, an Arachnomorph that has taken damage will be stunned long enough for you to continue attacking it.
Arachnomorphs will attempt to surround you, always keep their distance unless they are attacking, and are quick enough to keep out of your attack range when being chased. Use signs (Aard, Axii, or Igni) or bombs (that freeze or burn) to stun or stop the Arachnomorphs and allow them to be attacked. Once an Arachnomorph is attacked, press home the advantage; continue attacking it as foe is stunned. During this time other Arachnomorphs will continue to surround and attempt to entangle you.
Enemy Attacks (Arachnomorph Colossi)
Accompanied by regular sized Arachnomorphs, larger colonies of these creatures are ruled by an immense Colossi variant. Its lunging attack can cover large distances, it isn’t as easily stunned, has a large vitality pool and increased damage. It is also much more aggressive; almost eager to scuttle and attack you! In addition to attacks that a regular Arachnomorph can attempt, a Colossi has the following:
Lunge (Ranged): An impressive lunge from mid-distance, usually attempted by this foe when you’re entangled. It hits hard, and should be parried.
Quick Combo (Melee): Many swift biting or mauling attacks in a row at close range, which can knock you down. Parry these or dodge them.
The Best Battle Tactics (Arachnomorph Colossi)
After taking care of the smaller Arachnomorphs, you should focus on stunning then damaging the colossi. Focus on stunning this gigantic foe with Axii or Igni when you’re close enough. Slow it down with Yrden beforehand. The stun won’t last as long on this large specimen, so step in quickly, deal as much damage as you can before it counterattacks and skitters away. Forcing the Arachnomorph against a wall helps keep it close enough to more easily stun, then attack the monster. Always be ready to dodge out of the way of its lunging attack then quickly dart in to inflict some damage yourself before the Arachnomorph runs away again. It shall soon yield!
ENDREGA DRONES
Danger Alert (groups)

Frequency

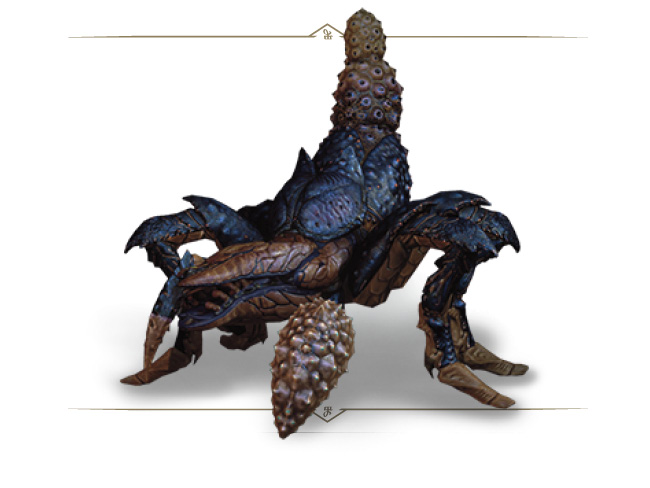
Endrega males (called ‘drones’) are gluttonous creatures whose only aim in life is to eat, fight and reproduce. Yet when venturing outside their nests, these aggressive hunters attack any and every creature they come across.
|
Loot: Endrega heart, Endrega chitin plates, Venom extract, Chitin scale |
|
Sub-Species or Named Variants: Endrega Drone |
|
Environments: Found in or around caves or abandoned structures across Velen and Skellige. Nests can be found in caves or secluded forested regions, typically within reasonable distance of potential food sources. |
|
Specific Encounter (Drones): Hermit’s Cave, southwest of Harviken, on the isle of Faroe (Skellige), with a Venomous Arachas. |
Vulnerable Against

Enemy Attacks
Drones are easy to identify thanks to their distinctive, cone-shaped abdomens. Unlike other Endregas, they can attack from a distance, sending out volleys of poisoned quills. As with all of their kind, bleeding has no effect on them and insectoid oil does them great harm.
Poisoned Quills Volley (Ranged): A launch of poisoned dart-like quills that can damage as well as raise your toxicity to unsafe levels. Quen or dodging, or closing the gap so Drones are forced to attempt melee attacks, is the best course of action.
(Jump and) Lashing Pincers: Sharp mandibles lash out at incredible speeds, sometimes after it leaps to close the distance. Skilled Witchers can actually parry these strikes and temporarily stun them.
Rearing Bite: A dodge or roll is the safest option when an Endrega rises up and quickly launches forward with a pincer or biting maneuver.
Immunity to Bleeding: This creature ignores any additional bleeding damage your attacks may usually inflict.
The Best Battle Tactics
Endrega drones can shoot poisoned quills at distant targets from their abdomens, or attack with their pincers. Golden Oriole can neutralize the poison and prevent aggravated damage from the wounds. Drones are extremely aggressive and territorial. Once they get close, they try to stay close. If multiple drones are present, Northern Wind bombs can halt one or two of the beasts, giving you a moment to regain control of the situation. Yrden is also useful at containing drones.
Endrega do not bleed as profusely as men and Witchers do. It takes several good swings to crack their natural armor.
ENDREGA WARRIORS
Danger Alert (groups)

Frequency

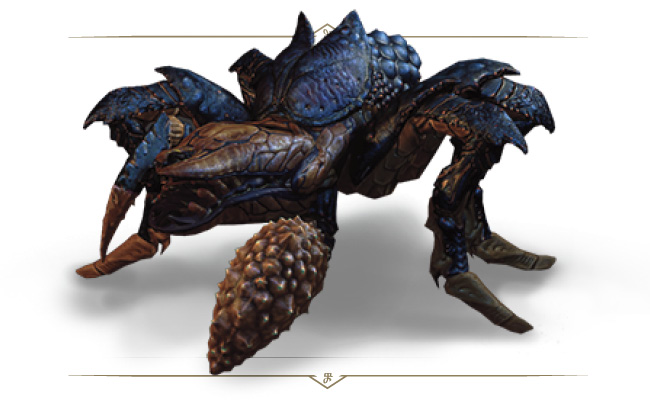
When confronting more dangerous foes, Endrega colonies unleash their larger, stronger members—the so-called Warriors. This caste lives only to fight, and gets ample opportunity to do so while defending the colony’s borders or conquering new territory.
|
Loot: Endrega heart, Endrega chitin plates, Venom extract, Chitin scale |
|
Sub-Species or Named Variants: Endrega Warrior |
|
Environments: Found in or around caves or abandoned structures across Velen and Skellige. Nests can be found in caves or secluded forested regions, typically within reasonable distance of potential food sources. |
|
Specific Encounter (Warriors): Faroe isle, southeast of Trottheim, in Skellige. |
Vulnerable Against

Enemy Attacks
An Endrega Warrior’s main weapon is its long tail, which is tipped with a club-like growth and spiked with venomous quills. Powerful abdominal muscles allow it to swing this tail with enough force to kill most lesser opponents in one blow. Endrega Warriors also use their mass and strength as a weapon by charging their opponents in an attempt to knock them over. As invertebrates with sectioned carapaces, Endrega Warriors do not bleed profusely, yet recoil in great pain when hit with a blade coated in insectoid oil.
Tail Lash: The Endrega Warrior spins around, whipping its tail into you; unless you quickly dodge or parry you face heavy damage and a chance to be poisoned.
(Charge and) Lashing Pincers: Sharp mandibles lash out at incredible speeds, sometimes after it leaps to close the distance. Skilled Witchers can actually parry these strikes and temporarily stun them.
Rearing Pincer Snap or Bite: A dodge or roll is the safest option when an Endrega rises up and quickly launches forward with a pincer or biting maneuver.
Immunity to Bleeding: This creature ignores any additional bleeding damage your attacks may usually inflict.
The Best Battle Tactics
Warriors are as vicious as Endrega Drones, with the added danger in the form of their poison barbed tail. The tail can counter a Witcher’s swordplay with ease, and Warriors are known to advance on an enemy with the tail first. As with other Endrega, the Warrior strain can strike quickly with its jaws and forelegs. It can also charge headlong into the enemy in an attempt to knock them off balance. Slow them down considerably using Yrden, then drop Northern Wind bombs or follow up with oil-coated swordplay.
ENDREGA WORKERS
Danger Alert (groups)

Frequency

Workers are the most frequently encountered caste of Endrega. Within the colony their duty lies in building nests and cocoons, acquiring food and caring for eggs and larvae. When threatened they summon Warriors to aid them, yet if forced to defend themselves they will—and do so surprisingly well.
|
Loot: Endrega embryo, Endrega heart, Venom extract, Chitin scale |
|
Sub-Species or Named Variants: Endrega Worker |
|
Environments: Found in or around caves or abandoned structures across Velen and Skellige. Nests can be found in caves or secluded forested regions, typically within reasonable distance of potential food sources. |
|
Specific Encounter (Workers): Two nests can be found in thee wooded Monster Nests northeast of Ursten (Novigrad). |
Vulnerable Against

Enemy Attacks
Endrega Workers are most often found traveling in groups of half-dozen or more members. They move slowly, yet when attacking, they are capable of covering the distance to their victim in the blink of an eye. Like all of their kind, Endrega Workers are highly venomous. Their usual tactic is to surround their enemy and attack him from several sides at once. Like all insectoids they do not suffer particularly from bleeding, yet are caused great harm by insectoid oil.
Acid Spew: From a distance of several paces, a stream of revolting acidic bile is forced at the target, which is damaging and poisonous. A dodge or roll avoids this spittle.
(Charge and) Lashing Pincers: Sharp mandibles lash out at incredible speeds, sometimes after it leaps to close the distance. Skilled Witchers can actually parry these strikes and temporarily stun them.
Rearing Pincer Snap or Bite (Poison): A dodge or roll is the safest option when an Endrega rises up and quickly launches forward with a pincer or biting maneuver. Any biting is toxic.
Immunity to Bleeding: This creature ignores any additional bleeding damage your attacks may usually inflict.
The Best Battle Tactics
The pincers and forearms of a Worker are venomous, but they can be parried to open the Worker up to further attacks. Workers can be surprisingly troublesome to inexperienced Witchers, thanks to the speed with which they can use their claws. Sidestep their initial attacks to bring their flanks within reach. Slow them with Yrden, or attempt Aard or Igni to stun and damage them and fend off groups at a time.
You may also find yourself close to an Endrega hive, with numerous egg sacks to destroy. Aard or Igni are your best methods here.
 GIANT CENTIPEDES & PALE WIDOWS

Giant Centipedes Danger Alert

Frequency

Pale Widows Danger Alert

Frequency

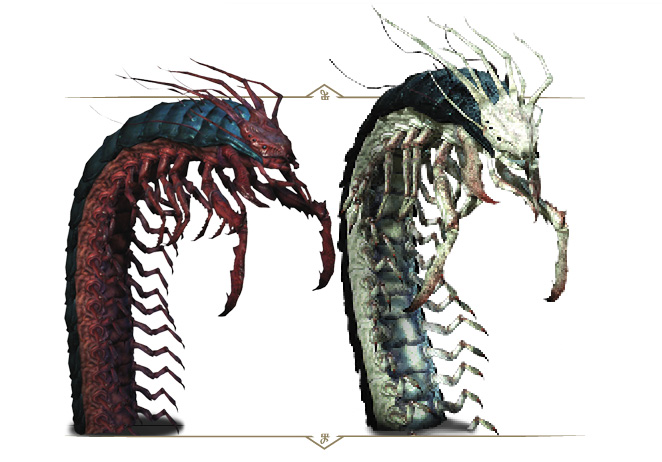
Giant Centipedes are enormous, insect-like monsters which can be found in many places in the world, but are particularly common in the lands (or more precisely, under the lands) of Toussaint. There they often dwell in close comity with Shaelmaars; Giant Centipedes feed on the small creatures which eat Shaelmaar dung. A rare variety of Giant Centipede dwells in underground lairs and owes its name to its unusual, pale white coloring.
|
Loot: Chitinous shell, Monster blood, Monster tooth, Monster heart, Giant Centipede discharge, Giant Centipede mandible, mutagen, Monster carapace |
|
Sub-Species or Named Variants: Giant Centipede, Pale Widow |
|
Environments: Vineyards, wooded areas, and underground cavern complexes throughout Toussaint. |
|
Specific Encounter (Giant Centipedes): Monster nests just southwest of Astre Castle Ruins (west Toussaint). |
|
Specific Encounter (Pale Widows): Secondary Quest: Turn to Face the Strange (see page 476). |
Vulnerable Against

Enemy Attacks
Giant Centipedes: These are dynamic and fast enemies, commonly occurring throughout the Duchy of Toussaint. Hard, chitinous armor covers nearly the entire body of a Giant Centipede. Sticking out from under this carapace are rows of hooked limbs. Giant Centipedes are able to bury into the ground with shocking speed, only to then appear back on the surface in another place. Once they select a target, they will circle it determinedly, trying to get close enough to deliver a blow. They attack primarily with their powerful mandibles, but they also possess glands allowing them to spew acid.
Pale Widows: Some scholars raise Pale Widow Giant Centipedes in laboratory conditions for the properties of their albumen, which makes an excellent base for the brewing of mutagenic potions. In all respects, they offer a similar, but slightly more challenging fight, as they are a little tougher than the more common Giant Centipede.
Sweep Attack (Melee): A wide arc slash with whole body; parry or dodge this, and expect to be staggered.
Mandible Attack (Melee): A basic biting attack performed directly at an opponent. Expect to be wounded and poisoned if struck by this. Parry or dodge to prevent it.
Burrowing and Emerging: After submerging, the Centipede emerges directly under you, dealing damage with a possible knockdown. Watch for the mound of dirt that precedes its emergence and stun it with Yrden when it appears. Aside from burrowing and emerging in different positions, this foe is stationary.
Toxic Spit (Ranged): At medium or far range, the Centipede spits toxic fluid at you, poisoning you and and dealing small amount of damage. If it misses, the toxin leaves a small poisonous cloud that disappears after a short time. Step into it, and your toxicity level rises.
Leaping Attack (Ranged): At medium range, this monster jumps from it’s current position toward you, before hiding underground at your position, ready to emerge.
Defensive Posture: Try attacking its back, and it parries every physical sword attack due to its hardened armor. If struck two or more times, it coils up. After some time, it performs its unrolling attack.
Unrolling Attack (Counterattack): If you strike this foe after it has emerged and while it is in a coiled defensive position, it quickly unrolls with a wide arcing slash that deals damage and knocks you down. So don’t attack it when you see it rolled up.
Resistances: This foe is resistant to poison and to physical attacks aimed at its back.
The Best Battle Tactics
Planning the slaying of these oversized worms takes patience, considering their ability to burrow and their toxic nature. The best tactic is to set up Yrden in the place where the Centipede is going to emerge from. When it bursts from the earth (usually where you were standing), it becomes paralyzed for a few seconds (within your Yrden spell), allowing you to inflict damage.
It also submerges after being struck by Igni, Aard, or Axil, allowing you to coax it into a burrowing maneuver, before setting an Yrden trap under your feet, before it emerges. You can also employ a more standard attack pattern of hitting the Centipede until it rolls up, before avoiding the counterattack, but it is hard and takes a long time, and the beast’s counterattack has a wide and long attack range.
KIKIMORE WARRIORS
Danger Alert

Frequency

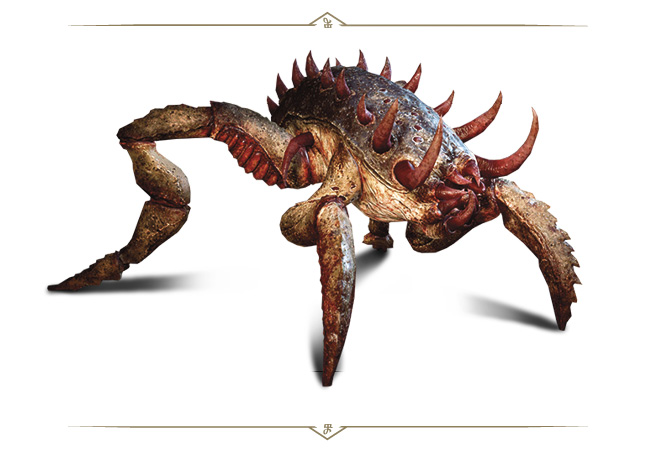
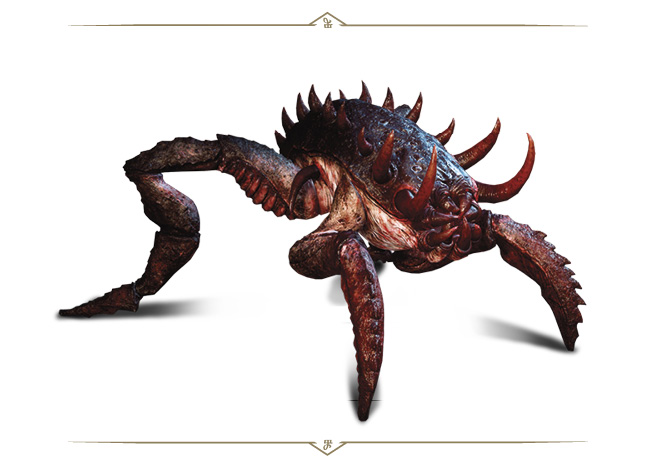
Kikimore Warriors defend their nests from trespassers. They attack somewhat slower than Kikimore Workers. They are able to spew streams of caustic venom a great distance and leap to attack.
|
Loot: Chitinous shell, Kikimore discharge, Monster carapace, Monster heart, Monster pincer, Green mutagens |
|
Sub-Species or Named Variants: Kikimore Warrior |
|
Environments: Warriors are only found in swamps or cave systems that support multiple Workers, which they control. |
|
Specific Encounter (Workers and Warriors): The Monster Den south of Dun Tynne Castle, and southwest of Dun Tynne Hillside. |
Vulnerable Against

Enemy Attacks
They are covered with thick, hard armor which easily deflects blows from even the sharpest sword. Kikimore Warriors are protected by swarms of Workers which obey their orders until they are themselves eradicated.
Attacking Movement and Defenses: Warriors are slower than their smaller Worker brethren, but have a high armor and vitality. They are herd creatures, and should be tackled in the same way as Endregas. They can sidestep, but mostly head straight for you and engage you with melee strikes. If you strike one a few times, it starts to attack with ferocity that usually forces you to retreat.
Jump and Melee Mandible Strike: Expect quick pincer attacks from the front mandibles of a Kikimore Warrior. This damages you (sometimes significantly compared to a Worker’s pincers), and usually poisons you. Sometimes the Warrior leaps at you before extending pincers. Parry or dodge to avoid being struck (timing your counter or dodge just as the creature begins to jut forward), and back away from any residual poison.
Acid Vomit: An unpleasant frontal secretion coats you in poisonous bile, which increases your toxicity, and should be dodged or rolled away from.
Push Back (Counterattack): If struck multiple times, expect a Warrior to push you back with front pincers, countering your subsequent sword attacks, and allowing others in the group an easier time when striking you. Nimble stepping in and out of combat negates this.
Resistances: They are completely immune to the effects of the Axii Sign.
The Best Battle Tactics
When grouped with Workers, the smaller specimens tend to crowd and prevent you from attacking the Warriors, as well as attempting their burrowing tactics. Clear a path and slay the Warriors to prevent the Workers’ more potent burrowing tactics from occurring. The strategies you used to slay Endrega come into play here. Obviously, crippling the Workers’ main burrowing attack by slaughtering any Warriors first, using Igni and armor-piercing weaponry to get the job done. They are vulnerable to fire (from Igni as well as weapons, bombs, or bolts), as well as oils and bombs that harm all insectoids.
KIKIMORE WORKERS
Danger Alert (groups)

Frequency

A single Kikimore Worker can be easily killed by even a child. It is rare indeed, however, to come across an isolated individual, for Kikimore Workers usual move in groups of a few to a dozen or so members. The only defense against a swarm of Kikimores available to a normal person is to flee. And not even that is guaranteed.
|
Loot: Kikimore discharge, Monster carapace, Monster heart, Monster pincer, Green mutagens |
|
Sub-Species or Named Variants: Kikimore Worker |
|
Environments: Workers can be found either in caves or occasionally infesting swamps and vineyards across Toussaint. Nests are also encountered, but very rarely, along with three or more of these scuttling creatures. Larger groups are controlled by Kikimore Warriors. |
|
Specific Encounter (Workers and Nest): The Vineyard infestation south of Dun Tynne Castle. |
Vulnerable Against

Enemy Attacks
Kikimores form colonies, making them similar to communal insects such as ants. Kikimore Workers take care of hunting food and bringing it back to the nest, while Kikimore Warriors defend the nest against attackers. Kikimore Workers listen to orders given by Kikimore Warriors. Eliminate the Warrior guiding a swarm, however, and the Workers will disperse and cease digging. Kikimore Workers are nimbler and quicker than Warriors, but far less hardy and vicious in battle.
Burrow and Jump Attack: When grouped with a Kikimore Warrior, the Workers constantly burrow under the terrain, impervious to Signs, and move toward you in a straight line before emerging with a jumping attack. Then they burrow again. Kill the Warrior, and the Workers do not perform this move, switching to melee attacks only.
Attacking Movement and Defenses: When on the ground, Kikimore Workers move in swarms, can sidestep, but mostly head straight for you and engage you with melee strikes. If you strike one a few times, it starts to attack with ferocity that usually forces you to retreat.
Mandible Strike: Expect quick snipping attacks from the front mandibles of a Kikimore Worker. This damages you (but not as significantly as a Warrior’s pincers), and usually poisons you. Parry or dodge to avoid being struck, and back away from any residual poison.
Resistances: They show complete immunity to the Axii Sign, and when they dig tunnels, they are invulnerable to all the other Signs as well. Poison also does them no harm.
The Best Battle Tactics
Quicken your slaughter of either Kikimore variant by employing weapons with armor-piercing capabilities. A good method for fighting them is to use the Igni Sign to temporarily immolate and immobilize them, as well as oils and bombs meant to damage insectoids. The tactics you used to slay Endrega come into play here. Obviously, crippling the Workers’ main burrowing attack by slaughtering any Warriors first is a sound tactic.