
The Witcher 3: Wild Hunt The Complete Edition Guide Gwent
Overview
At the very basic level, a game of Gwent consists of the following:
1. A conversation with a Gwent player, and a small bet by you on the likelihood of your victory.
2. The Gwent battlefield appears. The starting player is chosen via a coin toss.
3. Each player draws 10 random cards from their current deck of no fewer than 22 cards, and no more than 35 cards, then chooses up to two cards from this hand to discard, which are redrawn in the hopes of replacing them with better cards. The discard is optional. The 10 cards you end up with after any redrawing become your hand for the duration of the match (although special card abilities can affect your draw).
4. The match begins! When you start the first of (up to) three rounds, players remove a unit card from their hand, and place it on the battlefield in the appropriate combat rows, one card per turn (unless special abilities of the card deck dictate otherwise). Additionally, Weather cards can be put into play to further influence unit card strength points. Each unit card is worth a certain number of strength points, which are added to your overall total. The ultimate goal in a round is to have more points than your opponent.
5. Play continues until cards are exhausted, or a player passes their turn, which allows their opponent to continue to play until their cards are exhausted, or they pass. The player with the highest total points wins that round.
6. The next round starts with the remaining cards in hand still in play. The first player to win two rounds is the winner of the match (or bout).
The Gwent Battlefield: A Picture
The following image shows a sample Gwent battlefield, or board, where each Gwent match takes place.
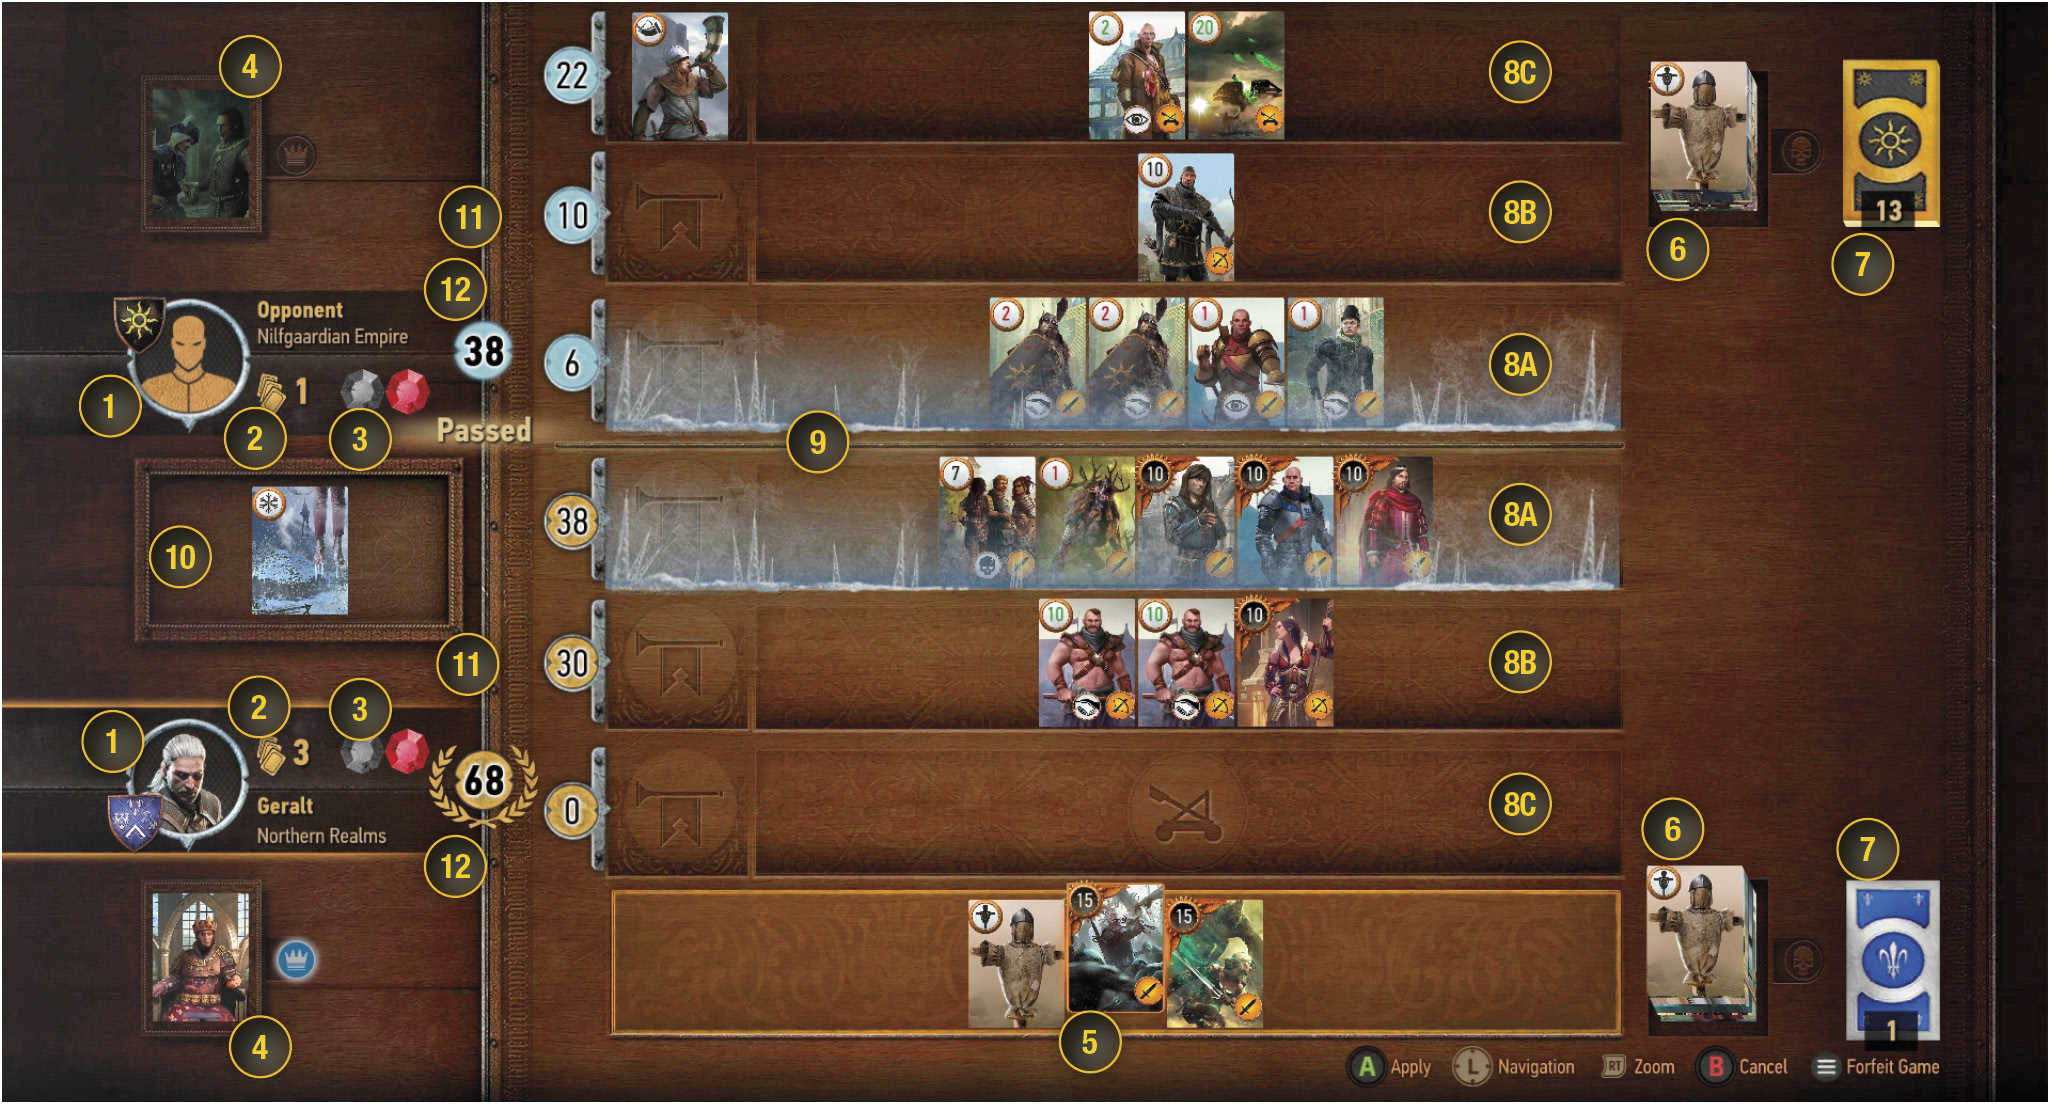
 The Players: This shows the opponent (at the upper half) and you (at the lower half of the battlefield). The shield and deck type under the name of the opponent is helpful, as it shows which Faction you are going up against (and which you are using yourself). Adjust your strategies accordingly.
 Cards in Hand: This is the number of cards you and your opponent have left to play. It is usually important that you have more remaining cards than your opponent, so you aren’t outdrawn at the end of the final round.
 Round Gems: You each have two red gems indicating how many rounds each of you has won. Lose a round, and a gem is shattered. Lose two rounds, and the match is lost.
 Leader Ability: In the top left (opponent) or bottom left (you) corner of the battlefield, your Leader sits. He or she has a specific ability, which you can choose before the match starts. Note in this picture, the opponent has already used his Leader Ability (which is why the Leader card is darkened). Remember to hit the “use leader card” button when you wish to unleash this ability (which is used once per game). It is extremely important you know what both you and your opponent’s Leader abilities are, so you can prepare for them! Remember to zoom in on your opponent’s Leader card to learn more about their ability. Forewarned is forearmed!
 Your Hand: The opponent’s hand isn’t visible (that would be cheating), but here you can see all the cards you still have left to play.
 Discard pile (also known as Graveyard): This shows the cards you and your opponent have played, and have been discarded in previous rounds, or in this round if a card has been scorched. You can look through this pile (especially as Medic cards allow you to return non-Hero cards from this pile).
 Remaining Deck Cards: These cards are the remaining ones that you didn’t draw at the start of the match, and aren’t used.
 Combat Rows: There are three combat rows of the battlefield, and the icon of the swords (8A: Close Combat), bow (8B: Ranged), and catapult (8C: Siege) are carved to indicate the unit types you can place there. Your opponent also has the same three rows, but in the opposite direction (so both Close Combat rows are in the middle of the battlefield. With the exception of Spies (which are placed on enemy rows), and Weather cards (which are placed in the “Weather” area, all your cards are placed on your own side of the battlefield.
 Commander’s Horn and Mardroeme Placement: This area on the left side of each row indicates whether a Commander’s Horn card (all Factions) or a Mardroeme card (Skellige Clans only) is augmenting the row in question. Note that in this example, the opponent has played a Commander’s Horn on his Siege Combat Row.
 Weather Effect: If a Weather card is placed, it affects both you and your opponent’s rows, and the type of Weather is shown on the row. Any Weather cards in play are placed here, between both players. In this example, a Biting Frost card is in play, reducing the effectiveness of the Close Combat Rows for both sides.
 Row points totals. The totals for all of the strength points for each card you and your opponent have played in each row are shown here.
 Total Points Value: This shows total points value of the cards on each of your three rows, as well as those of your opponent. The highest total wins the round.
Deck Factions
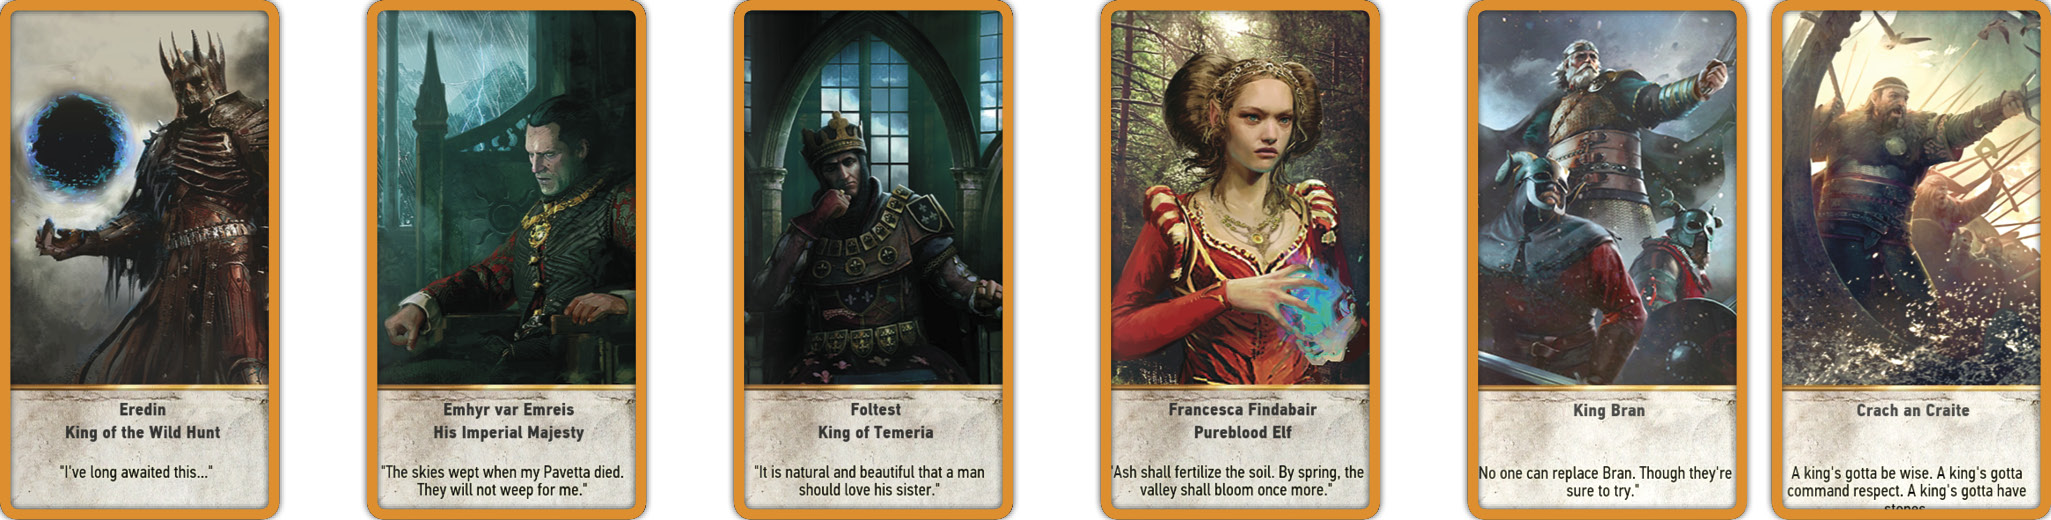
There are five types of deck in Gwent, each related to a particular faction. Each faction has its own perk, which is important to learn, and their own Leader with a number of unique Leader abilities you can choose from. They are listed in your Gwent menu in the following order:
 Monsters

A close-combat heavy army of frightening beasts that favor Muster abilities.
- Leader: Eredin
- Faction Perk: One randomly-chosen card stays on the battlefield after each round.
 Nilfgaardian Empire

The army of the Emhyr, with Tight Bond units, Spies, and Medics).
- Leader: Emhyr var Emreis
- Faction Perk: Win whenever there is a draw.
 Northern Realms

The army of King Foltest, with close combat and siege weaponry, sprinkled with Spies and Tight Bond units.
- Leader: Foltest
- Faction Perk: Draw a card from your deck whenever you win a round.
 Scoia’tael

Elves and dwarves combine to offer units with Muster, Medic, and a whole lot of agility.
- Leader: Francesca Findabair
- Faction Perk: You decide who goes first at the start of a battle.
 Skellige Clans

The Clans of Skellige combine to form a hard-hitting marauding band of Muster, Tight Bond; and Beserker troops with bear-faced ferocity.
- Leader: King Bran or Crach an Craite
- Faction Perk: Two random cards from the graveyard (discard pile) come to play on the board at the start of round three.