
The Witcher 3: Wild Hunt The Complete Edition Guide Training Witcher Archetypes Alchemy-focused Archetypes
Archetype 7: The Bombardier Of Blaviken
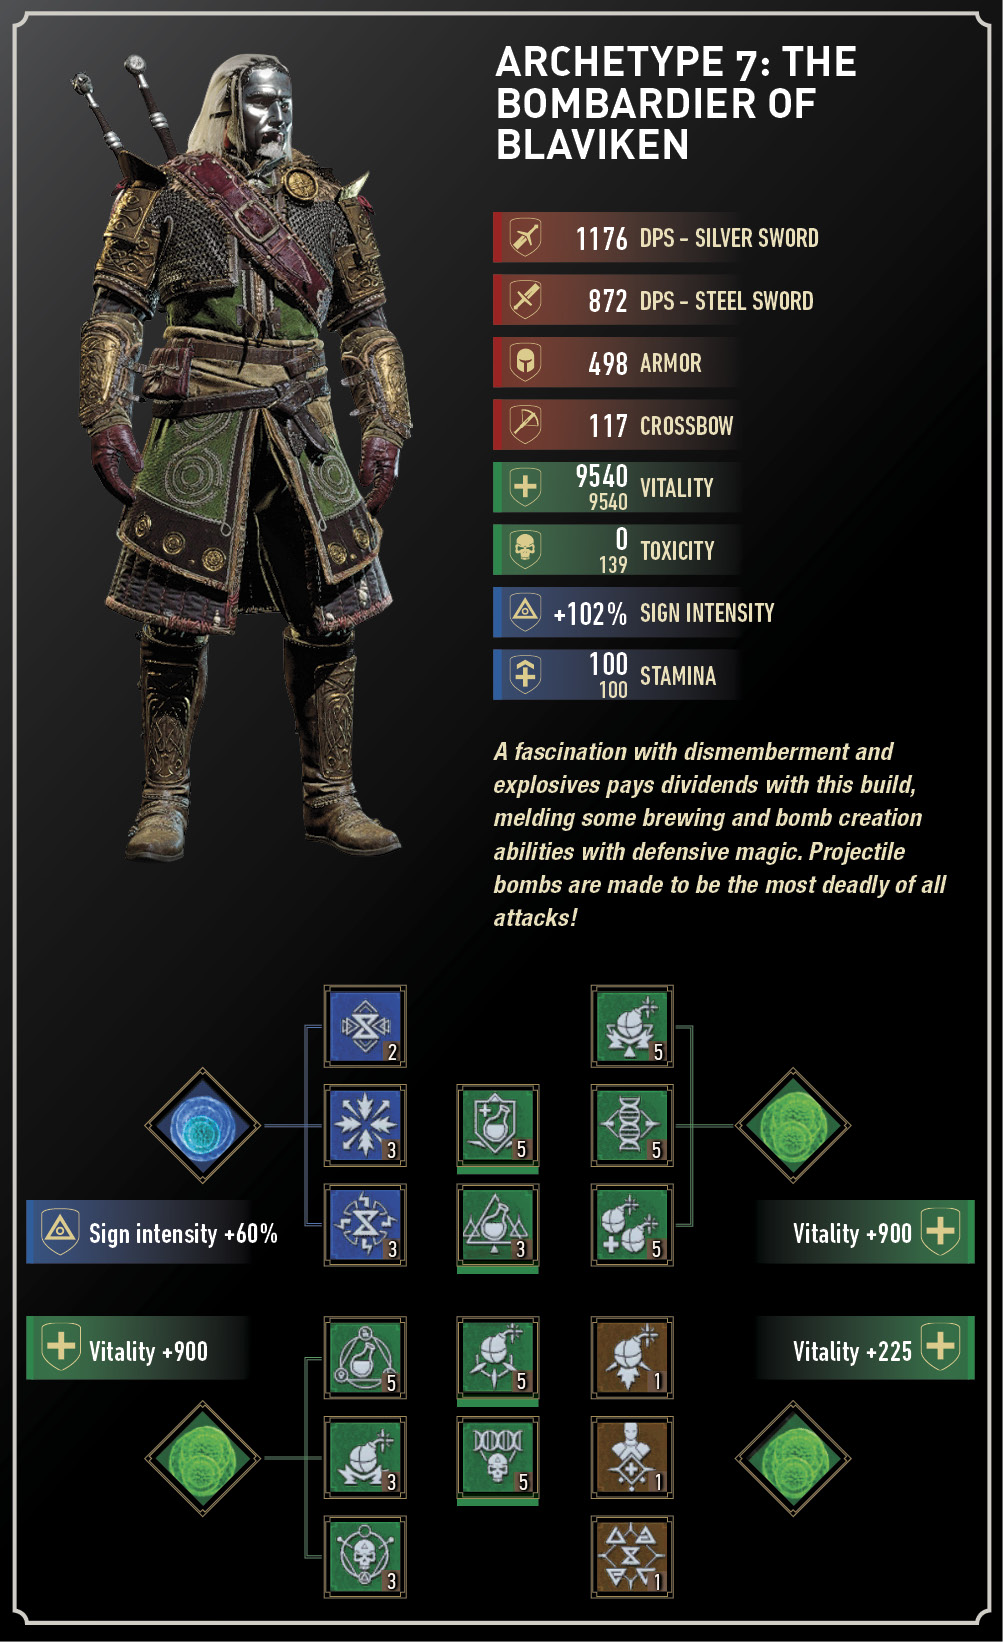
| Points to Unlock | Levels | Branch and Ability Name |
|---|---|---|
|
0 |
2 |
Yrden Sign: Sustained Glyphs |
|
0 |
3 |
Quen Sign: Exploding Shield |
|
6 |
3 |
Yrden Sign: Magic Trap*/** |
|
6 |
3 |
Quen Sign: Active Shield*/** |
|
0 |
5 |
Brewing: Heightened Tolerance |
|
0 |
3 |
Bomb Creation: Steady Aim |
|
0 |
3 |
Mutation: Acquired Tolerance |
|
8 |
5 |
Brewing: Refreshment* |
|
8 |
5 |
Bomb Creation: Pyrotechnics |
|
8 |
5 |
Mutation: Tissue Transmutation |
|
28 |
5 |
Bomb Creation: Cluster Bombs |
|
0 |
1 |
Bear School Techniques |
|
0 |
1 |
Rage Management |
|
0 |
1 |
Advanced Pyrotechnics* |
| Total Ability Points Needed | ||
| 12/16* Abilities | 43/59* Points | |
(* Additional Abilities as 16 Slots are unlocked through Mutations)
(** These Abilities require another Signs ability to be unlocked before they are accessed)
Armor: Undvik Armor or Ursine Armor
Swords: Ursine Steel Sword, Ursine Silver Sword
Crossbow: Any
Bombs: Grapeshot, Dancing Star, Dragon’s Dream, Devil’s Puffball
Potions: Blizzard, Maribor Forest, Swallow, Thunderbolt, White Raffard’s Decoction
Decoctions: Cockatrice, Katakan, Ekimmara, Succubus
Glyphs: Quen
Runestones: Dazhbog, Stribog, Triglav, Zoria
Glyphwords: Protection
Runewords: Invigoration, Prolongation, Rejuvenation
Mutations: Toxic Blood (2 Research Points)
Sometimes you wish you had more bombs. This archetype provides for that very specific need. It takes a lot of work to hunt down the ingredients for this archetype to really work, but the results are worthwhile. You end up with more than enough bombs, and each bomb is significantly more effective. Most encounters in the field should end decisively in your favor after many, many explosions.
Any spare Ability Points can go into branches that fit your preferences. If you want a bit more bite out of your swords, the early parts of the Combat Branch of the Ability Tree are a safe bet. If you’re trying to push your survivability, investing in Sign improvements for Yrden and Quen is not a bad call (and this archetype abilities list reflects a small selection of Signs to use, too). Yrden is of particular interest; you might find yourself utilizing the Magic Trap to slow down fast foes so your bombs hit their intended targets more easily. Or, you may wish to continue your Brewing, especially as your Toxicity is toughened.
Bombs are the centerpiece of this archetype. Steady Aim gives you more time to aim bombs. Pyrotechnics increases your damage capacity with Dragon’s Dream and Devil’s Puffball; projectiles that normally inflict no immediate damage by themselves. Efficiency increases the maximum number of bombs you can have in slot. However, the real star of the show is Cluster Bomb. Maxed out, Cluster Bomb causes your bombs to scatter additional explosive fragments (up to six at the highest level). A Superior Grapeshot and Dancing Star, already powerful, become pocket-portable battlefield devastators, and with maxed out Efficiency, you’ll have a lot more of them to throw around.
The other talents suggested in the Alchemy Branches of the Ability Tree aren’t just so you can reach Cluster Bomb: Tissue Transmutation to greatly boost your survivability when maxed out while consuming a decoction (likely the cockatrice decoction). Heightened Tolerance gives you a little more room to work with in terms of your toxicity levels, and Synergy allows your Mutagen Slots to be even more effective at stat boosts.
In terms of armor, the Undvik gear of Skellige (bolstered by sockets created by the Runewright) helps you withstand punishment while you try lobbing bombs (and Bear School Techniques keep your Vitality and Strong Attacks up), while the extra protection of Ursine gear does more than shield you from your own mis-thrown projectiles; the Adrenaline Point gains, coupled with Rage Management (Signs are cast using Adrenaline Points if your Stamina level is too low), enables you to utilize Yrden and Quen for longer than you’re normally capable of; allowing a “Signs first, Bombs second” approach to combat. Add more Adrenaline Points with both the Ursine blades.
With this archetype, there aren’t particular potions you need to use. In most situations, a focus on survival potions, like White Raffard’s Decoction and Swallow, is the best plan. Whereas, with bombs you have the pick of the crop: This build gives you a ridiculous amount of bombs to work with. Use your heavy hitters: Grapeshot, Dancing Star, Dragon’s Dream for especially now-vulnerable monsters, and Devil’s Puffball for those weakened by poison.
When choosing decoctions, Cockatrice decoctions allow all alchemy creations to be used one additional time. ALL of them. This is hands down the most useful decoction for this archetype. On the off-chance you’re not chugging down Cockatrice decoctions, choose ones that benefit elements such as your Attack Power (Succubus), Critical Hits (Katakan), or Vitality (Ekimmara).
With Glyphs and Glyphwords from the Runewright, the usual plan of adding Intensity to your Quen sign helps your defenses as you fiddle with more bombs to throw. Runestones should be chosen if they help you strike foes with your projectiles. Dazhbog (chance to cause burning), Zoria (freezing), and Triglav (stunning), and Stribog (staggering) all have a chance of immobilizing an enemy to a certain degree, after which more bombing can occur. A similar plan is in effect with Runewords; Rejuvenation restores your Stamina for each fatal blow you inflict (these don’t need to be sword strikes, which is key). Also for your consideration is Invigoration. If you’re keeping away from foes, your Vitality is likely to be at maximum for longer, so Vitality regeneration increases damage on your next attack. Or, choose Prolongation to increase your potion effects.
Mutations related to Alchemy (and to a lesser extent, Signs) are most beneficial here. With potions and decoctions upping your Toxicity, Toxic Blood is worthwhile; if you’re struck, the enemy receives damage that scales with your Toxicity. Euphoria (Potion Toxicity increases sword and Sign power) isn’t a wise choice as it doesn’t affect bomb damage.