
The Witcher 3: Wild Hunt The Complete Edition Guide Appendices and Compendiums Bestiary
Necrophages
Local legends have painted NecropHages as the dead risen, cursing and hungering for the living, but this is far from the truth. Though it is correct that where war, death, and pestilence go, NecropHages inevitably follow. Defined by an insatiable lust for flesh (living or dead), the various species of NecropHage have seen a population explosion as wars have ravaged the Continent.
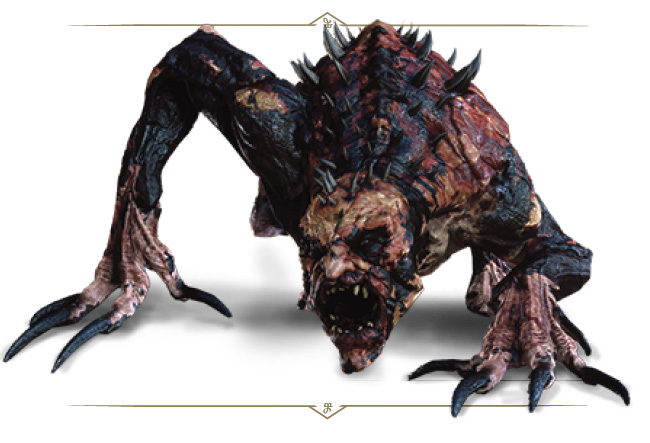
ALGHOULS
Danger Alert

Frequency

Ghouls seem to possess wits enough to at least know a brighter mind when they sense one, so let Alghouls lead their packs. When encountering such a group, the Alghoul should be eliminated as a first priority.
|
Loot: Alghoul bone marrow, Alghoul claw, Rotten meat |
|
Sub-Species or Named Variants: Alghoul, Cemetaur |
|
Environments: Battlefields and any location where a large number of corpses can be found in shallow graves or left out to rot. |
|
Specific Encounter:The Calveit Watchtower, on the river delta just southeast of Ferry Station, in Velen (with Ghouls). |
Vulnerable Against

Enemy Attacks
Alghouls differ from normal Ghouls in size, strength, coloring and, most importantly, intelligence. Whereas Ghouls and Graveirs are primitive creatures unfit to plan even the simplest ambush, Alghouls and their kindred (such as Cemetaurs) are capable of forethought, and are thus much more dangerous.
Leaping Claw (Ranged): Alghouls can leap at you from quite a distance. Be ready to dodge this attack, or have Quen refreshed to absorb the hit. Parrying it is possible, though you’re sometimes staggered.
Clawing (Melee): A raking claw from either arm is one way an Alghoul tries to wound you. Parry these from any angle if you’re close enough, or else dodge around and step in at the flank or rear while the Alghoul recovers from swiping the claw, and attack back.
Frenzy: Like a normal Ghoul, an injured Alghoul can fall into a frenzy and attack with blind fury. An experienced Witcher knows to get out of its way on such occasions and strike from behind, while for an inexperienced Witcher, such a turn of events often marks the end of his Path.
A Glowing Alghoul (Regeneration): If you’re seeing an Alghoul glowing a red color, it is regenerating. Focusing on the slaying of individual pack members one at a time ensures you can concentrate all your magic and swordplay on a single creature, rather than letting multiple foes heal time and time again.
Back Spines: When enraged, an Alghoul grows spines on its back. This makes attacking it a very dangerous proposition, as the spines are harmful if you use melee attacks. Axii can force the spines on an Alghoul to retract, with the added benefit of temporarily stunning the creature.
Alghoul Scream: An Alghoul can emit a piercing scream to stun nearby victims, as well as send nearby Ghouls into a raging frenzy. The shockwave is easily seen, and should be retreated from.
Leaders of the Pack: Alghouls can be found in command of higher level packs of Ghouls.
Drawn Power at Dusk: Fight Alghouls during the twilight or nighttime hours, and expect them to be slightly tougher combatants.
The Best Battle Tactics
During combat, Alghouls try risky maneuvers aimed at knocking their opponents to the ground so the others can finish the job by tearing them to shreds. Alghouls are smarter and more powerful than Ghouls, making them the greatest threat in a Ghoul pack. An otherwise coordinated pack becomes less so once the Alghoul has been dealt with. Focus your fury on an Alghoul first.
While Ghouls are great to practice countering with, Alghouls are much more of a problem due to their strength, larger vitality, and defensive spines and screaming. Sometimes in the heat of battle, successfully employing Axii is difficult (so target the Alghoul first, and use strong attacks to inflict greater damage while the Alghoul is stunned for a couple of seconds). Aard and Igni are other options, pushing some of the pack members on their back and clearing a path to the Alghoul.
A more subtle combat plan is also available to those not wishing to face an entire pack at once. Edge slowly into an Alghoul territory until one of the pack sees you. Back up, cast Axii, and kill it (bombs or crossbow bolts work as well as Signs and swordplay). Then repeat the process. This only works if you’re patient, and haven’t charged into the middle of an Alghoul territory.
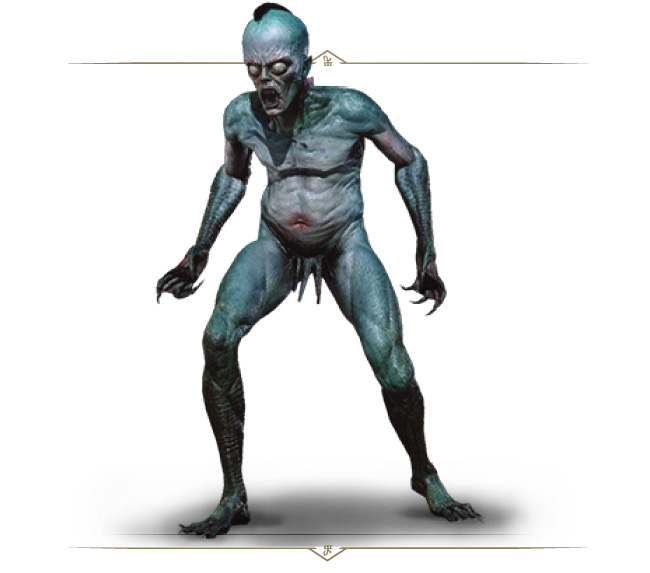
DROWNERS
Danger Alert

Frequency

A Drowner resembles a corpse dredged from the bottom of a pond. It is sickly blue or green in color, with slime and sludge oozing out of every pore and the acrid stench of rot wafting off it. But their scaly skin, gills, and dorsal fins suggest Drowners are an entirely foreign species.
|
Loot: Drowner brain, Drowned Dead tongue, Water essence |
|
Sub-Species or Named Variants: Drowner, Drowned Dead, Mucknixers, Vodnicks, Muire D’Yaeblen |
|
Environments: Coastal shores or river banks, where the bloated remains of the battle-torn corpse have been left to rot. Drowners that congregate in large enough numbers create nests near sources of water and food. |
|
Specific Encounter:The Guarded Treasure southwest of Kaer Trolde Harbor, on the western coast of Ard Skellig (Skellige). |
|
Specific Encounter (Nest): The hidden treasure on the tiny island northeast of Olena’s Grove, in Velen. |
Vulnerable Against

Enemy Attacks
Drowners, Mucknixers, Vodniks, and drowned dead all live in putrid, rotting filth, and so have developed a high resistance to poison.
Leaping Swipe (Ranged): The usual attacking plan for a Drowner involves leaping in your general direction and swiping with their disgusting claws. It is simplicity itself to step out of the way with a quick dodge, before attacking while the Drowner recovers. This “dance” is one of the most proficient ways to cut down a group of Drowners quickly and effectively.
Claw Swipe (Melee): If you’re going toe-to-webbed toe with a Drowner, they tend to flail with claw attacks when you’re close to one. It’s usually better to back up, or have one burning and helpless for a few seconds before being this close. Or, parry the claws (from any angle), watching for the possibility of being staggered.
Scream of Anguish: Drowners react to the deaths of their fellows by screaming in pain. This show of mourning leaves them defenseless for several seconds.
Resistances: Drowners are resistant to poisoned attacks from bombs and blades that you may possess. Though humanoid in form, they are primitive creatures no more intelligent than carp or pike. That is why spells affecting the mind, the Axii Sign included, are ineffective against them.
The Best Battle Tactics
Drowners are particularly vulnerable to magic drawn from the element of fire, including the Igni Sign. Drowners are quite weak to Igni, susceptible to being lit aflame and stunned while they screech in agony. When attacked by multiple Drowners, it’s possible to catch the pack in an Yrden trap, then blast the Drowners with Igni.
Drowners are predominantly pack creatures by nature, usually in groups of three or greater. You know they have spotted you if they occasionally burrow into the ground. This is a sure warning Sign that they’re preparing to ambush if you encroach farther on their territory.
You can counterattack the claw swipes from a Drowner, causing a bit of extra damage to them. However, this can be quite difficult when multiple Drowners are attacking. They can interrupt your counterattacks with their own attacks. Drowners try to leap at a Witcher from beneath the ground. Watch for disturbances at your feet, and roll or dodge to safety. The usual tactic of applying Quen so the first time an enemy strikes you it is absorbed is a great plan; then sidestep (dodge) from the Drowner’s leaping claw attack and step back in with a sword swipe, or Igni.
Drowners are the most frequent entity you’ll fight underwater, though the options here are somewhat limited. If you cannot retreat to the land where you have a full complement of bombs, swords, and Signs to utilize, and must remain underwater, utilize the crossbow. Mix automatic and manual crossbow attacks to whittle down the vitality of these aquatic atrocities.
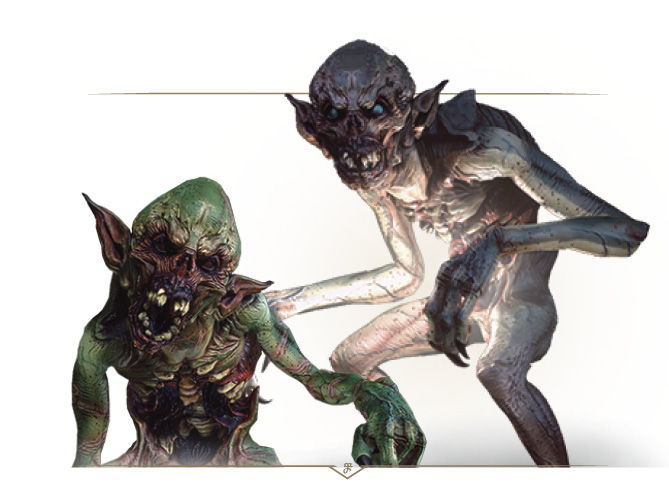
FOGLETS
Foglets Danger Alert

Frequency

Ignius Fatuus Danger Alert

Frequency

These creatures have powerful arms and claws like Zerrikanian kinjals, yet what makes them truly dangerous is their mastery of deception, beguilement and disorientation.
|
Loot: Foglet teeth Foglet mutagens, Fifth essence |
|
Sub-Species or Named Variants: Foglet, Tangalore, Ignius Fatuus |
|
Environments: Battlefields or any location where a large number of corpses can be found, as well as swamp-like locations, and low ground where fog can occur both naturally, and unnaturally. |
|
Specific Encounter:The moorland near the murdered caravaneers, southeast of Devil’s Pit (Velen). |
|
Specific Encounter (Ignius Fatuus): Contract: Swamp Thing (see page 516). |
Vulnerable Against

Enemy Attacks
Foglets may appear wherever thick fog can arise: swamplands, mountain passes or the shores of rivers and lakes. If no fog is forthcoming, they create or summon it themselves. Quickly thickening air undisturbed by the wind infallibly signals a Foglet is present—and preparing an attack.
The Fog: Rapidly thickening fog tends to be a sign that Foglets are close. Prepare Quen if the fog is accompanied by snarling. It’s possible to visually follow a Foglet as he moves within the fog; simply look for this mist congealing in different areas to prepare for a Foglet’s appearance. Foglets can also disappear at will, so track them from their last location using the appearing mist as evidence.
Dopplegangers: Foglets create ethereal illusions of themselves that can cause physical harm, while the real Foglet stalks the area. Damaging the illusions disrupts them, and can reveal the Foglet’s location.
Raking Claws: One, two, or three clawing attacks as the Foglet pushes forwards. Blocking while moving allows you to ready yourself for a parry or counter, and Quen means any surprise attacks are negated (indeed, the Foglet is staggered for a moment, allowing you to press home the advantage with swordplay or Moon Dust bombs).
The Best Battle Tactics
When fighting Foglets, remain calm and keep your wits about you no matter what. Since Foglets can take on immaterial form, a slight shimmer of air or a rustle in the grass might be the only clue you have to their location. Casting the Aard Sign at these beings causes them to become tangible, giving purchase to blades and other weapons.
While Foglets can disappear, watching for moving patches of fog or grass swaying in a path leading directly to their victims is one way to identify their location. It is possible to counterattack a Foglet as they materialize to attack, a good way to begin your offense.
Yrden is particularly useful for buying you time to react to a Foglet ambush, slowing down the monsters and disabling their invisibility. Moon Dust bombs can keep Foglets from turning invisible and disrupt their illusions. Aard can knock both an ethereal and fully-formed Foglet on its back, ready to be skewered. Axii is another great choice, as you can (if you have the Stamina) befuddle a Foglet, jump in and attack it, then jump back and flummox it with Axii again.
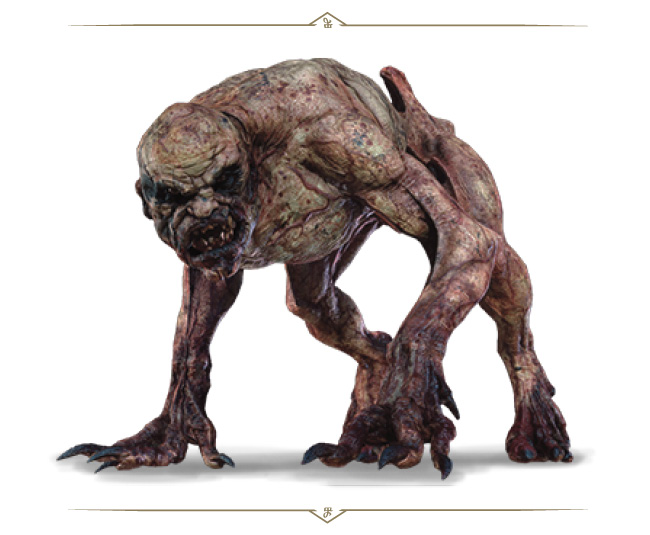
GHOULS
Danger Alert

Frequency

Ghouls are driven by one thing and one thing only: an insatiable appetite for human flesh. Beware of them near nests, where four or more Ghouls may be encountered.
|
Loot: Ghoul blood, Venom extract |
|
Sub-Species or Named Variants: Ghoul, Graveir |
|
Environments: Battlefields or any location where a large number of corpses can be found in shallow graves or left out to rot. |
|
Specific Encounter:The Ferry Station signpost in Velen. |
Vulnerable Against

Enemy Attacks
In a one-on-one fight with a trained Witcher, a Ghoul poses little threat, but one must remember that wounded individuals can erupt in a mad frenzy.
Leaping Claw (Ranged): Ghouls can leap at you from quite a distance. Be ready to dodge this attack, or have Quen refreshed to absorb the hit.
Clawing (Melee): A raking claw from either arm is usually the way a Ghoul tries to wound you. Parry these from any angle if you’re close enough, or else dodge around and step in at the flank or rear while the Ghoul recovers from swiping the claw, and attack back.
Frenzy: A wounded Ghoul sometimes turns and begins a series of viciously grotesque attacks (which can stun you), in a frenzy almost suicidal in nature. Listen for Ghouls shuddering and snarling in place after an injury. This is a sign that they are enraged. They aggressively leap at their victims, sprinting around them to confuse them. Enraged Ghouls also regenerate their wounds. Parrying these clawing attacks is expected, or dodging and slicing at the creature from the side, or stopping it with your preferred magic. Don’t expect the Ghoul to retreat during this time.
A Glowing Ghoul (Regeneration): If you’re seeing a Ghoul glowing a red color, it is regenerating. Focusing on the slaying of individual pack members one at a time ensures you can concentrate all your magic and swordplay on a single creature, rather than letting multiple foes heal time and time again.
Leaders of the Pack:Alghouls can be found in command of higher level packs of Ghouls.
Drawn Power at Dusk: Fight Ghouls during the twilight or nighttime hours and expect them to be slightly tougher
combatants.
The Best Battle Tactics
A lone Ghoul is a threat only to careless or unskilled Witchers. While not explicitly vulnerable to Yrden, this trap Sign slows Ghouls down for easy dispatching. Ghouls are rarely found alone. Packs of three or more often circle around you rapidly, attacking from the flanks while you are occupied by another. Setting Yrden down at your feet allows you to better react when the rush inevitably comes.
Do not attack a Ghoul too aggressively with your sword. They can counterattack through your own strikes, trading their blood with yours. A better plan is to strike a couple of times, back away, and attempt a more measured takedown.
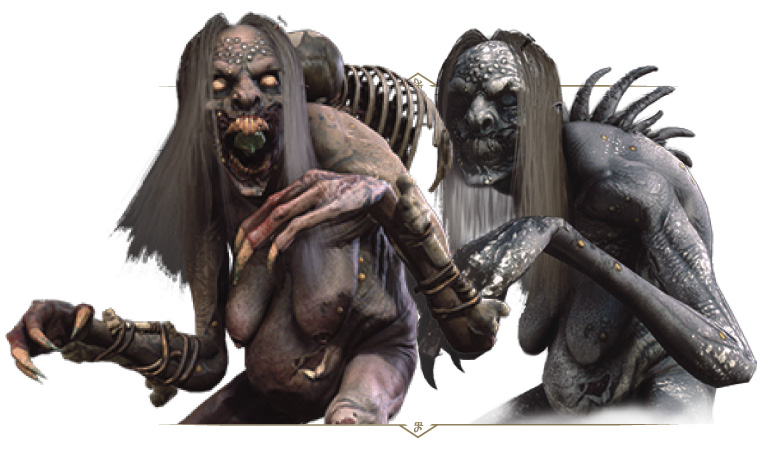
HAGS, GRAVE
HAGS, GRAVE Danger Alert

Frequency

Mourntart Danger Alert

Frequency

Aged, deformed women who loiter near graveyards and battlefields, Grave Hags feed on human corpses, slurping the rotten marrow using long prehensile tongues. If at all possible, fight them during the day. At night, they grow bolder and stronger.
|
Loot: Grave Hag ear, Hag teeth, Venom extract, Runestones, Grave Hag mutagen |
|
Sub-Species or Named Variants: Grave Hag, Mourntart |
|
Environments: Battlefields, graveyards, or any location where corpses can be found in shallow graves, or rotting out in the open. |
|
Specific Encounter:The Hidden Treasure by the burned hut on the peninsula, south of Condyle (Velen). |
|
Specific Encounter (Mourntart): Contract: The Merry Widow (see page 508). |
Vulnerable Against

Enemy Attacks
Grave Hags use their tongues in combat to grab or flog their victims. Claws built for digging up buried bodies serve just as well as weapons to rend flesh. Though clumsy in appearance, Grave Hags move and attack at great speed—sometimes even a Witcher’s reflexes are too slow to avoid their blows.
Tongue Lash: The tongue of a Grave Hag can surprise even veteran Witchers with the speed and range it can lash out. Being struck by it can cause temporary blindness, leaving you unable to properly defend yourself. However, a well-timed counterattack can sever the tongue. Otherwise, step away from the tongue’s range.
Warty Claw Attacks: Expect filthy claw-like attacks from both hands when facing a Grave Hag. These come with a variety of step-ins toward you, and are quick, difficult to counter, but can be parried. Or, you can dodge them and step in yourself with a quick bladed attack as she recovers.
Weaknesses:On rare occasions hunger-driven Grave Hags will hunt during the day. They are less dangerous at such times, for sunlight weakens them considerably. So, if you know where a Grave Hag makes her lair, meditate until the daytime before advancing on it.
The Best Battle Tactics
Grave Hags are territorial and aggressive when provoked, using their great speed to rapidly close on prey. You should always have Quen active, and Yrden prepared for use, in the event that a Hag is spotted before combat begins. This provides the best chance to defend yourself, as you can slow this she-beast down and instantly shrug off her first attack.
While not explicitly vulnerable to Igni, igniting a Grave Hag can give a Witcher a needed respite from their assault. Axii and Aard are also helpful in this respect, enabling you to follow up with attacks while the Grave Hag is stunned. Black Blood can be effective at stopping a Grave Hag that has gotten the best of you in the melee. This is another useful way to push back against her relentless assault.
The claws of a Grave Hag are sharp, but not enough that skilled swordplay cannot defend against them. A well-timed parry can stop a maddened Hag’s claws. The follow-up counter-attack can then open the Grave Hag up to successive silver sword blows.
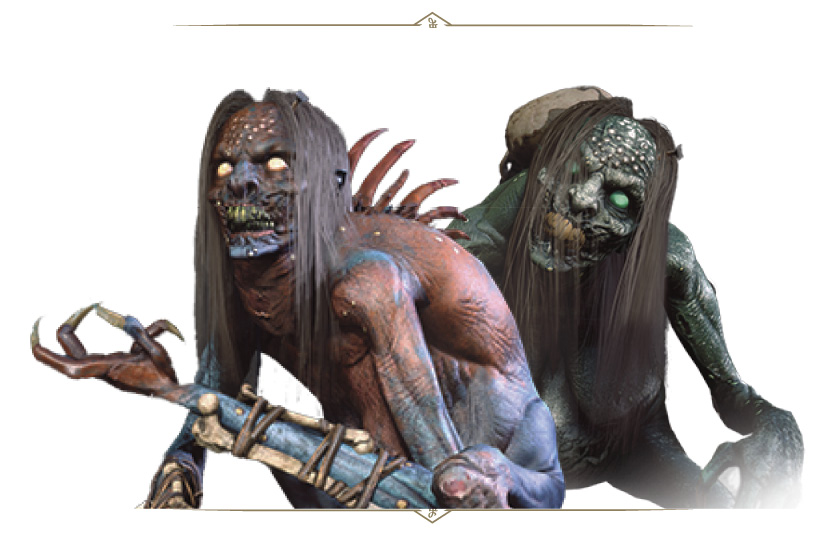
HAGS, WATER
Hags, Water Danger Alert

Frequency

Abaya Danger Alert

Frequency

Swamp bints may masquerade as lost old women to lure travelers back to their rickety wetland shacks. In truth, only a blind man or drunkard could mistake the rank sludge and rotting carrion of a Water Hag’s den for a cozy cottage.
|
Loot: Water Hag teeth, Venom extract, Water essence, Ducal water, Ribleaf |
|
Sub-Species or Named Variants: Water Hag, Bilge Hag, Abaya |
|
Environments: Battlefields, locations where large numbers of corpses are left out to rot or in shallow graves, coastal marshes and caves. |
|
Specific Encounter:The Guarded Treasure between Arette and Honeyfill Meadworks (Gustfields Territory). |
|
Specific Encounter (Abaya): Contract: Muire D’Yaeblen (see page 531). |
Vulnerable Against

Enemy Attacks
Their wrinkled, wart-covered bodies stand nearly two yards tall, colored a pinkish-green and stinking of muck and fish. Bony growths two spans long stick out from their backs, with hair like a tangle of seaweed and claws that would make a Werewolf proud completing the picture.
Sickle Claw Attacks: Expect filthy claw-like attacks from both hands when facing a Water Hag. These come with a variety of step-ins towards you, and are quick, difficult to counter, but can be parried. Or, you can dodge them and step in yourself with a quick bladed attack as she recovers.
Mud Ball: They are also able to form mud into balls, which they toss to temporarily blind opponents. Simply peer through the obscured view the best you can, or better yet, dodge the ball by watching the Hag lean back and start the throw, and react quickly.
Submerged Swim: Though bulky, they are excellent swimmers. They can even swim through thick mud with astonishing agility, surfacing behind or beside their victims to attack them with their sickle-shaped claws. Deft dodging and looking for movement in the water helps avoid these surprise attacks.
Strength in the Storm: Water Hags are particularly active and dangerous during rainstorms, conditions which furthermore hinder the use of the Igni Sign, usually the most effective weapon against all moisture-loving creatures.
The Best Battle Tactics
Water Hags can ‘swim’ through mud as swiftly as they can through water, and they can use this to ambush their prey. Slow the Water Hag down with Yrden. A clever Witcher can catch a Hag with Yrden just as it bursts from the ground, allowing plenty of time to savage it with their silver swords.
The brutal power of a Water Hag may be familiar to those who have faced a Grave Hag, but possibly more threatening is their ability to throw balls of mud at the faces of their opponents in order to blind them, and they do this with frightening accuracy. Keep your eyes focused on a Water Hag attempting this maneuver so you can evade it with time to spare.
Water Hags have been known to work alongside Drowners, making these ancient Hags some of the most dangerous monsters. In these situations, it may help to carry Dragon’s Dream bombs. Combining them with a shot of Igni may set the Hag and the Drowners on fire.
Northern Wind bombs are another way to contain a Water Hag, freezing them and making them more susceptible to physical harm. Otherwise, expect a war of attrition when facing this Hag; try burning it with Igni so the Hag is incapacitated, and strike with strong attacks before backing off and trying again.
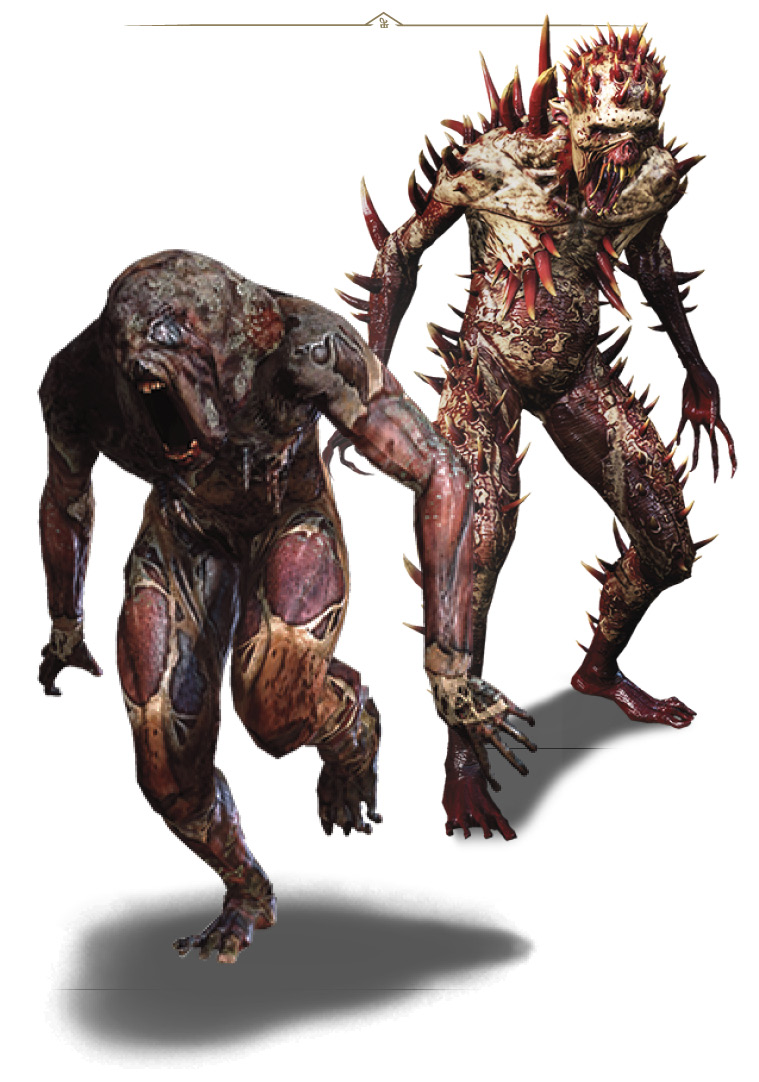
ROTFIENDS
 SCURVERS

Rotfiends Danger Alert

Frequency

scurvers Danger Alert

Frequency

Once rarities, but in the present age of constant warfare, Rotfiends have become a veritable plague. They feed on carrion, usually in groups, and present a danger to lone travelers, especially considering their speed which is more than a match for a horse at f ull gallop.
While fighting a Scurver, one cannot afford to forget about their special boney spines, razor-sharp protuberances sticking out from their skeletons. When a Scurver is near death, the gasses and enzymes gathered within its body cause it to explode, flinging these spines out at great speed, turning them into one last deadly weapon in their arsenal.
|
Loot (Rotfiend and Scurver): Rotfiend blood, Greater Rotfiend blood, Necrophage hide |
|
Sub-Species or Named Variants: Rotfiend, Devourer, Scurver |
|
Environments: Battlefields or any location where a large number of corpses can be found in shallow graves or left out to rot. Approaching Rotfiend nests is particularly dangerous, due to the explosive nature of the monsters themselves. |
|
Specific Encounter (Rotfiends): The Monster nest just north of Codger’s Quarry (Velen). |
|
Specific Encounter (Scurvers): During the exploration of Tesham Mutna (Toussaint), during Main Quest: La Cage au Fou (see page 323). |
Vulnerable Against

Enemy Attacks
Rotfiends resemble decomposing human bodies that have been stripped of their skin. Their presence is given away by the overwhelming stench of the rot which gives them their name. Devourers are a particularly dangerous kind of Rotfiend marked by an insatiable appetite for human flesh. In groups, expect them to try to surround you.
Close-range Flailing (Melee): Expect close range swiping, melee attacks using both arms as the Rotfiend or Scurver advances. Parrying or dodging these moves stops you from being hit.
Mid-range Melee Leap (Ranged):To close the gap, a Rotfiend or Scurver may leap at you and follow this up with some flailing. It also has a rudimentary dodging ability; jumping back to avoid sword strikes before following up with another leaping attack. As usual, parrying or dodging is a good plan, along with Quen to stop the first attack that gets through.
Burstable: When a Rotfiend’s health is low, it goes into its death throes, ending in an explosion which damages anything close by.
Grotesque Spike Shower (Scurver only): Similar to Rotfiends, the Scurver thrashes in agony when its health is low, collapsing to its knees and exploding upon death, shooting spikes in all directions. The attack range for this death explosion is much larger (around five meters or 16 feet!) than that of a Rotfiend. Use Quen to protect yourself, as retreating doesn’t usually get you out of range in time.
Strength after Twilight: Rotfiends and Scurvers feed in the twilight hours and at night, when they become much more dangerous than during the day.
The Best Battle Tactics
Much like Ghouls and Alghouls, Rotfiends and Scurvers roam in packs. They are fast enough to run down horse riders, so be wary when traveling near known Rotfiend haunts.
The gasses building up within a Rotfiend’s body are highly unstable and become even less stable as combat with them wears on. When a Rotfiend begins to spasm uncontrollably in place, it could be a sign that they’re about to explode. It is not safe to stand near these creatures, nor is it wise to try slaying them with a silver sword in this state. They will more than likely explode, possibly ending a witless Witcher’s career.
Igni can trigger Rotfiend explosions more quickly. This can be a useful attribute to exploit when confronted by multiple Rotfiends or Scurvers. Aard is another excellent choice, as it causes the knockdown of this enemy, so you can quickly skewer it without worrying about an explosion. Because of the dangerous nature of a Rotfiend’s explosion, using Quen to protect yourself becomes an excellent idea, more so than under normal circumstances. Retreat from a thrashing Rotfiend prior to it bursting, for obvious reasons.
Remaining at distance is a great way to prevent yourself from being hit by one of these exploding atrocities. Any bombs or crossbow bolts help here. And don’t forget the Necrophage oil!
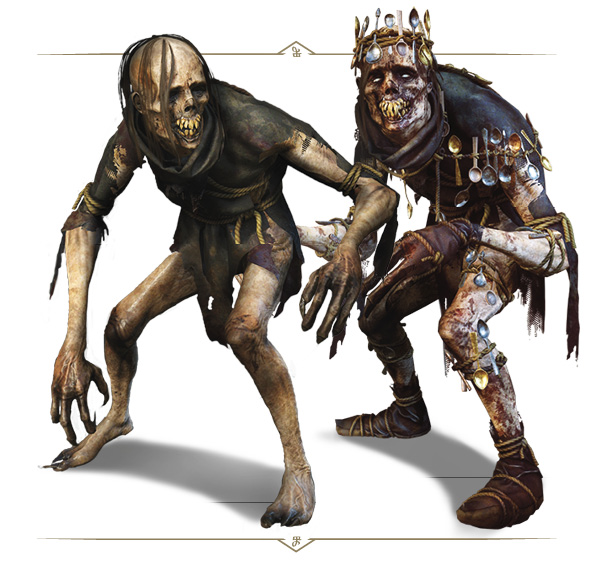
WIGHTS
WIGHT, SPOTTED
Wights Danger Alert

Frequency

Spotted Wight Danger Alert

Frequency

This species mainly lives in ancient burial sites, though they have been spotted near more recent cemeteries or wherever mass graves can be found. Wights spend the winter months in a state of lethargy very similar to human sleep. They live strictly solitary lives.
|
Loot: Green mutagens, Monster saliva, Wight ear, Wight hair |
|
Sub-Species or Named Variants: Wight, Spotted Wight, Wight Spoon Collector |
|
Environments: Caves, dusty and old burial sites, and abandoned manor houses. |
|
Specific Encounter:Rosetree Hill Cave (unmarked), northeast of Tourney Grounds in Toussaint, during Secondary Quest: The Warble of a Smitten Knight (see page 443). |
|
Specific Encounter (Groups): During Main Quest: La Cage au Fou (see page 323). |
Vulnerable Against

Enemy Attacks
It is a certainty that if a Wight finds itself in danger, it immediately spews out an ectoplasmic solution which transforms into Barghests nearly instantaneously. These Barghests obey the Wight and attack anyone the Wight deems a foe. If one of them is killed, the Wight tries at once to replace it with another ally.
Barghest Summoning: At the beginning of combat, a Wight summons up to three Barghests, and tries to keep one guarding him at all times; summoning the Barghest again should you kill it. Therefore, it is worth ignoring the Barghest and concentrating all offensive power on the Wight itself. The unfortunate Spoon Collector does not have this ability.
Gaunt Claw Attacks: Expect raking claw-like attacks from both hands when facing a Wight. These come with a variety of step-ins towards you and are quick and difficult to counter, but can be parried. Or, you can dodge them and step in yourself with a quick bladed attack as your foe recovers. Don’t be over-confident when striking a Wight, as it usually counters your sword strikes after you inflict a couple of hits.
Drunkard’s Spittle: Just like a Water Hag can throw balls of muck, a Wight can launch a disgusting wad of spittle which staggers you and causes temporary drunkenness! When you see the Wight move its head in readiness, use Quen or dodge to avoid this dirty projectile.
Submerged in the Spoons (Spotted Wight only): When fighting the spoon-collecting Wight, be aware that it has a defensive maneuver not unlike a Water Hag’s, disappearing into the gigantic pile of spoons strewn throughout its cellar dwelling before pursuing you from underneath. When it begins to surface, you can be partially pulled under and immobilized before the Wight appears to inflict a couple of hits. Dodge away from the clattering spoons indicating where the Wight is, and wait for it to emerge before continuing combat.
Resistances:Wights are resistant to poison and bleeding attacks, but vulnerable to silver.
The Best Battle Tactics
The best strategy when fighting them is to attack the Wight first, after temporarily stunning the Barghests guarding it with the Axii Sign. Confusing these spectral hounds allows you to focus all your attention on the Wight itself. With Quen active and Yrden at your disposal, slow down the foe and stop the first of its attacks from striking you.
Use Axii or Aard to confuse or knock back a Wight, allowing you to follow up while the Wight is indisposed. Time your parrying well to stop being clawed, and with a Necrophage oil-coated silver blade, use swordplay similar to that when attacking a Hag (of the grave or water variety) and the Wight will soon yield leaving only Barghests to deal with.