
The Witcher 3: Wild Hunt The Complete Edition Guide Gwent
Deck Building and Factions: Advanced Tactics
This Gwent masterclass concludes by revealing a general location of where each Faction’s cards are spread out, so you know how far through the adventure you’re likely to need to get to before you gather all of a Faction’s cards. This is followed by some deck-building strategies (both generally and for each Faction). Finally, a sample Gwent bout is undertaken, with the overriding tactics you should attempt.
 Monsters Faction

A beastly host of mainly Close Combat troops led by the frightening Eredin Beacc Glas.
General Locations Of Monster Deck Cards
| WHERE FOUND | NUMBER (46)* |
|---|---|
|
Geralt of Rivia (You) |
1 |
|
Randomly Acquired** |
19 |
|
0 |
|
|
Palace of Vizima |
0 |
|
Velen (No Man’s Land) |
2 |
|
Novigrad City |
2 |
|
Novigrad (including Oxenfurt) |
3 |
|
19 |
*This number includes the five Leader Cards, and 41 Deck cards**This is from players found throughout all territories
| EXPANSION CARDS*** | NUMBER (2) |
|---|---|
 Hearts of Stone Hearts of Stone |
2 |
 Blood and Wine Blood and Wine |
0 |
***Expansion Cards are included in the main total of 46
As you can see, the vast majority of Monster cards are found by randomly beating Gwent players, or challenging specific players across Skellige. This means you won’t be able to amass a very strong Monster deck until well into your adventure. Expect to perfect your Monster deck (collecting and strategies) after NIlfgaardian and Northern Realms decks, unless you really focus on finding these cards ahead of others.
Monster Deck Strategies
- The Monster deck focuses mainly on overwhelming an opponent using Close Combat troops. Ensure victory by using the Eredin: Commander of the Red Riders ability, which acts like a Commander’s Horn for your Close Combat units. It’s another good option as it is always available, and doesn’t add to your deck “bloat”.
- Eredin: Destroyer of Worlds (discard two cards, and draw one card of your choice from your deck) may seem counter-intuitive to those planning to out-draw their opponents. But if you require a specific card to win a late round (such as a Clear Weather, Muster unit, or Hero), it can win a bout!
- A better bet is usually Eredin: Bringer of Death, which acts in the same way as a Medic (drawing a card from your discard pile); helpful because Monster decks are devoid of Medics. Augment that by adding Yennefer of Vengerberg (a seven-point Hero Medic).
- Your overarching tactics is to tactically play Muster groups, beginning with the least-threatening, and stopping your foe from Scorching higher-value Muster groups (such as the Crones). Use your Vampires and Arachas Muster groups as one of their group has a higher strength-point, and can take the brunt of a Scorch while leaving the rest of the units intact. If you haven’t collected all the Muster cards in a group, and all Muster groups in general, Monster decks are far less effective. Remember to add yet another Muster group with Gaunter O’Dimm’s group (Neutral).
- Remember you have a few Ranged units too, including the Toad (a seven-point non-Hero unit) which has the ability to Scorch an opponent’s Siege row if the total value of units present is greater than or equal to 15. It’s spectacular when playing against Scoia’Tael decks! Partner Toad with Villentretenmerth (Neutral) to bring devastation to an opposing Close Combat row too.
- As you perfect your Gwent card collecting, your mid-strength cards (such as the Frightener or Ice Giant) should be removed and replaced with High-value Heroes and Neutral cards, to avoid deck “bloat”.
- Use the Mysterious Elf to enable one Spy ability; otherwise your lack of Spies and Medics is a shortfall. Only use your Mysterious Elf once your Muster units are in play; you don’t want to waste your Elf on gathering a duplicate Muster.
 Nilfgaardian Empire Faction

The Black Ones, a collection of troops for most types of combat, supplemented by Medics, Spies and Tight Bond units, led by Emhyr var Emreis.
General Locations Of Nilfgaardian Empire Deck Cards
| WHERE FOUND | NUMBER (42)* |
|---|---|
|
Geralt of Rivia (You) |
1 |
|
Randomly Acquired** |
9 |
|
0 |
|
|
Palace of Vizima |
0 |
|
Velen (No Man’s Land) |
21 |
|
Novigrad City |
4 or 5*** |
|
Novigrad (including Oxenfurt) |
5 or 6*** |
|
1 |
*This number includes the five Leader Cards, and 37 Deck cards**This is from players found throughout all territories
***Total reflects cards that can be bought either in Novigrad City, or Novigrad Territory, but not bought twice.
| EXPANSION CARDS**** | NUMBER (2) |
|---|---|
| Hearts of Stone |
2 |
| Blood and Wine |
0 |
**** Expansion Cards are included in the main total of 42*****This total includes one card you have an additional chance to purchase.
This deck is usually the second you end up securing all your cards for, after the Northern Realms. The majority (26) of the cards can be purchased at various traders, and only a few (nine) are randomly found. Of the rest, seven are secured during quests, and one is with you in your base deck (the first Leader card). If you have the funds, gather most of this deck quickly, and strengthen your deck without too much hope for a random outcome.
Nilfgaardian Empire Deck Strategies
- The Nilfgaard’s faction perk isn’t especially helpful, but if you see an opportunity for a draw (without expending more cards), take it.
- Though not available until you complete Secondary Quest: High Stakes, the Emhyr var Emreis: The Relentless Leader card (draw a card from your opponent’s discard pile) is a critically-helpful card; allowing you to use a powerful non-Hero from your opponent’s pile, or a Spy card you may have played earlier.
- A good complement of Spy cards (three, plus the Neutral Mysterious Elf); additional help (though giving your opponent more strength points than the Northern Realms Spies) to out-draw your opponent.
- Offers three Medics that can be placed in two different rows; vital to use throughout your Gwent gaming with this deck when gathering previously-discarded non-Hero cards. Be sure to complement them with Decoy cards so you can reuse Medics as often as you need to.
- A focus on both the Close Combat and Ranged row (but with a few Siege row cards to help spread out your forces, minimizing the effects of Weather Cards).
- The largest number of ten-point non-Heroes (two Black Infantry Archers and the Heavy Zerrikanian Fire Scorpion) of any Faction; augment these with Commander’s Horn, Morale Boost, and Medic them back into play. Or use Decoys on these, or other high-value non-Heroes.
- Your Tight Bond cards (Young Emissary, Impera Brigade Guards, and Nausicaa Cavalry Riders) are invaluable during early Gwent bouts, and are less likely to be Scorched due to their low individual strength. But remove them as you gain higher-value units (especially Heroes and Neutral Heroes) so you don’t “bloat” your deck.
- Always play Villentretenmerth; even over Special Scorch cards, to obliterate the highest non-Hero from your enemy’s Close Combat row.
 Northern Realms Faction

A mixture of units from all three rows (with a slight favoring of close combat and siege troops), along with many Tight Bond cards, a few Spies and Morale Boosts, and a single Medic, led by King Foltest.
General Locations Of Northern Realms Deck Cards
| WHERE FOUND | NUMBER (43)* |
|---|---|
|
Geralt of Rivia (You) |
22 |
|
Randomly Acquired** |
2 |
|
4 |
|
|
Palace of Vizima |
1 |
|
Velen (No Man’s Land) |
8 |
|
Novigrad City |
3 or 4*** |
|
Novigrad (including Oxenfurt) |
1 or 2*** |
|
1 |
*This number includes the five Leader Cards, and 38 Deck cards
**This is from players found throughout all territories
***Total reflects cars that can be bought either in Novigrad City, or Novigrad Territory, but not bought twice.
| EXPANSION CARDS**** | NUMBER (2) |
|---|---|
|
|
2***** |
|
|
0 |
****Expansion Cards are included in the main total of 43
*****This total includes one card you have an additional chance to purchase.
This is likely to be the deck you utilize for your first few dozen Gwent bouts, simply because you start your adventure with the majority of this deck (22 cards). Of the rest, 13 can be had through purchasing at vendors across the lands, one is secured by beating the Nilfgaardian Nobleman in Vizima, only five are found during quests, and only two cards are randomly rewarded. This makes the Northern Realms deck easy to collect, learn, and augment.
Northern Realms Deck Strategies
- The Faction Perk (draw a card from your deck whenever you win a round) allows you to outdraw your opponent more easily. Combine this with Spies and Medics to keep your card hand full until you’re ready to unleash hell!
- Visit the Inn at White Orchard and purchase the Foltest: Lord Commander of the North Leader card. The ability this gives you (to clear all Weather effects) enables you to reduce Clear Weather cards in your deck, and ignore any Weather effects in later rounds that your opponent attempts.
- A good complement of Spy cards (three, plus the Neutral Mysterious Elf) offer additional help to out-draw your opponent.
- A focus on both the Close Combat and Siege row. The latter is especially useful, as this row isn’t utilized as often in other factions. It forces an opponent to carry a larger variety of Weather cards, which lessens their chances of drawing a high-point card.
- Though you only have one Medic (Dun Banner Medic), she is worth her weight in gold! Use her in the second and third rounds to resurrect an important non-Hero (like Villentretenmerth). Add Yennefer of Vengerberg for her Medic powers too.
- Tight Bond cards offer excellent points potential, if you can dissuade a foe from Scorching them. The two Tight Bond Catapults offer exceptional strength from just two cards (32).
- Employ all your Hero cards, plus any you’ve collected from your Neutral deck, to provide some hard-hitting strength unaffected by Scorch and Weather.
- Your Poor F--king Infantry cards are initially seen as pathetic, until you realize you can place them to coax a foe into action, or use up this Infantry to eke out a victory (usually after an opponent passes).
 Scoia’tael Faction

Led by the charismatic Francesca Findabair, this collection of non-humans uses the first two rows of combat almost exclusively, with many Agile cards to add flexibility, and Muster groups plus a quartet of Medics to round out this deck.
General Locations Of Scoia’tael Deck Cards
| WHERE FOUND | NUMBER (43)* |
|---|---|
|
Geralt of Rivia (You) |
1 |
|
Randomly Acquired** |
15 |
|
0 |
|
|
Palace of Vizima |
0 |
|
Velen (No Man’s Land) |
0 |
|
Novigrad City |
6-12 |
|
Novigrad (including Oxenfurt) |
12-18 |
|
3 |
*This number includes the five Leader Cards, and 38 Deck cards
**This is from players found throughout all territories
***Total reflects cards that can be bought either in Novigrad City, or Novigrad Territory, but not bought twice.
| EXPANSION CARDS**** | NUMBER (11) |
|---|---|
|
|
11***** |
|
|
0 |
****Expansion Cards are included in the main total of 43
*****This total includes nine cards you have an additional chance to purchase.
Only the first Leader card is found in your deck. The rest can be purchased (18), won randomly (15), or won from the Elven Merchant near Carsten (1). Add to this deck during quests by securing eight more cards, though four of them are during Secondary quests; ensure you save your progress before each bout! You’re likely to use this deck later in your adventure.
Scoia’tael Deck Strategies
- The Faction Perk allows you to automatically choose who goes first. As you usually want your opponent to go first (so you can see what they are planning and counter them), always choose to go second.
- Scoia’Tael units have the largest number of troops that are Agile and can be placed in either Close Combat or Ranged rows. Use this to circumvent Weather cards, and in conjunction with the Francesca Findabair: Hope of the Sen Seidhe (Leader ability) that can shift Agile units to your most optimal row; a tactic your foe won’t likely be expecting!
- Francesca Findabair: Daisy of the Valley allows you to draw an extra card at the beginning of battle; an obvious advantage when trying to out-draw your opponent. Use it! Francesca Findabair: The Beautiful acts like a Commander’s Horn for your Ranged units; another good option (as it is always available, and doesn’t add to your deck “bloat”).
- Of the four Factions, the Scoia’Tael have the most impressive Ranged row troops, so focus on this and, to a slightly lesser extent, your Close Combat row.
- With only one Siege row card, don’t expect to place a card at the back of your battlefield. But remember that Schirru (an eight-point non-Hero Siege unit) has the ability to Scorch an opponent’s Siege row; spectacular when playing against Northern Realms and Nilfgaard decks! Add Villentretenmerth (which does the same Scorching to your foe’s Close Combat row), and Francesca Findabair: Queen of Dol Blathanna (Leader ability; Scorches your foe’s Close Combat row as well), and you have three enemy-Scorching possibilities per game!
- Augment your lack of Spies with the Mysterious Hero (Neutral). Play all your Medics (combining them with Decoys so you can use them again and again), and ensure your Muster forces (lower strength to begin with, and Havekar Smuggler units at later stages) are fully ready to fight; the three Smugglers can add 15 points to your Close Combat row in one placement!
- All your Medics aren’t combat-ready (they have a zero strength), but if you add a Morale Boost to the Ranged row (with Milva, for example), they add three points; don’t forget this benefit!
- You have a 10-point non-Hero named Isengrim Faoiltiarna. Use this mighty troop to give your Ranged units a Morale Boost, then bring Isengrim back using a Medic time and time again.
 Skellige Clans Faction

Offering one of two legendary Skelligers to lead the assembled clansfolk, the Skellige Clans deck favors ill winds and weather, unique Berserker troops, a couple of powerful characters, and a few unique abilities to overcome and overwhelm, as well as Tight Bond and Muster groups.
General Locations Of Skellige Clans Deck Cards
| EXPANSION CARDS*** | NUMBER (37) |
|---|---|
|
|
0 |
|
|
37 |
| EXPANSION CARDS*** | NUMBER (2) |
|---|---|
|
|
23 |
|
14 |
***Expansion Cards are included in the main total of 37. Remember the Weather Cards are counted as Neutral, though they are specifically used by this deck faction.
You have a base deck of this faction when you begin Blood and Wine Gwent Quest: To Everything - Turn, Turn, Tournament!. Find the remaining cards by challenging 19 different merchant types across this realm. This is likely to be the last deck you perfect. Remember the Gwent players of Toussaint use any of the five decks; not just this one!
Skellige Clans Deck Strategies
- You only have a choice of two Leaders, so build your deck tactics around either King Bran (employ additional Weather Cards including Skellige Storm) or Crach an Craite (a more aggressive plan going for a two-round win; using up high-value cards as early as possible so you can gather them back and reuse them in the second round).
- Remember your Faction ability allows you to return two random discarded cards to your hand at the start of round three only. Employ this with Crach an Craite’s ability if you wish (though your aggressive style of play should mean you never reach the third round as you’re going for round wins as early as possible).
- With your Faction ability, it’s possible to use two Heroes up to three times in a game: once each in the first round and once each again in the second round, using Crach an Craite’s ability. You can use them once again in the third round, if they were randomly picked from your discard pile. For this reason, keep your discard pile small (using Medics) to maximize your chances of gathering high-value discarded cards.
- Olaf is a mighty unit, offering Morale Boost, the Agile ability, and a massive points. He’s also Scorch-bait, so employ him tactically and Medic him back into play.
- Cerys is a godsend as she summons the Clan Drummond Shieldmaidens who instantly use their Tight Bond ability to grant you 46 Close Combat points. Have her in your hand at the start of a match rather than a Shieldmaiden, if you can. Then use Crach an Craite’s Leader ability and use her again!
- Use your Berserkers not only to eke out a win (in the case of the Young Berserkers individually, or in groups), but also as Scorch-bait. Stack your deck with Mardroemes (and Ermion) to ensure there’s a high chance of a Berserker transformation.
- You only have three active Heroes; your fourth is Hemdall, who only appears once the Kambi card is played and discarded. So use your Kambi as soon as you can, and prepare for Hemdall to arrive in the second round, as a Close Combat killing machine.
- Light Longship units have Muster, so you only need one in your hand.
- War Longships have Tight Bond, and Draig Bon-Dhu has Commander’s Horn; combine them both to maximize your Siege row (along with Gaunter O’Dimm).
- Use Birna Bran (and Yennefer) to bring back Olaf (powerful card), the Clan Dimun Pirate (Scorch), or one of the Light Longship (Muster) units.
- The Clan Dimun Pirate and Villentretenmerth both have Scorch and are great to employ one after another for constant devastating demoralization!
General Locations Of Neutral Cards
| WHERE FOUND | NUMBER (16) |
|---|---|
|
Geralt of Rivia (You) |
0 |
|
Randomly Acquired* |
2 |
|
1 |
|
|
Palace of Vizima |
0 |
|
Velen (No Man’s Land) |
0 |
|
Novigrad City |
1 or 2 |
|
Novigrad (including Oxenfurt) |
10 or 11 |
|
1 |
*This is from players found throughout all territories
**Total reflects cards that can be bought either in Novigrad City, or Novigrad Territory, but no bought twice.
| EXPANSION CARDS*** | NUMBER (7) |
|---|---|
|
|
6**** |
|
|
0 |
***Expansion Cards are included in the main total of 17
****This total includes one card you have an additional chance to purchase.
Neutral cards are all over the place! Seven of them are picked up during quests (all but one are Gwent-specific). Two are won randomly (including Villentretenmerth unfortunately, so keep playing merchants until you secure this much sought-after card!). Four are purchased (most of the Gaunter O’Dimm units), one is won from Aldert Greet during the Tutorial back in White Orchard Tavern (Zoltan Chivay is the card), or it can be found at Hanged Man’s Tree in Velen if you miss Aldert, and finally, one card is loose (the Cow). Use these to augment your faction decks, and fill in gaps with higher-point cards or those with abilities you lack.
General Locations Of Weather and Special Cards
| WHERE FOUND | NUMBER (28)* |
|---|---|
|
Geralt of Rivia (You) |
7 |
|
Randomly Acquired** |
5 |
|
1 |
|
|
Palace of Vizima |
0 |
|
Velen (No Man’s Land) |
2 |
|
Novigrad City |
1 |
|
Novigrad (including Oxenfurt) |
4 |
|
2 |
*This number includes **This is from players found throughout all territories
| EXPANSION CARDS*** | NUMBER (7) |
|---|---|
|
|
1 |
|
|
6 |
| EXPANSION CARDS*** | NUMBER (6) |
|---|---|
|
|
1 |
|
5 |
***Expansion Cards are included in the main total of 28
Most Weather cards (12) are either found in your deck to start with (seven) or won randomly (five). It isn’t usually a huge benefit to have three of each card type (especially Torrential Rain; who plays this three times in a match?), so don’t worry too much about finding these. The three Skellige Storm cards are either looted (2) or won (1) from a character during your Blood and Wine adventuring in Toussaint.
Most Special cards (10) are purchased from traders; find them at the earliest point you can, as most are useful no matter what tactical plans you’re trying. The three Mardroeme cards are gathered during your Blood and Wine adventure; one you start with, and two are won from characters in Toussaint.
Gwent: Building A Better Deck
Your first deck-building plans occur with the Northern Realms deck. It is advisable to perfect your Gwent deck build with this Faction first, before turning to the Nilfgaard, and finally to the Monsters and Scoia’Tael. Use the Skellige Clans deck as soon as you wish, when playing the Blood and Wine Expansion.
The following advice applies to all five factions:
As you build up the quality of cards in your deck, refrain from adding Weather cards (or at the very least, add a single Biting Frost); you want a slim deck (so your best cards are drawn more often), and ability cards (and Decoys) are usually a lot more helpful, especially in early matches.
Decoys should be placed into a deck as often as possible. Even if you use one to remove a card you don’t really need, this card keeps your card count up. Utilize Decoys to return a high-value card back into your hand (after it is affected by Weather, for example).
The Commander’s Horn is usually played at the end of a round (or the opponent focuses on this bonus and usually attempts to thwart this card with Weather). It is another card to “burn.” But a better plan is to place it on a row the opponent isn’t expecting. Or use on an empty row to make your foe think you’ll be amassing cards there, and watch your foe’s tactics before countering them. But in the grand scheme of things, the Horn isn’t used as often as you’d think. So keep it (or multiples of this card) away from your deck. Or use Dandelion.
During your initial Gwent bouts, always pick the units with abilities over your “normal” cards. Spies, Medics, Tight Bond, and Muster cards are all favored over a lower-level cards like Sabrina Glevissig (Northern Realms four-point ranged non-Hero). This is because ability cards give you more flexibility, plus Spies and Medics add to your card hand total; the key to winning.
At low to mid-level Gwent games (when you’re still collecting, but don’t have all the cards of a Faction), use troops with five or six strength points or higher. As you receive more 7 or 10 point cards (whether they are Heroes, non-Heroes, or Neutral cards), replace your lower-value non-ability cards with the higher-point cards.
Your aim is to create a Faction deck with the smallest number of high-value cards. Use only the highest-point cards available to you, and ditch the rest, unless they have an ability you use constantly.
You can place between zero and ten Special cards in your deck. Don’t feel obliged to utilize Special cards if you never find yourself using them (though Decoys offer an important deck-maintaining strategy). At a maximum, keep Decoys, one Commander’s Horn (unless you have a number of Heroes which aren’t affected by the Horn), one Scorch, and one Clear Weather until you develop your own strategies.
If you see three Torrential Rain decks in your deck as you’re about to face off in a match with a Scoia’Tael player, you’re doing something very wrong. If you don’t know why this is wrong, please re-read this chapter!
Beware of deck “bloat”; keep your card deck lean and mean (if your total deck size gets over 26, you may start losing because you aren’t drawing your better cards). Your aim is to bring a 22-24 card Gwent deck to a bout with a total strength count of between 150-165+ points.
If you have a deck that permits this, spread your troops out over all three rows to minimize the effectiveness of Weather cards your opponent plays.
Remember your opponent doesn’t change decks between games, so if you lose, retry the bout with a tweaked deck (perhaps with a different Leader ability) more suitable to take them down.
Use Villentretenmerth (Neutral), Toad (Monster), Schirru (Scoia’Tael), and Clan Dimun Pirate (Skellige Clans) wherever possible: A Scorch is devastating.
Gwent: A Sample Card Game
Round 1 Tactics
Before the round starts, swap up to two of your least-impressive, weakest, and usually lowest-point cards (with the exception of Spies) to maximize the potential of your hand in the game to come. If you have too many duplicates of Special cards or other ability cards you don’t use, think about removing them from your deck before your next match. Then play the first round with one of the following two tactics in mind:
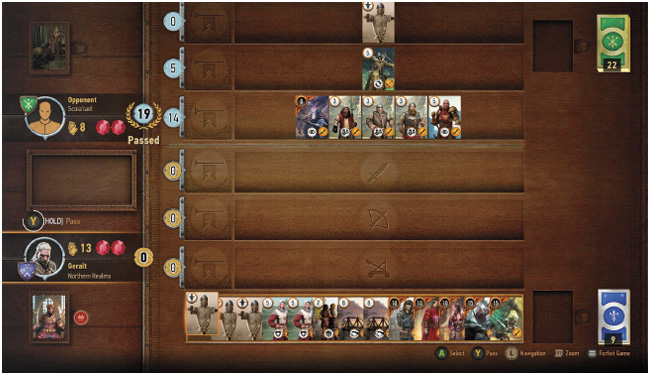
Play To Win:
Depending on your opponent’s actions (they may pass early, or not take advantage of their position), you can try to win the round. A massive combat presence is usually not advisable, as you need your best forces for the second or third round. But you can try to win in two rounds if you wish. The trick is to win without expending all your best cards. So place lower-value cards on the board. A one-point advantage at the end of this round is still a win!
Play To Lose (But With A Card Advantage):
Usually after you see what your opponent is doing, you should attempt to maintain a card advantage in your available deck (to the right of your portrait, on the left side of the battlefield). Remember that the remaining cards in the deck (bottom right corner of the battlefield) aren’t normally used; you only have the cards in your hand! So you want to keep the majority of the best cards for the rounds you are assured victory in. This means conserving cards. Why? Because a player with more cards left to play has more options. Use the following tactics:
Add to your deck with a Spy (and to a much lesser extent, a Medic). This keeps your remaining cards from being depleted. If your foe uses Spies, Decoy them into your hand and use them against your foe. No matter what your plans, use up all your Spies in this round (to gain the card advantage).
“Burn” your less important cards, judging whether their abilities are worth ignoring. For example, you may have a Poor F--king Infantry card, and take a turn using it instead of wasting a much higher card. The Infantry has a Tight Bond ability, but it’s sometimes worth ignoring that ability in order to finish a round with a stronger set of cards to play later.
Bring some inclement Weather onto the battlefield. Though this can be seen as wasteful, it is better than dropping a large-point card you wish to keep until a future round. Weather cards also usually push an opponent into their card reserves (to counter with Clear Weather, commit further units, or pass).
Remember you can always pass, which leaves your strength total as-is, and allows the opponent to keep playing. Do this when you’ve set up a good and devastating series of cards you want to place in the next round. Passing is usually done early, as you can’t lose more than one round!
Finish a round without committing your more potent cards into the battlefield. A massive first-round victory isn’t tactically advantageous (as you have fewer options for future rounds); save your best troops for rounds two or three. On the other hand, Medic heavy decks can push harder in the first round.
Delay Your Play: Fear Of Commitment
You should exercise caution when committing a card to the battlefield. A Hero can never be brought back into your hand. A non-Hero can only be brought back into your hand by using up a Decoy, and a Medic (after discarding). But keeping a group of high-value cards in your hand as long as possible is much more advantageous. Why? Because:
- It forces your opponent to start playing their cards, so you can react to their tactics.
- It forces your opponent to play Weather and Scorch cards early, so you can play cards that might have succumbed to these Special cards if you played them too early.
- It enables you to watch for openings in the battlefield. Has your foe played a Biting Frost? Then refrain from playing a Clear Weather in case your opponent has a second Weather card, or the round tactics change and you don’t need to use it. Then employ Clear Weather at the last possible moment.
- It sometimes causes your opponent to think you are weak, and pass. Then you can eke out a win with the lowest possible cards that guarantee a win.
Round 2 Tactics
You should have ended the first round by eking out a win (and maintaining either an equal number, or slight card advantage compared to your opponent), or a loss but with at least two or three additional cards compared to your opponent. The tactics for this round are different depending on how the first round went:
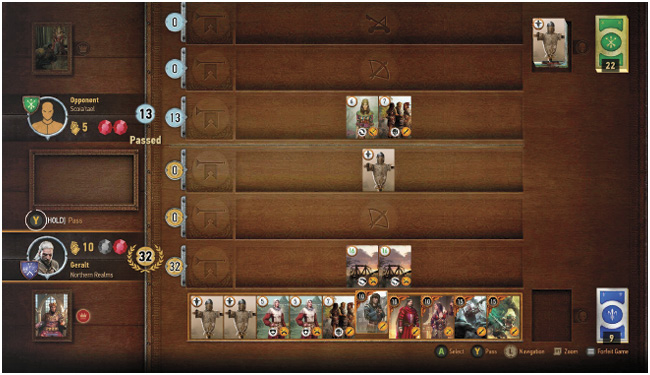
Round 1 Won? Let Battle Commence!
If you won the first round, you’re usually more evenly matched with your opponent, making this round a little tougher. At this point, you can:
Immediately pass: If you wish to play a purely strategic game, you can pass immediately (or after expending one or two low-point cards in the hope your opponent drops some higher-point cards). If your opponent uses a card (or two) to claim victory, all the better; this plan gives you the advantage in the third round; a similar tactic to “losing” in Round 1. This plan is more advantageous if you’re placing cards first in this round, as your foe will go first in the final round; which allows you to see what your opponent is planning, and counter it.
Make this the Final Round: If you reckon your deck is strong enough, and your foe’s deck is weak enough to claim victory after two rounds, then go for it! Remember your opponent is likely to have more high-point cards than in the final round, especially if you didn’t “sucker” your foe into dropping their best troops earlier. Use the Final Round tactics from this point.
Coax more cards out: Though you’ll probably need to commit some of your higher-quality cards, you can “pretend” that you’ve fully committed to winning this round, watch your opponent play some of his or her best troops, and then wave the white flag and pass (after Decoying any high-point cards, of course!). As long as the units your foe is committing are more powerful than yours, you put yourself in a good position to win the last round. A worthy sacrifice to your own deck!
Round 1 Lost? Let Carnage Commence!
If you lost the first round, you should have a significant card advantage over your opponent, in terms of quality (high-value units) and quantity (you should be able to out-draw your opponent by at least 2-3 cards). You must win, employing Final Round tactics, but with the knowledge that you should be keeping a number of high-value cards in reserve for the final round. Medics and Decoys come into play here (use the tactics described earlier in this chapter). Commit one or two of your “group” ability cards (Muster or Tight Bond groups). Drop in a powerful non-Hero, and Decoy it back. If your opponent passes (and never pass first!), Decoy cards you need for the final round, swapping them for lower-point cards if you can still maintain a victory.
You should be keeping your best cards for the last round, but during critical moments in this round, feel free to use up some of your strength. Place your Heroes first (as they add a good amount of value without being Scorched or crippled by Weather). Then see what your opponent does before committing high-value non-Hero units.
Cards that give you additional bonuses, such as Morale Boost, Olgierd von Everec, Commander’s Horn, and Dandelion, are most useful during this round to ensure victory. Then use Medics to resurrect Olgierd and Dandelion for use in the final round.
Use Scorch, but judge the board and place it when it is at its most destructive; taking out multiple five-point targets is better than one eight-point target. But play it before your own non-Heroes enter the battlefield, or you’ll only end up Scorching yourself! Use Villentretenmerth in this round too, with a Medic to return him for the final round.
Round 3 (Final Round) Tactics
If the Gwent bout reaches this point, there’s no need to worry about committing Hero troops into the fray—give your foe everything you’ve got! You should have a small card advantage, which helps you counter any plans your foe might have for winning. The trick here is when to place all your cards. As your foe doesn’t know what you have, and your deck should be stacked with your best quality troops, only the order you play your cards in is important: Place them with enemy Weather and Scorch cards in mind.
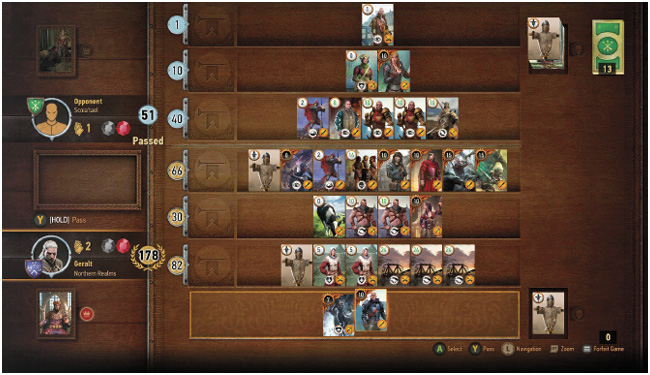
The Baiting Game To The Bitter End
Nothing can cramp your style like a foe who decimates your key non-Hero troops with a well-timed Scorch or Weather card.
- Firstly, ensure you have a Clear Weather card to hand (either via a card or a Leader ability, if possible). Then your enemy’s Weather cards don’t matter at all. After only concerning yourself with Scorch, place everything you’ve got (even after Weather cards are played by yourself or your foe). At the very end of the round, check the totals. If you still need points, play the Clear Weather.
- Secondly, ensure that your enemy’s Scorch attacks are minimized, by employing the multitude of Scorch tactics listed in that section of this chapter. But generally, try placing a single high-value non-Hero so the opponent plays Scorch, then bring it back (if you need it) using a Medic. Afterwards, commit your higher-point group cards (Tight Bond units, for example).
Decoy cards should already have been used in earlier rounds, but if you still have any, use them to retrieve a Medic so you can play it again (and to a lesser extent, an enemy Spy to play yourself and gain a card).
After The Bout
Battle to the bitter end, hopefully claim victory, and strengthen your deck by adjusting it after every Gwent game. Remove cards you only use rarely. Look to find complete “sets” of cards (such as a group of Muster or Tight Bond cards of the same name) on your travels. Start to use new decks as you receive enough cards of that Faction, bolstering them with Neutral cards and become the finest Gwent player in the land!