
The Witcher 3: Wild Hunt The Complete Edition Guide Training Witcher Archetypes Combat-focused Archetypes
Archetype 1: The Man Of Steel And Silver
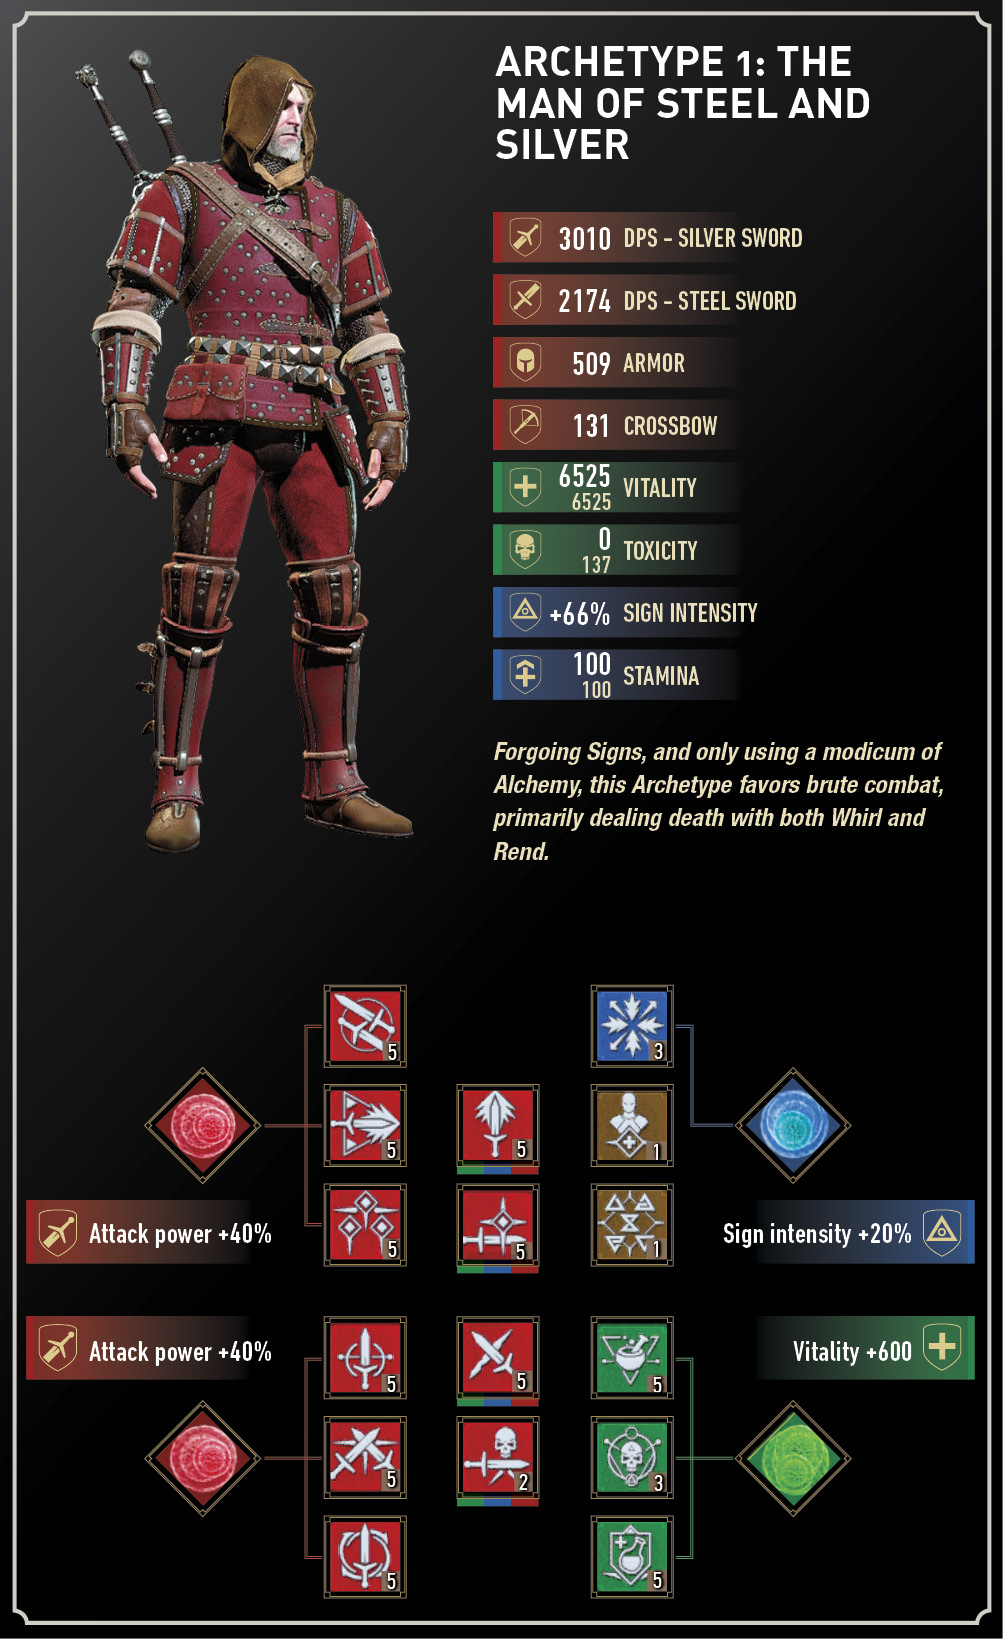
| Points to Unlock | Levels | Branch and Ability Name |
|---|---|---|
|
0 |
5 |
Fast Attack: Muscle Memory |
|
0 |
5 |
Strong Attack: Strength Training |
|
0 |
5 |
Battle Trance: Resolve |
|
8 |
5 |
Fast Attack: Precise Blows |
|
8 |
5 |
Strong Attack: Crushing Blows |
|
20 |
5 |
Fast Attack: Whirl |
|
20 |
5 |
Strong Attack: Rend |
|
20 |
5 |
Battle Trance: Razor Focus |
|
30 |
5 |
Fast Attack: Crippling Strikes* |
|
30 |
2 |
Defense: Deadly Precision* |
|
0 |
3 |
Quen Sign: Exploding Shield* |
|
0 |
5 |
Oil Preparation: Poison Blades |
|
0 |
3 |
Mutation: Acquired Tolerance |
|
8 |
5 |
Brewing: Refreshment |
|
0 |
1 |
Cat School Techniques |
|
0 |
1 |
Rage Management* |
| Total Ability Points Needed | ||
| 12/16* Abilities | 54/65* Points | |
(* Additional Abilities to swap in, or insert as 16 Slots are unlocked through Mutations)
Swords: Ursine Steel Sword, Ursine Silver Sword
Crossbow: Any
Bombs: Samum, Northern Wind
Potions: Blizzard, Swallow, Maribor Forest, Thunderbolt
Decoctions: Archgriffin, Doppler, Katakan, Succubus
Glyphs: Quen, Mending, Reinforcement
Runestones: Devana, Perun, Stribog
Glyphwords: Protection, Retribution
Runewords: Rejuvenation, Elation, Severance
Mutations: Deadly Counter (2 Research Points), Bloodbath (5 Research Points)
If you enjoy using swords over Signs (and the building up of Stamina and Adrenaline), and this is one of your first times adventuring, use this basic archetype that focuses most on swordplay abilities. Choose light armor before you secure Feline gear. The Cat School Techniques are recommended for use with light armor, due to the large critical hit damage bonus the ability confers for each piece of light armor you wear. Rage Management allows you to opt for Quen protection using your bounty of Adrenaline Points, when your Stamina level is low.
The Fast Attack and Strong Attack Combat branches further enhance your ability to score critical hits, while making each critical hit that much more devastating to an enemy. Your additional Adrenaline (from Abilities such Razor Focus) enables you to utilize both Whirl and Rend for longer, and this allows for attack flexibility: Whirl primarily for groups of human-sized opponents, and well-timed Rends for larger, stronger foes when you really need additional critical hit chances (as long as you time the strike correctly!). Deadly Precision gives you a 2 percent chance of an instant kill, which is an amusing and random event.
Signs are mostly ignored, which isn’t usually recommended (but this is a combat-centric build). Quen helps with a modicum of protection, but your agility, rolling and dodging (that is, not being hit) is your protection plan here! Instead, a light focus on Alchemy gives you a chance at poisoning your foes, a better tolerance for Toxicity, but the main ability is Refreshment, enabling you to use any potion you like to increase your Vitality, so you don’t need to depend on Swallow quite as often.
Though crossbows aren’t the main focus of this build by any means, always choose the best quality one you can find.
Potions like Blizzard are helpful for maintaining your Stamina. Thunderbolt offers an increase in attack power to further demolish your foes. Maribor Forest is extremely helpful as it accelerates the generation of Adrenaline Points; the cornerstone of what makes this Archetype so successful. Swallow is obviously to help with your Vitality.
Samum and Northern Wind bombs allow you to soften up foes, but also to either blind or freeze them; couple this with the Doppler decoction and attacks from behind to thoroughly savage your chosen enemy.
Archgriffin Decoctions are imperative for dealing additional damage to a particularly tough foe. Katakan Decoctions increase your critical hit chance, and Doppler does the same with attacks from behind; as you’re wearing light armor and are nimble, this is an excellent ploy, especially after bomb-lobbing. Succubus Decoctions grow your attack power, and should be imbibed at the start of a fight that you know will take a little longer than usual.
Glyphs should primarily be Quen-related, to bolster your less-than impressive Sign ability. Play around with Mending and Reinforcement depending on whether you need the additional Vitality regeneration or toughened armor. Runestones can be fashioned depending on where you need additional bonuses; Perun’s Adrenaline Point gain is fantastic, though you may wish to use Stribog to stagger (as you aren’t using Aard offensively). Devana is another choice to add additional bleeding damage, but not quite as effective as the stacked bonuses of Perun.
Glyphwords like Protection give you a stamina-free Quen at the start of combat, which allows you to wade in without delay. Or try Retribution in case you’re hit and wish to return damage automatically (30 percent of the time). Runewords are for you to ensure even more combat potency; Stamina or Adrenaline point restoration every time you kill with Rejuvenation or Elation, and Severance is a must to increase both Whirl and Rend; the true focus of this archetype!
Bloodbath or Deadly Counter are the Mutations of choice for this archetype. The former results in a finisher for each kill, which is amusing, but each critical hit generates more adrenaline, filling you up with fewer need for defense or down-time in combat. The latter allows you to counterattack wounded foes with a finisher, which quickens combat against groups. For larger monster foes, you’ll need the increased damage when fighting at higher levels. Feel free to unlock more potent Mutations as you progress still further in your adventure.