
The Witcher 3: Wild Hunt The Complete Edition Guide Appendices and Compendiums Bestiary
Cursed Ones
As befits the name, cursed ones are entities that have been transforms by magical means to take, by choice or not, an inhuman form. Their rarity compared to many other monsters (with the exception of the relatively common Archespores) may mean a Witcher is unprepared to face them. Do not make that mistake!
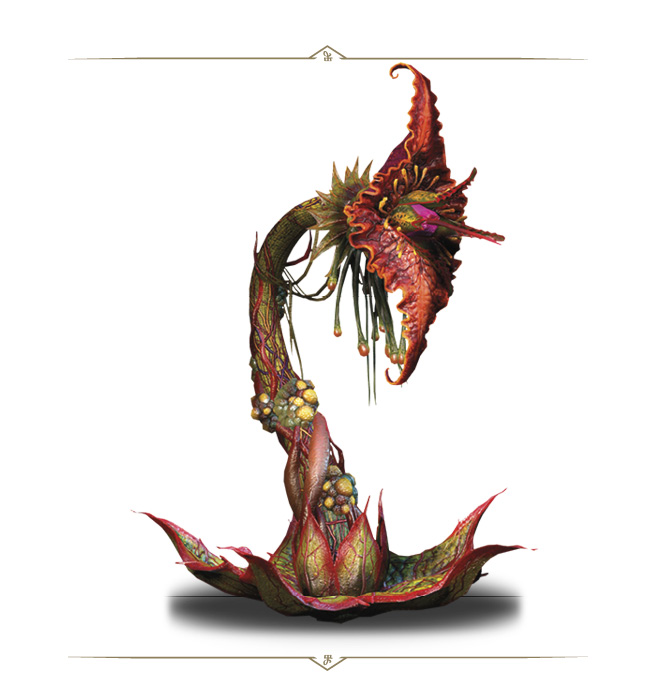
 ARCHESPORES

Danger Alert

Frequency

A revolting, acid-spitting plant with root tendrils that do more than cause havoc to wineries.
|
Loot: Archespore Juice, Infused Dust, Monster Spore, Mutagen |
|
Sub-Species or Named Variants: Archespore (yellow, green, black, all identically-named). |
|
Environments: Vineyards, wooded areas. |
|
Specific Encounter:The exterior of the Mere-Lachaiselongue Cemetery. |
Vulnerable Against

Enemy Attacks
The Archespore is a stationary plant that can quickly submerge itself underground, before reappearing in one of its predetermined “bulb” positions. It utilizes a combination of melee and range attacks.
Archespore Varieties: Be aware of three variations of this plant monster: A yellow form with a single central stem that doesn’t grow bulbs or move around, and remains stationary. A green form exists, which spawns up to three bulbs that it can maneuver between. A more dangerous black form has also been seen, which spawns up to five bulbs it can move between.
Constant Vigilance: An Archespore is more instinctual than clever; it constantly rotates its maw-like head toward you, so you’re usually not able to slice it from the flank or rear.
Bulb Sprouting: The Archespore usually begins combat by sprouting up to five bulbs (depending on the variety), which should be seen as “escape options” it can maneuver to. Slash them and then quickly move away.
Bulb Maneuvering: Otherwise, the Archespore uses the bulbs to move between as combat continues, stopping you from slicing at the central stem, which is the only way to kill it.
Stalk Sweep (Melee): A wide arcing slash using the Archespore’s whole body (two variations). Jump out of the way so you’re not struck and possibly staggered.
Maw Attack (Melee): The plant’s central maw is used to bite and strike you (three variations). This can be parried or dodged.
Acid Spit (Ranged): A medium to far-ranged attack, a stream of disgusting acidic spittle flies from the central maw. It can damage and poison you if it connects, so watch for the plant moving its head back before spitting and dodge.
Counterattack: If you succeed in striking the main stem of an Archespore three times, it quickly buries into the ground and the bulb it protruded from explodes, damaging you. Back off after three strikes to avoid this.
Suicide Bulb: The plant spawns between three and five bulbs around you which explode shortly afterward. Using Quen or rolling away from the bulbs lessens any damage you may receive.
Hiding Underground: With the exception of Aard, if you strike it with any Sign it burrows underground for a few moments and cannot be hit. Then it appears from one of its bulbs and continues combat.
Resistances: The Archespore is resistant to both poison and bleeding damage.
The Best Battle Tactics
The Archespore is a large, mutated plant, able to inflict both melee (bud stem) and ranged (acid spit) attacks. Though unable to move over ground, it changes position by using bulb-like ground blossoms and moves between each of them. If necessary, the Archespore can grow bulbs to either increase its moving capabilities or to damage you.
The most competent way to rid the general area of this mouthy plant pest is to destroy the bulbs spawned around the main plant stalk. This limits the plant’s movement possibilities so you can more easily finish it off. Signs are less powerful than you might think, as all but Aard cause it to burrow underground, preventing follow-up blade attacks. Therefore, it is useful to use Aard to stun it, then slice the stalk up.

BERSERKERS
Danger Alert (groups)

Frequency

Berserkers (shown in their beastly form) are known in Skellige legends as men who transform into bears when overwhelmed by battle rage.
Vulnerable Against

|
Loot: Bear Fat, Berserker Pelt, Raw Meat |
|
Sub-Species or Named Variants: Berserker. |
|
Environments: Skellige, Vildaaris’ Village (Fornhala). |
|
Specific Encounter (Groups): During Main Quest: King’s Gambit (see page 232). |
Enemy Attacks
Human Form: Expect all the attacks and defensive postures that a cunning bandit leader would possess.
Berserker Bear Form: Prepare for a larger, and more ferocious bear combat once a Berserker has transformed. All bear attacks are the same.
The Best Battle Tactics
A berserker begins as a human. Consult the section of the Bestiary devoted to Humans and Nonhumans (page 717), view the weaponry the berserker is carrying, and employ any and all tactics for defeating these foes as if they were a toughened bandit leader. Steel swords and Hanged Man’s Venom do well against them, and any tactics learned from fighting other humans will serve you well here.
It is when they change into their berserker bear form that a silver sword, tainted with cursed oil, will show its worth. Be certain you read up on Bear combat (see page 718), as outside of anatomical differences, a berserker’s bear form can be treated like fighting a real bear, save that these beasts are much tougher and more relentless. If you’ve invested in improving your Igni Sign, this is where the Melt Armor ability can really show its value. Be sure to slot it into play before encountering a Berserker.
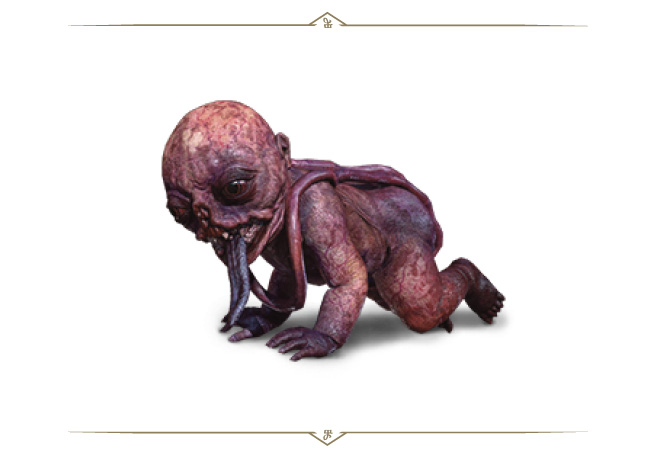
BOTCHLINGS
Danger Alert

Frequency

Perhaps the most repulsive creature ever met, born of dead, unwanted babies discarded without a proper burial, their unformed flesh is twisted with hate, fear, and malice.
|
Loot: Necrophage Skin, Rotting Meat |
|
Sub-Species or Named Variants: Botchling, Lubberkin |
|
Environments: The fortified settlement of Crow’s Perch. |
|
Specific Encounter:Crow’s Perch (Velen) during Main Quest: Family Matters (see page 159) |
Vulnerable Against

Enemy Attacks
Transformed Form: Assuming you choose to kill this creature, the Botchling transforms into a slavering beast not unlike a Ghoul or Alghoul. You would be wise to study the attack patterns of both these Necrophages, as these are the attacks the Botchling engages in.
Throughout the fight at Crow’s Perch, wraiths also appear to complicate matters, and you are wise to prepare for this fight by reading up on their (quite different) combat tactics to ensure you’re not overwhelmed.
The Best Battle Tactics
Your chance to fight this lamentable and gruesome creature comes while helping the Bloody Baron deal with his family matters. If saving the Botchling isn’t what you deem appropriate, you have two courses of action: You can either attempt to kill the Botchling immediately (starting a fight), or you can use Aard to knock the Baron over while he carries the monster.
Should you choose to kill it and draw its blood, be prepared; it changes to a ghoulish appearance, and fights with similar ferocity. Watch it closely and be prepared to parry and counter any of its claw swipes (and utilize the Ghoul combat on page 739 of this Bestiary).
As you deal damage to it, the Botchling becomes enraged, growing spines similar to those of an Alghoul (see page 737 of this Bestiary). During this time, the Botching begins to regenerate at an alarming rate, and the spikes harm you should you attempt to strike with swords.
The Botchling is weak when Axii is cast: Use this weakness to pacify the monster, so its spines retract and it is kept in place while you circle around it to deliver punishing sword strikes (or Sign attacks if you wish). Axii also cuts off the rapid regeneration, enabling a reasonably straightforward takedown.
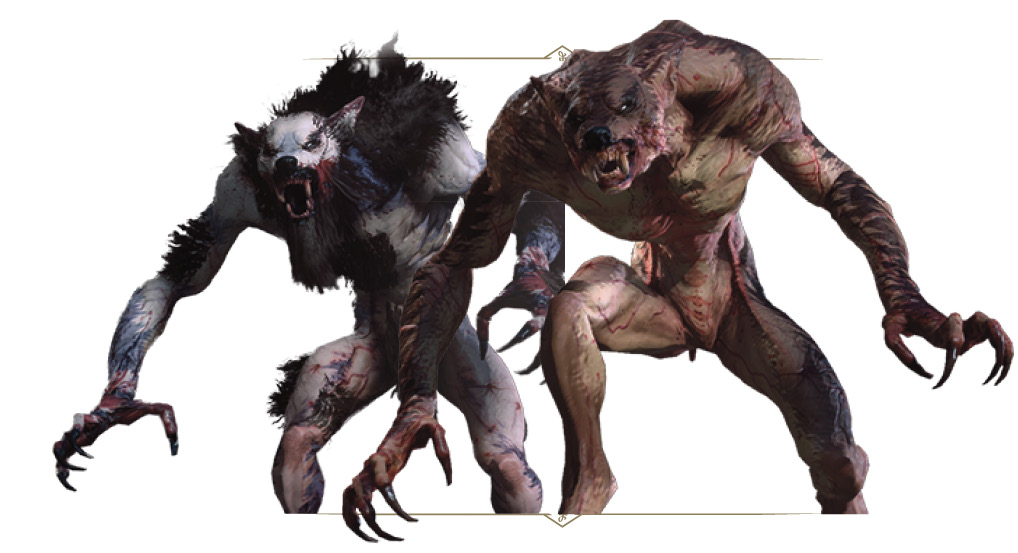
ULFHEDINN & WEREWOLVEs
ULFHEDINN Danger Alert
Frequency

Werewolves Danger Alert

Frequency

Creatures with both men and wolves inside of them, and taking the worst traits of each. Beware the full moon!
|
Loot: Werewolf Pelt, Werewolf Saliva, Werewolf Mutagen |
|
Sub-Species or Named Variants: King of the Wolves, Werewolf, Ulfhedinn |
|
Environments (Werewolves): Found in Velen and Skellige, typically in dark, secluded areas. Most active and dangerous at night during a full moon. |
|
Specific Encounter (Ulfhedinn): During Secondary Quest: In Wolf’s Clothing (see page 423). |
|
Specific Encounter (Werewolves): Prowling near the Ancient Oak, near Crookback Bog (Velen). |
Vulnerable Against

Enemy Attacks
These hairy, bipedal beasts have large claws, ferocious teeth, and extreme speed. Ulfhedinn are a breed of Werewolf found mainly in Skellige, and aside from being stronger than their continental brethren, an Ulfhedinn shares all combat traits of a normal Werewolf.
Lunging Claw Strike: Should the Werewolf wish to close the gap, it leaps from the ground in your general direction, landing with a huge and vicious clawing swipe. Dodge this to avoid being struck and possibly stunned; watch and dodge just as the Werewolf’s feet leave the ground, or as soon after as possible. Dodging away, diagonally backward gives you the distance you need to avoid the landing and swipe.
Clawing and Double Clawing: At close and melee distances, the Werewolf tends to stand and swipe with his powerful claw. Or, he raises up both arms, and brings them down vertically with a double clawing move that is both highly-damaging and can stagger you, causing bleeding. Another timed dodge is required, usually when you see his arm (or both arms) raised up before the strike. There is a tiny opportunity to retaliate with your blades just after either claw attack, as the Werewolf recovers.
Bite Attack: After dropping to all-fours, the Werewolf launches a highly-damaging biting lunge. Look for the change in stance, then dodge as soon as you see all four claws on the ground to avoid being struck.
Regeneration: As combat continues, a Werewolf is able to regenerate vitality back, increasing the need to interrupt this and dish damage, so you aren’t fighting a foe that continuously heals!
Near-Death Ferocity (Ulfhedinn): Near death, the Ulfhedinn becomes extremely dangerous, striking with increased strength.
Summoning Wolves: Werewolves also have the ability to summon Wolves, so prepare for combat with these beasts should you spot them arriving during a battle.
The Best Battle Tactics
These breeds of cursed ones are some of the fastest and most lethal. They can leap great distances at such speeds that it can be a challenge defending against them. Watch for the dual overhand claw swipe;
it cannot be parried and causes grievous wounds and bleeding. Counterattacks against a Werewolf or Ulfhedinn can be difficult to time. It is best to use dodging footwork and evade them instead of parrying.
Yrden is of great use in avoiding their attacks, though their speed sometimes means they miss your circle of slowdown. Instead, employ Quen to shrug off the first attack a Werewolf inflicts; they are fast enough that you may not be able to parry or time attacks without being struck. Another good tactic is to cast Quen, and as soon as a Werewolf claws at you and Quen pushes the beast back, retaliate with two or three fast attacks, possibly followed by an expertly timed Rend.
When possible, use Igni. Setting these foes aflame can force Werewolves to stay still long enough to score more vicious strikes (hopefully with critical hits), usually on their flanks. Fire, bleeding, and poison effects can be used to slow the regeneration of these creatures.
Avoid fighting Werewolves in tight spaces if at all possible, since the speed of their assault can quickly overwhelm even highly skilled warriors. Werewolves have incredible reach, and you want to have the room to work with while fighting them. Explosive bolts for a crossbow can be useful for inflicting fire damage at greater range, should the Werewolf be at a distance. He won’t be for long, though!