
Tom Clancy's Ghost Recon: Wildlands Guide Welcome to Bolivia Remanzo: El Gato
The Chemist

Objectives
- Capture the Santa Blanca chemist
- Extract the chemist to Remanzo Bravo
LOCATIONS
- Liquid Cocaine Lab
- Remanzo Bravo
REWARDS
- + 1,000 XP
Brief
We’ve obtained intel on a Santa Blanca chemist working on cutting-edge techniques for smuggling cocaine out of the country. He’s working out of a Santa Muerte church in Remanzo. Locate the chemist and extract him for interrogation.
Corralling the Chemist
With cocaine energy drinks and unpleasant drug mules part of the investigation in this province, finding the chemist responsible is your first priority. Turning a church into a chem lab may be despicable, but the mission area in the southwest of this province is easily accessed, open enough to send recon drones in, and has fewer foes than you might think. However, the chemist needs to be extracted alive, and the enemies can easily spot you if you attempt to cross the open ground without proper tactical planning.
Liquid Cocaine Lab: Recon
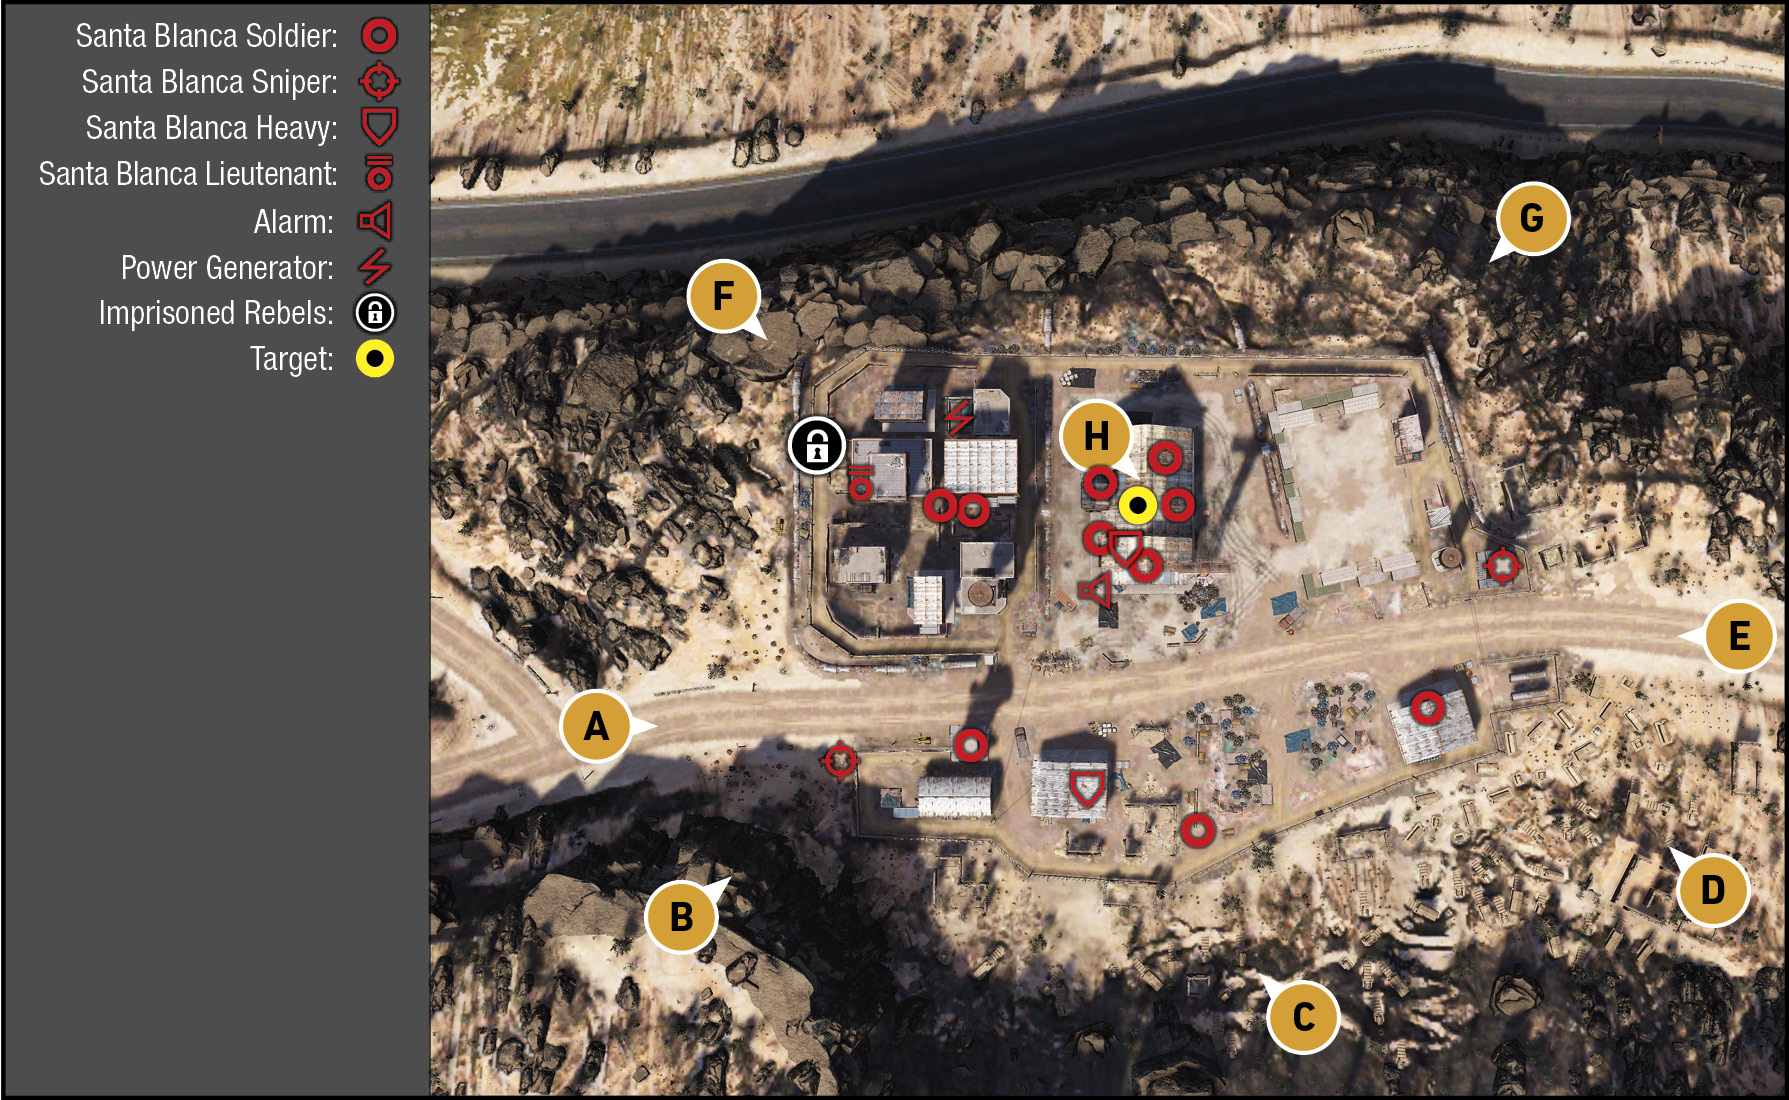
TACMAP
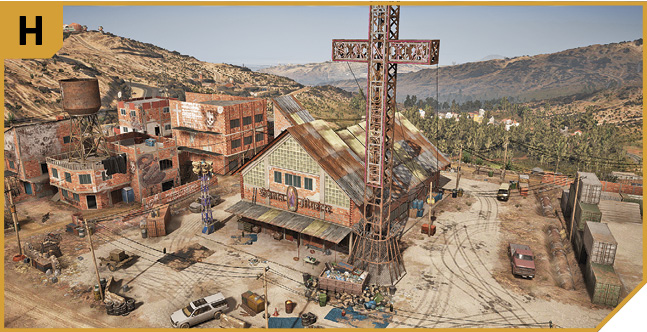
Think about splitting the combat area into three distinct areas. There’s the south yard—a long area with three warehouses, some ruined structures, and refuse everywhere. The only real threats are the scattered foes (one armored) and a sniper in the tower to the west. Then there’s the northwest maze of four low-rise brick buildings and the generator. There are few foes here (but one is a captain), and little need to head here unless you want to shut down power. Finally, there’s the church and yard to the northeast. Aside from the sniper in the eastern tower, the majority of the foes are in and around this church, so focus your firepower here, after neutralizing the alarm siren on the pole outside the church itself.
West: Main Road
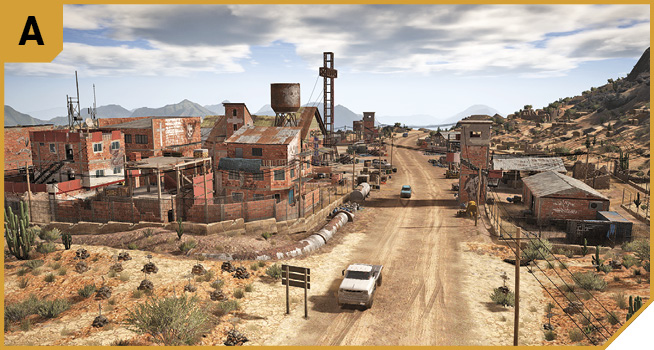
Unless you’re trying to quickly overwhelm the enemy by driving an armored vehicle directly at the church (H), absconding with the chemist, and driving away again with no plans of a stealth assault, this infiltration point is of limited use. The sniper in the tower ahead and right can easily see you, as can the foes in the building cluster to the left.
Peel off to B or F before you reach the base entrance, unless you’ve already dealt with foes between here and the target church building. Note the propane tank on the opposite (north) side of the road to the sniper tower. Blow that up if you need to distract the enemy (while your teammates infiltrate from a different direction).
Southwest: Windmill Overlook
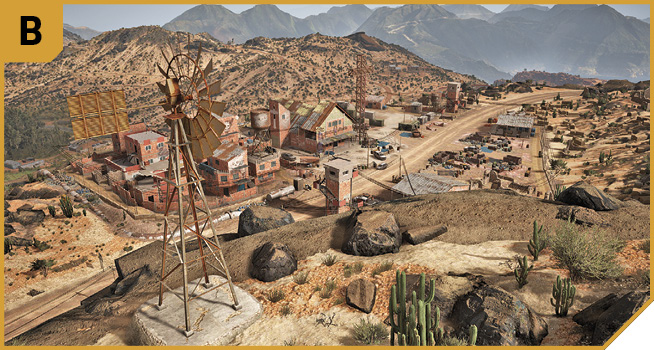
The rocky outcrop near the rusting windmill is a fantastic spot from which to recon the area, as well as remove the sniper at the tower below, along with foes on the south side of the road. Before this happens, snipe the alarm pole by the church to prevent reinforcements, and use this area to cover your teammates. As the mission progresses, and once your team is inside, you can easily climb down from here, locate a vehicle, and drive it close to H to help with the getaway.
Conversely, it’s unwise to maneuver through the area below this rocky outcrop, as you can’t climb over the mesh fence on the north, west, and south sides in the southwest corner of the base. You need to enter via the ruins at C instead.
South: Scree Slope and Graves
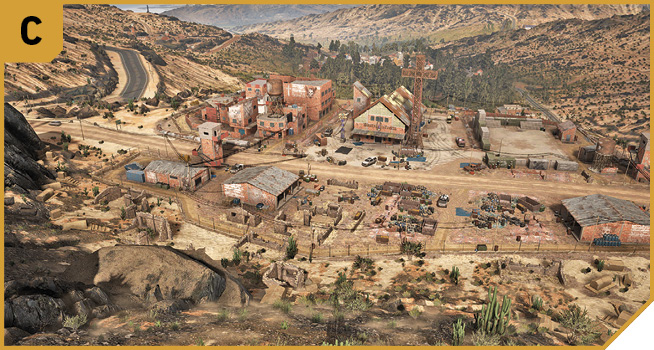
The upper ground to the south is perfect for reconnoitering from, and the ruins in the central part of the south edge of this base allow quick access and a direct path to the church itself. However, the ability to camp up here between the rocks—and use a sniper rifle to tag foes through windows in the church, the alarm pole panel, and enemies as they emerge from the church during combat with other teammates—makes this a great place to start from.
You also have the luxury of easy access in all directions into the base, depending on how the mission is progressing. For example, you could quickly find a vehicle and drive it to the church, or back up a foe heading into combat, or snipe both sharpshooters in either enemy sniper tower, or cause a distraction by sniping any of the propane tanks.
Southeast: Graveyard
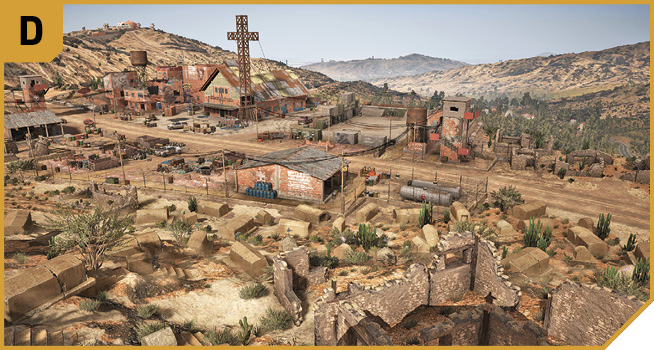
Though the tombs make great places to hide behind, and the sloping ground (at least, higher up) makes a great sniping position, the closer to ground level you go, the more problems occur. You can’t access the warehouse building or head across to the church, thanks to the tall mesh fencing, which means you need to enter via either the small ruined building north of C, or the main road (E).
Don’t overlook the propane tanks near the sniper tower. Shoot them if you want to create a proper distraction.
East: Main Road
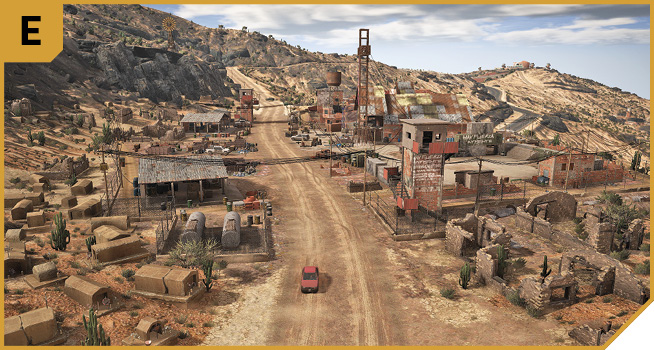
Just like A, moving in from this direction gets you spotted (especially by the sniper in the tower, unless you strike him first), though it’s slightly easier to pull up close to the church, storm it, extricate the chemist, and drive away again, as there are fewer foes on this side of the mission area. In addition, there’s a wide area outside the church for vehicular maneuvers, and some smaller structures around the soccer pitch to the northeast you can use when sneaking in to assault the church from the north.
Northwest: Perimeter and Low-Rise Maze
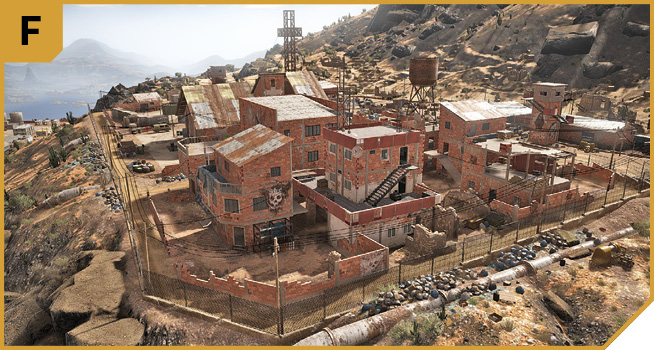
If you’re conducting a sweep of foes or gunning for the generator, this is where the most problematic takedowns occur, thanks to the five brick structures in close proximity to one another, each with two (or more) floors the enemy could be hiding in. Proper drone-tagging of enemies is critical, as they are difficult to get the jump on in this cross-shaped alley, with numerous doorways and steps they could be hiding behind.
If you do clear out the enemies here, you can use the ruined brick wall as cover when assaulting the church. You don’t want foes moving into this area, as it’s too dense to offer an advantage to you in a firefight.
To the northwest, you can’t enter from the exterior fence; instead you need to sneak in via A or the small gap in the exterior fence just north of the church (H). Use the latter if you want to quickly interact with the generator area and small cage of rebels, which are also in this vicinity.
Northeast: Church Yard (Soccer Pitch)
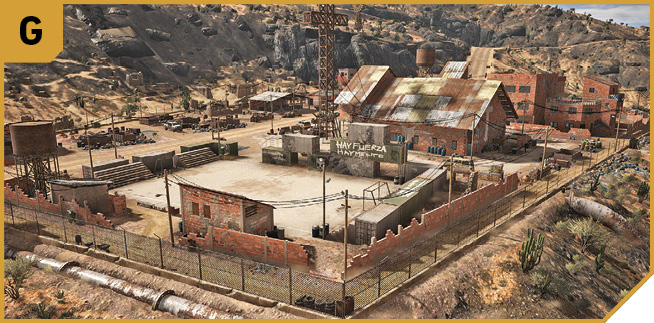
If you manage to navigate through into this area, usually via E after removing the sniper in the east tower and any foes who might intend to raise the alarm, you can use the large stacked cargo containers between the soccer pitch and the church as cover. Shoot foes patrolling or coming out of the church, or send in a drone to ascertain exact enemy locations.
This side is a better place to assault from—as long as the alarm has been destroyed—as it is more open, and the containers make great cover. Sneak around the perimeter from the sniper tower to reach the rear of the church, too.
The soccer pitch makes a great spot to land a helicopter when extracting the chemist, and the side of the road near the church usually has a truck to use for the same purpose, if needed.
|

Liquid Cocaine Lab: Other Tactical Advice
 This mission can be simplified if you don’t care about freeing the small band of rebels in the cage to the northwest (near F). Just start a firefight, ideally near or from a truck you’re able to drive competently, and wait for the chemist to escape. Then chase him down, apprehending him away from any cartel strongholds.
If you wish to apprehend the chemist “properly,” start at A, shooting the west sniper, foes on the south side of the base, and the alarm panel along the way. Sneak through the south warehouse and debris to clear all foes south of the road, as well as the east sniper in the tower. Then sneak in via the soccer pitch (near G) to the rear entrance of the church. At this point, check the area for a getaway vehicle, or bring one and park it on the pitch. Enter the church via the north corner doorway. Make quick work of the enemies in and around the church, sweeping for remaining foes. Then grab the chemist, bundle him into a vehicle, and head for the rally point.
You could also try creating a disturbance by destroying one of the large propane tanks—creep in from C, stand near one of the armored trucks, and take the shot. This freaks out everyone, including the chemist, who makes a run for it. Simply get into the truck and chase him down, ignoring all foes in this base.
If there are foes inside the church, or the low-rise maze area, use explosive drones to wipe them out, or flashbangs to cause confusion, and then clean them up.
 If none of the previous plans work for you, station a sniper at B and D to cover the two other Ghosts who can enter from the break in the perimeter fence north of H. While the snipers concentrate on the foes to the south and the enemy sharpshooters in both towers, the ground Ghosts can silently remove foes in F, killing the generator and freeing the prisoners. With the snipers shooting out the alarm panel, the two Ghosts can now head into the church (from the north and south entrances) and clear the area of remaining foes before grabbing the chemist. Variations on this plan work well.
Clipping the Chemist: To Remanzo Bravo
You need to take the chemist alive, grab him, and drag him up the steps of the church and into a waiting vehicle. A well-armored truck or chopper are great choices, though any rust bucket in the vicinity works, and the busy road through the middle of the base can be used to flag down a civilian and steal their vehicle, if worse comes to worst. Assuming this stowing goes off without a hitch, it’s a short and relatively pain-free journey to Remanzo Bravo, almost due north of the laboratory. As usual, park up at the rally point and introduce the chemist to Bowman, who’s picked out a set of nail clippers for this occasion. The mission concludes once the extraction is complete.