Prima Games eGuides
primagames.com Browse Redeem a code Help
Tom Clancy's Ghost Recon: Wildlands eGuide
Sign in My Guides

Sign in or create an account

We'll email you a link. No password needed, and if you don't have an account yet, the link makes one.

By creating an account or signing in, you agree to our Terms of Service and Privacy Policy.

Have a password?

Had an account on the old eGuides site, or a code from a printed guide? Help and troubleshooting

Sign in with a password

By signing in, you agree to our Terms of Service and Privacy Policy.

Check your email

A sign-in link is on its way. It works once and expires in 15 minutes. Open it and you're in, with an account if you didn't already have one.

Contents

  • Changelog
    • Updates
  • Foreword
    • Foreword
  • Spec Ops Training
    • Introduction
    • Basic Gameplay
    • The Map
    • How to Play
    • Choose a Playstyle
    • Mission Types and Activities
    • Most Recon: Tactical Advice for Story Missions
  • The Factions
    • Introduction
    • Operation Kingslayer
    • The Rebel Forces
    • Santa Blanca Cartel
    • Unidad Forces
  • The Armory
    • Introduction
    • Guns
    • Assault Rifles
    • Light Machine Guns
    • Submachine Guns
    • Sniper Rifles
    • Shotguns
    • Handguns
    • Compact Machine Guns
    • Items
    • Drone
  • Skills
    • Introduction
    • Weapon
    • Drone
    • Item
    • Physical
    • Squad
    • Rebel Support
  • Welcome to Bolivia
    • Welcome to Bolivia
    • Itacua: La Yuri Y El Polito
      • Itacua: La Yuri Y El Polito
      • Key Locations
      • Amaru’s Rescue
      • Rebellion Rising
      • Culta’s Prisoner
      • El Polito’s Sports Car
      • Armadillo’s Commander
      • La Yuri And El Polito
      • Itacua Side Missions
      • Itacua Province Content
    • Ocoro: El Emisario
      • Ocoro: El Emisario
      • Key Locations
      • Aggressive Competition
      • The Boat Lab
      • Cooking with Coca
      • The Hospital
      • Special Transport (Optional)
      • El Emisario
      • Ocoro Side Missions
      • Ocoro Province Content
    • P.N. De Agua Verde: Carzita
      • P.N. De Agua Verde: Carzita
      • Key Locations
      • Carzita’s Assistant
      • The Casino
      • The Politician
      • The Resort
      • Carzita
      • Carzita’s VIP List
      • Agua Verde Side Missions
      • Agua Verde Province Content
    • Barvechos: El Pulpo
      • Barvechos: El Pulpo
      • Key Locations
      • El Pulpo’s Right-Hand Man
      • The Bank Heist
      • The Money Truck
      • Nidia’s Cash
      • El Pulpo
      • Barvechos Side Missions
      • Barvechos Province Content
    • San Mateo: El Pozolero
      • San Mateo: El Pozolero
      • Key Locations
      • The Prison Village
      • La Carcel Del Pueblo
      • The Journalist
      • The Death Truck
      • El Pozolero
      • Sandoval’s Remains (Spoiler/Optional)
      • San Mateo Side Missions
      • San Mateo Province Content
    • Tabacal: Madre Coca
      • Tabacal: Madre Coca
      • Key Locations
      • Freedom of Speech
      • Stock Drop
      • Salazar
      • Killasisa Coca Farm (Optional)
      • Inside Job (Optional)
      • Madre Coca
      • Tabacal Side Missions
      • Tabacal Province Content
    • Espiritu Santo: La Santera
      • Espiritu Santo: La Santera
      • Key Locations
      • The Advisor
      • Gold Rush North
      • Gold Rush South
      • La Santera’s Chapel
      • Soldiers Of Santa Muerte
      • La Santera
      • Espiritu Santo Side Missions
      • Espiritu Santo Province Content
    • Villa Verde: El Wey
      • Villa Verde: El Wey
      • Key Locations
      • Framing El Wey
      • Laboratory 1
      • Laboratory 2
      • Miners Strike
      • El Wey
      • Villa Verde Side Missions
      • Villa Verde PRovince Content
    • Caimanes: El Cerebro
      • Caimanes: El Cerebro
      • Key Locations
      • Submarine Fleet 1
      • Submarine Fleet 2
      • Submarine Fleet 3
      • Boat Ride
      • The Prototype
      • El Cerebro
      • Caimanes Side Missions
      • Caimanes Province Content
    • Malca: El Chido
      • Malca: El Chido
      • Key Locations
      • The Agent
      • Bad Publicity
      • El Chido’s Car
      • Show Canceled
      • El Chido
      • Malca Side Missions
      • Malca Province Content
    • Pucara: DJ Perico
      • Pucara: DJ Perico
      • Key Locations
      • The Bodyguard
      • DJ Perico’s Home
      • Radio Santa Blanca
      • DJ Perico
      • El Sueño’s Convoy (Optional)
      • The Engineer
      • Pucara Side Missions
      • Pucara Province Content
    • Montuyoc: Carl Bookhart
      • Montuyoc: Carl Bookhart
      • Key Locations
      • The Outpost
      • The Deserter
      • Carl Bookhart
      • Full Load (Optional)
      • The Instructors (Optional)
      • Montuyoc Side Missions
      • Montuyoc Province Content
    • Mojocoyo: Antonio
      • Mojocoyo: Antonio
      • Key Locations
      • Eastern Cocaine Cache
      • Western Cocaine Cache
      • Hidden Cocaine Cache
      • Mojocoyo’s Boss
      • Gabriela (Optional)
      • The Main Stash (Optional)
      • Mojocoyo Side Missions
      • Mojocoyo Province Content
    • Remanzo: El Gato
      • Remanzo: El Gato
      • Key Locations
      • The Chemist
      • The Quinoa Factory
      • Energy Drinks
      • The Mule Doctors (Optional)
      • El Gato
      • The Real El Gato (Spoiler)
      • Remanzo Side Missions
      • Remanzo Province Content
    • Koani: Boston Reed
      • Koani: Boston Reed
      • Key Locations
      • Train Graveyard
      • The Truck Depot (Optional)
      • The Convoy (Optional)
      • Flight Plan
      • The Undertakers
      • Boston Reed
      • Koani Side Missions
      • Koani Province Content
    • Libertad: Marcus Jensen
      • Libertad: Marcus Jensen
      • Key Locations
      • Chemical Trail
      • Marcus Jensen
      • Toxic Assets
      • Toxic Convoy
      • The Refinery Chief
      • Libertad Side Missions
      • Libertad Province Content
    • Flor De Oro: General Baro
      • Flor De Oro: General Baro
      • Key Locations
      • The Black Site
      • The Trail of the General
      • The Mole (Optional)
      • General Baro
      • Flor De Oro Side Missions
      • Flor De Oro Province Content
    • Inca Camina: La Cabra
      • Inca Camina: La Cabra
      • Key Locations
      • The Drug Lord’s Ride
      • Northern Plane
      • Eastern Plane
      • Southern Plane
      • La Cabra
      • Inca Camina Side Missions
      • Inca Camina Province Content
    • Media Luna: El Comandante
      • Media Luna: El Comandante
      • Key Locations
      • Media Luna Investigation
      • The Santa Blanca Prisoner
      • El Comandante
      • Media Luna Side Missions
      • Media Luna Province Content
    • Monte Puncu
      • Monte Puncu
      • Key Locations
      • Sueño’s Proposition
      • Monte Puncu Side Missions
      • Monte Puncu Province Content
    • La Cruz
      • La Cruz
      • Key Locations
      • The Confession
      • La Cruz Side Missions
      • La Cruz Province Content
    • Special Missions
      • Overview
      • La Plaga
      • El Muro
      • La Gringa
      • El Yayo
      • Ramon Feliz
      • El Cardenal
      • El Boquita
      • Nidia Flores
      • El Sueño
  • Rewards and Achievements
    • Overview
    • Story Progression
    • Gun Collector
    • Beyond the Campaign
    • Skill Based
    • DLC Achievements
    • Ubisoft Club Rewards
  • Interactive Maps
    • Map of Bolivia
    • Itacua
    • Ocoro
    • P.N. de Agua Verde
    • Barvechos
    • San Mateo
    • Tabacal
    • Espiritu Santo
    • Villa Verde
    • Caimanes
    • Malca
    • Pucara
    • Montuyoc
    • Mojocoyo
    • Remanzo
    • Koani
    • Libertad
    • Flor de Oro
    • Inca Camina
    • Media Luna
    • Monte Puncu
    • La Cruz
  • Videos
    • Combat Tips
    • Assault
    • Factions
    • Stealth
    • Intel
  • Narco Road DLC
    • What’s New?
    • Los Kamikazes
    • The Death Riders
    • Los Jinetes Locos
    • El Invisible
    • Lost Car Side Missions
    • Amphetatruck Side Missions
  • Fallen Ghosts DLC
    • What’s New?
    • New Skill Tree
      • Overview
      • Level 30 Requirement
      • Level 32 Requirement
      • Epic Skill: Fast Reload
    • Eastern Precinct Missions
      • Overview
      • Operation Fallen Lord
      • Intel Gathering
      • Exposed Corruption
      • Walkurenritt
      • Old Friends
      • Regrets
      • To The Death (Boss Mission)
      • Colonel Merlo (Final Story Mission)
    • Western Precinct Missions
      • Overview
      • Intel Gathering
      • The Trail
      • Ghosts
      • Union Rights
      • Saving La Granja
      • Hide and Seek (Boss Mission)
    • Northern Precinct Missions
      • Overview
      • Intel Gathering
      • The Broadcast
      • Ambush
      • Gold Digger
      • Tyrants
      • Cruzar (Boss Mission)
    • Achievements & Trophies
      • Fallen Ghosts DLC Achievements

Tom Clancy's Ghost Recon: Wildlands Guide › Welcome to Bolivia › Ocoro: El Emisario

Special Transport (Optional)

Objectives

  • Steal the medical supply truck
  • Take the truck to the rebels

LOCATIONS

  • Combat Outpost (Unidad)
  • Puerto Nuevo

REWARDS

  • + 350 XP

Brief

Prior to the cartel attack on Ocoro hospital, the rebels loaded a truck with vital medicines and tried to get them to safety, but Unidad stopped the truck at a checkpoint and confiscated it. Locate the truck, steal it, and take it to the rebels.

MISSION ACCESS

Complete Main Mission: The Hosptial to access this Mission.

Mountain-Top Medicine Truck

This mountain-top outpost has a single, winding road to drive up to reach it, if you aren’t taking a chopper. It’s worth familiarizing yourself with the terrain before entering this base, as one of your team is going to be driving down the mountain and then southward to Puerto Nuevo.

Caution: Unidad Forces Present

This location is very well defended, and is a Unidad stronghold, meaning aggressive tactics are simply met by more and more Unidad reinforcements until you’re overwhelmed. A stealth course of action is recommended.

Most Recon: Night Time Is The Right Time

This is a working army base, and the time of day can affect the position of the soldiers. Though there are always snipers on both towers, and the defenses, a number of foes will be eating in the mess hall (the southeast corner building) throughout the day, and some may be sleeping in the tent barracks (south) during the night. Send up your drone and prepare for combat in or around these areas accordingly.

Combat Outpost: Recon

TACMAP

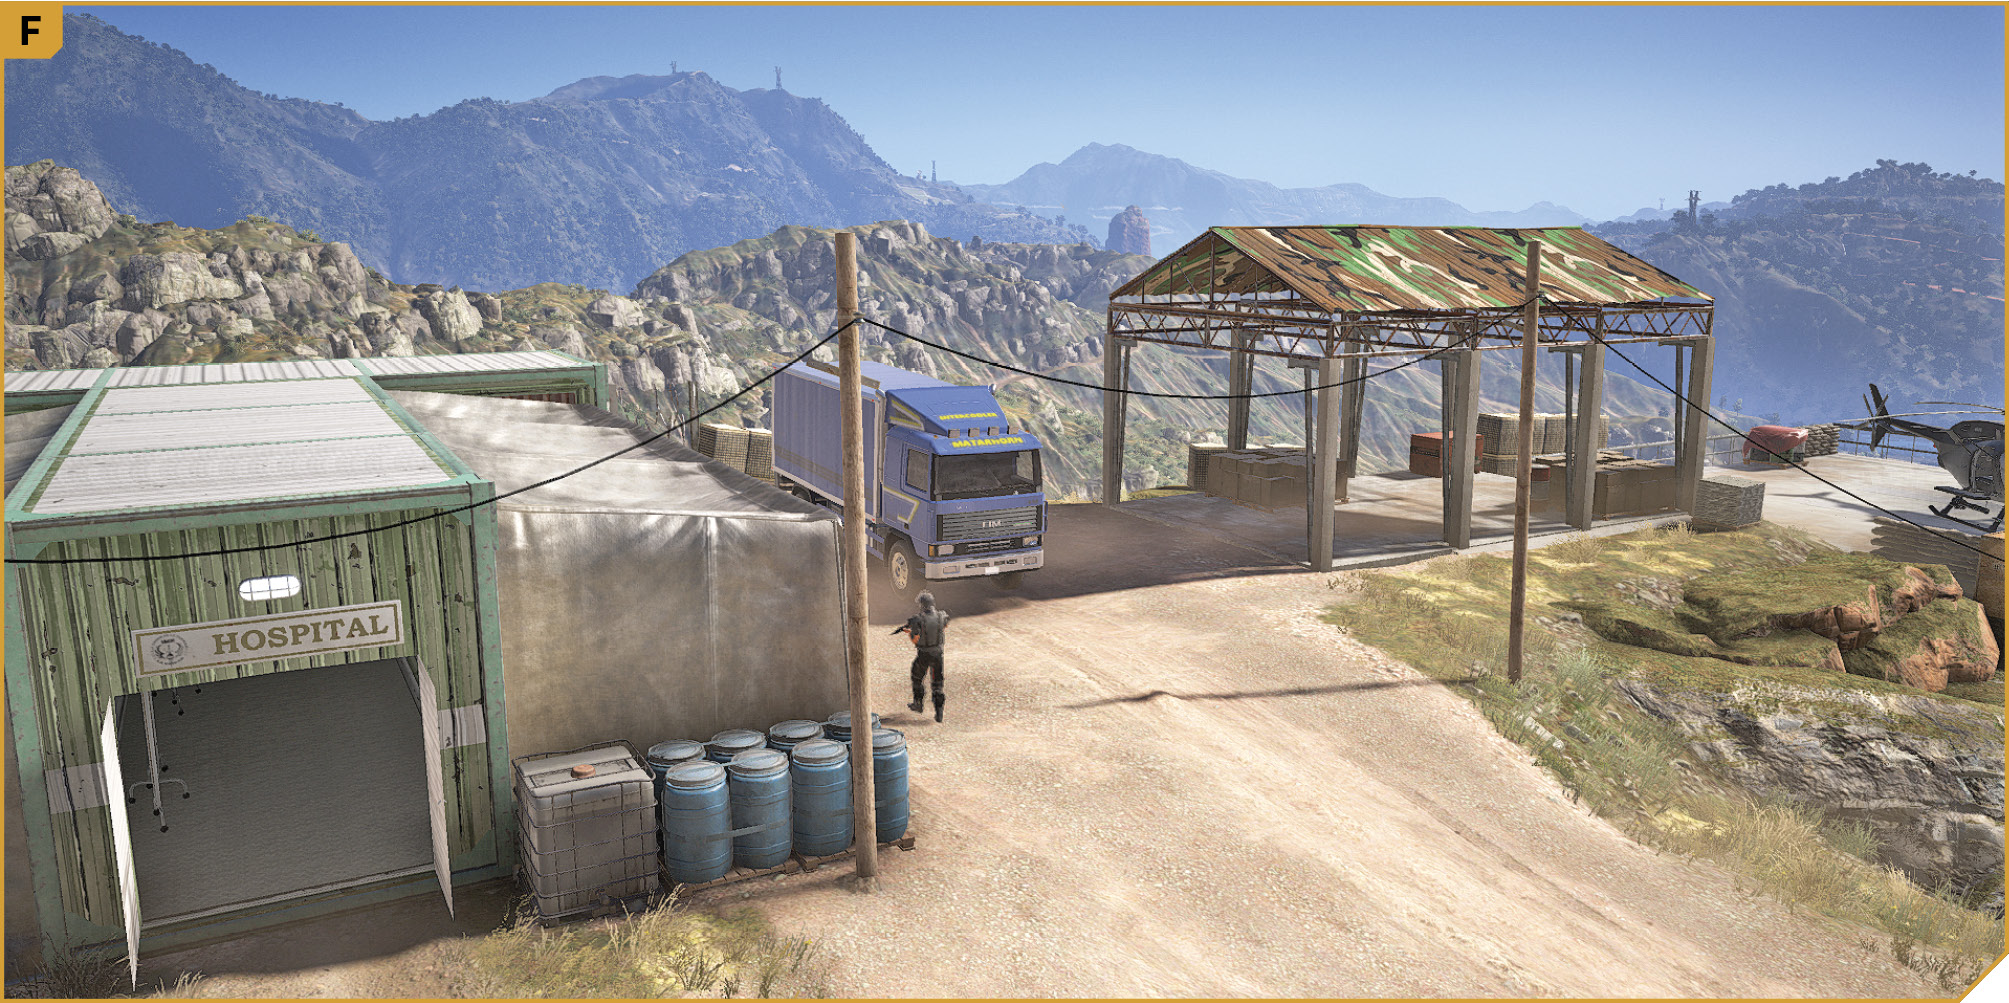
This is a small base, but it has a number of veteran troops, and a good amount of defenses to circumvent. The two sniper towers on the highest point (west) and eastern perimeter are problematic, but the Mortar and Minigun just south of the target truck, near the barracks tents, ensure that if an enemy is killed and then seen by a Unidad soldier, or if the enemy spots you, this can turn into a hectic bloodbath. Make sure everyone knows their role, as well as what each building in the base contains (there’s a comms building, armory, and mess hall near the eastern sniper tower, and a hospital just west of the truck).

Parking Spot

Park the vehicle you used to get here, and have one of your crew drive it to block the road once the truck has driven past, waylaying any enemy vehicles from pursuing you.

Rocky Shortcut
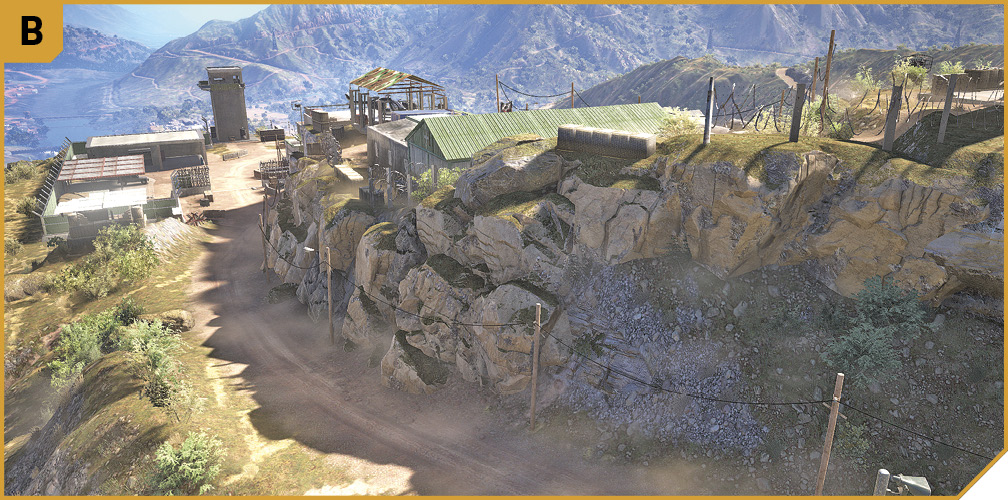
A spot of careful climbing along the right rocky side of the road allows you to reach a set of concrete box defenses, and a view of the west sniper tower. Tag the sniper, then creep around the north side of the hospital, and access the target truck almost immediately, and with almost zero enemy interaction. With two Ghosts up here, the second can cause havoc, or steal the helicopter afterward.

Base Entrance (North)
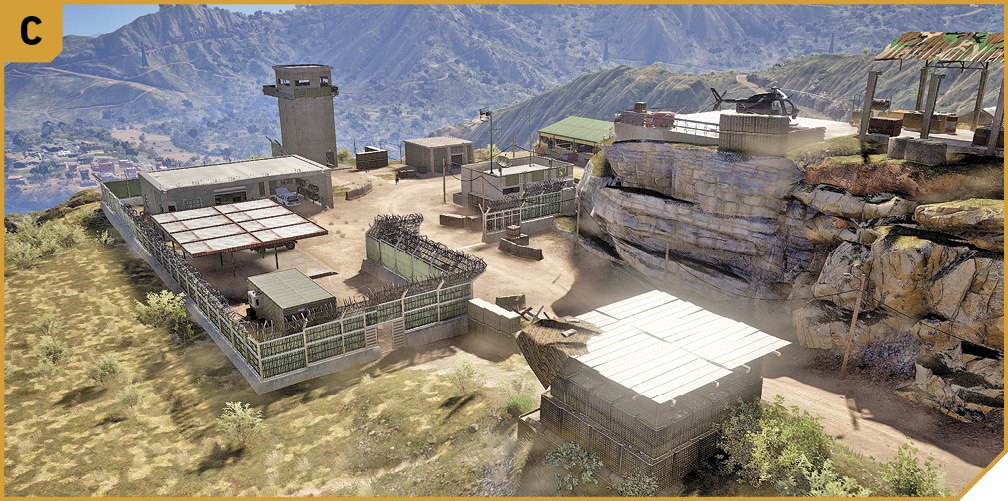
There’s a sentry post to sneak around the north side of, to neutralize the guard there. Then enter the base by the open gap and work your way along the inside of the perimeter wall. When you’re in the northeast corner of the base, you can either hobble the enemy’s SUV (with C4, detonating only after the truck is stolen to remain stealthy), or use the SUV yourself to help block pursuers or guard the truck en route out of here. You can continue around the perimeter to reach the east sniper tower, too.

East Sniper Tower

Above the armory, across from the comms building, and north of the southeast mess hall is the second sniper tower. Feel free to tag the sniper from C, or physically climb up the tower to remove the threat, before using the tower to cover your colleagues. Note the gap in the perimeter fence; climb the defensive crates to enter the base without being spotted.

South Infiltration Point

Move from the entrance road (A) southeast around the rocks to the perimeter fence, which allows you up and into the base, along the south barracks area. Take care not to be spotted by the minigun or mortar operator, or the sniper on the west tower. From here, you can stealth-kill and move into the hospital, and through to the truck, or back up a teammate. You can also head southwest to remove multiple threats in the mess hall, or destroy a second Unidad SUV with C4.

Medical Supply Truck

The truck is parked between the hospital and the open structure near the helipad. It must be driven counterclockwise along the circular path and out of the base. Maximize the extraction potential by stealing it without alerting the enemy, or have your teammates neutralize the two enemy vehicles and helicopter just as you steal the truck.

Combat Outpost: Tactical Advice

A clandestine plan is most feasible, and infiltrating at B, moving up the rocky outcrop, into the hospital, and then stealing the truck directly, allows you to flee quickly, but under fire. Or, you can move clockwise around the perimeter of the base, tagging both enemy SUVs with C4 before taking the truck, so your pursuers are waylaid.

A variation on a stealth theme is recommended here, though there’s a greater chance of completely neutralizing foes if you have one Ghost tackle each sniper, then climb the tower and provide cover while two other Ghosts take out the vehicles, chopper, and finally reach the truck. Don’t break cover until the your own snipers are in position, and have removed the mortar and minigun enemies. Then engage in a firefight.

Or, simply have one teammate head from B to secure the truck, and three others in vehicles; armored APCs and/or a chopper are recommended. Then you can stop enemies after the truck escapes.

Most Recon: Making The Most Of A Bad Job

There’s a minigun and mortar nest close to each other and the truck itself. If you must make noise inside the base and start a firefight, remain on this higher ground, use these nests to your advantage, and clear the base of the initial soldiers before helicopter reinforcements arrive. Then leave between bouts of violence.

The Truck Stops Here

When the truck is en route out of the base, have the remaining teammates hop in and provide covering fire, or join the driver in a nearby vehicle or chopper to provide cover for any pursuing enemy vehicles. Drive the truck methodically, and don’t overshoot the switchback turns as you weave down the mountain. Then follow the route to the drop-off point at Puerto Nuevo. It’s not worth taking a shortcut until you see the poplar trees as you close in on the village. Then cut across to the road, and follow it to the small compound. The mission concludes once you exit the truck.

Most Recon: Making The Most Of A Bad Job

If you’re working with friends, make sure your comrades are blocking any enemy ground troops in vehicles as you head out of the base, and along the route into the rebel village. Note there are innocent civilians on the route to the rendezvous point, so take care not to run them over.

When you reach the rebel area, Unidad forces may have pursued you. If you’re Solo, it’s worth locating a vehicle and fleeing, or staying within the compound, moving everyone else into defensive positions inside, and taking out any airborne threats before wiping out advancing foes who followed you in trucks or on foot. If you’re in Co-op, you should have prepped this area with defensive planning, such as moving a vehicle to block the entrance and fire over, having a couple of Ghosts in an armored SUV or chopper to deal with more sizable Unidad threats, and forces on the ground to stay dug in and protect the rebels. Call on Rebel Support if the situation is getting sticky.

Keep reading with a free account

The first 3 sections of Tom Clancy's Ghost Recon: Wildlands are open to everyone. An account opens the rest of it, and every other guide in the archive. It's free, and there's nothing to buy.

Bought guides on the old Prima Games site? Your account and every guide you own moved here, so there's nothing to buy again. Sign in.

Create a free account Or browse our free guides

PreviousThe Hospital NextEl Emisario