
Tom Clancy's Ghost Recon: Wildlands Guide Welcome to Bolivia Ocoro: El Emisario
Aggressive Competition

Objectives
- Interrogate El Emisario’s assistant
- Gain access to the cocaine factory
- Stop the cocaine production line
- Destroy the cocaine stocks
LOCATIONS
REWARDS
- + 350 XP
Brief
Ocoro’s primary cocaine lab is located inside a former slaughterhouse. Access to the lab requires a key code only known to El Emisario’s assistant. Find the assistant, obtain the key code, then enter the lab and sabotage it.
Convoy: An Assist From El EMisario’s Minion
Begin your mission in the southern Ocoro mountains, where Emisario’s assistant is under heavy guard in a three-vehicle convoy traveling the treacherous roads close to rally point Ocoro Alpha. Your usual convoy-stopping plans are recommended here.
Assistant’s Convoy: Recon
This convoy is traveling along the mountainside roads of south Ocoro province, and there is no fixed location for a takedown. You are encouraged to utilize a recon chopper to check the direction the convoy is moving in, while the remaining members of your team set up a vehicle-based barricade and ambush point, usually at a switchback corner in the road, or an area where the enemy will find it difficult to maneuver to escape. The convoy is comprised of a lead pickup, an armored SUV with the assistant in it, and a second rear pickup. Each pickup has two cartel foes, while the SUV has the assistant and a driver.
Assistant’s Convoy: Tactical Advice
 A vehicular barricade along the route the convoy is taking is a good way to slow down the enemy, providing you have enough time to set it up, and find cover on the side of the road to tag the drivers of each vehicle as they slow down. Make the driver of the assistant’s SUV your primary target, so he doesn’t escape (though the assistant can take the wheel). Grenades and other explosives are okay for the pickups, but you need the assistant alive, not smoking in a burned-out SUV shell.
Usually, after the cartel thugs are taken care of, the SUV takes off on its own with the assistant at the wheel, so have a vehicle ready to pursue. Simply ram it off the road until it crashes or overturns. Grab the fleeing assistant (he has no weaponry to worry about) and interrogate him until you obtain the code for the
cocaine factory.
 With three other Ghosts independently helping your cause, feel free to each take a vehicle, and have one concentrate on neutralizing the front pickup, one the rear pickup, and two on the SUV itself. A mixture of precision driving, and ramming the foes off the road (excellent at this altitude and with this precarious a road) is another method, if barricades and stationary ambushes aren’t your thing.
Get in, Run around, And Break Stuff. Copy That!
You’re about to assault the main cocaine lab in Ocoro province. There are close to 30 hostiles to worry about, a number of buildings they (and you) can hide in and around, and an entire settlement on the western side of the railroad tracks. Utilize extreme caution when approaching, and approach from a direction the enemy won’t be expecting.
Ocoro Base: Recon
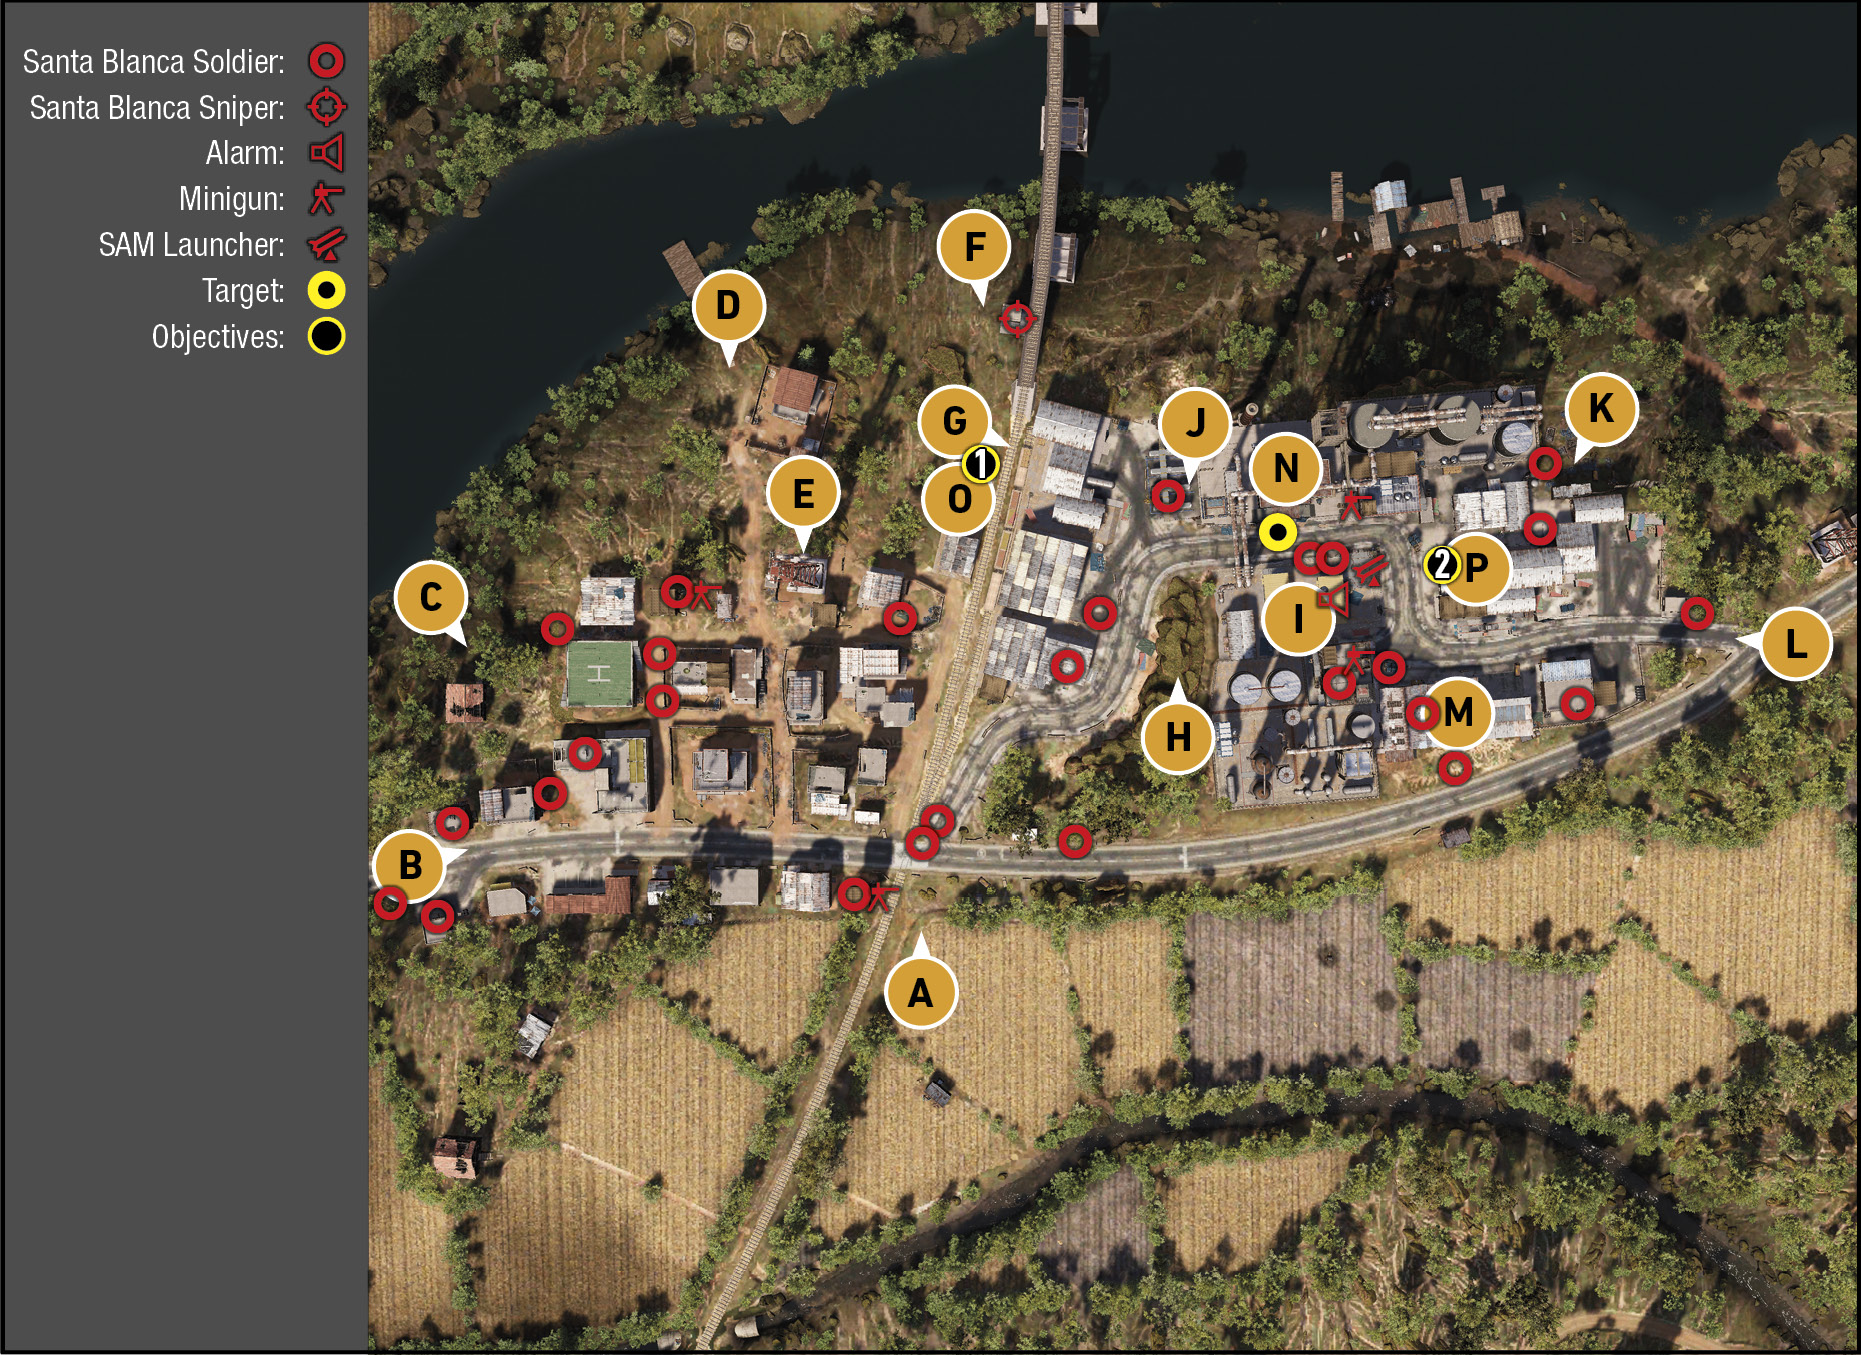
TACMAP
Separate the cocaine factory (east) from the brick warehouses and settlement (west), bisected by the railroad tracks. Though enemies can cross these areas, and there’s an additional objective just over the railroad tracks once the factory is sabotaged, you have the option to clear out all foes, or make a minimal presence felt. Beware the mounted guns and SAM capabilities of the forces here.
Main Road And Railroad (South-Central)
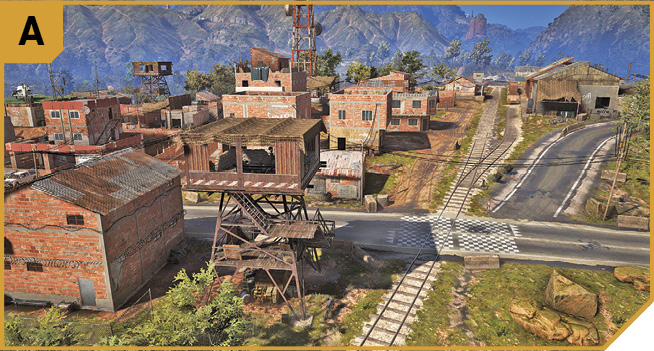
The central part of the southern perimeter is where you’ll naturally drive to before infiltrating the factory. However, the area has a number of guards, not least of which is the one in the wooden tower just west of the tracks at the road junction. It’s well worth removing the foe up here if you’re planning a clean sweep of the area. Watch for a number of foes on the ground to the north.
Jaquar Blanco And Gas Station (Southwest)

The western village and helipad base that joins the factory may not be in your planning, but with a number of foes who can raise the alarm, it’s worth conducting a stealth sweep of this area. Though you can drive west to east along the main road, the element of surprise is lost; it’s better to approach from the fields to the southwest, removing foes at the gas station and adjacent Jaquar Blanco café, before checking cartel foes patrolling the north side of the road.
Western Village And Helipad (Northwest)

Conducting a house-to-house sweep while tagging troublesome foes on the rooftops of some of the structures here helps you secure the area before heading to the factory itself. Removing threats at the helipad ensures you have one option when extracting the team after objectives are met. The area comprising the three main structures (with the helipad in the middle) to the west should be seen as a zone to check for hostiles, before neutralizing them.
Northwest Compound
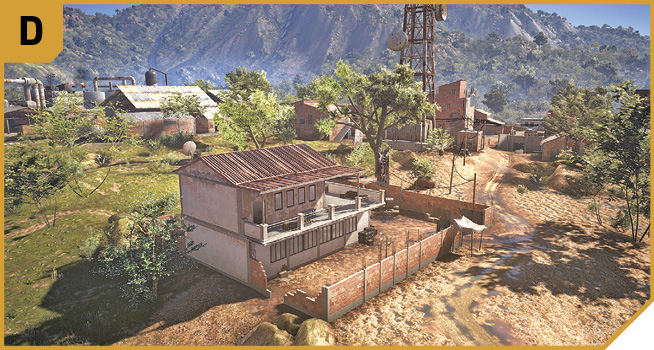
Close to the river is a small walled compound with a large house inside. Though there are few foes, it’s worth spending some time removing the two or three foes stationed here. Check the grounds for a possible escape vehicle. But most of all, hit this area with stealth takedowns first, so you aren’t outflanked when you’re removing threats to the south in the main radio mast area.
Radio Mast And Comms Buildings
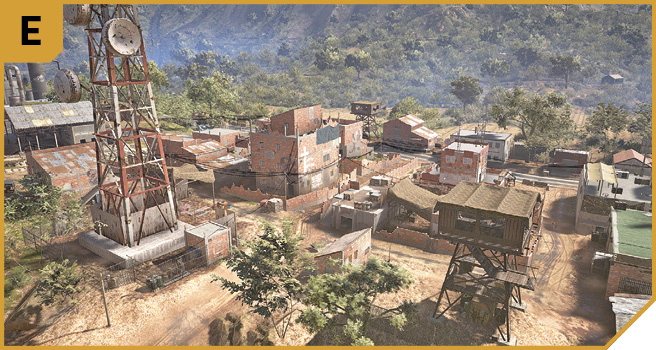
This maze of ramshackle and brick structures stretches from the edge of the river to the road (north to south), and the train tracks (to the east). Think of this as a separate area to either completely ignore if you’re planning on minimizing enemy interactions, or somewhere you must remove all threats from. The latter requires you to find the mounted gun in the wooden tower just west of the large radio mast. Then scan the upper balconies and floors for foes and tag them, before conducting a final sweep of ground patrols. Expect around half a dozen enemies to cull.
Railroad And Sniper Tower
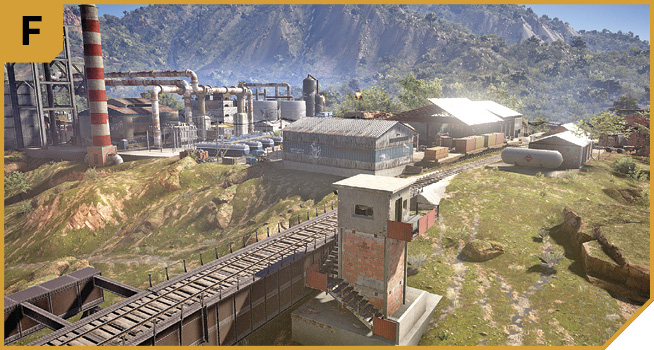
The railroad bisects the village (west) from the factory (east), and is a good infiltration point to enter from, assuming you’re crossing the bridge from north of the river. The main concern is a sniper in the tower, so make the neutralization of this foe a priority.
Railroad Station And Warehouses

The central part of the entire built-up area (and western side of the factory) consists of an unloading station with three main warehouses. Keep to the west of the road that leads into the factory, and you can remove around four threats to lessen your chances of being shot at.
Factory Road And Low Hill

If you’re heading up from the fields to the south, crossing the road to the east of the junction, the low hills in the middle of this area provide some reasonable cover if you’re sniping while flat on your front. Back up any daring attempts to drive up and into the factory from here. This location is also helpful when you’re called on to help a fellow Ghost, as it’s equidistant from most other locations in the factory section of this map.
Tall Warehouse, South Refinery, And SAM Site

The tall, corrugated metal warehouse in the central part of the factory, adjacent to the south refinery area, is a key location as there’s a mounted gun on the roof. Send a Ghost up there (or drop in from a chopper) to both remove the rooftop threats, and take up a covering position which allows good views of the factory. You can quickly remove other enemies, such as the foe in the mounted gun nest just east of the objective. There’s also a good view of the road to the east, allowing you to cover your brethren on the ground.
The south refinery area itself can only be entered via a concrete step between the warehouse and the south garage structure, and offers no real benefits except for a couple of propane tanks to blow up.
Note the SAM site on the corner of the road (northeast part of this area), close to two smaller factory buildings colored yellow. The SAM site means attacking from a helicopter becomes fraught with difficulty, unless a fellow Ghost removes the threat with explosives from the ground (or by using deft explosives from the air).
North Factory Refinery And Transformer

If you need to kill the lights, you can break the lock of the electrical transformer area and shut down everything (useful if you’re fighting in the dark). Otherwise, this area north of the bisecting road is best entered from the river to the north, as you can easily and quickly sneak to the objective door with minimal combat. Only the foe in the mounted nest, just east of the door, needs immediate attention.
Northeast Warehouse Sheds

The cluster of dilapidated shack-like warehouses in this part of the factory grounds are best entered from the northeast, heading south from the river, so you can tackle the foes roaming the area without having to react to any in your periphery.
Eastern Factory Checkpoint Road

The eastern entrance to the factory is worth considering, though the length of the road and the enemy on the rooftop at I means stealth infiltrations are tricky compared to entering from other areas. You can quickly fan out to K or M from here, though.
Southeast Garage

The enemy may be hiding in and around this large warehouse, and you should too; it’s helpful when hiding from both the foes using the mounted weaponry, as well as when you’re destroying the cocaine in the warehouse at P. Feel free to head in from the south, through this warehouse too, at the start of your infiltration.
|
 Target: Cocaine Laboratory
|
 Objective: Cocaine Warehouse (Railroad)
|
 Objective: Cocaine Warehouse (East)
Cocaine Factory: Tactical Advice (To The Lab)
 You can either enter using extreme stealth, with minimal need to engage the enemy, or you can ensure everyone is dead before entering the laboratory. The latter is a better plan, as you have further objectives to accomplish here afterward. Try to tag as many foes as you can using suppressed fire and stealth before resorting to less-subtle violence.
The following routes are acceptable:
Heading south from the river to J, and directly to N without firing a shot.
Working your way east from B.
Working your way west from L.
The most problematic foes must be dealt with immediately. These are the enemies atop the wooden towers with mounted weaponry, the sniper at the railroad bridge, the SAM site (if you’re planning an airborne attack afterward), and any mounted weaponry in the nests at the factory.
 A similar plan is required if you’re with other Ghosts, though you can work your way through the factory more competently. Send a Ghost to I from the south to remove the mounted gun foe atop the tall warehouse before tagging the foe in the mounted gun nest just north of the SAM site. With the first Ghost providing cover, then have a second Ghost head in from the river through K, to mop up ground forces. A third Ghost can deal with the sniper at F, then remove foes throughout the train station area at G. The final Ghost can provide covering fire and help out where needed at H.
Once the area east of the railroad is removed of enemies, you can decide whether a block-by-block takedown of the remaining foes to the west is necessary. Push them back at least to E.
You can also speed in using a vehicle, or even a helicopter, but there’s little planning involved, and the SAM site is problematic for an airborne assault. Better to enter from the water or the south.
Cocaine Factory: Tactical Advice (To The Cocaine Warehouses)
 Before hacking the laptop in the laboratory, have your Ghosts stationed near P or G (whichever has any stragglers left). Then head to P first to destroy the cocaine shipment before finally moving to O and completing the mission. Your success depends on how many foes you left standing before hacking the lab laptop.
 With knowledge of the cocaine warehouses, you can position a Ghost at O and P just before the laboratory laptop at N is hacked. That way, you can immediately destroy the cocaine shipments in unison, and escape the same way.
Escape options include a helicopter the fourth Ghost has commandeered from the west rooftop, or a cigarette boat along the river. Have your fourth Ghost act as the getaway driver; if you’ve already dealt with enemy threats before the warehouses are accessible, there’s no need for more than one operative to destroy the cocaine in each building.