Prima Games eGuides
primagames.com Browse Redeem a code Help
Battlefield 3 Premium eGuide
Sign in My Guides

Sign in or create an account

We'll email you a link. No password needed, and if you don't have an account yet, the link makes one.

By creating an account or signing in, you agree to our Terms of Service and Privacy Policy.

Have a password?

Had an account on the old eGuides site, or a code from a printed guide? Help and troubleshooting

Sign in with a password

By signing in, you agree to our Terms of Service and Privacy Policy.

Check your email

A sign-in link is on its way. It works once and expires in 15 minutes. Open it and you're in, with an account if you didn't already have one.

Contents

  • Battlefields
    • Conquest
      • Alborz Mountains
      • Armored Shield
      • Azadi Palace
      • Bandar Desert
      • Caspian Border
      • Damavand Park
      • Death Valley
      • Epicenter
      • Grand Bazaar
      • Gulf of Oman
      • Kharg Island
      • Kiasar Railroad
      • Markaz Monolith
      • Nebandan Flats
      • Noshahr Canals
      • Operation Firestorm
      • Operation Métro
      • Operation Riverside
      • Sabalan Pipeline
      • Seine Crossing
      • Sharqi Peninsula
      • Strike at Karkand
      • Talah Market
      • Tehran Highway
      • Wake Island
    • Conquest 64
      • Alborz Mountains
      • Armored Shield
      • Azadi Palace
      • Bandar Desert
      • Caspian Border
      • Damavand Park
      • Death Valley
      • Epicenter
      • Grand Bazaar
      • Gulf of Oman
      • Kharg Island
      • Kiasar Railroad
      • Markaz Monolith
      • Nebandan Flats
      • Noshahr Canals
      • Operation Firestorm
      • Operation Métro
      • Operation Riverside
      • Sabalan Pipeline
      • Seine Crossing
      • Sharqi Peninsula
      • Strike at Karkand
      • Tehran Highway
      • Wake Island
    • Rush
      • Alborz Mountains
      • Armored Shield
      • Azadi Palace
      • Bandar Desert
      • Caspian Border
      • Damavand Park
      • Death Valley
      • Epicenter
      • Grand Bazaar
      • Gulf of Oman
      • Kharg Island
      • Kiasar Railroad
      • Markaz Monolith
      • Nebandan Flats
      • Noshahr Canals
      • Operation Firestorm
      • Operation Métro
      • Operation Riverside
      • Sabalan Pipeline
      • Seine Crossing
      • Sharqi Peninsula
      • Strike at Karkand
      • Talah Market
      • Tehran Highway
      • Wake Island
    • Squad Rush
      • Alborz Mountains
      • Armored Shield
      • Azadi Palace
      • Bandar Desert
      • Caspian Border
      • Damavand Park
      • Death Valley
      • Epicenter
      • Grand Bazaar
      • Gulf of Oman
      • Kharg Island
      • Kiasar Railroad
      • Markaz Monolith
      • Nebandan Flats
      • Noshahr Canals
      • Operation Firestorm
      • Operation Métro
      • Operation Riverside
      • Sabalan Pipeline
      • Seine Crossing
      • Sharqi Peninsula
      • Strike at Karkand
      • Talah Market
      • Tehran Highway
      • Wake Island
    • Squad Deathmatch
      • Alborz Mountains
      • Armored Shield
      • Azadi Palace
      • Bandar Desert
      • Caspian Border
      • Damavand Park
      • Death Valley
      • Epicenter
      • Grand Bazaar
      • Gulf of Oman
      • Kharg Island
      • Kiasar Railroad
      • Markaz Monolith
      • Nebandan Flats
      • Noshahr Canals
      • Operation Firestorm
      • Operation Métro
      • Operation Riverside
      • Sabalan Pipeline
      • Seine Crossing
      • Sharqi Peninsula
      • Strike at Karkand
      • Talah Market
      • Tehran Highway
      • Wake Island
    • Team Deathmatch
      • Alborz Mountains
      • Armored Shield
      • Azadi Palace
      • Bandar Desert
      • Caspian Border
      • Damavand Park
      • Death Valley
      • Epicenter
      • Grand Bazaar
      • Gulf of Oman
      • Kharg Island
      • Kiasar Railroad
      • Markaz Monolith
      • Nebandan Flats
      • Noshahr Canals
      • Operation Firestorm
      • Operation Métro
      • Operation Riverside
      • Sabalan Pipeline
      • Seine Crossing
      • Sharqi Peninsula
      • Strike at Karkand
      • Talah Market
      • Tehran Highway
      • Wake Island
    • Scavenger
      • Aftermath - Azadi Palace
      • Aftermath - Epicenter
      • Aftermath - Markaz Monolith
      • Aftermath - Talah Market
    • Close Quarters/Gun Master
      • Close Quarters - Donya Fortress
      • Close Quarters - Operation 925
      • Close Quarters - Scrapmetal
      • Close Quarters - Ziba Tower
      • Aftermath - Azadi Palace
      • Aftermath - Epicenter
      • Aftermath - Markaz Monolith
      • Aftermath - Talah Market
    • Capture the Flag
      • Operation Riverside
      • Nebandan Flats
      • Kiasar Railroad
      • Sabalan Pipeline
    • Tank Superiority
      • Alborz Mountains
      • Armored Shield
      • Bandar Desert
      • Death Valley
    • Air Superiority
      • Operation Riverside
      • Nebandan Flats
      • Kiasar Railroad
      • Sabalan Pipeline
  • Essentials
    • Primer
      • What's New in Battlefield 3?
      • What's New in Close Quarters?
      • What's New in Armored Kill?
      • What's New in Aftermath?
      • What's New in End Game?
    • Basics
      • Introduction and Interface
      • Spawn Screen
      • Movement and Fundementals
      • Combat
      • Game Modes
      • Squad Play
      • Multiplayer Tactics
      • Persistance System
      • Battlelog
      • Specilizations
      • Camo Patterns
    • Classes
      • Introduction
      • Assault
      • Engineer
      • Support
      • Recon
    • Weapons
      • Introduction & Accessory Index
      • Assault Rifles
      • Carbines
      • Light Machine Guns
      • Sniper Rifles
      • Personal Defense Weapons (PDWs)
      • Shotguns
      • Pistols
      • Crossbow
    • Vehicles
      • Vehicle Customization
      • Light Vehicles
      • Infantry Fighting Vehicles (IFVs)
      • Mobile AA
      • Main Battle Tanks (MBT)
      • Attack Helicopters
      • Scout Helicopters
      • Transport Helicopters
      • Jets
      • Stationery Anti-Vehicle Weapons
  • Campaign
    • Mission 1: Semper Fidelis
      • Semper Fidelis
    • Mission 2: Operation Swordbreaker
      • Operation Swordbreaker
    • Mission 3: Uprising
      • Uprising
    • Mission 4: Going Hunting
      • Going Hunting
    • Mission 5: Operation Guillotine
      • Operation Guillotine
    • Mission 6: Comrades
      • Comrades
    • Mission 7: Thunder Run
      • Thunder Run
    • Mission 8: Fear No Evil
      • Fear No Evil
    • Mission 9: Night Shift
      • Night Shift
    • Mission 10: Rock and a Hard Place
      • Rock and a Hard Place
    • Mission 11: Kaffarov
      • Kaffarov
    • Mission 12: The Great Destroyer
      • The Great Destroyer
  • Multiplayer
    • Crash Course in Co-operative Play
      • Crash Course in Co-operative Play
    • Co-Op Mission 1: Operation Exodus
      • Operation Exodus
    • Co-Op Mission 2: Fire from the Sky
      • Fire from the Sky
    • Co-Op Mission 3: Exfiltration
      • Exfiltration
    • Co-Op Mission 4: Hit and Run
      • Hit and Run
    • Co-Op Mission 5: Drop 'em Like Liquid
      • Drop 'em Like Liquid
    • Co-Op Mission 6: The Eleventh Hour
      • The Eleventh Hour
  • Compendium
    • Multiplayer Scoring
      • Multiplayer Scoring
    • Assignments
      • Assignments
    • Achievements and Trophies
      • Achievements and Trophies
    • Dog Tags
      • Dog Tags
    • Ranks
      • Ranks
    • Camo Patterns
      • Camo Patterns
    • Ribbons
      • Ribbons
    • Medals
      • Medals

Battlefield 3 Premium Guide › Essentials › Vehicles

Transport Helicopters

Each transport helicopter is capable of holding five players, making them ideal for transporting squads to any spot on the battlefield. During Conquest matches, these large choppers are the best way to capture neutral control points at the start of a battle. But the transport helicopter’s impressive troop capacity is also its weakness, and may result in a big score for a fighter pilot or any other unit armed with heat-seeking missiles. To avoid such threats, fly low and fast, using trees, hills, and buildings to mask you movements. As long as you avoid line of sight with your enemies, they can’t attain a lock and fire a missile. There are no vehicle unlocks or loadout options for transport helicopters.

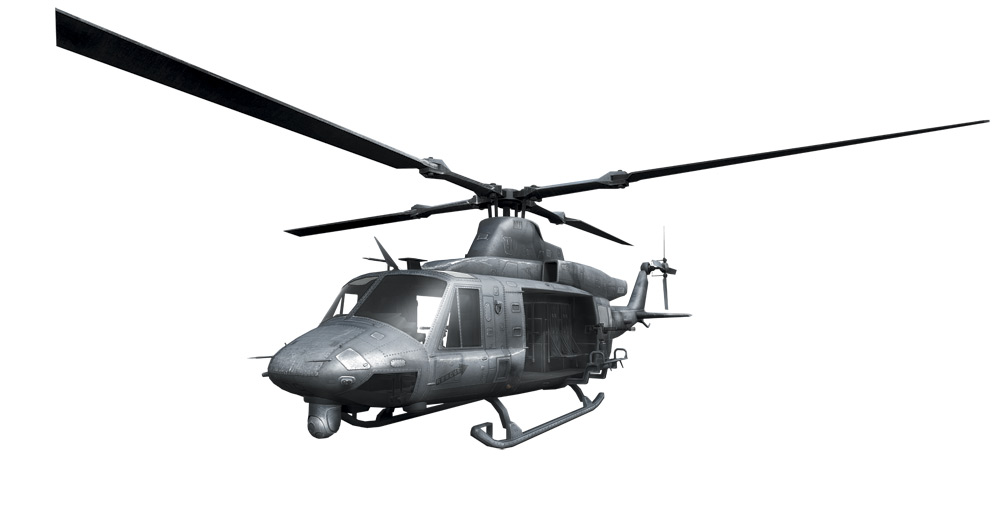
UH-1Y Venom

Nationality : US

Description : The modern version of the Twin Huey helicopters used by the Marines since the 1970s, this new variant was introduced in 2008.

Vehicle Performance

Speed
Armor
Firepower

Vehicle Occupancy

Seat Position Weapon
1 Pilot None
2 Gunner Minigun
3 Gunner Minigun
4 Passenger Troop Kit
5 Passenger Troop Kit

Field Notes

The Venom is the US team’s fastest high-capacity troop transport. It is also armed with port and starboard mounted miniguns. The miniguns have a blazing rate of the fire, ideal for engaging troops and light vehicles. With sustained fire, they can even damage armored vehicles such as tanks and IFVs.

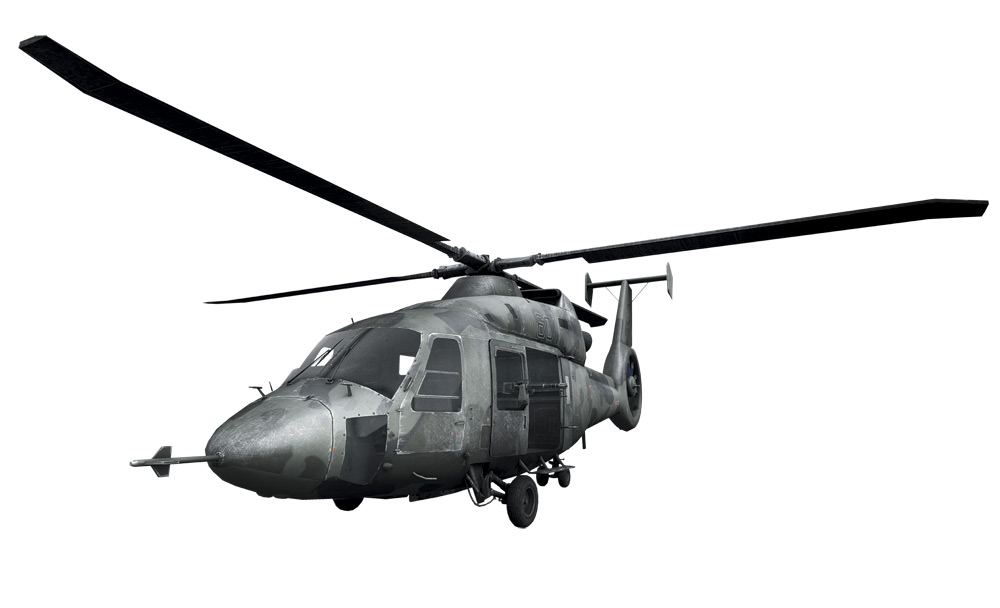
KA-60 Kasatka

Nationality : RU

Description : This new utility helicopter from Kamov is entering service with the Russian Air Force to replace the aging Mi-8.

Vehicle Performance

Speed
Armor
Firepower

Vehicle Occupancy

Seat Position Weapon
1 Pilot None
2 Gunner Minigun
3 Passenger Minigun
4 Passenger Troop Kit
5 Passenger Troop Kit

Field Notes

The KA-60 performs much like the US team’s Venom, but the pilot sits on the starboard side. This can be a bit disorienting at first, compared to piloting the other choppers where the pilot either sits in the middle or on the port side. So when maneuvering the chopper at low altitude, be mindful of the port side to avoid clipping trees, towers, and other objects.

[ Transport Helicopter Tactics ]

  • Unless you have experience flying helicopters, don’t try to fly a transport helicopter filled with teammates. This is the wrong time to take a flying lesson. If you want more experience flying, find a server with a low player count and experiment taking off, flying, and landing.
  • It takes a few seconds for a transport helicopter’s rotor to spin up before takeoff. So after securing an enemy base in Rush matches, watch for enemies lurking about during these vulnerable seconds as you can die fast if you get hit with a rocket or tank round. Also, take steps to ensure the enemy doesn’t steal your choppers.
  • The transport helicopters can be used to quickly capture control points during Conquest matches—hover over the flag to convert it. The more players onboard, the faster it will be captured. However, watch out for defenders below. A hovering chopper makes a juicy target. It’s much safer to drop troops via parachute onto a control point.
  • Use the miniguns to blow apart light cover offered by walls and rooftops. This is a great way to expose M-COM stations located inside small structures during Rush matches.
  • The miniguns are capable of high rates of fire, but they have a tendency to overheat, rendering them inoperable for a few seconds. So lay off the trigger occasionally to give the barrels a chance to cool down. For a better view of distant targets, use the minigun’s zoom function.
  • When piloting a transport helicopter, orbit around a contentious point so the gunners on the port and starboard sides can provide supporting fire with the miniguns. While orbiting around one location, usually only one gunner has the best view. So consider switching directions so both gunners get a chance to lay down some fire. A transport helicopter spitting out thousands of rounds is likely to draw attention so be prepared to escape to a safe distance if you detect a missile lock. Drop altitude fast in an attempt to break line of sight with a missile before it is launched.

Keep reading with a free account

The first 3 sections of Battlefield 3 Premium are open to everyone. An account opens the rest of it, and every other guide in the archive. It's free, and there's nothing to buy.

Bought guides on the old Prima Games site? Your account and every guide you own moved here, so there's nothing to buy again. Sign in.

Create a free account Or browse our free guides

PreviousScout Helicopters NextJets