Prima Games eGuides
primagames.com Browse Redeem a code Help
Battlefield 3 Premium eGuide
Sign in My Guides

Sign in or create an account

We'll email you a link. No password needed, and if you don't have an account yet, the link makes one.

By creating an account or signing in, you agree to our Terms of Service and Privacy Policy.

Have a password?

Had an account on the old eGuides site, or a code from a printed guide? Help and troubleshooting

Sign in with a password

By signing in, you agree to our Terms of Service and Privacy Policy.

Check your email

A sign-in link is on its way. It works once and expires in 15 minutes. Open it and you're in, with an account if you didn't already have one.

Contents

  • Battlefields
    • Conquest
      • Alborz Mountains
      • Armored Shield
      • Azadi Palace
      • Bandar Desert
      • Caspian Border
      • Damavand Park
      • Death Valley
      • Epicenter
      • Grand Bazaar
      • Gulf of Oman
      • Kharg Island
      • Kiasar Railroad
      • Markaz Monolith
      • Nebandan Flats
      • Noshahr Canals
      • Operation Firestorm
      • Operation Métro
      • Operation Riverside
      • Sabalan Pipeline
      • Seine Crossing
      • Sharqi Peninsula
      • Strike at Karkand
      • Talah Market
      • Tehran Highway
      • Wake Island
    • Conquest 64
      • Alborz Mountains
      • Armored Shield
      • Azadi Palace
      • Bandar Desert
      • Caspian Border
      • Damavand Park
      • Death Valley
      • Epicenter
      • Grand Bazaar
      • Gulf of Oman
      • Kharg Island
      • Kiasar Railroad
      • Markaz Monolith
      • Nebandan Flats
      • Noshahr Canals
      • Operation Firestorm
      • Operation Métro
      • Operation Riverside
      • Sabalan Pipeline
      • Seine Crossing
      • Sharqi Peninsula
      • Strike at Karkand
      • Tehran Highway
      • Wake Island
    • Rush
      • Alborz Mountains
      • Armored Shield
      • Azadi Palace
      • Bandar Desert
      • Caspian Border
      • Damavand Park
      • Death Valley
      • Epicenter
      • Grand Bazaar
      • Gulf of Oman
      • Kharg Island
      • Kiasar Railroad
      • Markaz Monolith
      • Nebandan Flats
      • Noshahr Canals
      • Operation Firestorm
      • Operation Métro
      • Operation Riverside
      • Sabalan Pipeline
      • Seine Crossing
      • Sharqi Peninsula
      • Strike at Karkand
      • Talah Market
      • Tehran Highway
      • Wake Island
    • Squad Rush
      • Alborz Mountains
      • Armored Shield
      • Azadi Palace
      • Bandar Desert
      • Caspian Border
      • Damavand Park
      • Death Valley
      • Epicenter
      • Grand Bazaar
      • Gulf of Oman
      • Kharg Island
      • Kiasar Railroad
      • Markaz Monolith
      • Nebandan Flats
      • Noshahr Canals
      • Operation Firestorm
      • Operation Métro
      • Operation Riverside
      • Sabalan Pipeline
      • Seine Crossing
      • Sharqi Peninsula
      • Strike at Karkand
      • Talah Market
      • Tehran Highway
      • Wake Island
    • Squad Deathmatch
      • Alborz Mountains
      • Armored Shield
      • Azadi Palace
      • Bandar Desert
      • Caspian Border
      • Damavand Park
      • Death Valley
      • Epicenter
      • Grand Bazaar
      • Gulf of Oman
      • Kharg Island
      • Kiasar Railroad
      • Markaz Monolith
      • Nebandan Flats
      • Noshahr Canals
      • Operation Firestorm
      • Operation Métro
      • Operation Riverside
      • Sabalan Pipeline
      • Seine Crossing
      • Sharqi Peninsula
      • Strike at Karkand
      • Talah Market
      • Tehran Highway
      • Wake Island
    • Team Deathmatch
      • Alborz Mountains
      • Armored Shield
      • Azadi Palace
      • Bandar Desert
      • Caspian Border
      • Damavand Park
      • Death Valley
      • Epicenter
      • Grand Bazaar
      • Gulf of Oman
      • Kharg Island
      • Kiasar Railroad
      • Markaz Monolith
      • Nebandan Flats
      • Noshahr Canals
      • Operation Firestorm
      • Operation Métro
      • Operation Riverside
      • Sabalan Pipeline
      • Seine Crossing
      • Sharqi Peninsula
      • Strike at Karkand
      • Talah Market
      • Tehran Highway
      • Wake Island
    • Scavenger
      • Aftermath - Azadi Palace
      • Aftermath - Epicenter
      • Aftermath - Markaz Monolith
      • Aftermath - Talah Market
    • Close Quarters/Gun Master
      • Close Quarters - Donya Fortress
      • Close Quarters - Operation 925
      • Close Quarters - Scrapmetal
      • Close Quarters - Ziba Tower
      • Aftermath - Azadi Palace
      • Aftermath - Epicenter
      • Aftermath - Markaz Monolith
      • Aftermath - Talah Market
    • Capture the Flag
      • Operation Riverside
      • Nebandan Flats
      • Kiasar Railroad
      • Sabalan Pipeline
    • Tank Superiority
      • Alborz Mountains
      • Armored Shield
      • Bandar Desert
      • Death Valley
    • Air Superiority
      • Operation Riverside
      • Nebandan Flats
      • Kiasar Railroad
      • Sabalan Pipeline
  • Essentials
    • Primer
      • What's New in Battlefield 3?
      • What's New in Close Quarters?
      • What's New in Armored Kill?
      • What's New in Aftermath?
      • What's New in End Game?
    • Basics
      • Introduction and Interface
      • Spawn Screen
      • Movement and Fundementals
      • Combat
      • Game Modes
      • Squad Play
      • Multiplayer Tactics
      • Persistance System
      • Battlelog
      • Specilizations
      • Camo Patterns
    • Classes
      • Introduction
      • Assault
      • Engineer
      • Support
      • Recon
    • Weapons
      • Introduction & Accessory Index
      • Assault Rifles
      • Carbines
      • Light Machine Guns
      • Sniper Rifles
      • Personal Defense Weapons (PDWs)
      • Shotguns
      • Pistols
      • Crossbow
    • Vehicles
      • Vehicle Customization
      • Light Vehicles
      • Infantry Fighting Vehicles (IFVs)
      • Mobile AA
      • Main Battle Tanks (MBT)
      • Attack Helicopters
      • Scout Helicopters
      • Transport Helicopters
      • Jets
      • Stationery Anti-Vehicle Weapons
  • Campaign
    • Mission 1: Semper Fidelis
      • Semper Fidelis
    • Mission 2: Operation Swordbreaker
      • Operation Swordbreaker
    • Mission 3: Uprising
      • Uprising
    • Mission 4: Going Hunting
      • Going Hunting
    • Mission 5: Operation Guillotine
      • Operation Guillotine
    • Mission 6: Comrades
      • Comrades
    • Mission 7: Thunder Run
      • Thunder Run
    • Mission 8: Fear No Evil
      • Fear No Evil
    • Mission 9: Night Shift
      • Night Shift
    • Mission 10: Rock and a Hard Place
      • Rock and a Hard Place
    • Mission 11: Kaffarov
      • Kaffarov
    • Mission 12: The Great Destroyer
      • The Great Destroyer
  • Multiplayer
    • Crash Course in Co-operative Play
      • Crash Course in Co-operative Play
    • Co-Op Mission 1: Operation Exodus
      • Operation Exodus
    • Co-Op Mission 2: Fire from the Sky
      • Fire from the Sky
    • Co-Op Mission 3: Exfiltration
      • Exfiltration
    • Co-Op Mission 4: Hit and Run
      • Hit and Run
    • Co-Op Mission 5: Drop 'em Like Liquid
      • Drop 'em Like Liquid
    • Co-Op Mission 6: The Eleventh Hour
      • The Eleventh Hour
  • Compendium
    • Multiplayer Scoring
      • Multiplayer Scoring
    • Assignments
      • Assignments
    • Achievements and Trophies
      • Achievements and Trophies
    • Dog Tags
      • Dog Tags
    • Ranks
      • Ranks
    • Camo Patterns
      • Camo Patterns
    • Ribbons
      • Ribbons
    • Medals
      • Medals

Battlefield 3 Premium Guide › Essentials › Vehicles

Light Vehicles

The light vehicles are the fastest land vehicles in the game, and are useful for rushing control points and M-COM stations at the start of a battle. But their light armor and exposed positions make them death traps if driven into heavy action. Most explosive munitions can disable these vehicles with one hit, potentially killing the driver and passengers. Their greatest defensive asset is their speed and off-road capability. To ensure survival, use these vehicles to traverse terrain on a map’s periphery; stay away from heated battles near control points and M-COM stations. Although these vehicles can attain high speeds on roads, most roads are traveled by larger and more deadly vehicles like tanks and IFVs. So stay off-road and out of sight. Such tactics are essential when staging raids on distant enemy-held control points or M-COM stations. There are no vehicle unlocks or loadout options for the light vehicles.

Growler ITV

Nationality: US

Description: Used by the USMC starting in 2009, the Growler is the only transport vehicle that fits in the V-22 Osprey.

Vehicle Performance

Speed
Armor
Firepower

Vehicle Occupancy

Seat Position Weapon
1 Driver None
2 Gunner 12.7mm Machine Gun
3 Passenger Troop Kit

Field Notes

The Growler ITV is fast and maneuverable, but the open-cockpit design leaves the driver and passengers vulnerable to incoming small arms fire. Never drive this vehicle into the middle of an intense firefight. Instead, use it for quick raids on distant control points.

VDV Buggy

Nationality : RU

Description : Russian paratrooper light buggy.

Vehicle Performance

Speed
Armor
Firepower

Vehicle Occupancy

Seat Position Weapon
1 Driver None
2 Gunner 12.7mm Machine Gun
3 Passenger Troop Kit

Field Notes

Like the US Growler ITV, the VDV Buggy is a fast attack vehicle ideal for launching sneaky flanking attacks on lightly defended enemy positions. Due to its lack of armor, take extra steps to keep this vehicle out of the line of fire. While the machine gun turret is great for suppressing enemy infantry, the gunner position is completely exposed.

M1114 HMMWV

Nationality : US

Description : This vehicle has served in every division of the US Armed Forces for 20 years; increased armor was added as a response to urban threats.

Vehicle Performance

Speed
Armor
Firepower

Vehicle Occupancy

Seat Position Weapon
1 Driver None
2 Gunner HMG .50
3 Passenger None
4 Passenger None

Field Notes

The familiar HMMWV is the most common light vehicle when playing as the US. The vehicle’s body and doors can repel most small arms fire, but the windows leave the driver and passengers somewhat exposed. Consider keeping this vehicle back from the action and using its machine gun turret (with zoom capability) to engage enemy infantry and helicopters.

GAZ-3937 Vodnik

Nationality : RU

Description : Dependable armored 4x4 that was introduced in 1997.

Vehicle Performance

Speed
Armor
Firepower

Vehicle Occupancy

Seat Position Weapon
1 Driver None
2 Gunner HMG .50
3 Passenger None
4 Passenger None

Field Notes

The Vodnik performs much like the HMMWV, but has a slightly taller profile making it a bit unstable on uneven terrain. Watch your speed, particularly when turning. Otherwise you may roll the vehicle, forcing you to find another ride or continue your journey on foot.

RHIB

Nationality : US and RU

Description : The Rigid Hull Inflatable Boat (RHIB) is a vessel whose hull is partially rigid and partially inflatable to allow it to traverse long distances at high speed.

Vehicle Performance

Speed
Armor
Firepower

Vehicle Occupancy

Seat Position Weapon
1 Driver None
2 Gunner Light Machine Gun
3 Passenger None
4 Passenger None

Field Notes

The RHIB is used by both teams and usually spawns next to bodies of water or within the lower deck of US aircraft carriers. Despite its light machine gun mounted on the bow, this is a transport vehicle, not a gunboat. The boat cannot sustain heavy damage. Even worse, it provides zero protection for its occupants. Instead of launching frontal assaults, circumvent the enemy’s defenses and launch surprise attacks on rear positions.

Skid Loader

Description : Neutral

The Skid Loader is a small four-wheeled construction vehicle capable pushing or carrying material with its front-mounted bucket.

These compact vehicles are extremely agile and maneuverable, making them easy to use in crowded construction sites.

Vehicle Performance

Speed
Armor
Firepower

Vehicle Occupancy

Seat Position Weapon
1 Driver None
2 Passenger Troop Kit
3 Passenger Troop Kit

Field Notes

Unlike the other vehicles, the Skid Loader is completely new to the Battlefield series and can usually be found on maps with construction sites. These vehicles are not affiliated with either side and spawn independently, regardless of which team controls nearby flags. Although it has no weapons, the Skid Loader can be used as a light transport; it is capable of carrying three soldiers at a decent speed. The view from the cramped cockpit is rather limited, so always switch to an external view when driving one of these vehicles.

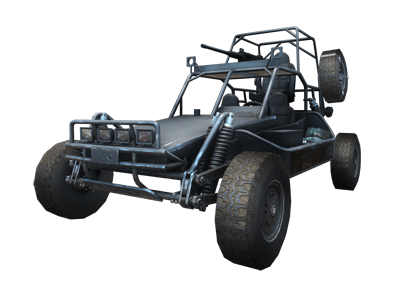
DPV

Nationality : US

Designed as a fast attack vehicle for Special Operations units, the DPV is known for its lightweight yet rugged construction. While it’s not effective against armored vehicles, it poses a significant threat to infantry.

Vehicle Performance

Speed
Armor
Firepower

Vehicle Occupancy

Seat Position Weapon
1 Driver None
2 Gunner Heavy Machine Gun
3 Passenger Troop Kit

Field Notes

What the DPV (Desert Patrol Vehicle) lacks in armor it makes up for in speed and agility. Like the other light vehicles, the DPV is best utilized for high-speed flanking attacks, and is ideal for raiding distant control points during Conquest matches. The open cockpit design offers zero protection against small arms fire, so avoid driving through large concentrations of enemy infantry. Instead, stay off-road, moving through the less traveled areas of the map to avoid enemy vehicles and mines.

Quad Bike

Nationality : US and RU Description: Fast unarmored transport vehicle with two seats.

Vehicle Performance

Speed
Armor
Firepower

Vehicle Occupancy

Seat Position Weapon
1 Driver None
2 Passenger Troop Kit

Field Notes

The quad bike is the fastest ground vehicle available, making it ideal for zipping across the battlefield at high speed while avoiding the slower, heavily armored vehicles. The driver has no access to weapons, but the passenger riding on the back can equip all weapons in their troop kit. But at high speed, firing from the back of a fast-moving quad bike is highly inaccurate.

Rhino

Nationality : US and RU

Description : Modified van with remote turret and open passenger seats.

Vehicle Performance

Speed
Armor
Firepower

Vehicle Occupancy

Seat Position Weapon
1 Driver HMG .50
2 Passenger Troop Kit
3 Passenger Troop Kit
4 Passenger Troop Kit

Field Notes

The Rhino is a heavily modified civilian van that is available to both teams. The remote heavy machine gun turret on top of the van is controlled by the driver, so it’s got the feel of driving an IFV or tank. With sheets of metal welded over the most of the van’s front windows, the driver operates the vehicle from the turret’s camera view. In addition to the HMG turret, the Rhino has four passenger positions, which allows troops to fire their own weapons from the side and rear windows. The open windows provide some cover as well as a good view of the vehicle’s periphery, which is ideal for targeting enemy support soldiers hoping to slap a C4 charge to the side of the vehicle.

Tip

An engineer riding in the Rhino can repair the vehicle from the passenger seat. Simply aim the Repair Tool at a piece of the vehicle’s interior to perform repairs while on the go. When an engineer, assault, and support soldier fill the passenger seats, the Rhino can be a force to reckon with. While the engineer repairs and fires rockets, the assault soldier can heal and revive the other passengers when not firing their assault rifle or grenade launcher. Meanwhile, the support soldier can drop an ammo box inside the vehicle to keep the rest of the squad supplied while occasionally tossing C4 charges or mines out the back of the vehicle to take out any pursuers.

Phoenix

Nationality : US

Description : Modified armored jeep with grenade launcher and HMG.

Vehicle Performance

Vehicle Performance

Speed
Armor
Firepower

Vehicle Occupancy

Seat Position Weapon
1 Driver None
2 Gunner HMG .50
3 Grenadier Grenade Launcher

Field Notes

The Phoenix is a modified M1114 HMMWV fitted with two roof-mounted turrets. The turret on the back is equipped with an automatic grenade launcher that is ideal for targeting groups of enemy infantry—the weapon can rapidly fire up to nine grenades before it must be reloaded. The grenade launcher turret can rotate only 180 degrees, so it’s best if the vehicle is facing the target. A heavy machine gun is attached to the front turret, This turret can rotate a full 360 degrees, but the rear grenade launcher turret blocks its view when facing the vehicle’s rear. With no adequate weapon coverage from behind, the Phoenix is extremely vulnerable to flanking attacks. So stay on the move to avoid getting C4 stuck to the back of your ride.

Barsuk

Nationality : RU

Description : Modified armored jeep with grenade launcher and HMG.

Vehicle Performance

Speed
Armor
Firepower

Vehicle Occupancy

Seat Position Weapon
1 Driver None
2 Gunner HMG .50
3 Grenadier Grenade Launcher

Field Notes

This modified GAZ-3937 Vodnik performs similarly to the Phoenix. However, the turret positions are reversed: the grenade launcher is on the front, and the heavy machine gun is on the back. While the front-mounted grenade launcher can rotate only 180 degrees, the rear-mounted machine gun can traverse a full 360 degrees. This allows the gunner on the back the ability to engage targets in all directions. Since the machine gun is mounted slightly higher than the grenade launcher turret, visibility is unobstructed when engaging targets straight ahead as well. Given the improved visibility of the rear gunner, the Barsuk is harder to sneak up on from the rear—or any direction for that matter. Structurally, the Barsuk has a slightly higher profile than the Phoenix, therefore it is a bit unstable on uneven terrain. Watch your speed when turning, otherwise you may inadvertently roll the vehicle onto its side.

Caution

The turret positions atop the Phoenix and Barsuk are completely exposed, leaving the weapon operators vulnerable to incoming fire. To avoid getting sniped, stay on the move when moving through enemy-controlled territory.

ASRAD

Nationality : US

Description : Armored jeep modified with a roof-mounted ASRAD cannon.

Vehicle Performance

Speed
Armor
Firepower

Vehicle Occupancy

Seat Position Weapon
1 Driver None
2 Gunner ASRAD
3 Passenger Troop Kit
4 Passenger Troop Kit

Field Notes

The ASRAD is a M1114 HMMWV that has been outfitted with a rooftop-mounted ASRAD cannon. While identical to the familiar HMMWV in terms of armor and speed, the addition of an ASRAD cannon makes this vehicle especially efficient in the destruction of aircraft. Aside from being an anti-aircraft vehicle, switching to secondary fire when in the gunner’s position disables the lock-on capability of the cannon, enabling the gunner to fire upon land-based targets as well. With this in mind, it is possible to engage a tank or IFV, but given the lighter armor of the ASRAD it is best to attack these heavier vehicles while passing or make use of the vehicle’s maneuverability to fire on them from behind.

Caution

While the occupants of the vehicle are relatively safe within the vehicle, the open windows present a hazard when attacked by explosives or a skilled marksman.

Vodnik AA

Nationality : RU

Description : Armored jeep modified with a roof-mounted ASRAD cannon.

Vehicle Performance

Speed
Armor
Firepower

Vehicle Occupancy

Seat Position Weapon
1 Driver None
2 Gunner ASRAD
3 Passenger Troop Kit
4 Passenger Troop Kit

Field Notes

The Vodnik is no stranger to the battlefield. This time, it has been outfitted with an ASRAD cannon, making it particularly deadly to aircraft. As with its US counterpart, the ASRAD , switching to secondary fire while in the gunner’s position enables the ability to fire the ASRAD unguided against targets. One advantage to the Vodnik AA over the ASRAD is that the Vodnik AA is an amphibious vehicle, meaning that traversal of waterways is possible should the vehicle be used for flanking or if it needs to make a quick escape. Like the ASRAD , though, the addition of an ASRAD cannon makes the vehicle useful against land-based targets and infantry.

Dirtbikes

Nationality : US and RU

Description : Fast unarmored transport vehicle capable of carrying two persons.

Vehicle Performance

Speed
Armor
Firepower

Vehicle Occupancy

Seat Position Weapon
1 Driver None
2 Passenger Troop Kit

Field Notes

One of the fastest and the most maneuverable of the ground vehicles, the dirtbike is an unimposing transport vehicle that can quickly and efficiently navigate the battlefield, and it’s small enough to enter buildings as well. While the driver may be unarmed, the passenger has full access to his own troop kit. While accuracy with a firearm is difficult when traveling at the high speeds the dirtbike is capable of, explosives, such as grenades and C4, are highly effective drive-by weapons.

[ Light Vehicle Tactics ]

  • The roof-mounted machine guns found on most of these vehicles are excellent anti-aircraft guns. Fire a steady burst of automatic fire at enemy helicopters to make them spin out of control. On the HMMWV and Vodnik, the gunner operates the machine gun turret from within the vehicle, which protects the gunner from small arms fire. Each turret also has a zoom function, making them great weapons for spotting and engaging enemies at long range.
  • Think twice before loading your entire squad into one of these vehicles. All it takes is one hit from a tank or rocket launcher to disable your ride, potentially killing a large number of your squad members. If the vehicle becomes disabled, bail out and seek cover before the flaming wreck explodes.
  • Given their speed, the light vehicles are great for scoring road kills. Simply drive directly toward enemy troops at high speed and run them down before they can dash out of your way.
  • Passengers in the Growler ITV and VDV Buggy can fire the weapons from their troop kits. But accurately targeting enemies while driving in moving vehicle is tough. It’s often better to save your ammo for when the vehicle reaches its destination.
  • At the start of a battle, don’t drive off in one of these vehicles until a few teammates hop inside.
  • On most maps, these vehicles serve as your team’s primary means of transportation. Stranding teammates at your base won’t win you any fans.
  • However, your squad mates can spawn into the vehicle if there are open seats.
  • One of the highlights of any Battlefield game is the vehicles. Nothing can be more entertaining than hopping into a tank and cruising across the landscape, laying waste to both enemy vehicles and structures.
  • Many of the vehicles from Battlefield 3 have returned in the Back to Karkand maps, along with some new vehicles that were originally featured in Battlefield 2 .
  • Quad bikes have no armor, leaving the driver and passenger completely exposed. Furthermore, the vehicle can be quickly destroyed by small-arms fire, so keep moving and avoid areas of high enemy concentration.
  • Quad bikes make excellent car bombs. Stick two or three C4 charges to the front of a quad bike and then drive it into the side or rear of an enemy tank or tank destroyer. While traveling at high speed, jump off the quad bike approximately 20 meters before impacting the enemy vehicle. The quad bike will continue traveling in a straight line toward the enemy vehicle. When the driverless quad bike makes contact, detonate the C4 to score an unorthodox vehicle kill.
  • It’s possible to accurately fire guided anti-vehicle weapons like the Javelin, IGLA, or Stinger from the back of a moving quad bike. This combination can make the quad bike a formidable threat on a battlefield filled with tanks and aircraft.
  • Given their speed, quad bikes are great for scoring road kills. Simply drive directly toward enemy troops at high speed and run them down before they can dash out of your way.
  • At the start of a battle, don’t drive off in one of these vehicles until a teammate hops on the back. On most maps, these vehicles serve as your team’s primary means of transportation. Stranding teammates at your base won’t win you any fans. However, your squadmates can spawn into the vehicle if there is an available seat.
  • Quad bikes can perform some amazing jumps. Look for ramps or other sloped terrain to send this vehicle flying through the air.
  • Park a Rhino near a control point, loaded with C4. Use the Rhino to bait enemies in, then detonate the C4 once they’re close enough.
  • Avoid prolonged solo use of the Rhino, as it is prone to being disabled or destroyed if proactive repairs are not made.
  • While driving the Rhino, avoid tanks and IFVs at all costs because they will quickly destroy the vehicle with one or two direct cannon rounds.
  • The best method to keep this murder bus in operation is to have passengers repairing the vehicle as it comes under fire. While sitting in the passenger seat you are also able to drop ammo boxes and medic kits, in turn, healing and resupplying the occupants of the vehicle.
  • The Rhino has little to no cover, which means that occupants are exposed to incoming fire. But in contrast, these openings also give a clear view of anyone attempting to plant C4 on the vehicle.
  • The Rhino is also great for getting through tight spaces, so don’t be afraid to lose a tank by turning down a small alley. Driving through narrow openings also lends itself well to getting across a map quickly to flank control points during Conquest matches.
  • In light engagements, the Phoenix and Barsuk are useful as a stationary turrets. Just be sure that an escape route is already available in the event that the fire-fight escalates.
  • The Phoenix and Barsuk are highly effective patrol vehicles. Make use of their speed and firepower to control objectives and choke points.
  • Before riding a dirtbike, it is possible to throw an ammo crate or medic kit onto it. This effectively heals and resupplies the driver and passenger while they are on it.
  • Sometimes, the most direct path is not the safest. In times like these, keep an eye out for the ramps that are located throughout the maps. Dirtbikes can take advantage of these to make quick escapes or get the jump on enemy forces.
  • Dirtbikes make great bombs, too! These vehicles tend to be plentiful and maintain their momentum for some time after bailing out. So, if you don’t mind destroying yours, strap some C4 to it and drive at breakneck speed toward your target and bail out; just don’t forget to detonate the charge.
  • The cannon on both the ASRAD and Vodnik AA has a high effective range. Use this to your advantage to protect control points and M-COMs from afar, instead of engaging the enemy at close range, where the vehicles’ vulnerability to explosives can be exploited.

Keep reading with a free account

The first 3 sections of Battlefield 3 Premium are open to everyone. An account opens the rest of it, and every other guide in the archive. It's free, and there's nothing to buy.

Bought guides on the old Prima Games site? Your account and every guide you own moved here, so there's nothing to buy again. Sign in.

Create a free account Or browse our free guides

PreviousVehicle Customization NextInfantry Fighting Vehicles (IFVs)