
Battlefield 3 Premium Guide Essentials Classes
Recon
US Starting Loadout
Primary: MK11 MOD 0
Sidearm: M9
Gadgets: Radio Beacon
Specialization:
RU Starting Loadout
Primary: SVD
Sidearm: MP443
Gadgets: Radio Beacon
Specialization:
Strengths: Long-range/spotting specialist
Weaknesses: Slow-firing; vulnerable in close quarters
The recon class is much more than just a sniper. New equipment like the Radio Beacon, SOFLAM, and MAV put a greater emphasis on team play, allowing the recon player to fill a more supportive role.
It’s up to the recon class to spot targets for infantry and vehicles, informing teammates of enemy movement and designating targets for laser-guided munitions. But this doesn’t mean recon troops can’t still crack skulls at long range.
The sniper rifles offered by this kit require the greatest amount of skill and patience of any weapon type, and are best reserved for players willing to put in the practice to master them.
Unless you score headshots every time, it will take two or three hits to down an opponent. Accuracy and stability can be improved significantly by firing from a prone position with a Bipod.
Unlock Progression
| Unlock | Name | Image | Recon Score |
|---|---|---|---|
| 1 | T-UGS |

|
5,000 |
| 2 | SV98 |

|
13,000 |
| 3 | SOFLAM |

|
26,000 |
| 4 | MAV |

|
45,000 |
| 5 | SKS |
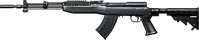
|
71,000 |
| 6 | M40A5 |

|
104,000 |
| 7 | M98B |

|
146,000 |
| 8 | MK11 MOD 0 (for RU) |

|
195,000 |
| 8 | SVD (for US) |

|
195,000 |
Special Equipment
Radio Beacon
Unlock: Recon Kit Start
Description: The AN-PRC-117F radio allows the recon soldier to deploy an additional squad spawn position. The recon soldier must be part of a squad for this item to function.
Field Notes
Remember the Squad Leader Spawn Beacon (SLSB) from Battlefield 2142? Well, the Radio Beacon works the same way, only it’s carried by the recon class. Use this device as a forward spawn point for getting your squad back into the action.
This is particularly helpful for attackers during Rush matches, allowing squads to spawn close to the objectives. The Radio Beacon can be placed on any flat surface. However, pay close attention to where you’re placing it.
You don’t want to place it anywhere enemy troops can easily spot. Otherwise your spawning squad mates may be killed before they get a chance to defend themselves.
So place these devices behind large rocks or other pieces of solid cover that provide both protection and concealment. The Radio Beacon emits a constant beeping sound. Enemies can use this distinct sound to home in on the device and either destroy it or camp it.
If your Radio Beacon is being camped, immediately notify your squad, warning them not to spawn on it. You can retrieve the Radio Beacon by interacting with it. Alternately, it can be destroyed with explosives or disabled with the MAV’s jamming feature.
T-UGS
Unlock: 5,000 Recon score
Description: The T-UGS (tactical unattended ground sensor) uses motion sensors to detect the presence of vehicles and infantry. The sensor emits an audible beep on detection and can be avoided by moving at low speed.
Field Notes
The T-UGS motion sensor is a great way to keep tabs on enemy movement in high traffic areas, such as around flags in Conquest or near M-COM stations in Rush matches. To deploy this device, you must find a piece of even terrain.
An icon of the device appears in front of you when selected. The icon turns green when you’re standing over a suitable area—it turns red when standing on rough terrain. Since the device is visible, try to place it in high grass or vegetation to better conceal it from enemy troops.
Once deployed, enemy units that move within the motion sensor’s detection radius show up on each teammate’s minimap to guide units toward hostile intruders.
However, enemies can avoid detection by crawling. Like the Radio Beacon, the T-UGS makes a beeping sound, potentially warning enemies of its presence. If you find an enemy T-UGS, you can destroy it with explosives or jam it with a MAV and render it inoperable.
SOFLAM
Unlock: 26,000 Recon score
Description: The AN/PEQ-1 SOFLAM allows the recon soldier to designate enemy vehicles for precision strikes. The SOFLAM is semiautonomous and will designate targets even when unattended.
Field Notes
The SOFLAM (special operations forces laser acquisition marker), unlocked by the recon kit, is a laser target designator. This tripod-mounted device is used to target vehicles for guided munitions fired by IFVs, tanks, helicopters, and jets.
Both the Guided Shell and Guided Missile vehicle weapon unlocks rely on the SOFLAM to acquire targets. Once a target is painted with a laser, teammates in vehicles equipped with these guided weapons get an indication on their HUD.
At that point, all they have to do is fire and the shell or missile automatically zeros in on the target and scores a hit. While behind the device, you can pan and zoom in on targets at will.
But if you leave the SOFLAM behind, it can still acquire targets on its own, but only within a limited viewing arc. So if you leave the SOFLAM behind, point it down a street or other narrow passage that is frequented by enemy vehicles.
Unattended SOFLAMs can be destroyed with explosives or jammed by an enemy MAV.
MAV
Unlock: 45,000 Recon score
Description: A remotely operated micro air vehicle equipped with a suite of motion sensors and a camera with IRNV capabilities for aerial reconnaissance.
Field Notes
The MAV is a small unmanned reconnaissance drone deployed by the recon class. It effectively takes the place of the UAV made popular in Bad Company 2.
While operating the MAV, you’re vulnerable to attack, so only deploy this device when you’re in a relatively secure area. You must also find a relatively flat piece of terrain from which the MAV can take off.
Once activated, the view switches to the MAV’s camera, allowing you to control the small vehicle like a small helicopter. Equipped with an infrared camera, the MAV makes it easy to spot enemy troops and vehicles by highlighting their heat signatures, which appear bright white on the black-and-white screen.
Using the spotting function, call out the positions of enemies for your teammates. The MAV also has the ability to disable enemy Radio Beacons, T-UGS motion sensors, SOFLAMs, and EOD Bots with its electronic jamming function.
But the MAV is very fragile and susceptible to small arms fire. So either keep it high above the battlefield or use trees and hills to mask its location.
[ RECON TACTICS ]
Equip the Bipod accessory as soon as you unlock it for your selected sniper rifle. The Bipod stabilizes the rifle, eliminating all lateral and horizontal scope drift. This makes it much easier to engage targets, especially at long range.
On bolt-action sniper rifles, the Straight Pull Bolt occupies the same slot as the Bipod, so you must make a tough choice. While the Straight Pull Bolt allows you to view through scope while loading a new round, it does nothing to stabilize the weapon.
Gravity greatly affects the trajectory of your bullets when sniping, causing each round to drop over distance. At long range, simply placing an enemy’s head in your crosshairs isn’t enough to score the instant kill.
Instead, compensate for range by aiming high, just above the target’s head. Use the black mil dots on the scope’s vertical crosshair line to gauge proper barrel elevation before gently squeezing the trigger.
After scoring a kill or two, move to a new location—the kill cam gives away your sniping spot, so don’t wait around for reprisals.
Choose your sniping location carefully, paying close attention to how you appear to enemy snipers. To avoid presenting your enemies with a clearly defined silhouette, avoid sniping from rooftops and the crests of hills.
Instead, snipe from lower elevations, using bushes and other objects behind you to break up your visible outline.
If you must snipe from a high elevation, make sure you have adequate cover and concealment, as you’re likely to draw plenty of attention in such a predictable spot.
And always drop prone. This not only reduces your chances of being spotted, but it also increases accuracy and stability.
You’ll never capture a flag or destroy an M-COM station by sniping. The powerful sniper rifles make the recon class extremely popular.
But a well-rounded squad should never have more than one recon soldier. While the recon class is great for long-range combat, the other classes are better suited for taking and holding ground.
The recon kit isn’t restricted to using sniper rifles. Consider equipping a shotgun or PDW for better close-quarters performance. This is a great way to boost your recon score if your sniping skills are lacking.
If you prefer keeping a sniper rifle, always switch to your pistol before moving around for quicker close-range target acquisition and rate of fire.
If playing in a match with friendly jets and helicopters, take it upon yourself to serve as the team’s spotter.
Using the high-powered scopes attached to the sniper rifles, it’s easy to zoom in on distant enemy troops and vehicles and spot them for your teammates.
The MAV and SOFLAM are equally effective for spotting and designating targets for destruction.
Due to their high speeds, aircraft have a tough time identifying ground targets. Spotting enemies greatly enhances their ability to identify and target enemy units.