Prima Games eGuides
primagames.com Browse Redeem a code Help
Assassin's Creed Origins eGuide
Sign in My Guides

Sign in or create an account

We'll email you a link. No password needed, and if you don't have an account yet, the link makes one.

By creating an account or signing in, you agree to our Terms of Service and Privacy Policy.

Have a password?

Had an account on the old eGuides site, or a code from a printed guide? Help and troubleshooting

Sign in with a password

By signing in, you agree to our Terms of Service and Privacy Policy.

Check your email

A sign-in link is on its way. It works once and expires in 15 minutes. Open it and you're in, with an account if you didn't already have one.

Contents

  • Changelog
    • Updates
  • Introduction
    • The Final Ptolemaic Dynasty
  • The Essentials
    • Overview
    • Player Health and Shield
    • Combat
    • Mounts and Vehicles
    • Animus Pulse
    • Discovering Locations
    • Completing Locations
    • Using the Map
    • Abilities/Ability Points
    • Inventory
    • Experience and Leveling Up
    • Gear
    • Tools
    • Senu
    • Animals
    • Beyond the Quests
  • Main Quests
    • Overview
    • Saqqara Pyramid
    • Siwa
      • Homecoming
      • The Oasis
      • The False Oracle
      • May Amun Walk Beside You
    • Alexandria
      • Aya
      • End of the snake
      • Gennadios the Phylakitai
      • Aya (continued)
    • Kanopos Nome
      • Egypt’s Medjay
    • Sapi-Res Nome
      • The Scarab’s Sting
      • The Scarab’s Lies
      • Pompeius Magnus
    • Giza
      • The Hyena
    • Memphis
      • The Lizard’s Mask
      • The Lizard’s Face
    • Faiyum
      • The Crocodile’s Scales
    • Faiyum Oasis
      • The Crocodile’s Jaws
      • Ambush at Sea [ULC]
    • Herakleion Nome
      • Way of the Gabiniani
      • Aya: Blade of the Goddess
    • Alexandria (Second Visit)
      • The Battle for the Nile
      • The Aftermath
    • Siwa (Second Visit)
      • The Final Weighing
    • Alexandria (Third Visit)
      • The Last Medjay
    • Current Time
      • Layla
    • Tyrrhenian Sea
      • Fall of an Empire, Rise of Another
    • Rome, Theatre of Pompey
      • 44 BCE, Ides of March
      • Outskirts of Rome
  • Side Quests
    • Siwa Side Quests
      • Gear Up
      • Family Reunion
      • Water Rats
      • Hideaway
      • Striking the Anvil
      • The Healer
      • Prisoners in the Temple
      • Bayek’s Promise
    • Lake Mareotis Side Quests
      • Hidden Tax
      • The Book of the Dead
      • Ambush in the Temple
      • Ulterior Votive
      • Lady of Slaughter
      • Birthright
      • Taste of her Sting
    • Alexandria Side Quests
      • The Accidental Philosopher
      • The Last Bodyguard
      • Higher Education
      • Serapis Unites
      • A Tithe By any other name
      • The Shifty Scribe
      • The Odyssey
      • Wrath of the Poets
      • Symposiasts
      • Phylakitai in the Eye
    • Kanopos Nome Side Quests
      • Old Times
      • Wild Ride
      • Taste of her Sting: Shrine of Serapis
      • Blue Hooligans
      • The Weasel
      • The Hungry River
      • Taste of her Sting: Crocodile Lair
    • Sap-Meh Nome Side Quests
      • In Protest
      • Thick Skin
      • Fair Trade
    • Sapi-Res Nome Side Quests
      • Conflicts of Interest
      • Smoke over Water
      • All Eyes on Us
      • Lost Happiness
      • Abuse of Power
      • The Tax Master
      • The Ostrich
      • Taste of her Sting: Sapi-Res Ruins
      • The New Kid in Town
      • Worker’s Lament
      • The Old Library
    • Ka-Khem Nome Side Quests
      • Taste of Her Sting: Ka-Khem Nome Old Temple
    • Giza Side Quests
      • Precious Bonds
      • What’s Yours is Mine
    • Memphis Side Quests
      • A Dream of Ashes
      • Blood in the Water
      • Odor Most Foul
      • Children of the Streets
      • Taimhotep’s Song
      • The Baker’s Dilemma
      • Mortem Romanum
    • Saqqara Nome Side Quests
      • First Blood
      • Secrets of the First Pyramids [ULC]
      • Rites of Anubis
      • When Night Falls
      • A Rebel Alliance
    • Faiyum Side Quests
      • Murder in the Temple
      • Feeding Faiyum
      • Curse of the Wadjet
      • Rebel Strike
      • The Bride
      • Sobek’s Gold
      • Forging Siwa
      • The Sickness
      • Fires of Dionysias
      • Demons in the Desert
    • Faiyum Oasis Side Quests
      • The Champion
      • The Man Beast
      • Sobek’s Tears
      • The Jaws of Sobek
      • Bad Faith
      • Shadya’s Rest
      • Fighting for Faiyum
    • Herakleion Nome Side Quests
      • Recon Work
      • Loose Cargo
      • Reunion
      • Predator to Prey
    • Uab Nome Side Quests
      • Seven Farmers
    • Atef-Pehu Nome Side Quests
      • The Matriarch
    • Green Mountains Side Quests
      • One Bad Apple
      • Playing with Fire
      • The Good Roman
      • Taking Liberty
      • Halo of the Huntress
      • Unseeing Eyes
      • Carpe Diem
      • Shadows of Apollo
    • Kyrenaika Side Quests
      • The Flea of Cyrene
      • The Lure of Glory
      • The Mousetrap
      • Founding Father
      • Pax Romana
      • Cat and Mouse
      • Absolute Power
      • Are you Not Entertained?
      • The Smugglers of Cyrene
      • Dead in the Water
      • My Brother for a Horse
    • Marmarica Side Quests
      • His Secret Service
    • Isolated Desert Side Quests
      • Plight of the Rebels
  • Activities
    • Overview
    • Gladiator Arenas
      • About Gladiator Arenas
      • Krokodilopolis
      • Cyrene
    • Hippodrome
      • Overview
      • Time Trials
      • Tournaments
    • Hunting Grounds (Animal Lairs)
      • Overview
      • Cobra Lair
      • Crocodile Lairs
      • Hippopotamus Lairs
      • Hyena Lairs
      • Ibex Lair
      • Leopard Lairs
      • Lion/Lioness Lairs
      • Vulture Lairs
    • Papyri Puzzles
      • Overview
      • Apollonion of Cyrene: Dead or Alive
      • Asklepieion: Forsaken City
      • Eastern Cemetery Mastaba: Stone Fungus
      • Galenos’s House: Royal Flora
      • Great Library: Divided Valley
      • Great Synagogue: Nature’s Way
      • House of Iwn: Just Laws
      • House of Life: A Long Drink
      • Hypostyle Hall: Fertile Lands
      • Iseion: Deafening Silence
      • Oracle of Apollo: Wet Work
      • Palace of Apries: In Plain Sight
      • Sarapeion: The Stone Gaze
      • Sarapeion of Karanis: The Leaning Tower
      • Tomb of Alexander the Great: Ray of Hope
      • Tomb of Battos: Underground Currents
      • Temple of Horus: Sea of Sand
      • Temple of Khonsou: Twin Despair
      • Temple of Ptah: Fallen Friend
      • Temple of Sobek: Sobek’s Rage
      • Temple of Thoth: Thoth’s Secret
      • Temple of Zeus: Undue Haste
      • Valley Market: The Blasphemer
      • Wabet: Burning Bush
      • Zephyros Stables: Dead End
    • Stone Circles
      • Overview
      • Amun
      • Apis
      • Divine Lion
      • Goat Fish
      • The Great Twins
      • Hathor
      • Horus
      • Osiris
      • Pisces
      • The Scales
      • Serqet
      • Taweret
      • The Planetarium
    • Tombs and Ancient Mechanisms
      • Overview
      • Adorer of Thoth Tomb
      • Golden Tomb
      • Mountain of the Dead
      • Nomarch’s Tomb
      • Seth-Anat Tomb
      • Tomb of Amenemhat III
      • Tomb of Djoser
      • Tomb of Khafre
      • Tomb of Khufu
      • Tomb of Menkaure
      • Tomb of Smenkhkare
      • Tomb of Sneferu
      • Tomb of the Cynic
      • Tomb of the Nomads
      • Great Sphinx
    • War Elephants
      • Overview
      • Herwennefer
      • Surus
      • Jumbe
      • Qetesh & Resheph
    • Hermit Locations
      • Hermit Location Sites
    • Ptolemy Statues
      • Ptolemy Statue Locations
    • Other Activities
      • Overview
      • Reda’s Daily Quest
      • Phylakes
      • World Events
    • Military Strongholds
      • Overview
      • Forts
        • Chersonesos Roman Fort
        • Kerkesoucha Granary
        • Limestone Quarry
        • Roman Akropolis
      • Medium Military
        • Arsinoites Quarry Hideout
        • Cyrene Barracks
        • Dionysias Caravanserai
        • Kerkasoros Outpost
        • Necropolis Hideout
        • Pharos Garrison
        • Prasinos Roman Camp
        • Saphthis Outpost
        • Saragina Camp
      • Small Military
        • Abandoned Temple Hideout
        • Akabis Roman Tower
        • Akronisos Camp
        • Auritina Roman Tower
        • Bandit Hideout
        • Camp Agrophylake
        • Camp Dory
        • Camp Kataskinono
        • Camp Menouthis
        • Camp Nisi
        • Camp Pyrrhos
        • Camp Tamaris
        • Camp Xeros
        • Carcer Roman Compound
        • Cleon’s Wharf
        • Collis Roman Hunting Camp
        • Coral Escarpment Camp
        • Desolated Lookout
        • Dionysias Wharf
        • Dioryx Megale Wharf
        • Djbt Jm Hideout
        • East Mediterranean Trireme
        • East Moeris Trireme
        • House of Sand Hideout
        • Kastor High Hideout
        • Kelida Hideout
        • Ketket Cove Hideout
        • Lah Hideout
        • Legio XXXVII Roman Docks
        • Livius Roman Tower
        • Mithidrates Roman Camp
        • Neith Cradle Hideout
        • Nikiou Post
        • North Mareotis Trireme
        • Per-Wsir Hideout
        • Poludeukes Hideout
        • Psammos Hideout
        • Psenhyris Trireme Wharf
        • Roman Quarry Camp
        • Roman Watchtower
        • South Mareotis Trireme
        • South Moeris Trireme
        • Delta Nile Trireme
        • Thenessos Hideout
        • Thintis Roman Tower
        • Upper Nile Trireme
        • West Mediterranean Trireme
        • West Moeris Trireme
  • Atlas
    • Map of Ancient Egypt
    • Alexandria
    • Atef-Pehu Nome
    • Black Desert
    • Desheret Desert
    • Faiyum
    • Faiyum Oasis
    • Giza
    • Great Green Sea
    • Great Sand Sea
    • Green Mountains
    • Haueris Nome
    • Herakleion Nome
    • Im-Khent Nome
    • Iment Nome
    • Ineb-Hedjet nome
    • Isolated Desert
    • Ka-Khem Nome
    • Kanopos Nome
    • Khensu Nome
    • Kyrenaika
    • Lake Mareotis
    • Libue
    • Marmarica
    • Memphis
    • Mesogeio Sea
    • Paraitonion
    • Qattara Depression
    • Sap-Meh Nome
    • Sapi-Res Nome
    • SaqQara Nome
    • Siwa
    • Uab Nome
    • White Desert
    • White Desert Oasis
  • Reference and Analysis
    • The Heroes
    • The Allies
    • The Historical Figures
    • Enemies
    • Enemy Types
    • Abilities
    • Acquiring Weapons and Gear
    • Regular Swords
    • Sickle Swords
    • Dual Swords
    • Heavy Blunts
    • Heavy Blades
    • Scepters
    • Spears
    • Hunter Bows
    • Light Bows
    • Warrior Bows
    • Predator Bows
    • Shields
    • Weapon and Shield Attributes
    • Available Mounts
    • Outfits
    • Inventory
    • Nomad’s Bazaar
    • Crafting
    • Achievements & Trophies
  • Art Gallery
    • Concepts
    • Material Design

Assassin's Creed Origins Guide › Main Quests › Memphis

The Lizard’s Mask

Prerequisite: Complete Main Quest: Aya

Suggested Level: 20

REWARDS: NA

Unlocks: Main Quest: The Lizard’s Face

Details: Bayek travels to Memphis to meet with the High Priest Pasherenptah to learn about one of his targets: the Lizard.

Speak to Pasherenptah in the Great Temple of Ptah

Memphis: Temple of Ptah
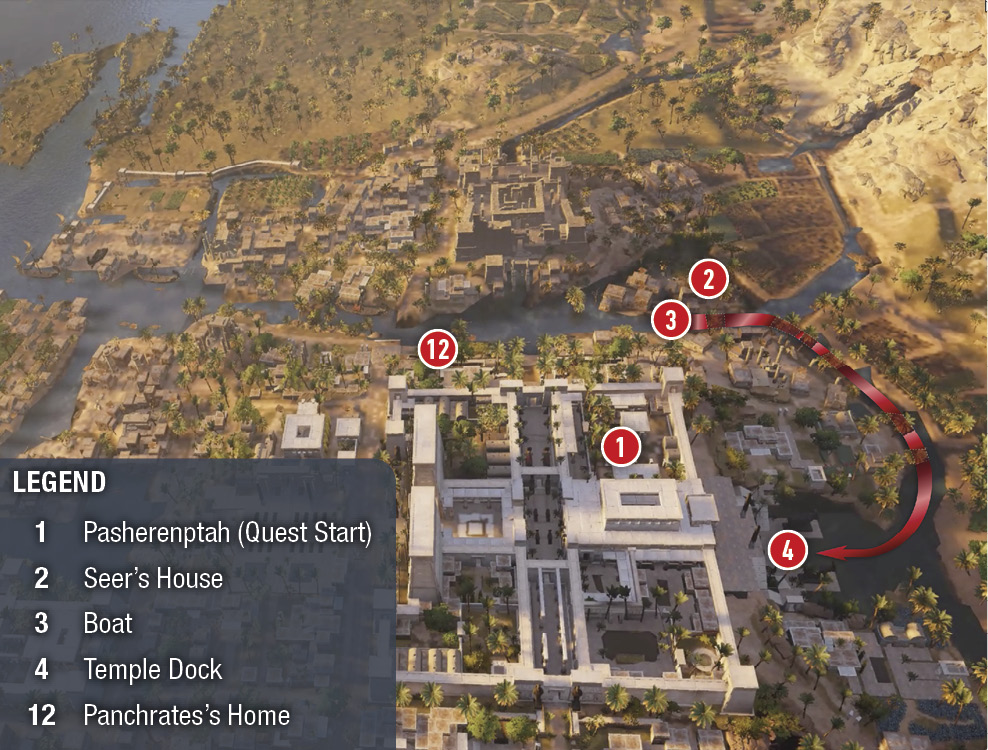
Bayek must work with Pasherenptah (1) to uncover the whereabouts of the Lizard, who is believed to be behind the curses that are plaguing the city of Memphis. Before you leave the Great Temple of Ptah after speaking with Pasherenptah, synchronize with the Viewpoint on the southeast tower.

Reach the Seer’s House and Speak to Taimhotep

Travel southwest to the marker to find the Seer (2) and Pasherenptah’s wife, Taimhotep. She is inside a small home performing a ritual to help prevent her child from being stillborn like her past pregnancies.

Bring the Cauldron into the Ritual Circle

Follow the marker 9 meters away to find the small cauldron on the floor. Pick it up and take it to the fire the participants are gathered around. During the excitement of the ritual, Taimhotep forces out some of the liquid from the cauldron meant for her. Bayek passes out from the drug.

You awaken in a drug-induced dream world. The Seer and Taimhotep are there with you. Walk through the raging sandstorm down the nearby dune slope. Continue along a pathway lined with ominous statues.

Continue into a large, dark tomb. Keep running straight through a brightly lit, narrow hallway. A cinematic shows Bayek’s doppelganger standing in front of the scale of justice just as a giant serpent (Apep, the Soul Eater) breaks through and eats your glowing heart, which the Bayek doppelganger throws into the air. A bow materializes in your hand. Magic, glowing arrows fall from above, forming a perfect circle around you.

Defeat the Soul Eater

The glowing bow has an unlimited number of arrows. The large snake rises out of the water and wraps itself around distant columns. Its health gauge appears at the top of the screen. The snake also spits damaging, poisonous, green acid that you should avoid. Dodge the projectile acid as well as the pool of acid that forms on the platform you fight from.

Hitting the snake anywhere on its body is damaging, but it is most damaging to shoot the snake in the weaks spots that are indicated with light. Aim for the body as it crawls up columns. As it slithers back down into the water below, keep hitting the exposed body with arrows.

The snake switches sides of the ship, so keep an eye on the ripples in the water to track its submerged position. Finally, dodge to avoid its lunging attack. It will come right at you and lunge across the platform where you are fighting. When the snake is down to half of its health, it destroys the ship. The fight continues in an arena where the snake is much more aggressive. At this point, the snake shoots even more poison and breaks the floor when it strikes. As the beast nears death, it shoots poison everywhere around the stage until it finally dies.

After the battle, you are knocked into a dark pool with floating lily pads. Swim to the stone crypt. A cinematic plays in which Bayek opens it and retrieves his heart. He grips it tightly in his hand and suddenly hears his son’s voice calling. He turns to look and he finds himself in a wheat field with Khemu. They approach each other, and Khemu whispers something in Bayek’s ear just before he wakes up.

The Seer translates what you’ve experienced and concludes that your enemy and Taimhotep’s enemy is the same and that someone is poisoning the temple food, which is killing Taimhotep’s unborn children.

Speak to Pasherenptah about Taimhotep

When leaving to head back to the temple, you run into Aya outside the Seer’s house. You tell her about the dreams of your son and how the Seer claims whoever is poisoning Taimhotep is your enemy.

Follow Aya

From the Seer’s (2), Aya heads to the stream and enters a boat (3). Get in and drive west. Turn right at the watery intersection to head north to the temple dock (4). Along the way, Bayek and Aya catch up and share what happened in each other’s lives while they were separated.

Follow Aya to the Apis Bull’s Quarters

Exit the boat and follow Aya as she runs north up the temple stairs and into the temple. She heads to the Apis Bull (1). When you reach the destination, Aya tells you to check on the bull while she talks to the priestesses.

Investigate the Sick Apis Bull’s Quarters

You need to find the cause of the bull’s (and Taimhotep’s) illness. Activate Animus Pulse to locate the clues around the bull pen. Pivot to your left and investigate the pile of bull dung. Bayek reaches deep into the large pile and pulls out a handful of peach pits.
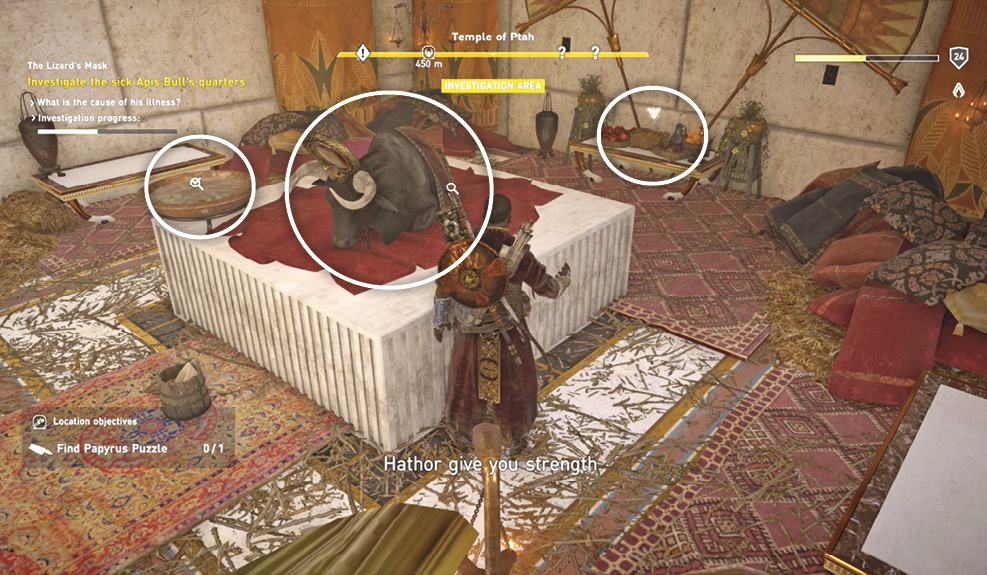
Speak to the man in the bull pen. He says the priestesses feed the bull and the fodder is in a shed that has been shut up since the bull got sick. Enter the bull’s chambers and investigate the water bowl, the Apis Bull, and the offerings on the table behind the bull.

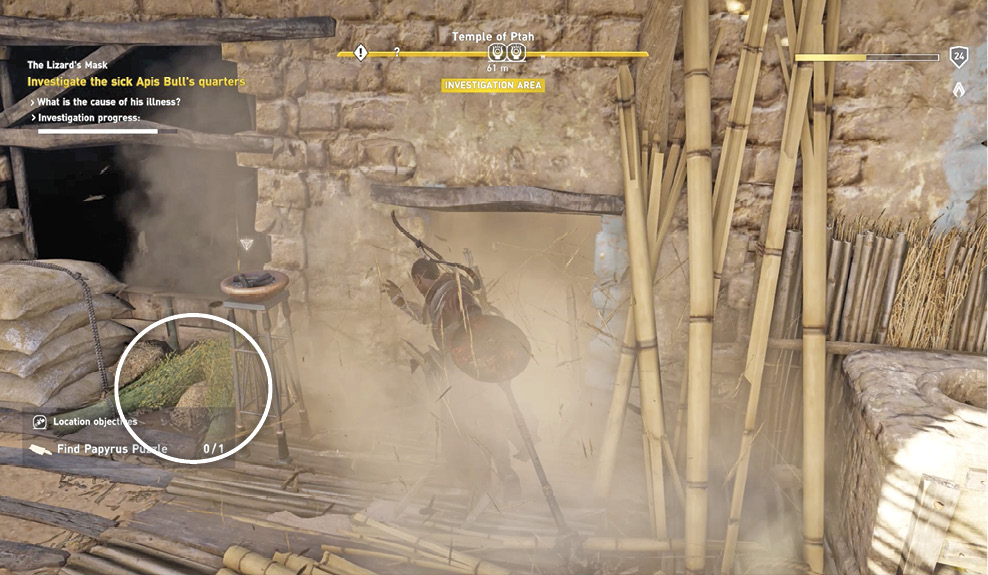
Exit the bull’s chambers. Head left and leave the bull pen. Interact with the food for the bull near the shed. Break through the sealed doorway to the right of the bull food to enter the shed. Investigate the peach pits inside to the left. These are the poison causing all the illness. Lying beside the peach pits is one of the priestesses’ necklace.
Fai-Jon Lamentu Crypt: Treasure

Follow the shaft inside the shed downward. You’ll reach a ledge overlooking a small chamber of treasure and cobras. You can use fire and arrows found on the ledge to eliminate the cobras below, grab the treasure, and return to the shed to continue the main quest.

Speak to Aya and the Twins to Report Your Findings

Aya is talking to the priestess twins in front of the food shed. Approach them to present your condemning evidence. The twin with the missing neckless takes off running but is quickly captured. They admit to the poisoning but they did it because they were being pressured by bandits who have kidnapped their brother. They present his severed finger in a box.

Find and Rescue the Twins’ Brother, Panchrates

Temple of Hathor

Prerequisite: Approach the temple

SUGGESTED LEVEL: 22 or higher

LOCATION REWARD: 400 XP

LOCATION OBJECTIVE: Kill one captain, loot one treasure
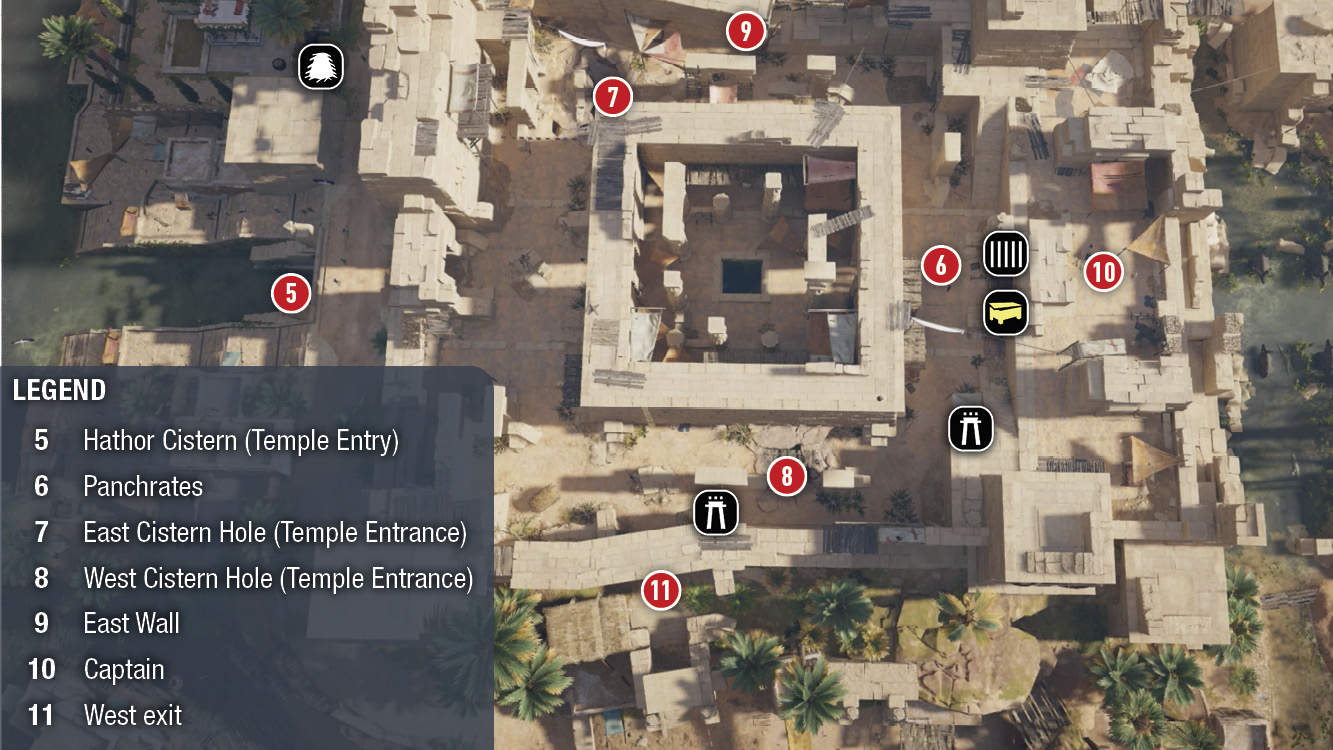
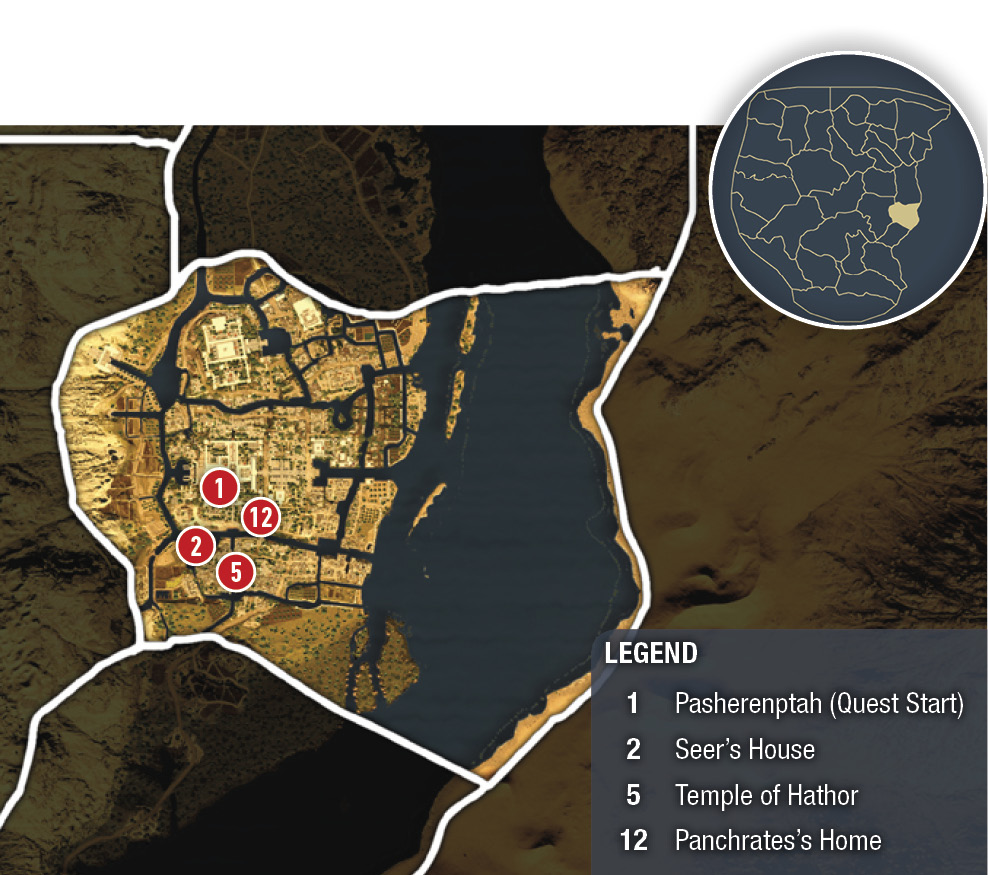
Aya watches over the twins while you go off to find the bandits at the temple of Hathor (5). Send Senu over the temple to locate Panchrates (6) and to mark all the bandits and treasure. Enter the temple via the north entrance (5) and the channel that runs underneath it.
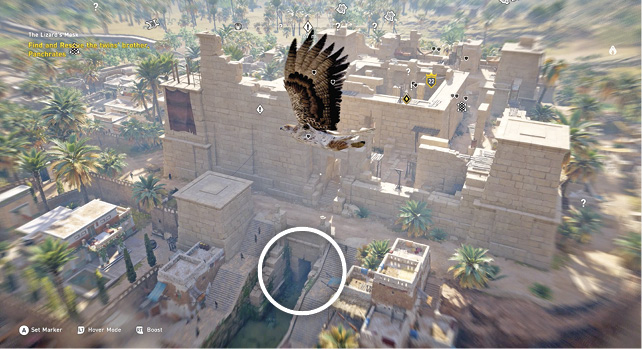
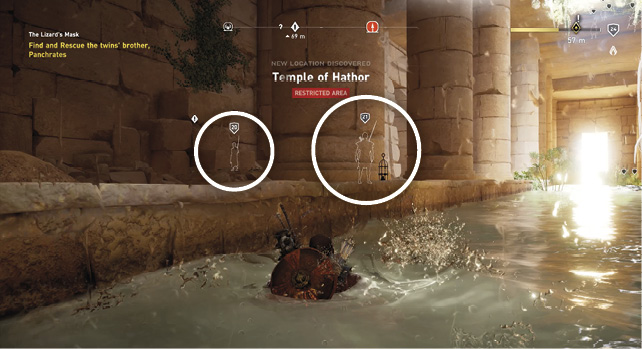
Swim into the underbelly of the temple and execute the two guards below. This is the Hathor Cistern. There are east and west passages that lead to exits up into the temple above. The east passage has you entering through the east hole (7) and the west cavern has you popping up through the west hole (8).

Hathor Cistern: Treasure

Swim through the west passage in the Hathor Cistern under the Temple of Hathor to find a small cavern with one of two treasures and a cobra. Dive deep into the pool near this treasure. Swim through a watery tunnel to reach a dry cavern containing the second treasure guarded by two protective crocodiles. Collect the treasure to complete the location objective.

We suggest climbing up the east passage’s cavern wall to enter the temple through the east hole (7). Hang on to the edge of the hole. Pull the nearby patrolling bandit down into the hole to his death. Call any other nearby bandits to the same death trap. Once you are safely standing in the northeast corner, plan your next move. We suggest getting to higher ground.

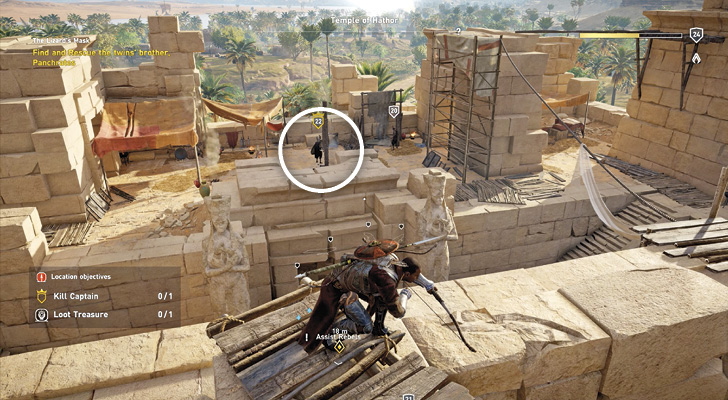
Climb the nearby east wall ladder (9) to reach the wall’s top. Begin moving around the temple’s top level, shooting arrows into the heads of any bandits who can spot you up here. This includes the captain (10) who patrols the upper platform above the south gate.
Carry Panchrates Back Home

Eliminate all the bandits in the camp and approach Panchrates (6). Free the captives near him for an extra 100 XP, and take the treasure near the captive cage to complete the location objective. Carry Panchrates west to a small exit (11) near a hiding booth. Call your mount, place him on it, and ride to his house (12) to the left across the bridge.
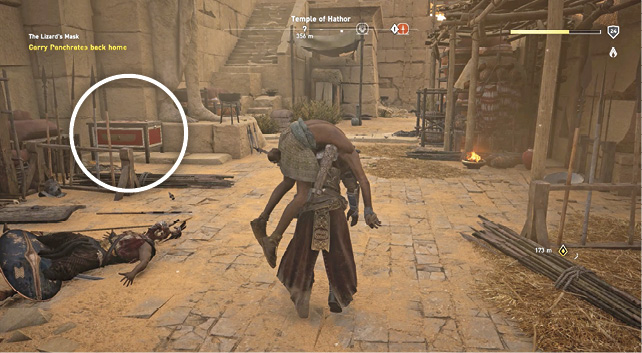
After you drop Panchrates off at home, he reveals that his abduction was ordered by a priest of Anubis at the Great Temple—a priest in Pasherenptah’s circle. He says he wears a blue scarf and has a terrible cough. You rejoin Aya outside his home. This quest ends here and continues in Main Quest: The Lizard’s Face.

Keep reading with a free account

The first 3 sections of Assassin's Creed Origins are open to everyone. An account opens the rest of it, and every other guide in the archive. It's free, and there's nothing to buy.

Bought guides on the old Prima Games site? Your account and every guide you own moved here, so there's nothing to buy again. Sign in.

Create a free account Or browse our free guides

PreviousThe Hyena NextThe Lizard’s Face