
Assassin's Creed Origins Guide Main Quests Faiyum Oasis
The Crocodile’s Jaws
Prerequisite: Complete Main Quest: The Crocodile’s Scales
Suggested Level: 28
REWARDS: NA
Unlocks: Shadya’s Rest; Legendary Light Bow; and one of three quests that unlocks Main Quest: Way of the Gabiniani
Details: Bayek remains on the trail of the Crocodile, who is clearly using gladiators to carry out their dirty work.
Reach the Krokodilopolis Arena
Faiyum Oasis: Krokodilopolis
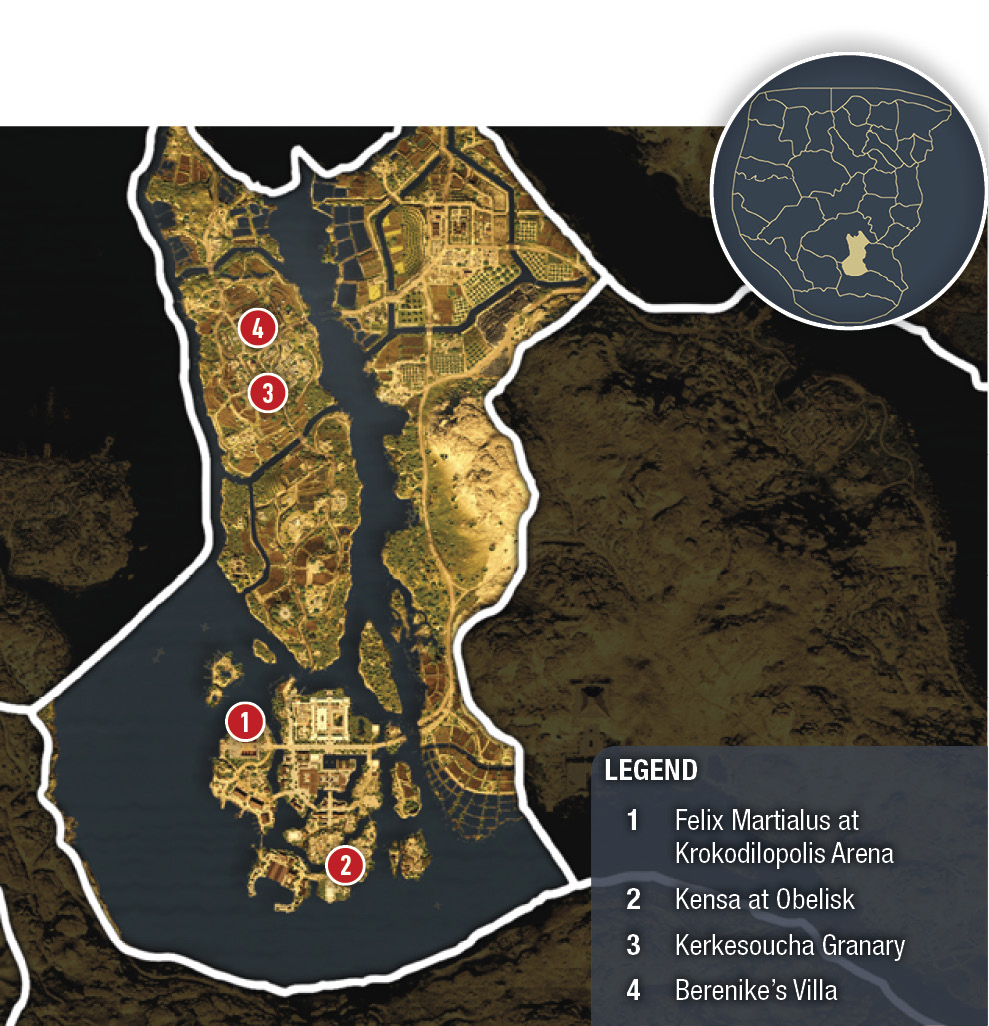
Faiyum’s populace is enthralled by the gladiatorial ring (1), but the stars of the arena are busy in the shadows, and Bayek must drive headfirst into the world of warriors and corruption.

Investigate the Entrance of the Arena
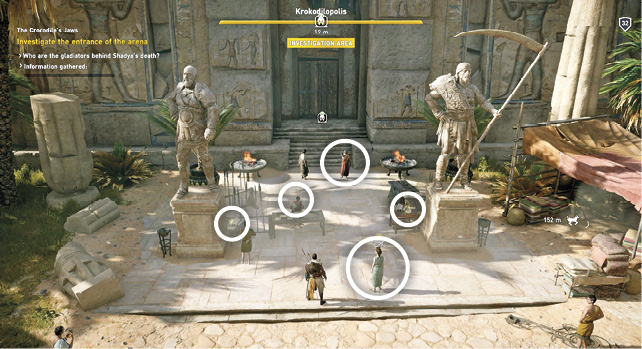
We suggest synchronizing with the Viewpoint on the Schena Wab and then approach the arena. To learn more about the arena, inspect these clues: talk to the old lady near the statues, talk to the man sitting at the table between fighter statues, check out the two scrolls next to the Diovicos and Veridovix fighter statues, and speak to the arena owner, Felix Martialus, on the steps of the arena.

You ask him about fighting in the arena. He brushes you off and tells you that you have to prove yourself on the streets before you will be considered for fighting in the arena. The man beside him points you to another fighter from Siwa. She hangs around the obelisk (2) in the east end.
Find the Siwan Gladiator
Krokodilopolis: East End
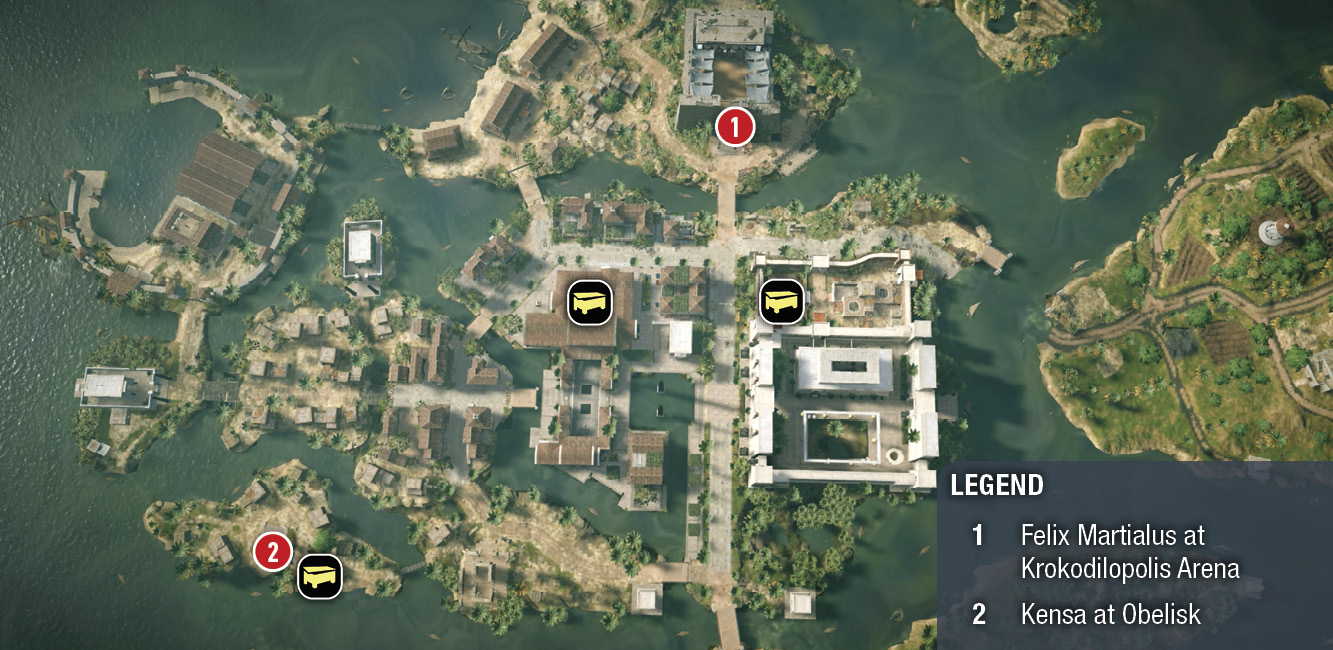
Head to the obelisk (2) on the east side near the Confiscated Stathmos. Here you discover an old friend from Siwa on her knees praying before the obelisk. You go off to have drinks and catch up. Afterward, you tell her you were turned away at the arena doors. She tells you that she can get you in and that the two of you can fight side by side on the same team.
Enter the Krokodilopolis Arena When You Are Ready
Krokodilopolis Arena
Now head back to the arena and talk to Felix (1). With Kensa at your side vouching for you, you get in with no problems.

Follow Felix Martialis
Now Felix introduces you to the inside of the arena and lays out the rules, most important being that you will fight with the weapons that he gives you.

Spar with Kensa
He leads you over to where Kensa is training and tells you to spar with her so he can study your form. Start by selecting her as your target and start dodging to get beside or behind her to land hits behind her shield. Take her health down to a quarter and the fight ends. The fight also ends if she takes your health down close to zero. In either case, the quest continues.

After the sparring session, Felix agrees to let you be Kensa’s fighting partner. As you exit the field, you run into the Gallic brothers. They are the reigning champion gladiators you believe were responsible for Shadya’s death.

Speak to Felix to Start the Match
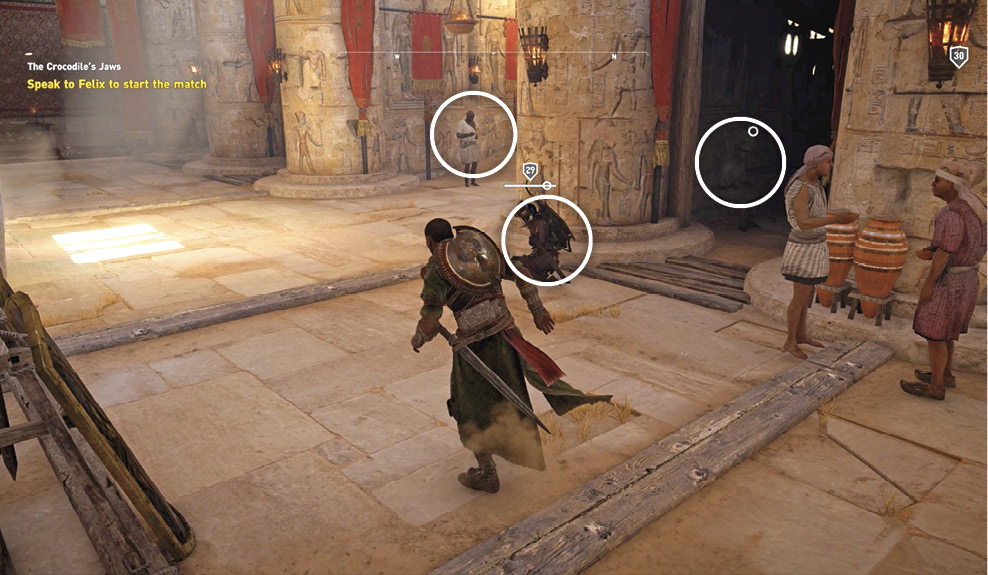
Next you find yourself inside the arena hall. You can exit at any time by interacting with the main doors. You can speak with Felix now to start the games, but to learn more about the politics around the games, speak to Kensa, Horus (ex-champion-turned trainer), and the Ptolemy soldier sitting in one of the side rooms. When you are ready to fight, speak to Felix. He says he’ll start you out against a few novices.
Enter the Arena Grounds
Walk into the arena with Kensa to begin the first round.

Win the First Round of the Games
First Team
Senu, climbing, and your weapon selection are not available in the arena. The arena changes hazard props for each event. In this first event, there are spinning spike pillars. Don’t get pushed into them while fighting. However, you can use them to your advantage by pushing someone into them.

In the first round, you go up against four Level 27 soldiers, all of whom have only swords. An easy fight. Let Kensa do her thing while you fight others. This keeps a couple soldiers preoccupied while you reduce their numbers. It won’t take long to fill up your adrenaline in this round.
Second Team
The next team consists of four soldiers with swords and an archer who quickly switches to his spear (an option you do not have). If you get surrounded, perform heavy attacks to do more damage to nearby opponents and push them back at the same time. Use fast light attacks when you can single out enemies. This helps build up your adrenaline and then focuses the special attack on whoever has the most health remaining.

Third Team
The final team consists of four soldiers: one with a spear, another with a sword, one with a sword and shield, and the last with a spear and shield. Keep your eye on the guys with the shields. Avoid them until you have built up an adrenaline special and then unleash it on one of the guys with the shield. Finally, you and Kensa can gang up on the last guy with a shield.

After the round ends successfully, Felix congratulates you but knocks your ego down a notch when he says you are not ready for the Gallic brothers just yet. He says your next round will be with gladiators and a lion!
Speak to Kensa
Back in the hall, check out the letter to Felix from “C,” which could stand for Crocodile. It talks about his gladiators doing side jobs. Speak to Horus again. This time it’s about the mercenary jobs. Speak to the soldier in the side room again. Lastly, speak to Kensa about the mercenary jobs.


Speak to Felix to Start the Match
Now it’s time for round two. You inquire about the mercenary jobs he’s assigning to gladiators, but he’ll have no jobs for you until you prove yourself further in the arena. Enter the arena when you are ready to fight again.

Win the Second Round of the Games
First Team
The environment has changed. Now there is a lion cage in the middle of the grounds, and the rotating spike columns are in new locations. Fire pits have been uncovered and lit. Lastly, there’s a pressure-sensitive spike platform in the back-right corner. Don’t stand on it, but do push opponents onto it for added damage. The lion stays caged during the first team bout. However, you can break the door (accidentally or on purpose) freeing the lion.

You are equipped with a spear in this round. This gives you the ability to do more damage to gladiators crowding around you. There are four Level 27 soldiers with swords and one with a shield and spear. Avoid the guy with the shield until you have built up an adrenaline special on the others to use on him.
Second Team
In the second bout, you face two brutes with maces and one soldier with a sword. Save the brute for last and try to lead opponents into hazards to help diminish their health. Use the adrenaline special on the brutes.

Third Team
In the third bout, you face two soldiers with spears and shields and a brute with a mace. A lion has also been released from one of the side gates. Move away from the lion so it focuses on the enemy and helps take the attention off your team. Do more running in this round to single out enemies and separate them from the group. Also, try to lure them into the hazards. Use more dodging to get behind shields. Try to use the adrenaline special on the brute.

Felix goes nuts up in the stands when you win this one. He’s really starting to pull for your team now.

Speak to Felix to Start the Match
You find yourself back in the arena hall again after the match. Kensa is gone; she’s off on a special mercenary job. Speak to Felix to start the next round without her but not with the Gallic Brothers quite yet. You can also speak to Horus and learn that Kallistos was killed on a job he was sent on by Felix. Learning this prior to speaking to Felix will slightly alter his conversation.

Win the Third Round of the Games
First Team
You’re going it alone this time. Don’t worry, you’ll be okay. The environment has changed again. The spinning spike columns are present; the two on the sides are rolling and spinning on a track. There is now a pit of spikes where the lion cage used to be. Falling in means instant death. Walk around the pit of death to help divide the opponents; they’ll have to pick a direction to reach you and then you can circle it to keep an opponent away from you.
The first team consists of three soldiers with swords and a brute with a large shield and spear. Avoid the brute while you build up adrenaline on the soldiers. As soon as the special is ready, target the brute and unleash it on him.

Second Team
During this phase, you face two soldiers, one with a sword and the other with a sword and shield. They’re accompanied by a brute with large shield and a heavy blade (bronze axe). Fight as close to the hazards as possible without getting knocked into one. Target the brute when you have an adrenaline special ready.

Third Team
In this round you face an elite soldier with a sword and shield. He’s an accomplished fighter with skills. Save this guy for last or when your special attack is filled up. With him are two soldiers with swords—or you could call them “adrenaline fuel.”

Back in the arena hall, after the battle, Kensa shows up and slaps you on the butt. She apologizes for leaving you alone. When you press her about the job she was on, she changes the subject.

Speak to Felix to Start the Match
Speak to Horus again and he’ll give you tips on fighting the Gallic Brothers: separate them and fight them individually.

Speak to Felix to start the final round. He’s counting on you to make the fight entertaining and begs you not to kill them since they are two of his top four fighters.
Defeat Brothers Diovicos and Viridovix
Diovicos is the crazy brother in chains. He has a back-breaking special move. Don’t fight up close for too long or he will show you how that works. Viridovix displays his amazing skills with his extremely long heavy blade (scythe) that can hook you, swing you around in the air, and then fling you to the ground. This is a very damaging move, so avoid him and make Diovicos your first target.


Keep moving to avoid attacks. Keep Diovicos selected as your primary target. After he attempts to strike you, dodge and strike him using only heavy attacks. Follow heavy attacks with a chain of light attacks to build up adrenaline. It will take more than one adrenaline special attack to defeat Diovicos.

With Diovicos out of the picture, you and Kensa can concentrate on Viridovix. Two against one is very helpful. While he is attacking Kensa, dodge behind him and attack him, but get out quickly and far enough away that his wide weapon swing will not make contact. Move in for an attack as soon as he fails to make contact.

The Aftermath
After you defeat both brothers, Felix looks shocked and Bayek is about to kill the brothers over the death of Shadya. The wounded and beaten brothers say they had nothing to do with it but points fingers at the Crocodile, whose name is Berenike—the old lady they keep showing in the crowd near Felix. They say she is the one who drowned the child and took the ledger from her. She gets nervous and whispers in Felix’s ear before she leaves.

Kensa gets upset when she sees what’s unfolding in front of her. She’s mad that you did not confide in her, admitting that she would have tried to help you if you had asked her.

Speak to Hotephres
After the battle, you find yourself outside the arena. Hotephres is standing nearby. Talk to him. He has learned, like many others now, that Berenike is the Crocodile. He tells you where her estate is located and that every night she retires to her villa.

Find and Assassinate Berenike the Crocodile
Kerkesoucha Granary
Prerequisite: Approach the Hideout
SUGGESTED LEVEL: 28 or higher
LOCATION REWARD: 1,500 XP
LOCATION OBJECTIVES: Kill two captains, kill one commander, loot four treasures
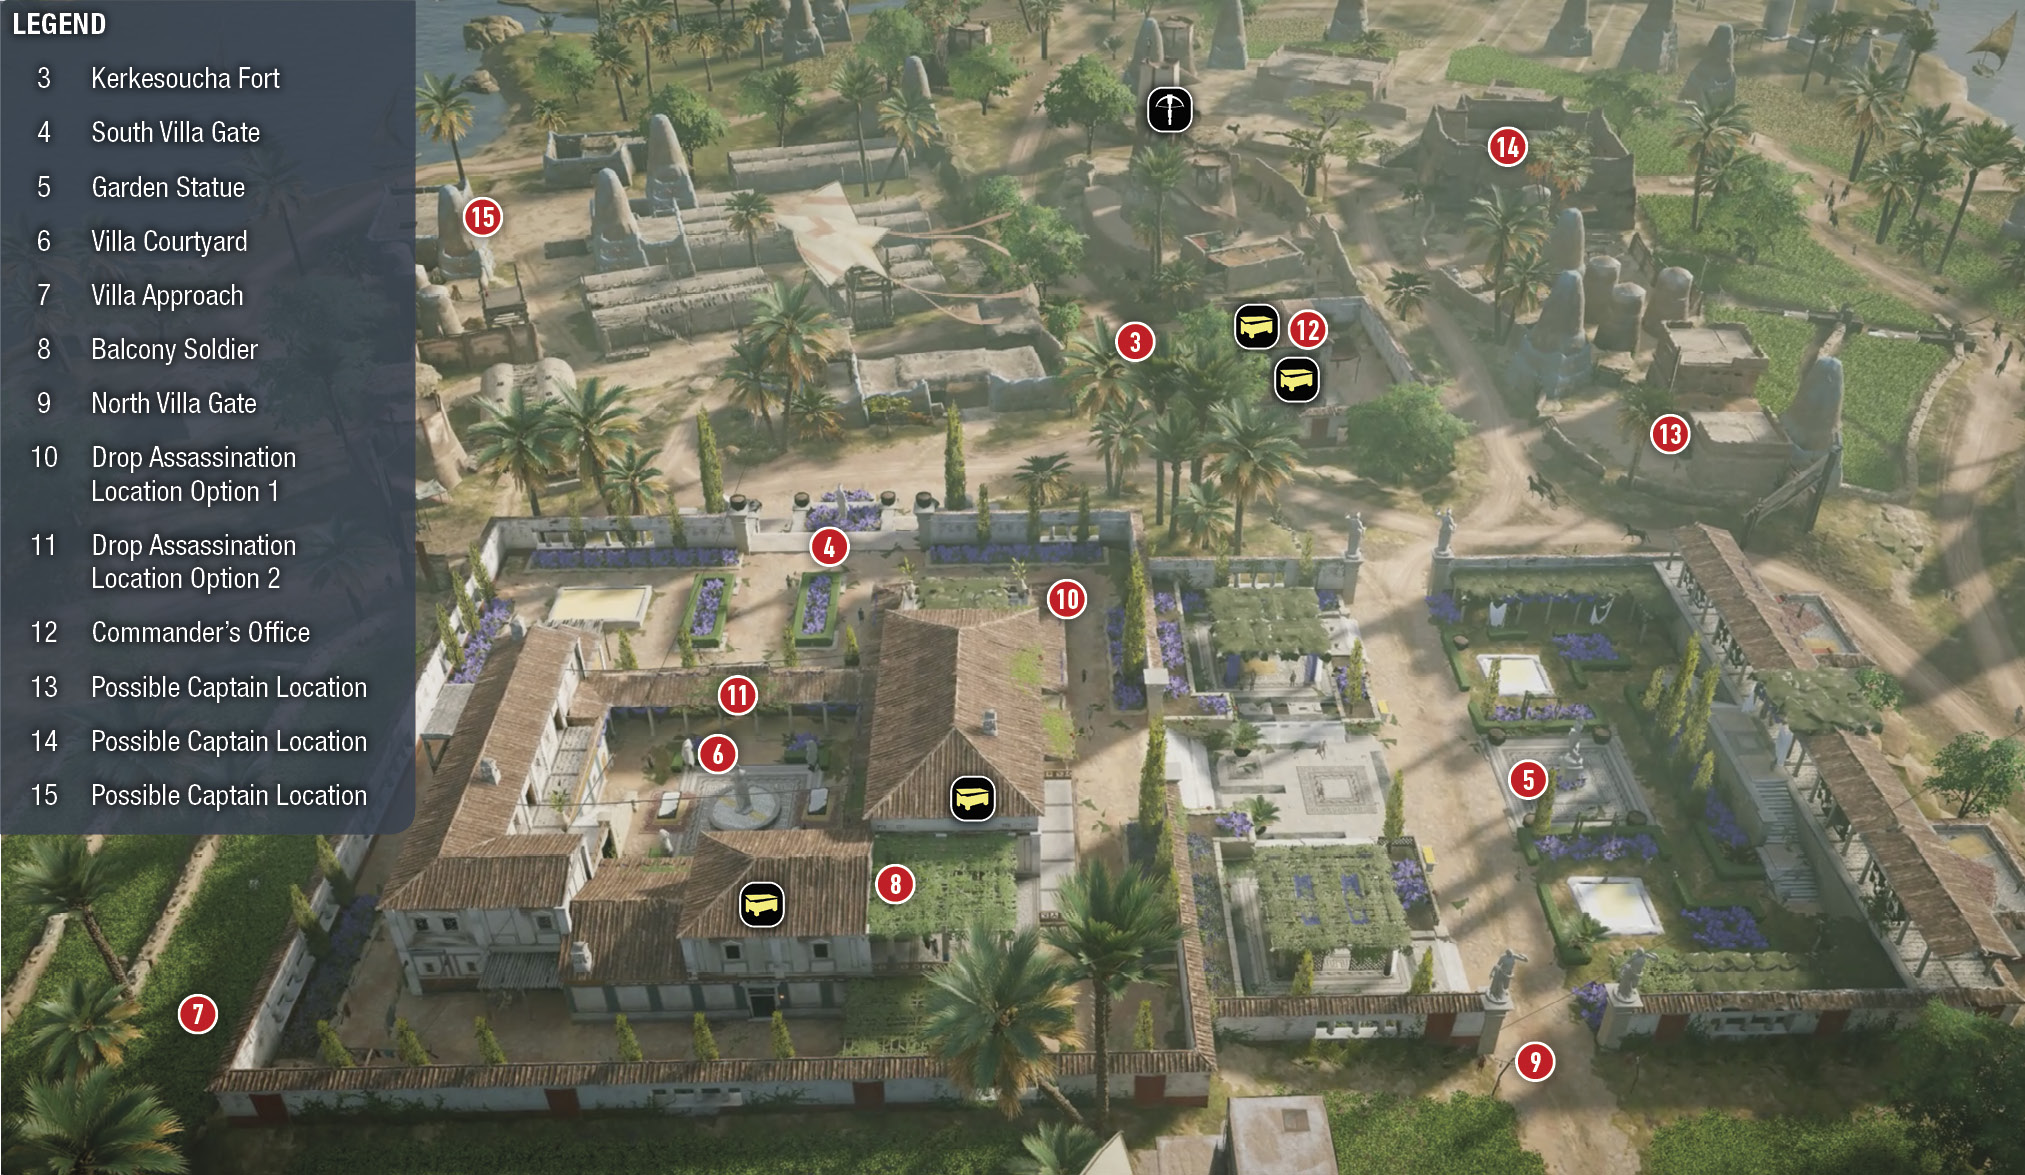
Mount a horse and ride north to the indicated area on the map. When you get close, send Senu up to locate Berenike. During the daytime, she can be found walking around the Kerkesoucha Granary (3), a very large fort in northern Faiyum Oasis. However, at nighttime it is much easier to get at her without all the soldiers around. She walks around her villa at night, which is technically part of the fort but is very lightly guarded. Meditate to change it to nighttime.
At night, you can find her and her bodyguard Kensa (yes, your dear friend from Siwa and gladiator partner) near the front gate (4) of the villa. Two Level 28 brutes stand guard at this entrance. You may also find her near the statue (5) in the garden. No matter where she is in the villa, she eventually walks closely under rooftops or the ropes stretched across the villa courtyard (6). So we suggest an approach from the extremely, unguarded northeast wall (7). Hop the fence and get to the rooftops. The only guard you should be wary of is the one on the balcony (8) under the pergola. If things go badly and you are chasing the Crocodile, then there will be a couple guards at the north gate (10) as well.

At night, reach the villa rooftops and get as close to Kensa and the Crocodile as possible. You won’t get a damage report from aiming a bow at the Crocodile’s head, so an arrow kill will likely set her scrambling for the nearest guards and Kensa will be hot on the trail for you.
Drop Assassination Location Option 1
If you see that her nighttime walk route takes her to the southwest corner of the villa grounds, then drop off the edge of the roof (10) over her to achieve a drop assassination. Make sure that you target the Crocodile and not Kensa, or the Crocodile will run to the guards and you’ll have to try to take her out with arrows before she alerts any. The Crocodile has an objective marker over her head.

Drop Assassination Location Option 2
If you meditate the time to night and the Crocodile and Kensa appear near the south villa entrance (4), then their nighttime walk likely has them heading straight for the villa courtyard (6). In this case, get to the low rooftop at the courtyard entrance, or use the suspended ropes (11) to get over your target as she passes under.

Layla Unplugged
You enter the kill room and Bayek gets in the final word with the Crocodile.

But you are pulled into the present after returning from the kill room. Dee pulls the plug, wakes you up, and is screaming about Abstergo having discovered her. She gets cut off. Layla gets sick all over the ground and realizes that Abstergo has found her as well.

Layla has many of the skills Bayek and Aya have but without all the fancy weapons and Animus Pulse. So you can take out the Abstergo intruders with stealthy takedowns. Crouch and sneak up the stairs to the main cave where they are searching for you.
Sneak into the tall grass to the right of the stairway exit. Wait for the nearest guard to approach the stairway and then silently assassinate him from the tall grass. Layla has the hidden wrist blade that she found on Aya’s mummy, so a takedown kills the intruders.

Let the next closest guard (to the left) see you for just a moment as you work your way into the tall grass on the left side of the stairway exit. As long as you hide before his meter goes red, then you’ll stay hidden and he’ll come investigate. Take him out when he gets close.
Two more to go. Head deeper into the cave and creep up behind the intruder near the construction light.
Lastly, head outside the cave and get the last one with his back to the entrance. A sandstorm kicks up, making visibility even worse for him. Take him out and you hear Dee getting murdered over the radio that he drops. Return to the Mobile Animus. This unlocks Main Quest: Way of the Gabiniani.
Back to Bayek
When you return to Bayek, you must complete the location objective for the fort. See our map for the four treasure locations: two in the villa and two at the commander’s office (12) in the fort. You can find captains in locations (13) or (14) and (15).