Watch Dogs Guide ONLINE MISSIONS
_CTOS MOBILE // ADVANCED TACTICS
By now, you should have followed the in-app tutorial and unlocked a few skills, challenged a few friends, and started to build up your levels and acquire skills. But what about some more advanced tactics?
ADVANCED TACTICS // APP PLAYER
/// Herding
You know the general direction the target is headed (to a checkpoint, sometimes via a time or cash bonus), so place units ahead so the foe is coaxed into changing direction down a more dangerous side street, ideally with infrastructure to activate. Round up the target with units behind and to the side, pushing to areas the target might get bogged down in (off-road, uphill, or in alleys). Don’t let your target control the direction they are traveling in; only let them think they’re in control!
/// Police Units in Hot Pursuit
Your different units have a single overriding advantage, so use them accordingly. The Interceptor is the fastest. The most aggressive at ramming are both the SUV and SWAT SUV. If the target is on foot, the SWAT SUV is great for taking the foe down, as the officer is armed with an assault rifle (or changes to a Enforcers with Skill Points). Don’t forget to upgrade them with your Skill Points; they will be even more powerful!
/// Chopper Above, Panic Below
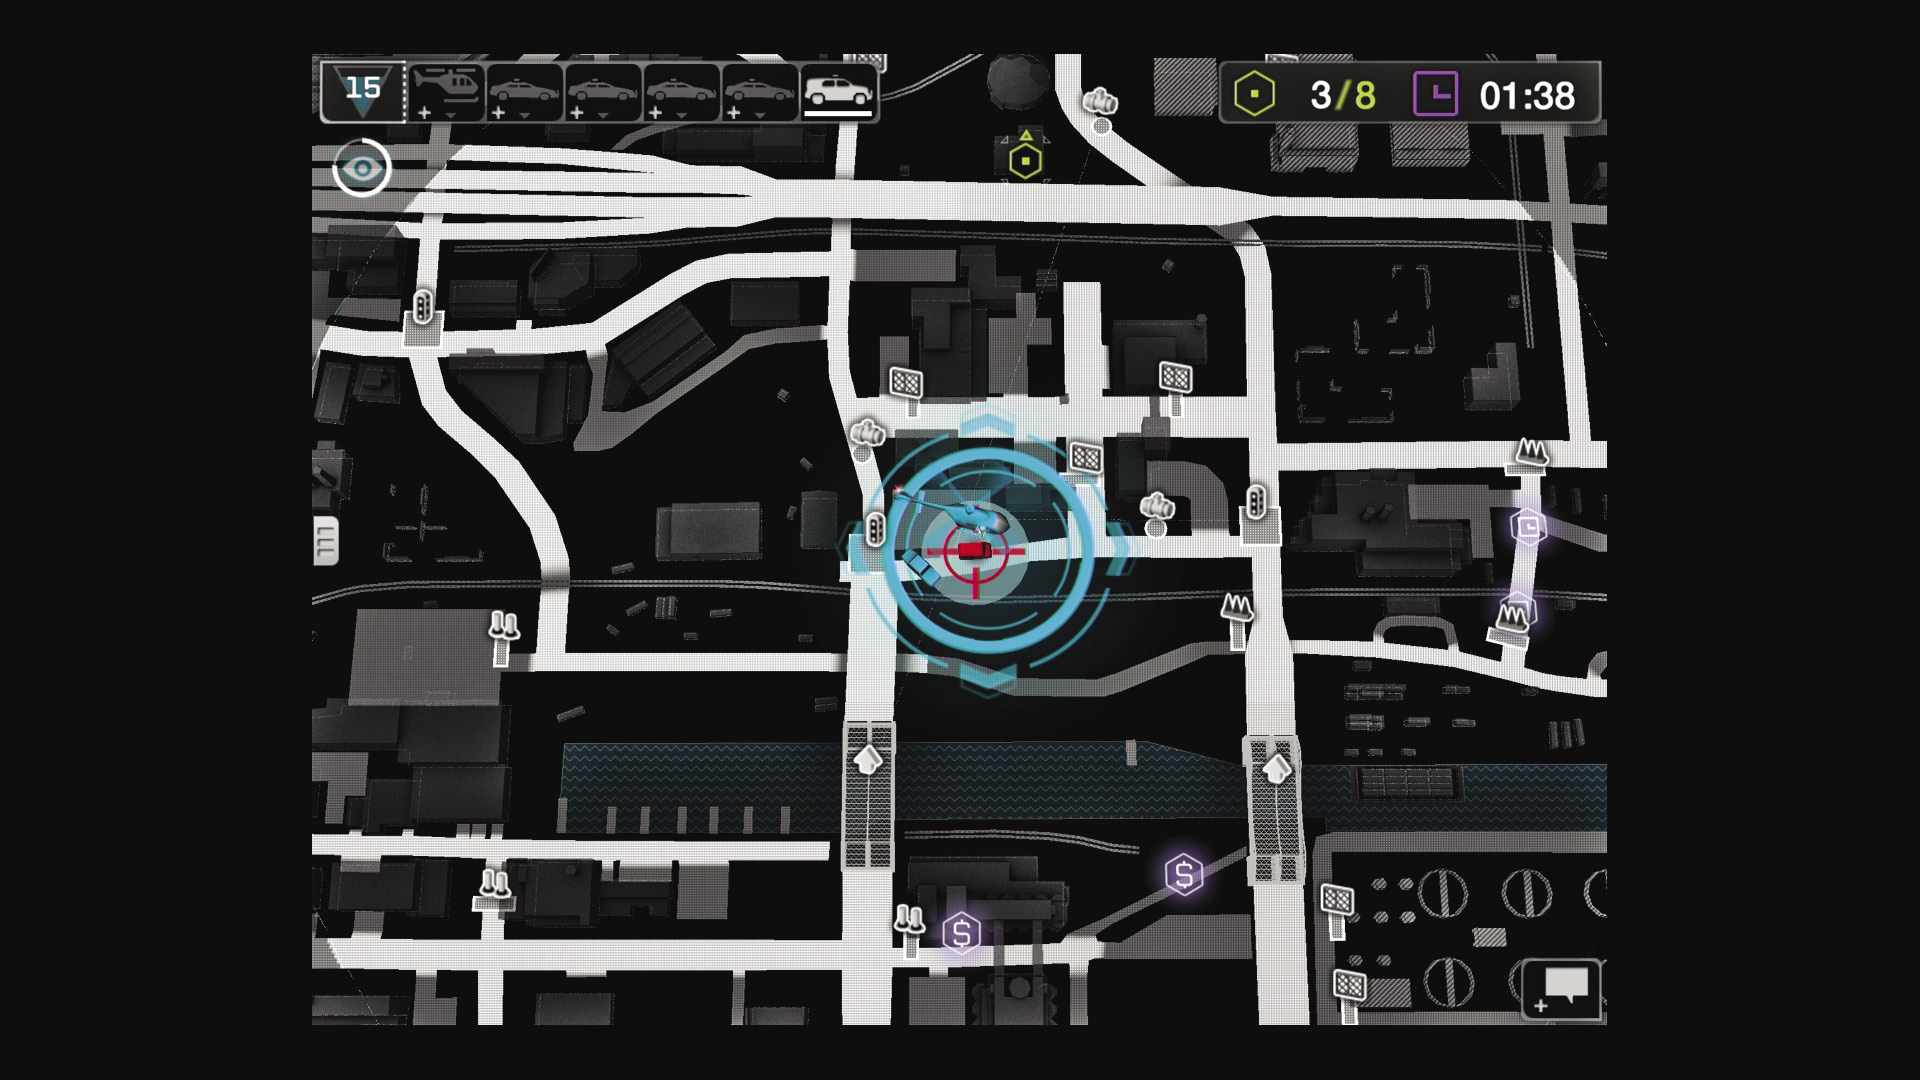
Maintain the pressure on the WD player by maintaining your helicopter above their head, for several reasons:
You gather Heat Points regardless of your other actions.
You give a line of sight for your sharpshooter to shoot at your opponent.
The helicopter’s spotlight and the sharpshooter’s laser sight stresses the target out and can make the road difficult to see during dusk or night matches.
/// Unit Management
There are some general rules to follow during a match to maximize your police potential:
Dispatch as many police units as you can and manage them properly.
Dispatch them in advance to make your target’s path more complicated.
When a unit is too far away or too damaged, take it back to save Heat Points, and then redispatch them somewhere else.
Save Heat Points and replace a basic unit (like the patrol car) with a more powerful unit.
/// Infrastructure Hacks
Don’t spend time just looking at the icons of every traffic light and blocker: Activate ctOS devices on the target’s path! Anticipate your target’s moves by activating infrastructure hacks before they are driven over. Arm traffic lights in advance to get the maximum blockage of cross-town traffic. Don’t be afraid to arm two or three infrastructure hacks on your target’s path to maximize your efficiency.
/// Spend, Spend, Spend!
At the end of a match, spend your Skill Points in the different skill upgrades; it makes a world of difference if your police units are fully kitted out and upgraded! Some key skills to unlock:
- Steam pipes, which cost two points, but are well worth a detonation!
- Unlock the SUV and SWAT SUV for your police units as soon as possible.
- Increase the number of units you can dispatch from three to five.
- Exclusive power-ups for the helicopter (such as Auto Pilot or the Super Shot for the sniper).
/// Check Your App Achievements
Consult the Appendices and read up on the description for completing every achievement; it’s the only way to buy all the skill upgrades.
/// Console Yourself
Your Uplay account is flexible, and you can register (for free) to PSN and Xbox Live, and play against targets within those game console ecosystems and against PC gamers. Widen your net to all your friends, no matter what system they own! Then take them apart on your own created challenges.
/// Omnipresence
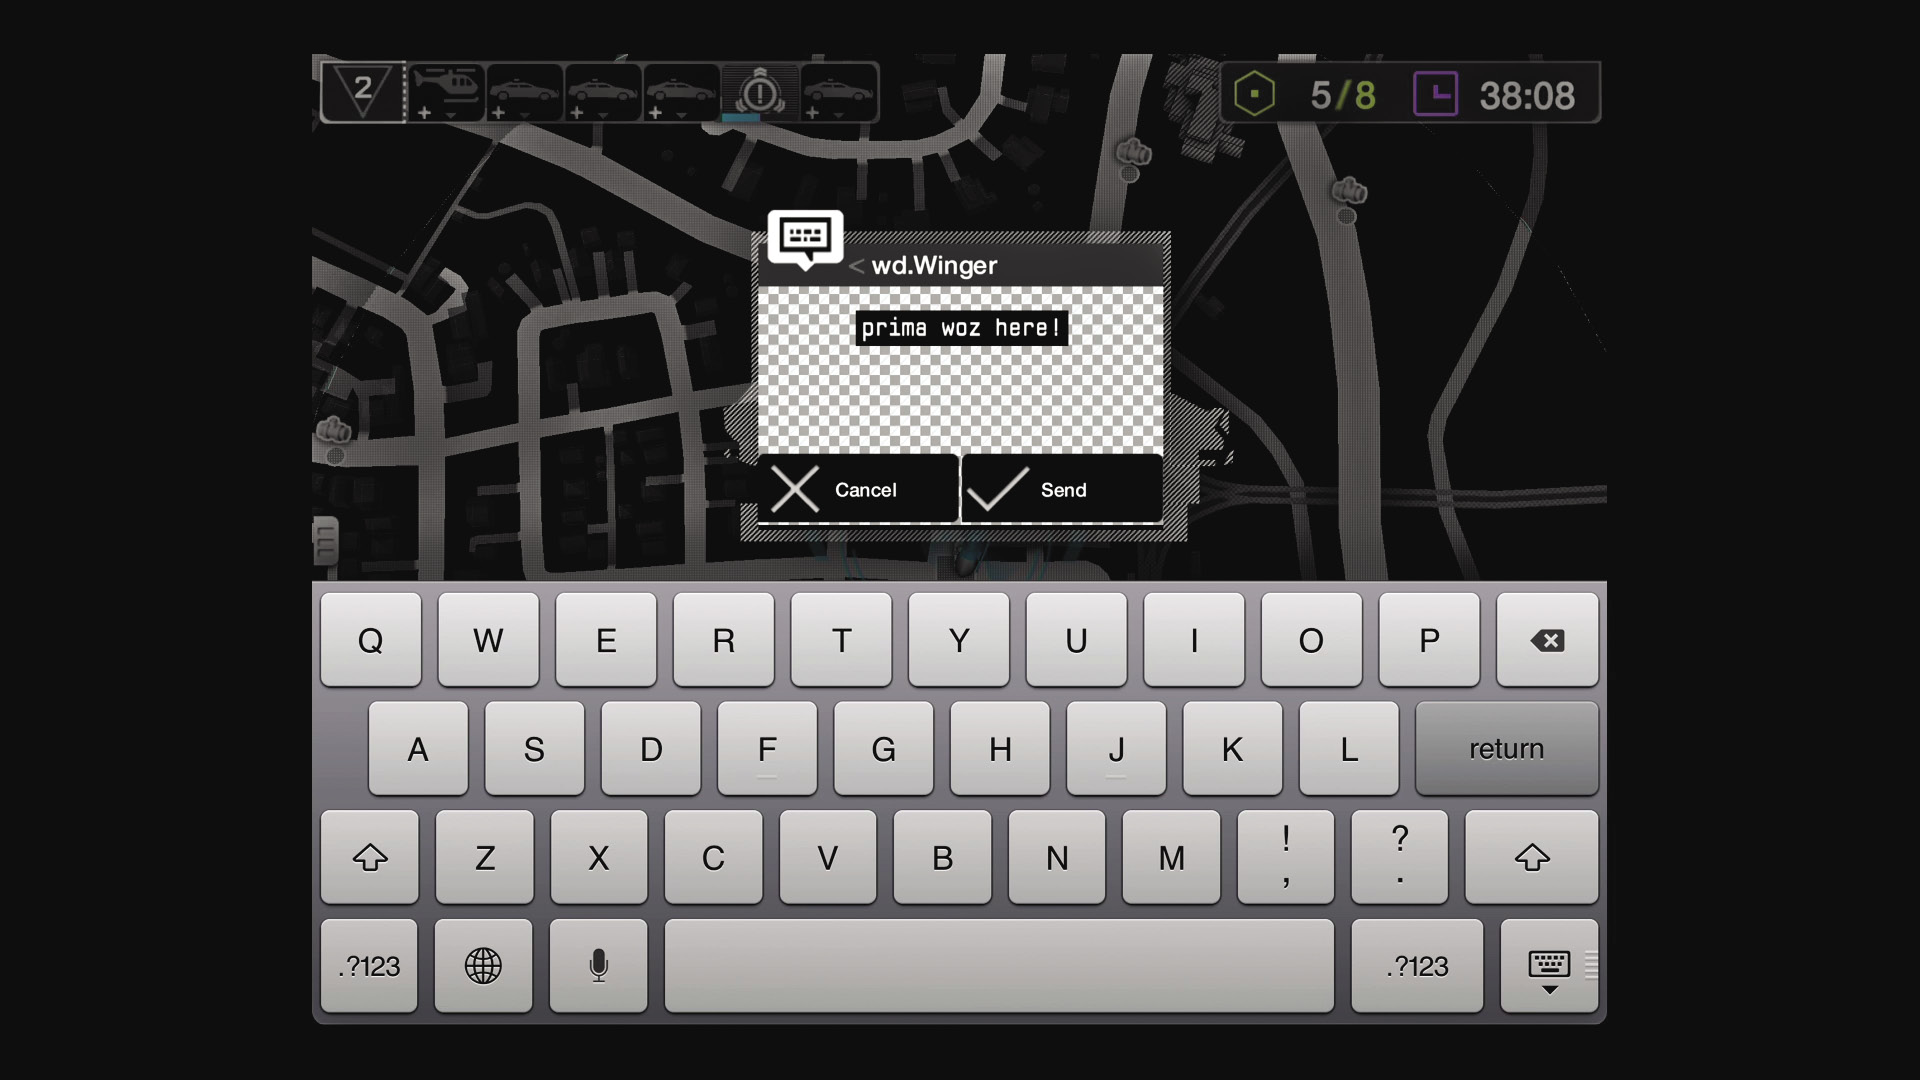
Use the Social Hack to brag, distract, or otherwise befuddle your opponent during a game (tap on the sign icon on your App hud and hack all the electronic signs, all over Chicago! Type in a message, possibly involving a zombie outbreak).
ADVANCED TACTICS // Watch_Dogs PLAYER
/// Any Faster, and We’d Be Going Back in Time
Travel as fast as you can. Then travel a bit faster; the whole purpose of the App Player is to slow you down between checkpoints. Keep up your speed and you finish more quickly; don’t get distracted and slow down or lose focus. But also ensure you’re not oversteering, missing shortcuts, and losing control of your car.
/// Cartographical Evidence
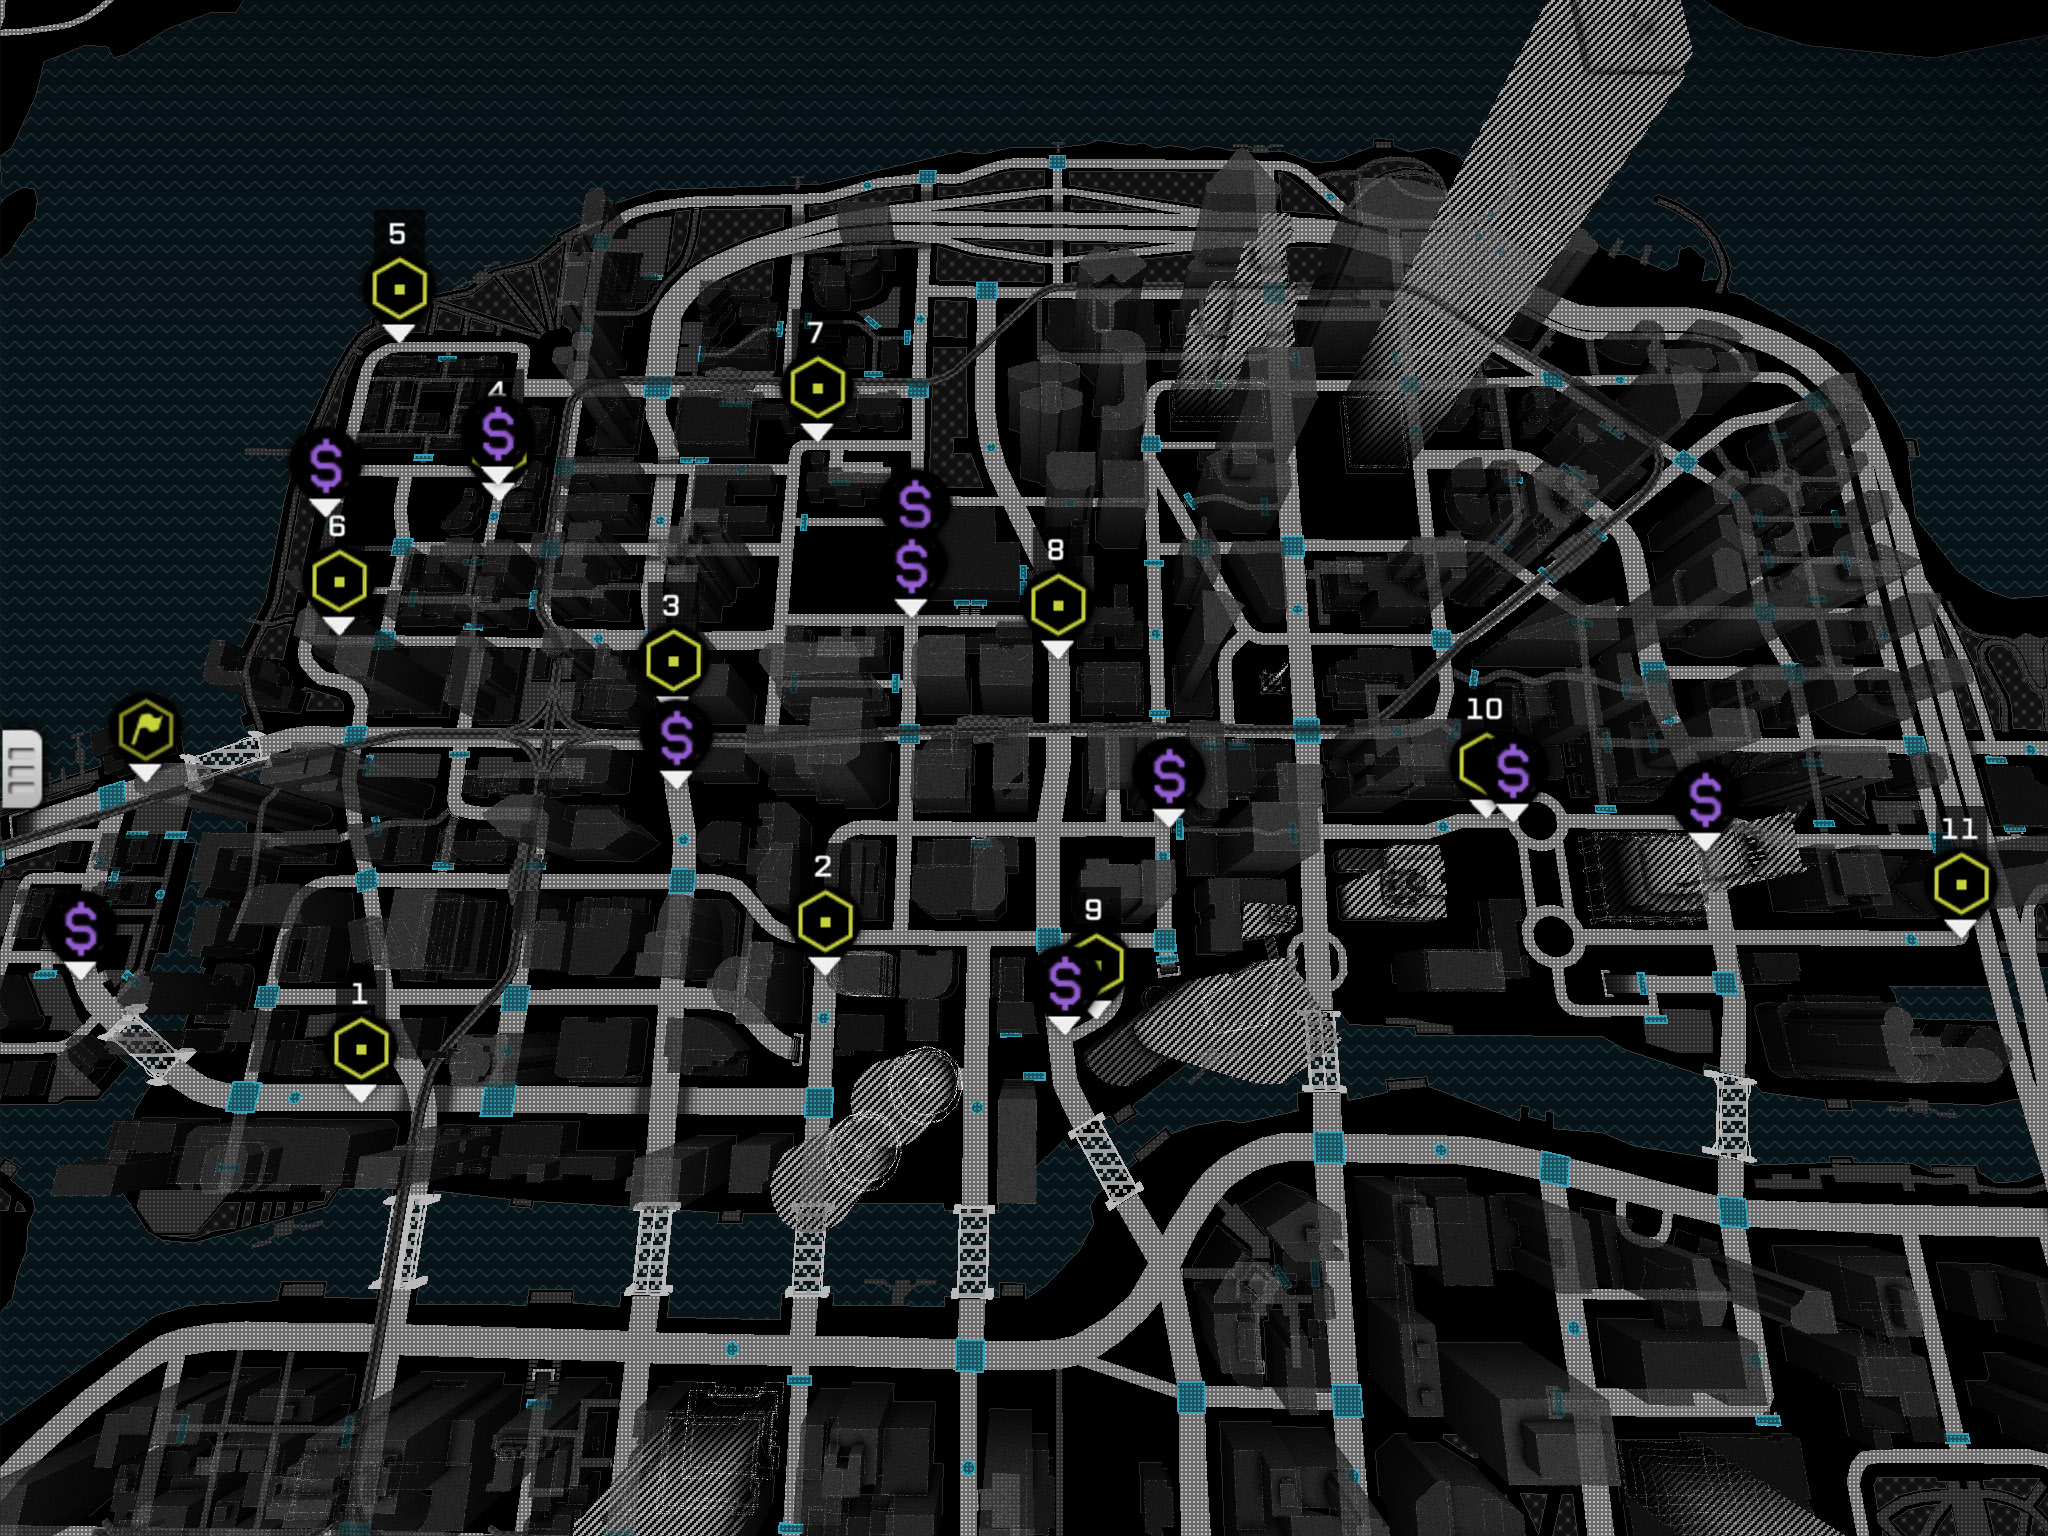
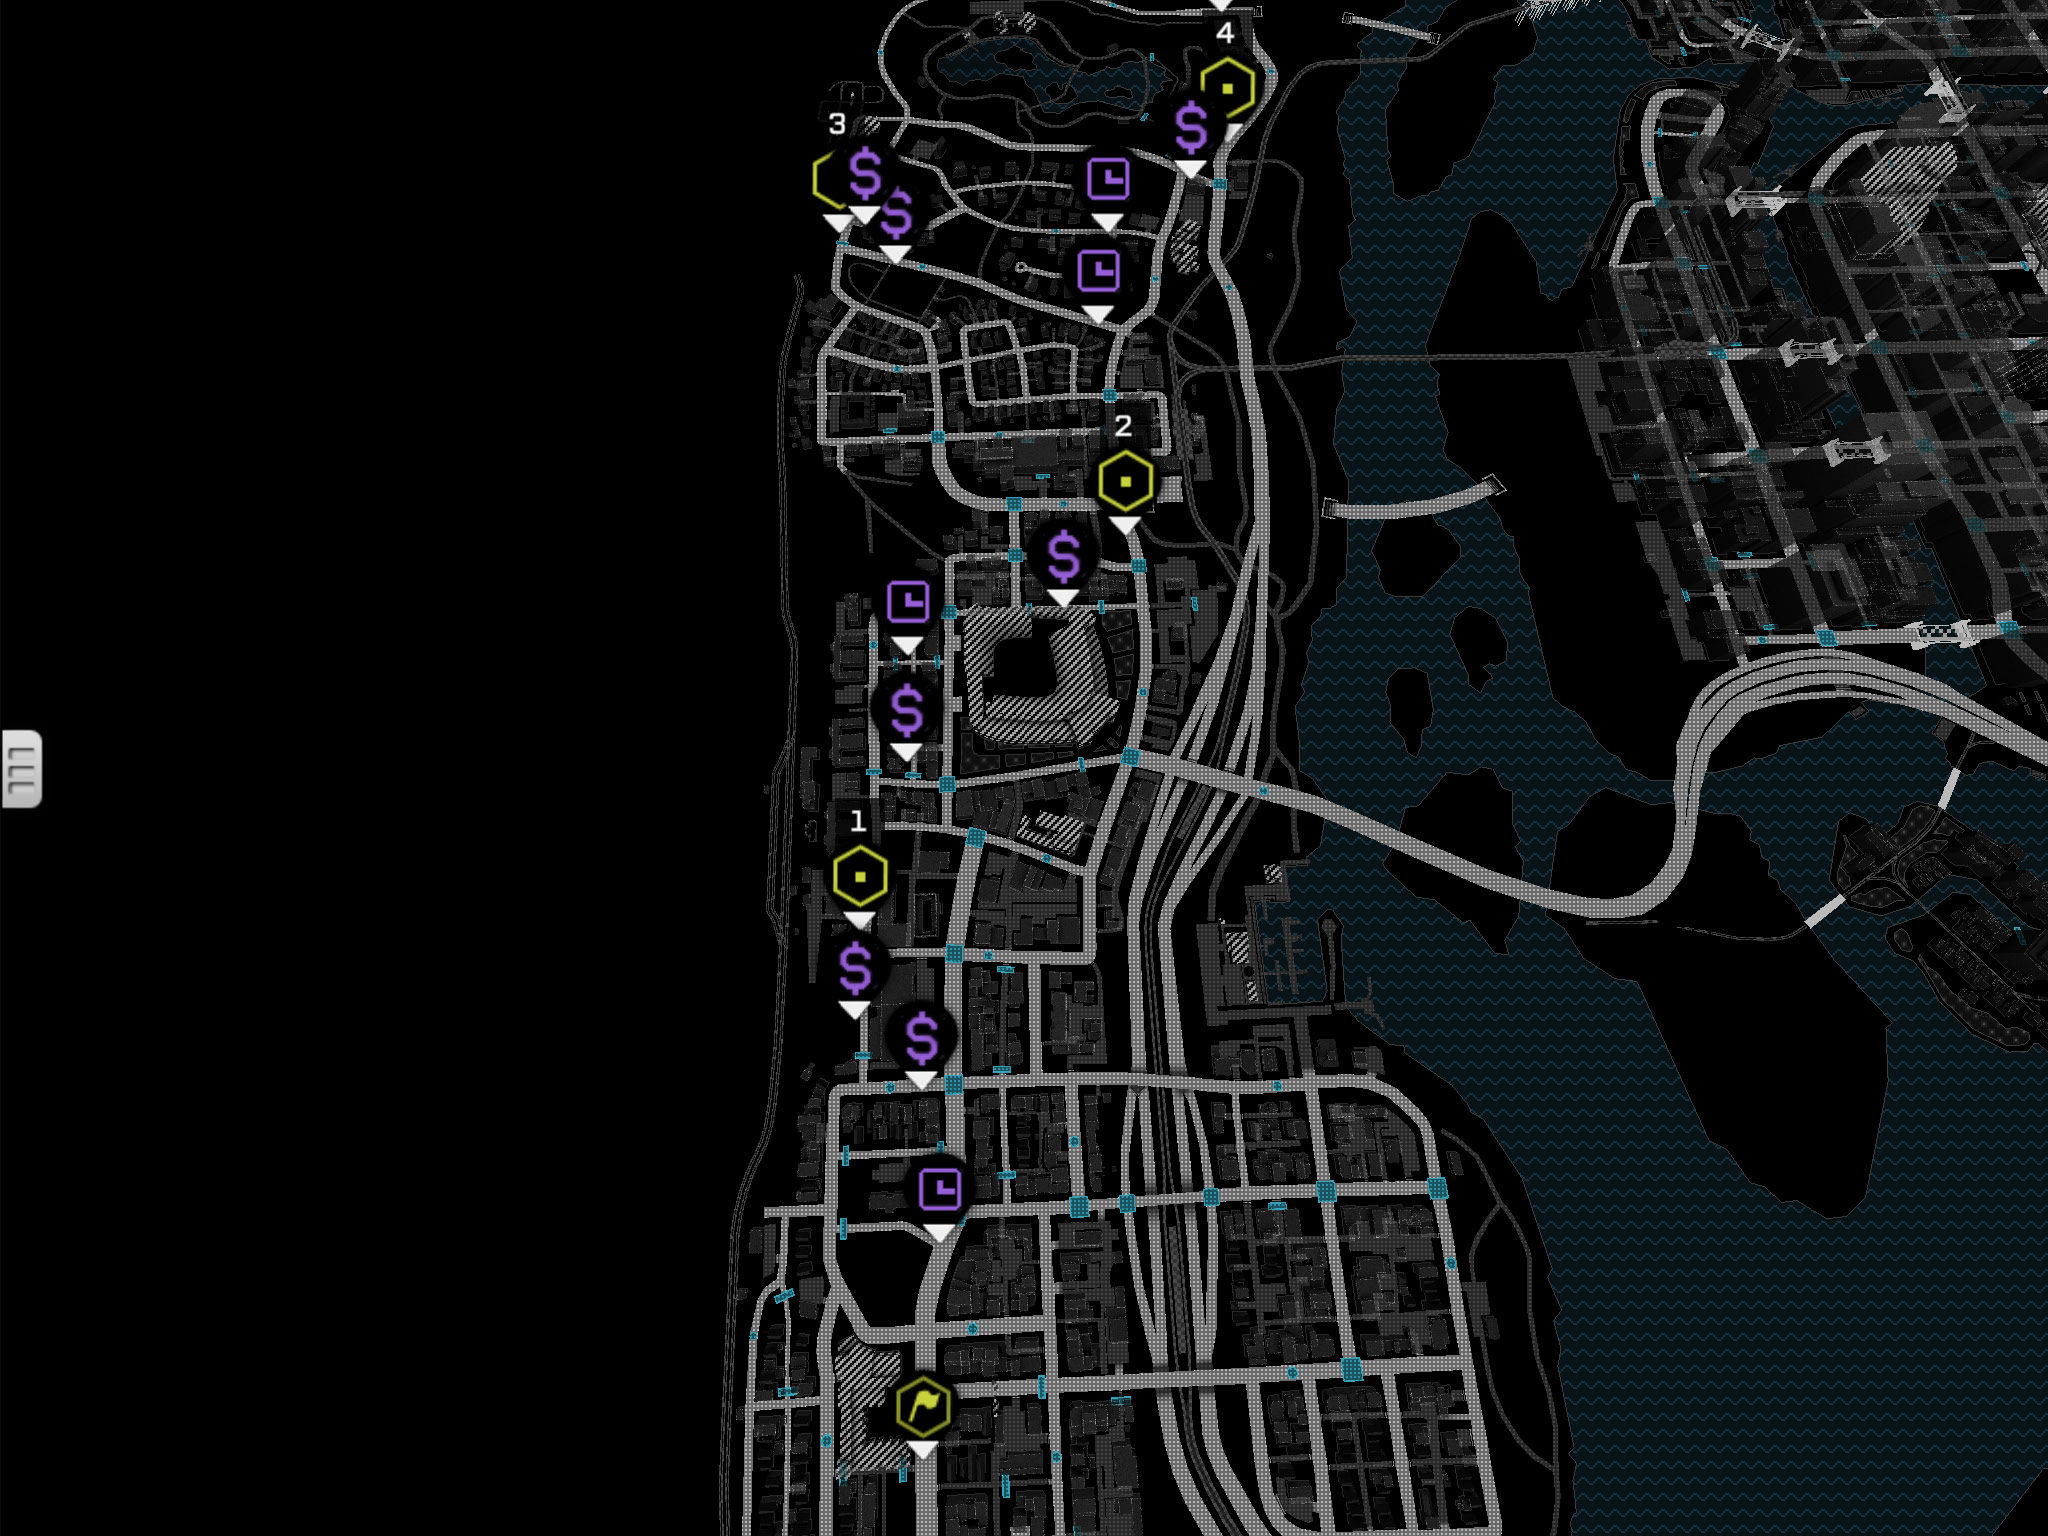
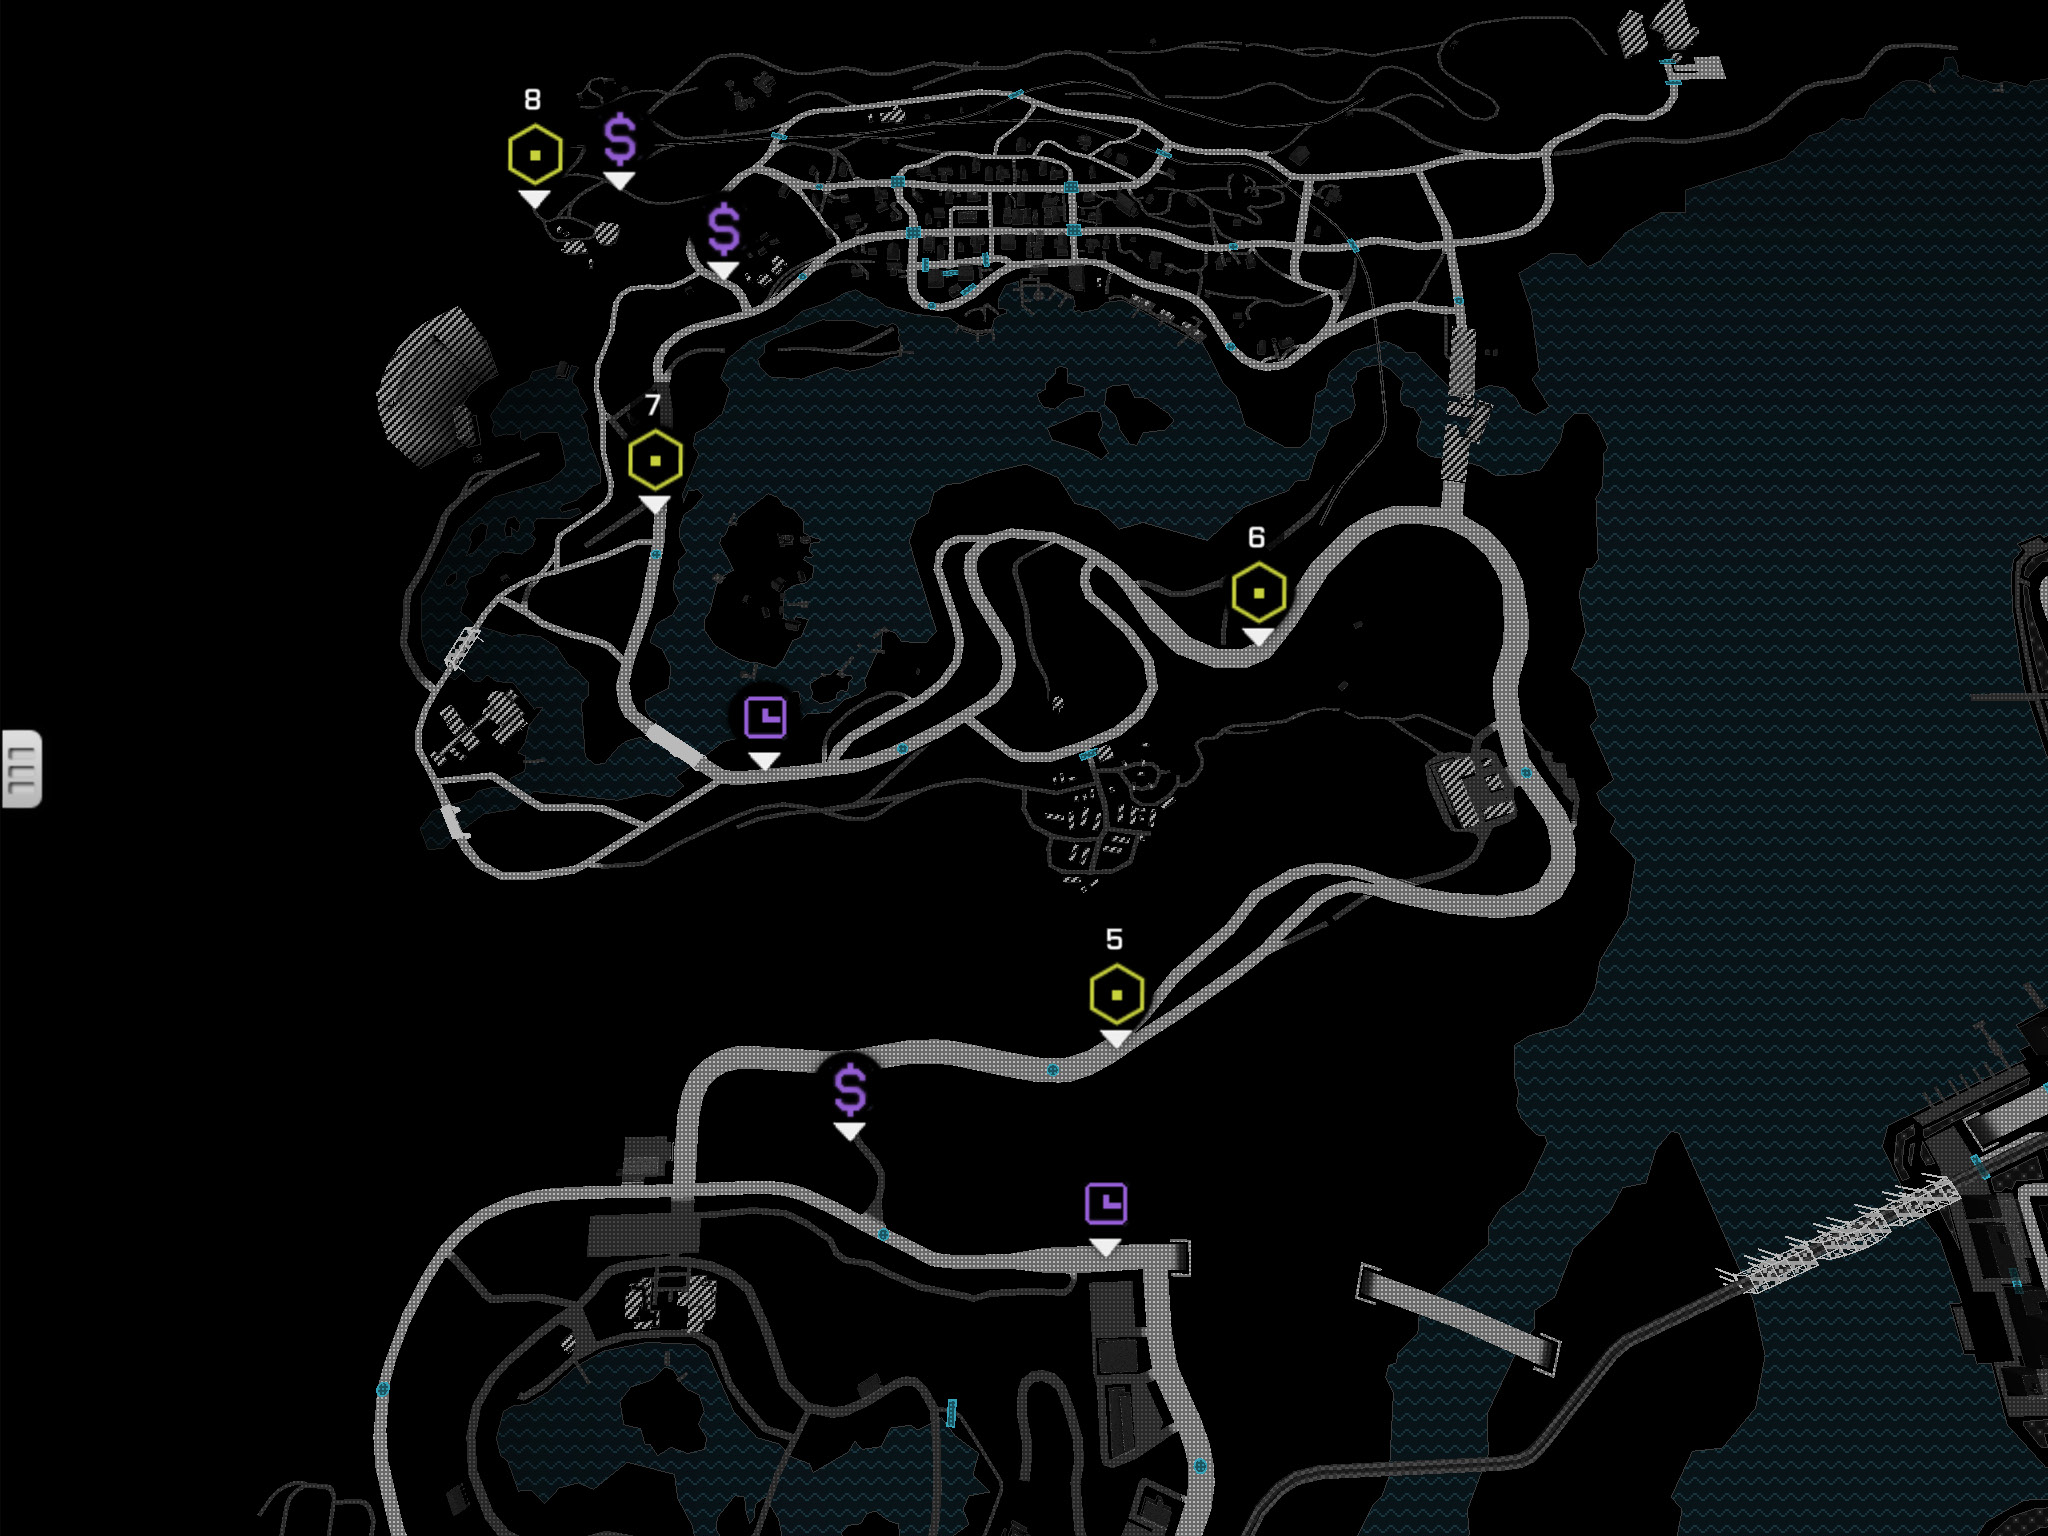
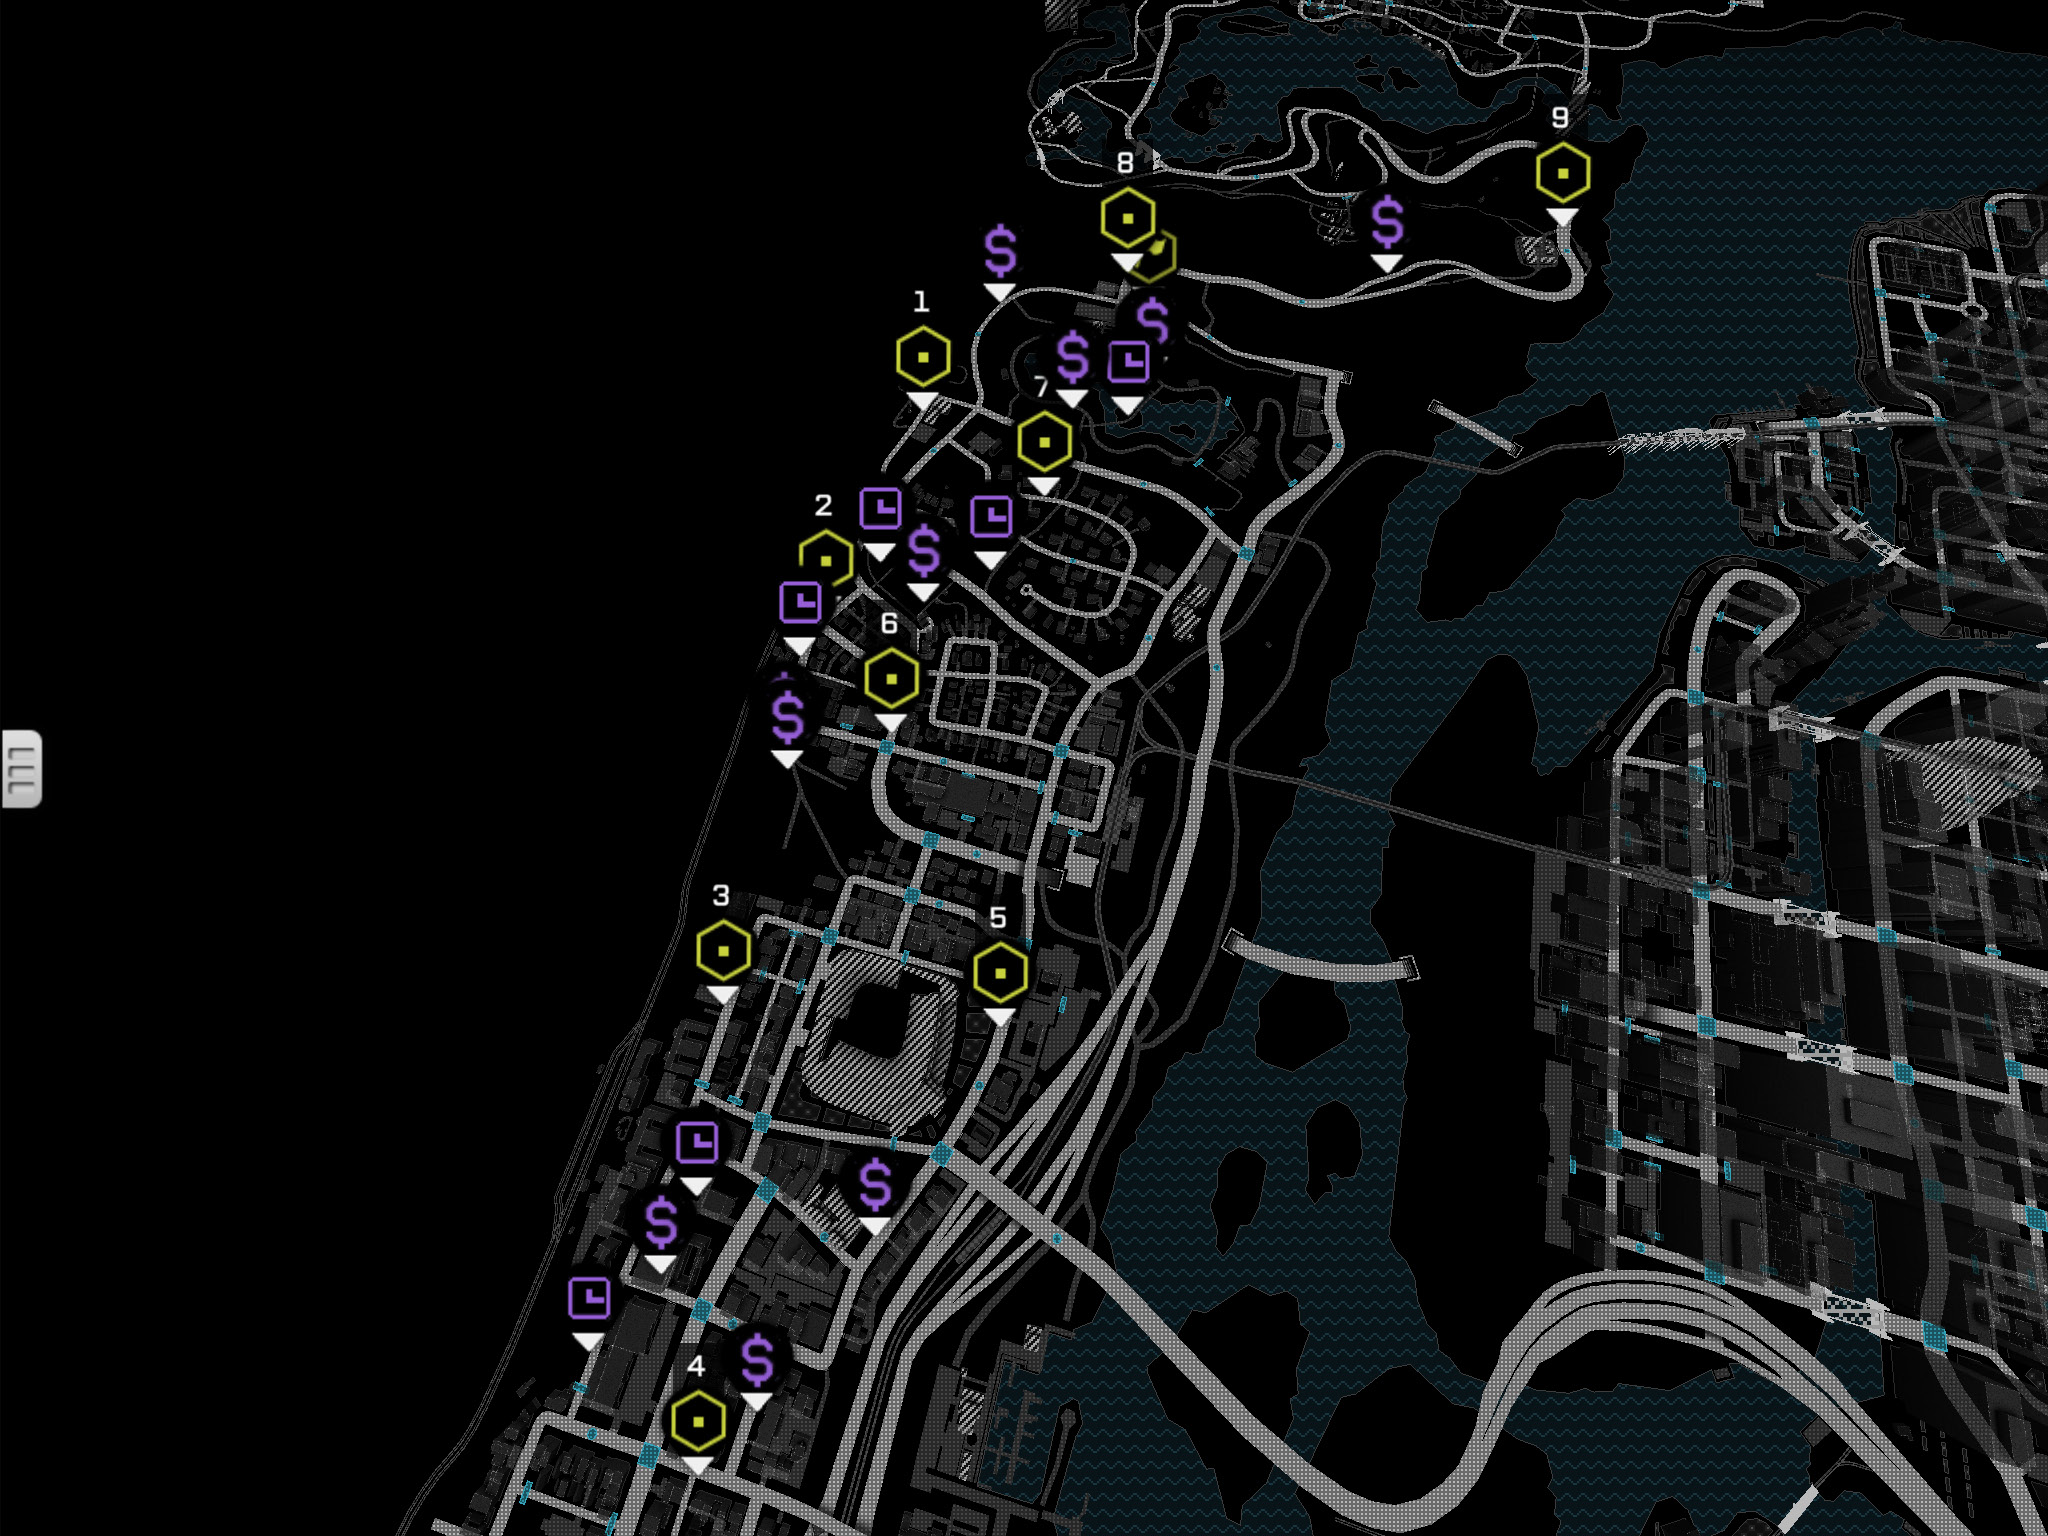
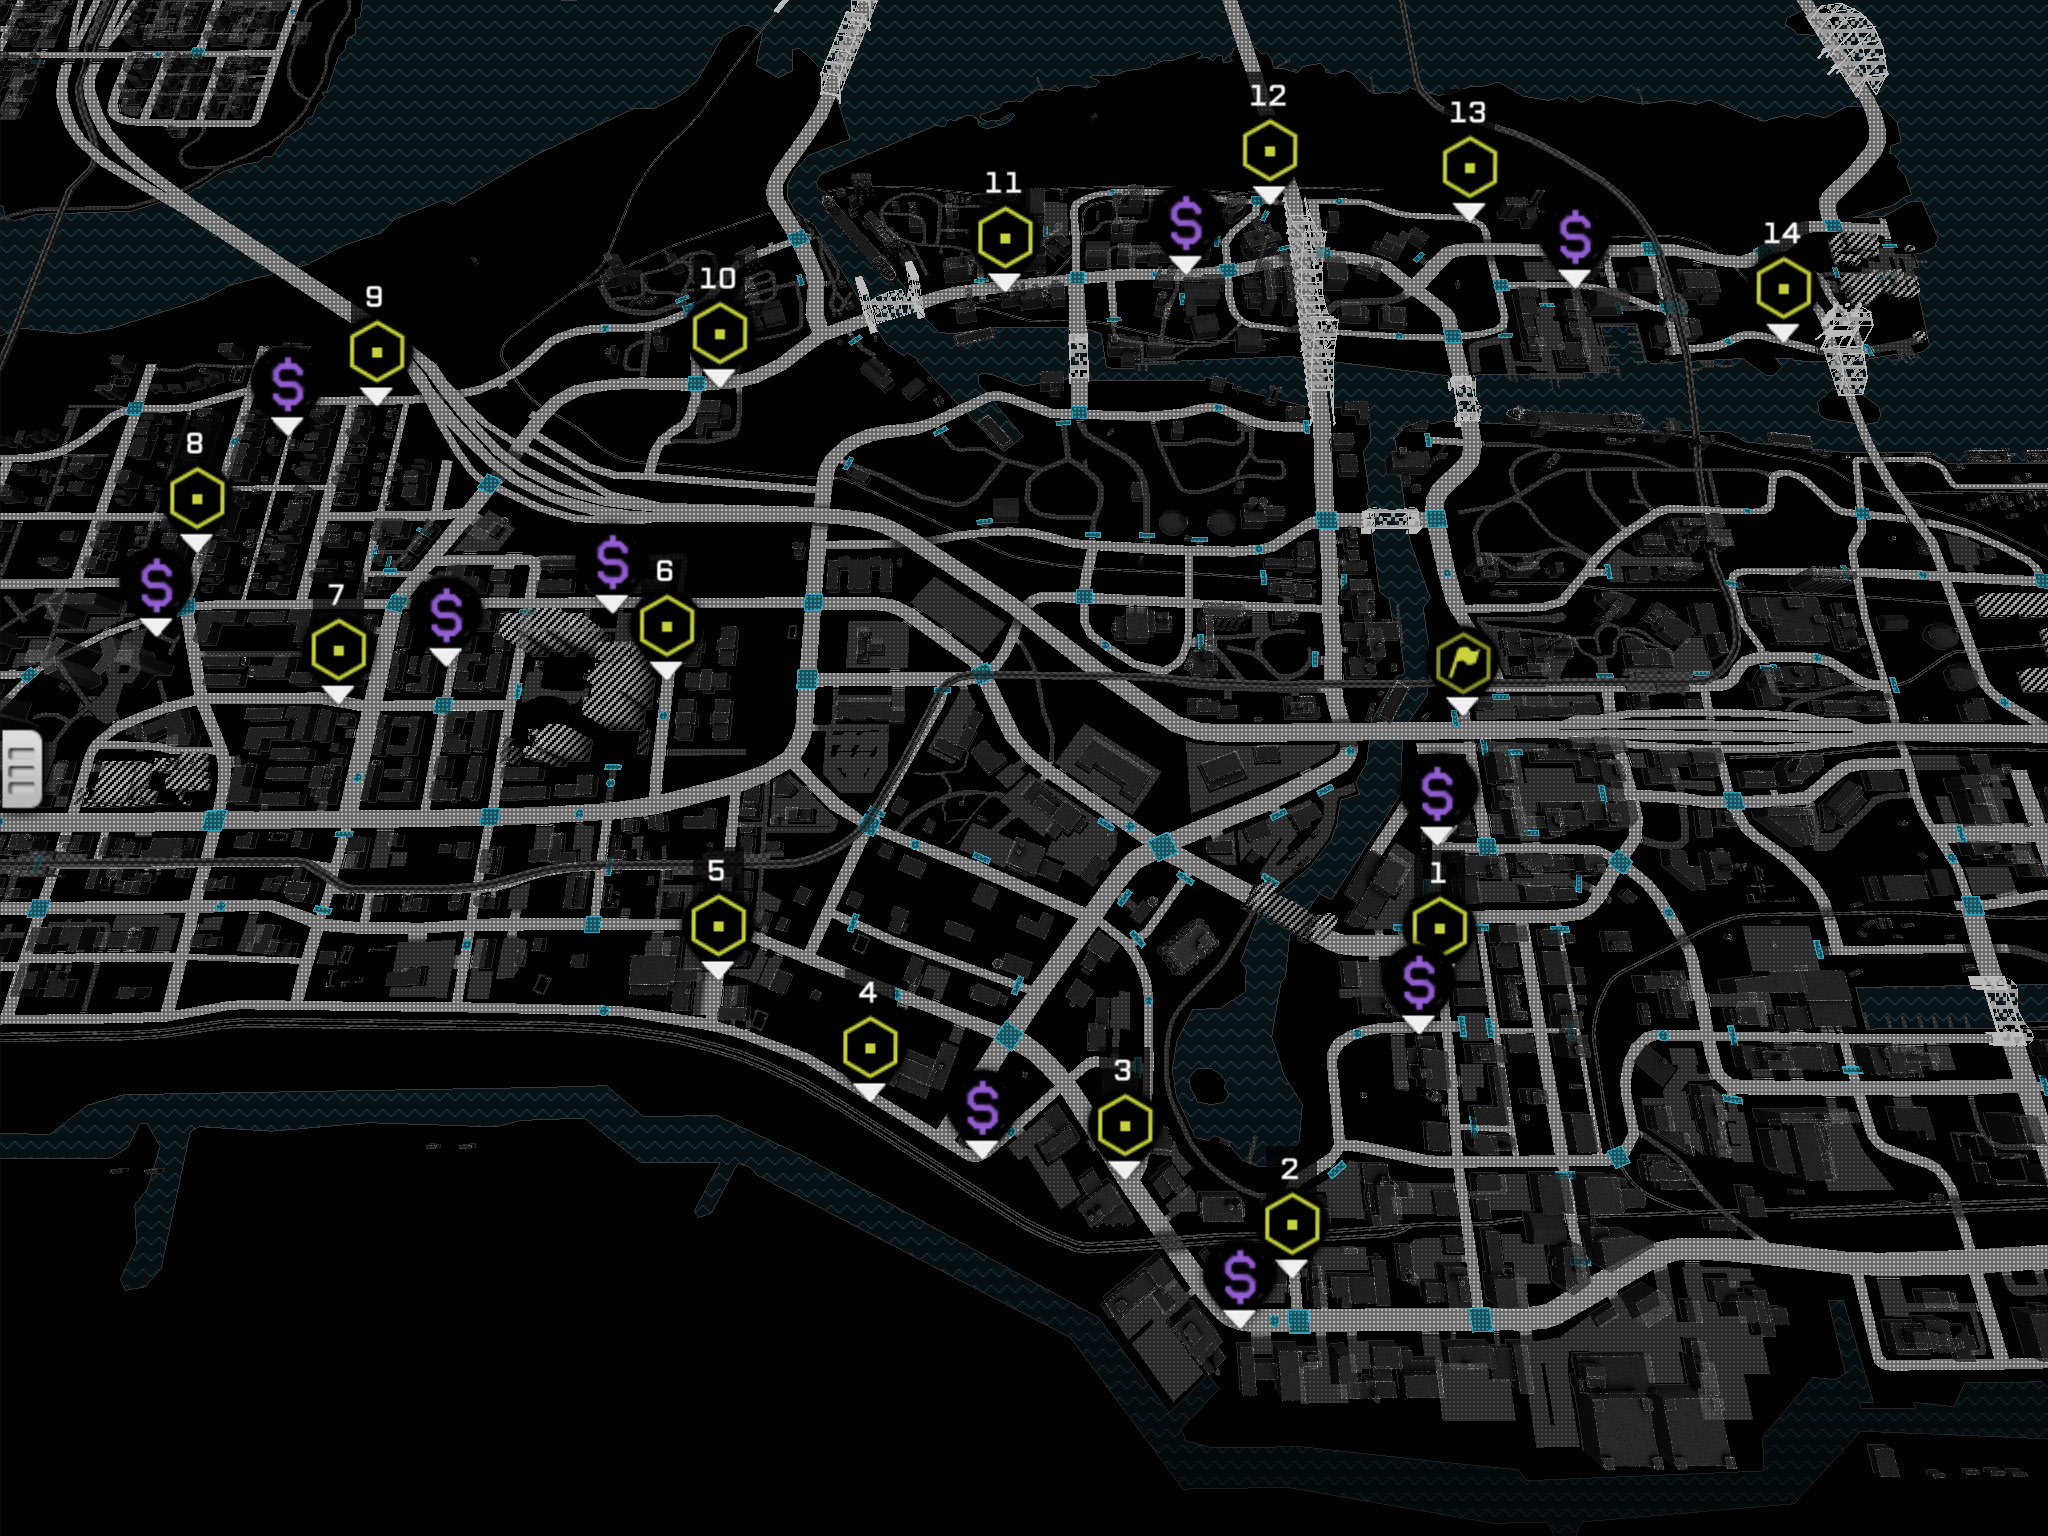
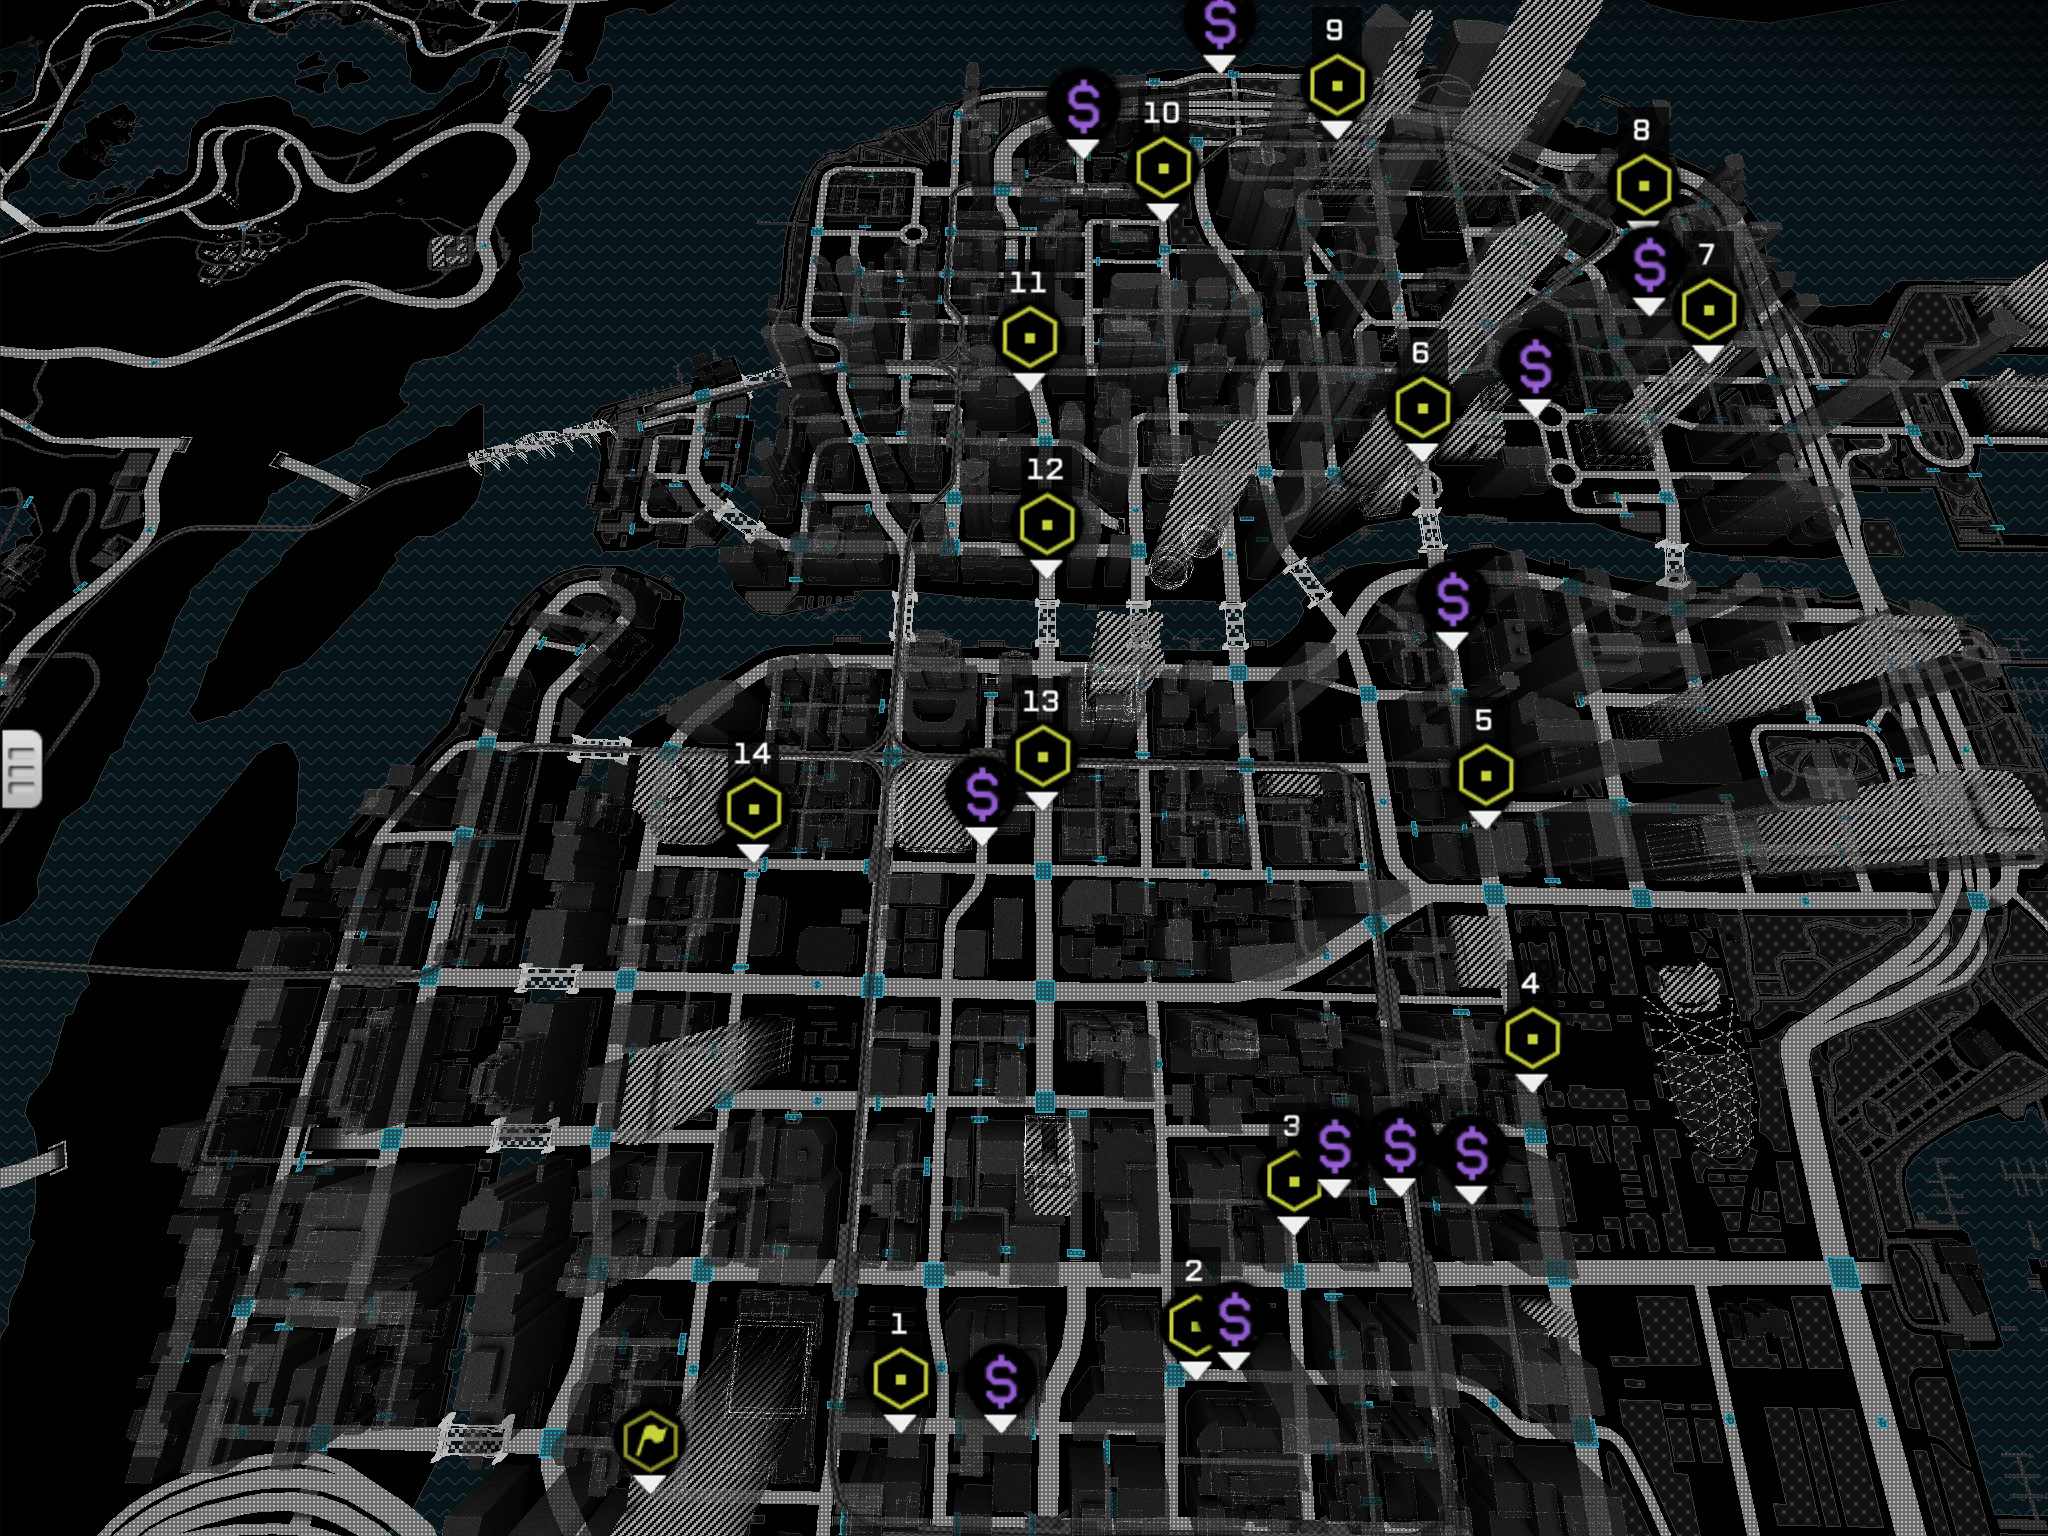
The maps presented in this guide show the locations of every checkpoint, time bonus, and cash bonus. Knowing where all of these are is extremely helpful, as you can create shortcuts to reach checkpoints. With time bonuses and cash, be aware that sometimes these are placed in areas excellent for shortcuts, while others could be traps (e.g., placed near a dead end). Remember there are Cash in Races and Cash and Time in Free Ride matches.
/// Aggressive, Not Passive
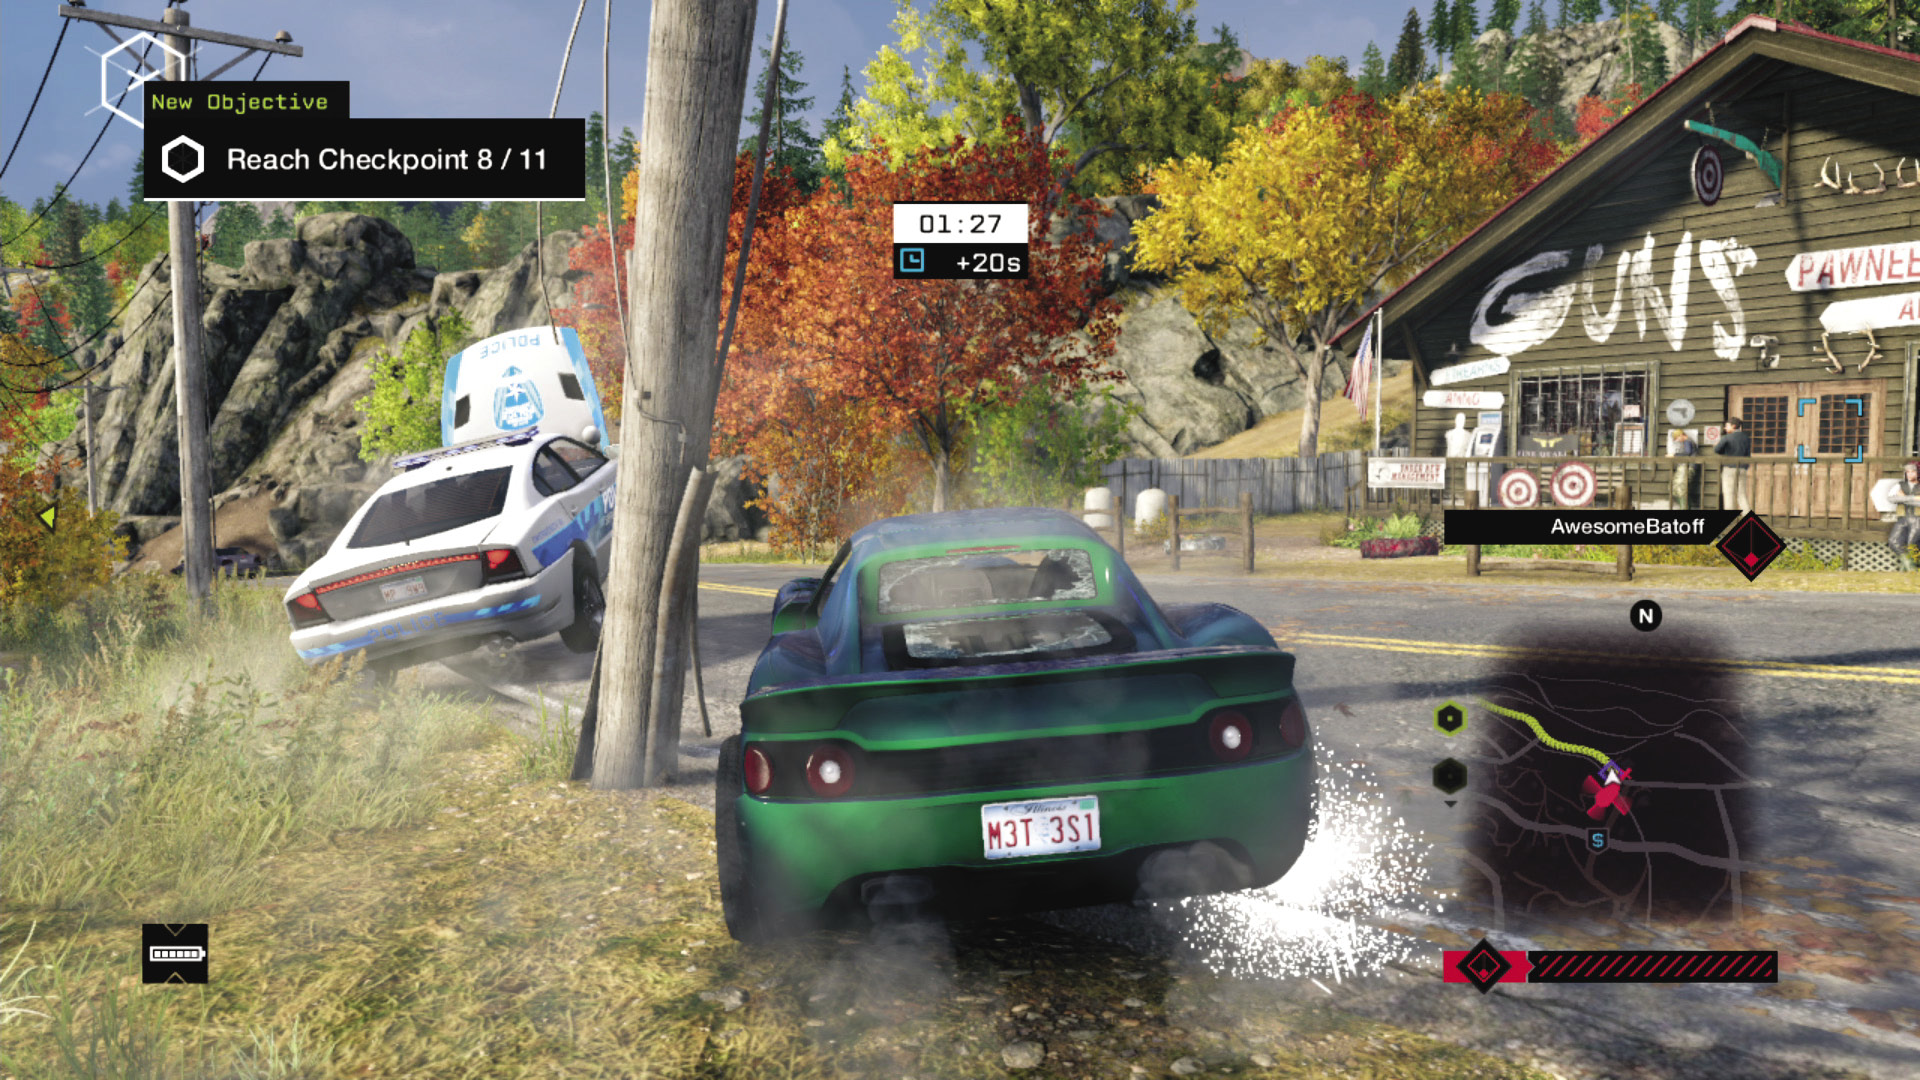
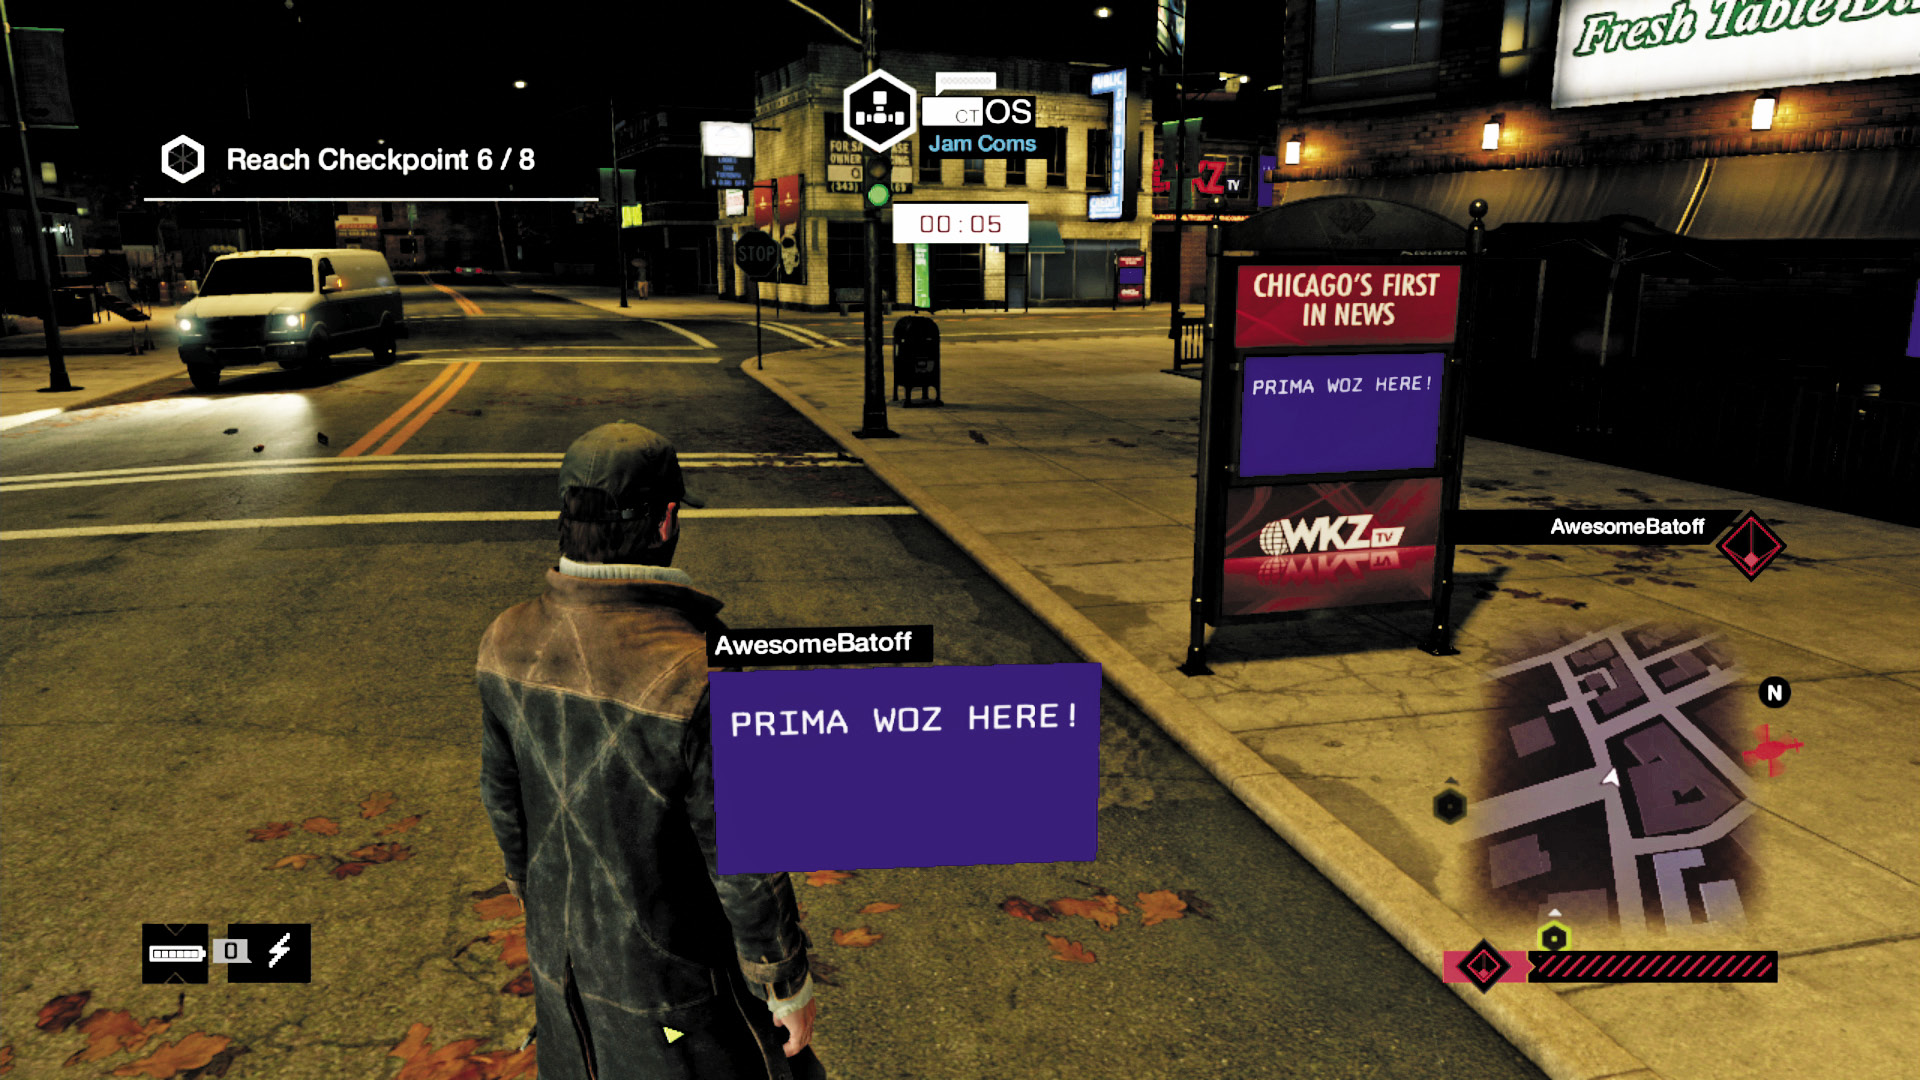
Aggressive driving is encouraged at all times, with regards to the police. Remember you have your own infrastructure hacks, so shutting down traffic lights or steam pipes before they are used against you is a great idea. Better yet are all the escape tactics you’ve learned during your single-player outings. Attack the helicopter when you get the chance (shooting the sniper or disabling it), which stops Heat Points from accumulating.
/// Crafting a Victory
Don’t ignore the excellent potential of Jam Coms, which in these matches actually stops the police from being dispatched! Also try your luck at Blackouts (or ramming or shooting ctOS boxes), which stops the App Player from using infrastructure hacks.
/// Climb Every Mountain
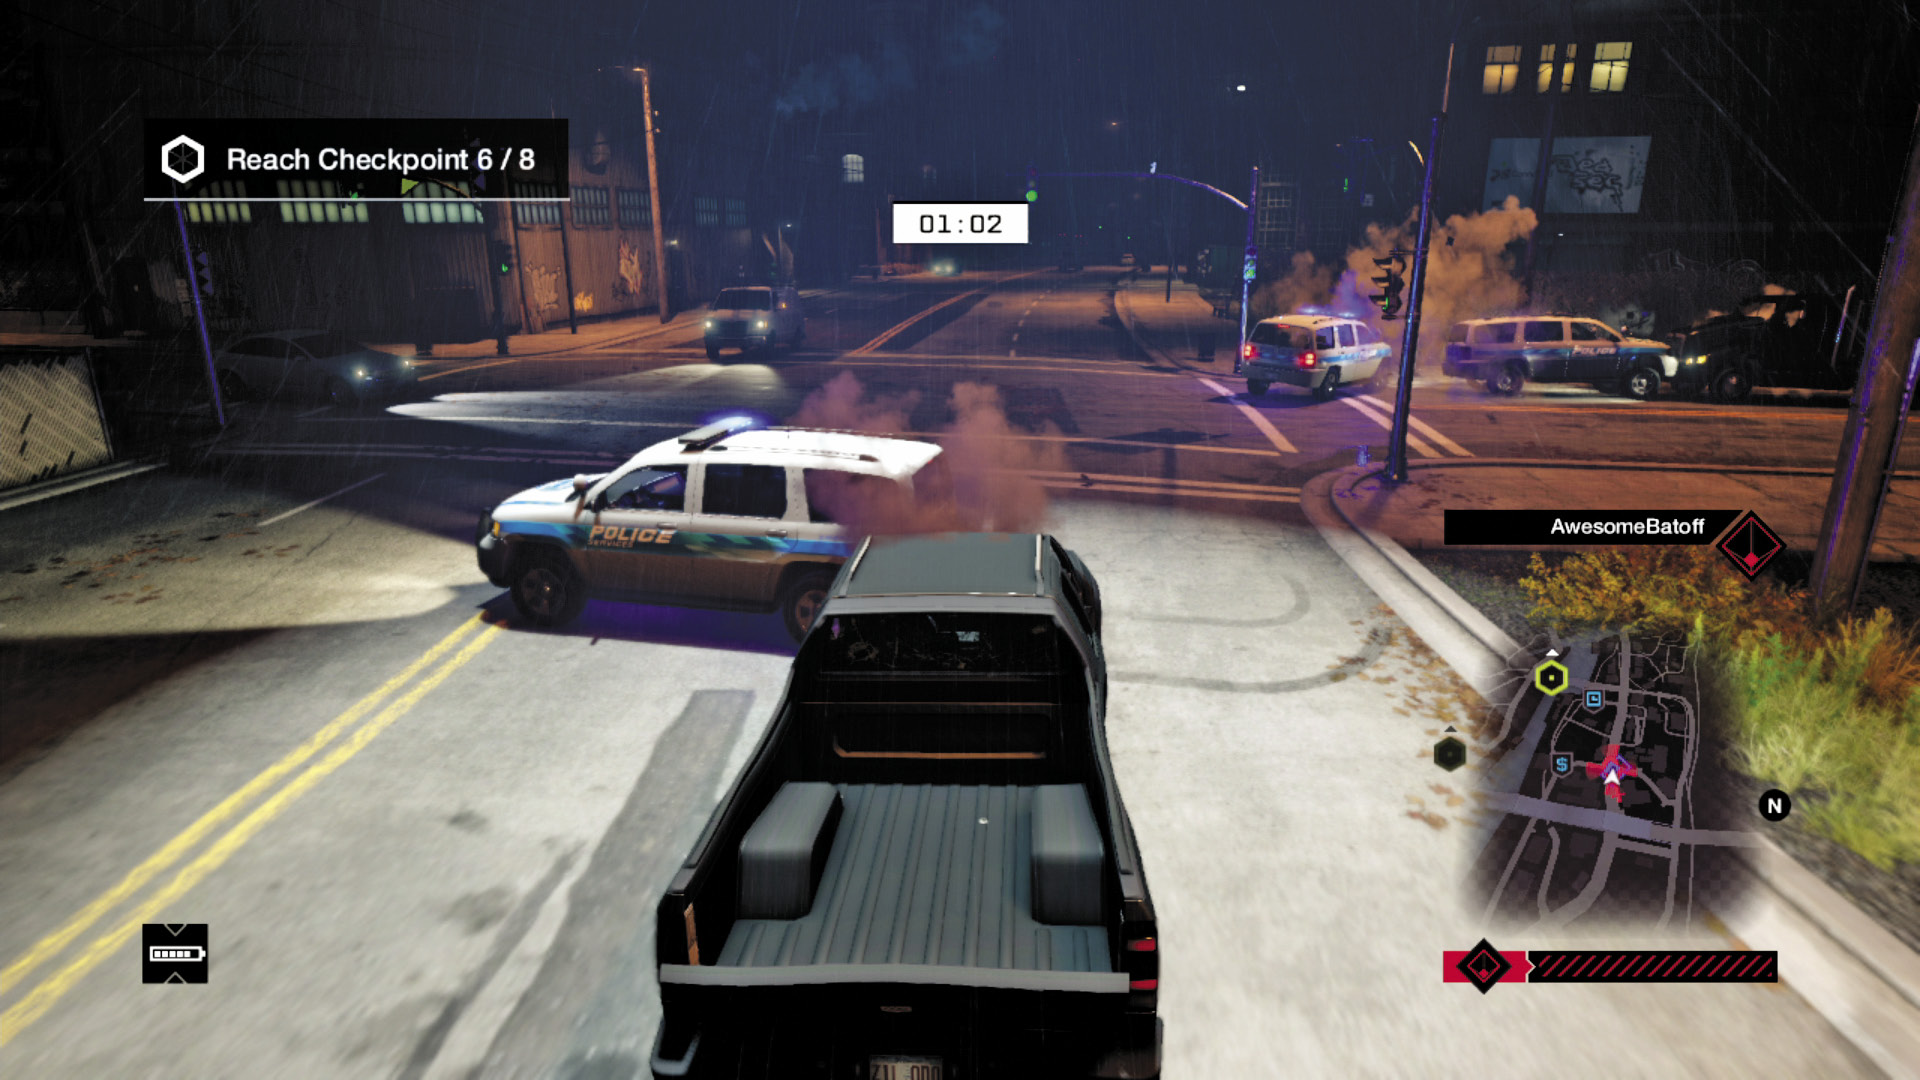
Exploration is another key to victory. Drive onto sidewalks to dodge infrastructure dangers such as blockers or steam pipes. Take shortcuts that lead the police off-road and over ramps, where they become stuck and need to be redispatched. Plan for these eventualities as often as you can.
/// An Eye on the Prize
Use your world map occasionally and your minimap constantly. Look to see where the next checkpoint is so you keep your momentum going and move toward your goal. You can also spot small red ctOS Mobile symbols on the minimap where the App Player is dispatching cops and activating infrastructure hacks, and take appropriate (and usually evasive) action to dodge these incoming problems.
/// The Right Ride
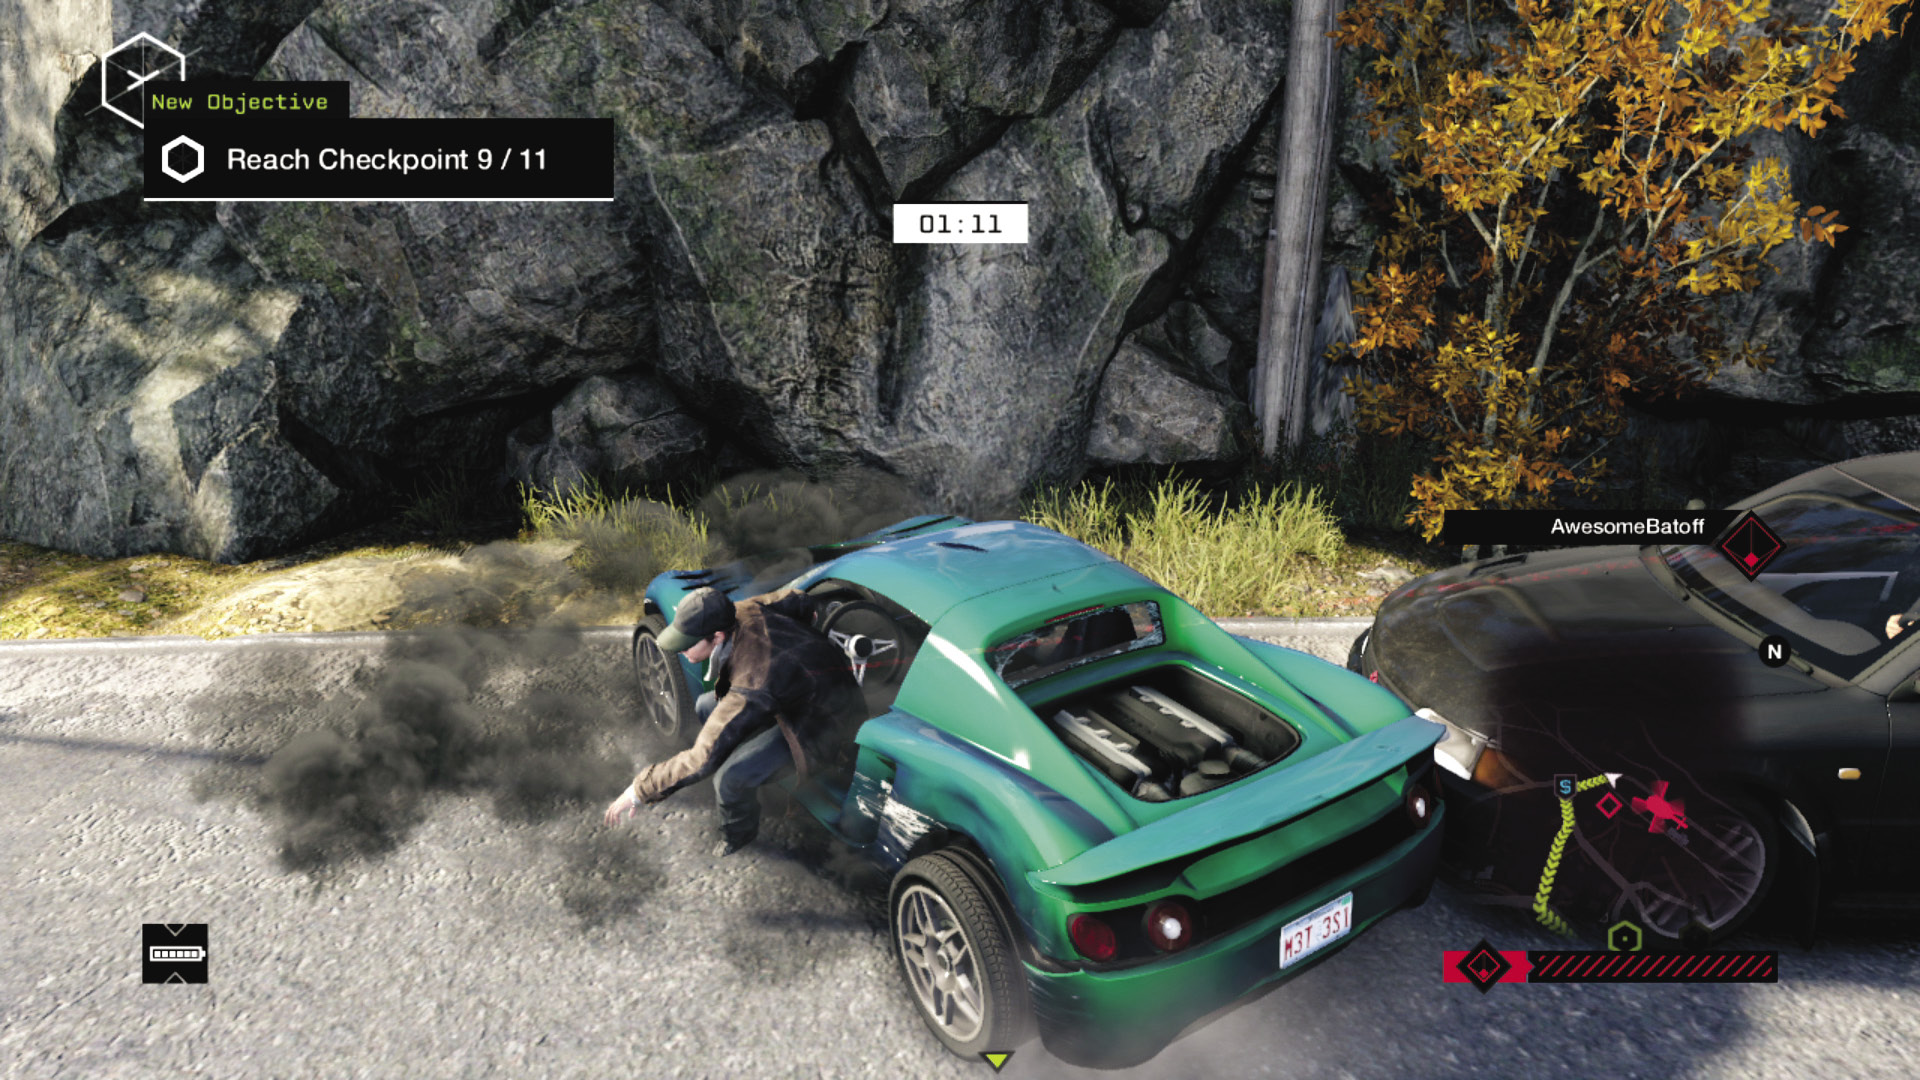
Just because you’re stuck with a particular vehicle when a Free Ride or Race begins doesn’t mean you need to keep it. Don’t hesitate to switch vehicles; you begin in a randomly determined sport vehicle, but there are faster performance, muscle cars, or bikes to use. This is one mission during which you can use the Cars on Demand App, too, so select a vehicle you’re familiar with and use it! Finally, is your vehicle starting to smoke? Then it’s about to become immobile, so start looking for another vehicle to steal.
/// Dying to Win
You can actually save time by dying during a match. For example, if your car is destroyed and there are no others around (especially near water), try to die (even by falling or dropping a proximity IED at your feet) so you respawn in a vehicle. Searching for a vehicle can be much more time-consuming.
/// Collateral Damage
You’re here to avoid the corrupt Chicago cops, not massacre civilians! It’s important to remember that if you run over civilians while escaping, the App Player gains Heat Points. In addition, fighting with cops on foot using weapons takes up far too much time, and killing cops just gives your opponent more Heat Points. Ride safe!
/// Never Give Up! Never Surrender!
Don’t ever give up during a match and quit: You get to keep all the bonus cash you collect even if you lose, so if you’re almost out of time, head to cash bonuses instead of checkpoints. You’ll also gain Notoriety for each checkpoint you reach, so keep on trying to reach them even if the outlook is bleak.
SAMPLE MATCH // A WALK IN THE PARK
Before we reveal the maps showing all the checkpoints, timers, and cash, let’s look at a sample match between the ctOS Mobile player “AwesomeBatoff” and the Watch_Dogs player “WD.Winger,” taking place throughout “A Walk in the Park” course.
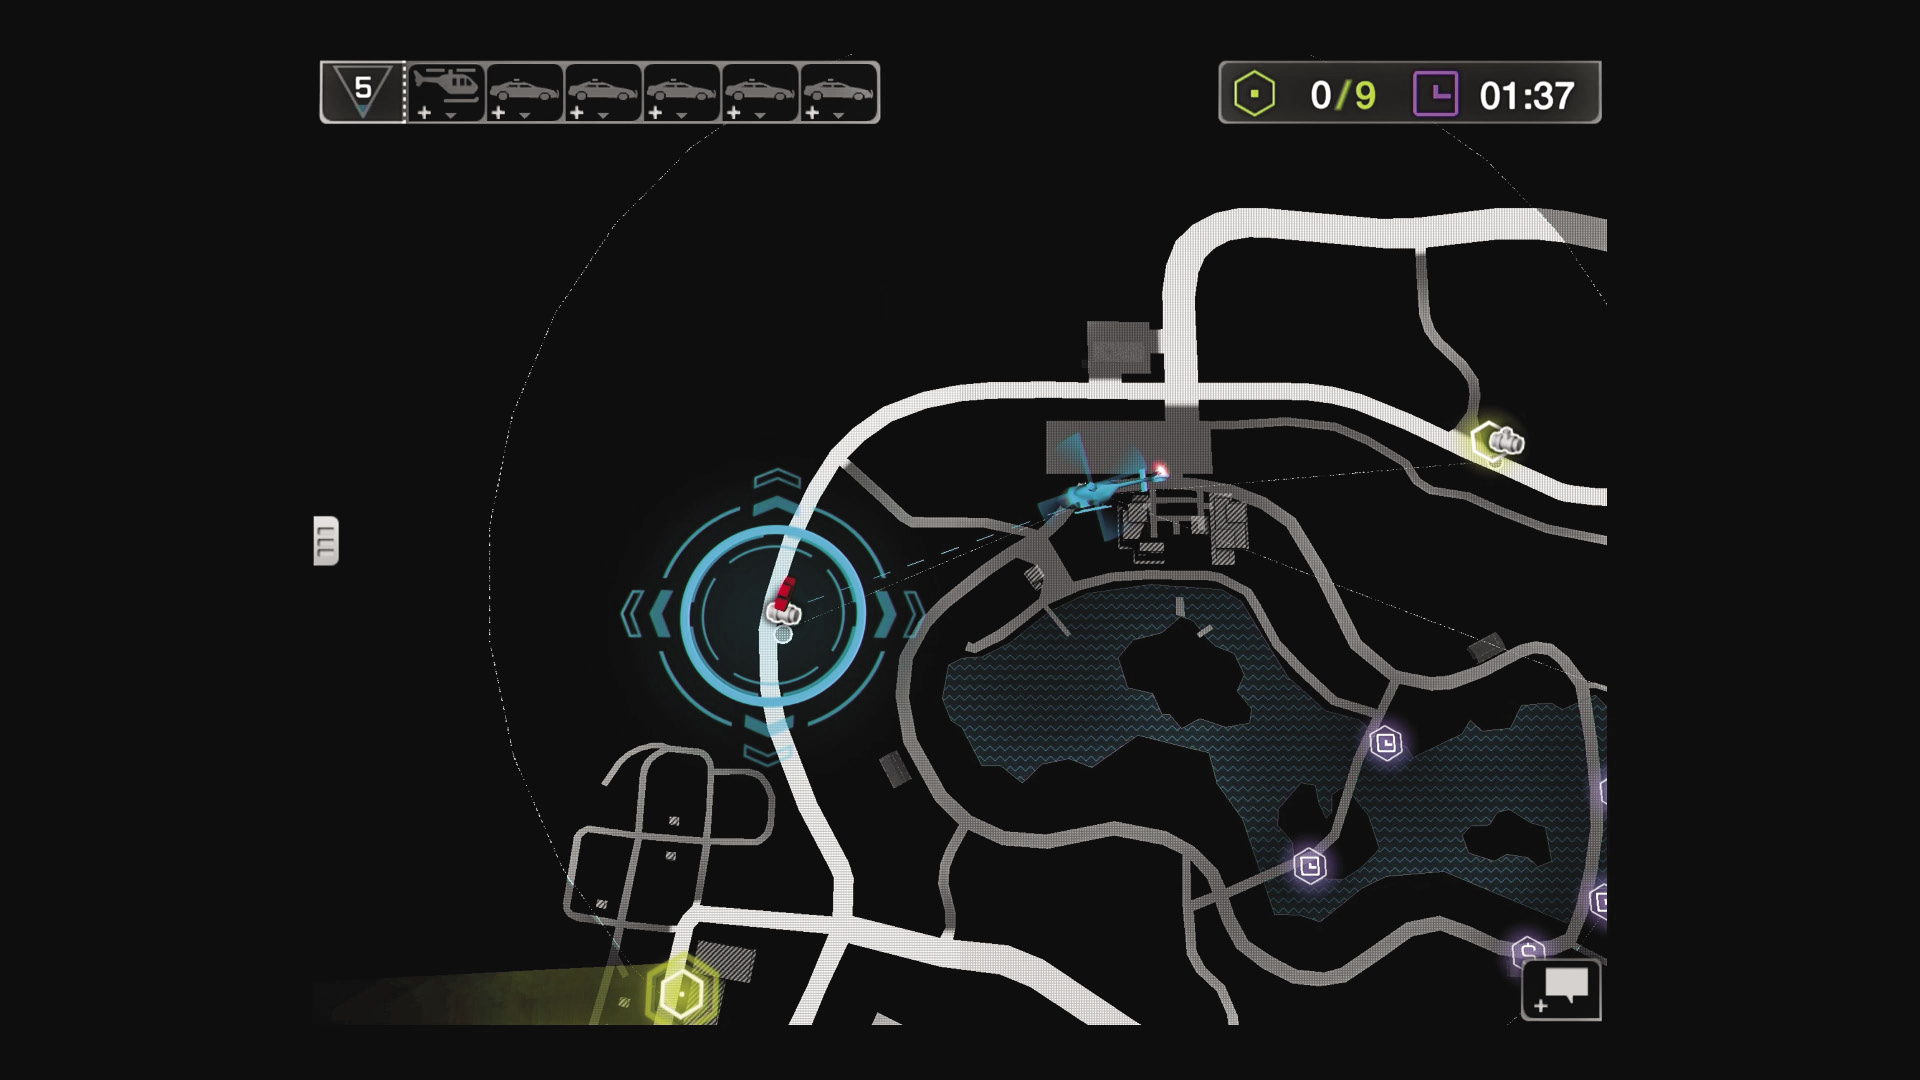
01 / Too Dark Park
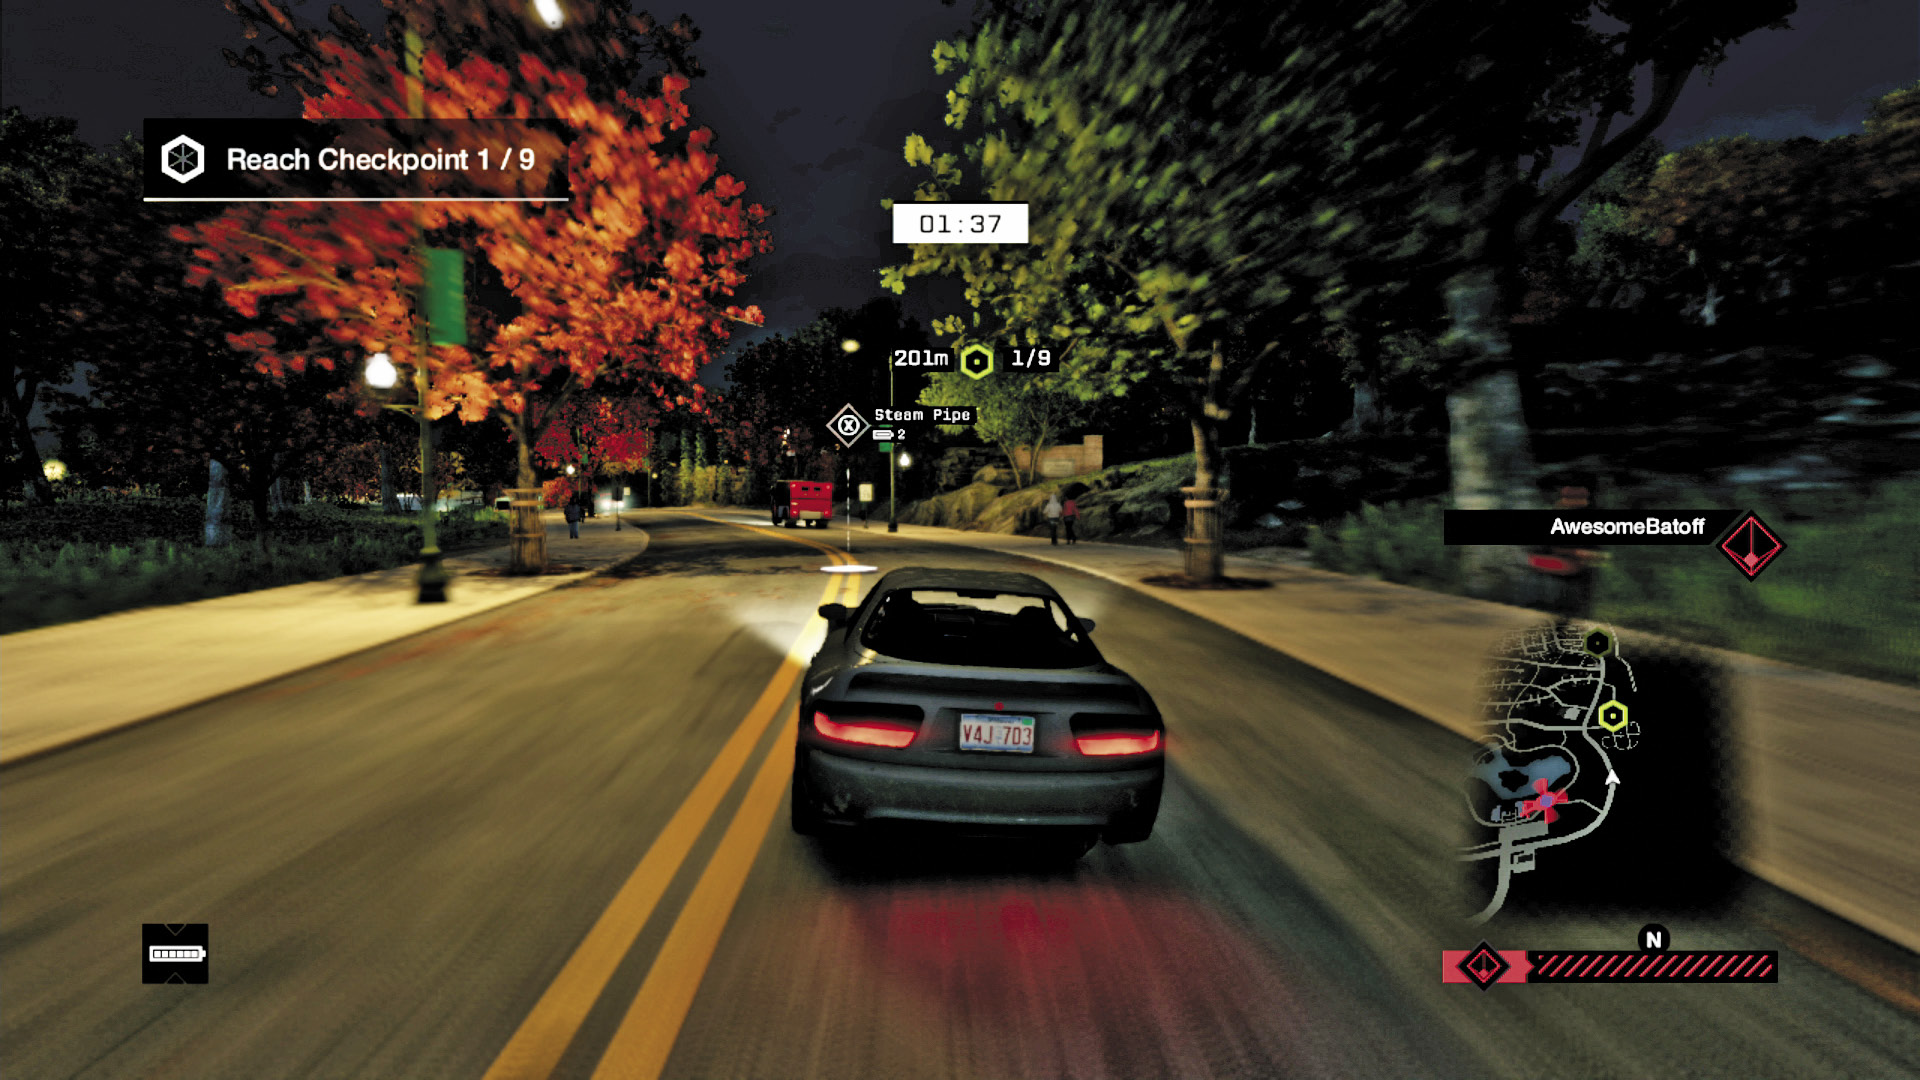
APP: We chose a dark map because it is more difficult to navigate, especially with the searchlight trained on the WD’s car. The steam pipe wasn’t destroyed; the APP Player is saving points for a powerful police presence.
WD: On this map, the first checkpoint is close to the cemetery, so an off-road jaunt through the park, dodging those sturdy trees, isn’t a good plan. Staying on the road, WD Player puts as much distance from the helicopter as possible.
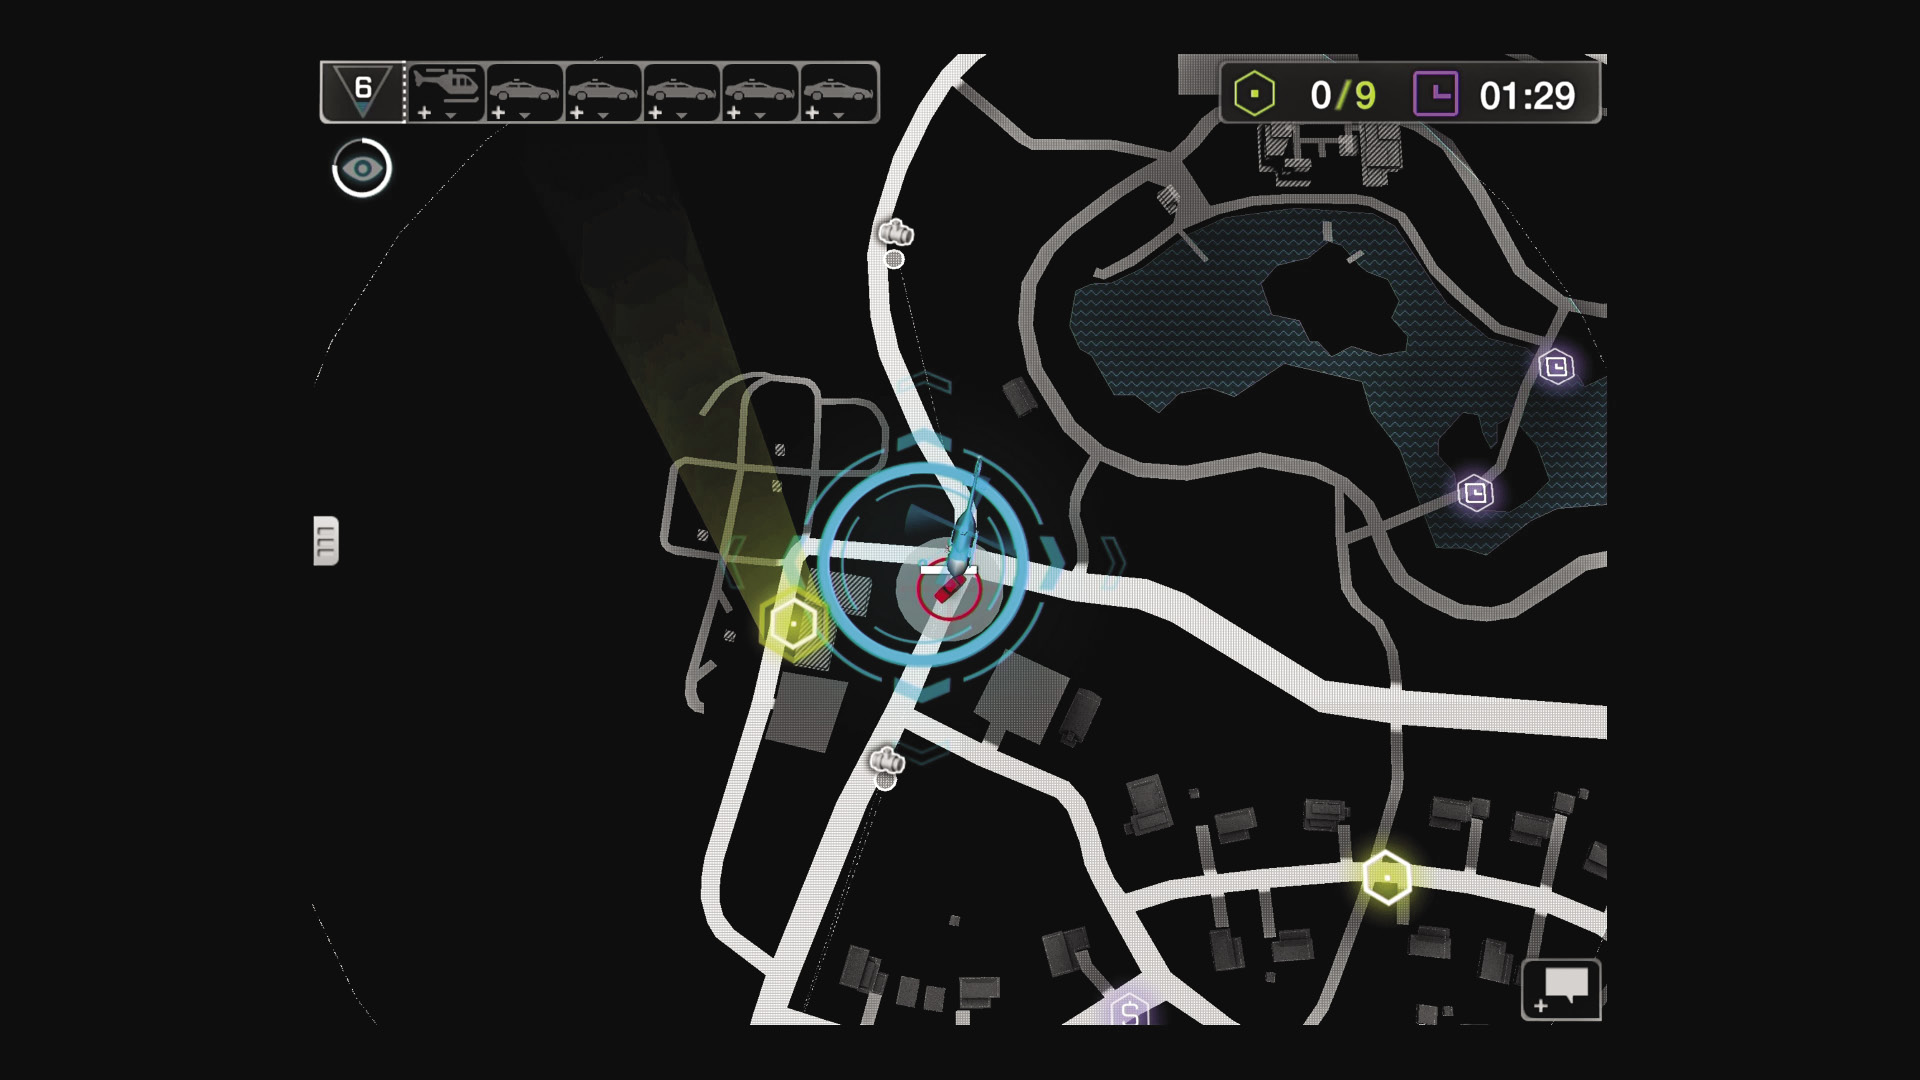
02 / Crash at Cemetery Gates
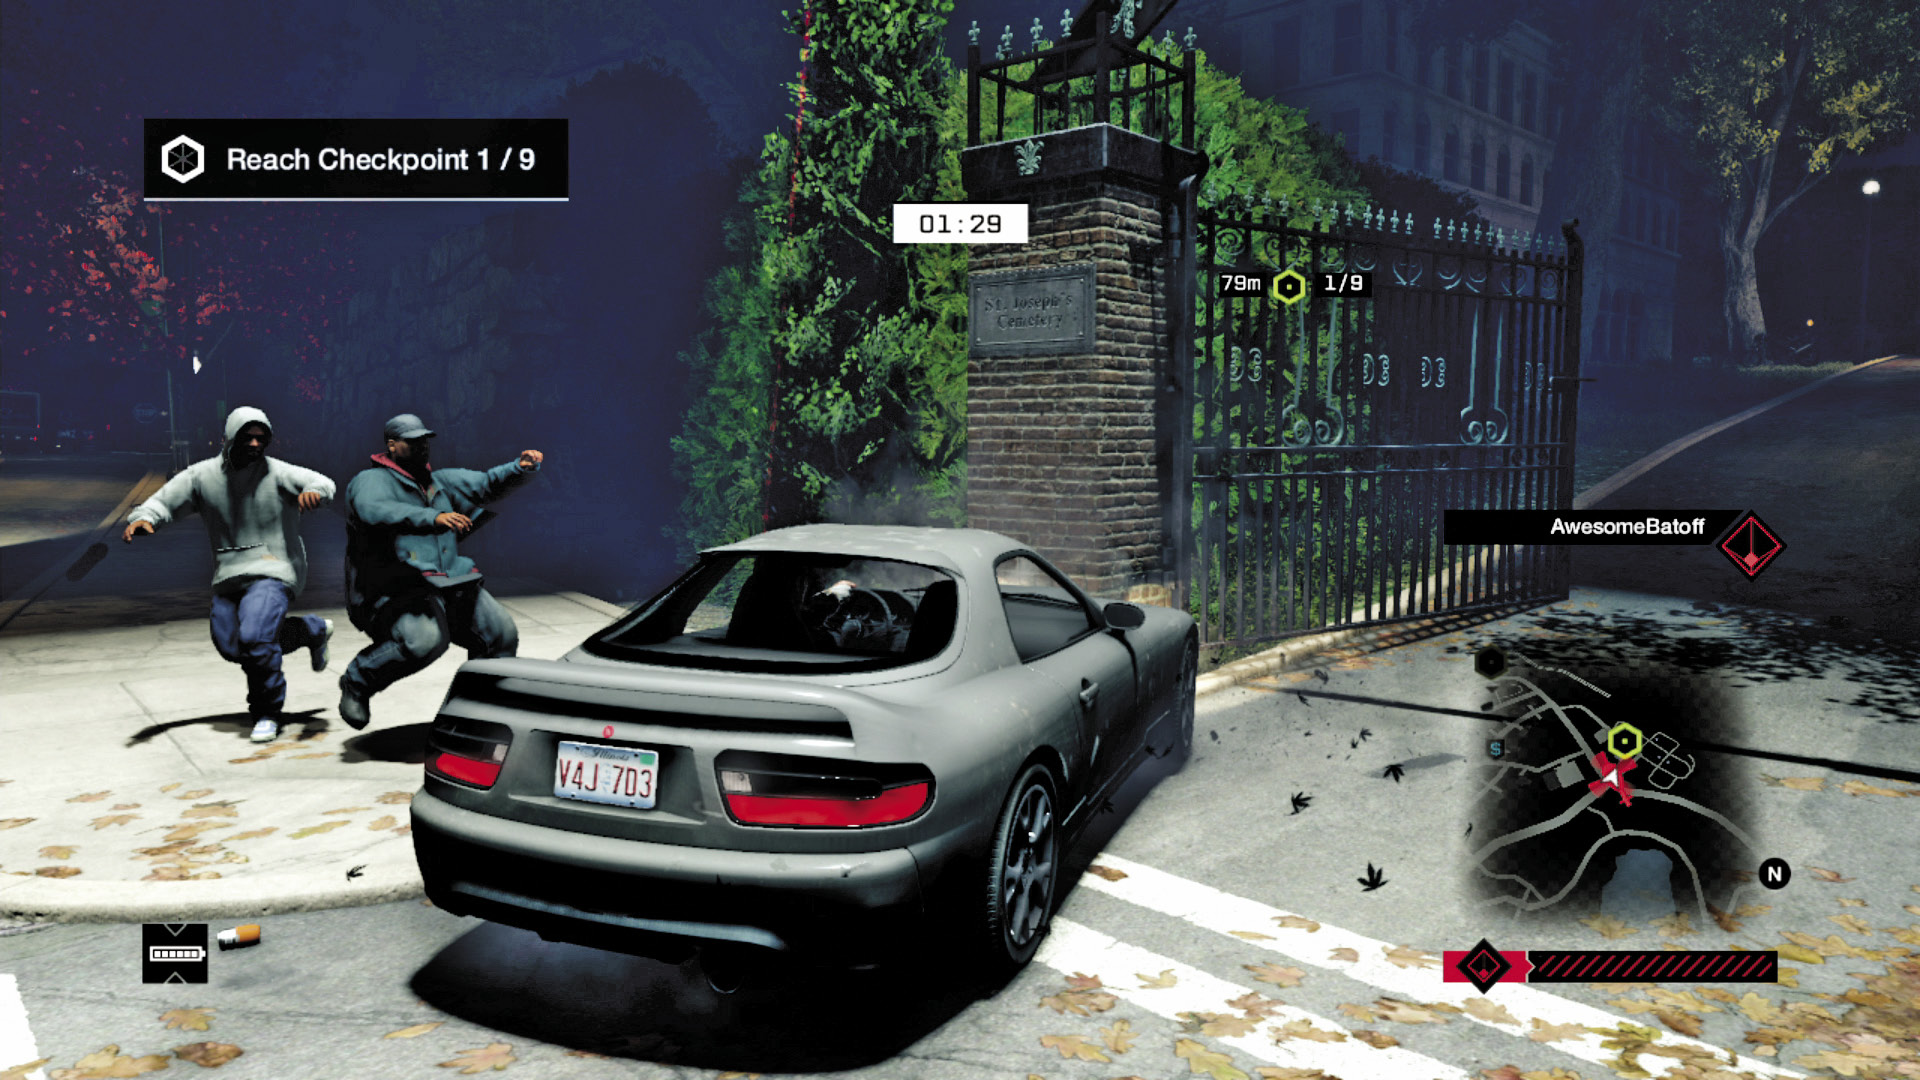
APP: Gotcha! Lock-on is achieved at 01:34, which increases the points as long as the spotlight stays on the WD Player’s vehicle. It’s fortunate that five seconds later, a mistake by the WD allows the lock-on to continue unabated!
WD: A mixture of the helicopter’s spotlight, a blind corner, and general incompetence prevented the WD Player from turning into the cemetery. Instead, they struck a wall, slightly damaging the car. Not the best plan; speed is paramount here!
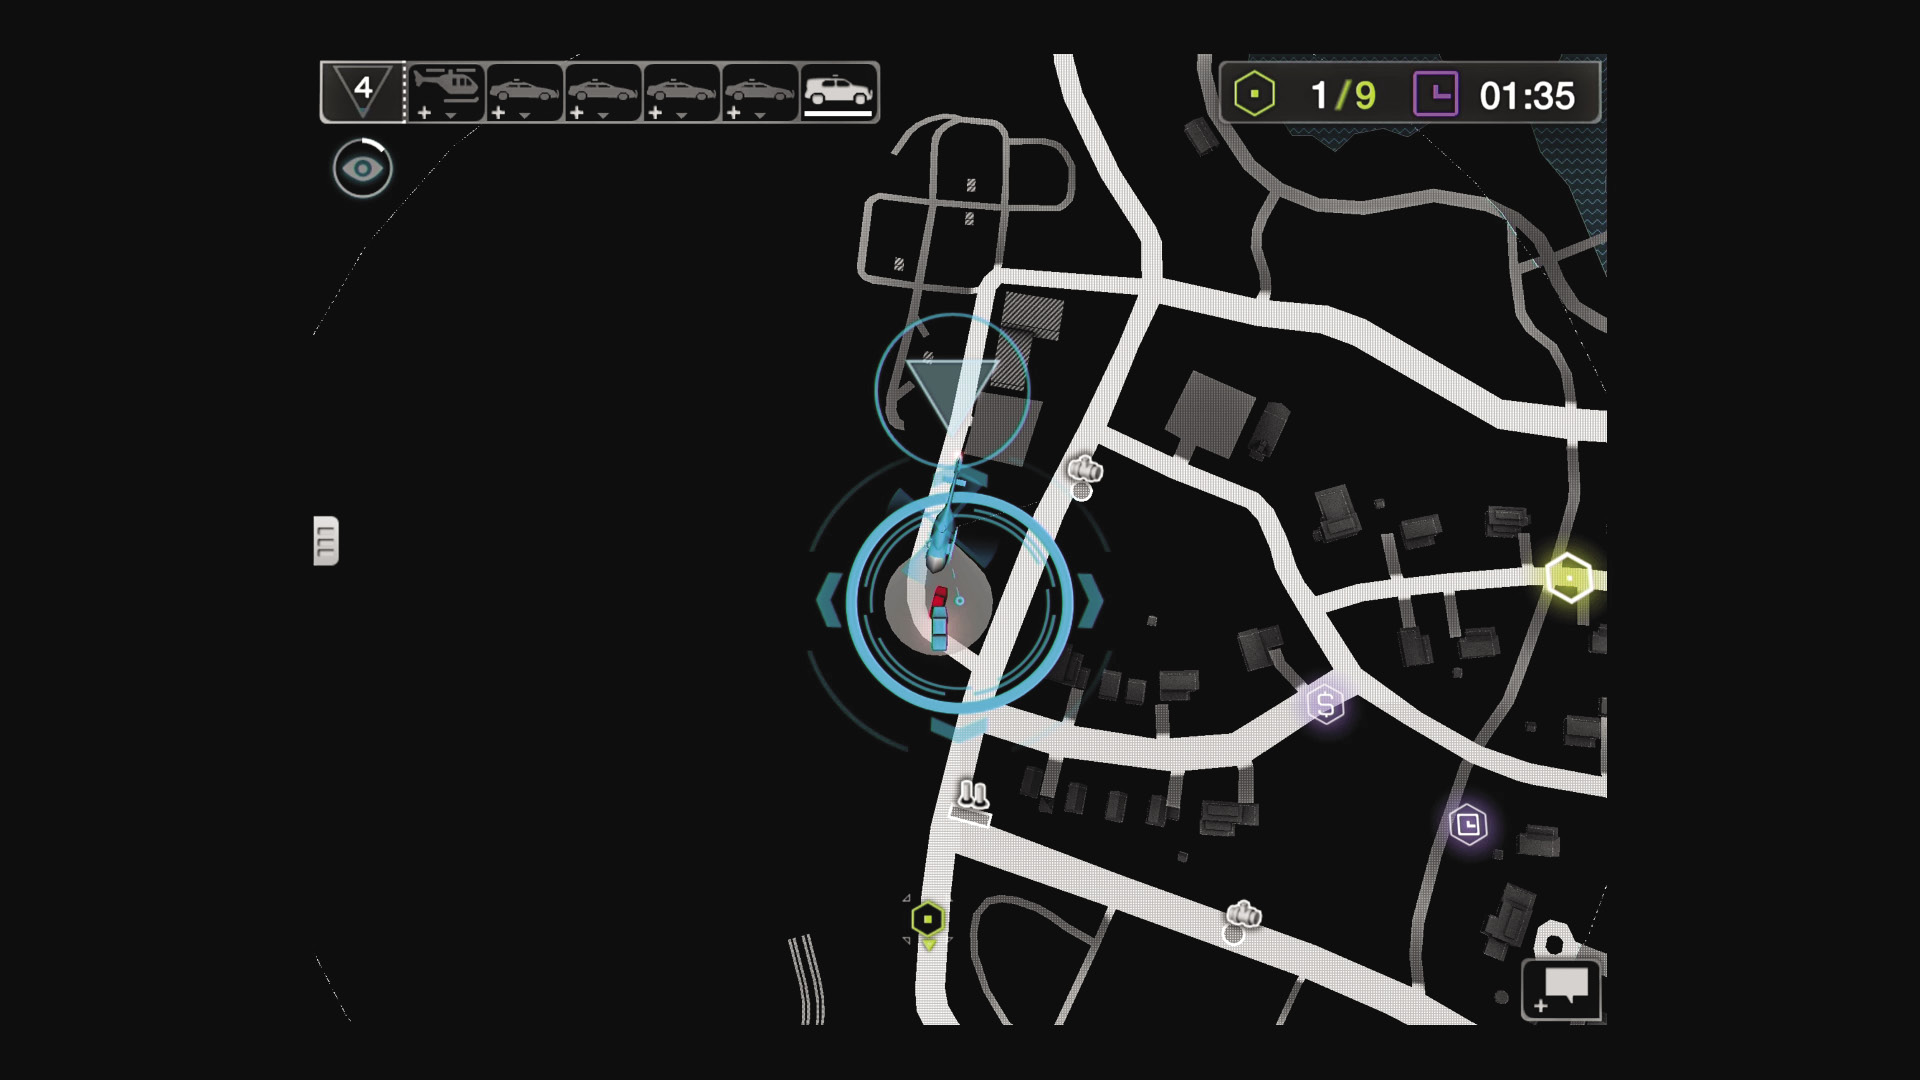
03 / Scratching the Paint Work
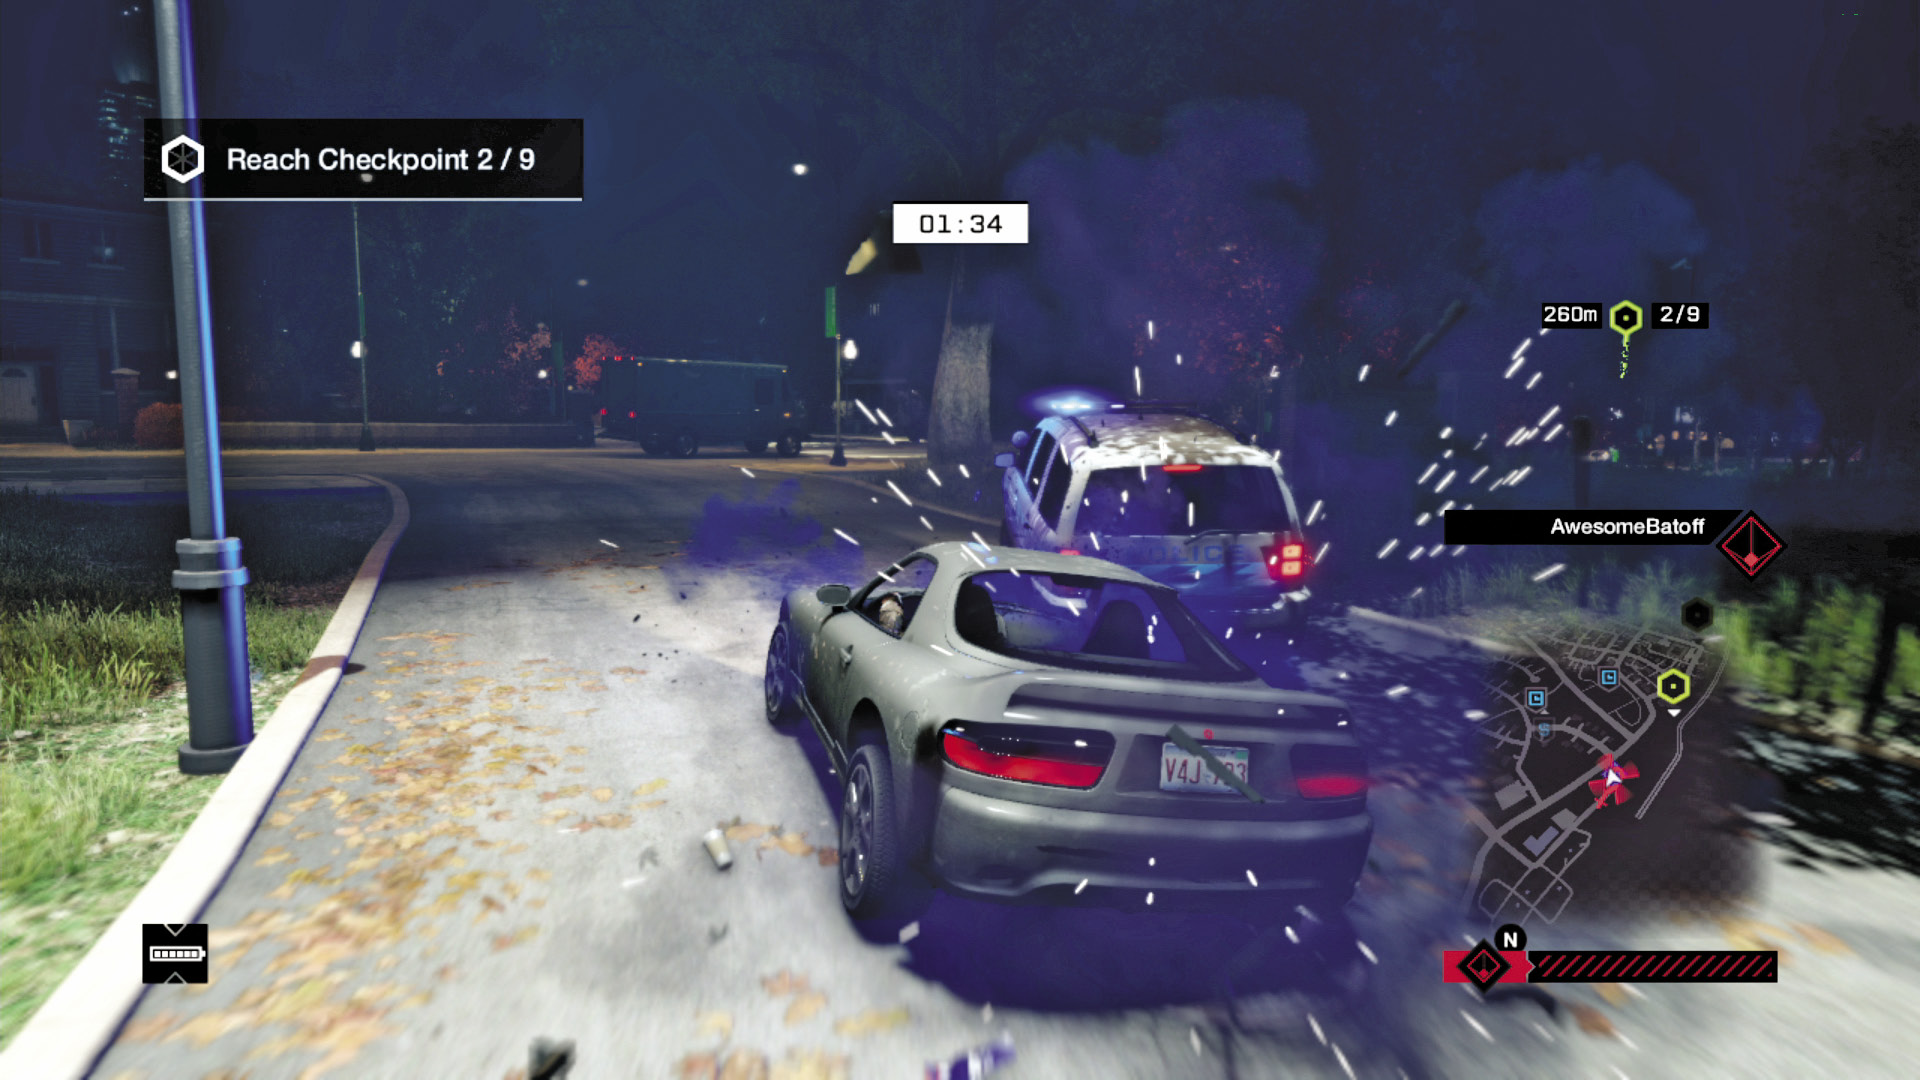
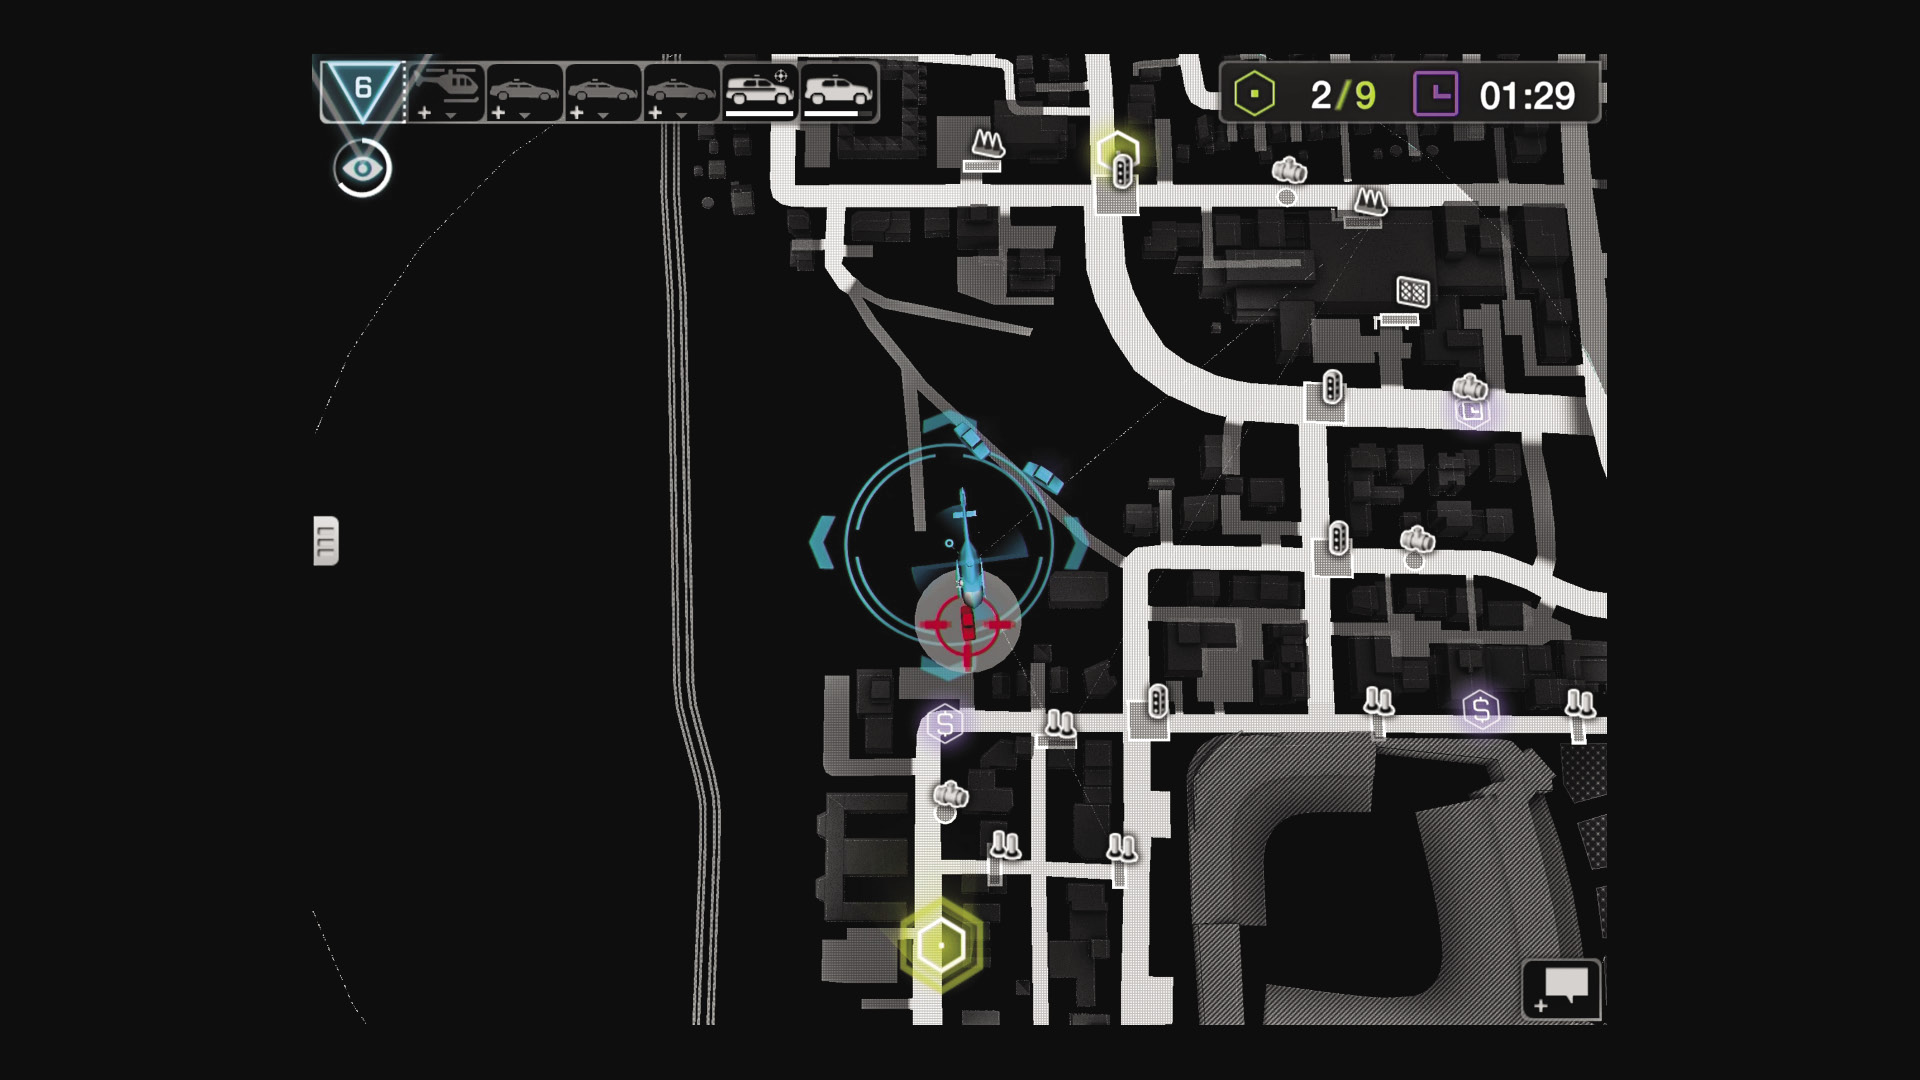
APP: The WD Player makes it through the first checkpoint, narrowly missing a ctOS box (which would have caused a Blackout, actually helping him). That stall allows the App Player to drop in an SUV, blocking the exit nicely.
WD: Heading through the first checkpoint was a breeze, but the helicopter is keeping up with the car, and there’s an SUV appearing too late to avoid. With this kind of damage this early, the car might not last the entire match!
04 / Shortcuts Aplenty
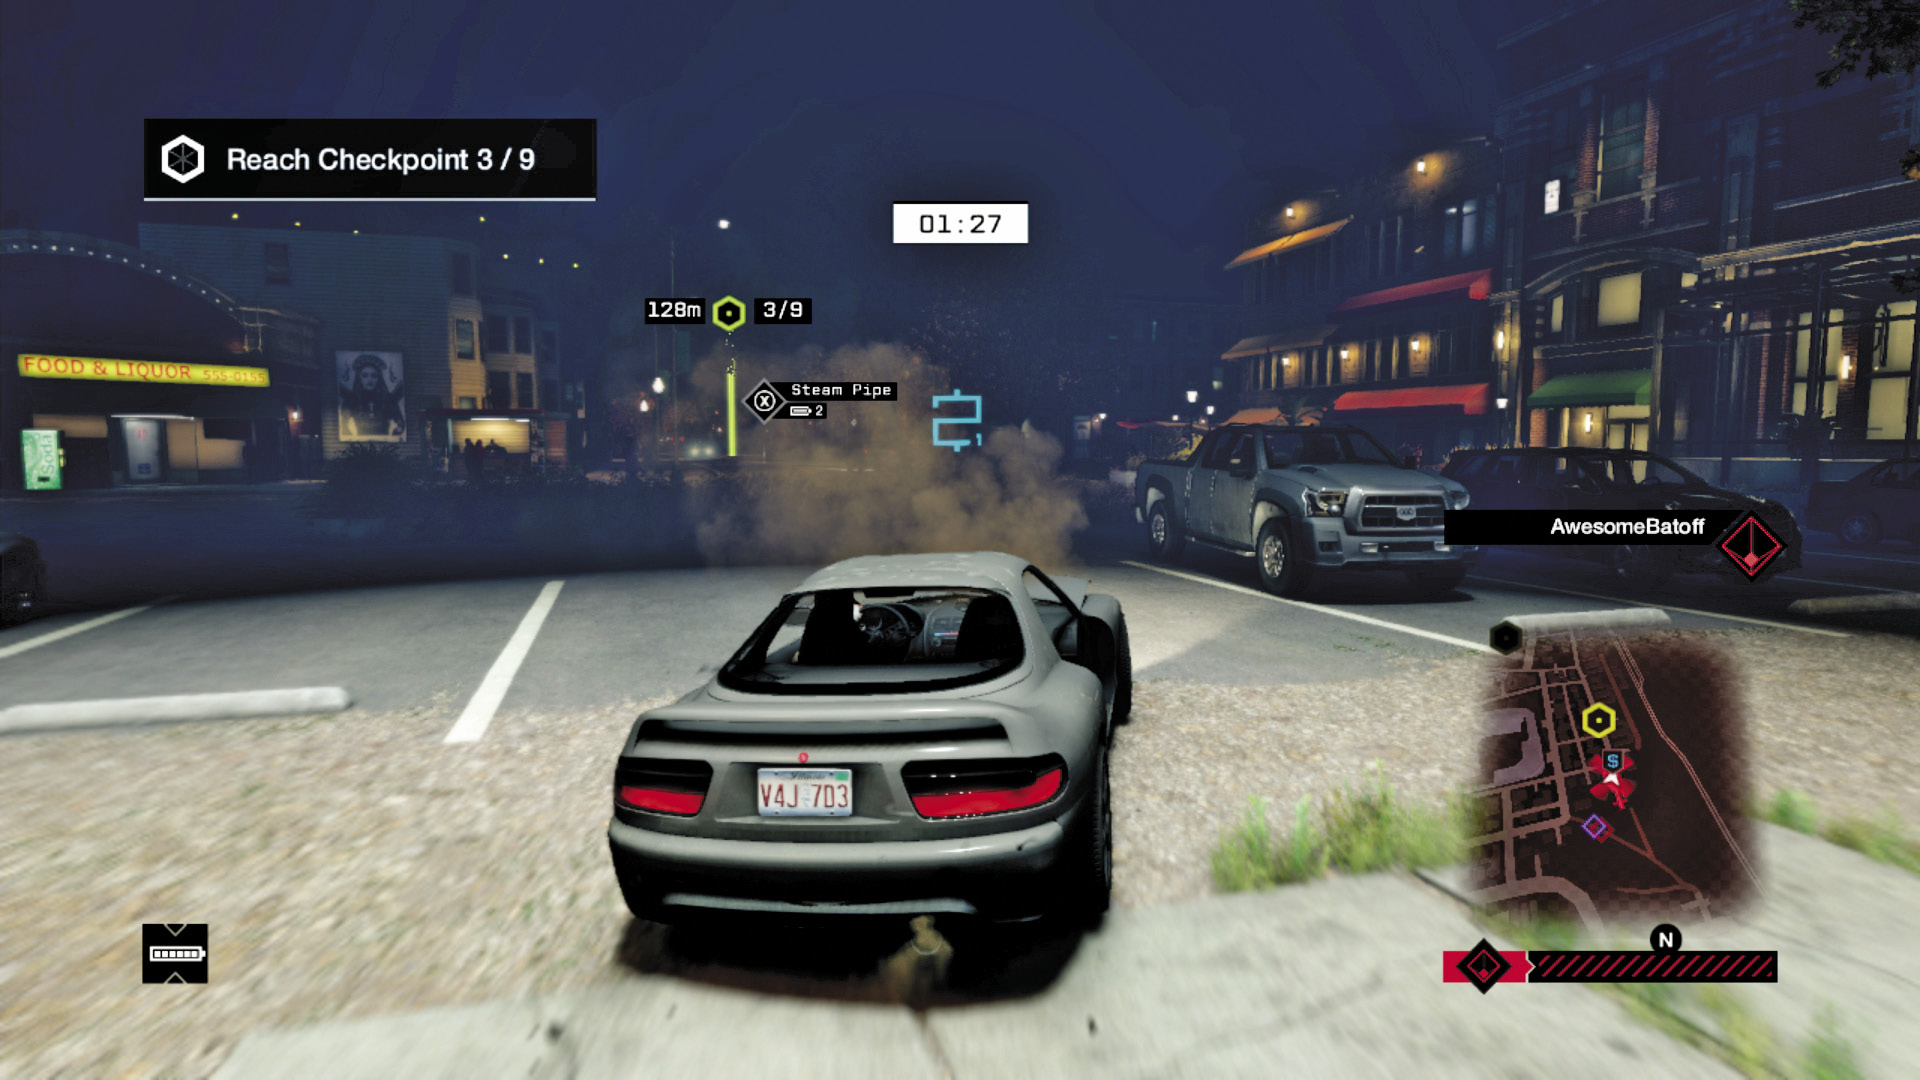
APP: With the spotlight firmly on the car, a second SUV is called up. Unfortunately, the WD Player drives onto dirt ground and then over a rocky outcrop. The police can’t follow directly, and the ground units have to use firmer ground.
WD: Even in the dark, and with that high-intensity searchlight and sniper gradually reducing the car to mangled metal, the WD player’s memorization skills of this Parker Square rocky jump and shortcut yield dividends and some extra cash.
05 / Wanton Destruction of Police Property
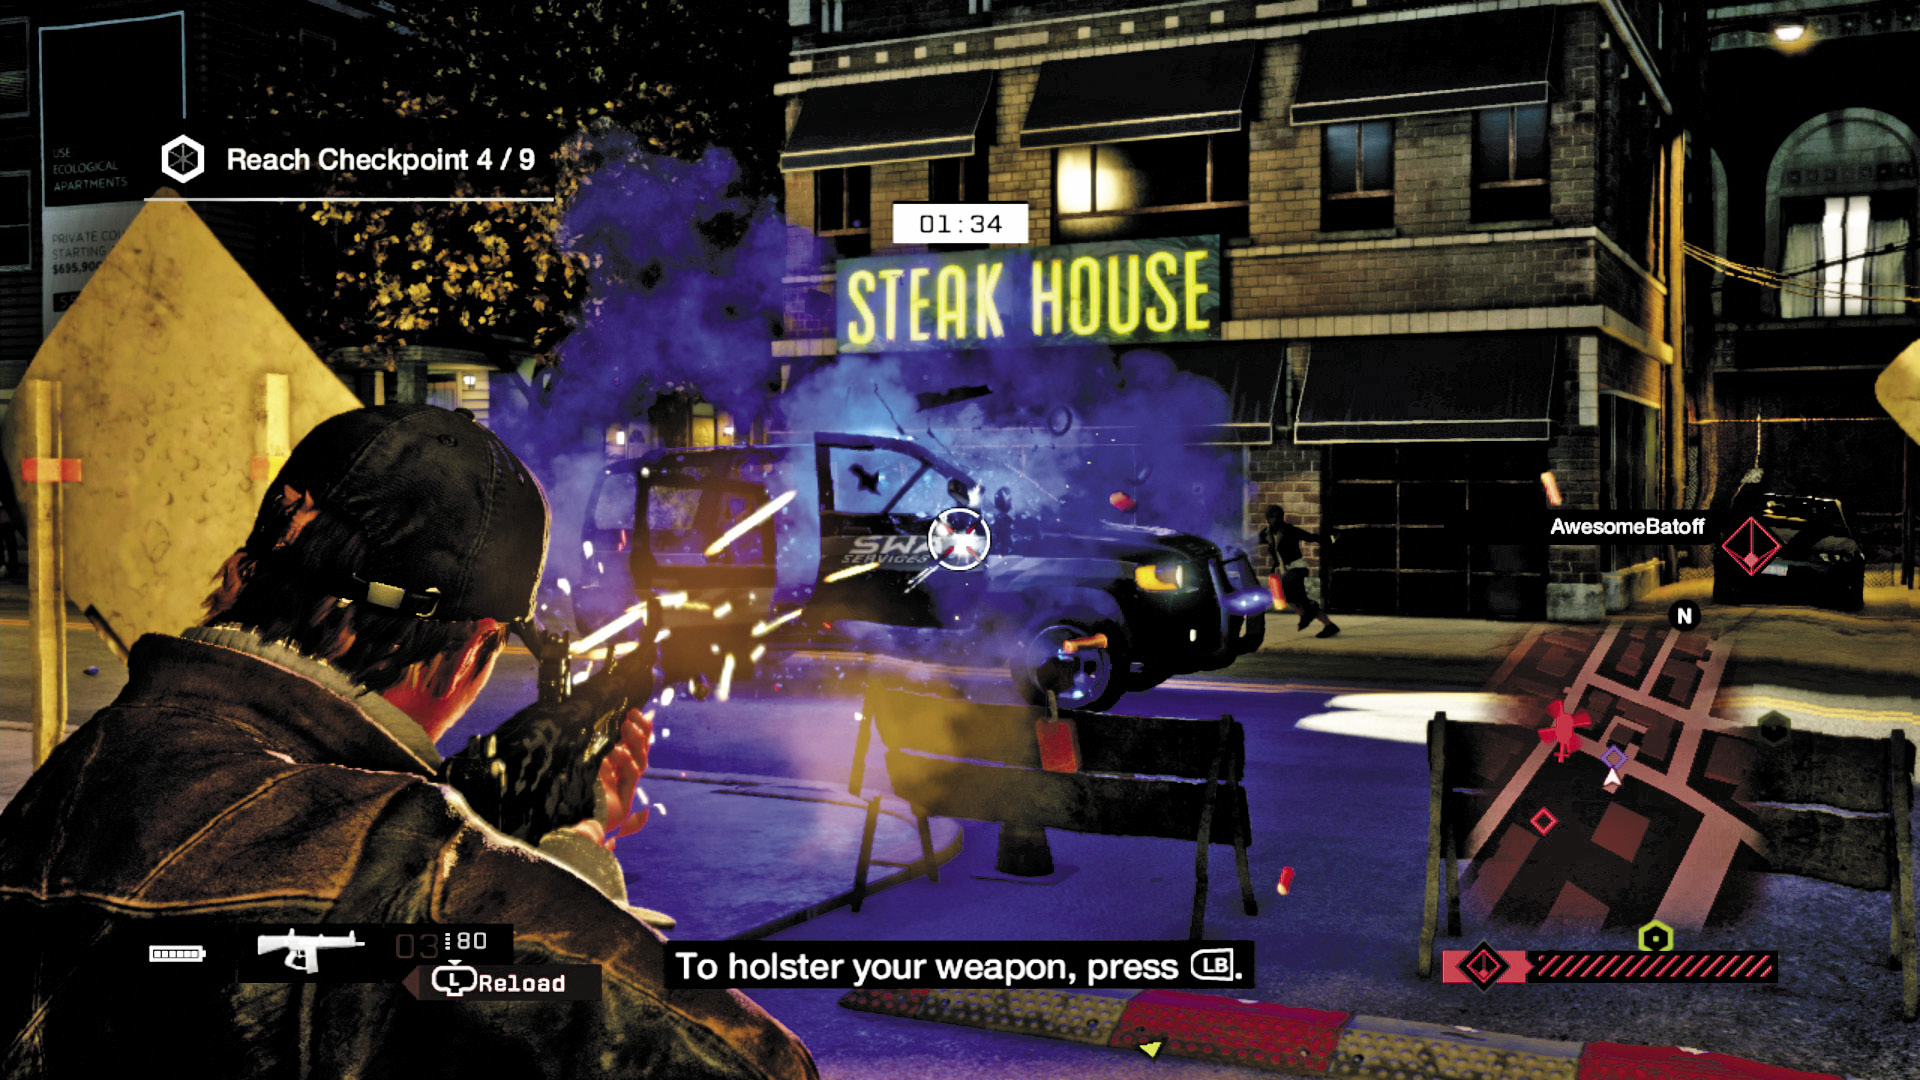
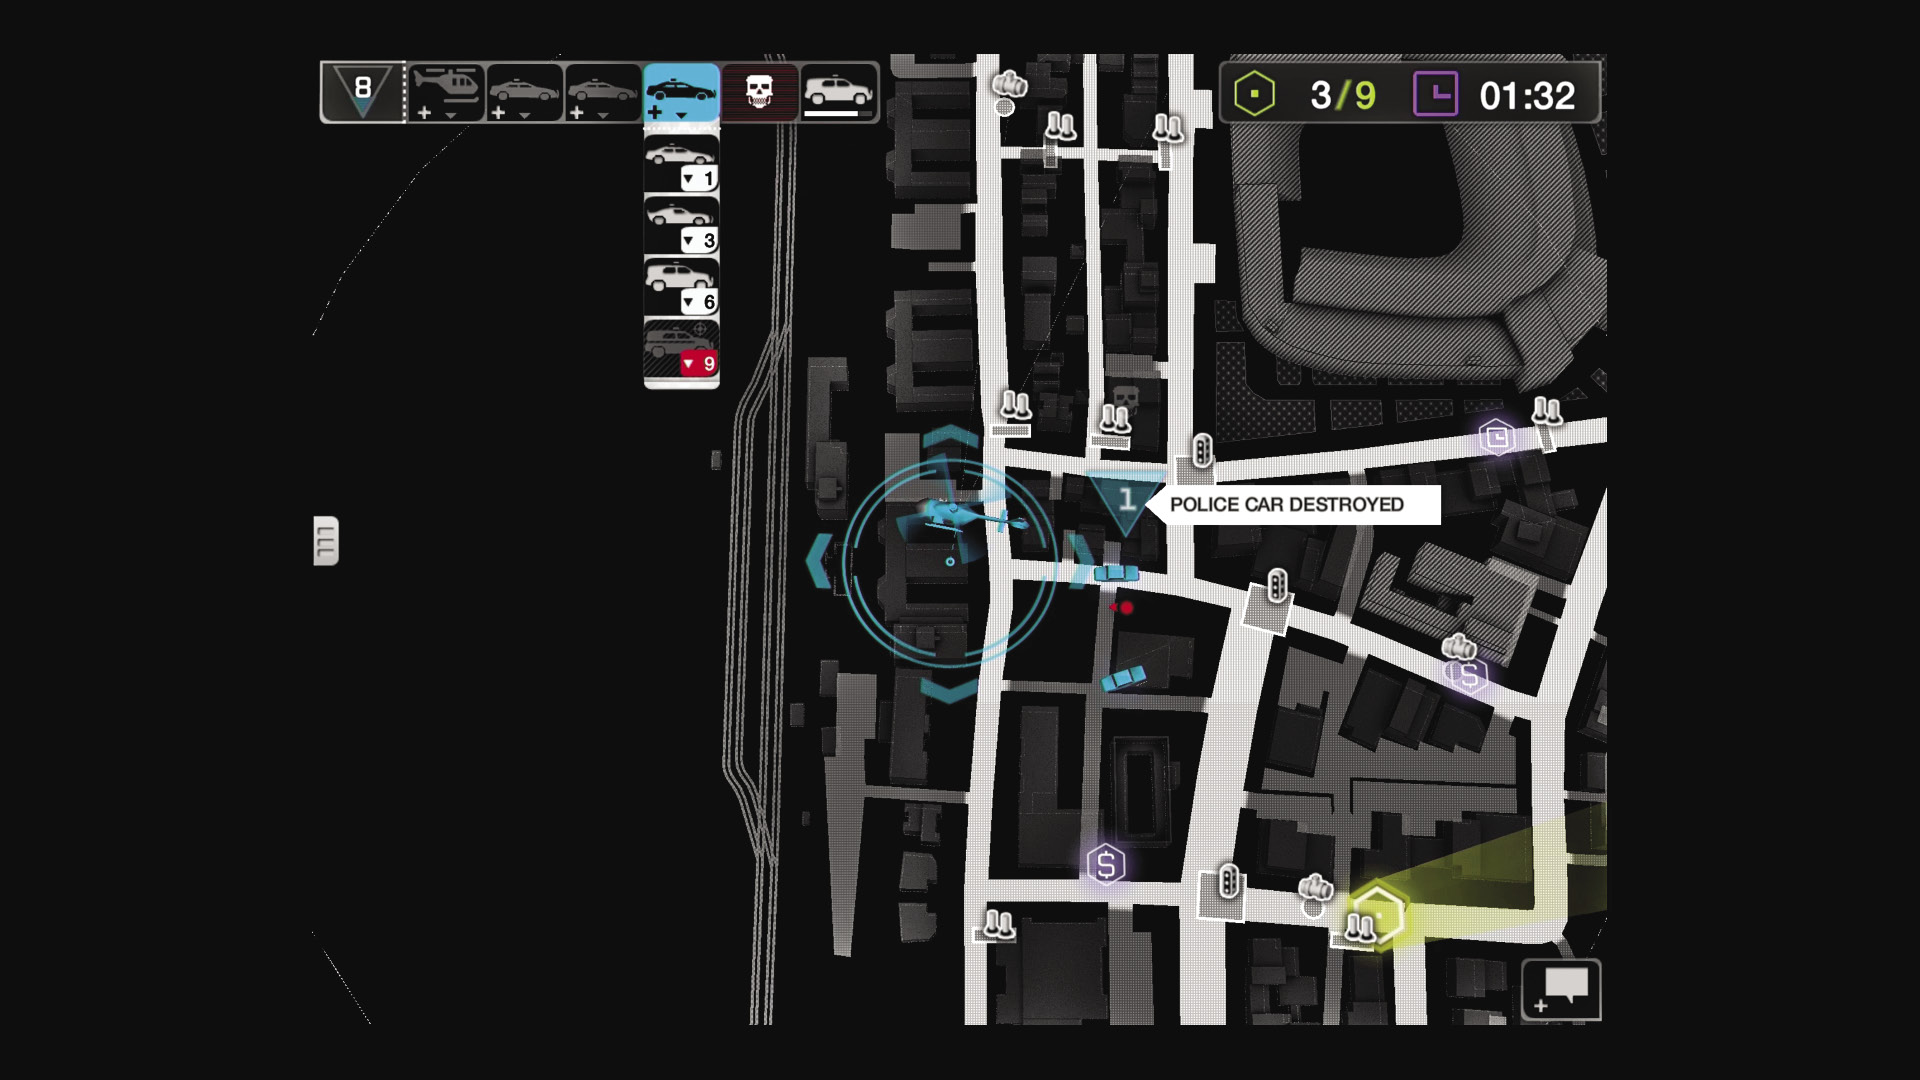
APP: The constant scraping into vehicles and the jump down to the cash causes the WD Player’s car to start smoking, and he ditches it after taking a corner at the construction yard a little too haphazardly. Meanwhile, you’re waiting to drop in a SWAT SUV.
WD: The WD Player brings all the weaponry he uses during single-player mode, so unleashing with an AR-12 shotgun wastes the SUV in seconds. However, this simply adds points to the App Player’s total. Plus, he’s getting attacked from behind. Is this the end?
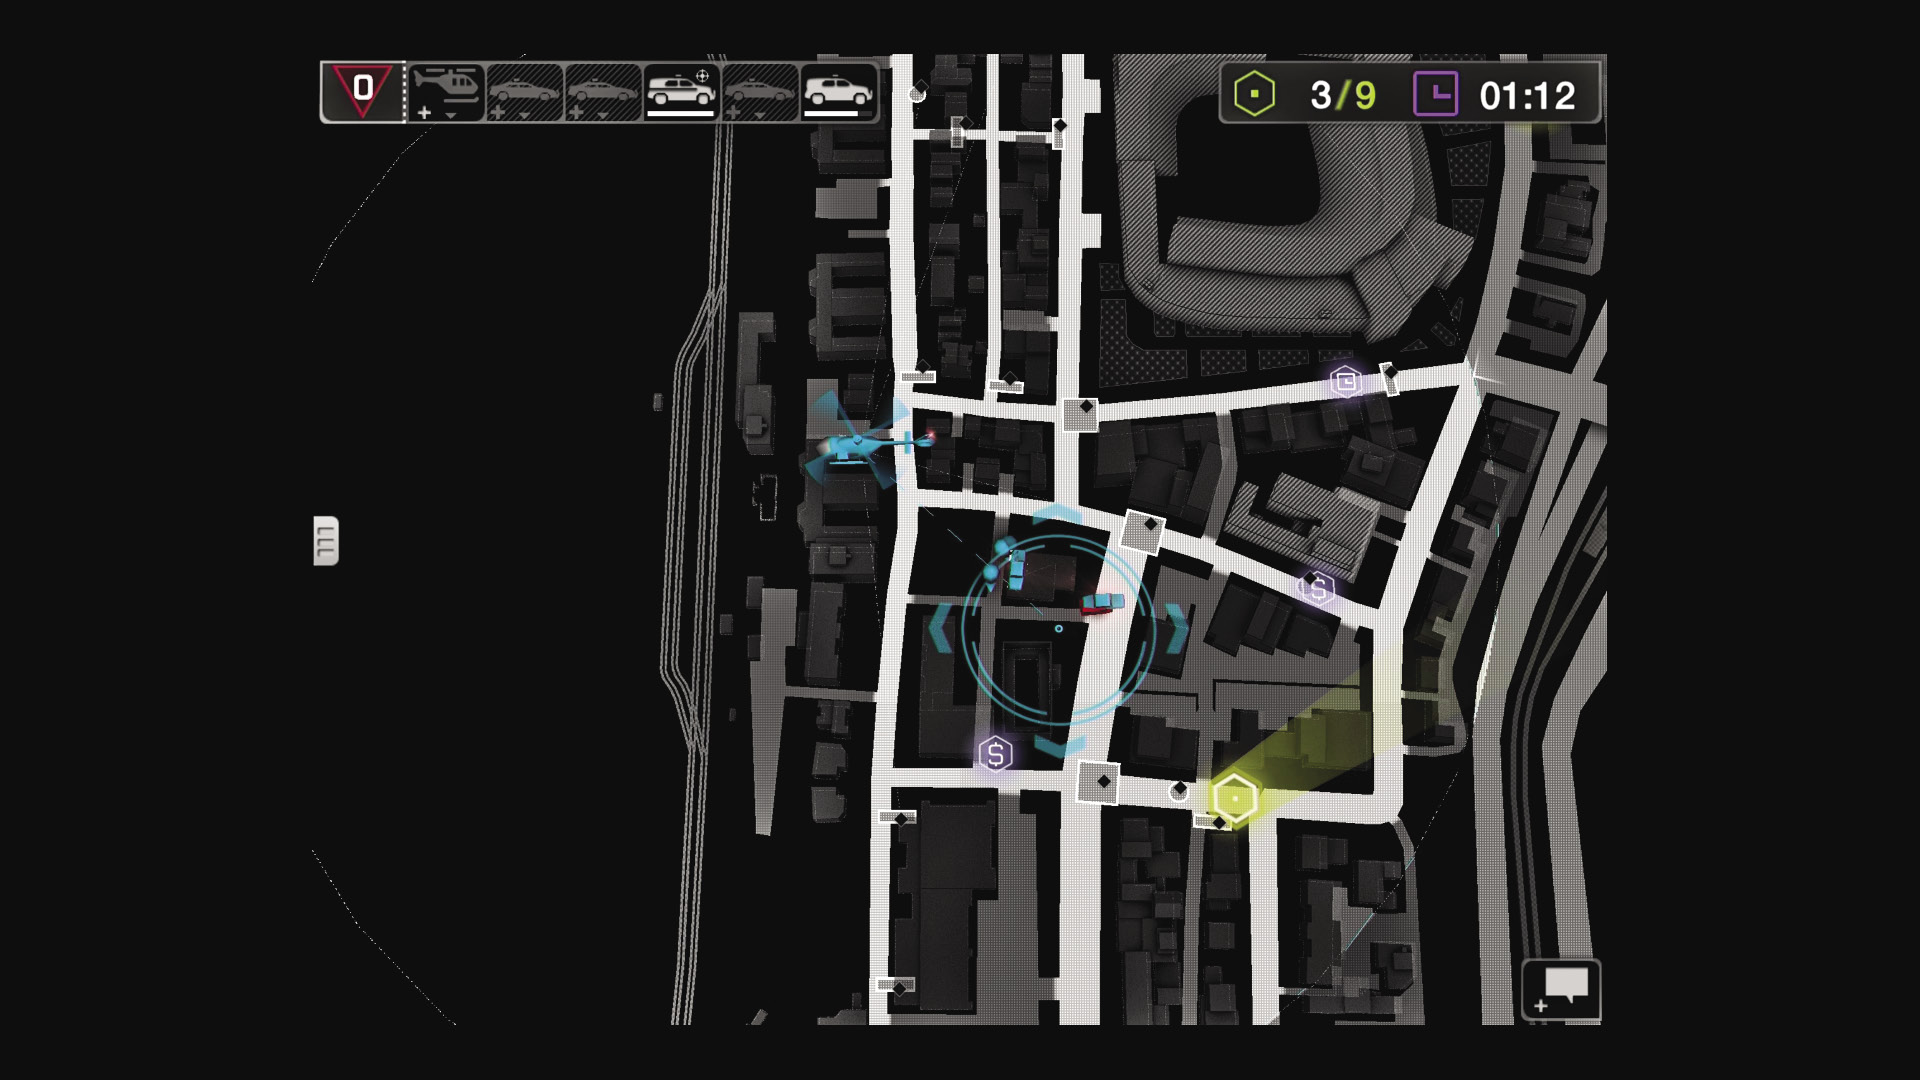
06 / SWAT SUV Is Go!
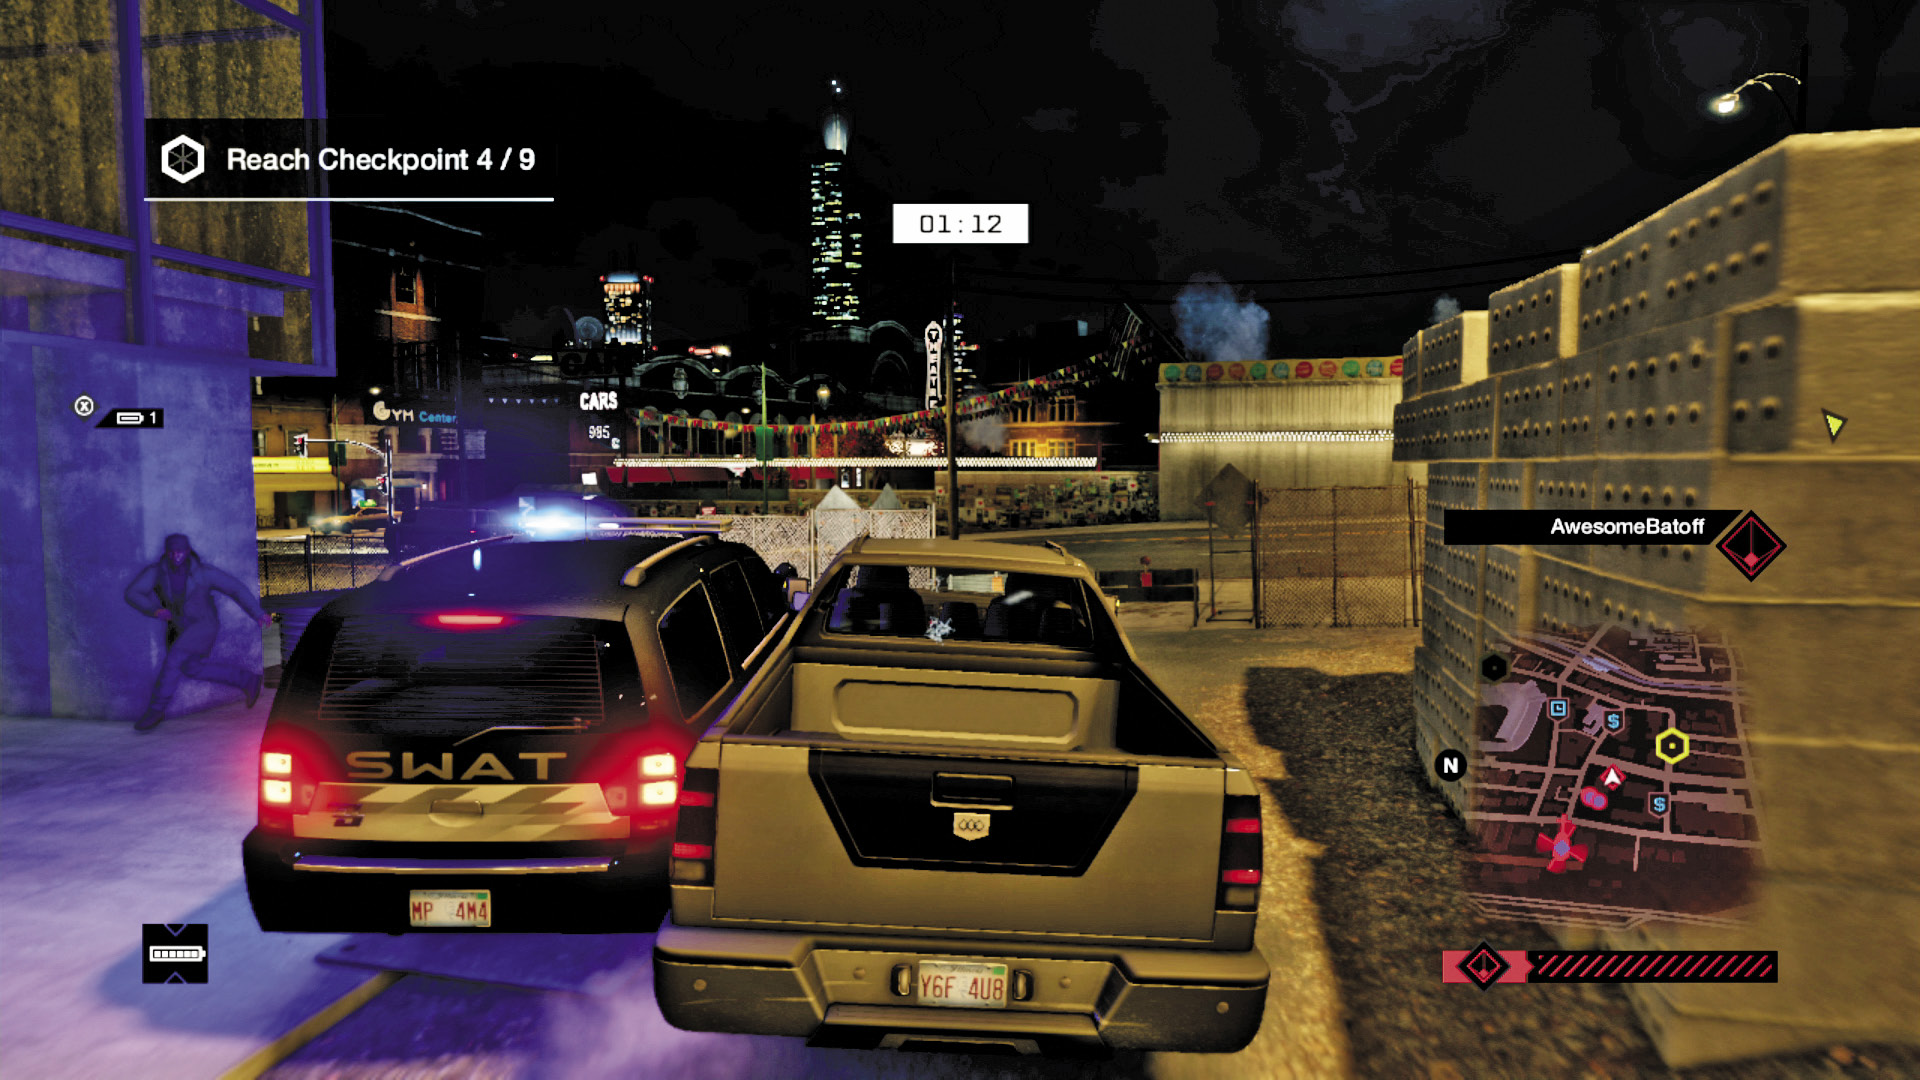
APP: With the points back from the SUV, the App Player drops in a SWAT SUV, the most powerful ground unit available. It immediately seeks out and sideswipes the WD Player, who just avoided death by scrambling to a truck.
WD: Another couple of police shots and the WD Player would have been done for; instead, he’s climbed into a heavy-duty truck capable of withstanding far more punishment. Time to focus on more checkpoints while keeping the SWAT SUV at bay.
07 / Massacre at Molar’s Grill (Part 1)
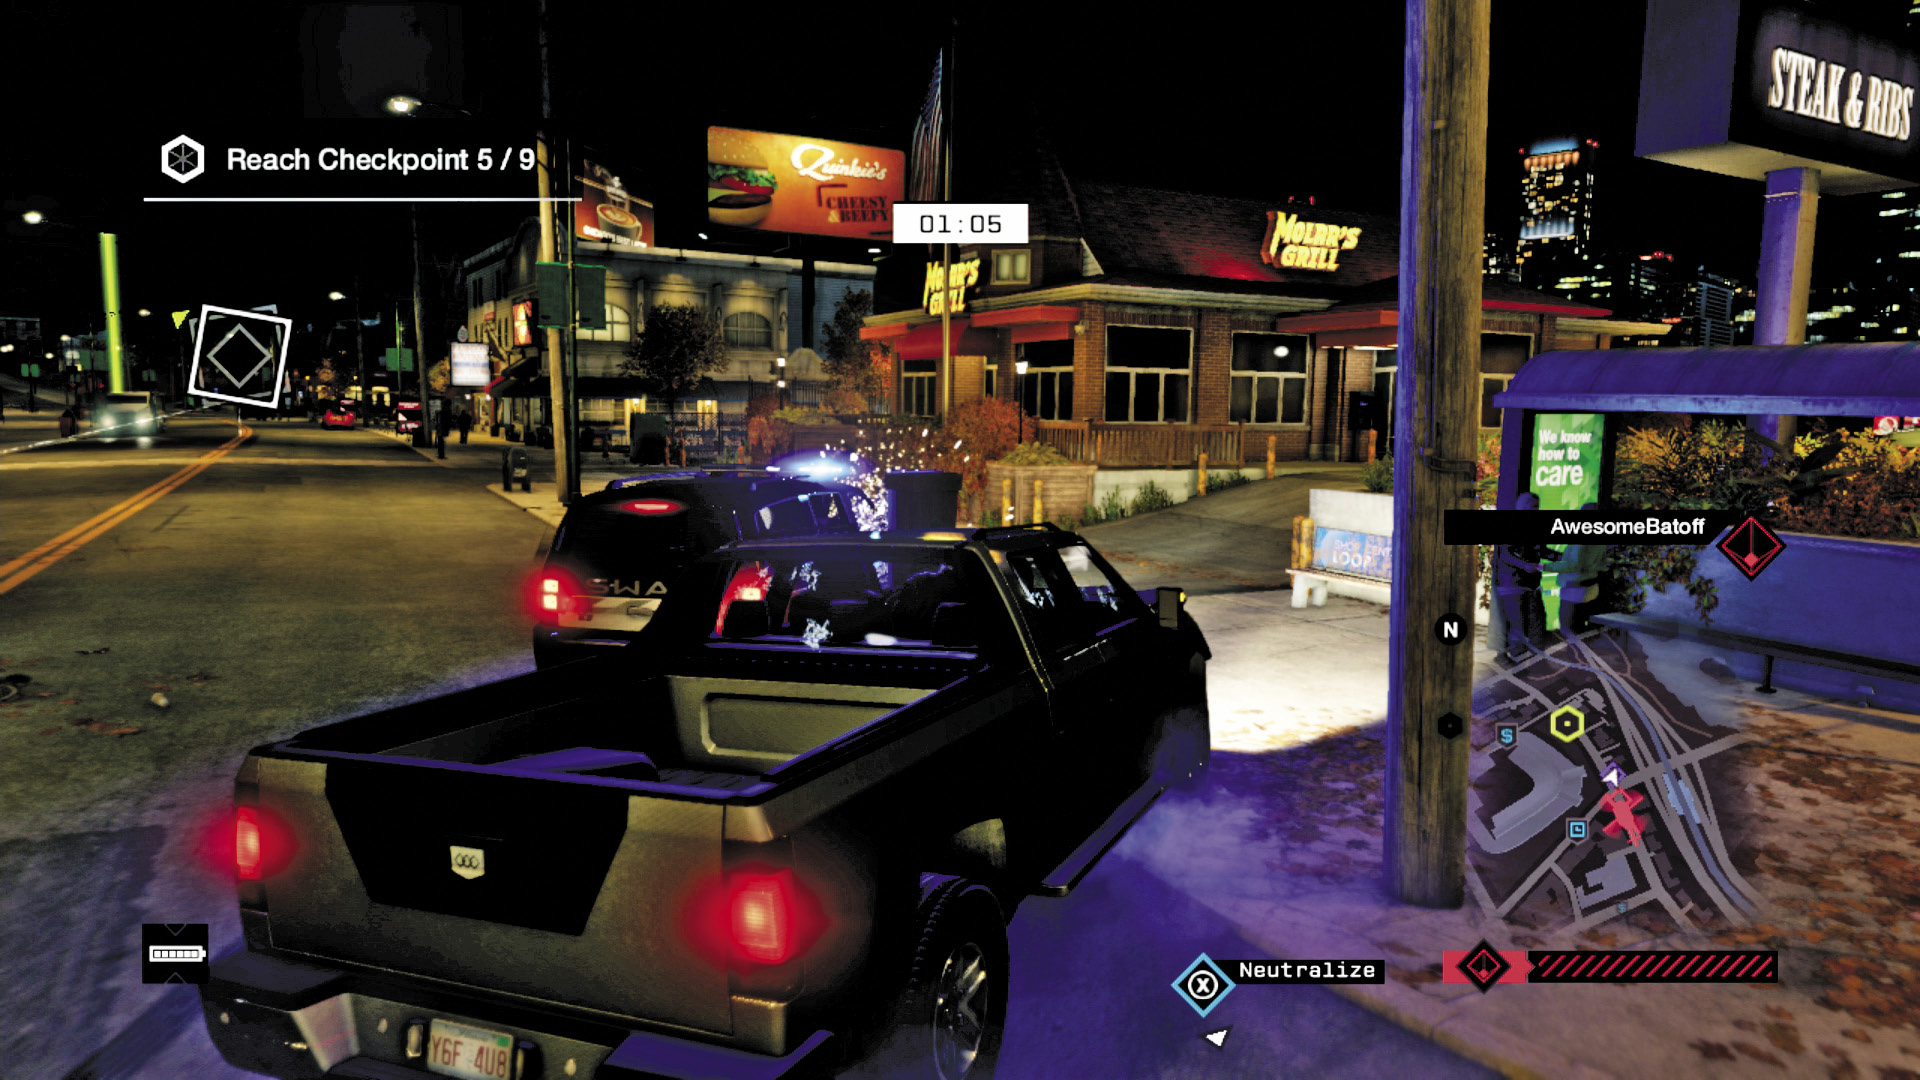
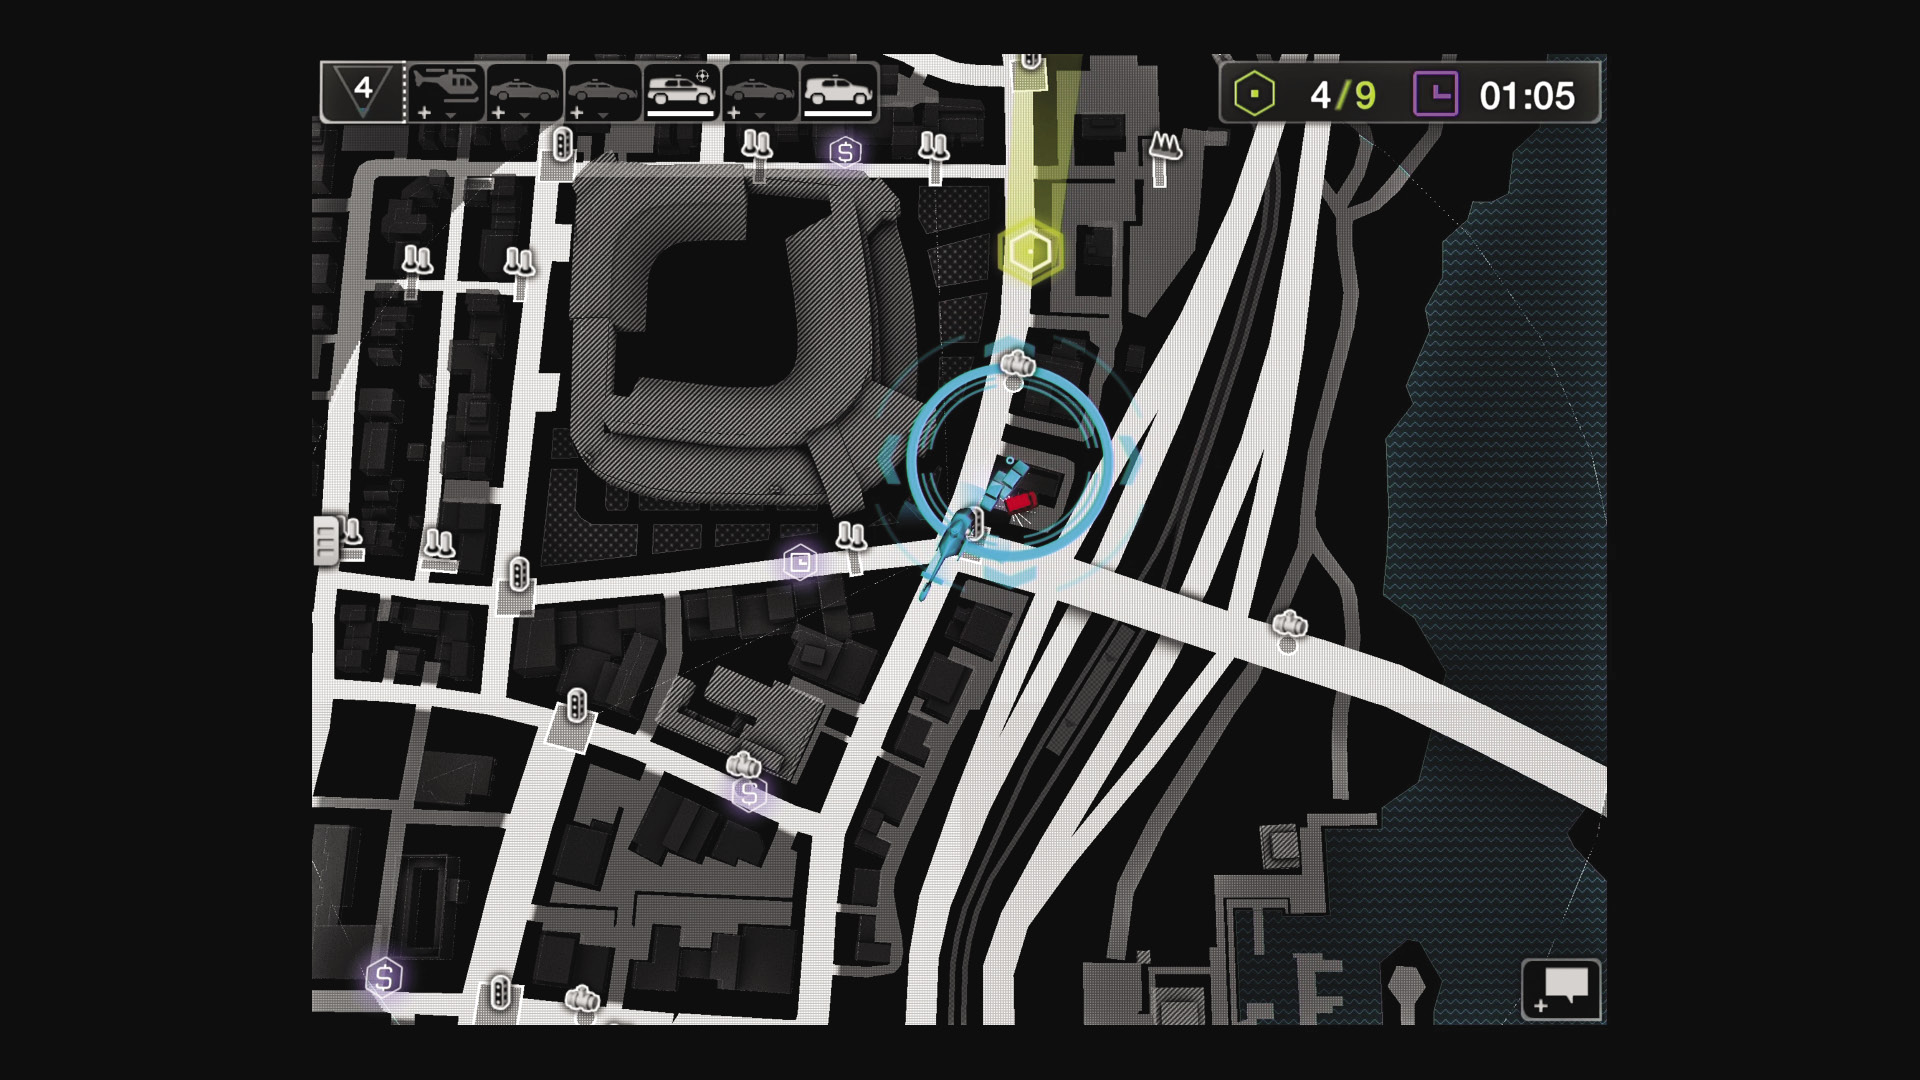
APP: Another SUV (of the six-point variety) is dispatched by the time the chase reaches the front of May Stadium. Sometimes, the mere threat of a steam pipe explosion can cause the WD Player to take evasive maneuvers.
WD: The truck was in good working order, until that SWAT SUV simply refused to give up the chase. Unlike most ctOS Mobile matches, the truck was ditched again after a swerve to avoid a possible steam pipe and a side shunt by the police.
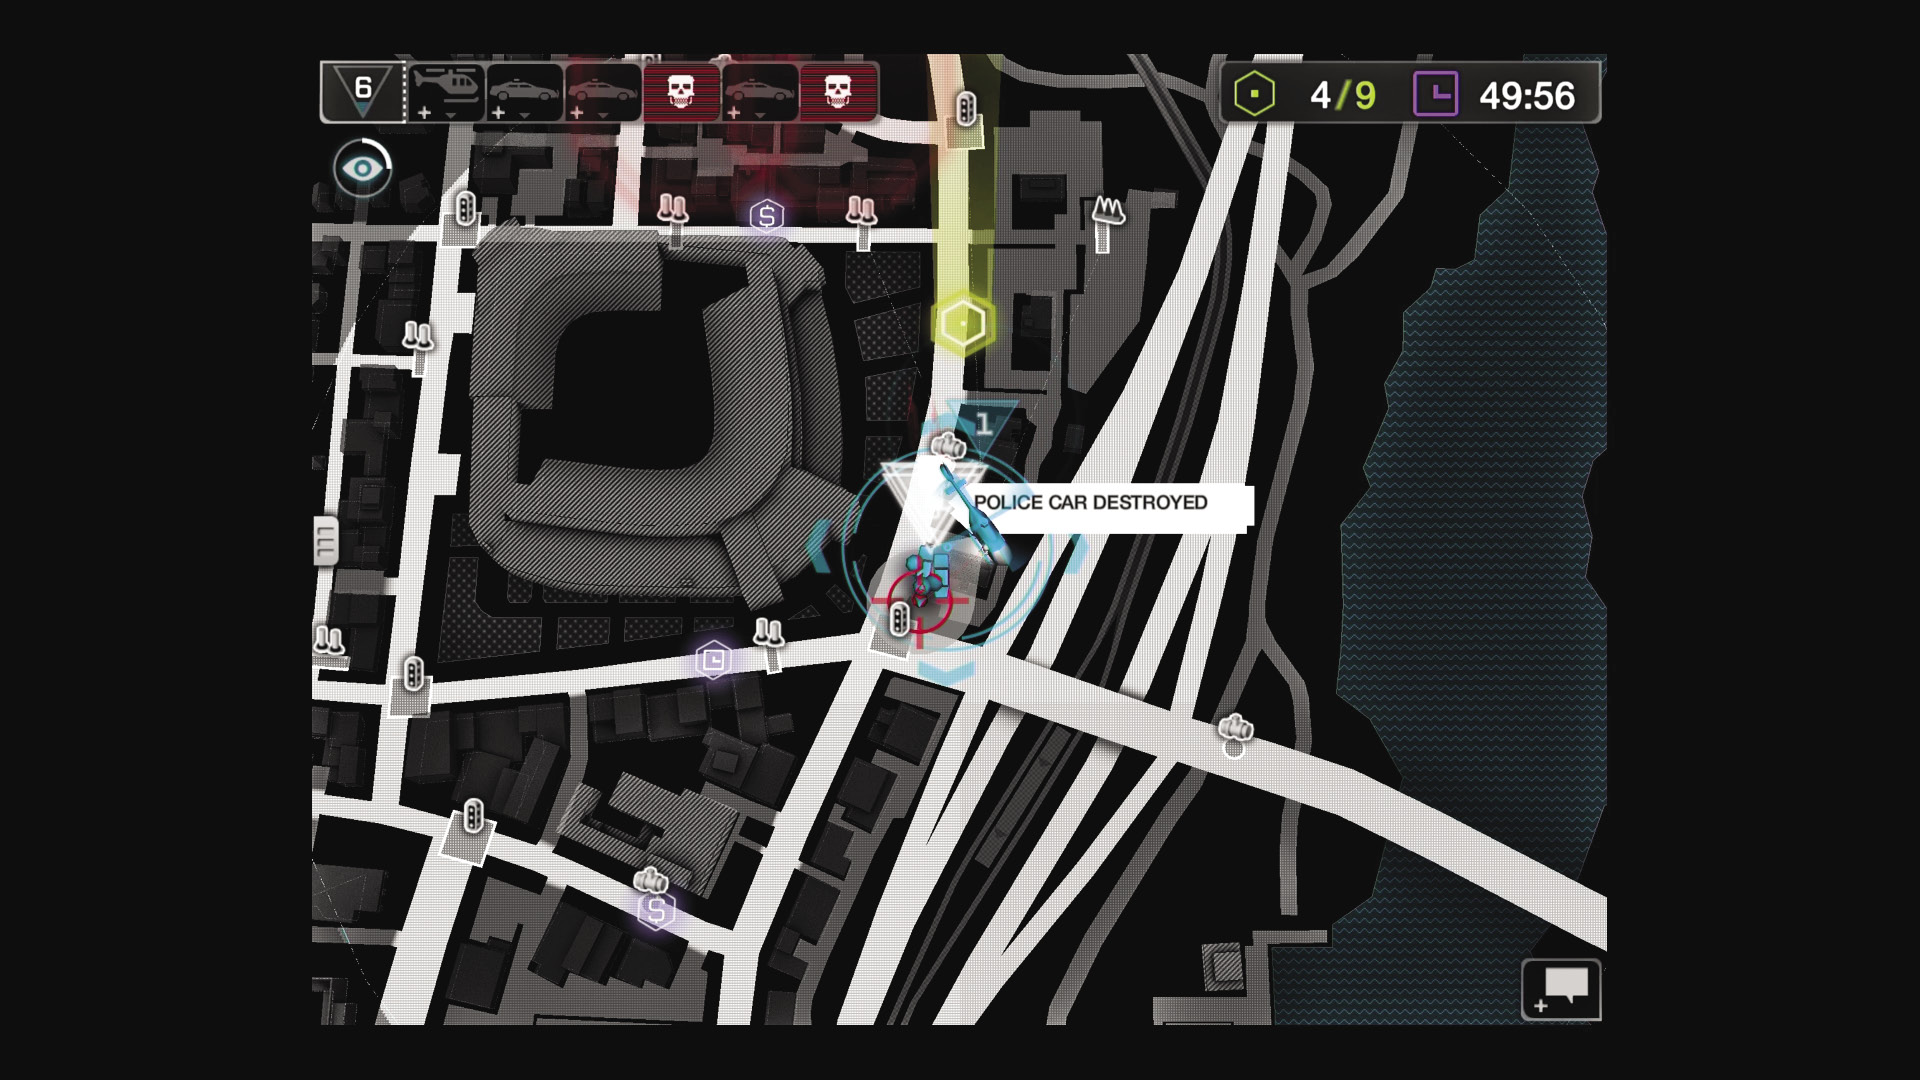
08 / Massacre at Molar’s Grill (Part 2)
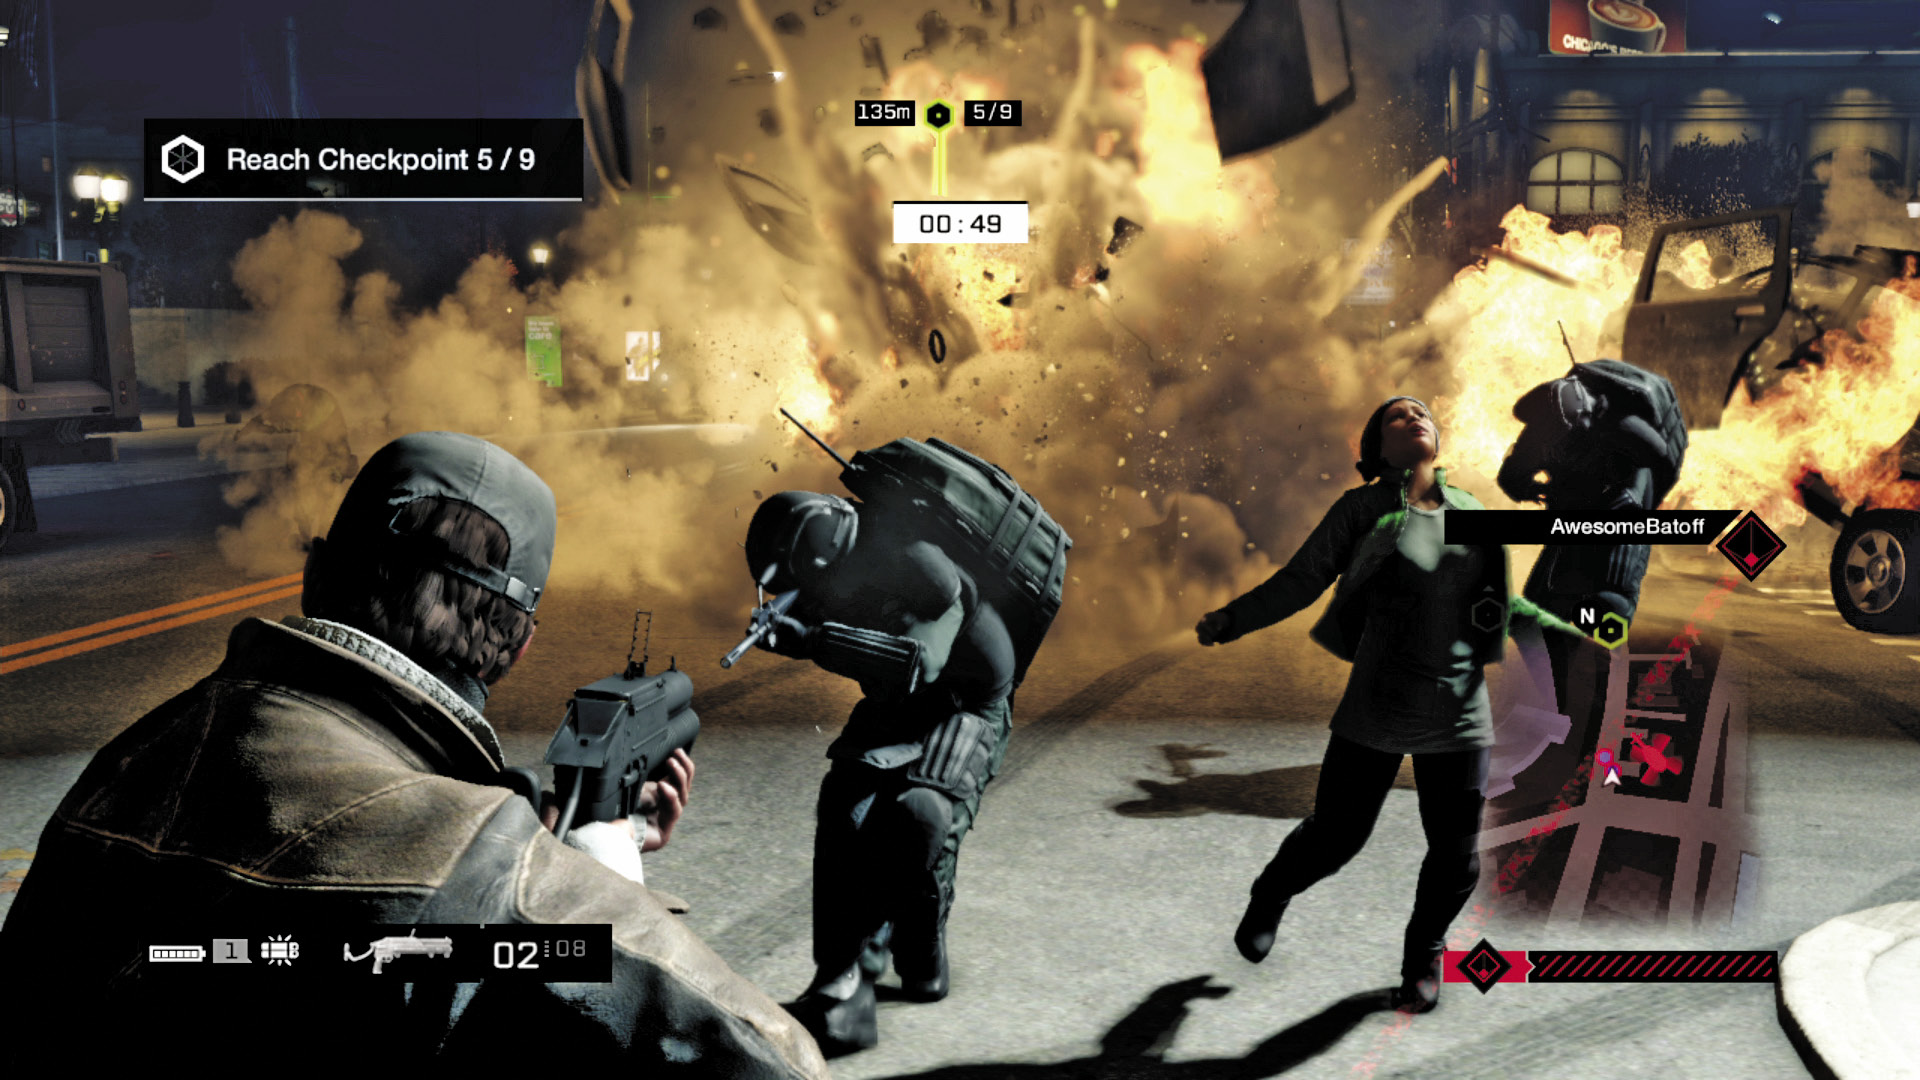
APP: The Enforcers inside the SWAT SUVs take great pleasure in blasting away at a hapless punk on the run. Except one armed with a grenade launcher; the WD player gets off a lucky blast, destroying two police vehicles at once!
WD: Winged by the constant sniping from the chopper, the situation seems dire. But with some lobbed projectiles and a devastating grenade salvo, WD Player lives to fight again! Though he’s rapidly running out of time.
09 / Reinforcements Have Arrived
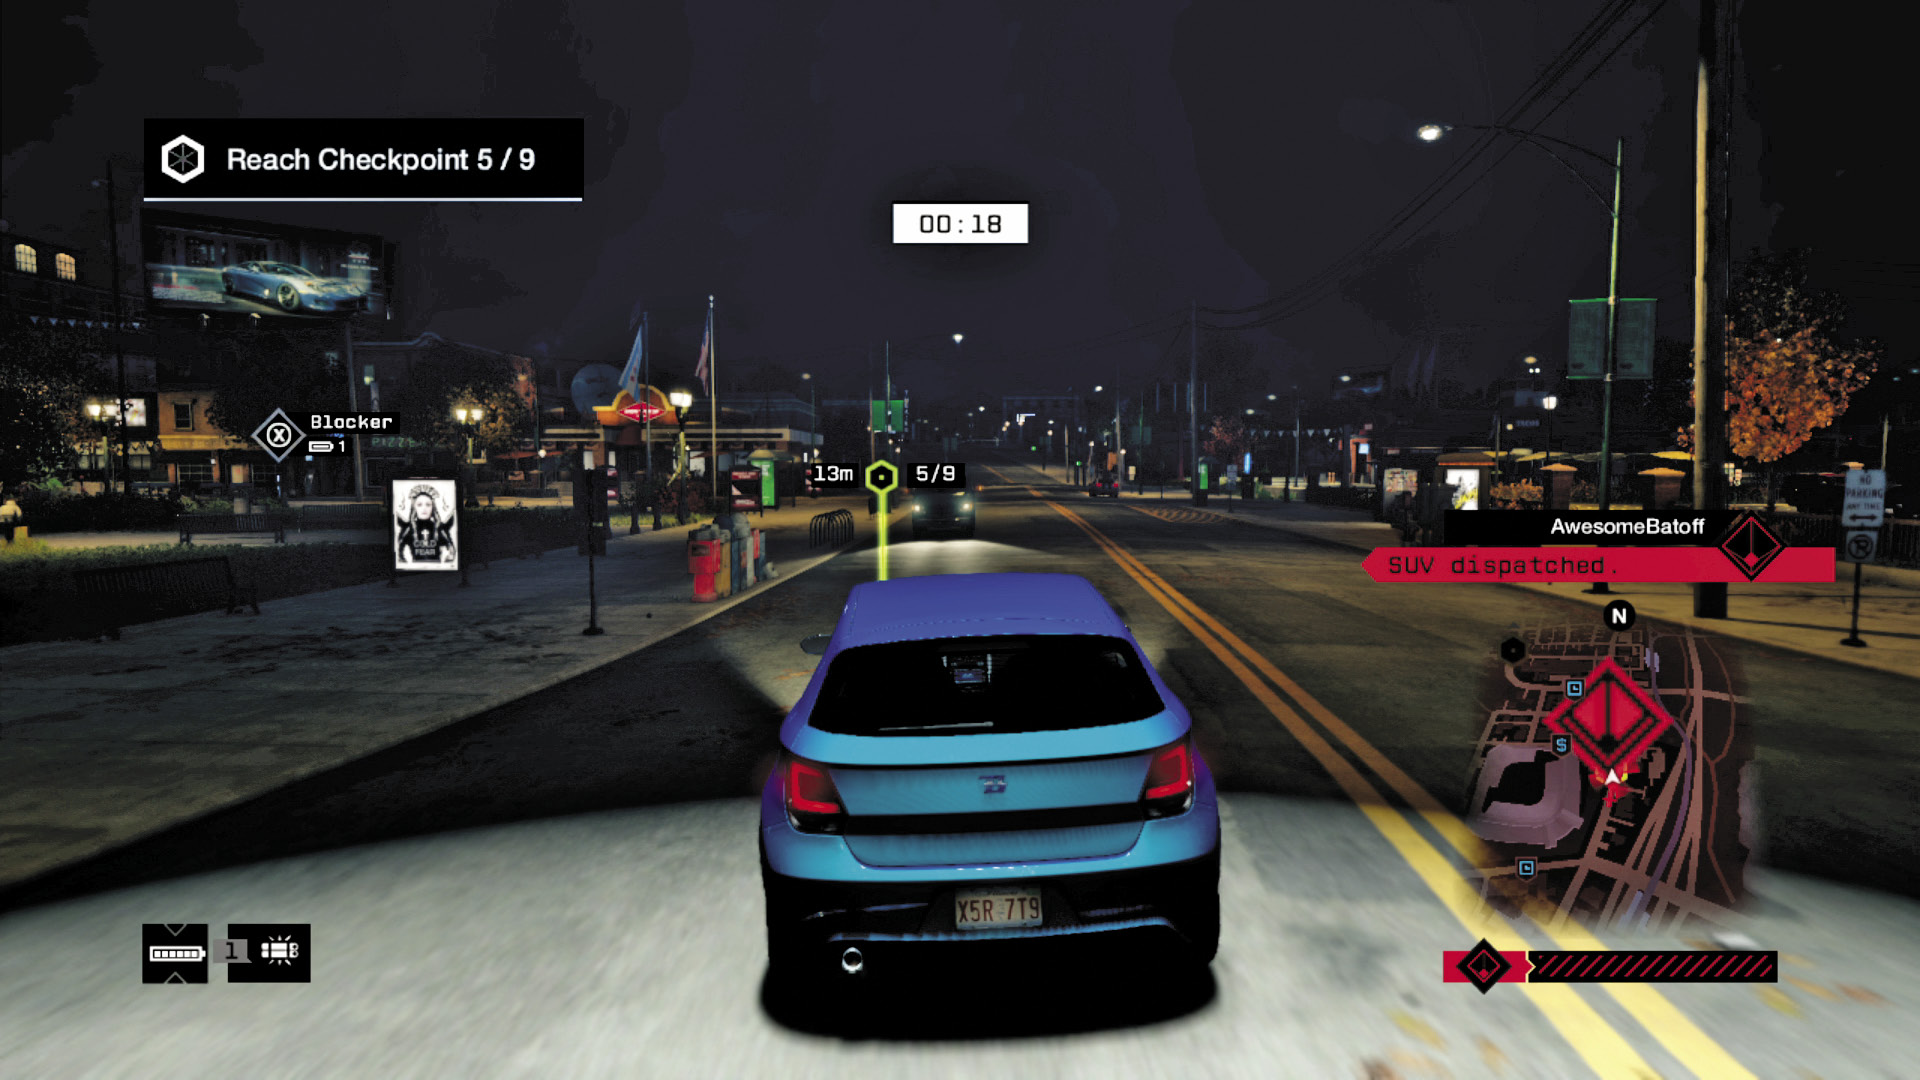
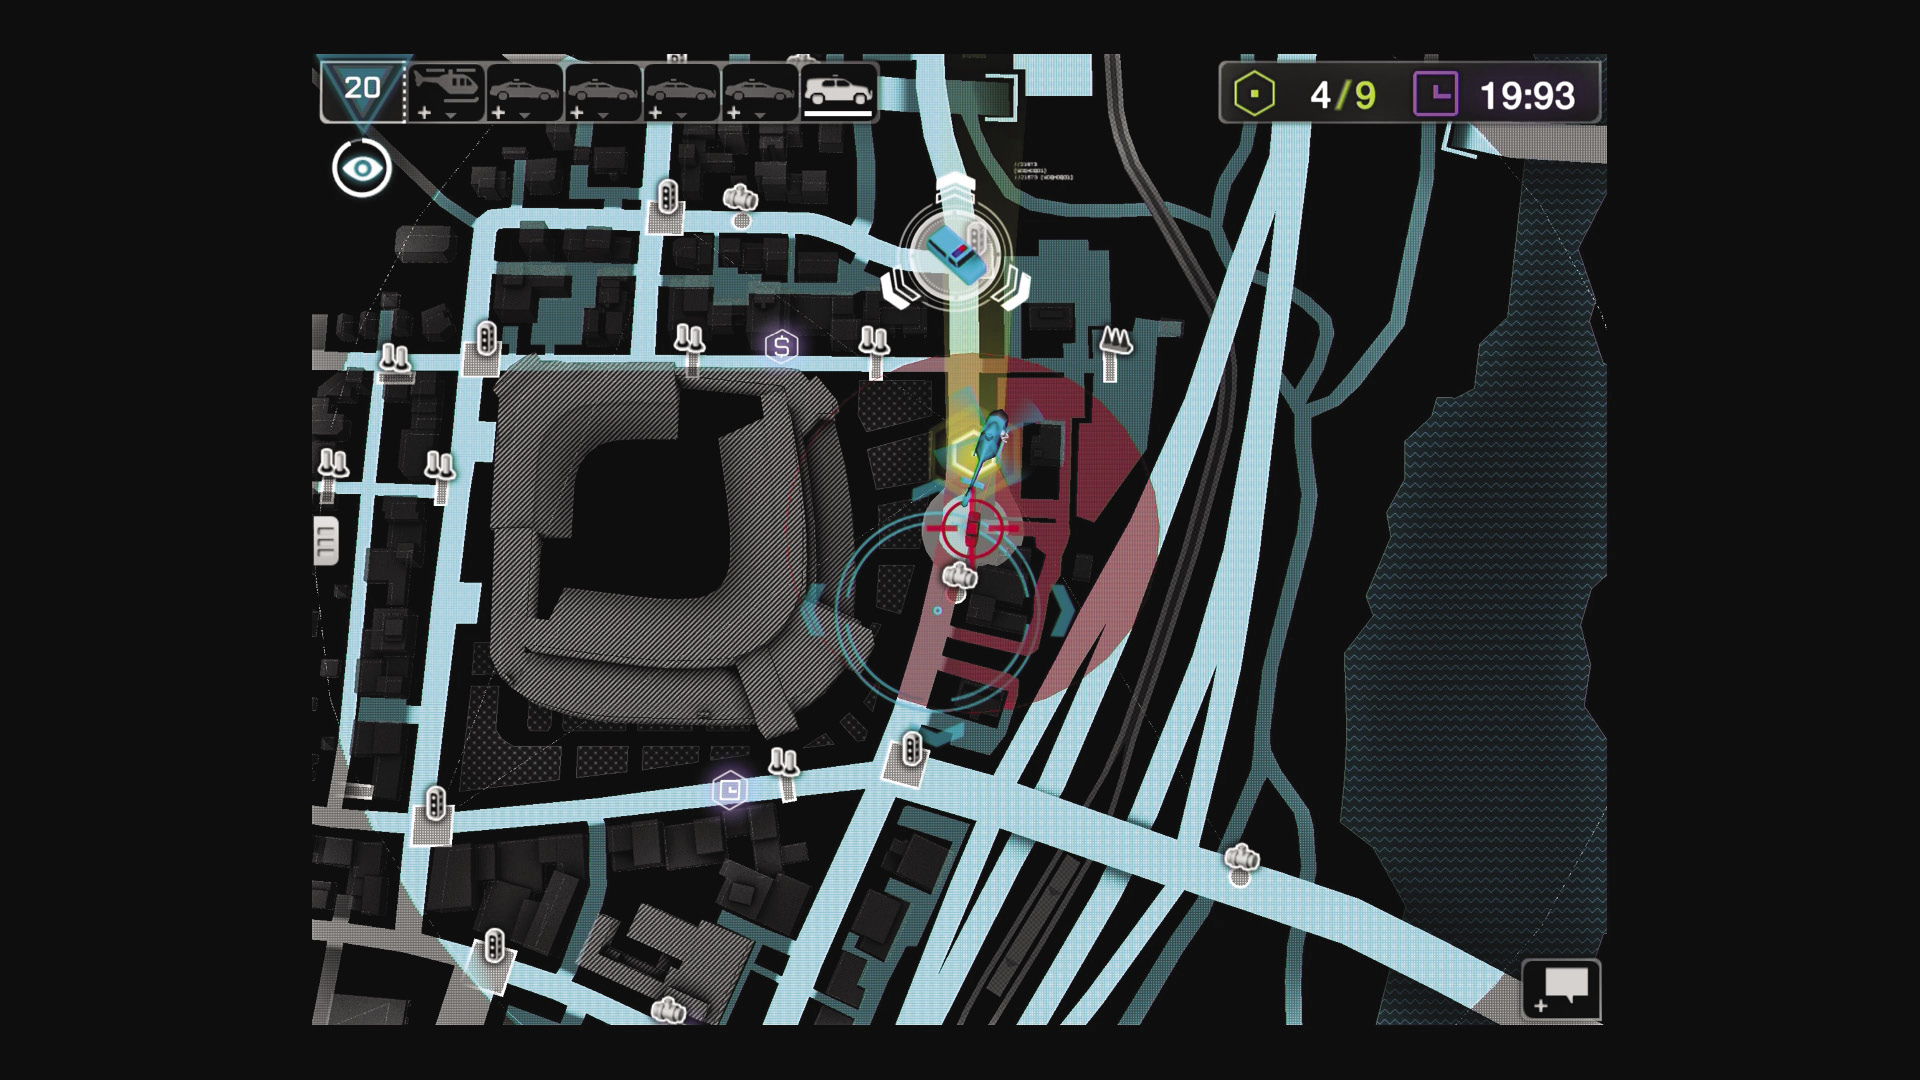
APP: Laying waste to cops and vehicles isn’t wise, as the App Player now has a maximum of 20 points to instantly spend! Six of these points immediately go into a new SUV, dropped north where the rival must drive past.
WD: Quickly bounding into the parking lot without succumbing to sniper fire, WD player takes a new vehicle for a spin, aiming it directly for the next checkpoint. With only a few seconds left, there can be no more delays.
10 / Dropping the Hammer
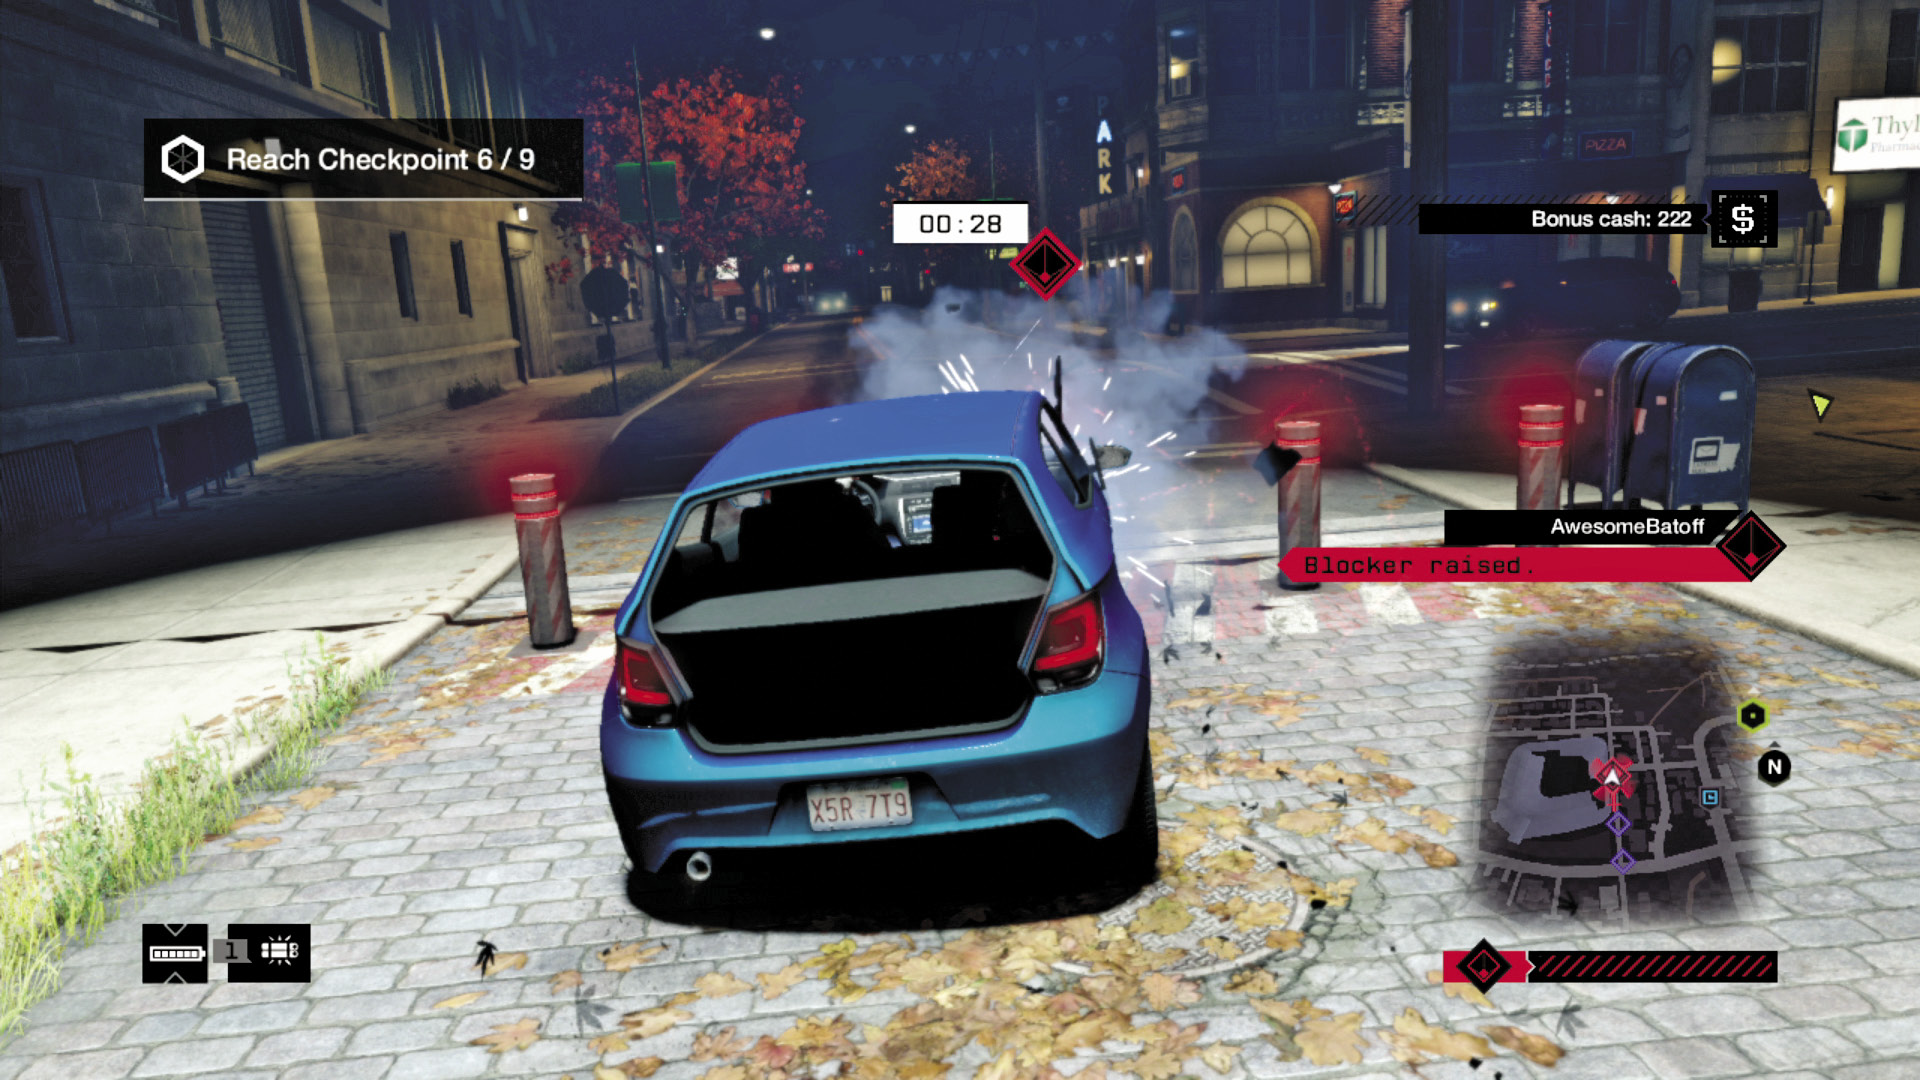
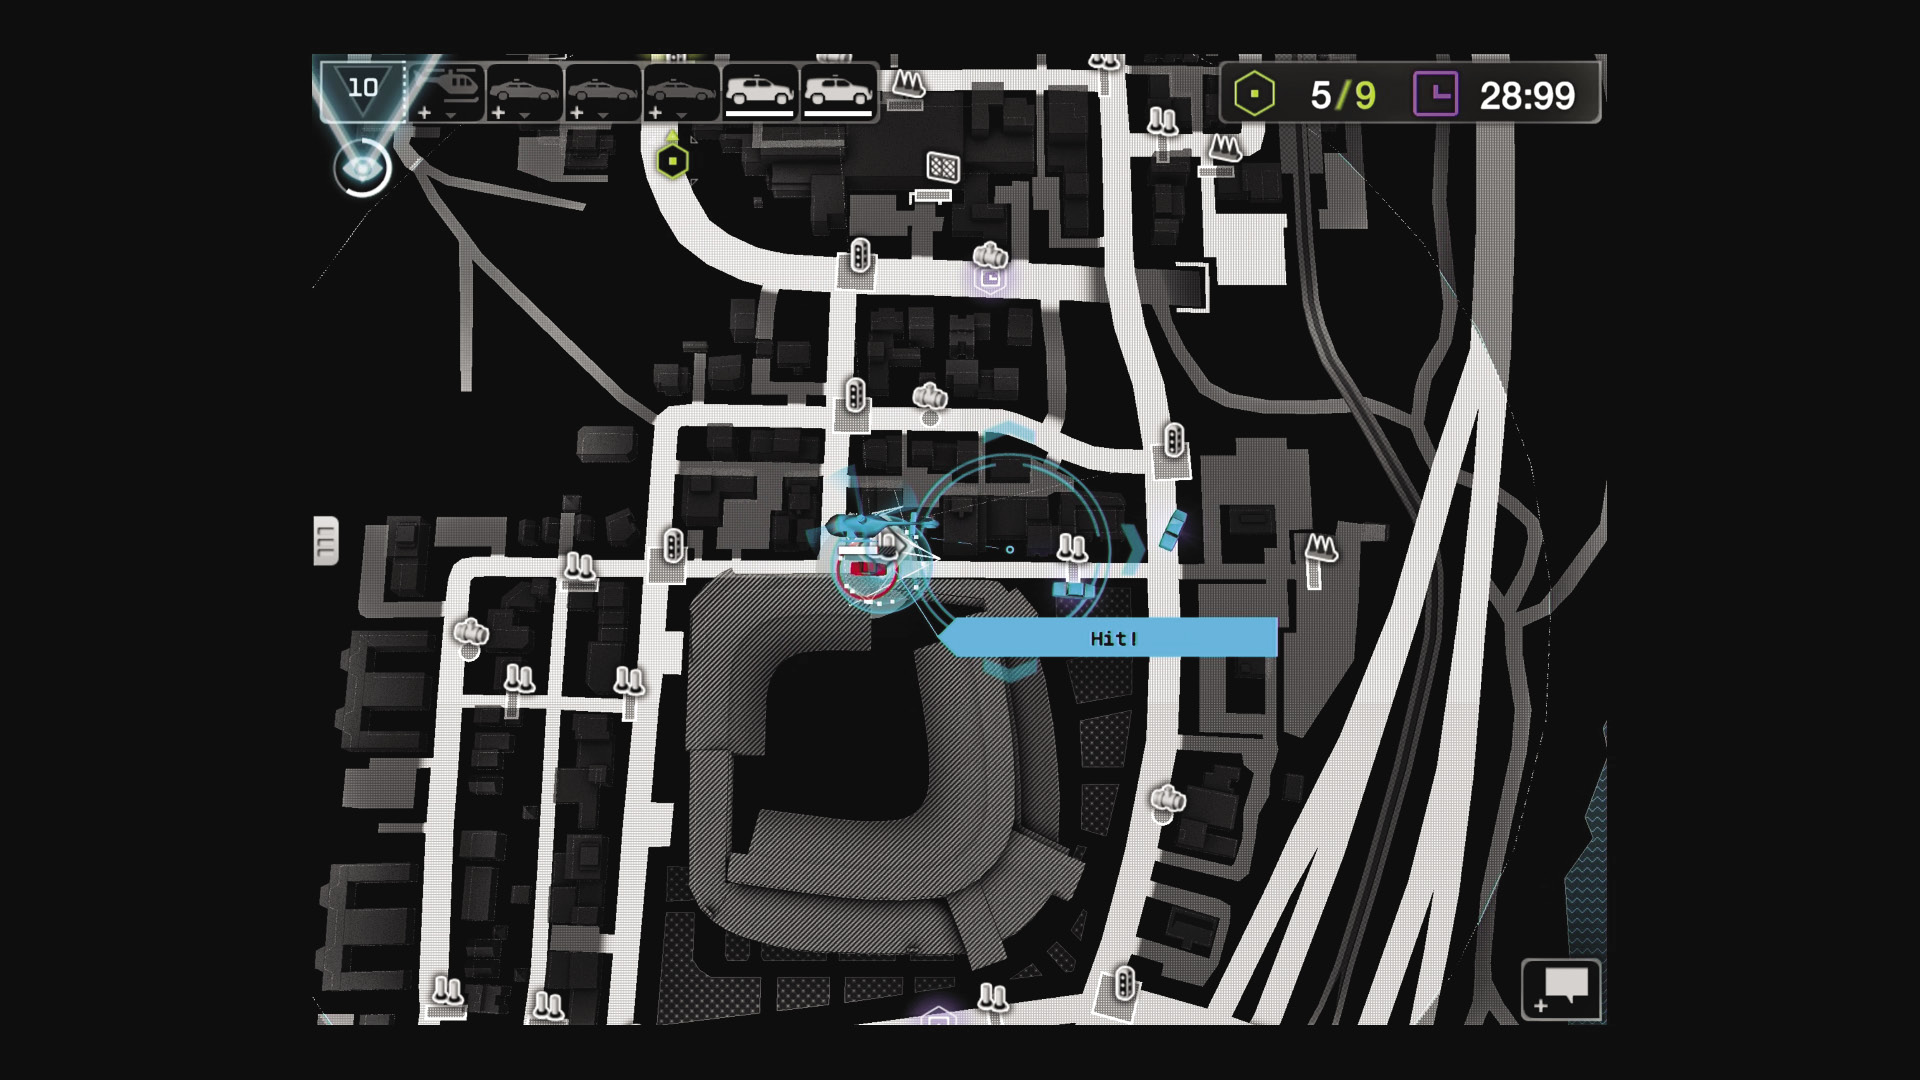
APP: The placement of that last SUV was important; it coaxed the enemy left, down a street with a cash reward, but one with a pair of blockers at either end. Taking a punt for a single point, the enemy is struck. It’s a hit!
WD: A quick look at the streets ahead shows the problem; there are steam pipes on the main roads, so the WD Player takes a chance (and a cash reward) by heading left down an alley. The blockers are raised, too late to avoid.
11 / Panic Setting In
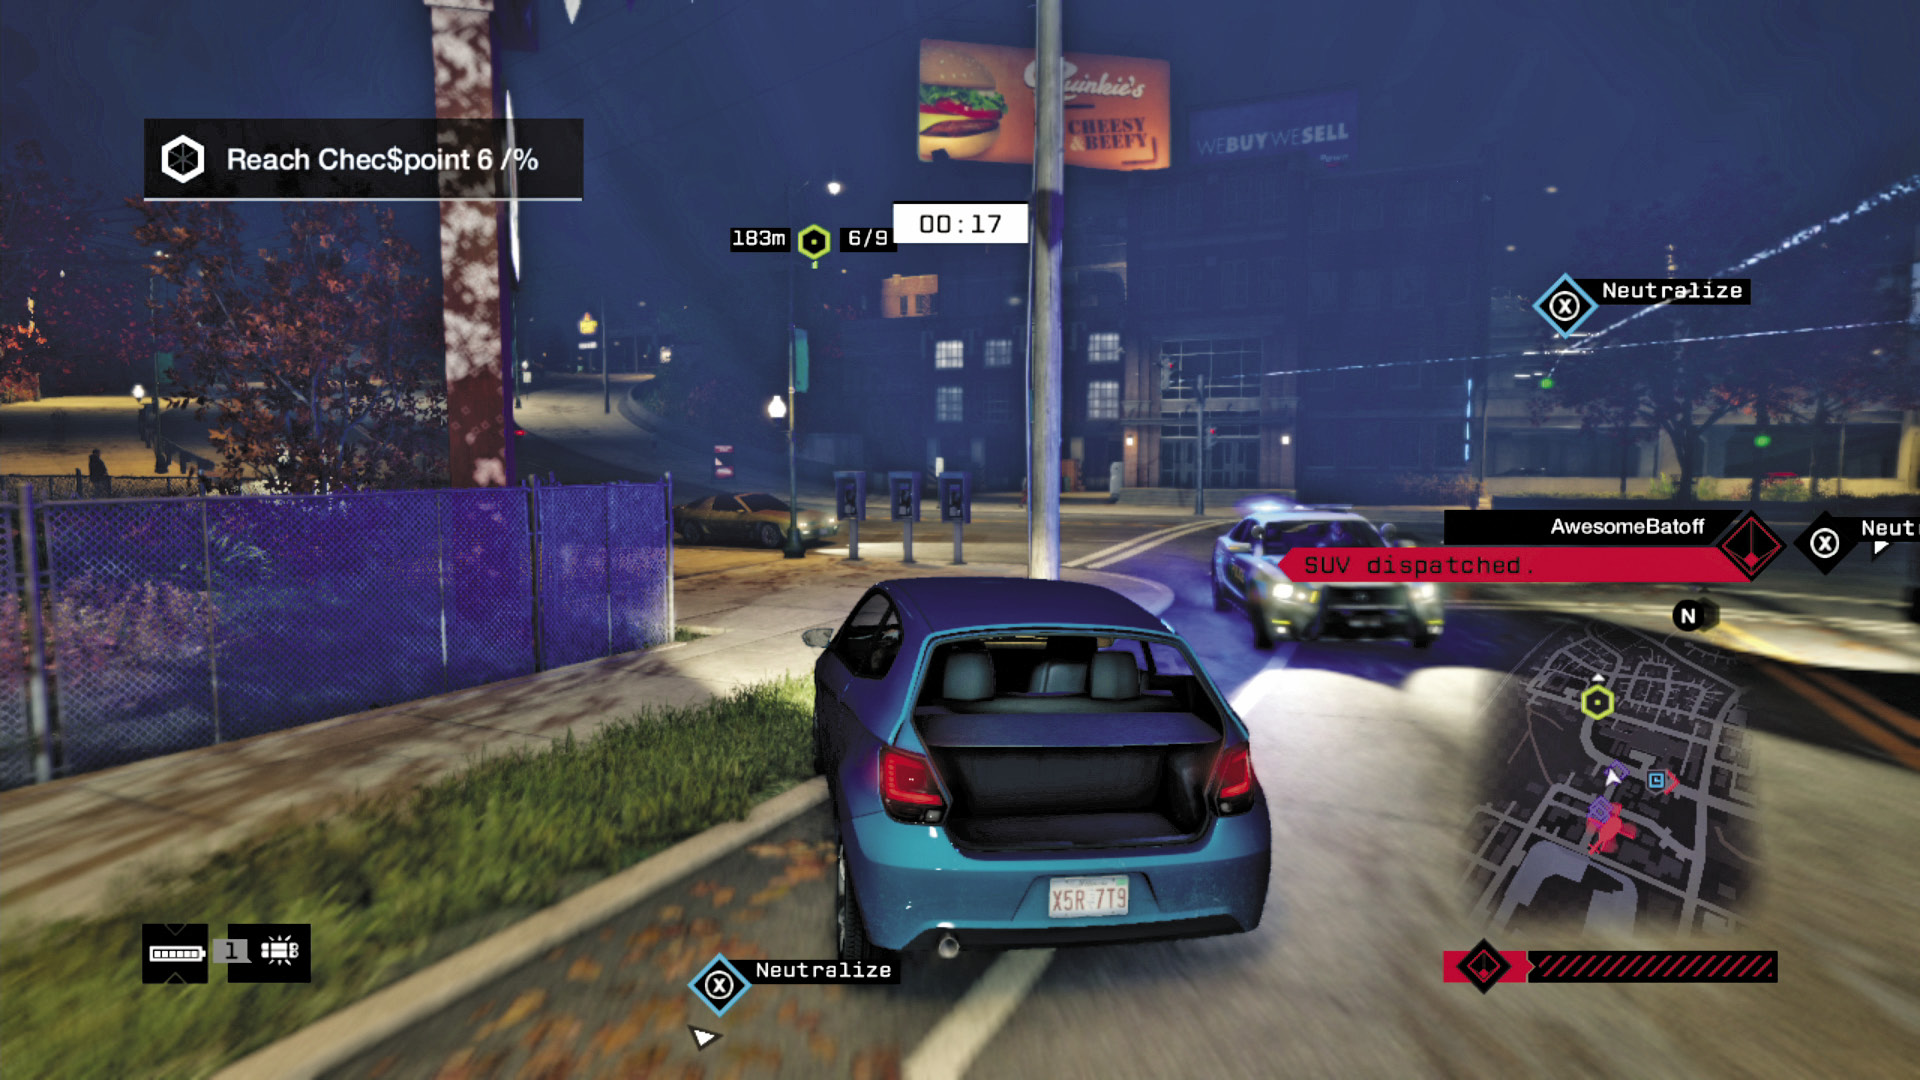
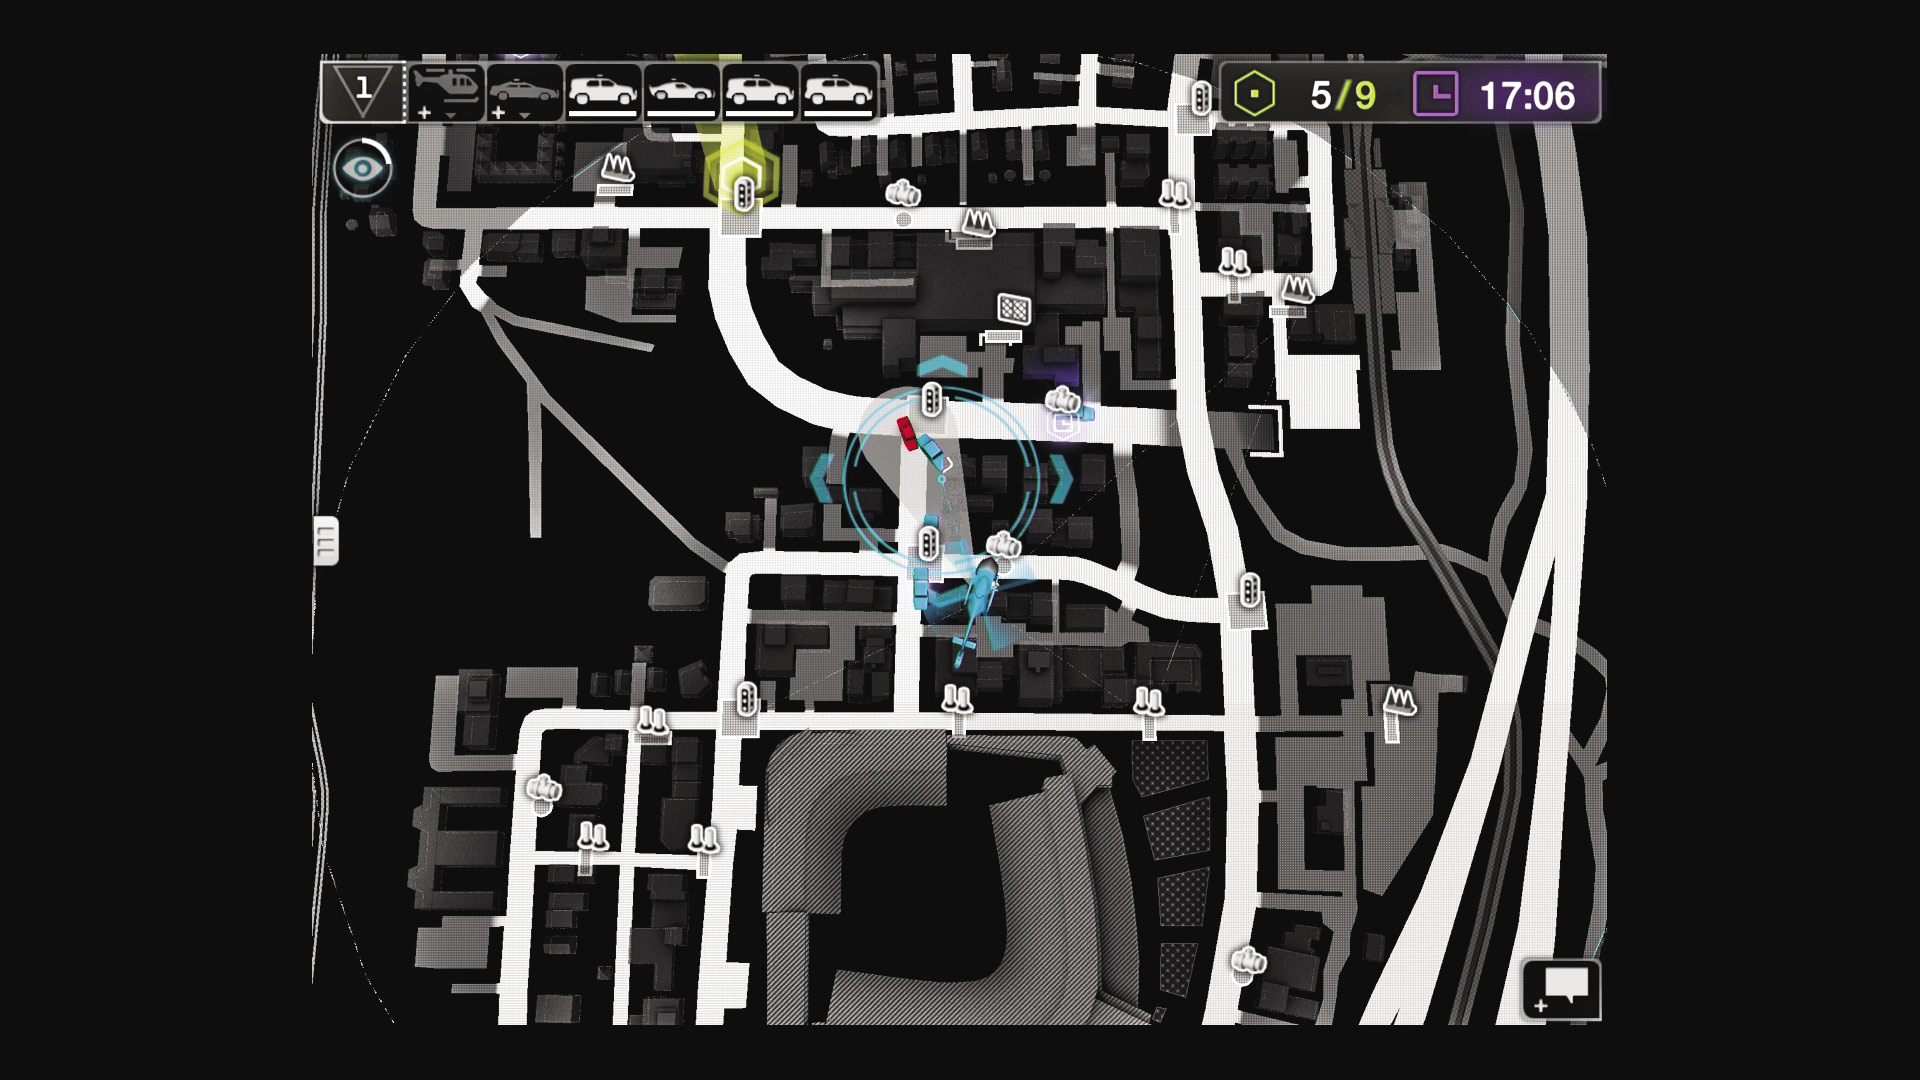
APP: The App Player feels he’s gaining the upper hand; with ten points still to spend, he drops a police interceptor on the enemy’s suspected path, and it successfully reaches its target, driving it into a second crash.
WD: Knowledge of the area is a must; doubling back onto the grassy hill with the rocky jump but driving in the opposite direction would have avoided a narrow miss with a police interceptor and an ensuing crash with a motorist.
12 / Cop a Load of This!
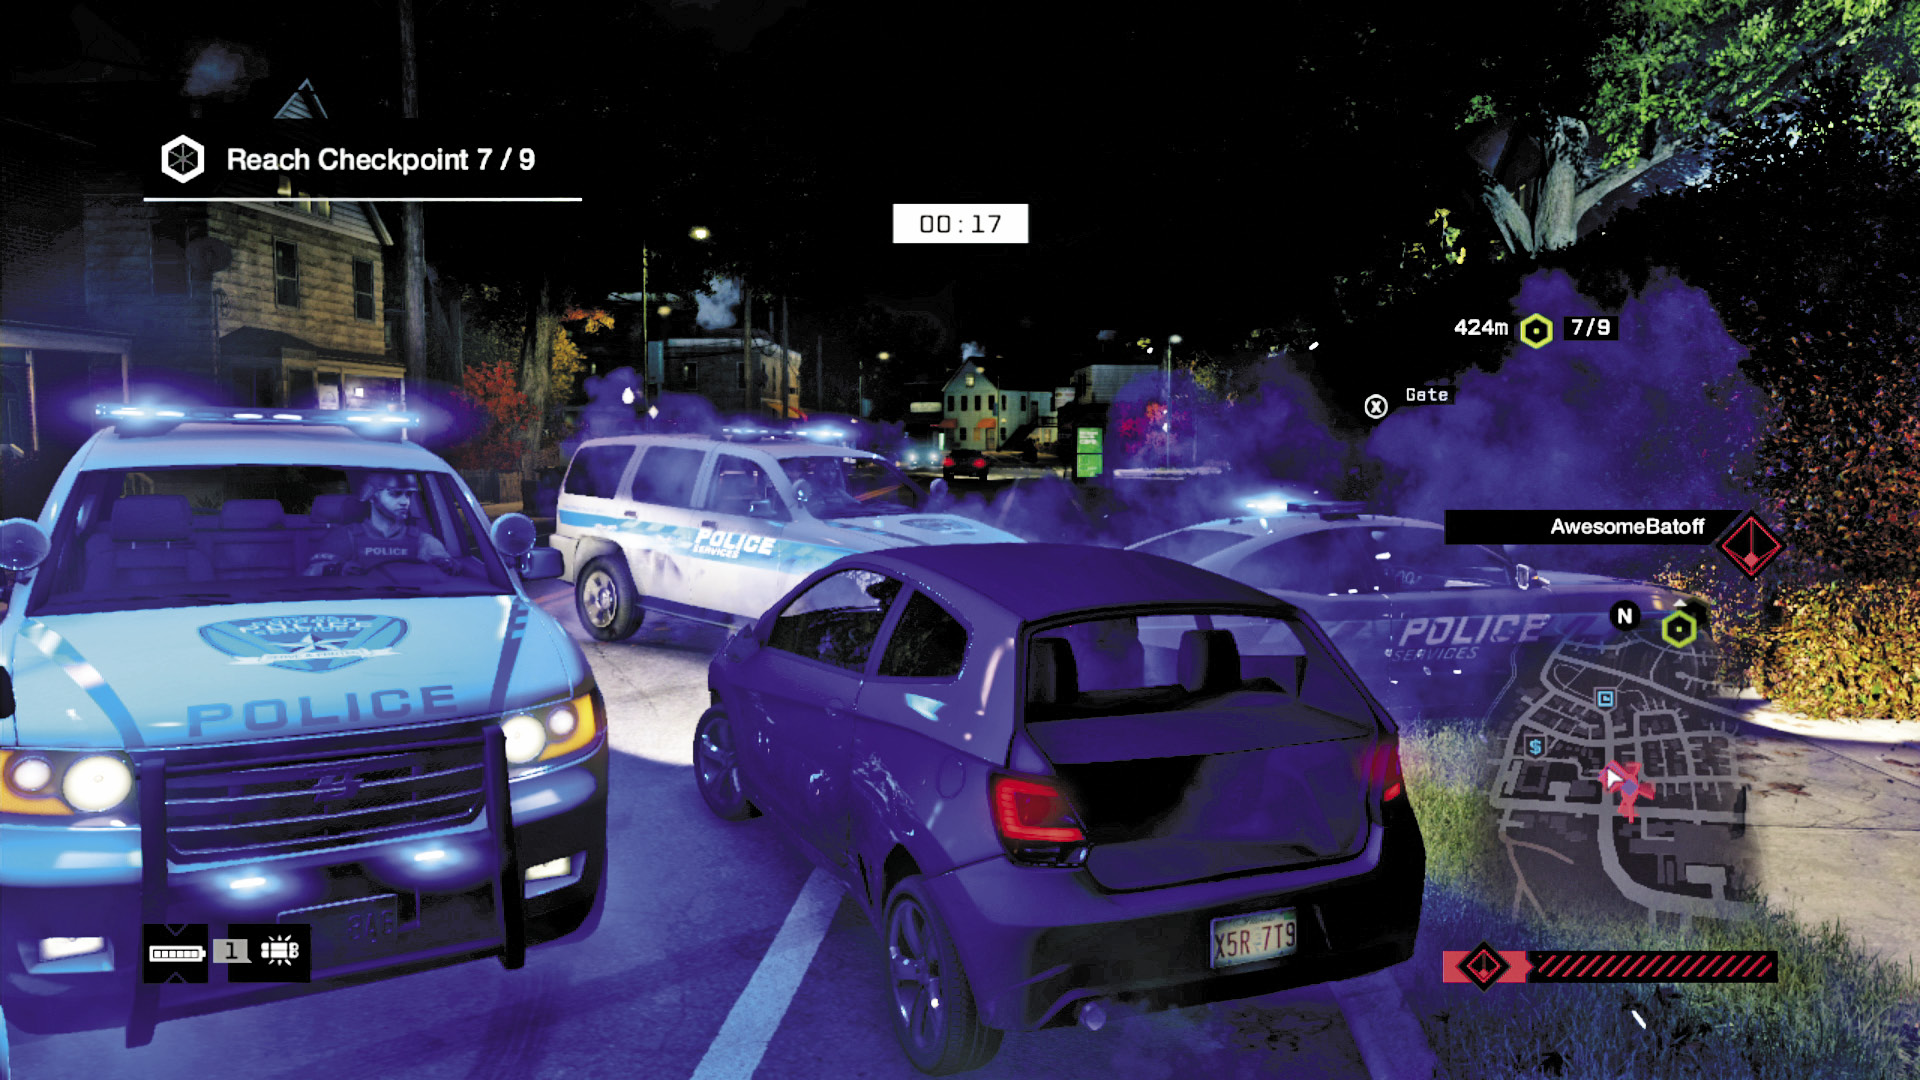
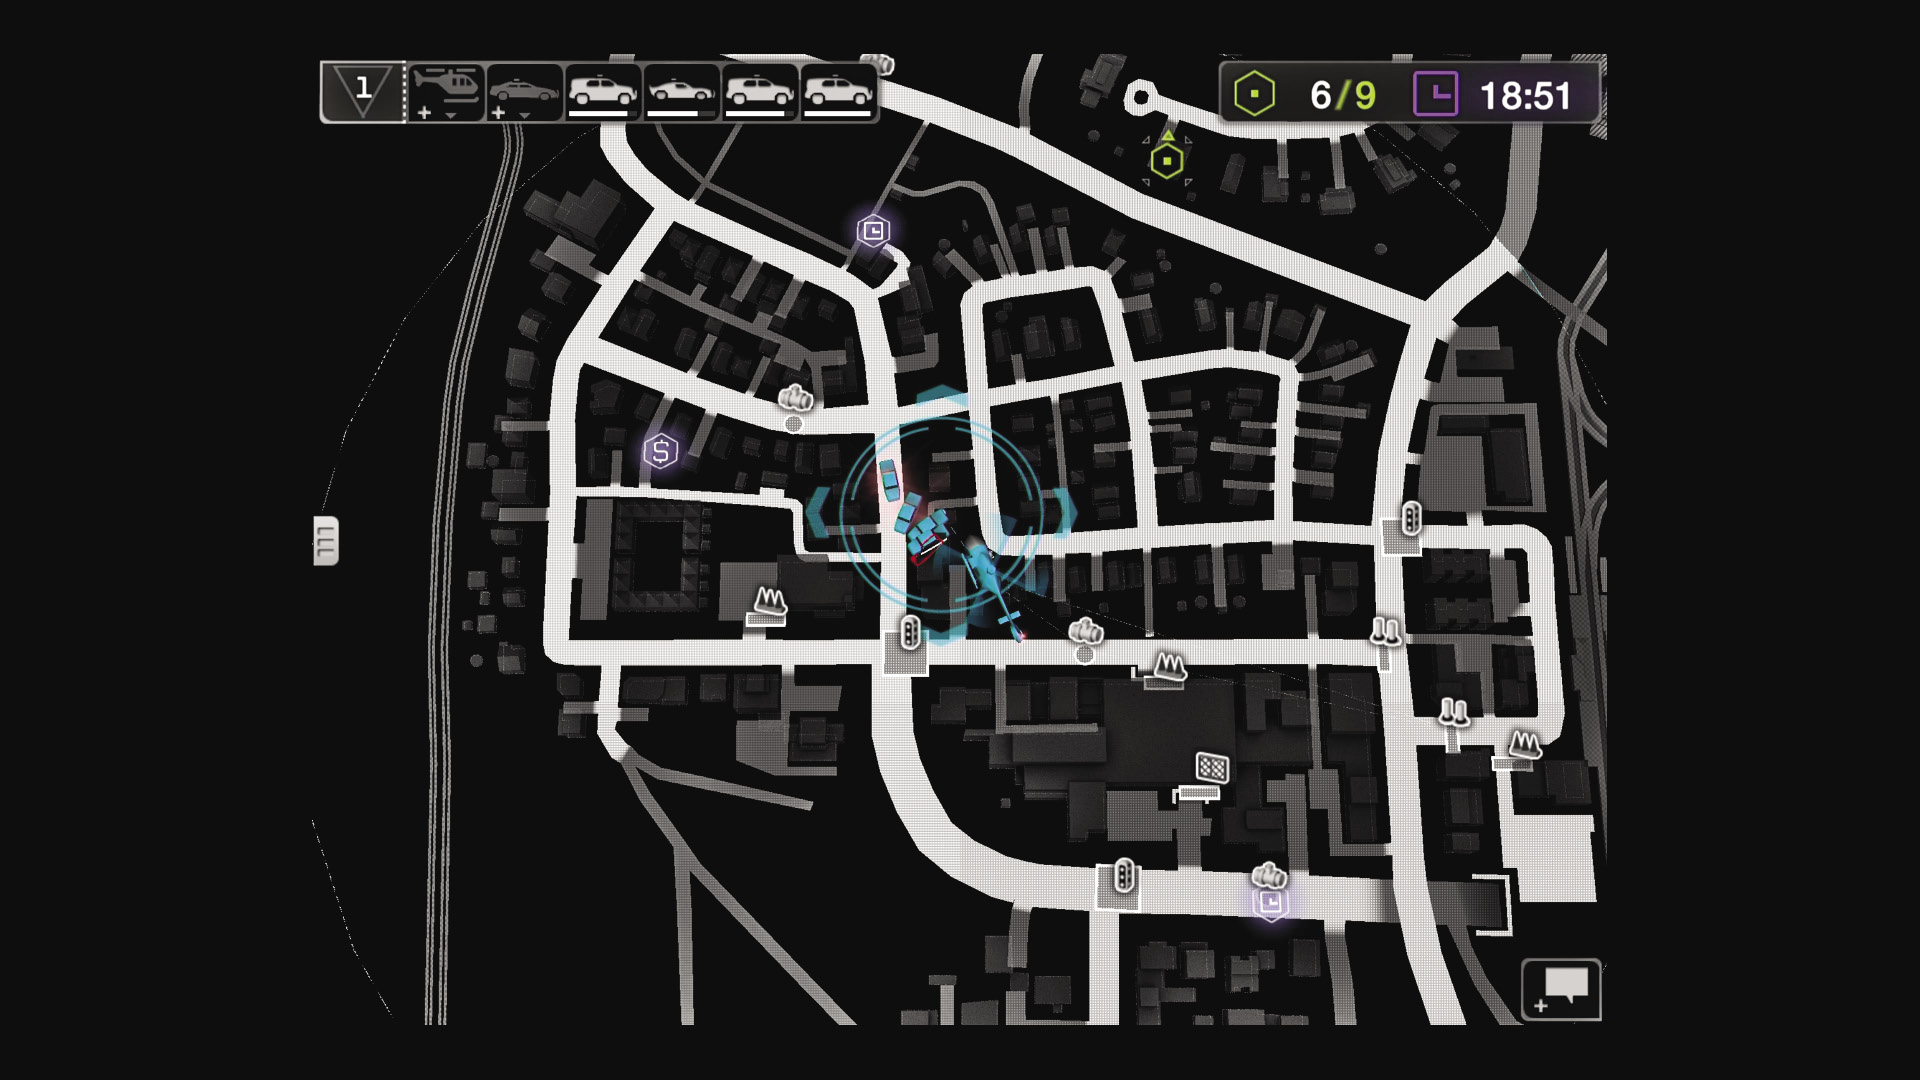
APP: Because more adept vehicles (an interceptor and SUVs) were chosen instead of multiple patrol cars, the drivers exhibit a good degree of competence, easily able to catch this underpowered enemy vehicle and hem it in.
WD: The main roads aren’t great when you’re avoiding four police vehicles all closing in behind you. There’s the added problem of the uphill turn and traffic at the intersection, ending with a police swarm. But it’s not over yet!
13 / All Over Now
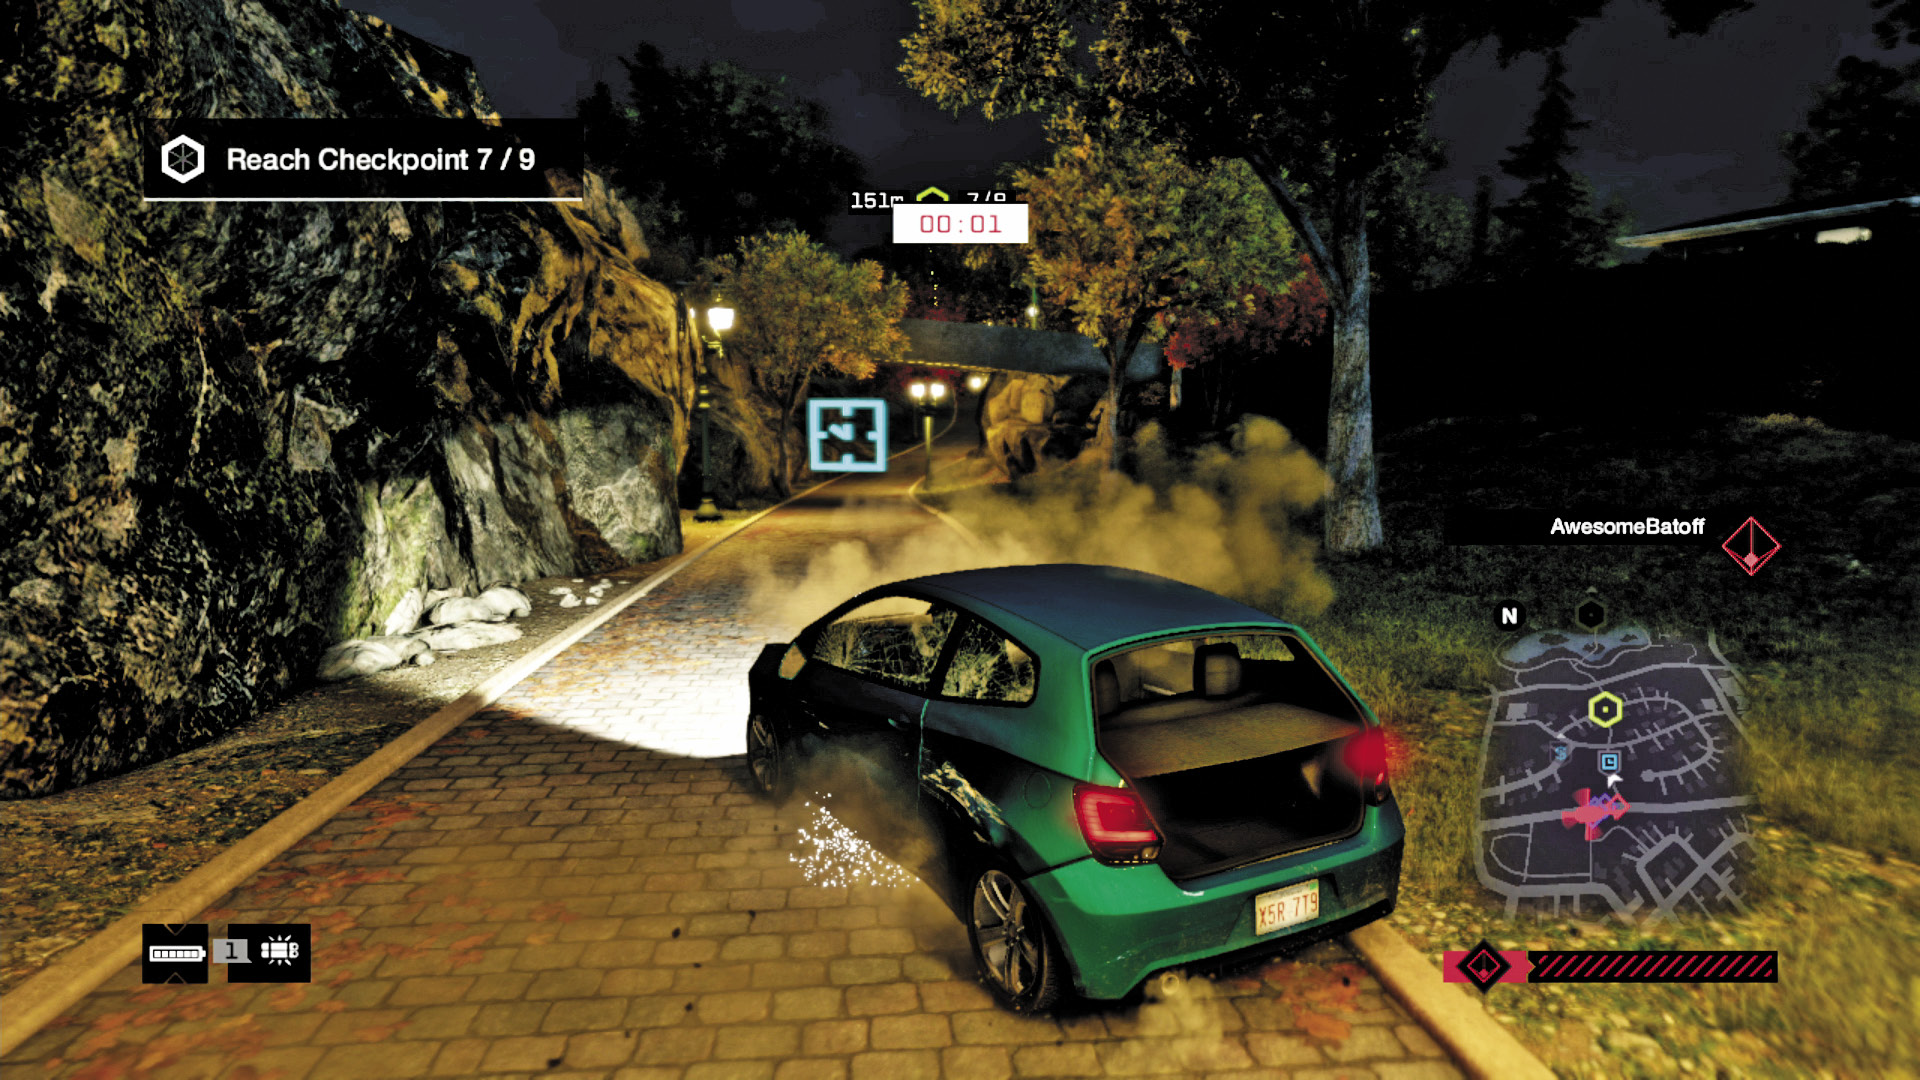
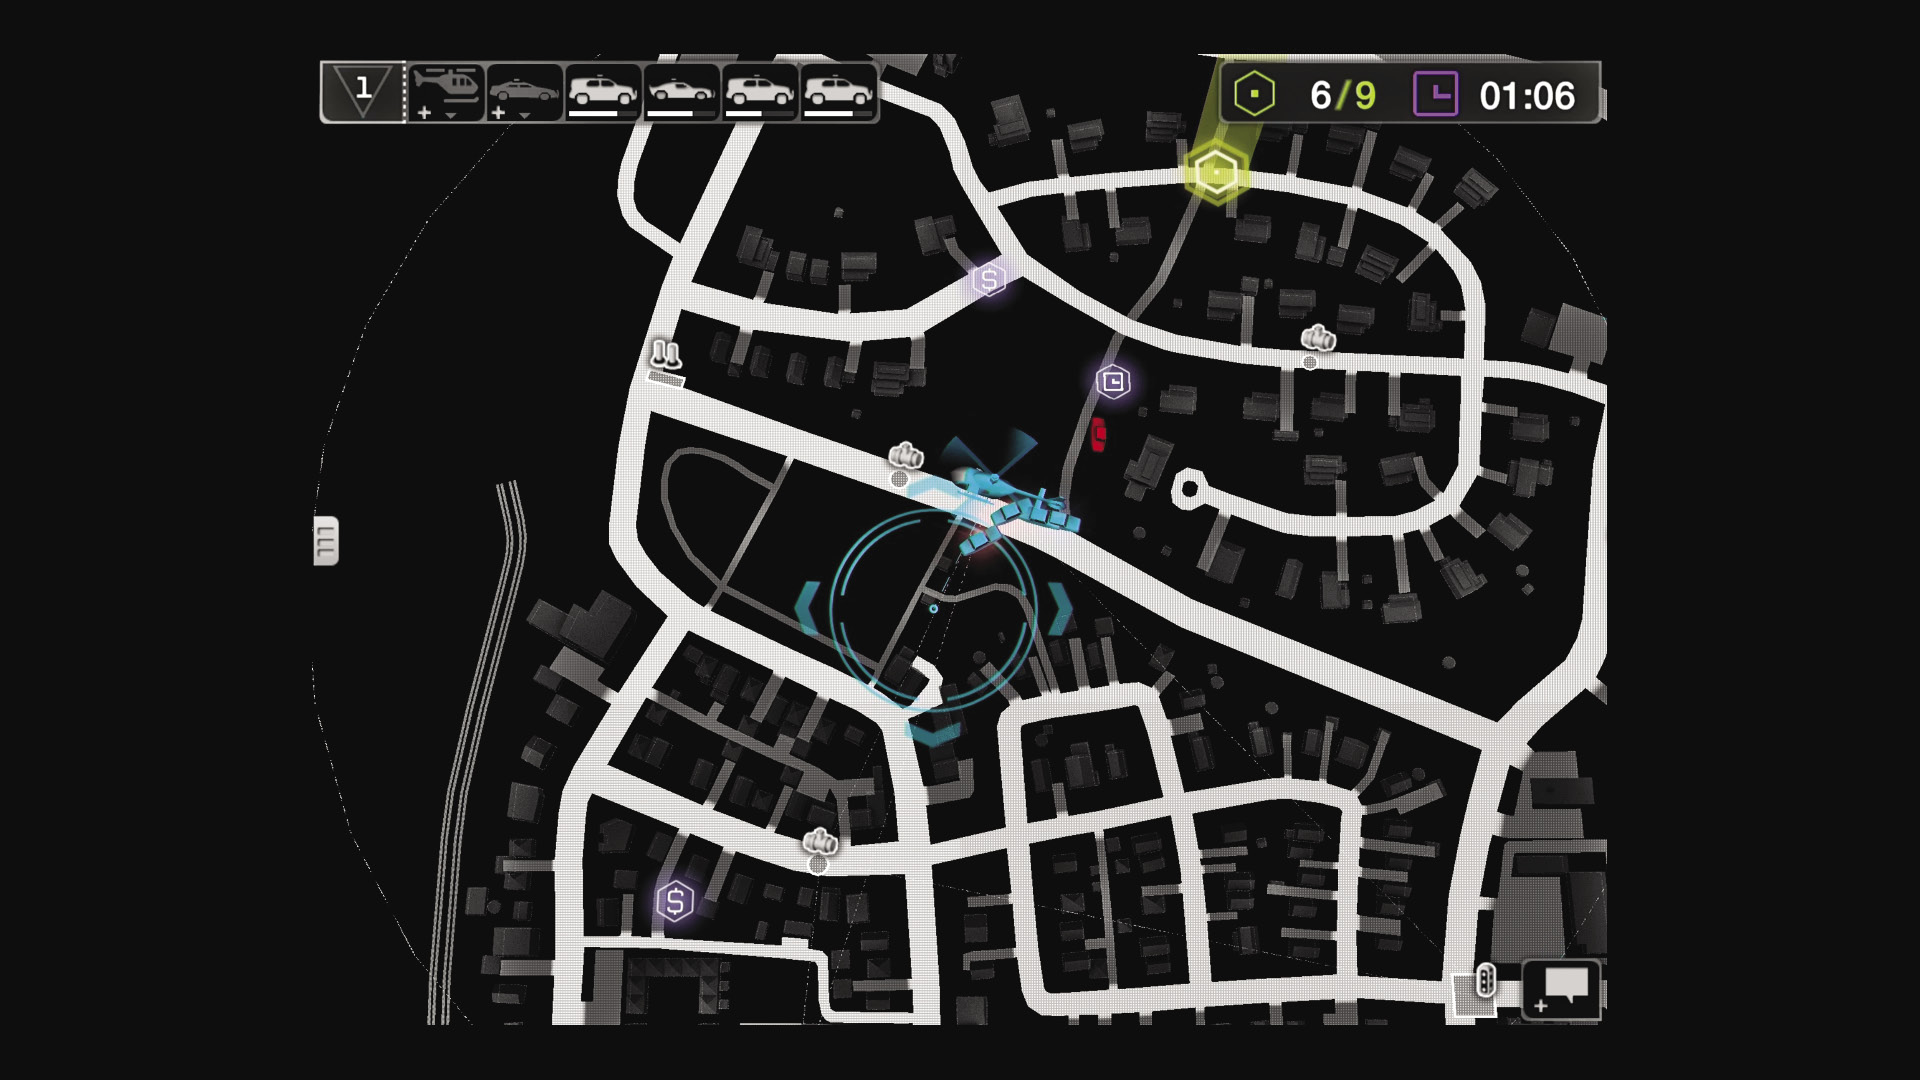
APP: There’s a slight bit of panic as the enemy drives into the park and toward two time extensions, especially as the police vehicles are getting snarled up on the grass. But fortunately, WD Player’s vehicle isn’t well suited for off-road antics.
WD: After spending far too long grabbing the first time extension as he entered the park, the shortcut to the checkpoint (through a second timer) seems possible—until the lack of traction in the vehicle sends it spinning just as the time is up.
ctOS MOBILE MATCHES // CHALLENGES
Available ctOS Mobile CHALLENGES: Free Rides
| Location | Name | Timer | Checkpoints | Timer Check | Total Time | Timer Bonus | Value Timer Bonus | Cash Bonus | Value Cash Bonus | Time of Day | Weather |
|---|---|---|---|---|---|---|---|---|---|---|---|
| // Pawnee and Parker Square | Up North |
120 |
8 |
20 |
260 |
6 |
15 |
10 |
200 |
Dawn |
Cloudy |
| // Parker Square | A Walk in the Park |
120 |
9 |
20 |
280 |
6 |
15 |
10 |
200 |
Dusk |
Clear |
| // Parker Square | Panic in Parker Square |
120 |
8 |
20 |
260 |
6 |
15 |
10 |
200 |
Dusk |
Rain |
| // The Wards | Boatyard Blitz |
120 |
8 |
20 |
260 |
6 |
15 |
10 |
200 |
Dawn |
Clear |
| // The Wards | Gun Through The Slums |
120 |
8 |
20 |
260 |
6 |
15 |
10 |
200 |
Dusk |
Cloudy |
| // Brandon Docks | Shipping Lines |
120 |
10 |
20 |
300 |
6 |
15 |
10 |
200 |
Dawn |
Rain |
| // Brandon Docks | Stuck in the Mud |
120 |
8 |
20 |
260 |
6 |
15 |
10 |
200 |
Dusk |
Storm |
| // Brandon Docks and the Wards | Make Some Noise |
120 |
8 |
20 |
260 |
6 |
15 |
10 |
200 |
Dusk |
Clear |
| // The Loop | No Roads Needed |
120 |
8 |
20 |
260 |
6 |
15 |
10 |
200 |
Night |
Storm |
| // The Loop and Mad Mile | Jumping to Conclusions |
120 |
8 |
20 |
260 |
6 |
15 |
10 |
200 |
Dawn |
Clear |
| // Mad Mile | Gateway Getaway |
120 |
8 |
20 |
260 |
6 |
15 |
10 |
200 |
Dusk |
Clear |
| // Mad Mile | Full Circle |
120 |
9 |
20 |
280 |
6 |
15 |
10 |
200 |
Dawn |
Cloudy |
| // Mad Mile and the Loop | There and Back |
120 |
8 |
20 |
260 |
6 |
15 |
10 |
200 |
Dusk |
Storm |
Available ctOS Mobile CHALLENGES: Races
| Location | Name | Timer | Checkpoints | Timer Check | Total Time | Cash Bonus | Value Cash Bonus | Time of Day | Weather |
|---|---|---|---|---|---|---|---|---|---|
| // Pawnee | Go Big or Go Home |
45 |
11 |
20 |
245 |
10 |
200 |
Dusk |
Clear |
| // Pawnee and Parker Square | Memory Lane |
45 |
15 |
20 |
325 |
10 |
200 |
Dusk |
Clear |
| // Parker Square (North and Central) | Suburban Slide |
45 |
14 |
20 |
305 |
10 |
200 |
Dawn |
Clear |
| // Parker Square (Central and South) | Home Sweet Home |
45 |
12 |
20 |
345 |
10 |
200 |
Night |
Cloudy |
| // The Wards (Central) | The Long Haul |
45 |
14 |
20 |
305 |
10 |
200 |
Dusk |
Clear |
| // The Wards (West) | High Risk |
45 |
14 |
20 |
305 |
10 |
200 |
Night |
Storm |
| // The Wards and Brandon Docks | Straightaways |
45 |
13 |
20 |
285 |
10 |
200 |
Dawn |
Cloudy |
| // Brandon Docks | Return to Rustville |
45 |
13 |
20 |
285 |
10 |
200 |
Dawn |
Clear |
| // The Loop (North) | Zigs and Zags |
45 |
10 |
20 |
225 |
10 |
200 |
Dusk |
Rain |
| // The Loop (South) | Back To School |
45 |
12 |
20 |
265 |
10 |
200 |
Night |
Clear |
| // The Loop and Mad Mile | Urban Explorer |
45 |
14 |
20 |
305 |
10 |
200 |
Night |
Storm |
| // Mad Mile (North) | Go for Gold |
45 |
12 |
20 |
265 |
10 |
200 |
Dawn |
Clear |
| // Mad Mile (South) | Goose Island Getaway |
45 |
11 |
20 |
245 |
10 |
200 |
Dawn |
Storm |
FREE ROAM MAPS // Pawnee
01 // Up North
FREE ROAM MAPS // Parker Square
02 // A Walk in the Park
03 // Panic in Parker Square
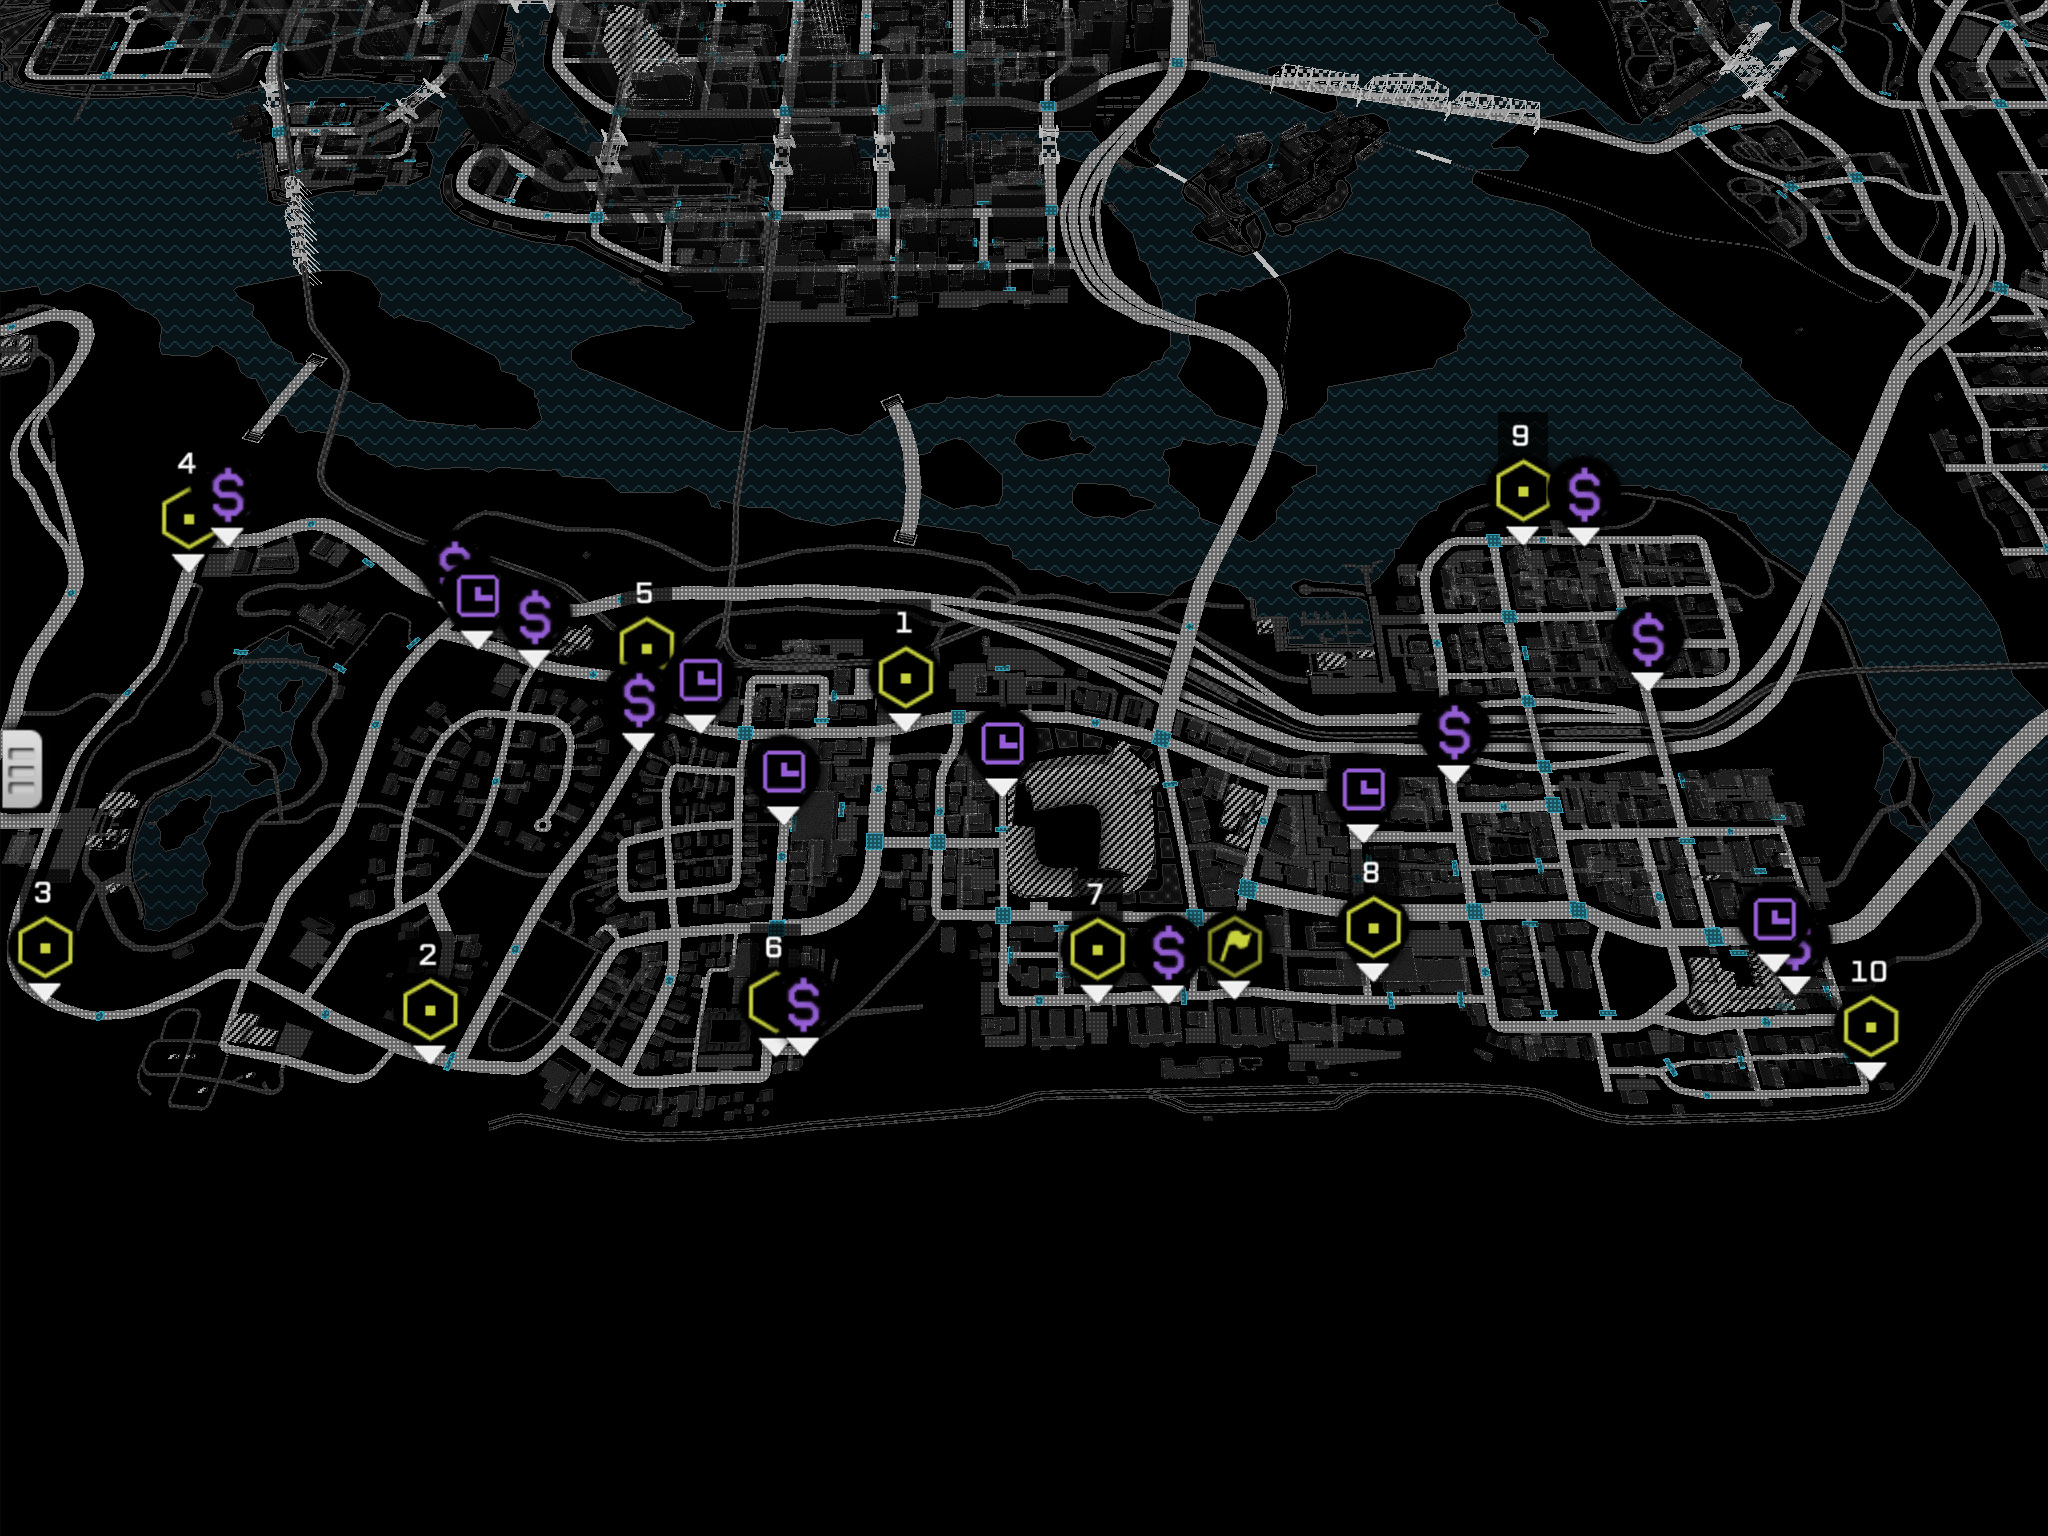
FREE ROAM MAPS // The Wards
04 // Boatyard Blitz
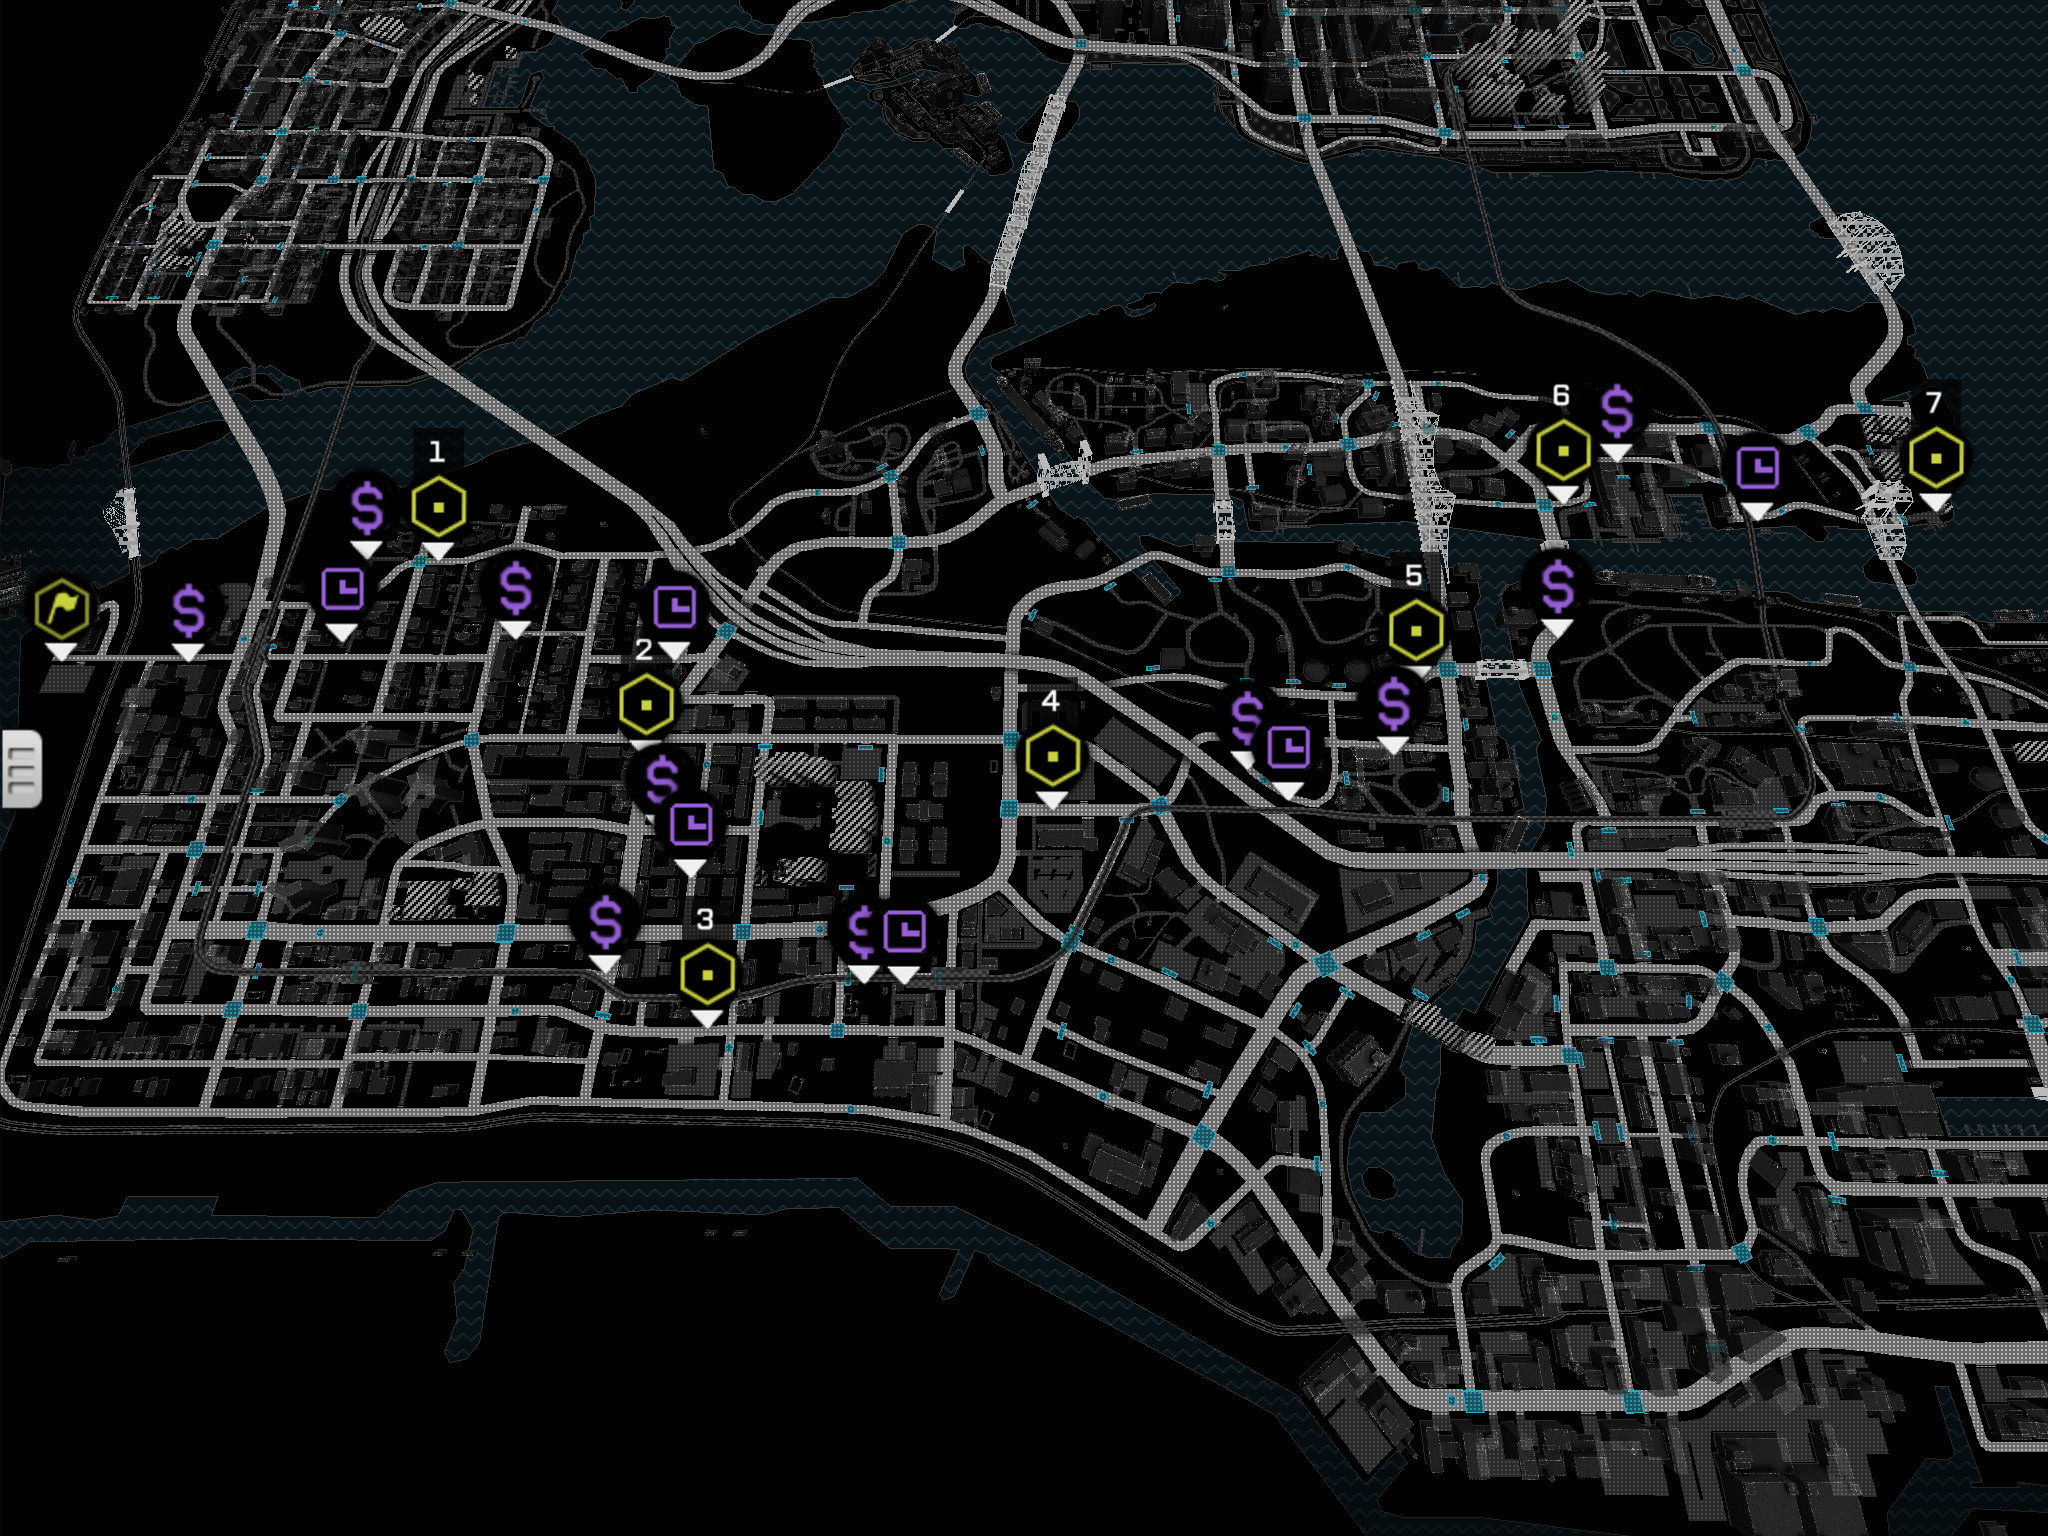
05 // Gun Through the Slums
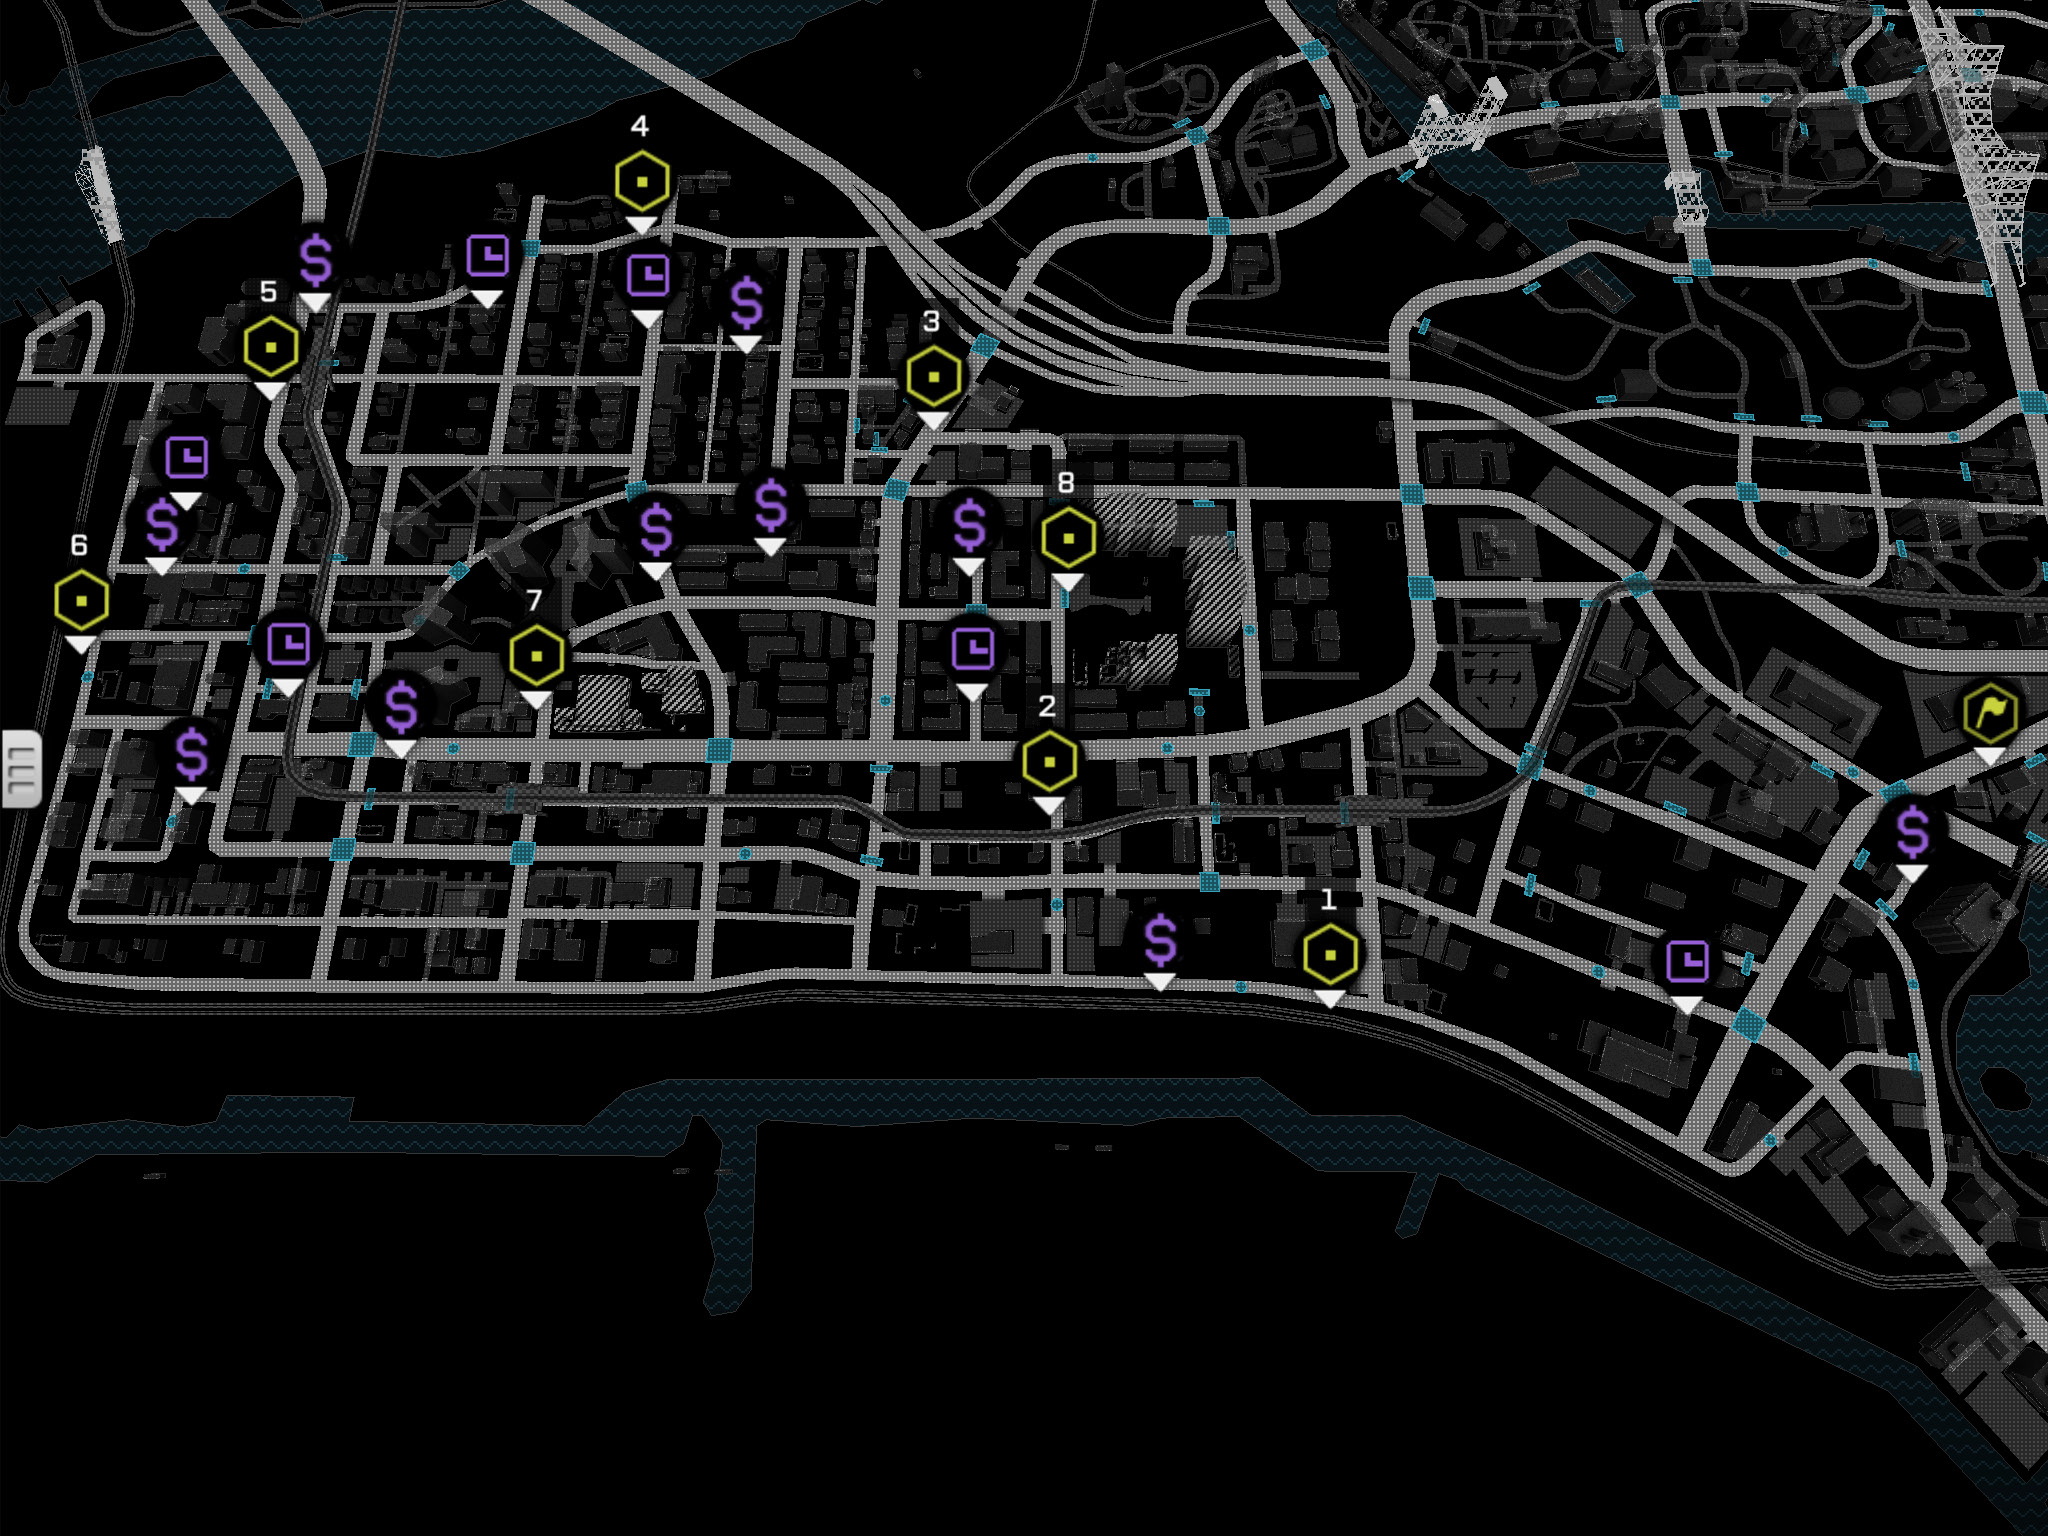
FREE ROAM MAPS // BRANDON DOCKS
06 // Shipping Lines
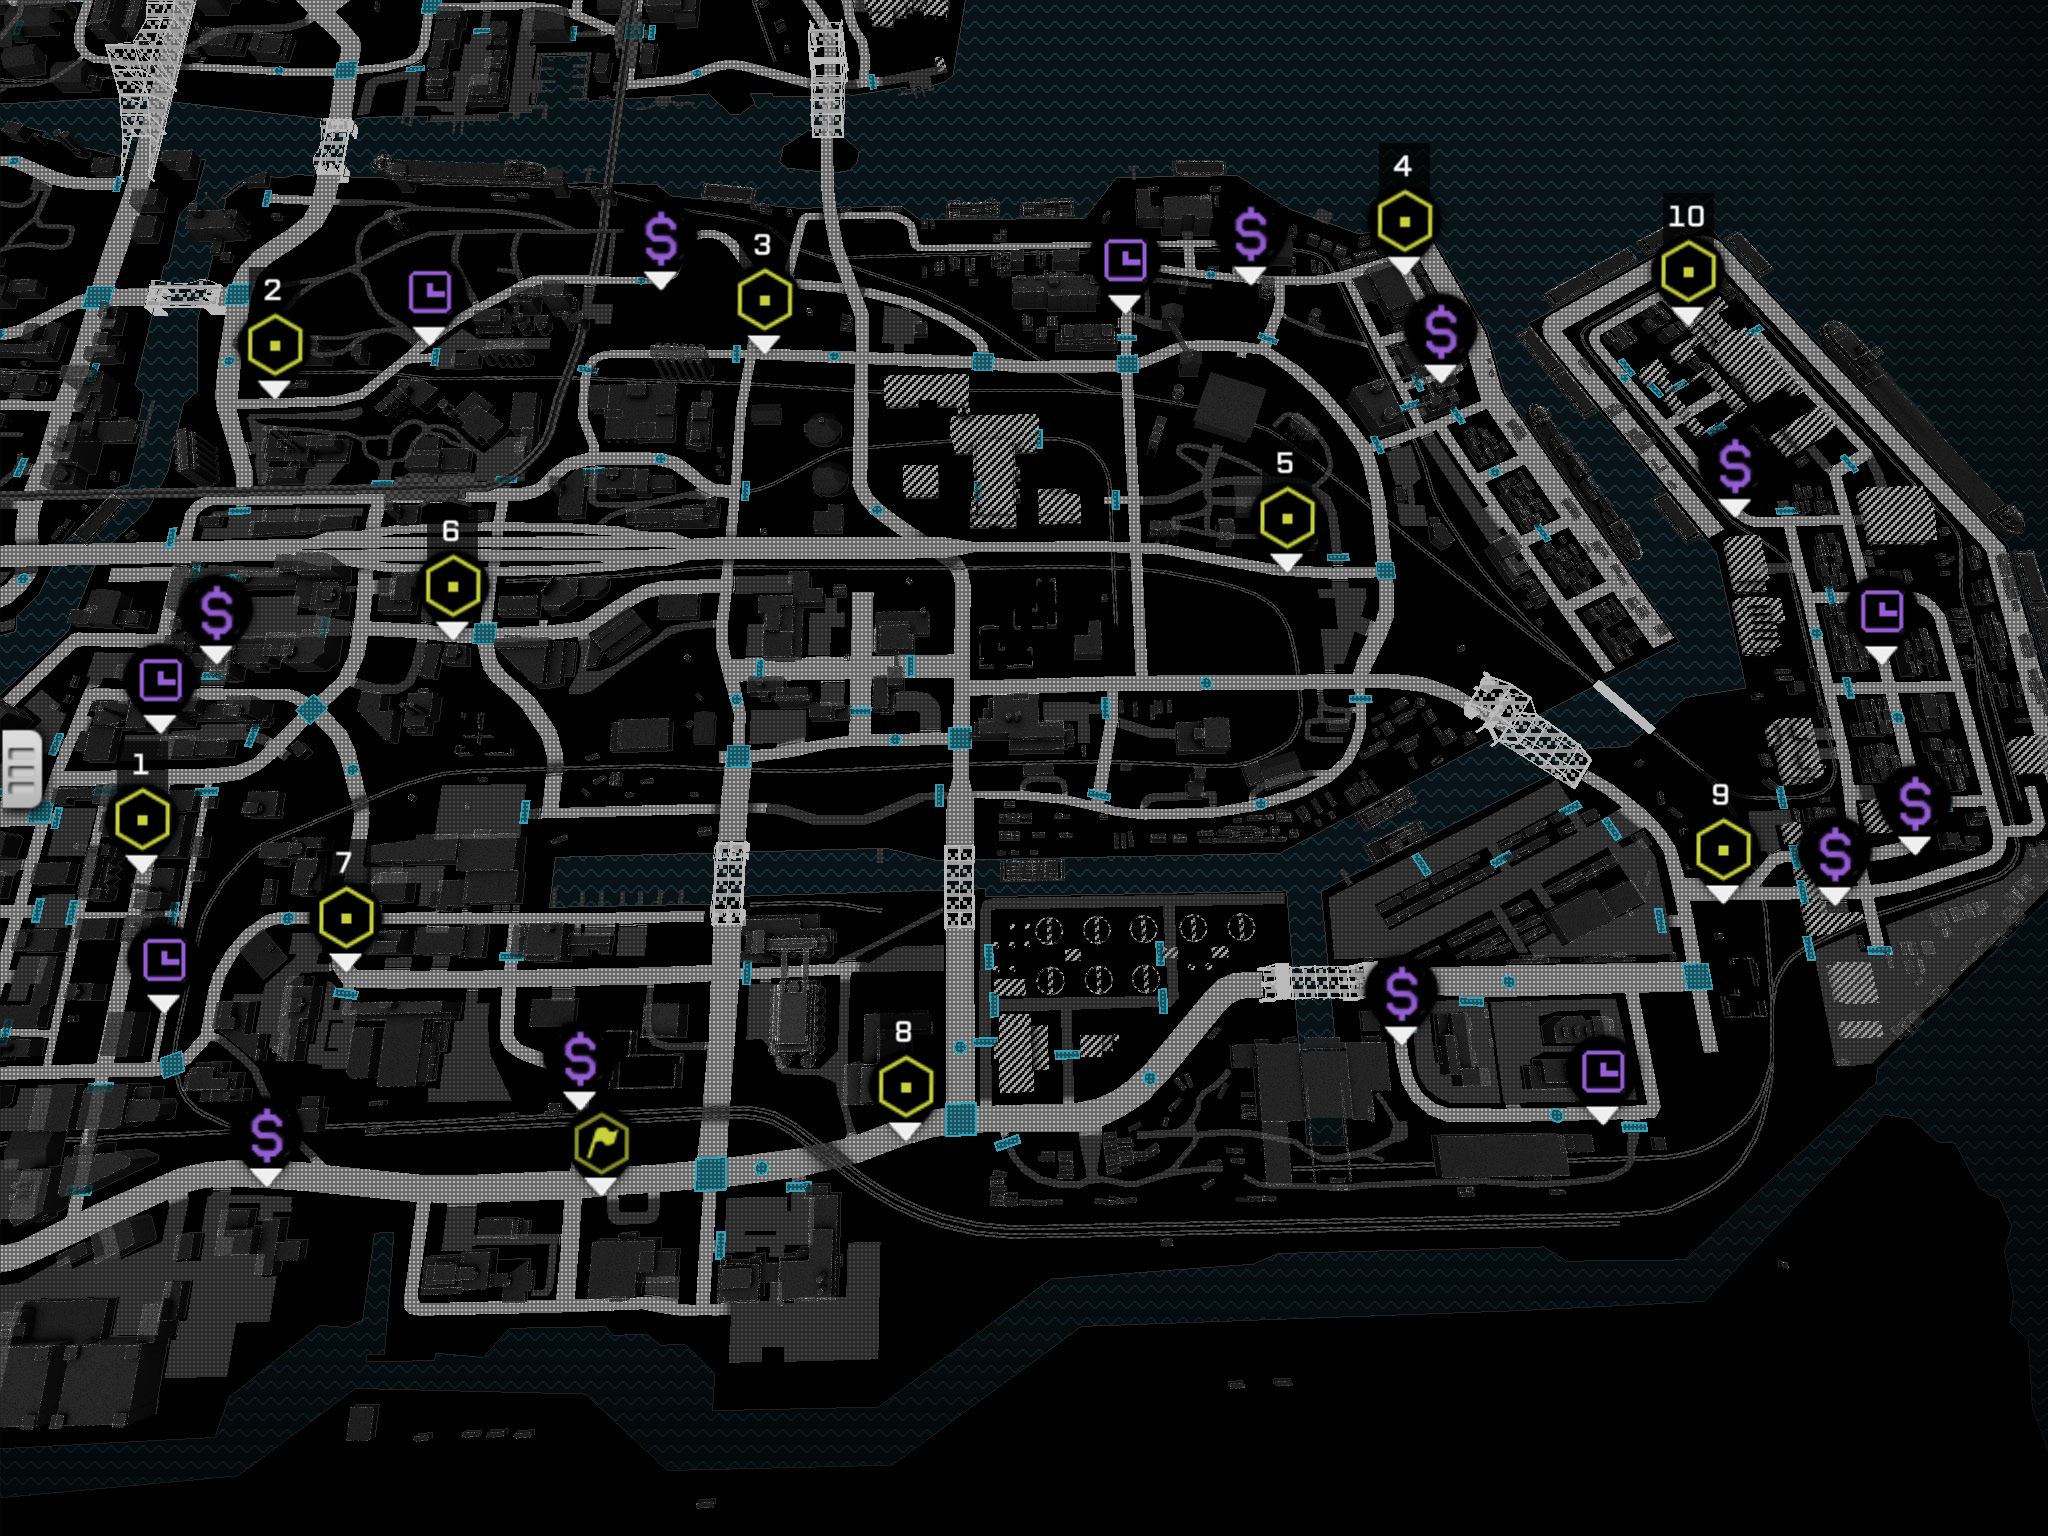
07 // Stuck in the Mud
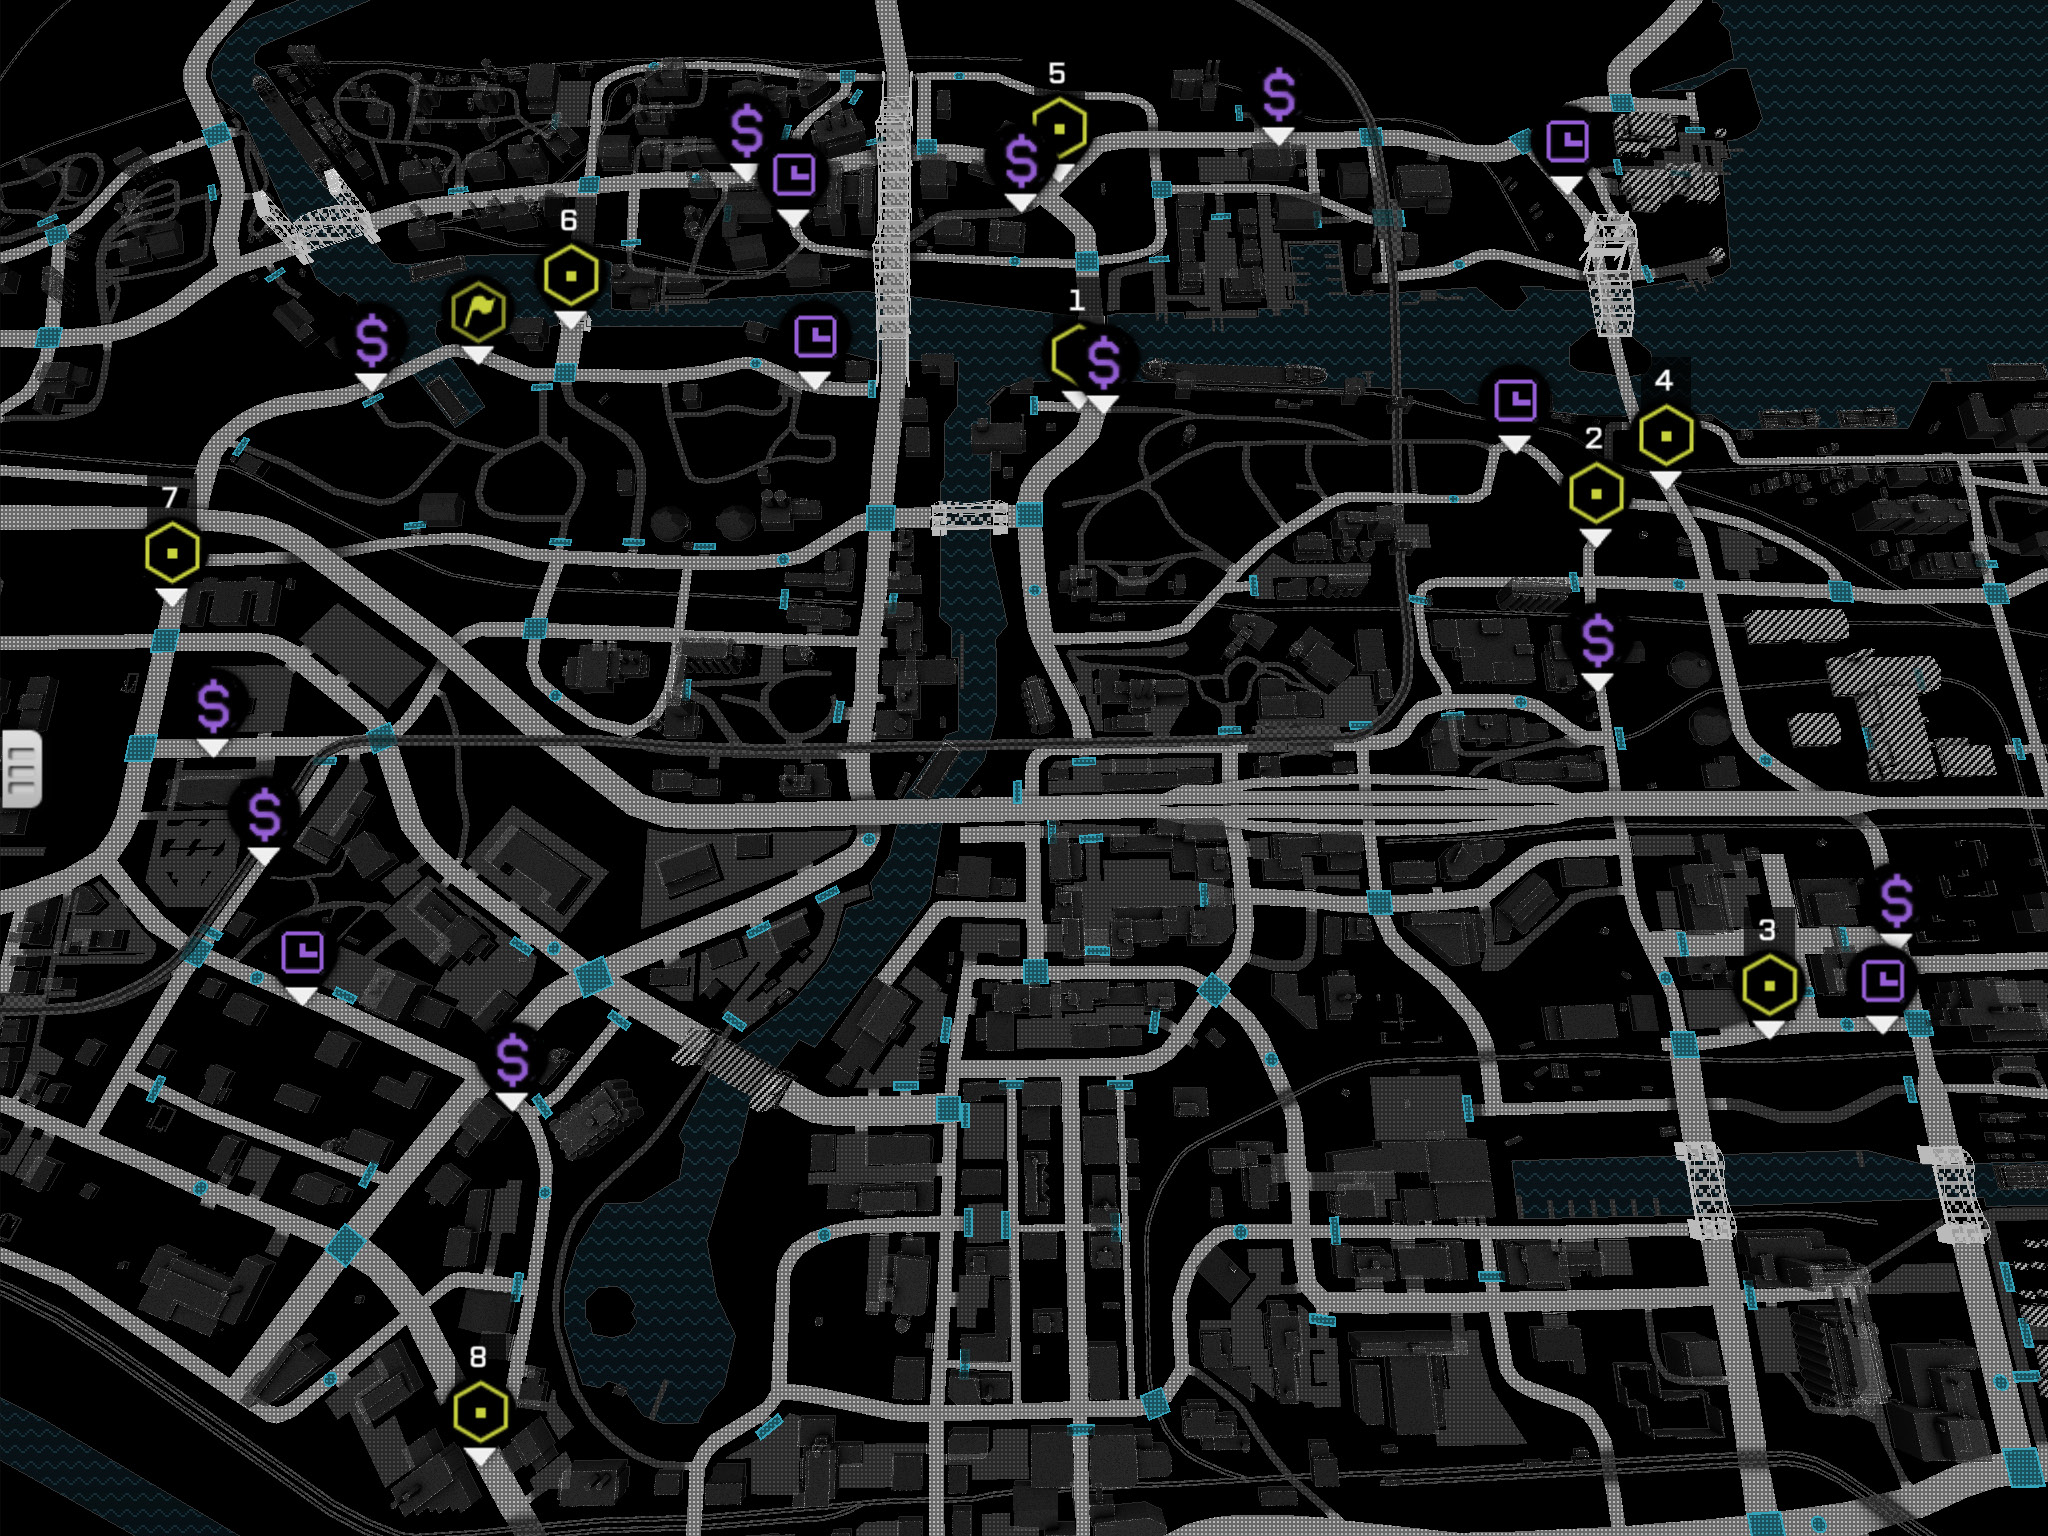
08 // Make Some Noise
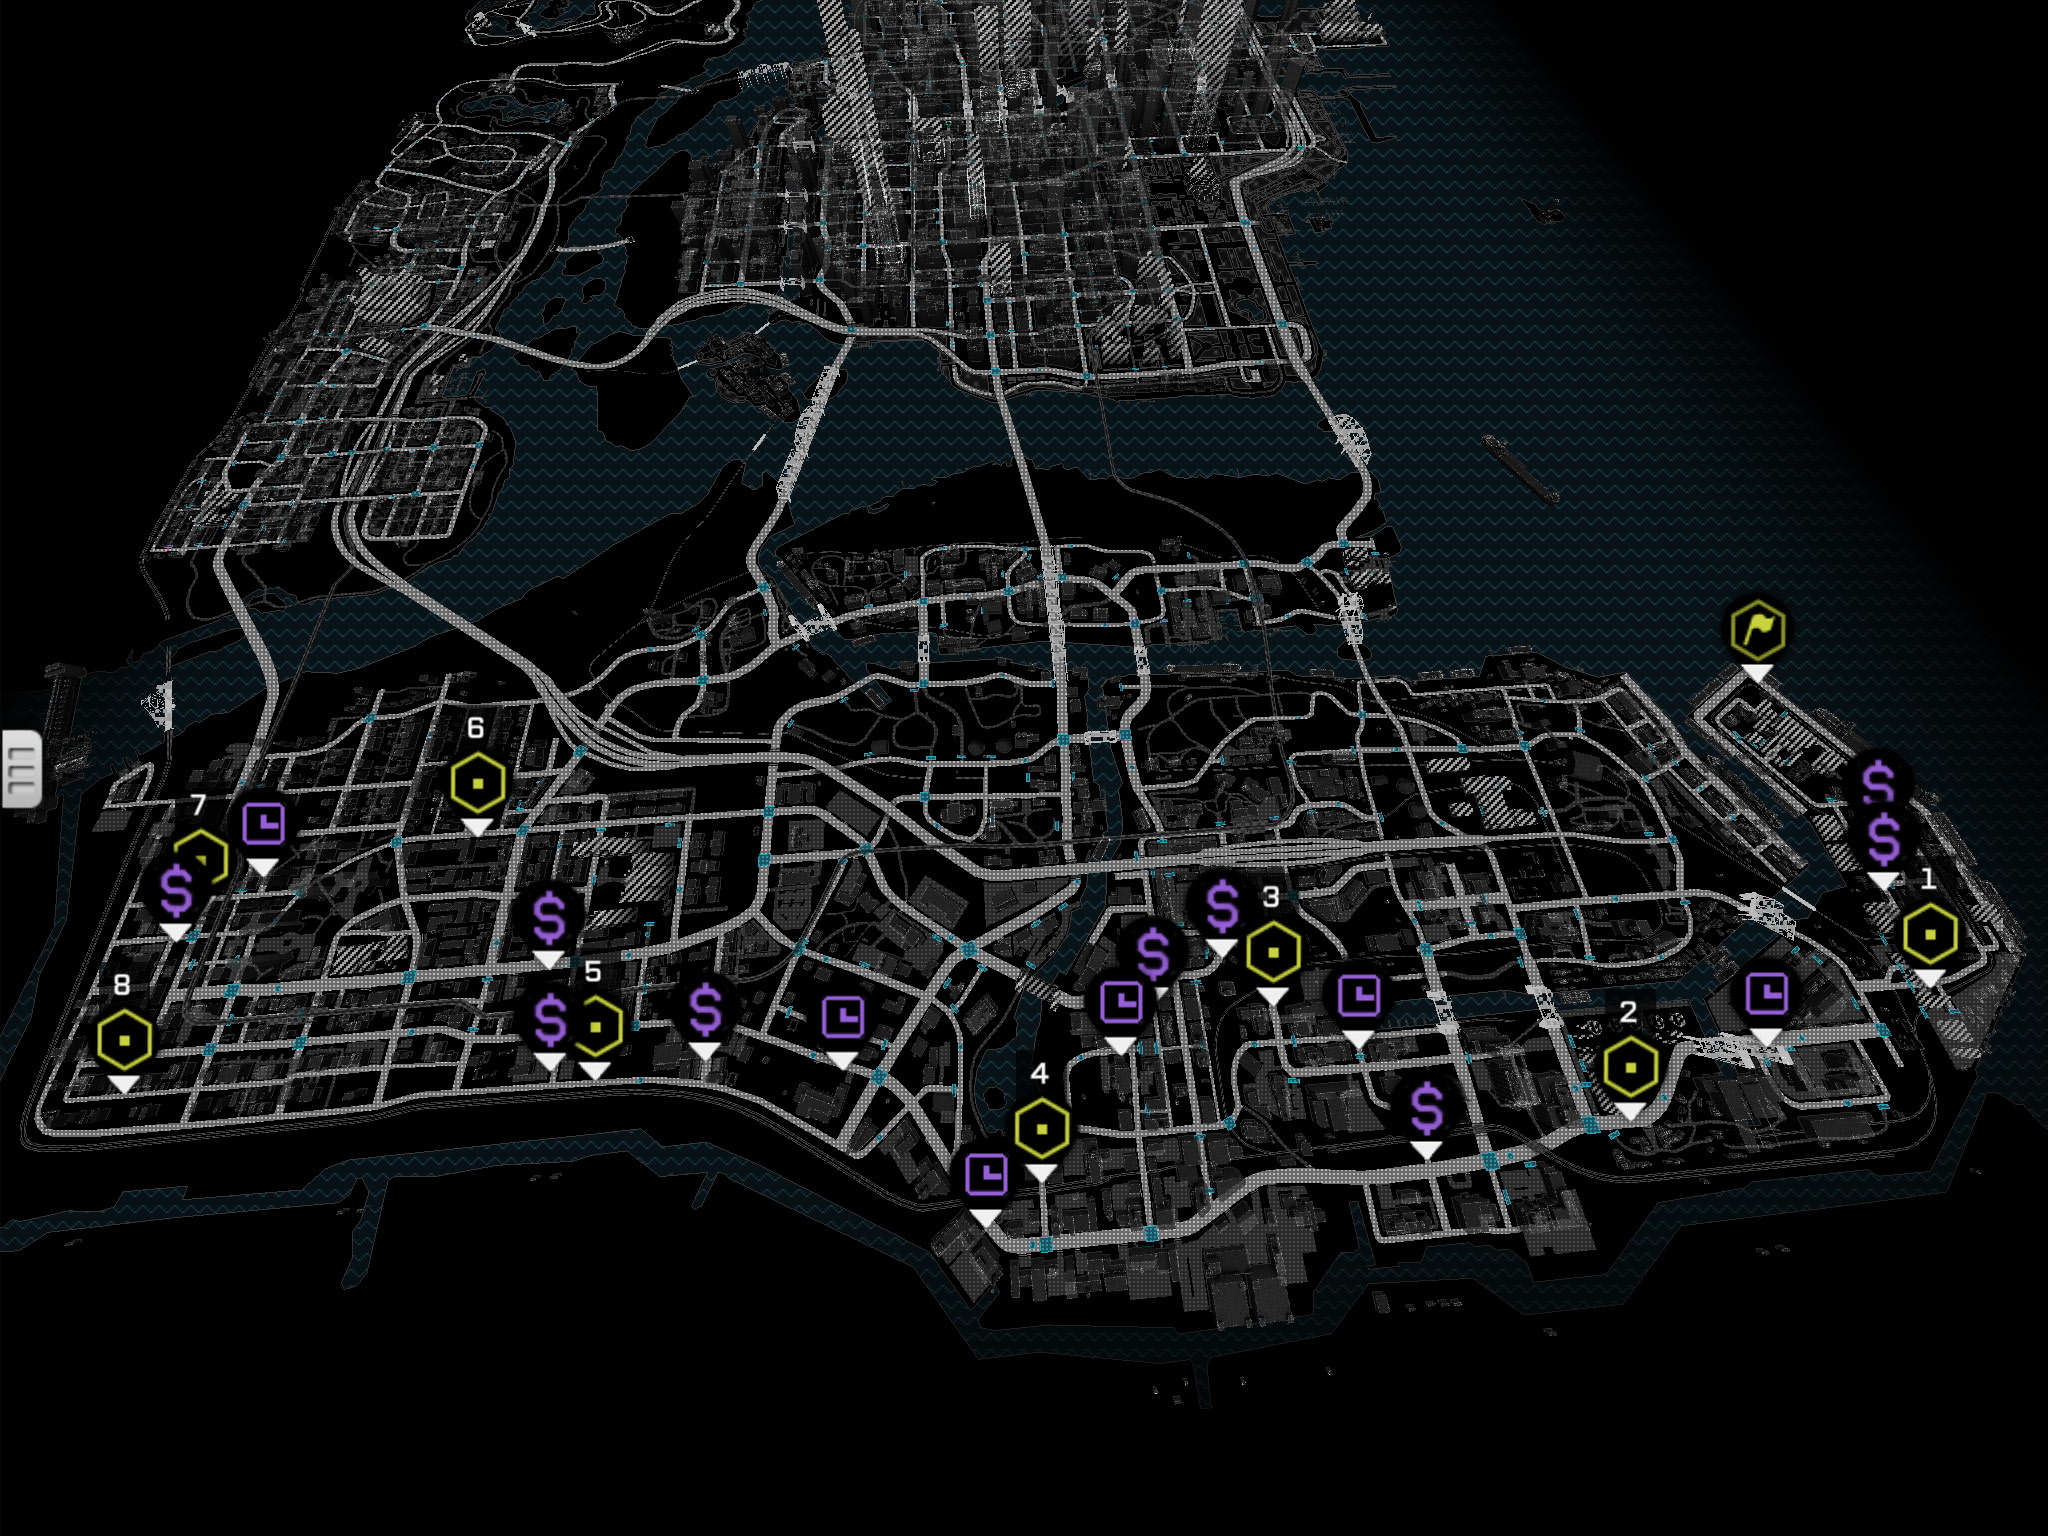
FREE ROAM MAPS // The Loop
09 // No Roads Needed
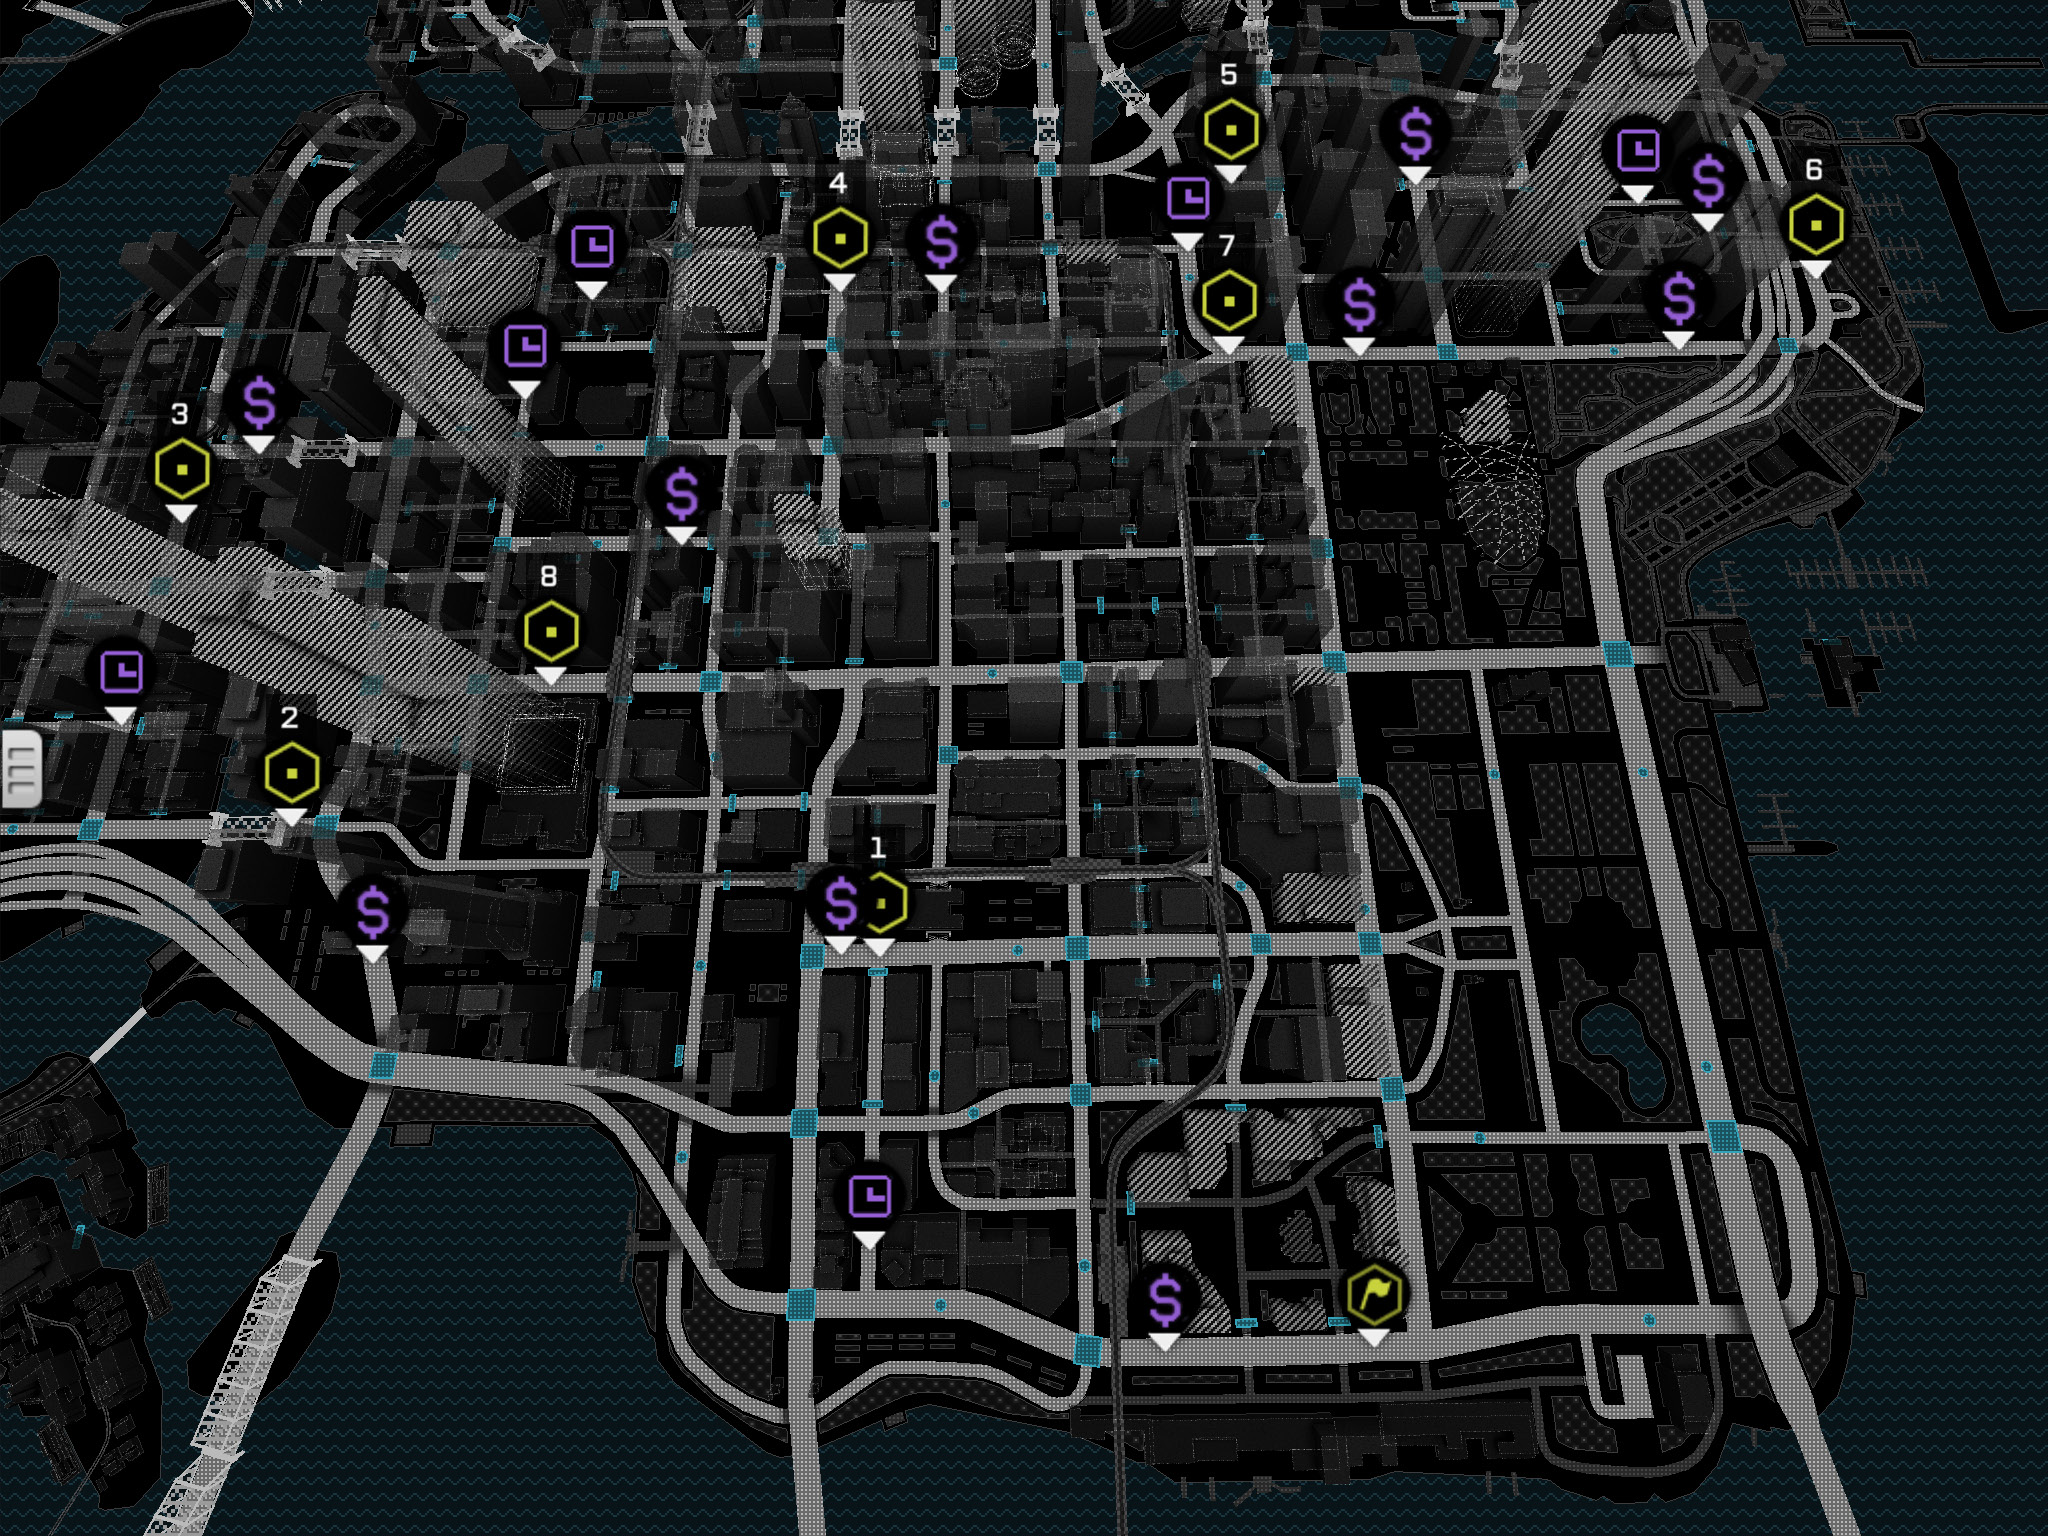
10 // Jumping to Conclusions
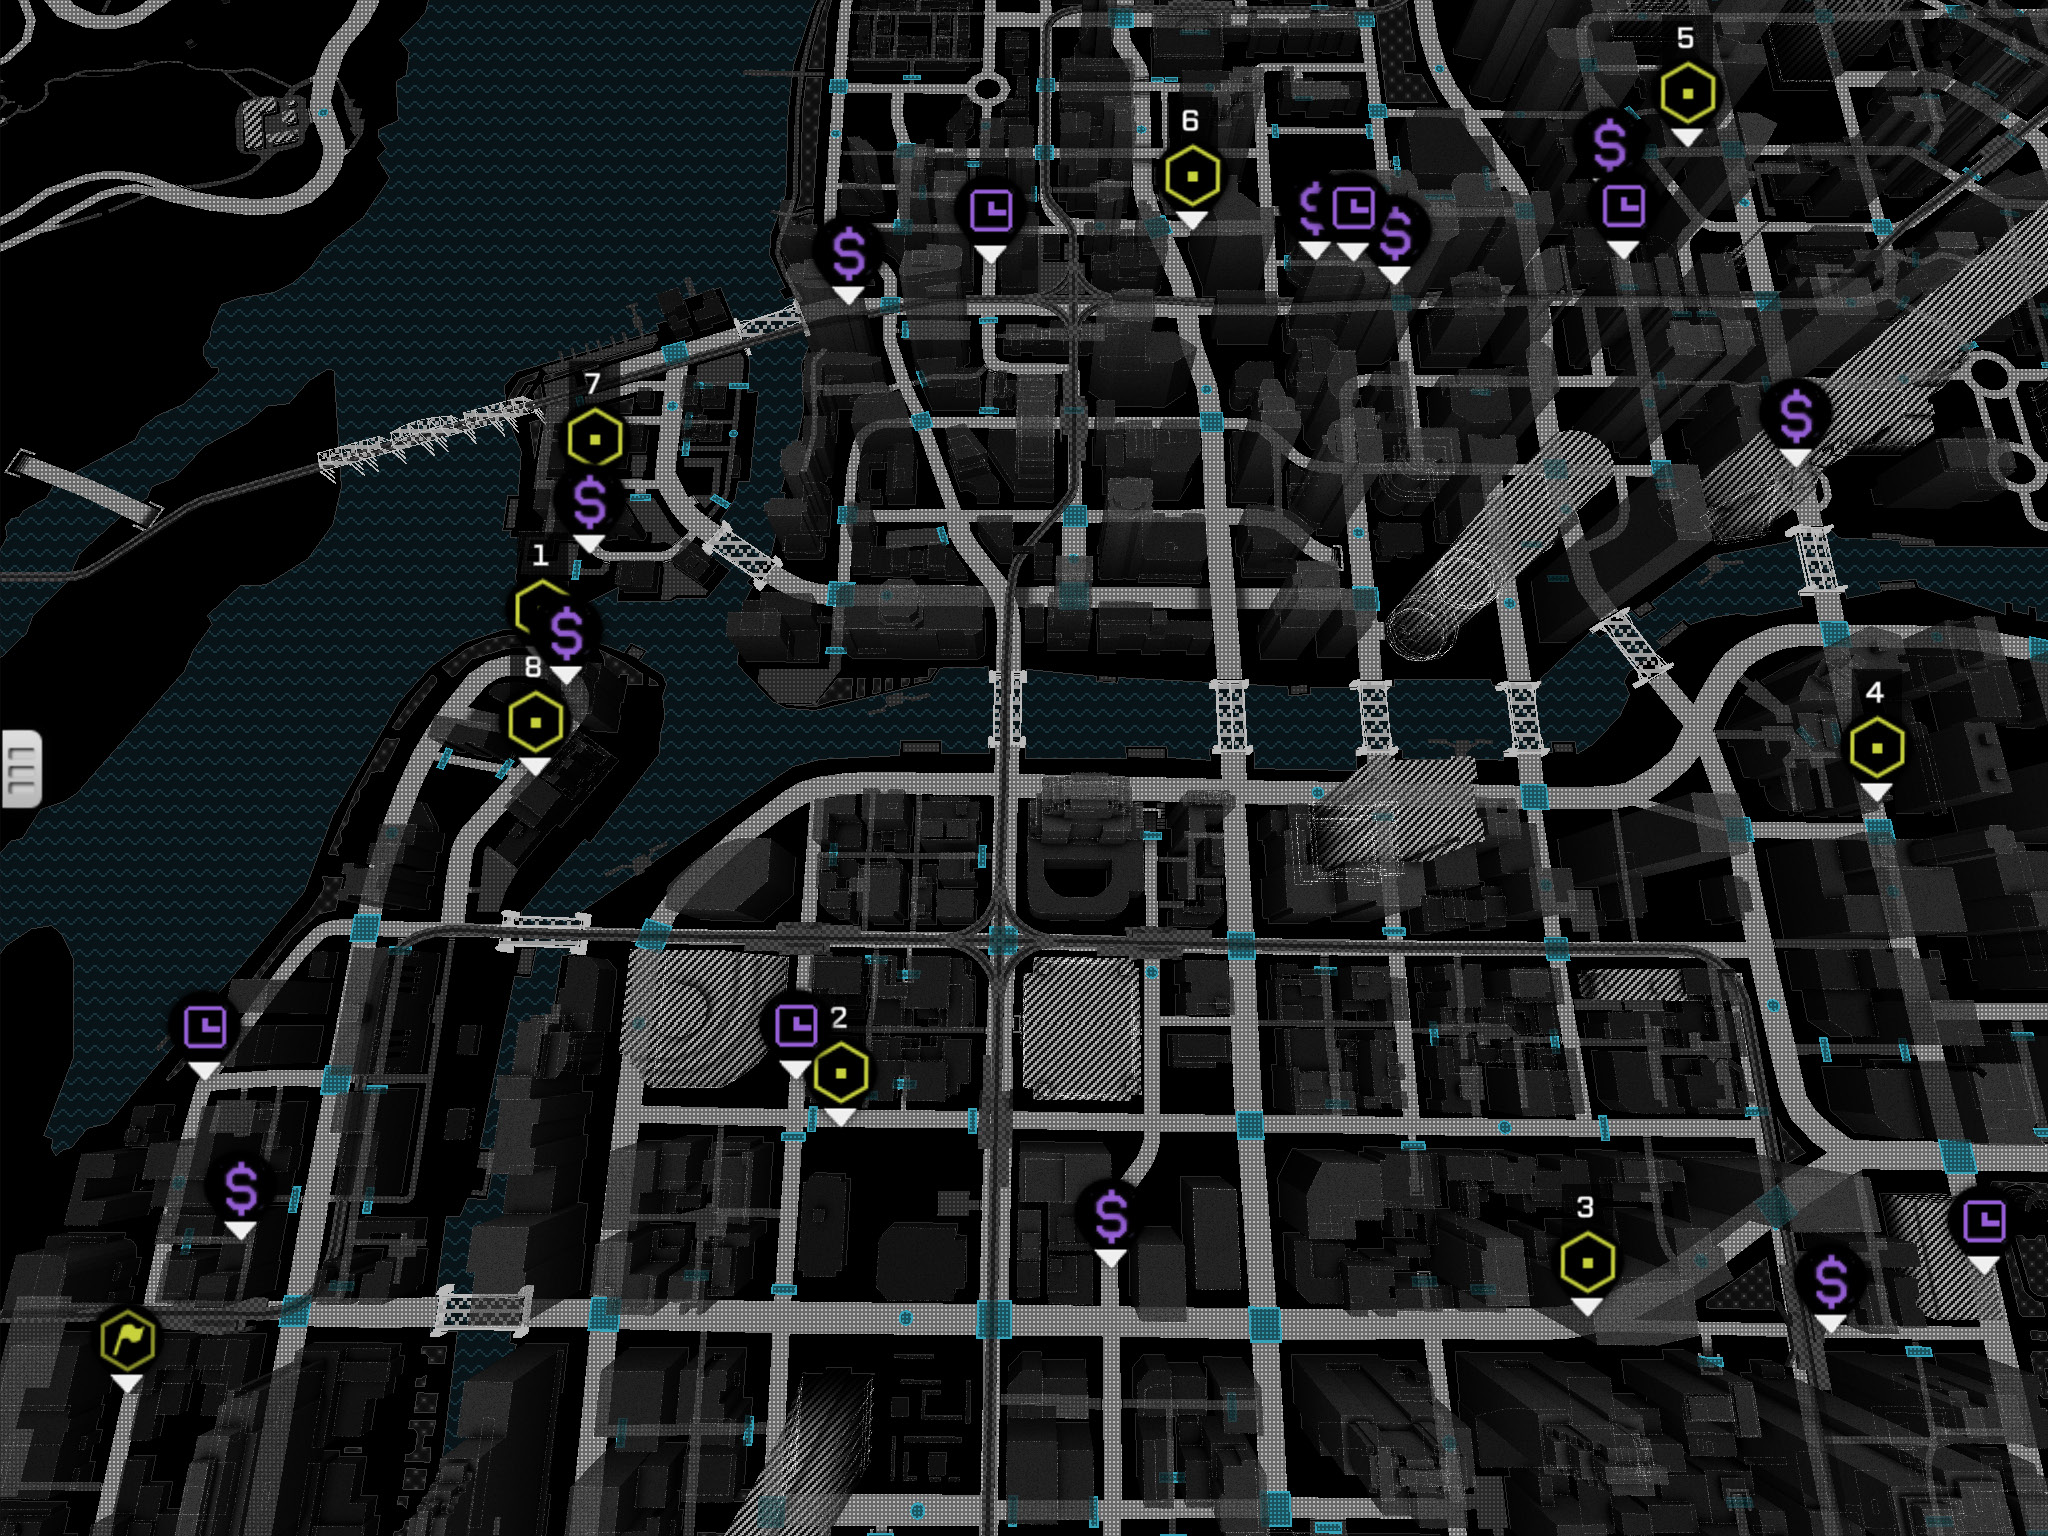
FREE ROAM MAPS // Mad Mile
11 // Gateway Getaway
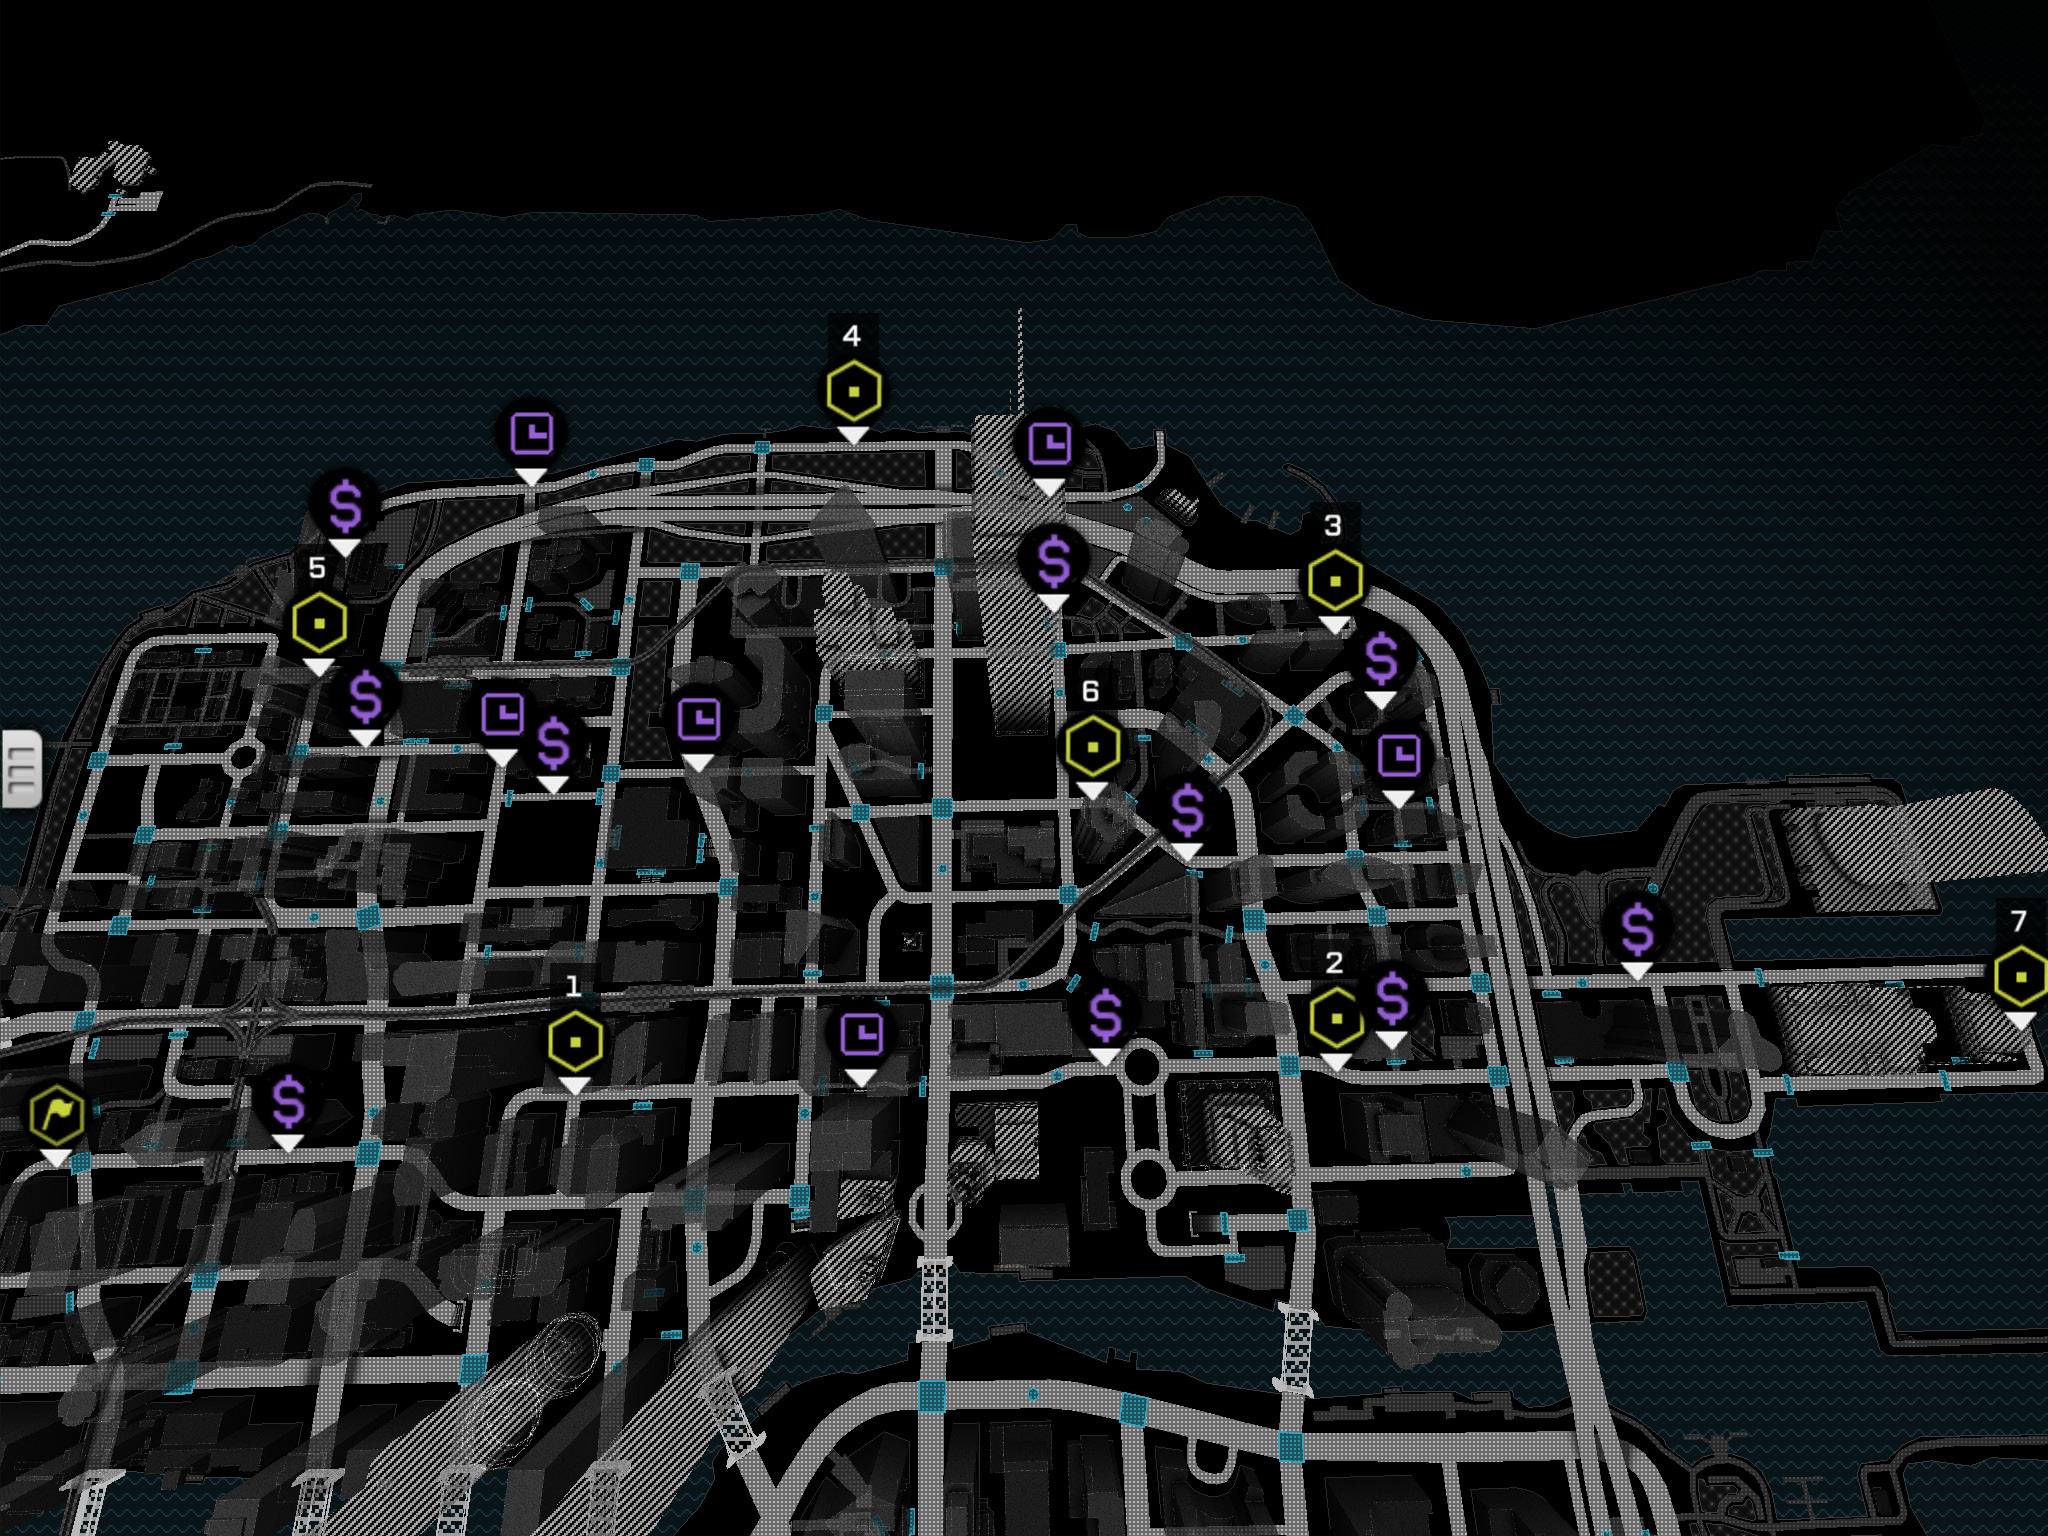
12 // Full Circle
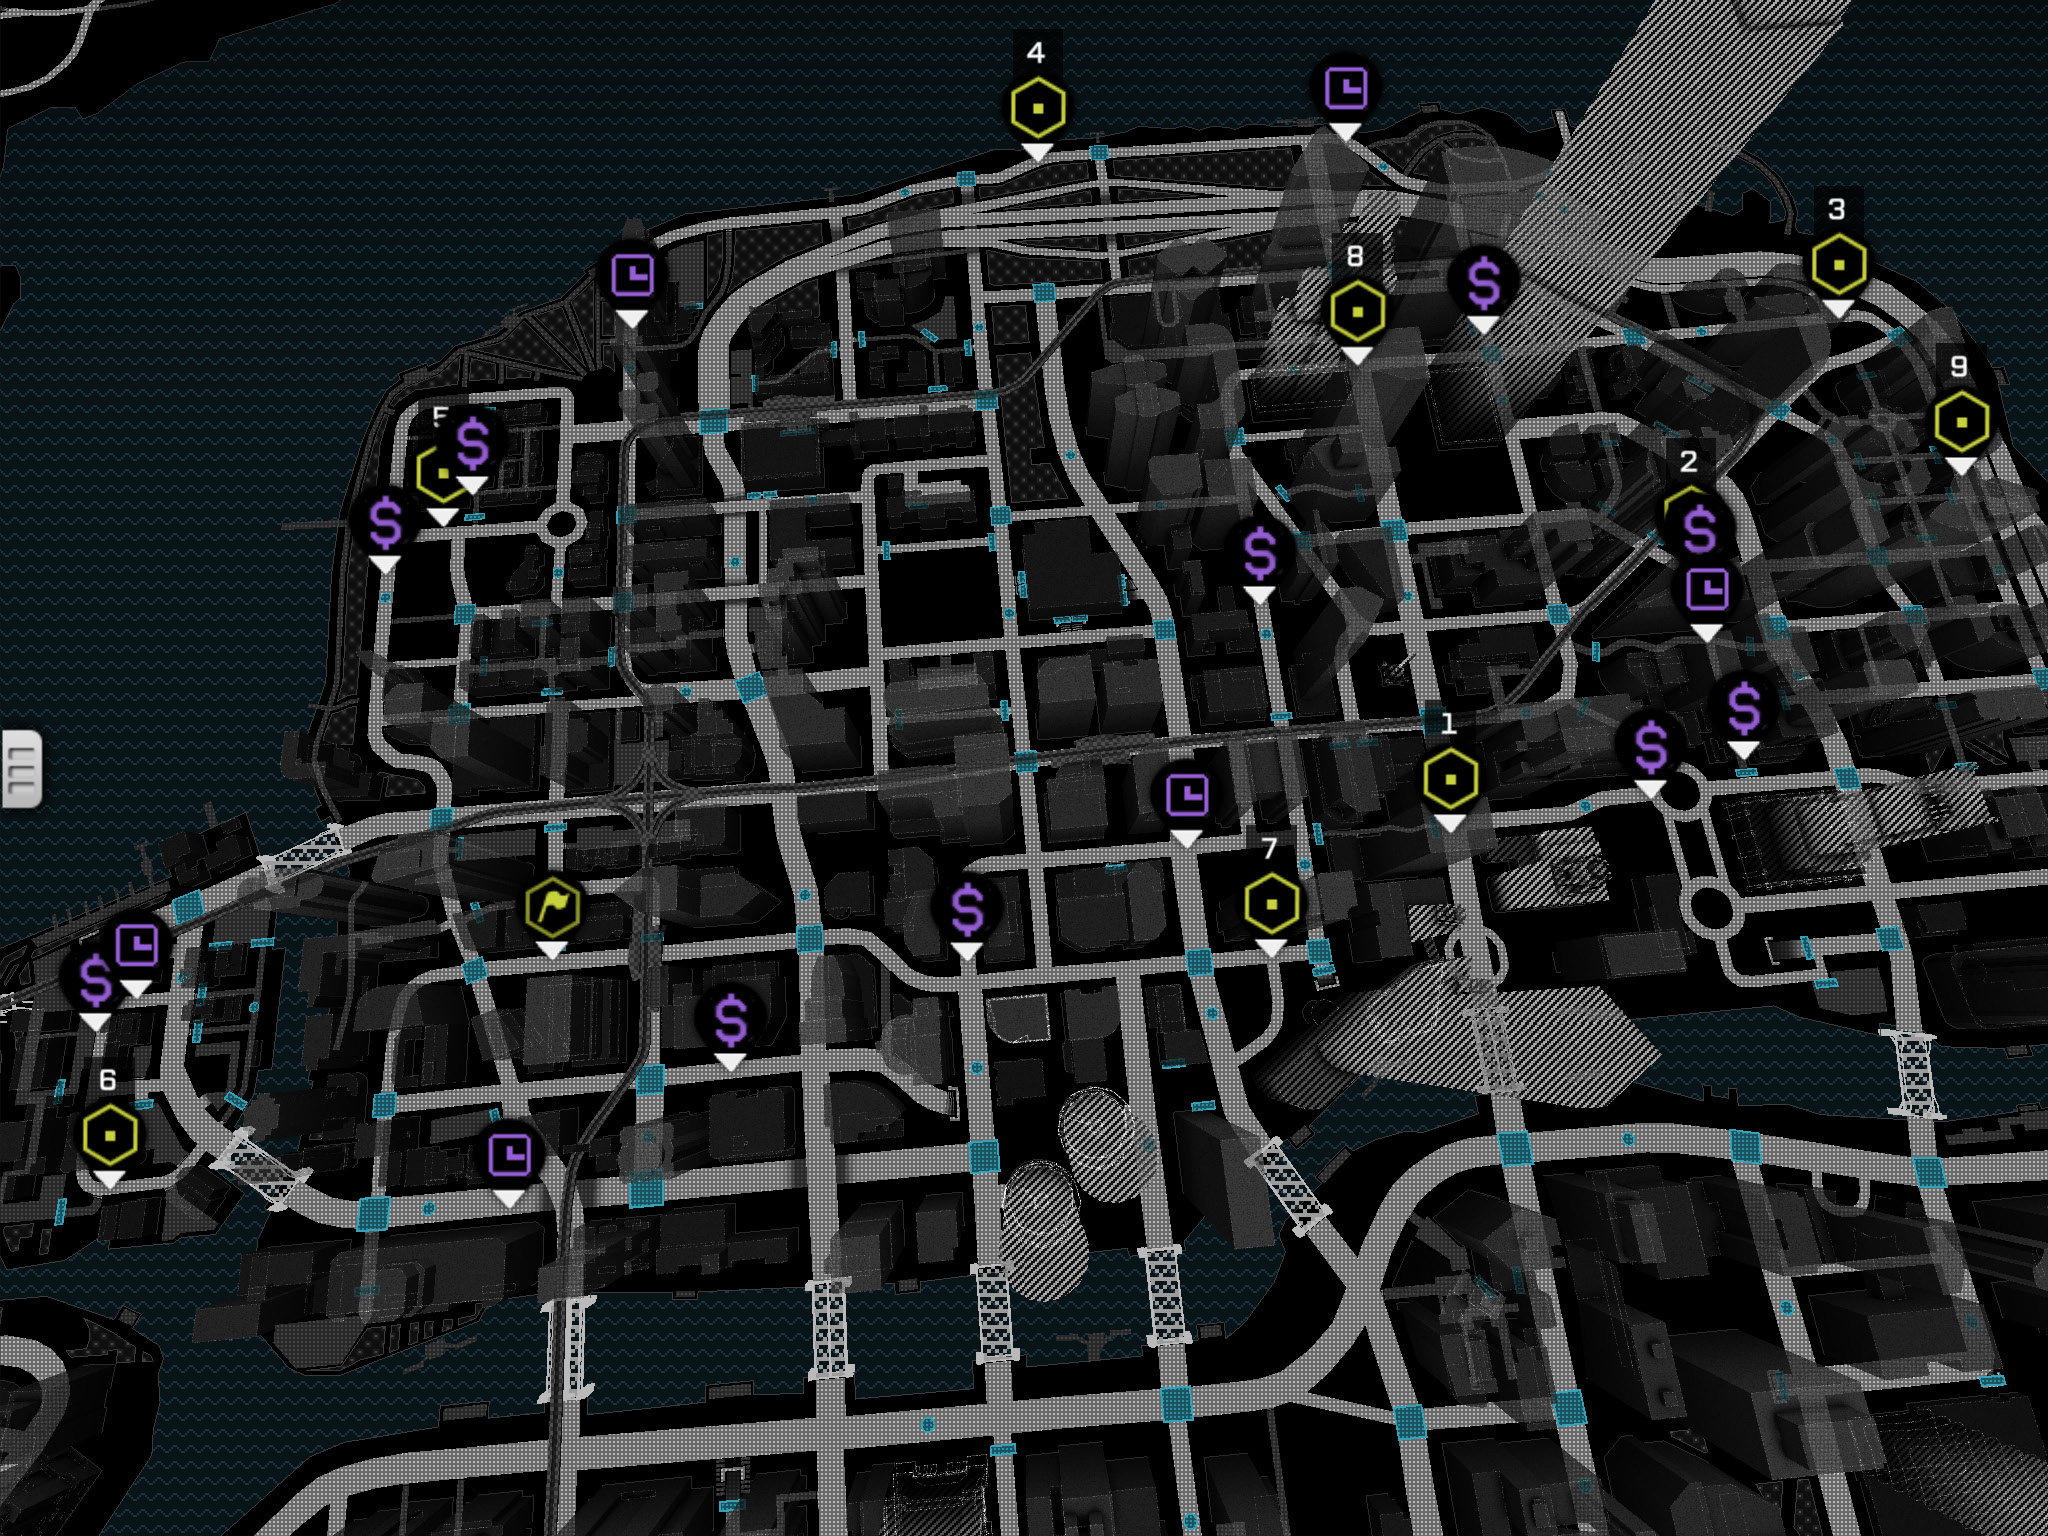
13 // There and Back
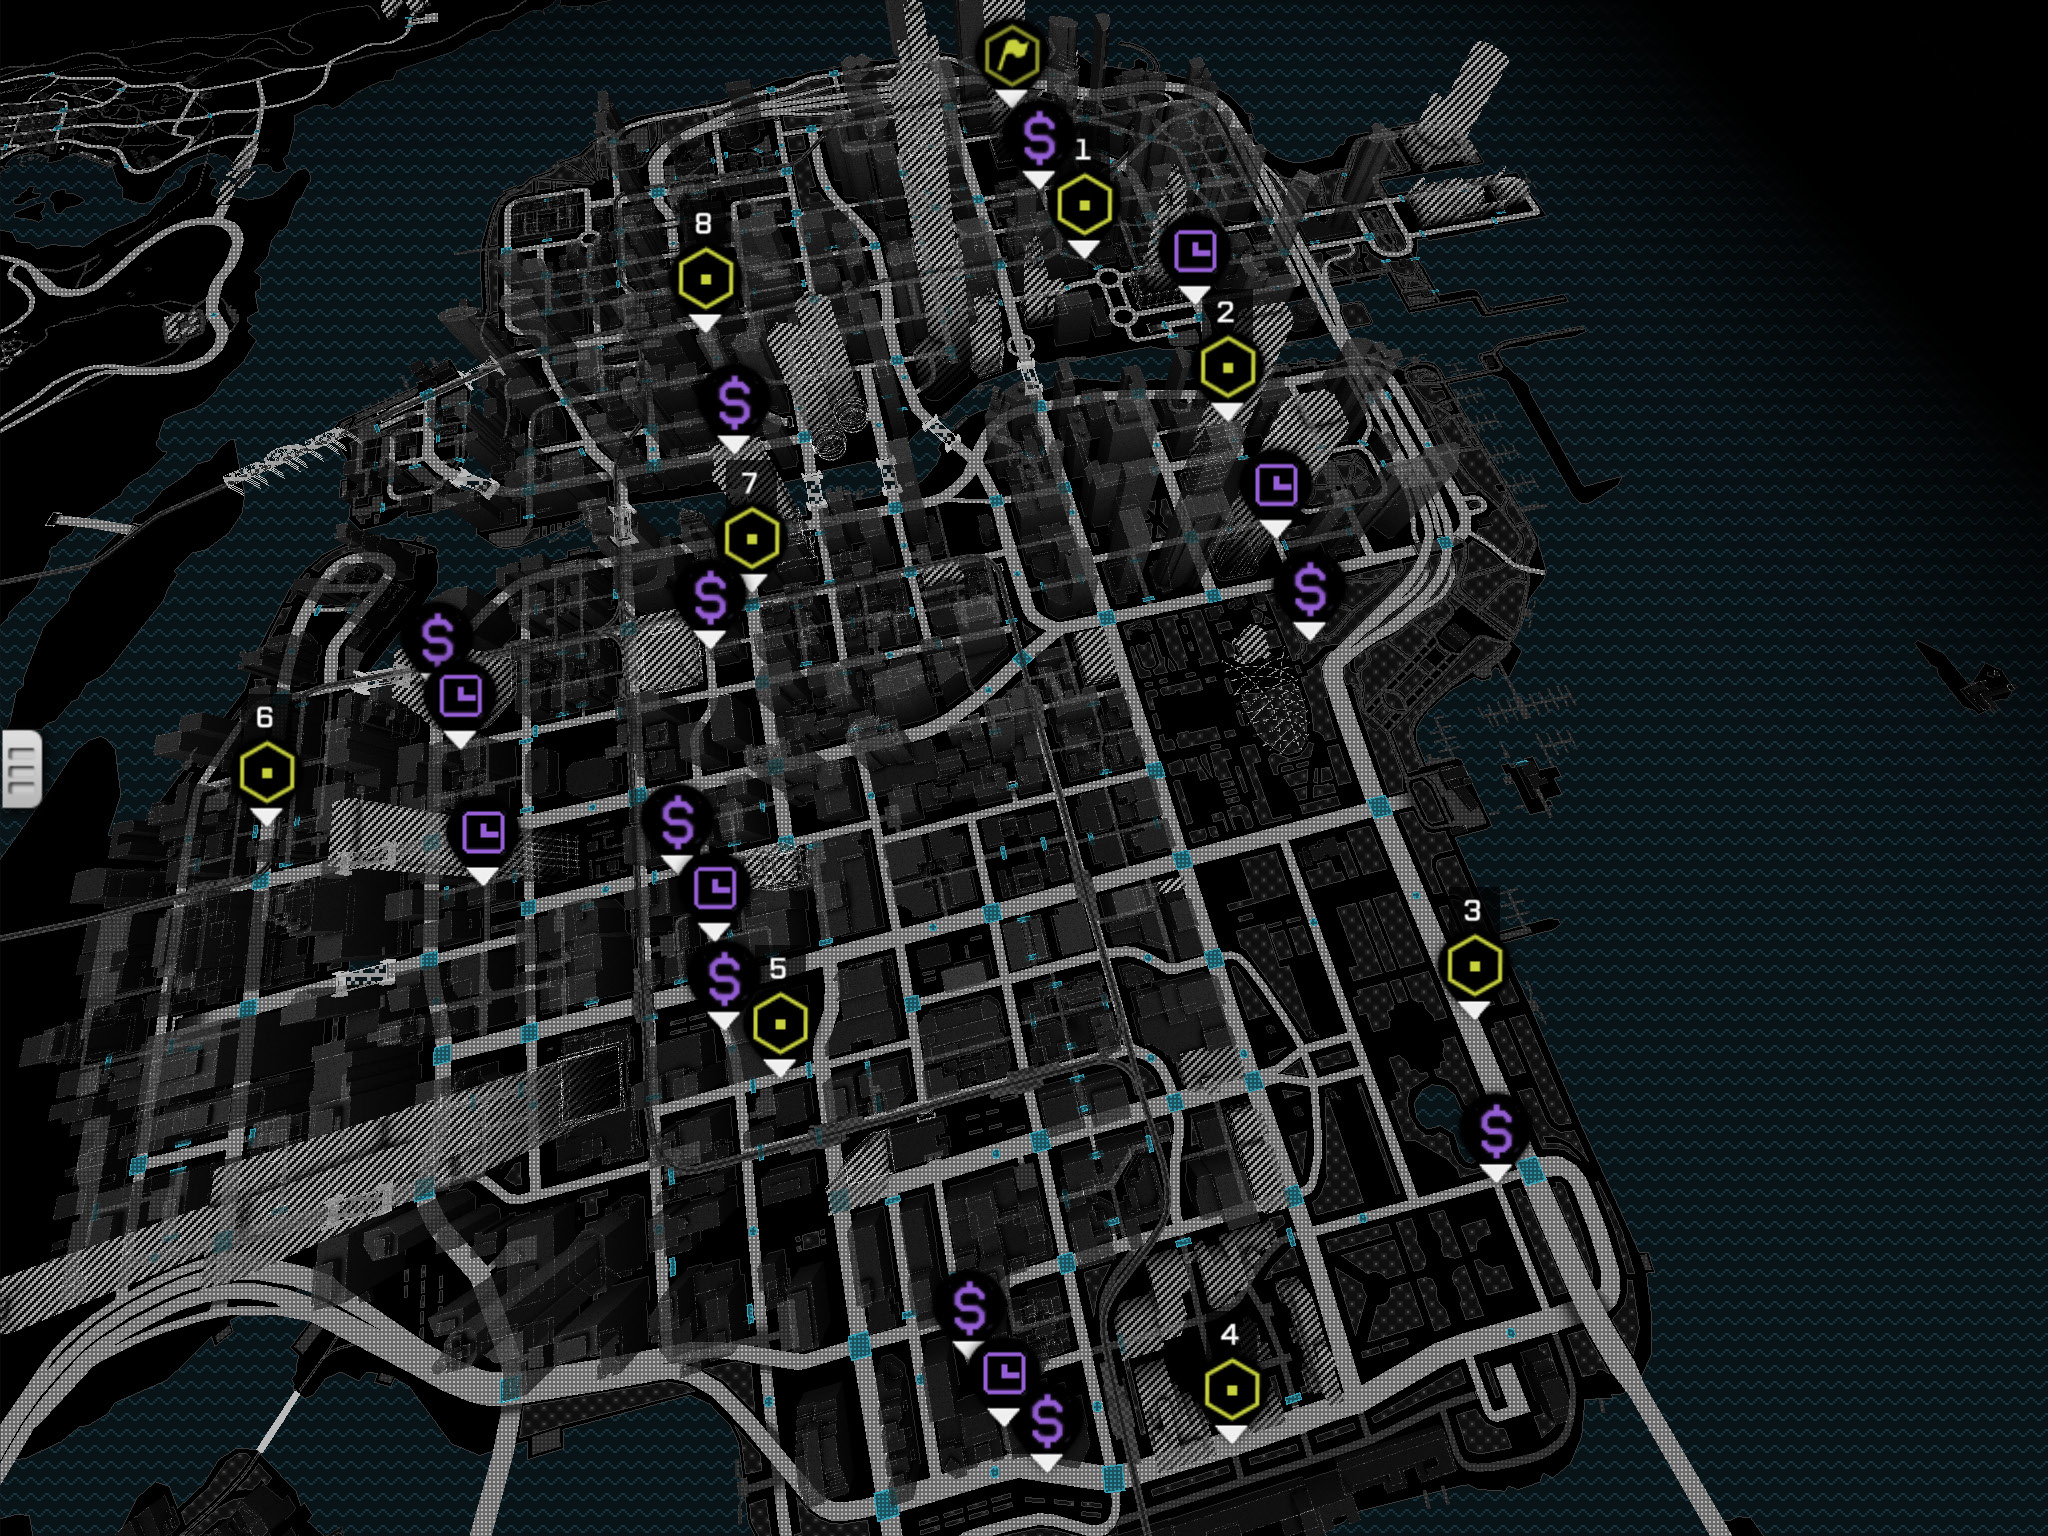
RaCES // Pawnee
14 // Go Big or Go Home
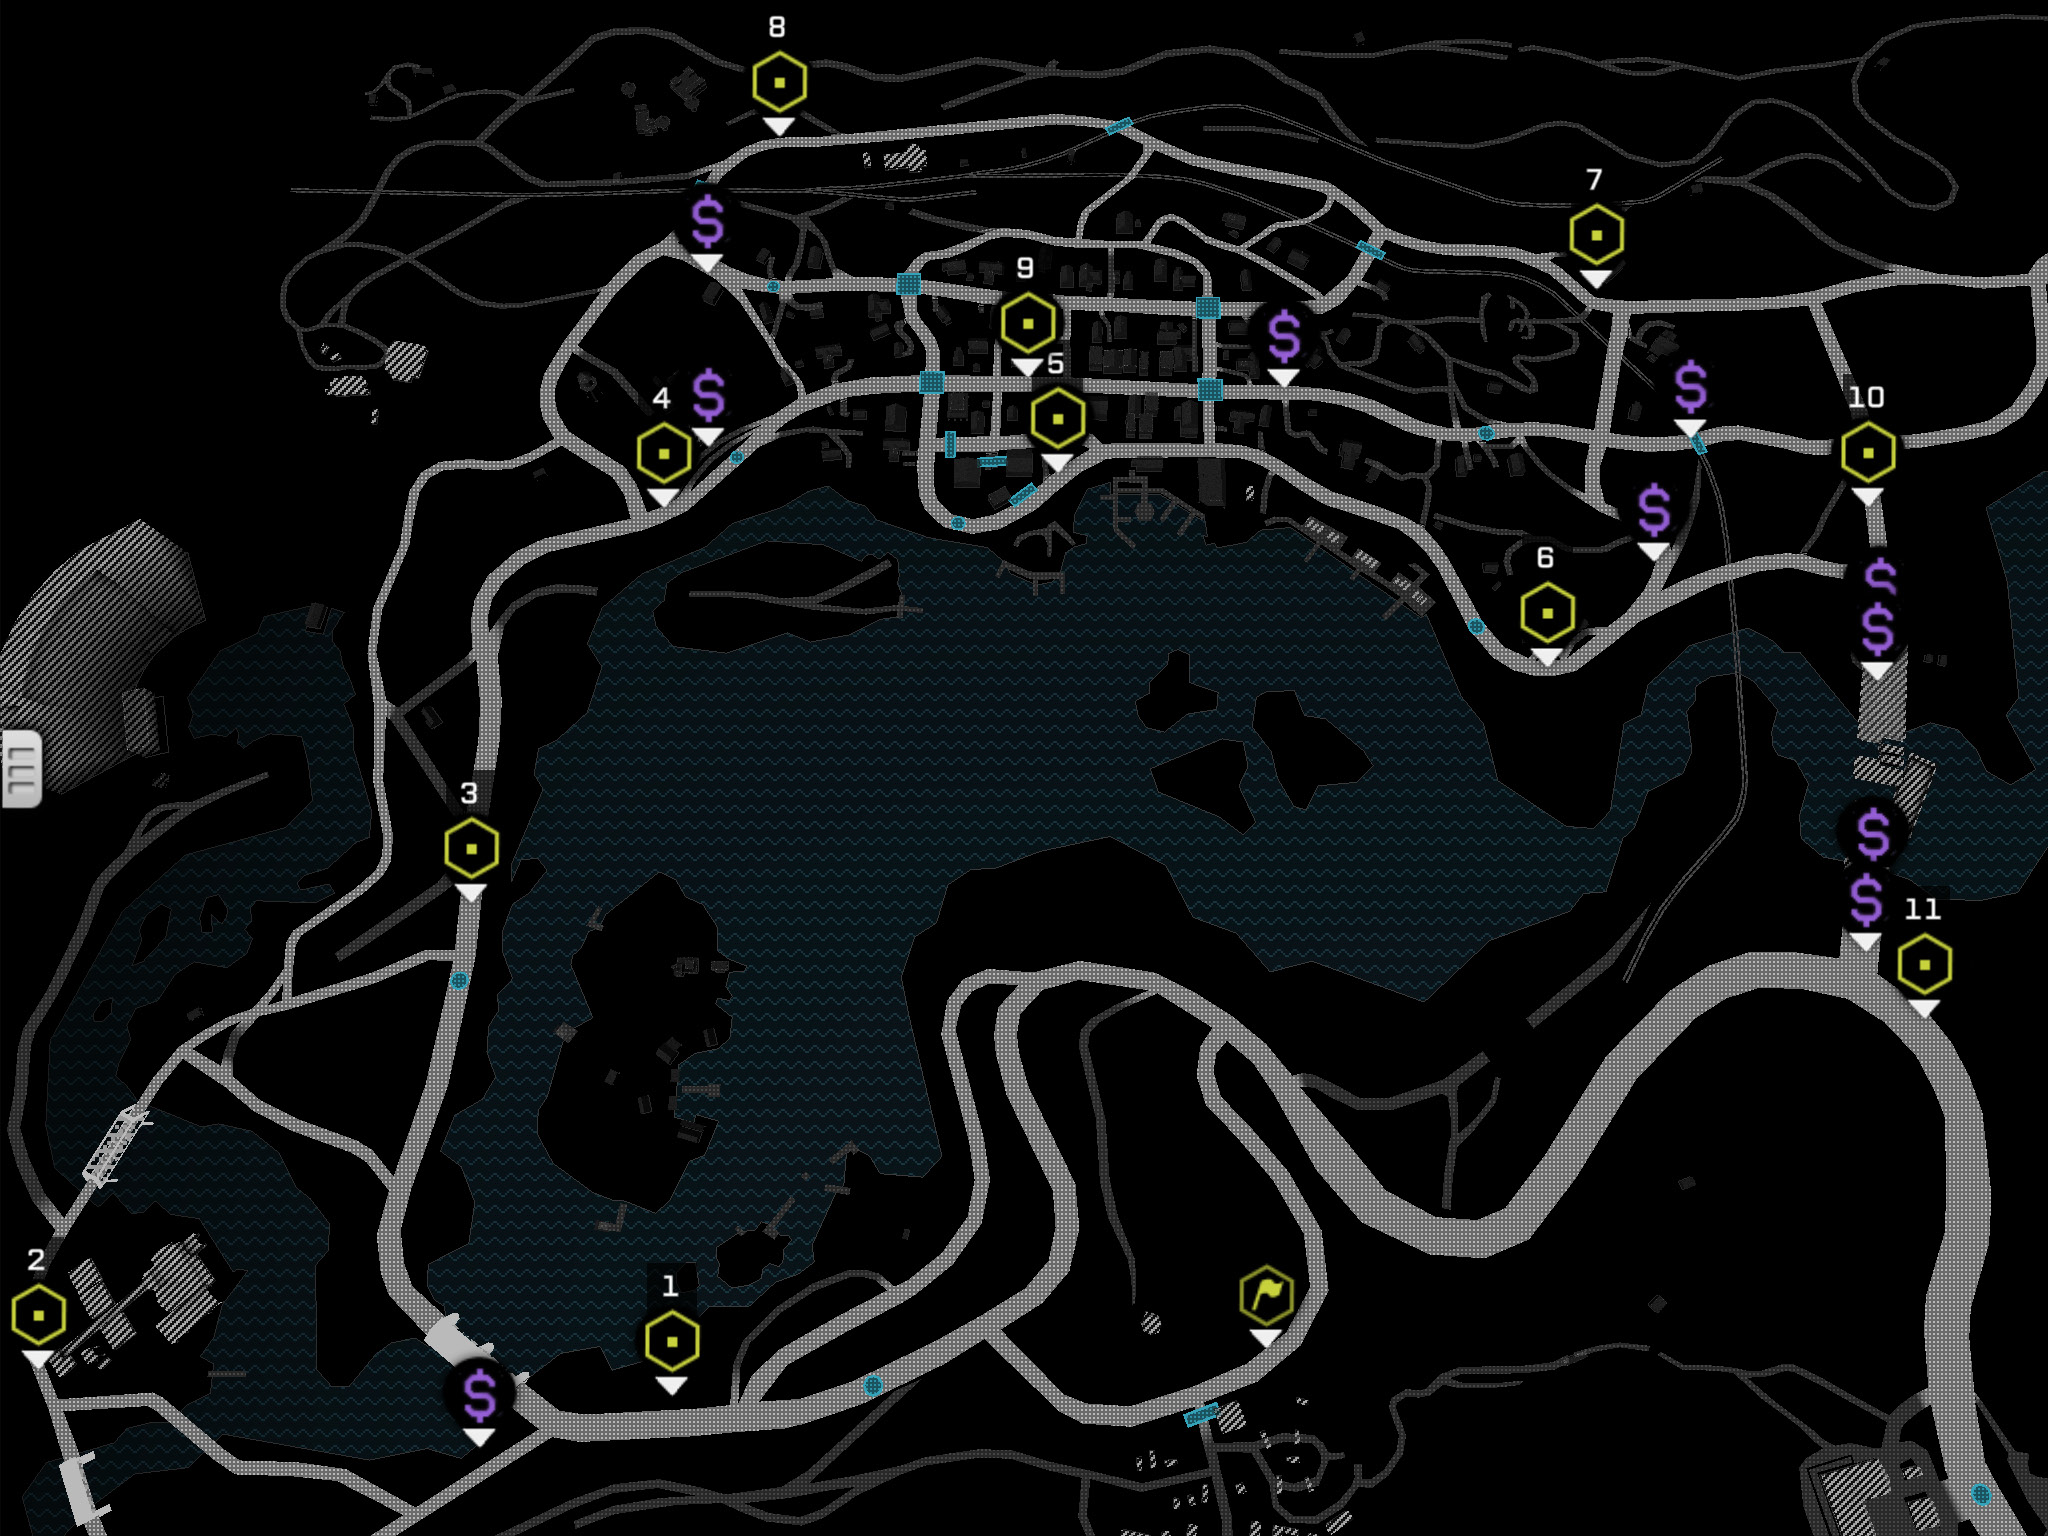
15 // Memory Lane
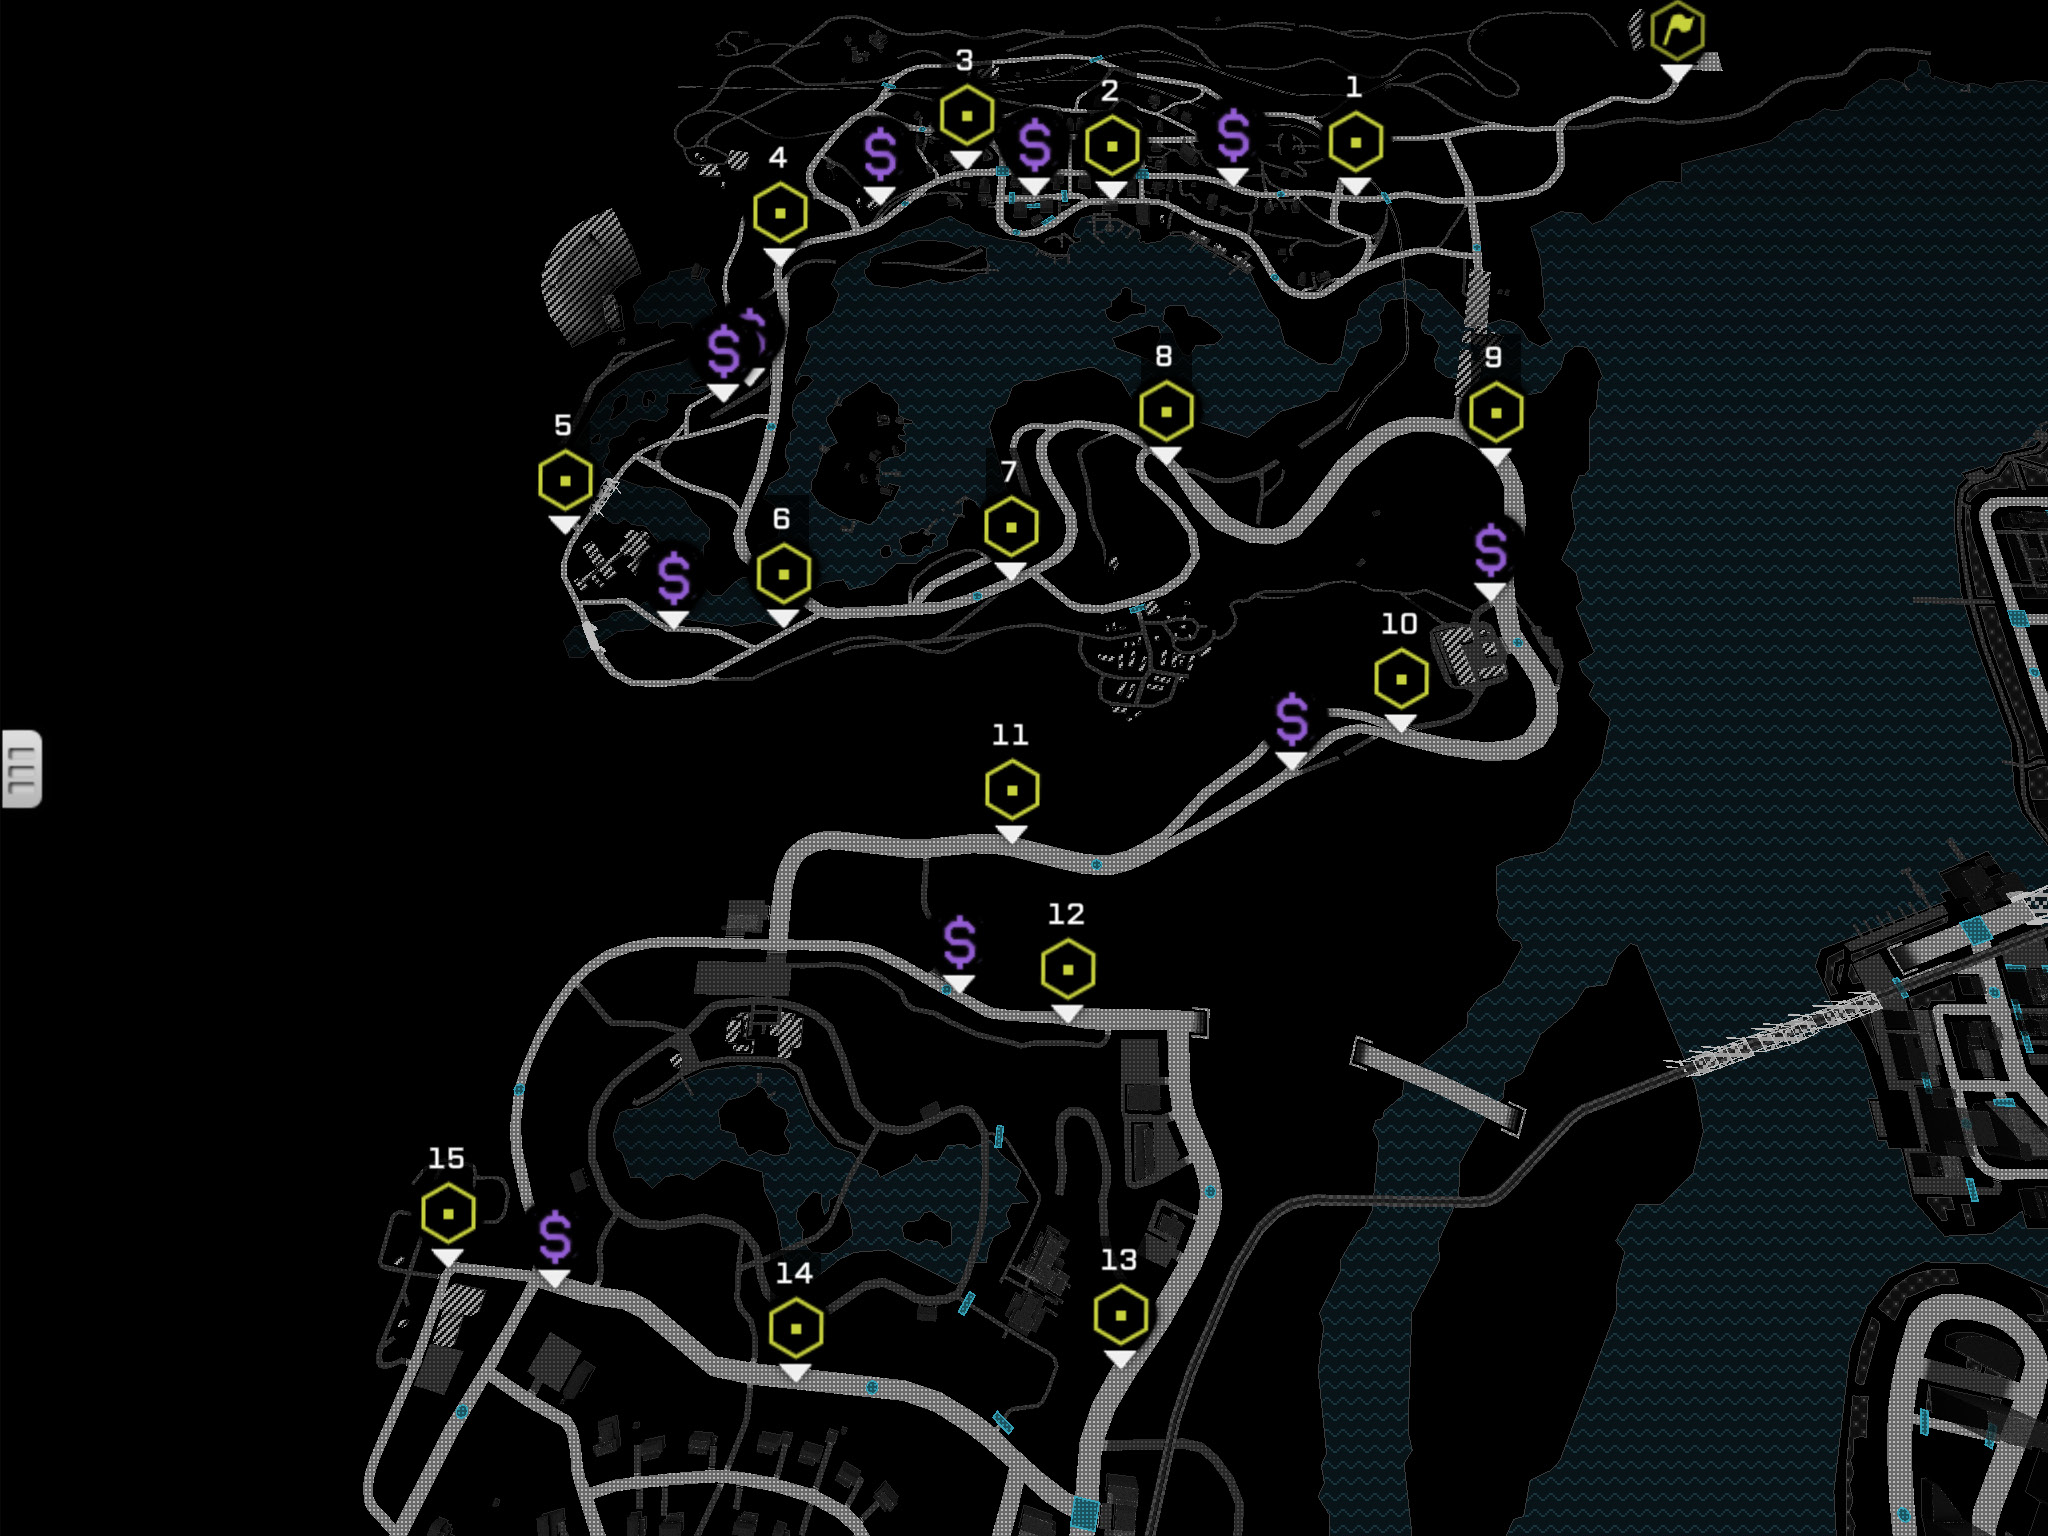
RaCES // Parker Square
16 // Suburban Slide
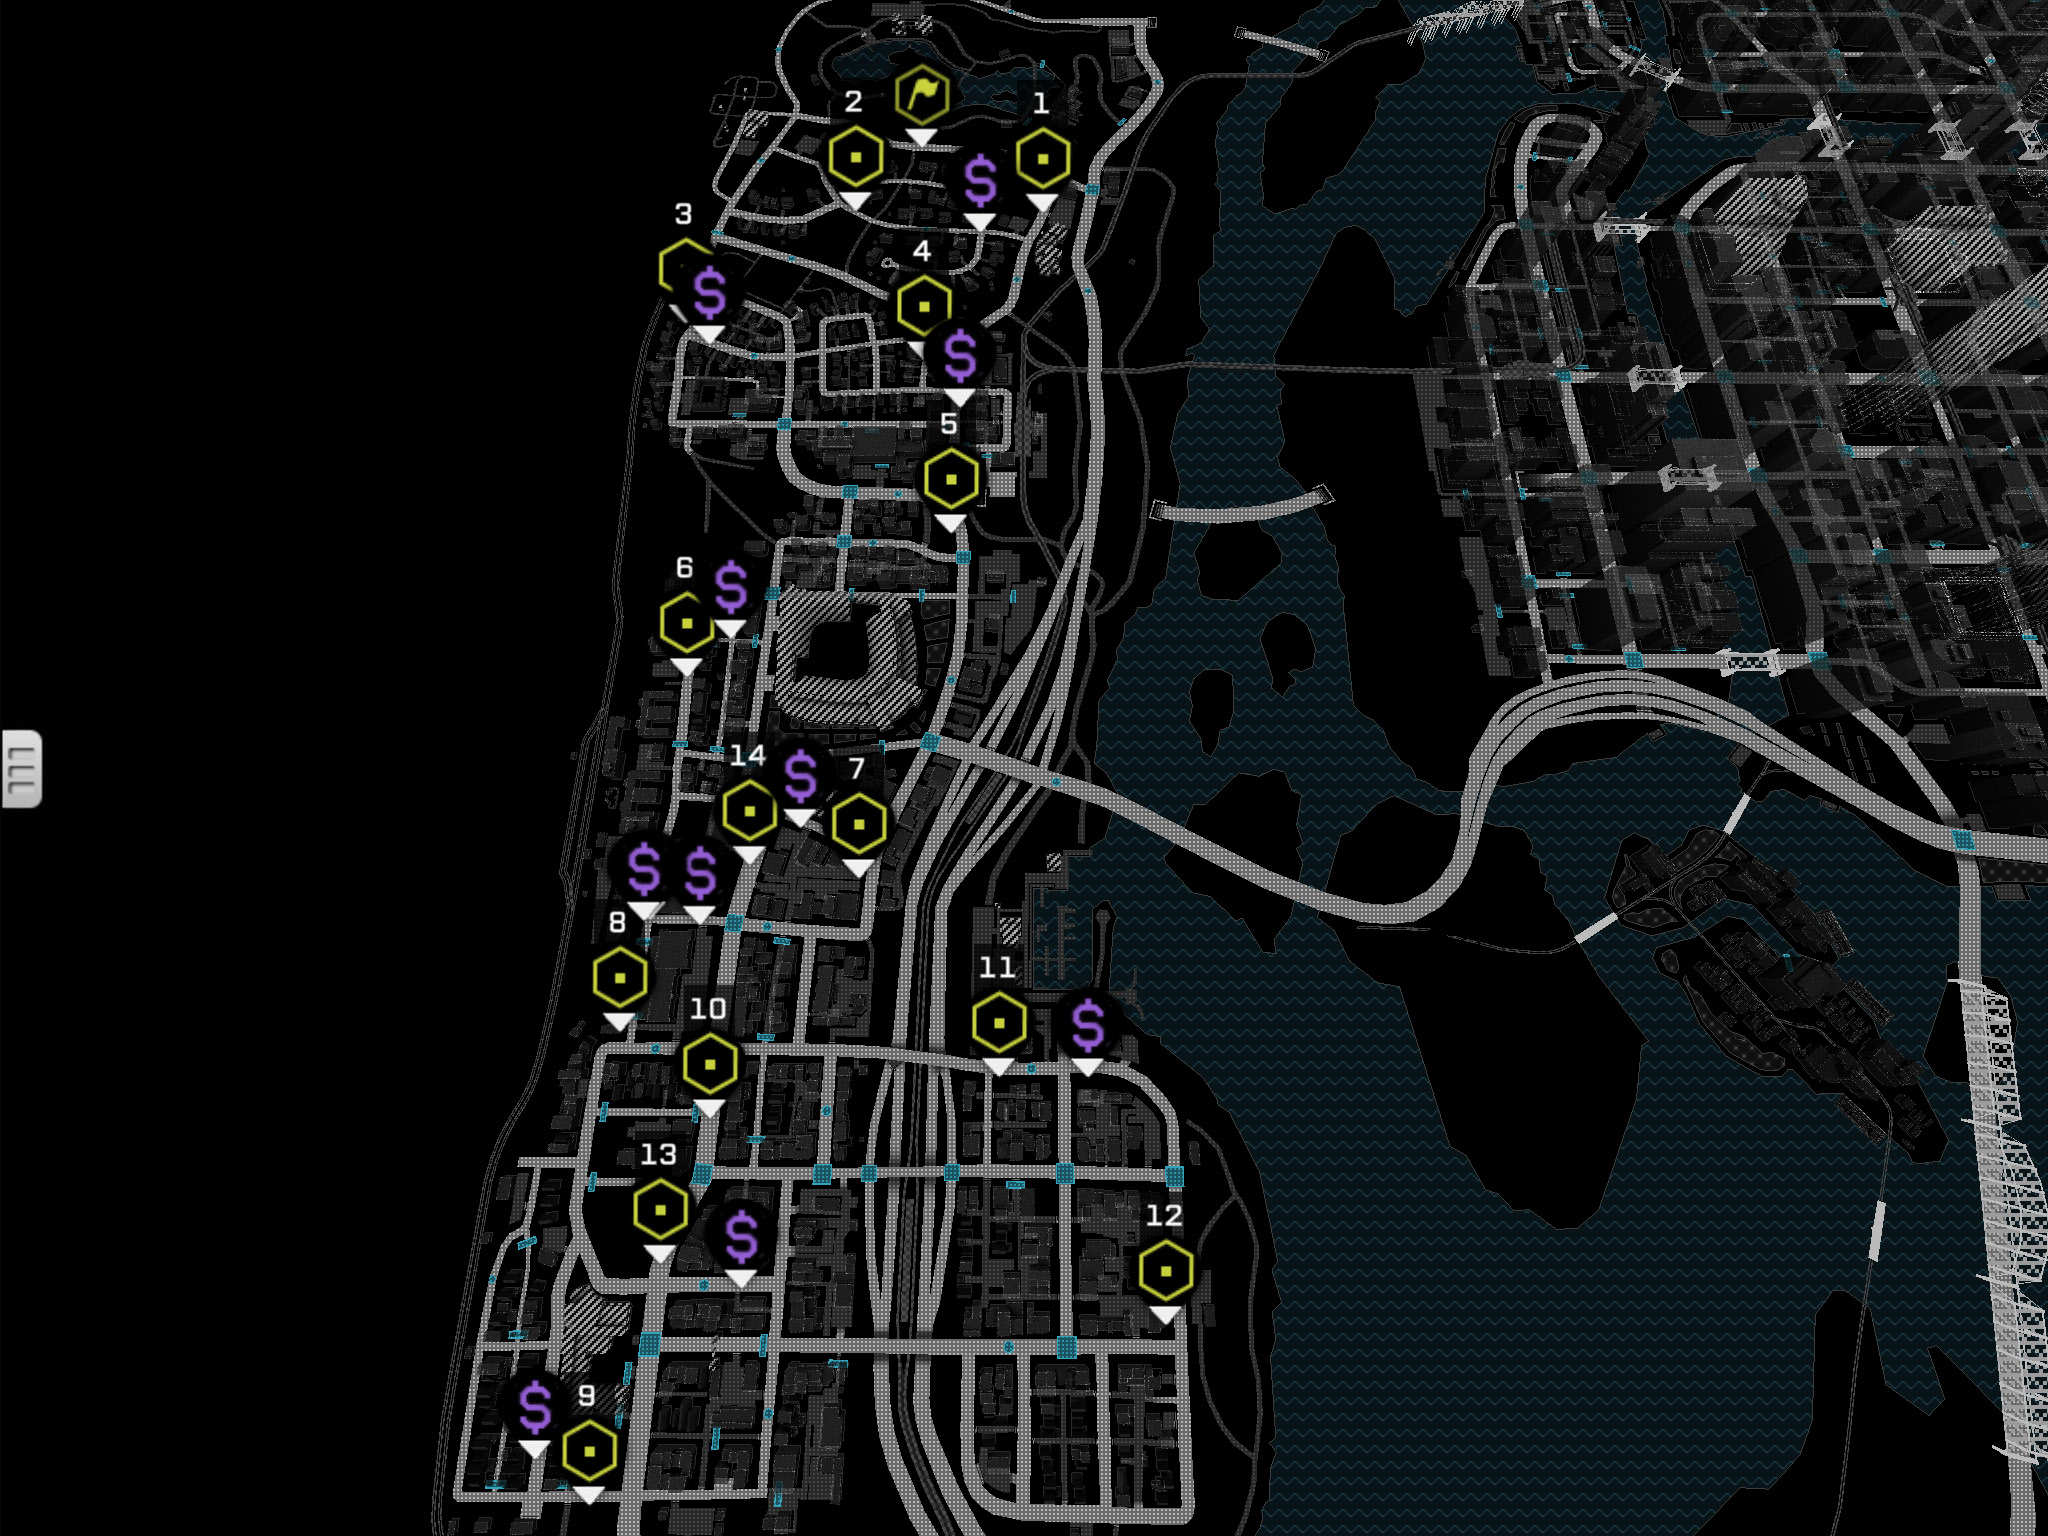
17 // Home Sweet Home
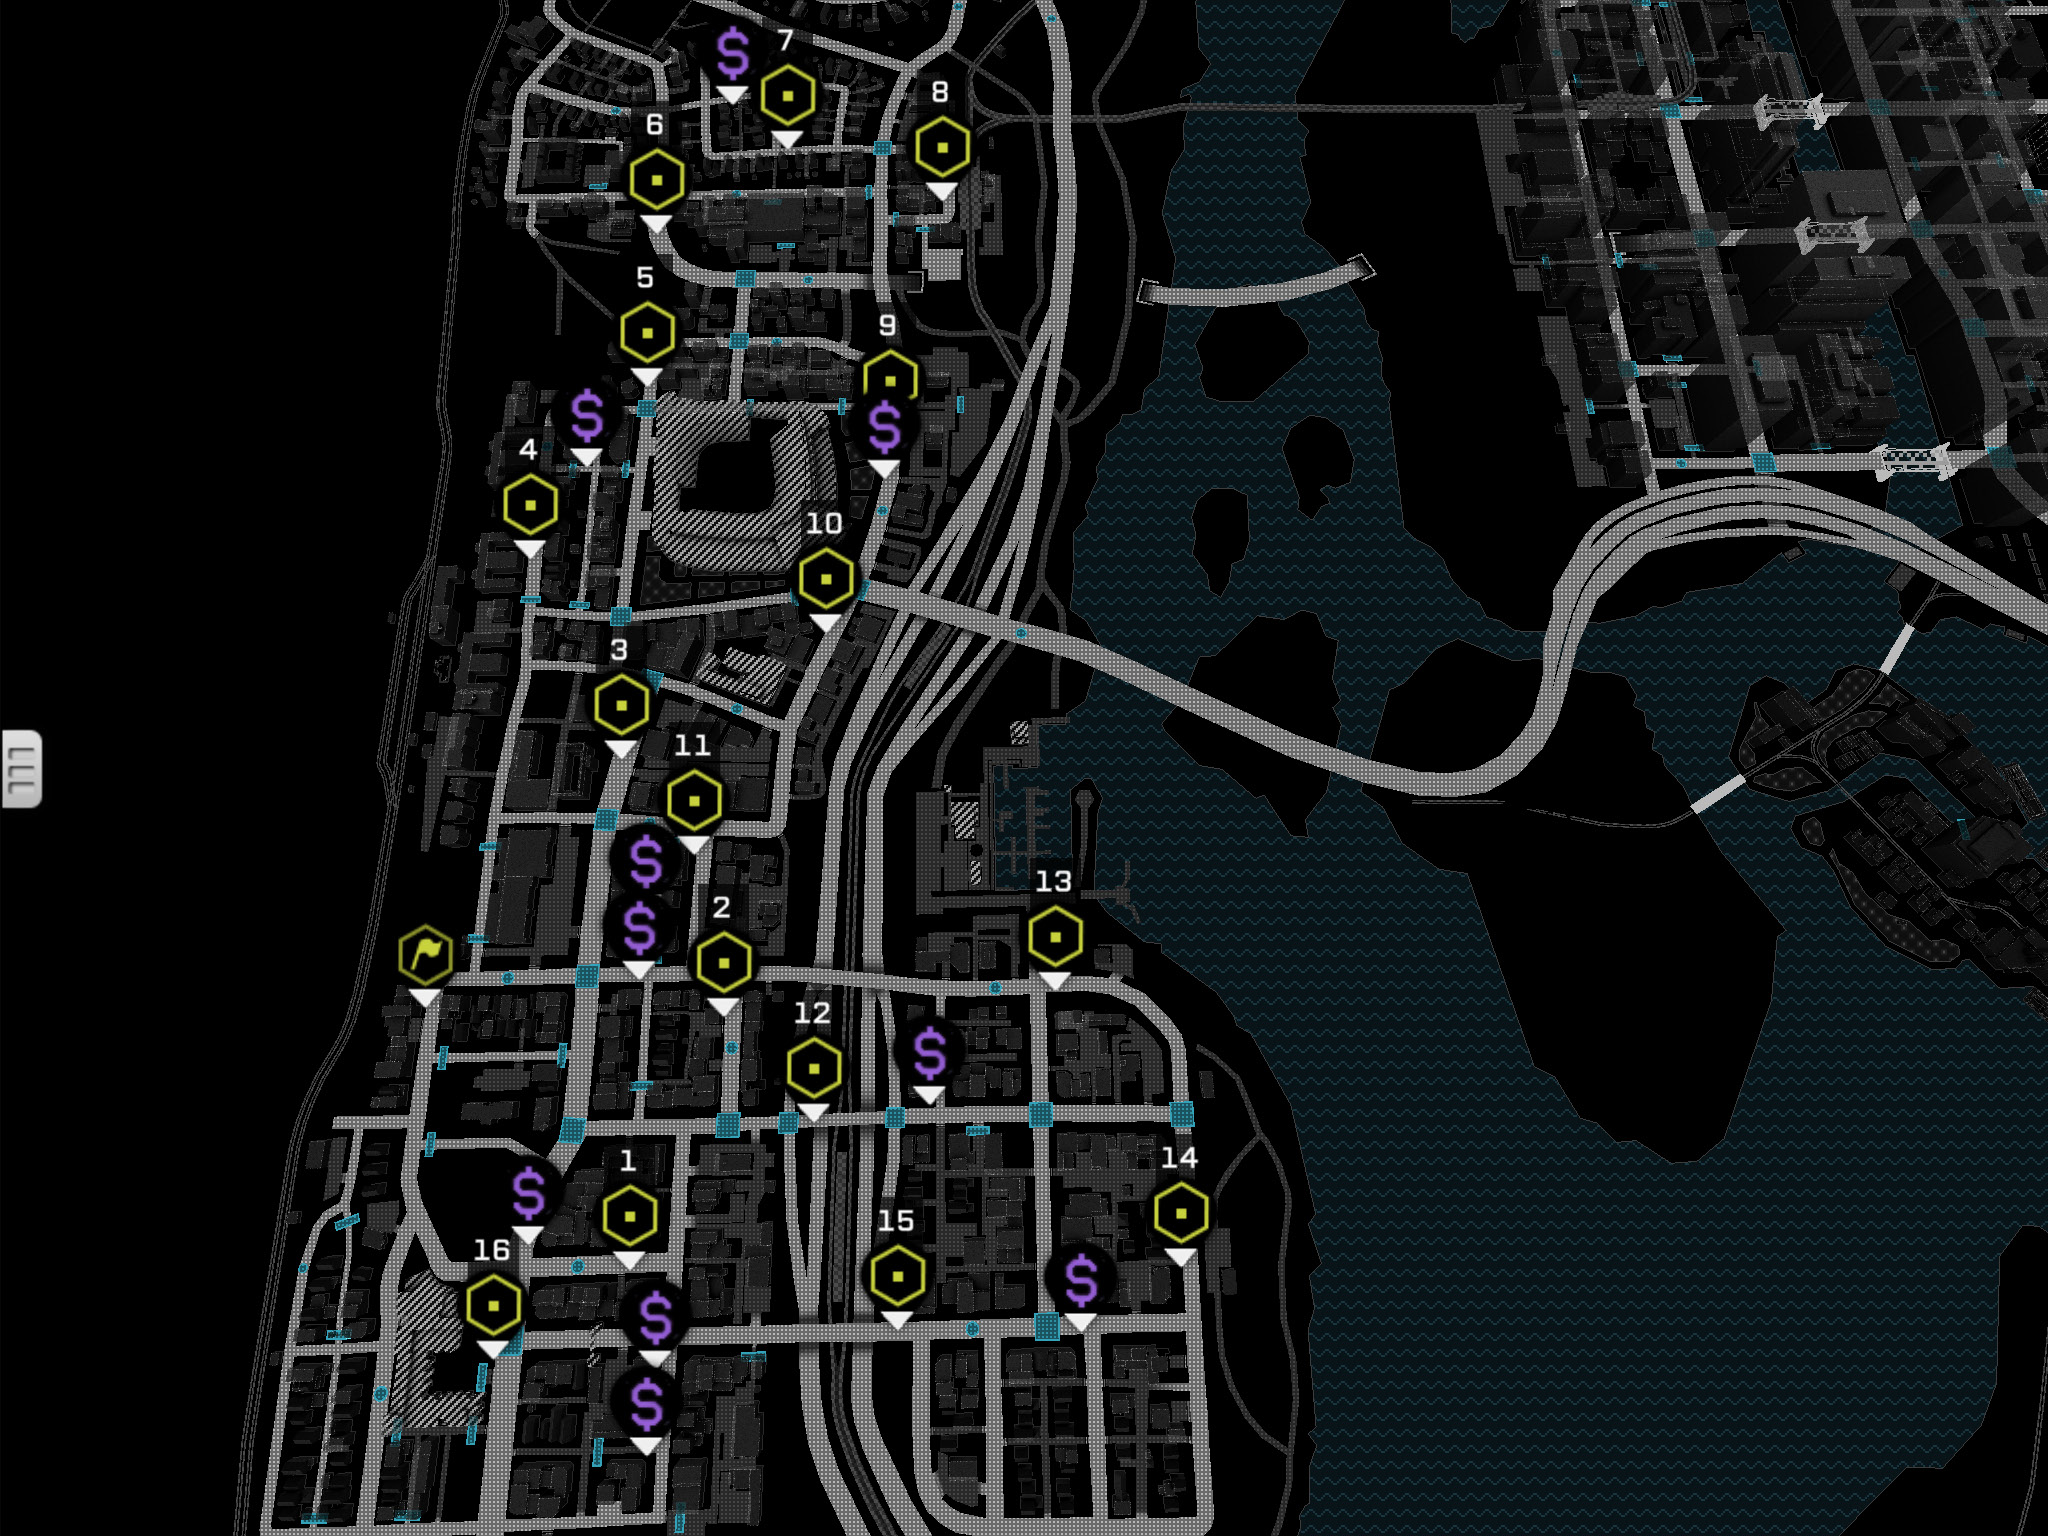
RaCES // The Wards
18 // The Long Haul
19 // High Risk
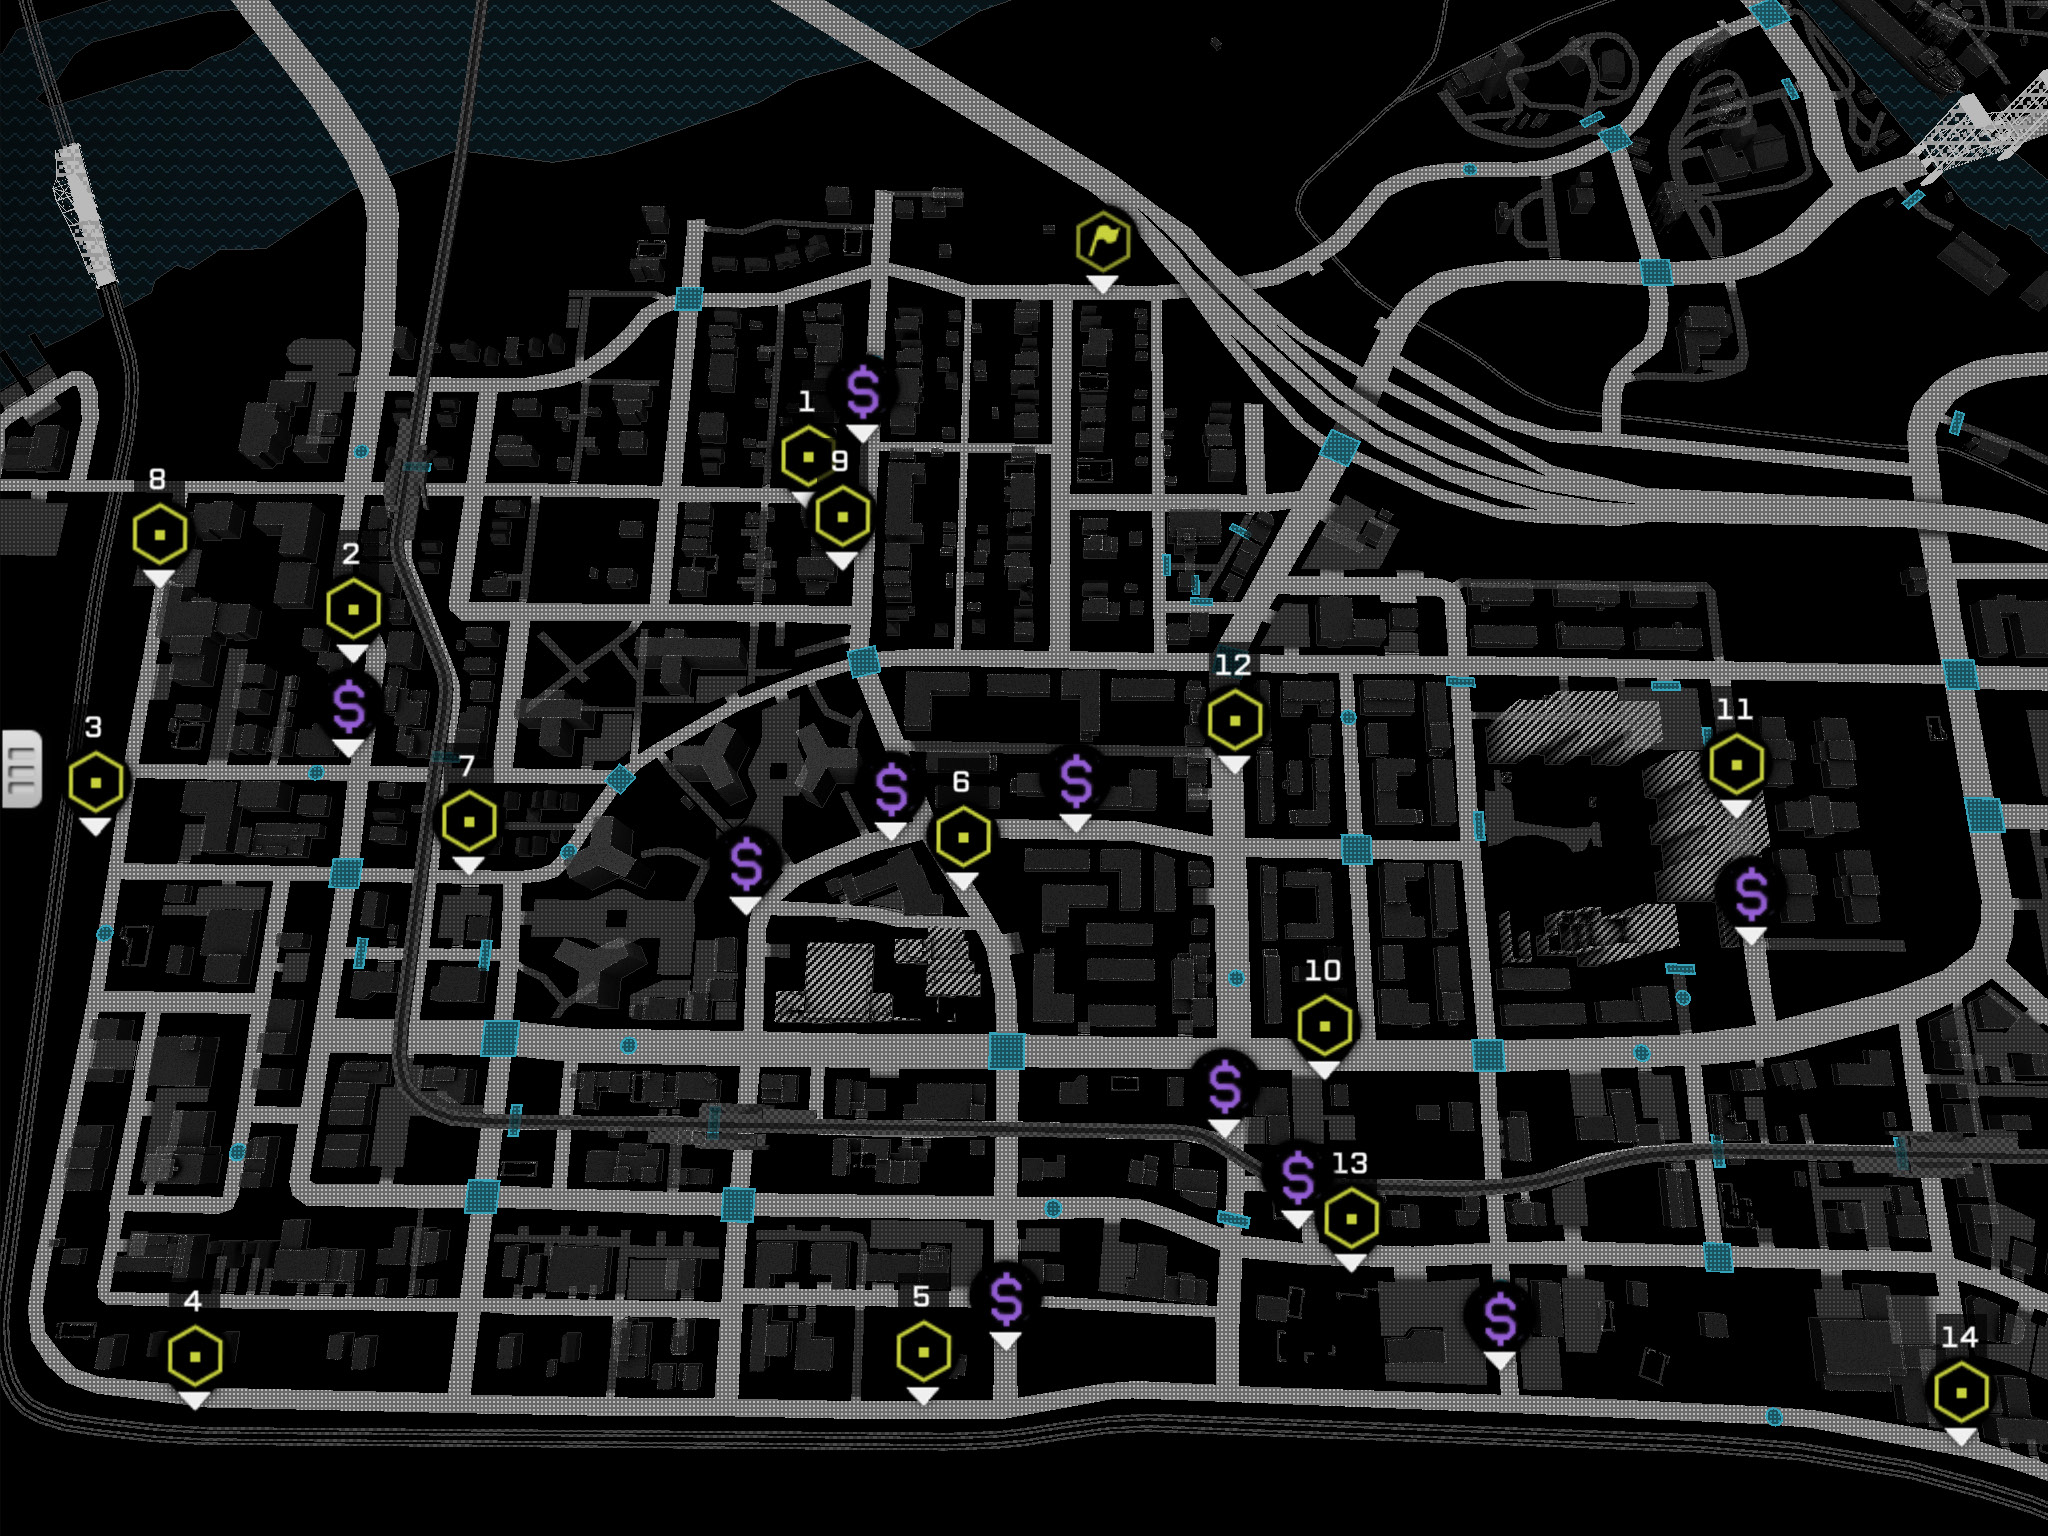
20 // Straightaways
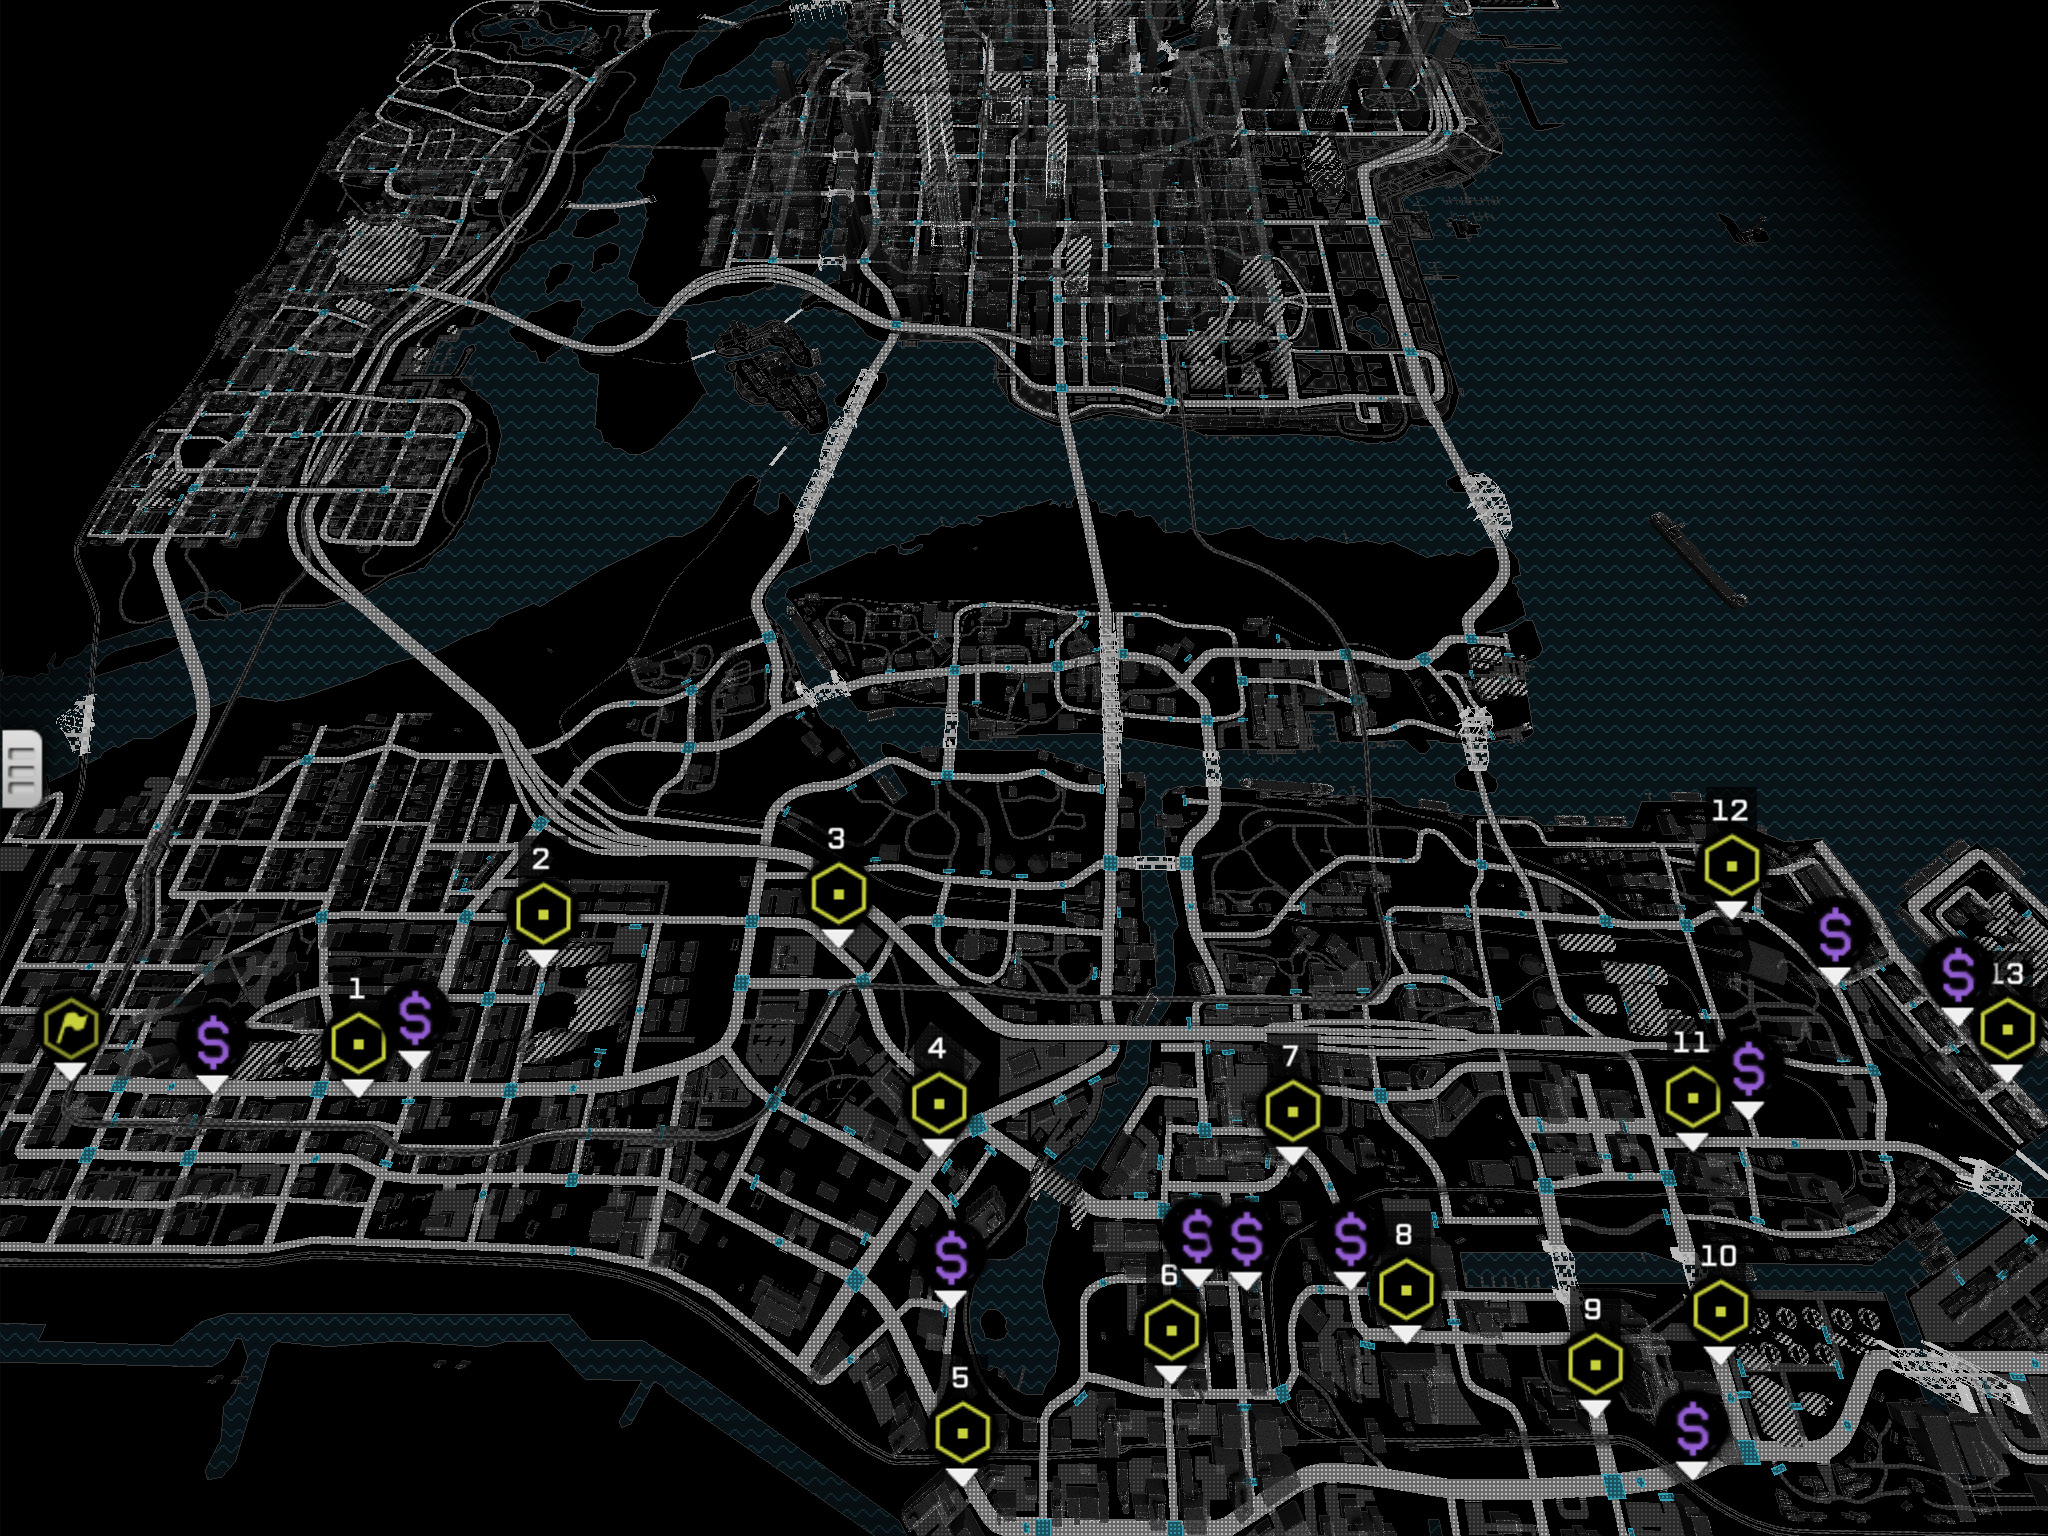
RaCES // Brandon Docks
21 // Return to Rustville

RaCES // The Loop
22 // Zigs and Zags
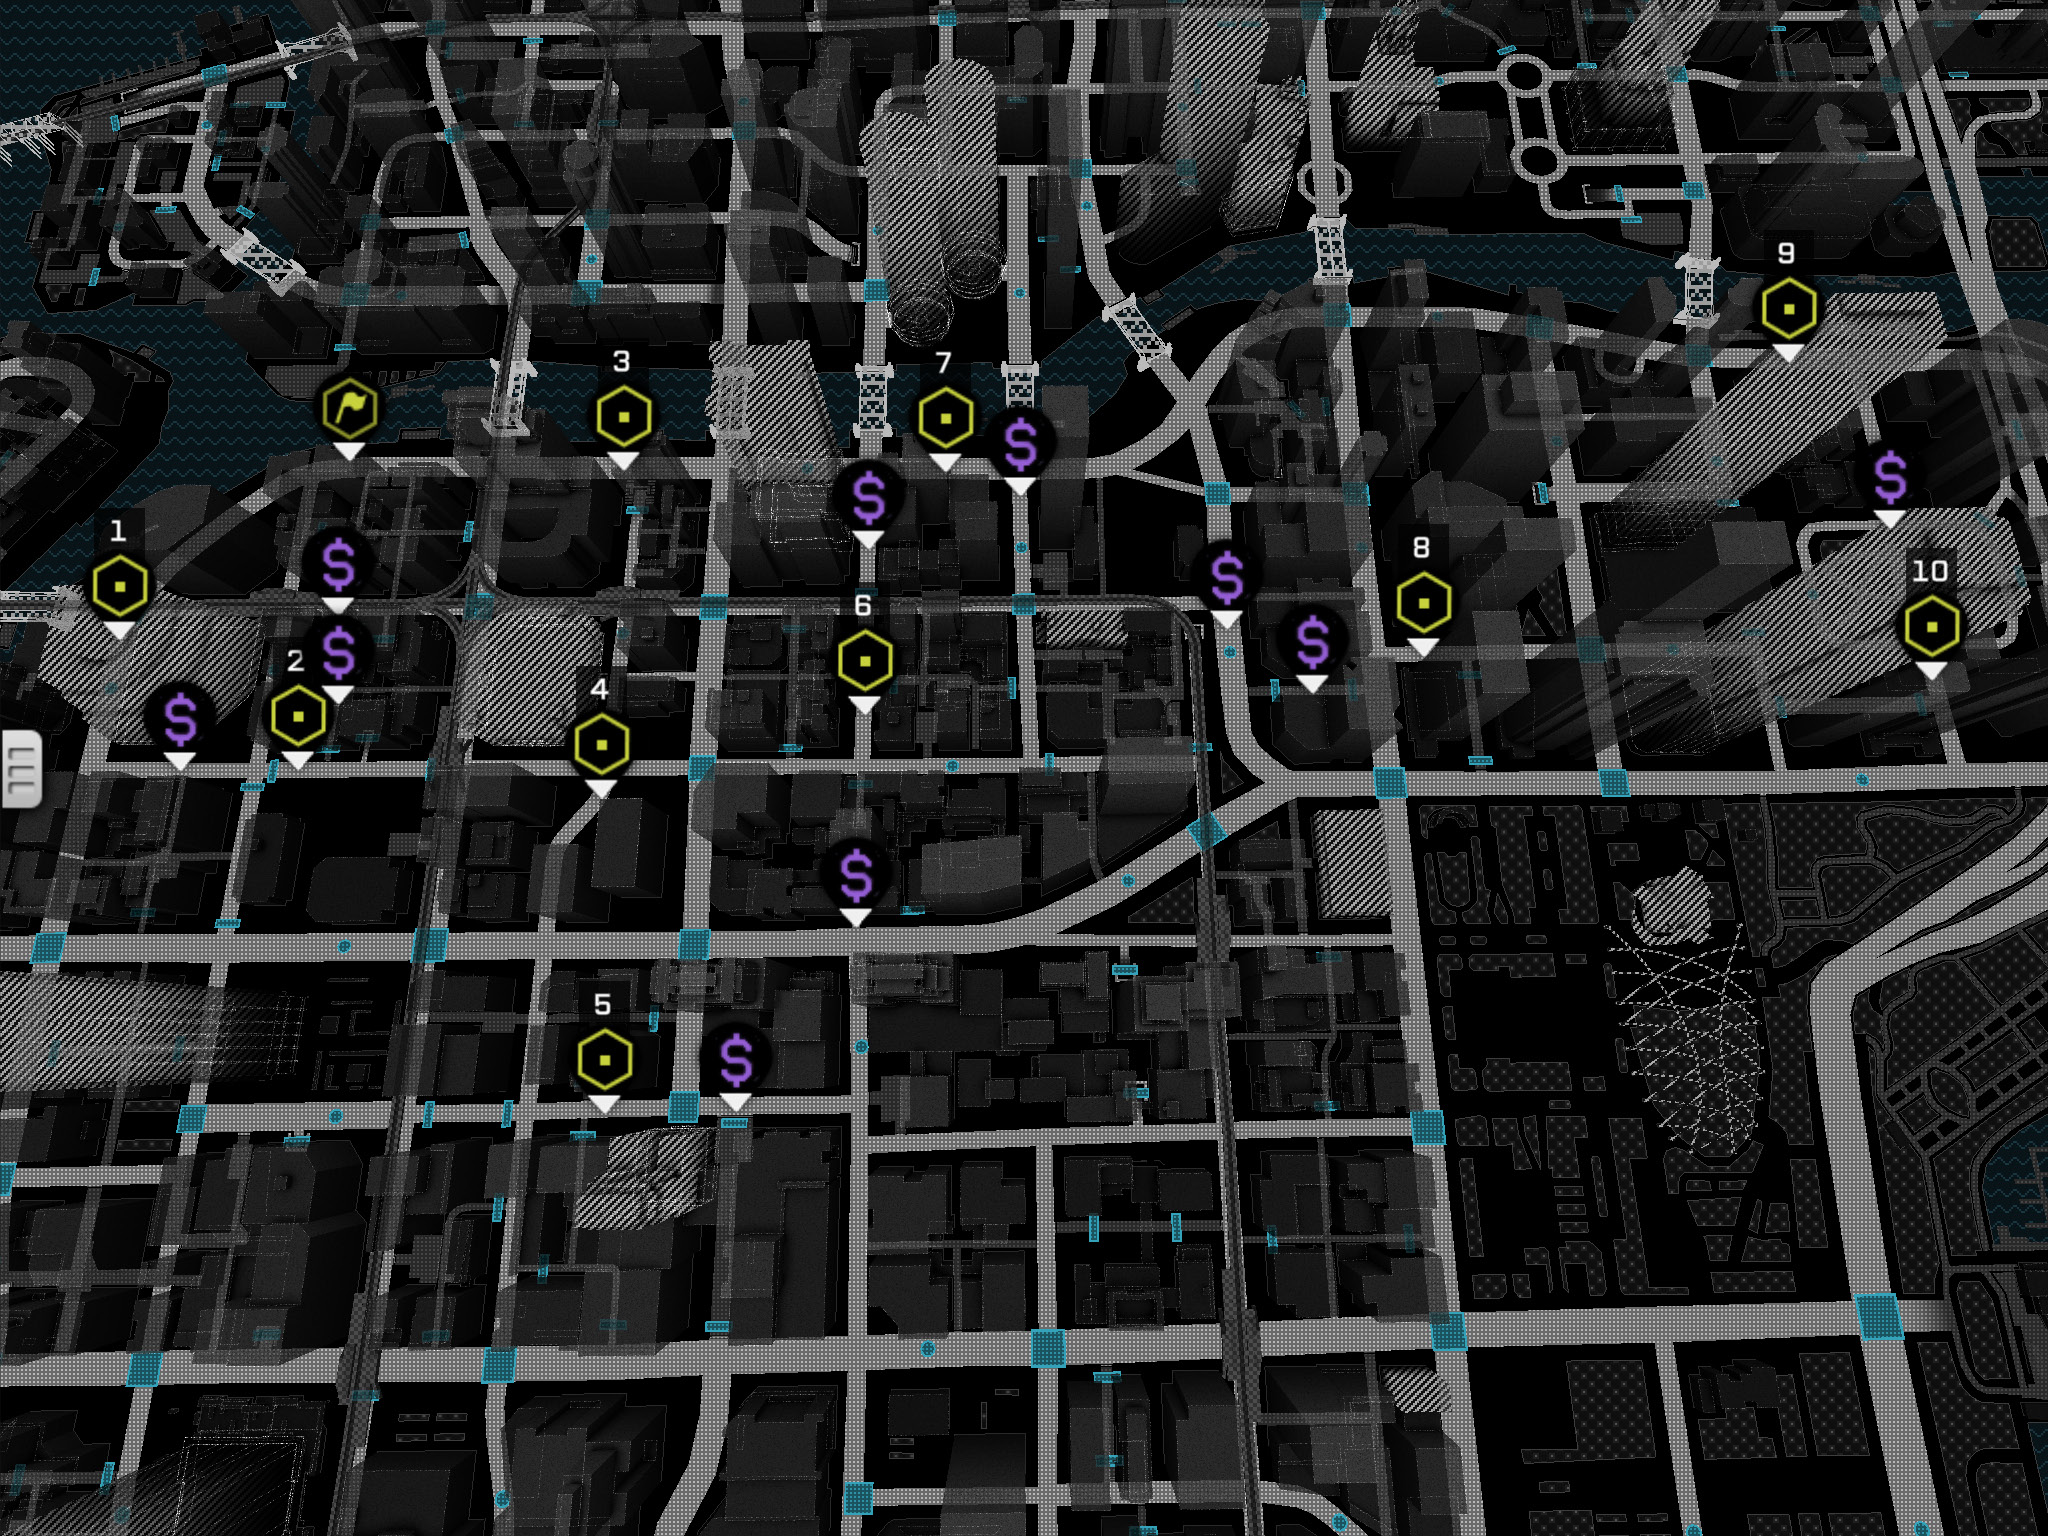
23 // Back to School
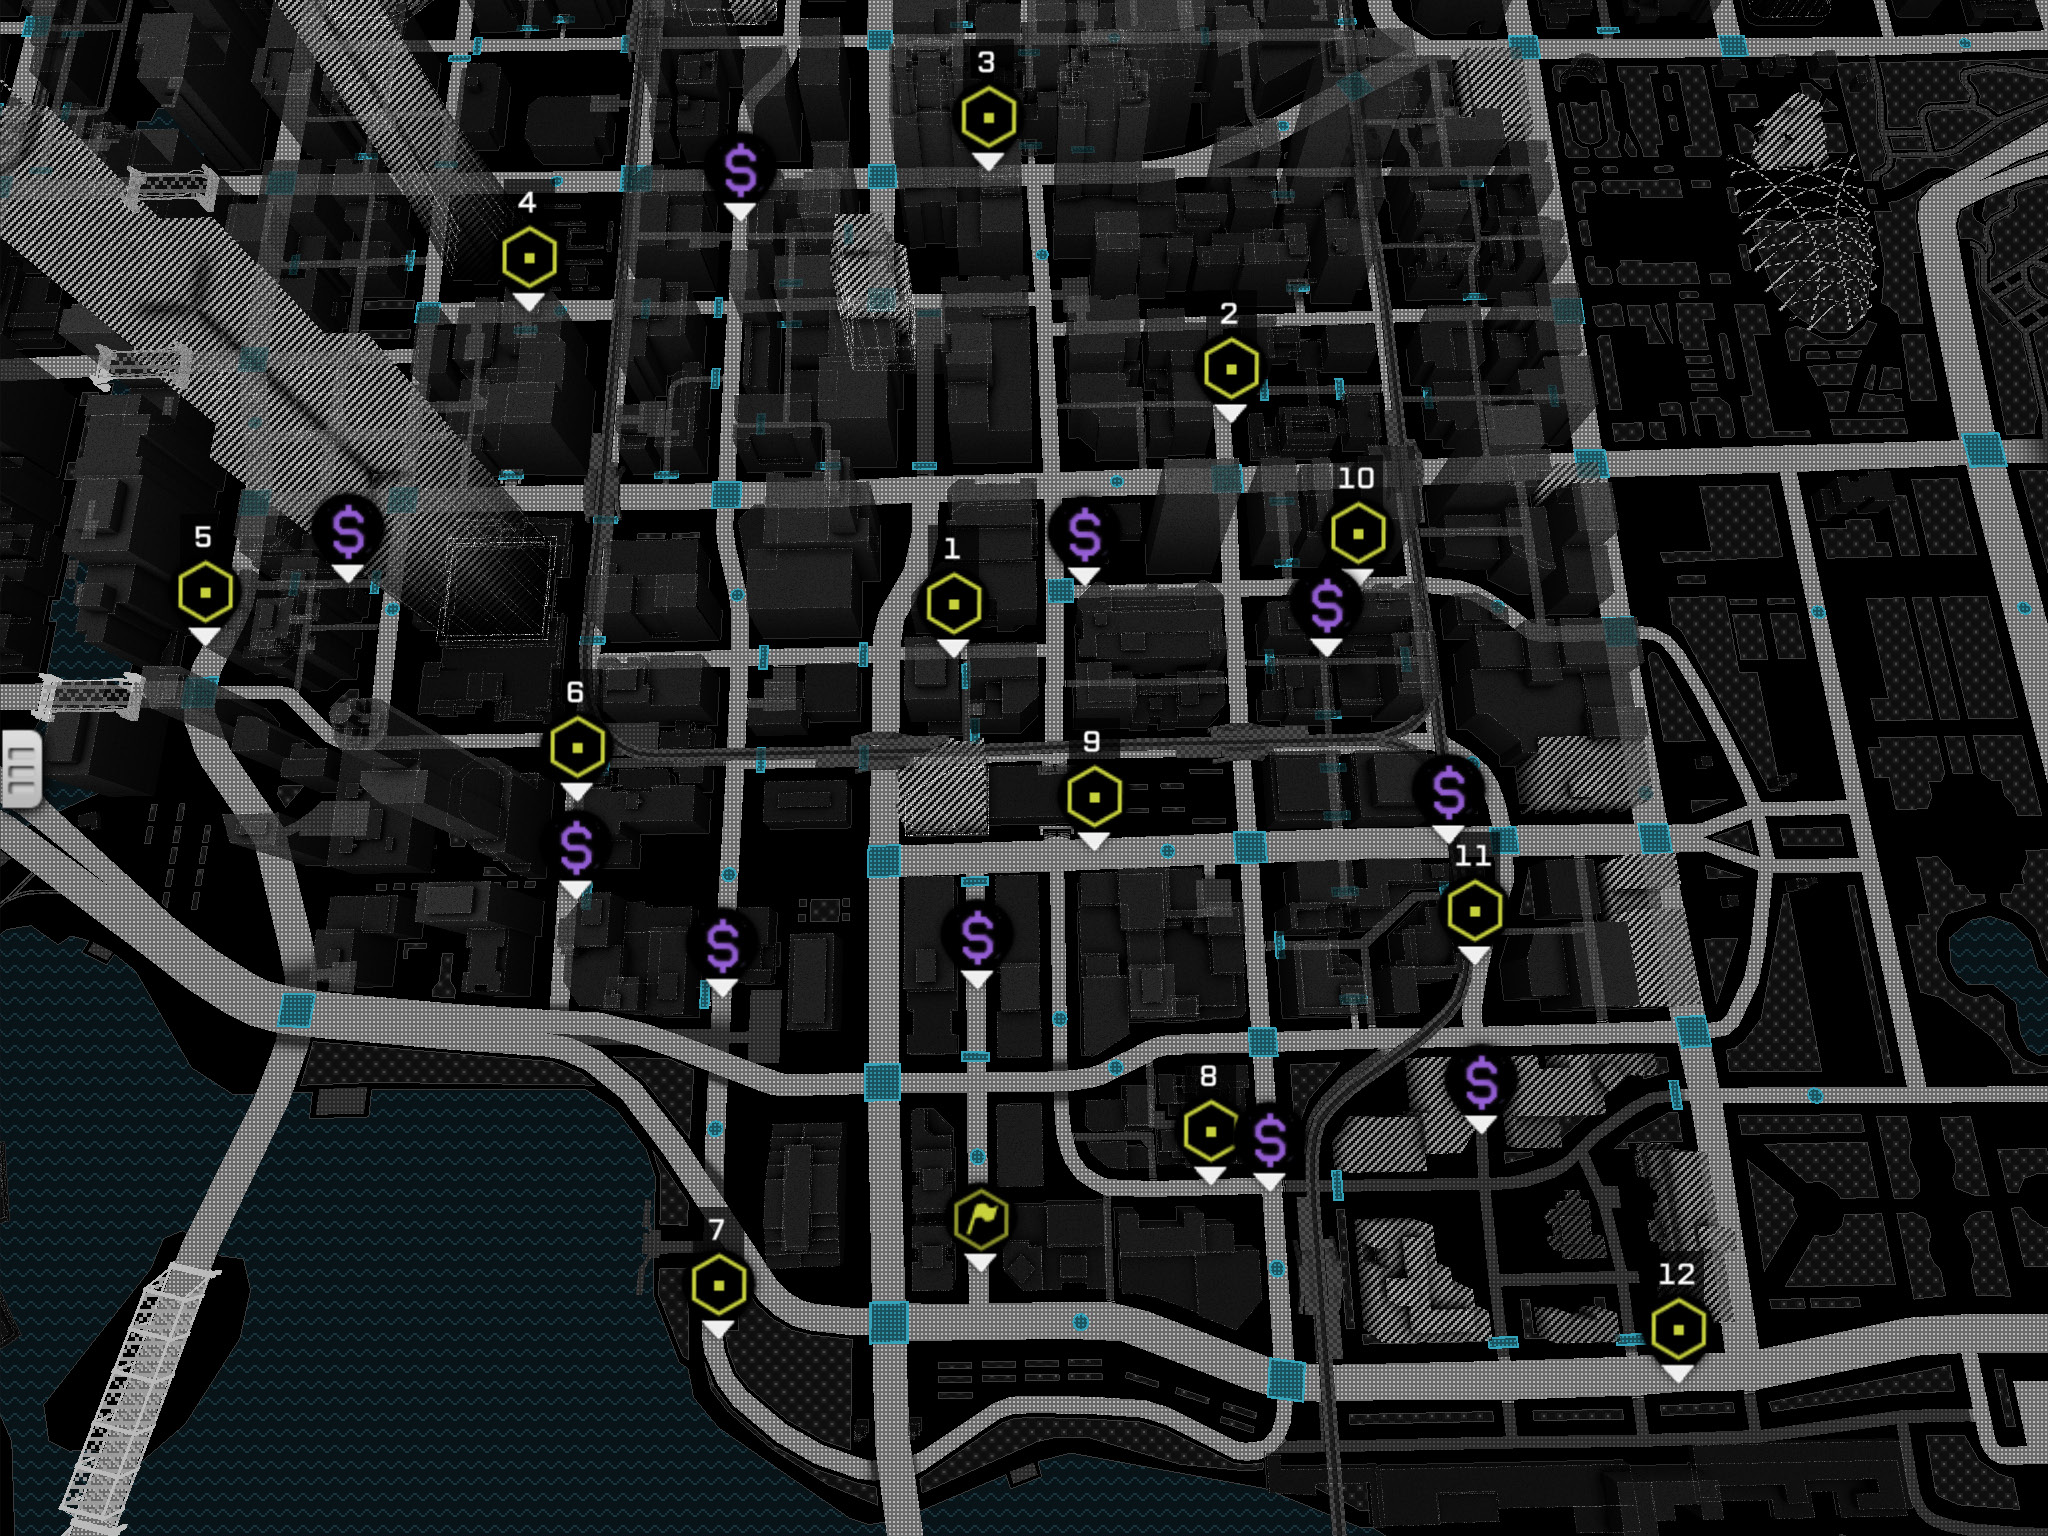
24 // Urban Explorer
RaCES // Mad Mile
25 // Go for Gold
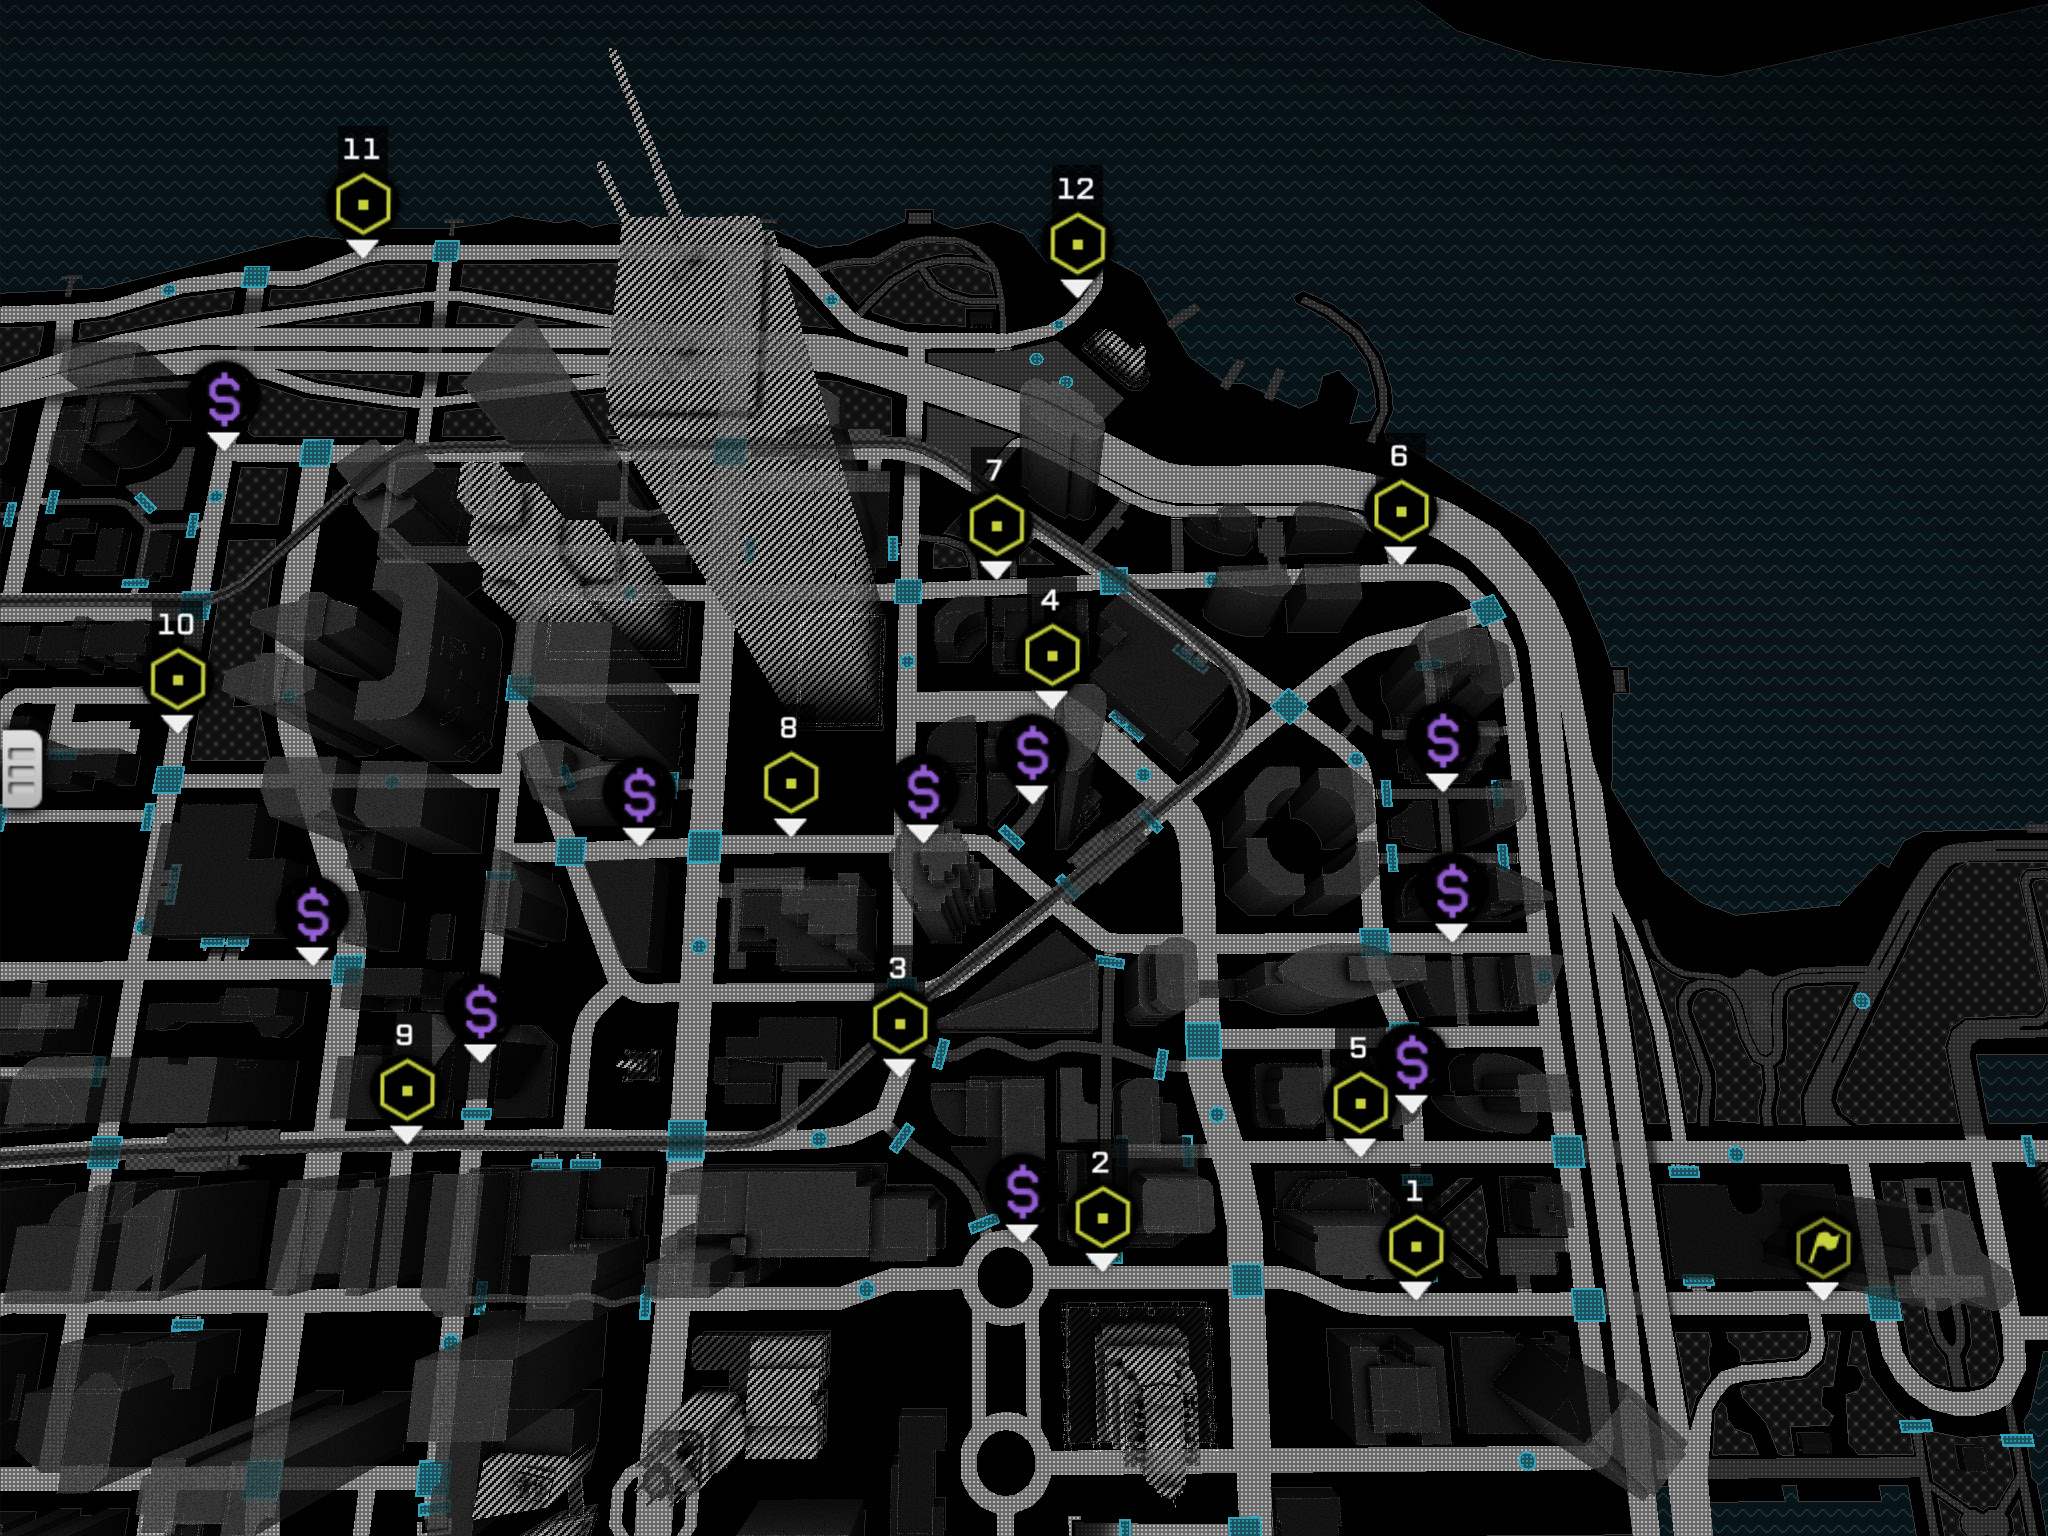
26 // Goose Island Getaway