Battlefield Hardline Guide Multiplayer Maps Riptide
Hotwire
| LEGEND | |
|---|---|

|
Police Deployment |

|
Criminal Deployment |

|
Spawn Area |

|
Hostage |

|
Money Pile |

|
Police Vault |

|
Criminal Vault |

|
Vault |

|
Extraction |

|
Hotwire Cars |

|
Control Points |
| BATTLE PICKUPS | |
|---|---|

|
Ammo |

|
Defibrillator |

|
Grappling Hook |

|
Health |

|
LMG |

|
Rocket Launcher |

|
Stinger |

|
Zipline |
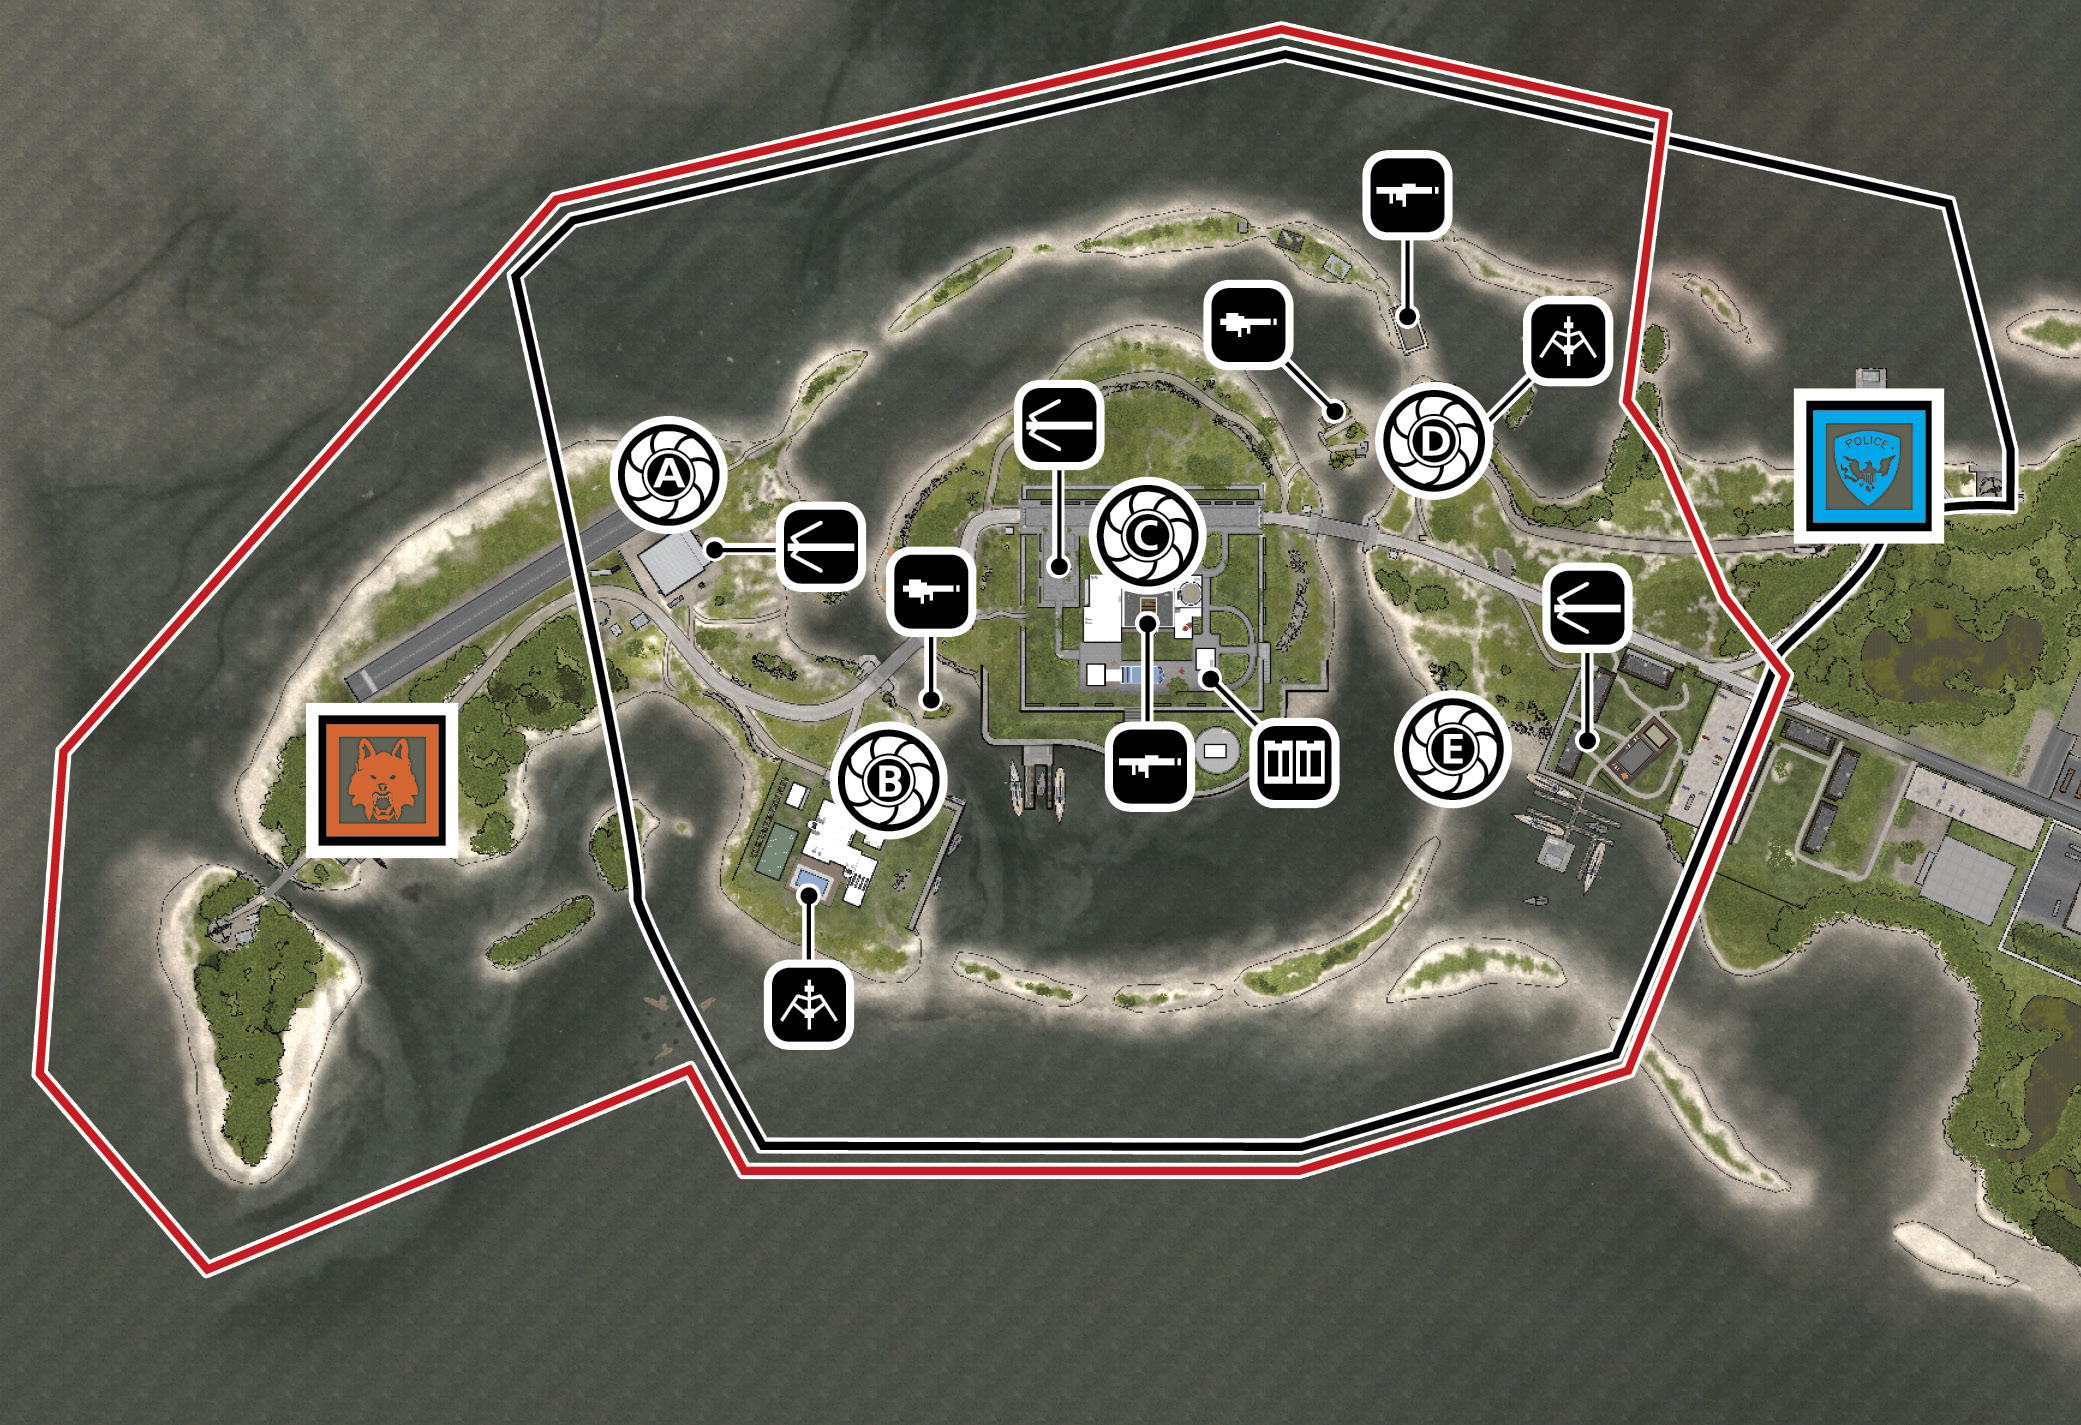
On Riptide, the five Hotwire vehicles are located at eacof the five key locations. The sports sedans (C and D) are located at the Cartel Mansion and Stilt House. Witfour seats, the sedans offer enougpositions to defend and repair the vehicle while on the move, assuming a mechanic is onboard wita repair tool. The muscle cars (B and E) aren’t bad choices either; you can find them at the Villa and near the Docks. But witonly two seats, the passenger has to decide whether to shoot back at opponents or conduct repairs. The fuel tanker (A), located at the Airport, is the least desirable of the Hotwire vehicles due to its slow speed and volatile cargo. Still, when in a pinch, capturing the fuel tanker can ease the drain on your team’s ticket count.
Your team’s vehicles are key to reaching and capturing the Hotwire cars on this map. Avoid running for these cars as you’re likely to get run over, sniped, or strafed by an enemy helicopter. Eacteam has access to three sedans, a utility van, a street motorcycle, a coupe, and one transport helicopter. So when you’re not driving a Hotwire vehicle, be sure to spawn back at your team’s deployment area to grab one of these vehicles and give chase. Early during the round, use your transport helicopter to drop teammates near the Hotwire vehicles, then use its guns to engage enemy units.
When racing around the map in Hotwire vehicles, many players initially gravitate toward the central roads connecting the Docks, Cartel Mansion, and Villa. But there’s a better route than these congested roads. Instead, consider racing around the map’s perimeter, utilizing the southern and northern sandbars. For example, if you just hopped in muscle car (E) by the Docks, head west along the southern sandbar toward the Villa. From the Villa, turn north, racing througthe Airport’s hangar. Immediately after exiting the hangar, turn east to cross the northern sandbar. When you reacthe Stilt House, head south, returning to the southern sandbar. By running this perimeter circuit you can maintain higspeeds while avoiding the map’s high-traffic center.
Unless you’re boosting the sports sedan (C) parked outside the Cartel Mansion, consider the center of the map a “no-go” zone. The narrow bridges in the map’s center are popular ambuspoints, often booby-trapped witlaser tripmines and breaching charges. There is also less room to
maneuver and maintain a consistent speed. For this reason, it’s best to stay near the perimeter of the map, even if it means making tight circuits around one of the sandbars.
Maintaining access to the map’s battle pickups can have a huge impact during the match. Use the Stingers, located near the Stilt House and Cartel Mansion, to shoot down the opposing team’s transport helicopter, greatly increasing the survivability of your team’s Hotwire vehicles. Also, make note of the two rocket launchers. One is located in the mansion and the other is located at the Stilt House. Instead of trying to ambusenemy vehicles directly witthese rocket launchers, rely on tracking darts to achieve locks. This allows you to take out vehicles on the opposite side of the map.
Hotwire Cars
| Vehicle | Name | |
|---|---|---|

|
A | Fuel Tanker |

|
B | Muscle Car |

|
C | Sports Sedan |

|
D | Sports Sedan |

|
E | Muscle Car |
Drive the long circuitous route around the small islands to rack up a huge score. —John Seefurth, Quality Analyst
The tide is low so you can drive througmost of the water. —Brian Paoloni, Quality Designer
There are good driving routes along the sand bars. —David Price, Weapon Designer