
Battlefield Hardline Guide Multiplayer Maps Downtown
Hotwire
| LEGEND | |
|---|---|

|
Police Deployment |

|
Criminal Deployment |

|
Spawn Area |

|
Hostage |

|
Money Pile |

|
Police Vault |

|
Criminal Vault |

|
Vault |

|
Extraction |

|
Hotwire Cars |

|
Control Points |
| BATTLE PICKUPS | |
|---|---|

|
Ammo |

|
Defibrillator |

|
Grappling Hook |

|
Health |

|
LMG |

|
Rocket Launcher |

|
Stinger |

|
Zipline |
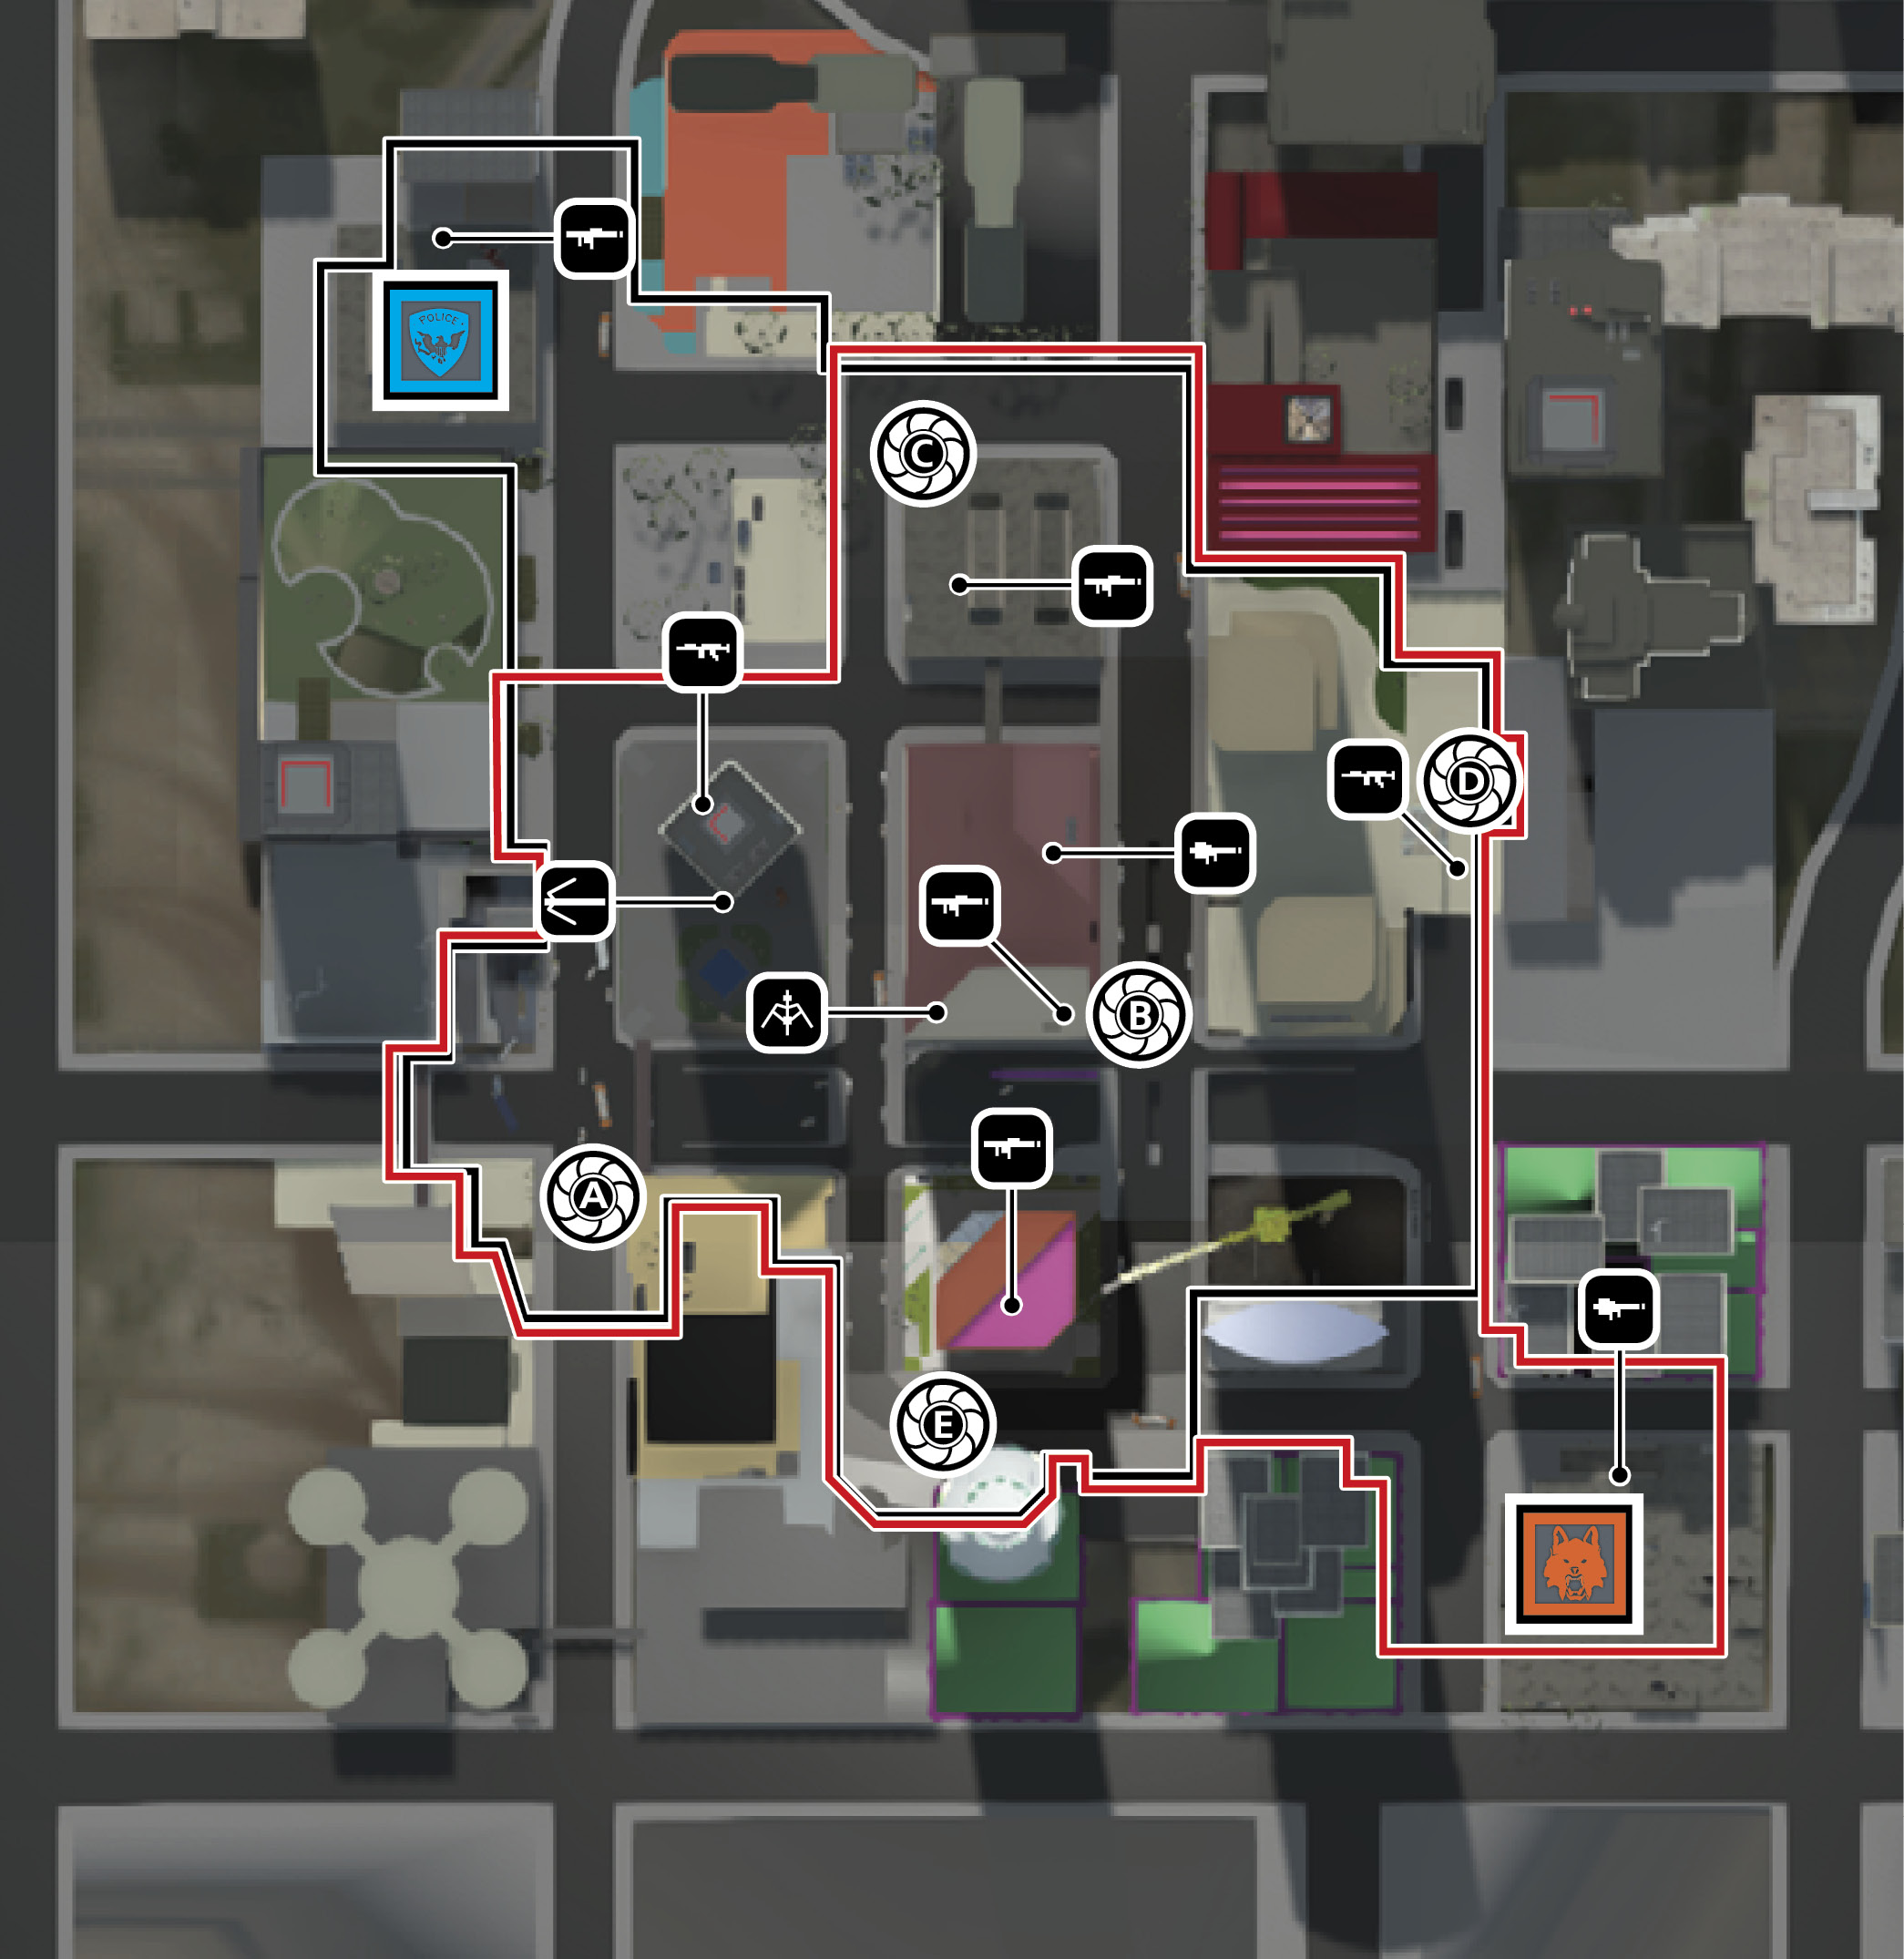
The beginning in a round of Hotwire on Downtown is actually one of the more simple times on this mode/map combination. Eacteam should go for the two closest Hotwire vehicles. Because Downtown was made for hot pursuit and road rage, four out of five of the Hotwire vehicles are either coupes or sedans, making for slight differences in their advantages, but all are fast nonetheless. Taking off to your team’s closest vehicles (A) and (C), or (D) and (E), for the law enforcement and criminals respectively, serves best for your team because you are able to start scoring as soon as you can, while the rest of your team uses the vehicles at your deployment area to chase down the enemy hotwire vehicles. While chasing down the quicker vehicles, the Tanker Truck (B) should not be forgotten. It may be big and it may be suicide driving too close to enemy gunfire, but it scores you just as many points as any other objective on the map. If you’re feeling ambitious, go straight for the tanker and try to get it back to your team’s half of the map before anyone else can get to it so you can stay protected for as long as possible. If you don’t think you’re going to make it there before the other team, why not blow it up? Odds are, if you’re late then the enemy is undoubtedly nearby, giving you a grand opportunity for some easy kills. Because the Hotwire cars respawn quickly after being destroyed, you won’t be waiting there too long before a new one appears and is ready for you to take it.
As witall Hotwire maps, the helicopter is going to be your team’s best weapon against recovering enemy controlled objectives. Maneuvering the helicopter between the incredibly tall skyscrapers is extremely difficult, especially when chasing down enemy vehicles; so make sure your best pilot is flying. As long as there are always two gunners operating the side door machine guns, the helicopter is always the best vehicle available. Your base is also equipped witseveral fast vehicles that should be used to get to key locations as quickly as possible. Set up ambushes or cut off Hotwire vehicles and cause your opponents to lose control of the objectives for as long as possible.
When driving one of the Hotwire vehicles, it is always a good idea to stay away from the enemy’s main deployment and when possible avoid driving directly under the main bridge in the center of the map. It’s a great place for snipers to sit waiting for drivers to come screaming down the main street, creating an easy shot for them. So what do you do if you’re avoiding these areas? Like most Downtown areas, this map is made of straightaways and sharp turns. Loop around your half of the map and make the very last turn you can before driving right by the enemy deployment. There is at least one turn that doesn’t drive down the middle of the map and doesn’t lead you straight to their base. Use the alternate, more dangerous, routes if needed because it’s not impossible to survive as long as you’re driving fast. There are also quite a few jumps, like the one at the top of the Garage, that allow you to bypass any roadblocks that are bottlenecking the major intersections.
As we mentioned before, the main bridge is an excellent place for snipers to set up and attempt to shoot anyone out of their cars driving directly under them. Your opponents have to drive straight toward you, so take the time to line up that perfect shot. There is some existing debris on the main bridge in the center of the map. This is useful for taking another car to set up in the middle of the road to cause enemy vehicles to either stop or come plowing in, forcing them to lose control over the objective that they currently control. If you’re ready for a car to be stopped there, you can get up close and kill the driver and/or any passengers in the car to then commandeer it for your team.
There is a battle pickup inside almost every major building. Use these to destroy enemy Hotwire vehicles passing by or to quickly get around to a location you need. Use the light machine guns and rocket launchers at the ambussites to destroy enemy vehicles mucmore easily. Use the zipline to put yourself in position to cut off the enemy if they get away from you alive.
Hotwire Cars
| Vehicle | Name | |
|---|---|---|

|
A | Muscle Car |

|
B | Fuel Tanker |

|
C | Sports Sedan |

|
D | Muscle Car |

|
E | Sports Sedan |
If the Cops shoot the helicopter enougit flies away before the Criminals can secure the loot. —Brian Paoloni, Quality Designer
Zipline between rooftops to escape witthe Heist bags in ways the cops won’t think about! —Ben Gaciu, System Designer