Prima Games eGuides
primagames.com Browse Redeem a code Help
Halo 5: Guardians eGuide
Sign in My Guides

Sign in or create an account

We'll email you a link. No password needed, and if you don't have an account yet, the link makes one.

By creating an account or signing in, you agree to our Terms of Service and Privacy Policy.

Have a password?

Had an account on the old eGuides site, or a code from a printed guide? Help and troubleshooting

Sign in with a password

By signing in, you agree to our Terms of Service and Privacy Policy.

Check your email

A sign-in link is on its way. It works once and expires in 15 minutes. Open it and you're in, with an account if you didn't already have one.

Contents

  • Introduction
    • Guide Overview
    • A Brief History
    • Cast
      • Fireteam Osiris
      • Blue Team
      • Supporting Characters
  • Spartan Training
    • The HUD
    • Controls and Options
    • Combat
  • Intel
    • Weapons
      • Overview
      • UNSC Weapons
      • Covenant Weapons
      • Forerunner Weapons
    • Enemies
      • Overview
      • Covenant Enemies
      • Promethean Enemies
    • Vehicles
      • Overview
      • UNSC Vehicles
      • Covenant Vehicles
      • Forerunner Vehicles
  • Campaign Walkthrough
    • Introduction
    • Walkthrough Elements
    • Difficulties
    • Mission 1: Osiris
      • Mission Briefing
      • Fireteam Osiris
      • Major Firefight: Security Checkpoint
      • Major Firefight: Kraken Battle
      • Major Firefight: Knight Encounter
    • Mission 2: Blue Team
      • Mission Briefing
      • Blue Team
      • Major Firefight: Assembly Bay
      • That Fair and Warlike Form
      • Major Firefight: Reactor Core
      • Major Firefight: Hazardous Hangar
    • Mission 3: Glassed
      • Mission Briefing
      • Strangers in a Distant Land
      • Major Firefight: Space Elevator Outpost
      • Major Firefight: Beyond the Bridge
    • Mission 4: Meridian Station
      • Mission Briefing
      • The Frontier
    • Mission 5: Unconfirmed
      • Mission Briefing
      • Unconfirmed Reports
      • Major Firefight: Apogee Station Base
      • Major Firefight: Apogee Station Rooftop
      • Major Firefight: Apogee Mine
      • Salvation Lies Within
    • Mission 6: Evacuation
      • Mission Briefing
      • Evacuation Plan
      • Major Firefight: Space Elevator Outpost
      • Sudden But Inevitable Betrayal
      • Major Firefight: Space Elevator Platform
    • Mission 7: Reunion
      • Mission Briefing
      • War Was in the Gates
      • Major Firefight: Covenant Camp
      • Major Firefight: Forerunner Facility Approach
      • The Mantle of Responsibility
      • Major Firefight: Warden Eternal
    • Mission 8: Swords of Sanghelios
      • Mission Briefing
      • Swords of Sanghelios
      • Major Firefight: Sanghelios Canyon
      • Major Firefight: Sanghelios Ruins
      • Hornet's Nest
      • Major Firefight: Arbiter Approach
    • Mission 9: Alliance
      • Mission Briefing
      • A Whisper in the Storm
    • Mission 10: Enemy Lines
      • Mission Briefing
      • Joint Operations
      • Major Firefight: Temple Grounds
    • Mission 11: Before the Storm
    • Mission 12: Battle of Sunaion
      • Mission Briefing
      • Fall of the Covenant
      • Major Firefight: Triple AA Turrets
      • Guardian
      • Major Firefight: Guardian Approach
    • Mission 13: Genesis
      • Mission Briefing
      • Danger Zone
      • Call Me Cupid
      • Major Firefight: Road to the Gateway
      • Major Firefight: Gateway Approach
    • Mission 14: The Breaking
      • Mission Briefing
      • Getting the Band Back Together
      • Major Firefight: The Warden's Horde
      • Major Firefight: Warden's Last Stand
    • Mission 15: Guardians
      • Mission Briefing
      • Leave No Spartan Behind
      • Major Firefight: Cryptum Facility
      • The Reclamation
  • Multiplayer
    • Introduction
    • What's New?
      • Overview
    • Getting Started
      • Interface
      • Controls
      • Movement
      • Combat Fundamentals
    • Progression and Customization
      • Spartan Hub
      • Requisition System
    • Tactical Primer
      • Pro Gamer Profiles
      • Terminology
      • Teamwork
      • Movement Mastery
      • Choose Your Battles
  • Armory
    • Loadout Weapons
    • Power Weapons
    • Grenades
    • Vehicles
    • Armor Mods
    • Power-Ups
    • Boosts
  • Warzone
    • Introduction
    • Warzone Fundamentals
    • Warzone Assault
    • Escape from A.R.C.
    • Dispatch
    • March on Stormbreak
    • Summit
    • Raid on Apex 7
    • Array
  • Arena
    • Introduction
    • Coliseum
    • Eden
    • Empire
    • Fathom
    • Orion
    • Pegasus
    • Plaza
    • Regret
    • The Rig
    • Truth
    • Altitude
    • Crossfire
    • Gambol
    • Trench
    • Trident
  • Appendix
    • Overview
    • Skulls
    • Mission Intel
    • Achievements
    • REQ Cards
      • Overview
      • Armor: Cosmetic, Permanent
      • Armor Mods: Game-Impacting, Permanent
      • Assassinations: Cosmetic, Permanent
      • Boosts: Game-Impacting, Single-Use
      • Emblems: Cosmetic, Permanent
      • Helmets: Cosmetic, Permanent
      • Loadout Weapons: Game-Impacting, Permanent
      • Power-Ups: Game-Impacting, Single-Use
      • Power Weapons: Game-Impacting, Single-Use
      • Random REQs: Game-Impacting, Single-Use
      • Stances: Cosmetic, Permanent
      • Vehicles: Game-Impacting, Single-Use
      • Visors: Cosmetic, Permanent
      • Weapon Skins: Cosmetic, Permanent
    • Ranks and Rewards
      • Spartan Ranks
      • Medals
      • Commendations
      • CSR Tiers
  • Arena Maps
    • Coliseum
    • Eden
    • Empire
    • Fathom
    • Orion
    • Pegasus
    • Plaza
    • Regret
    • The Rig
    • Truth
    • Altitude
    • Crossfire
    • Gambol
    • Trench
    • Trident
  • Videos
    • Mission 1--IWHBYD
    • Mission 2--Black Eye Skull
    • Mission 3--Iron Skull
    • Mission 5--Blind Skull
    • Mission 6--Thunderstorm Skull
    • Mission 7--Grunt Party Skull
    • Mission 8--Mythic Skull
    • Mission 10--Catch Skull
    • Mission 12--Cowbell Skull
    • Mission 13--Tilt Skull
    • Mission 14--Famine Skull
    • Mission 15--Tough Luck Skull

Halo 5: Guardians Guide › Multiplayer › Getting Started

Interface

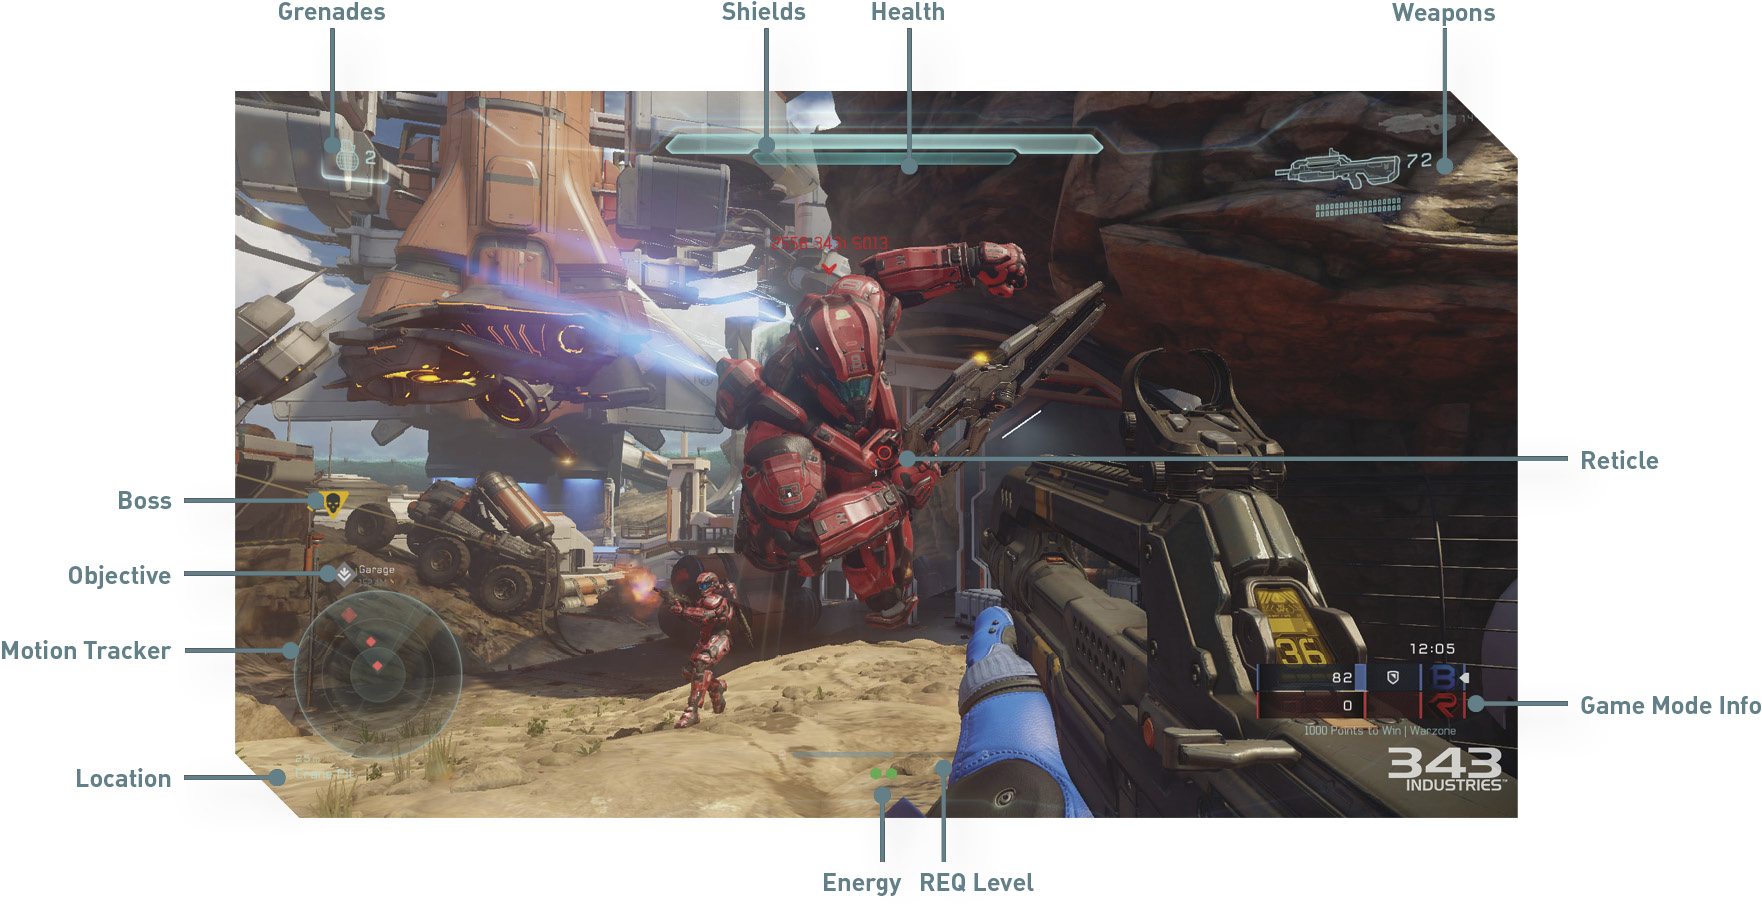
Before you jump into your first Warzone battle or Arena match, take a moment to get familiar with the game’s interface, controls, and gameplay mechanics. Even if you’re a long-time fan, there have been some changes in Halo 5: Guardians you should be familiar with.

Shields: This bar indicates the status of your Spartan’s shields. While active, shields absorb incoming damage. Once shields are depleted, damage is dealt to your Spartan’s health. If you seek cover and avoid subsequent damage, the shields will regenerate as long as you don’t sprint.

Health: This bar represents your Spartan’s health—if depleted, your Spartan dies and you must respawn. Like shields, health regenerates over time as long as your Spartan stays out of danger.

Reticle: The reticle shows where your weapon is aiming—place the reticle over targets before firing to score a hit. Striking targets with your weapon triggers a bloom animation around the reticle. These hit markers come in handy when engaging opponents at long range. The size and shape of reticle may differ based on the weapon equipped.

Weapons: These images show the weapons in your loadout. The larger image represents the weapon currently equipped. The numbers to the right of each weapon indicate their ammo count.

Grenades: This shows the type and number of grenades in your inventory. You can carry up to six grenades at a time—two Fragmentation Grenades, two Plasma Grenades, and two Splinter Grenades.

Motion Tracker: This device functions like radar, reporting the positions of nearby enemies. Threats are represented by red diamond-shaped icons. Moving or firing opponents within 25 meters are shown on the Motion Tracker. However, opponents equipped with suppressed weapons will not appear when firing.

Location: All maps have several defined locations, indicated by this line of text beneath the Motion Tracker. Use this information to immediately get your bearings while spawning or moving around. When speaking with teammates, use these location names to report enemy movement or request assistance.

Game Mode Info: This box shows the current standings of the match, including the score, timer, and victory conditions.

Objective: These diamond-shaped icons show the locations of and distance to objectives. When an objective is neutral, the icons are gray—they change to red or blue when occupied by the corresponding team.

Boss: In Warzone matches, the inverted triangle icons (with skulls) show the locations of Bosses. Regular Bosses are represented by gray icons, while Legendary Bosses are represented by yellow icons.

REQ Level: In Warzone, this status bar shows your progress to attaining the next REQ Level. The number on the left side of the bar represents your current REQ Level, and the number on the right shows the next REQ Level. New REQ Levels are acquired by scoring kills, earning medals, defeating Bosses, and capturing objectives.

Energy: In Warzone, these green, hexagonal icons beneath the REQ Level status bar are your Energy, rewarded for reaching new REQ Levels—your Energy correlates to your current REQ Level. Energy can be spent like currency to activate REQ Cards; interact with a REQ Station to select a REQ Card and activate it using Energy. All REQ Cards have specific REQ Level that must be met before they can be activated.

Keep reading with a free account

The first 3 sections of Halo 5: Guardians are open to everyone. An account opens the rest of it, and every other guide in the archive. It's free, and there's nothing to buy.

Bought guides on the old Prima Games site? Your account and every guide you own moved here, so there's nothing to buy again. Sign in.

Create a free account Or browse our free guides

PreviousOverview NextControls