Call of Duty: Infinite Warfare Guide Call of Duty 4: Modern Warfare Multiplayer Map Tactics
Strike
U.S. Forces vs. OpFor. This large urban desert area provides tons of buildings and secondary levels for players to take cover. The Marketplace is full of Shops, and the streets see lots of action. It takes place in the morning, so visibility is high. Use the multitude of building interiors to advance your team throughout the map.
These kits cover most of the action you’ll see on Strike. While there are some close-quarters battles, most of them can be dealt with via knife or shotgun and the standard assault rifles. The Mid-Range Assault CCS is set up with an ACOG Scope to pick off those pesky critters up the street. When you want to stop the swarm of enemies trying to flank you, show them your frags. Juggernaut will keep you breathing so you can continue shooting through walls with Deep Impact.
The Sniper-Shotgunner class is designed for the mobile sniper who needs to relocate often and may encounter some close-quarters fighting while bouncing from perch to perch. Grab Claymores to protect you while sniping, and Iron Lung to steady your hand.
Suggested Loadouts
Mid-Range Assault
| Slot | Name |
|---|---|
| Primary Weapon | M14 |
| Notes/Attachment | ACOG Scope |
| Side Arm | M1911 |
| Special Grenade | Smoke |
| Perk 1 | Frag x3 |
| Perk 2 | Juggernaut |
| Perk 3 | Deep Impact |
Sniper-Shotgunner
| Slot | Name |
|---|---|
| Primary Weapon | R700 |
| secondary Weapon | M1014 |
| Special Grenade | Flash |
| Perk 1 | Claymore x2 |
| Perk 2 | Overkill |
| Perk 3 | Iron Lung |
Tips & Locations
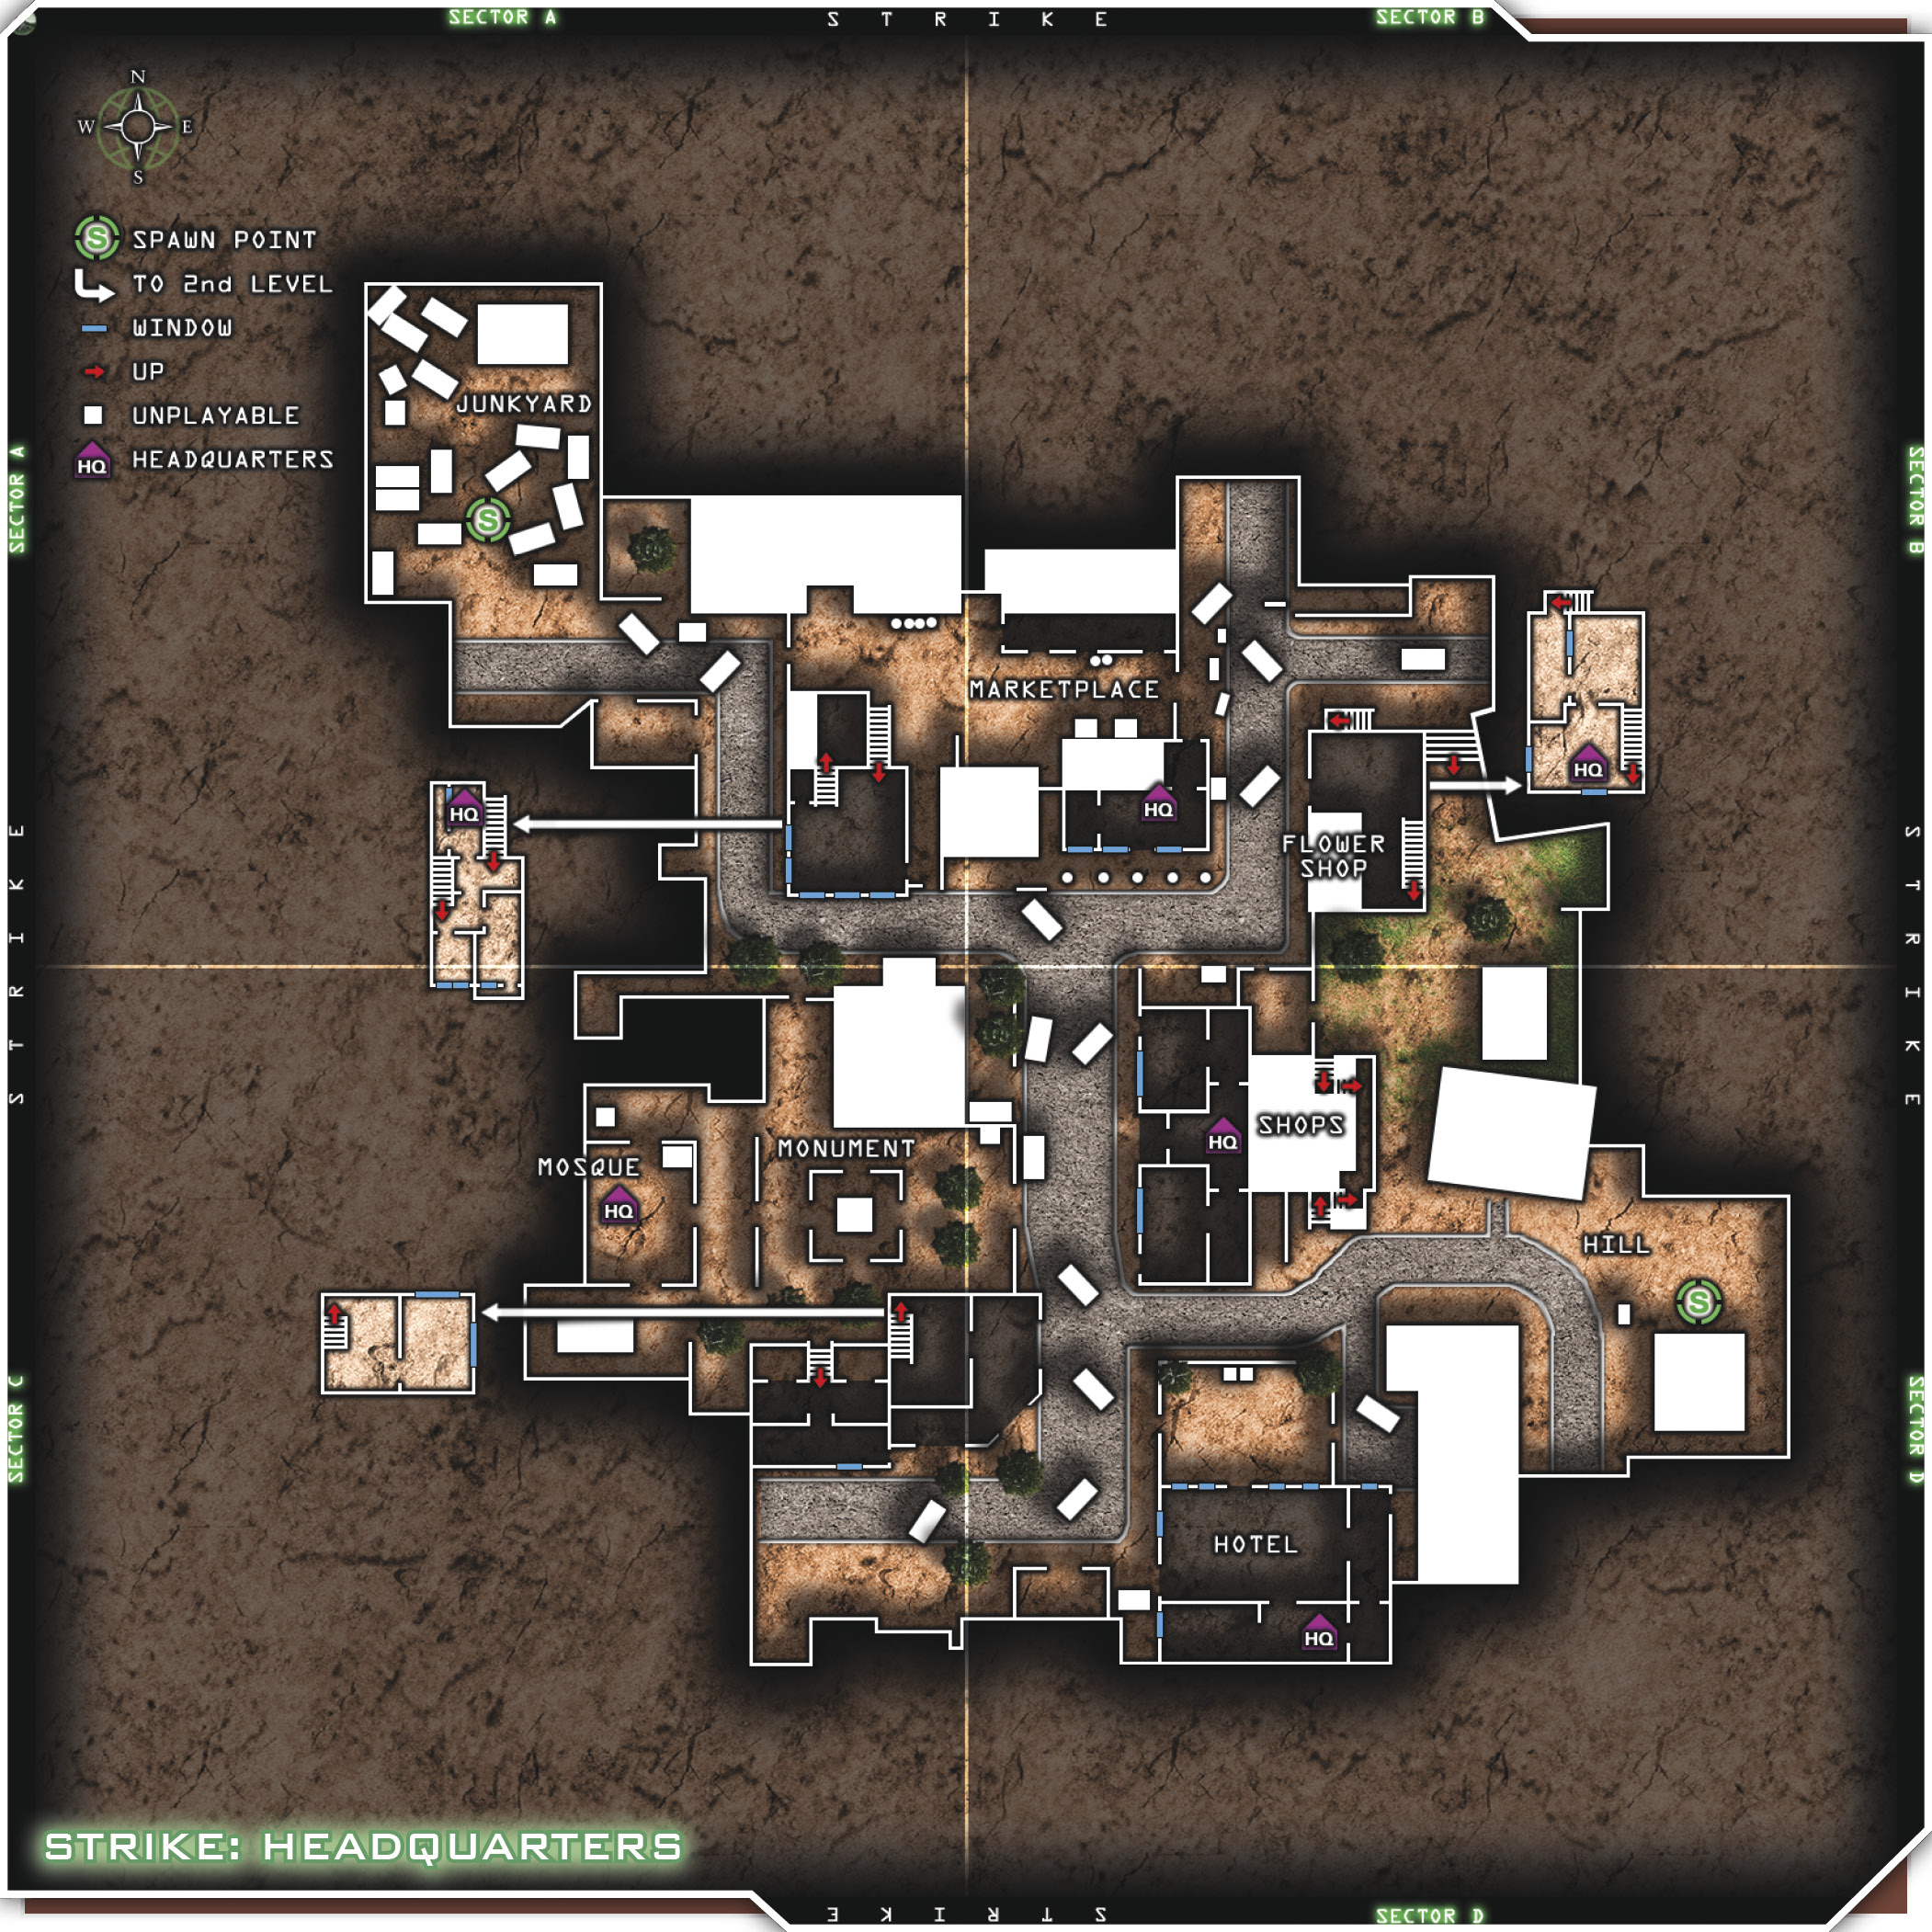
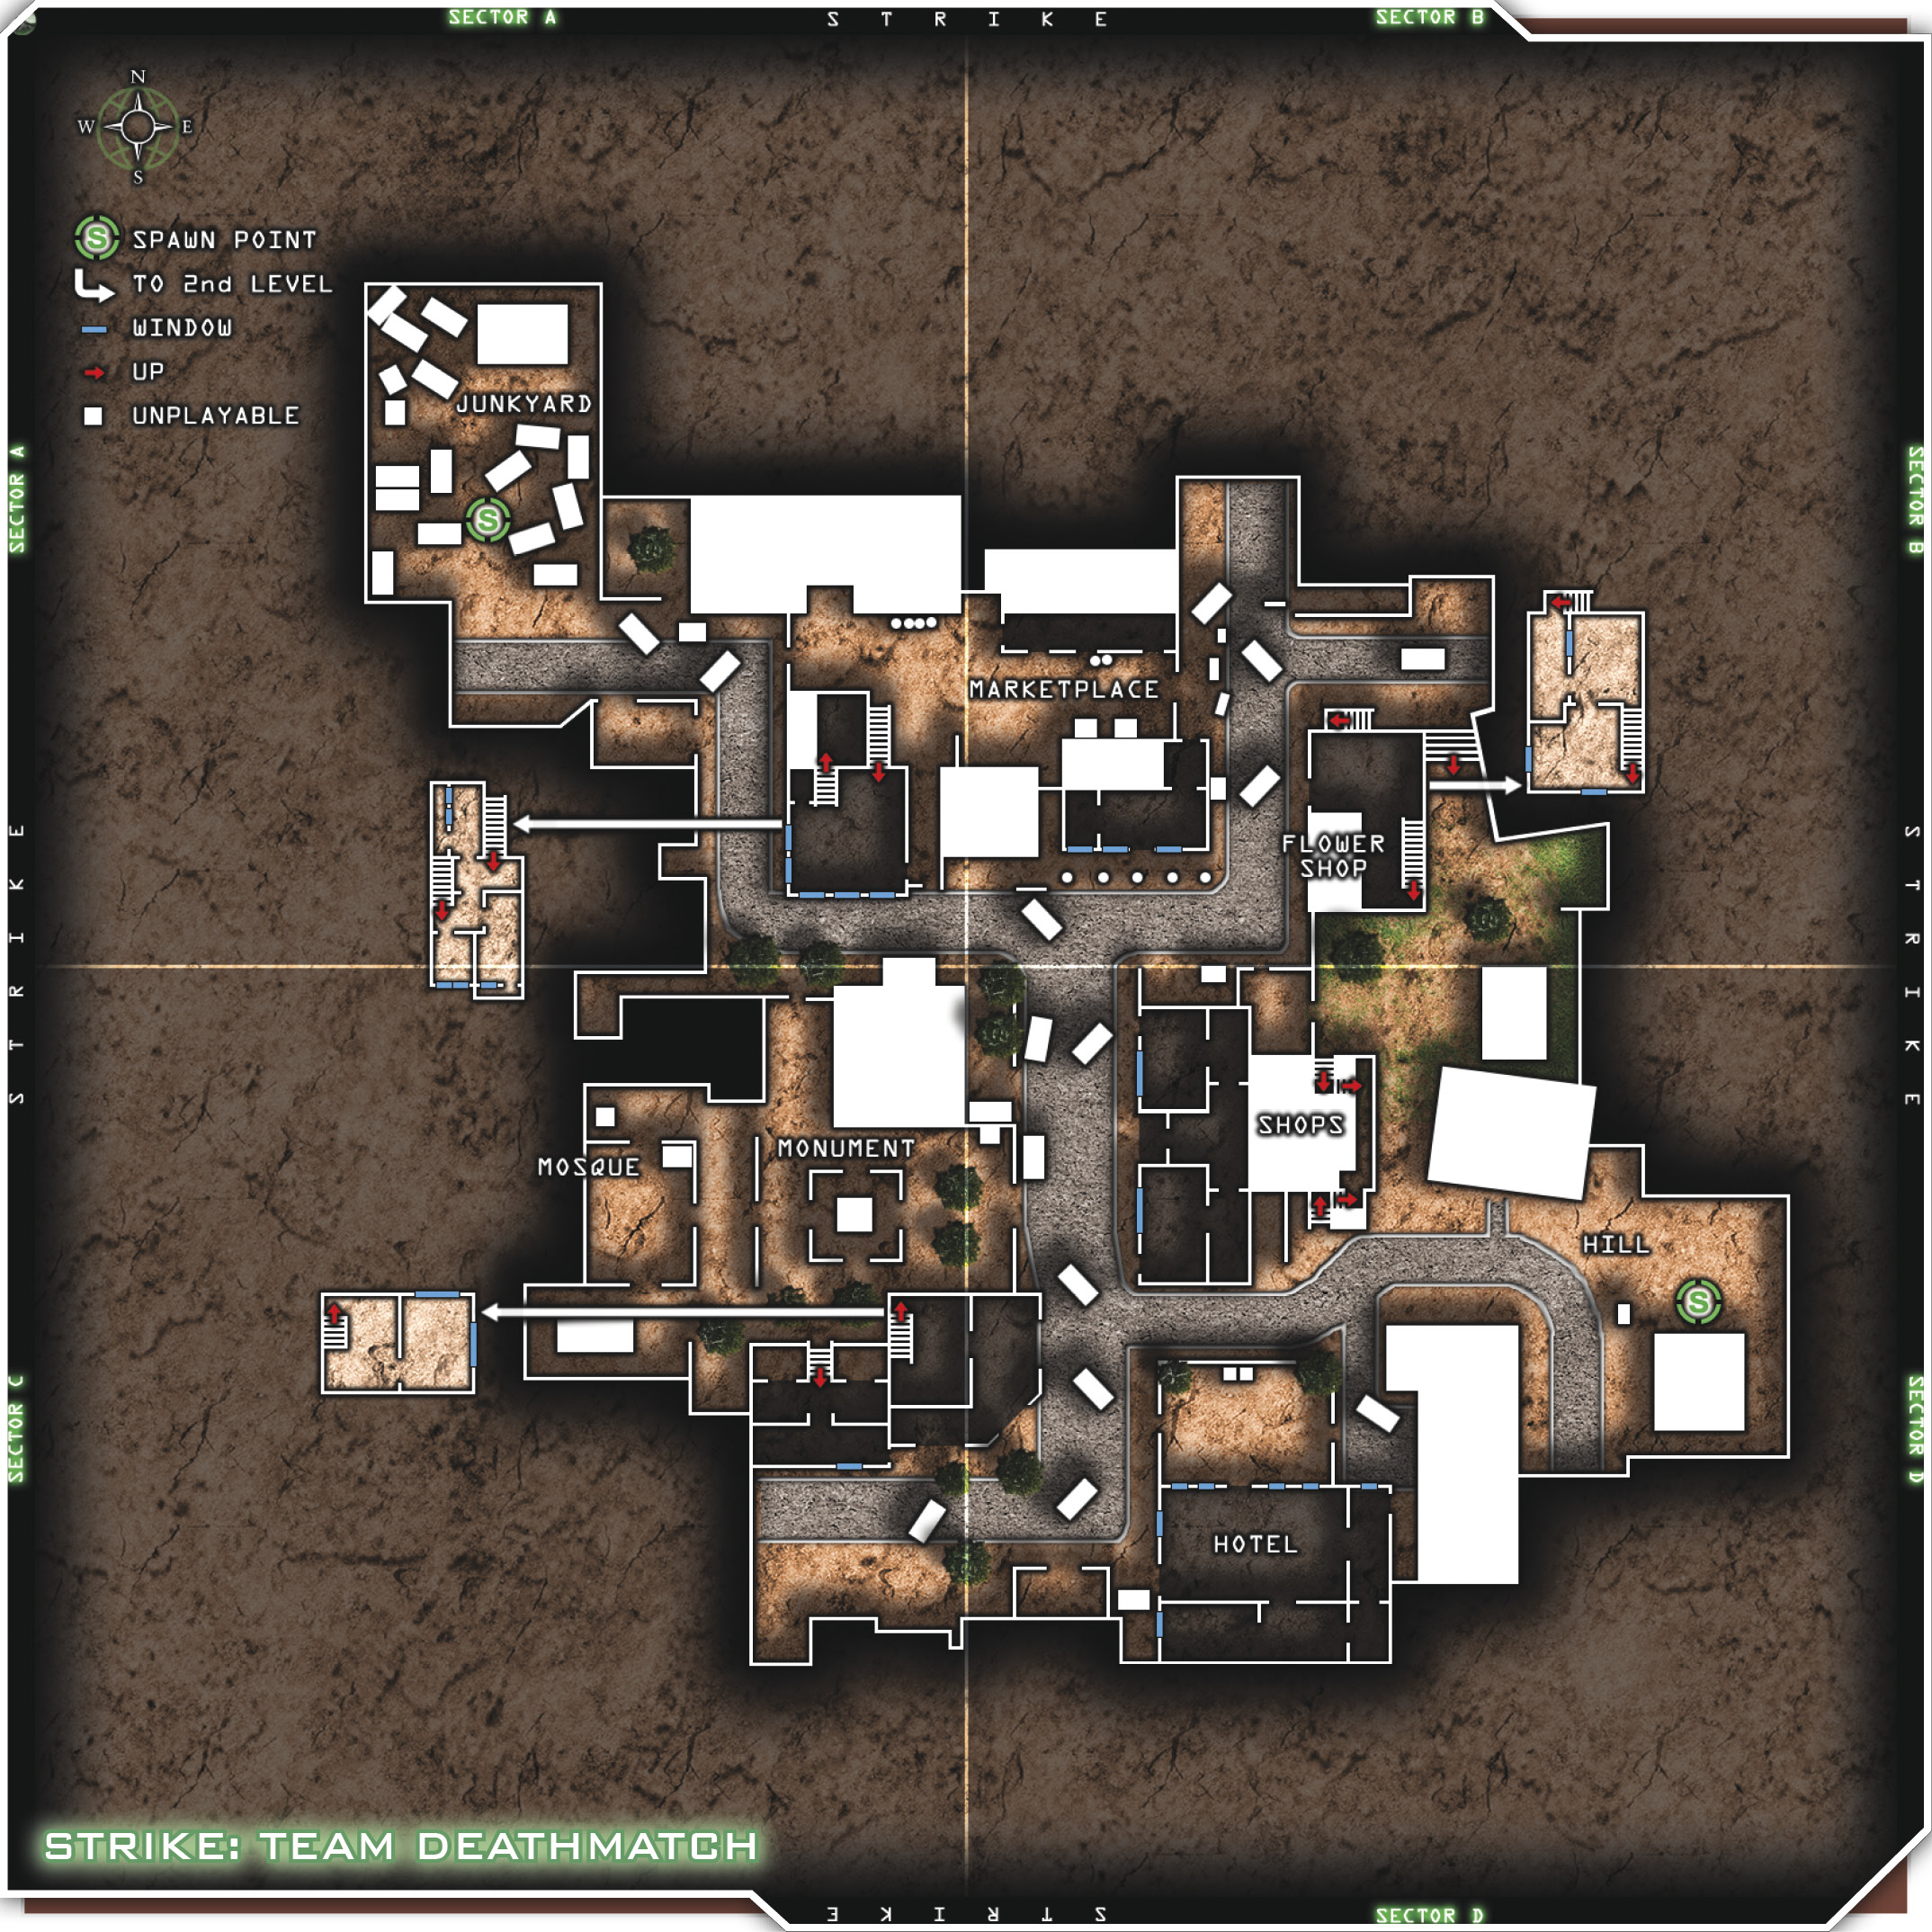
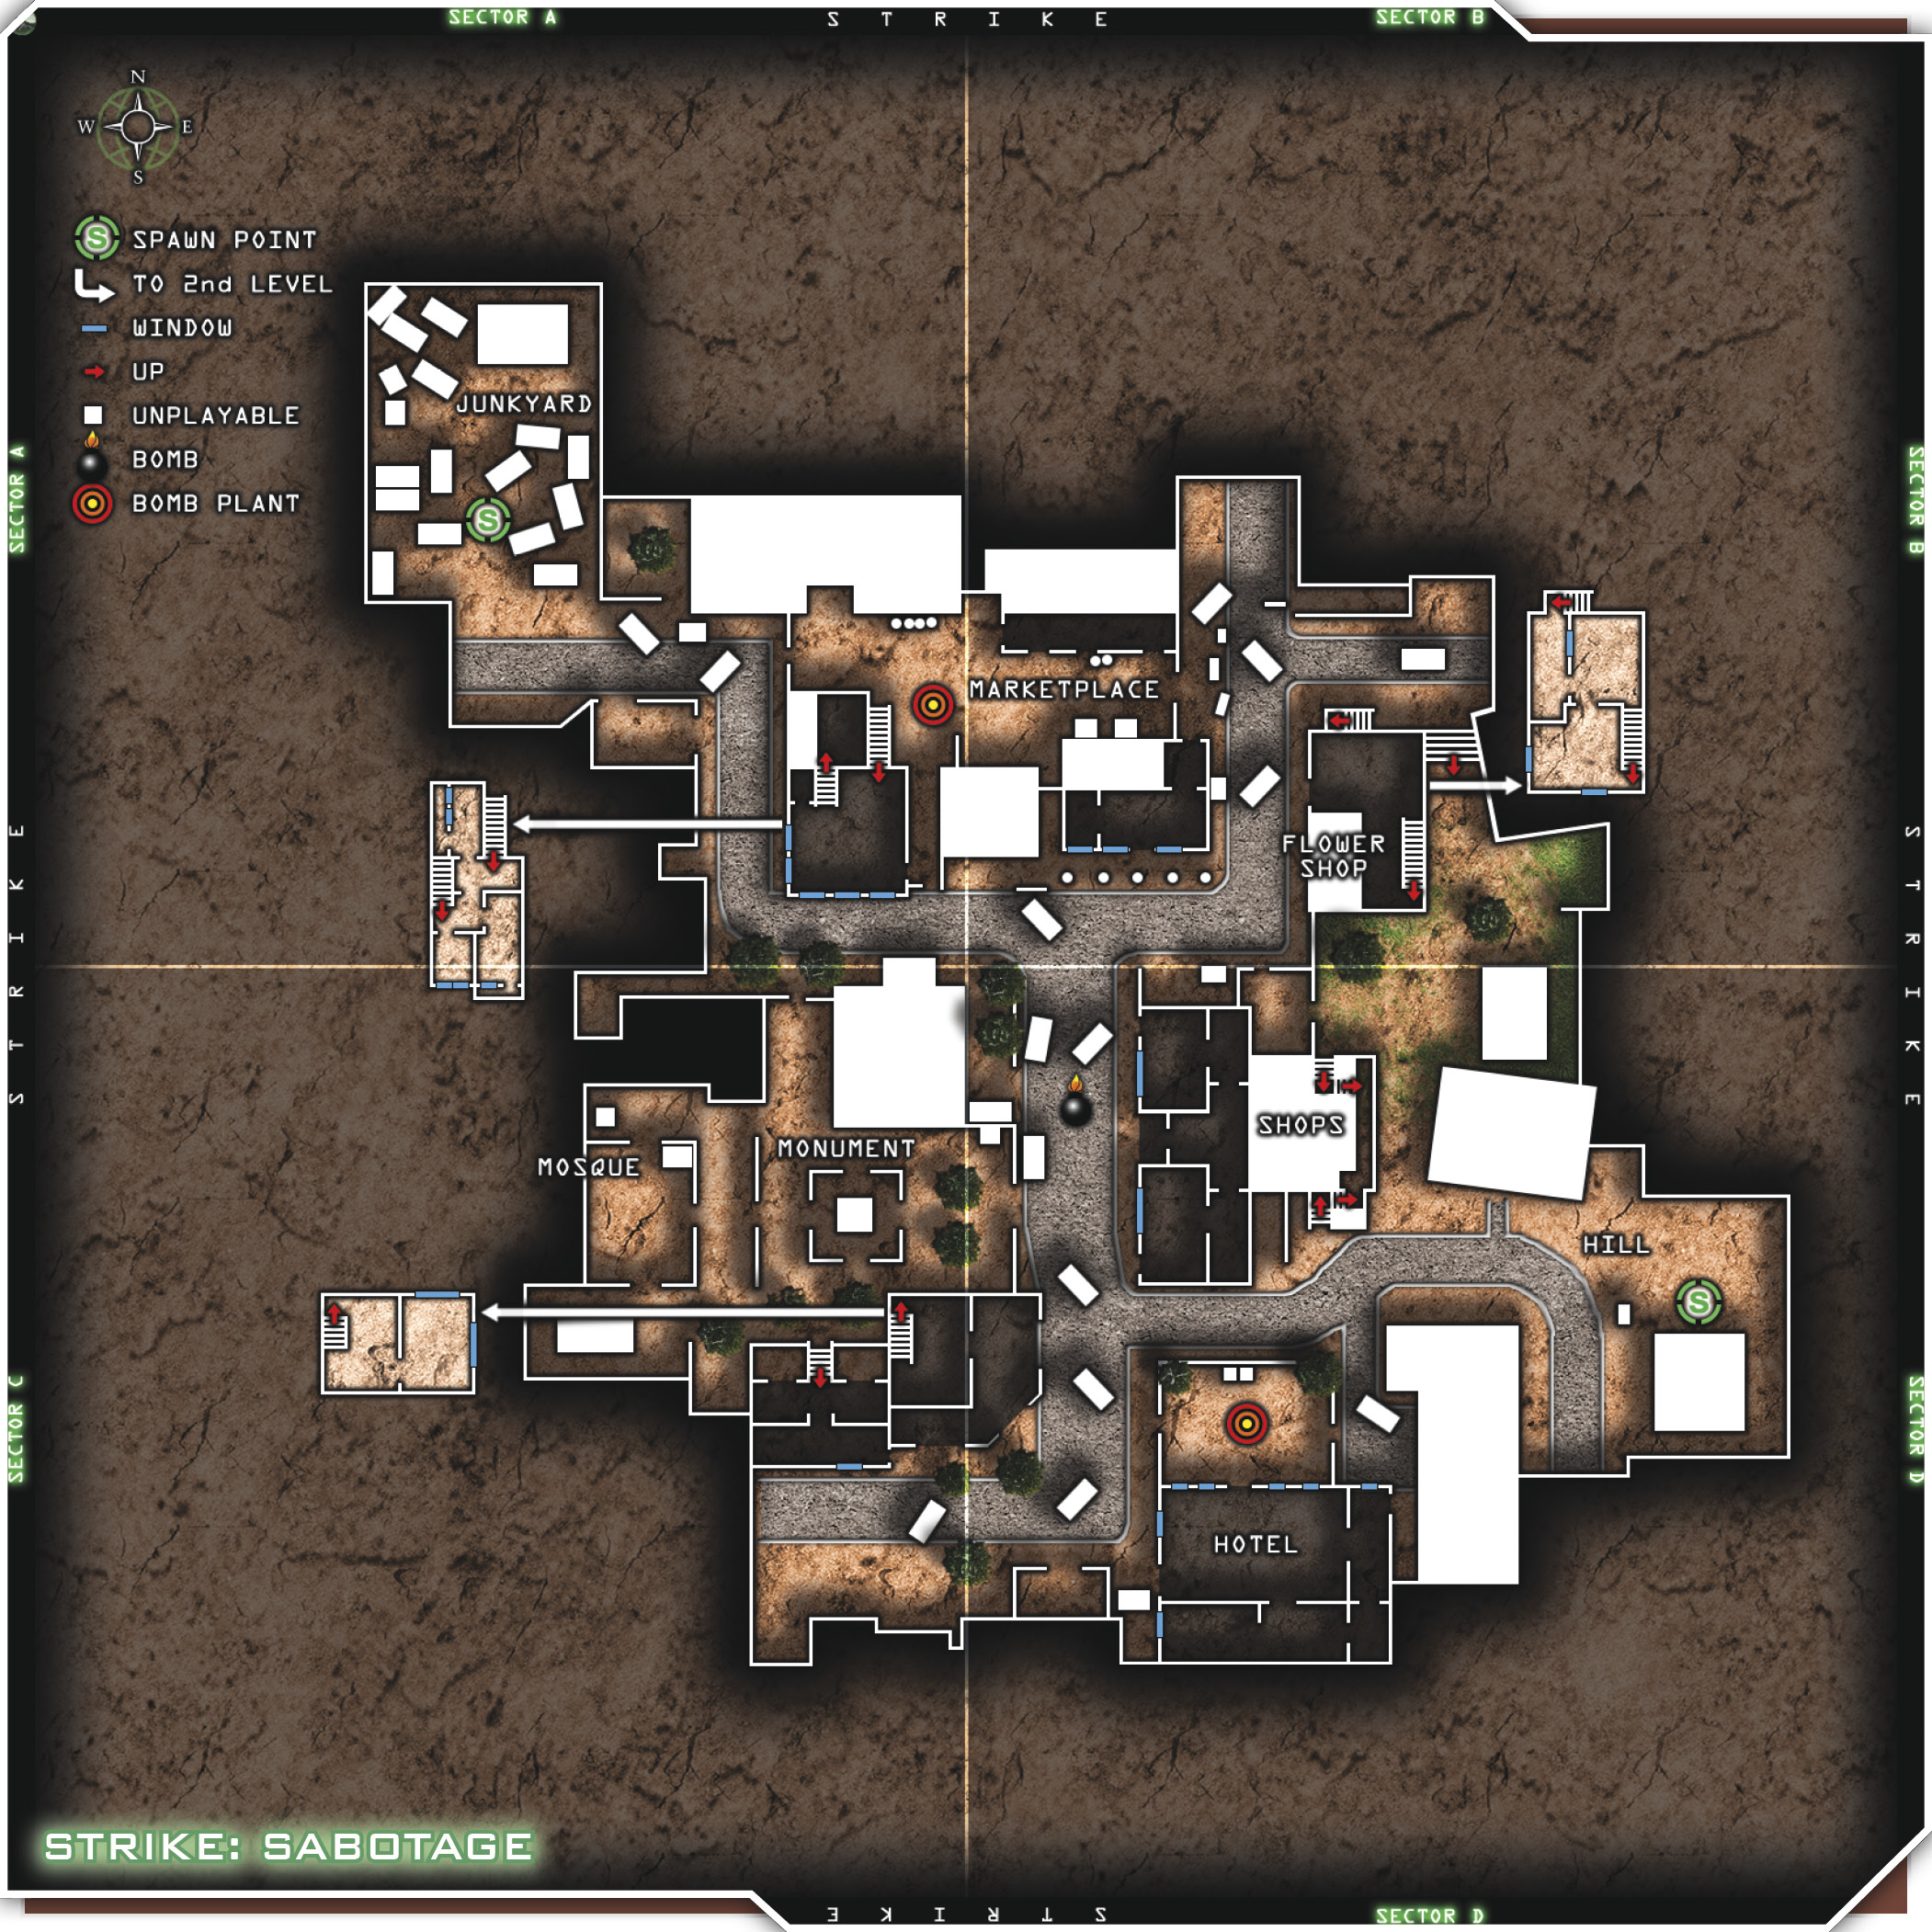
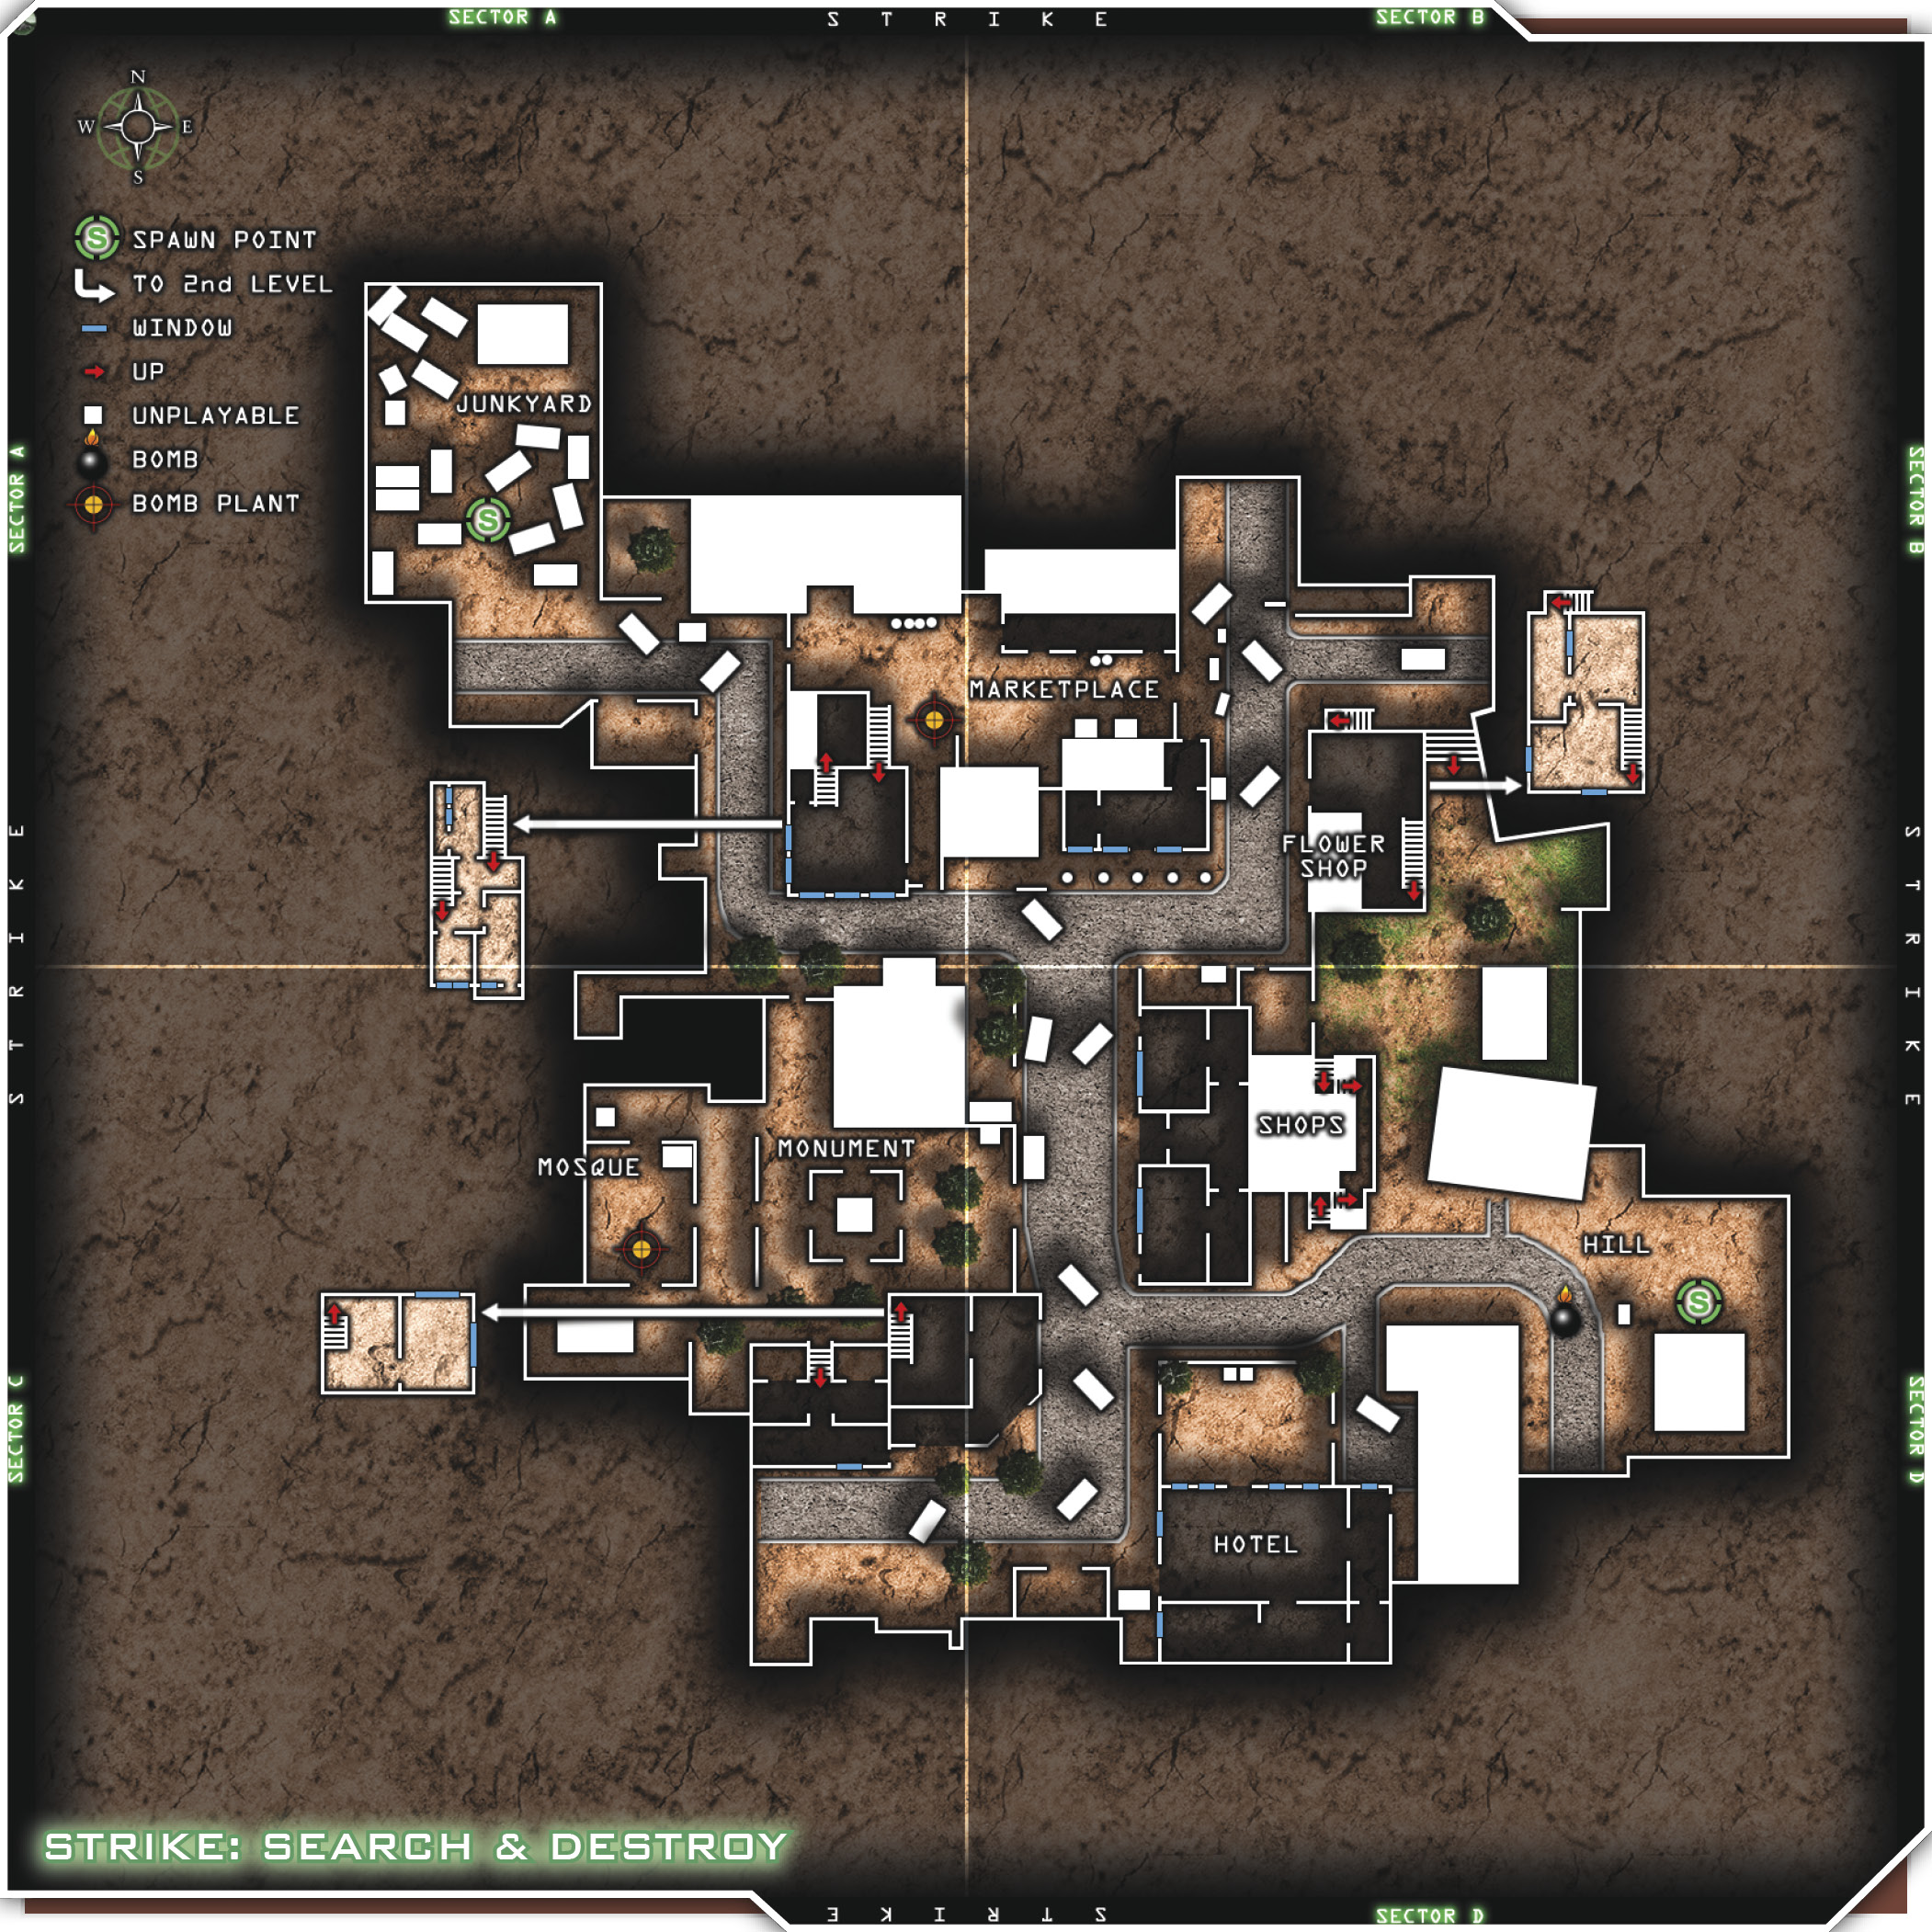
One team spawns in the Junkyard in the northwest corner of the map, and the other team spawns on the Hill in the southeast corner. Most firefights will occur right in the center of town, between the Monument and the Shops. Use the half-wall just outside the Hotel as cover to shoot up the street toward the Marketplace. The whole Marketplace area becomes very hot very quickly, so use grenades to cool it off. Try using C-4 on vehicles to create larger explosions when groups of enemies pass by them.
Snipers will like the multiple second-story levels on this map. There are plenty of places to snipe from even on the ground. Find a good line of sight to the action, and set some Claymores to cover your back. Always try to pair a sniper with a defender, because while enemies can shoot your Claymores, your buddy can at least shoot back. Use teamwork to divide and conquer. Use smoke and diversionary fire to make the enemy think you’re stronger in one area than another. Lure them into traps like Claymores or C-4 explosions, or just massively overpower them at your campsite. Snipers can make great use of the second-story level of the building just south of the Monument. A large opening offers a great line of sight to the Marketplace.
There are several buildings to camp. Use them whenever possible to take a breather and get a few quiet kills. Don’t overstay your welcome, though. As soon as the enemy knows you’re there, move out and commandeer another place. Hopping back and forth like this is great cover, and it can really frustrate the enemy because they can’t get a clear shot at you.
UAV Jammers are also a good perk on this map. Since there are so many avenues to relocate and maneuver, there could be an enemy around every corner. Be ready for stabby-time.
Grenade launchers and RPGs are a good choice for areas like the main street and some balconies. Try to gauge your distances before you shoot, so you don’t waste ammo. Launch a few up the street, and remember to note where you sighted up your shot and where it landed. This intel, combined with where you stood when you fired, will help you nail down the target next time.
Consider using only silenced weapons and UAV Jammers on this map. Since there are so many ways to navigate through the city, being unseen is a tremendous advantage. This is very frustrating to enemies who rely on radar and UAV scans to aid them in airstrikes or general tactics. Silencers decrease your weapon’s damage, but keep you hidden from radar. If you do run with a silenced weapon, consider the Stopping Power perk to maintain its damage level.
Team Tactics
There are so many things to do on this map, it’s hard to know where to start… How about the eastern team spawn on the Hill? Okay, we need an objective… Let’s steal the peach from the Marketplace.
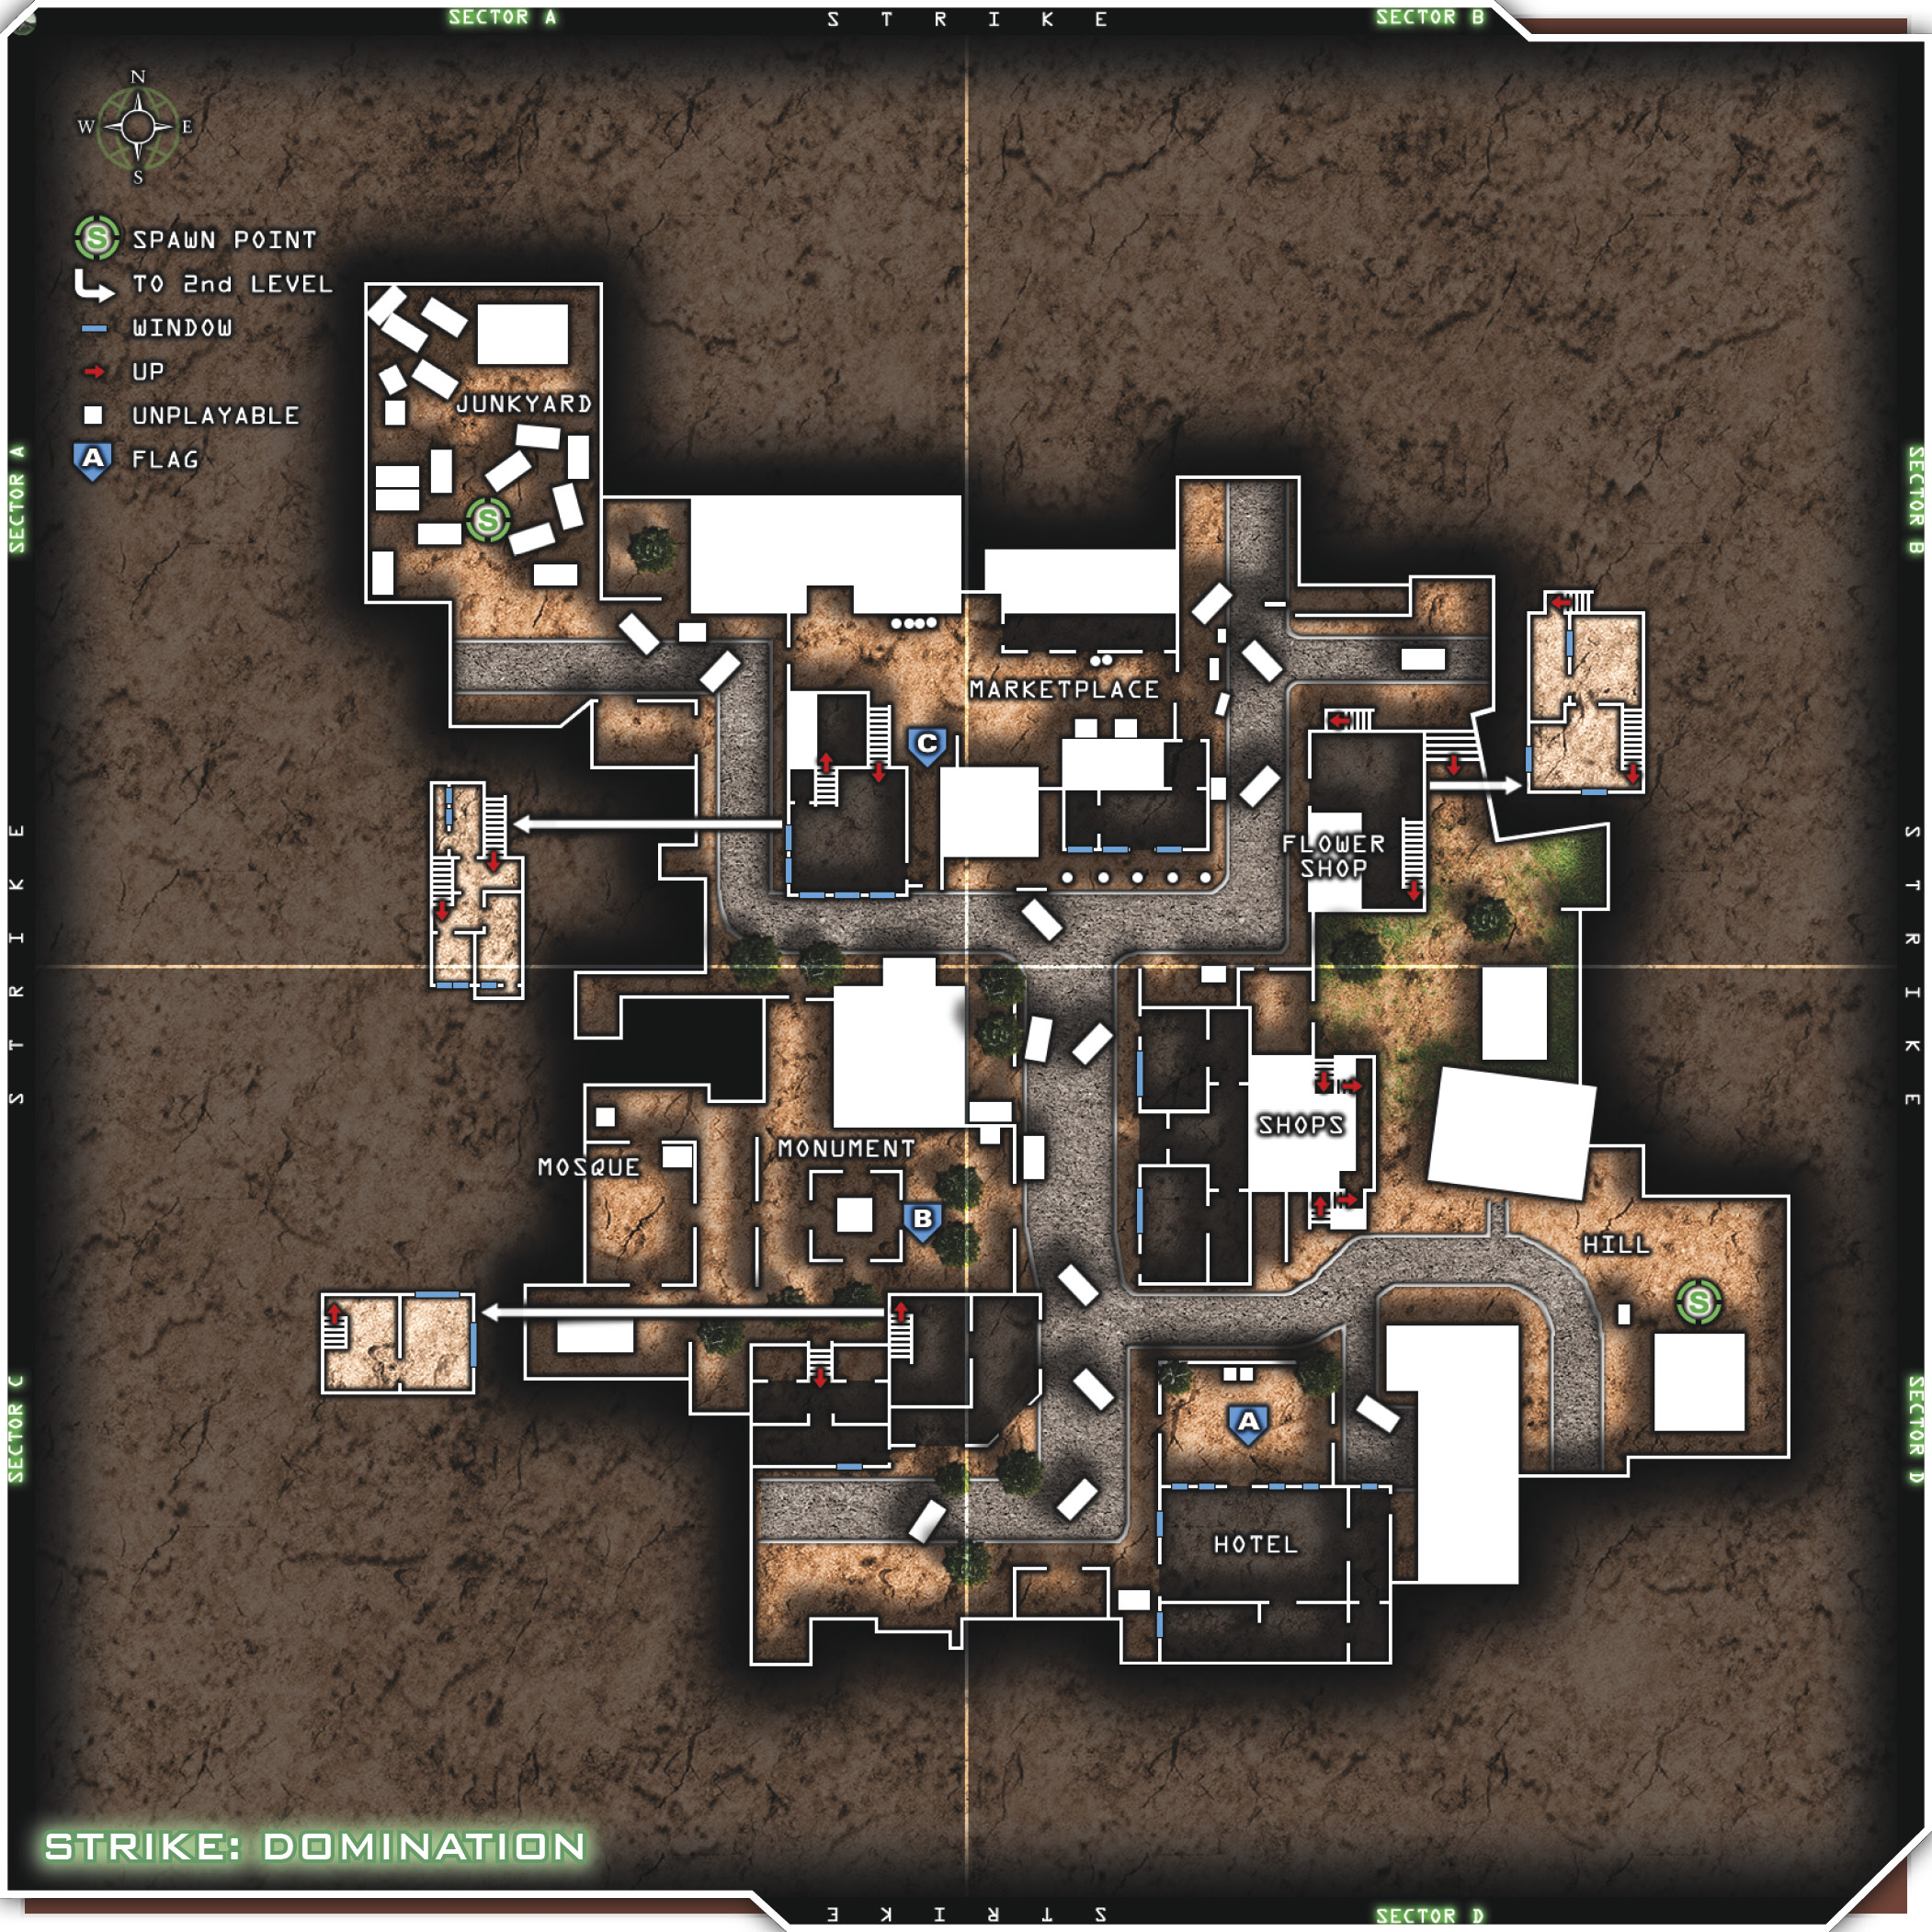
The Marketplace offers a good-sized area that can be locked down without too much loss of life. Getting there is the problem. Take your entire team north through the east side of the Shops (around the back) and make your way to the Flower Shop. Go around the back of the shop and fight your way into the Marketplace from the east-side entrance. Get your team inside by any means necessary: snipers, grenade launchers, frags, RPGs, whatever you need to gain control of the Marketplace. Smoke is a viable option to extricate your enemies as well. Fill the center of the Marketplace with smoke and see what comes out.
Once you’ve gotten control, delegate positions. Put a player on every access point to the entire Marketplace. There are entrances on all sides except for the north side, which makes it a good, fortifiable compound. Plant Claymores and C-4 wherever possible, and take up positions where you can watch the entrance points from afar and simultaneously avoid incoming grenade barrages. There are several upper-level windows where you can place snipers, and some great areas to create crossfires.
Another option for teams spawning at the Hill is the top gun assault. Take a team of 2 snipers or long-range riflemen, or even a grenade launcher, to the end of the main street just west of the Hotel. They can take up positions in the building on the southeast corner of the Monument, or right behind the half-wall in front of the Hotel. Let them work on their 5-kill streaks while the bulk of your team hovers around their spawn point, watching any entrances to it (like the alley behind the Shops and the main street). Once your snipers have access to the airstrike, have them call it in the center of town at the top of the main street. When your team sees the airstrike coming in, they should let it drop its ordinance and then follow close behind it on foot up the main street. You’re looking to overwhelm the enemy by using the air support and bringing in the rest of your team behind it.
After your snipers call in the airstrike and the rest of the team has made it up the street to the Marketplace, the snipers should use their cover to reposition on higher ground, such as the Flower Shop. From there, snipers can see enemies flowing out of their spawn points, the Marketplace and the main street. Use them to communicate enemy positions while your ground team remains mobile.
Wingman teams will also work here, but will require great communication. It’s easy to get outnumbered quickly on this map. Let’s work with three teams of two. All teams should have at least one player with a scope on an assault rifle, or a sniper with Overkill and an assault rifle, submachine gun, or shotgun to help when it comes time. Spawning from the Hill again in the southeastern corner of the map, send one team up north via the alley behind the Shops, send the second team up the street but through the Shops themselves, and send the third team to the Monument. All teams should concentrate on regrouping up at the Junkyard in the northwestern corner of the map.
The Monument team will see plenty of action, but can take a back route to the Junkyard by cutting straight through the Monument courtyard and keeping left. The Shops team may have some trouble getting in and out of the Shops, so bring some smokes. The Alley team may encounter a sniper or two down the length of the alley, but that’s why you brought yours along too. Outsnipe the enemies you encounter, and toss a few exploding cookies their way. Have everyone regroup at the Junkyard, and remobilize the team for a run back through town. Maintain the single-unit structure, backtrack down the main drag, and polish off any stragglers for the win.