
Prima Games eGuides
primagames.com Browse Redeem a code Help
Left 4 Dead 2 eGuide
Sign in My Guides

Sign in or create an account

We'll email you a link. No password needed, and if you don't have an account yet, the link makes one.

By creating an account or signing in, you agree to our Terms of Service and Privacy Policy.

Have a password?

Had an account on the old eGuides site, or a code from a printed guide? Help and troubleshooting

Sign in with a password

By signing in, you agree to our Terms of Service and Privacy Policy.

Check your email

A sign-in link is on its way. It works once and expires in 15 minutes. Open it and you're in, with an account if you didn't already have one.

Contents

  • Essentials
    • Display
      • The Screen
    • Game Modes
      • Introduction
      • Campaign
      • Realism
      • Versus
      • Survival
      • Scavenge
      • Single-Player
    • The A.I. Director
      • How It Works
    • Game Difficulty
      • About
    • Movement and Combat
      • On Maneuvers
      • Taking a Stance
      • Ranged Combat
      • Melee Combat
      • Health and Life
      • The Environment
    • Survival Tips and Tricks
      • Survivor General Tips
      • Infected General Tips
    • Survivors
      • The Cast
    • The Infected
      • Common Infected
      • Uncommon Infected
      • The Boomer
      • The Charger
      • The Hunter
      • The Jockey
      • The Smoker
      • The Spitter
      • The Tank
      • The Witch
    • Weapons and Equipment
      • Primary Weapons
      • Secondary Weapons
      • Mounted Weapons
      • Projectile Weapons (Belt Items)
      • Weapon Enhancements (Backpack Items)
      • Explosive Objects (Carry Only)
      • First Aid (Backpack Items)
      • Health Enhancements (Belt Items)
    • Achievements Appendix
      • Achievements
  • Walkthrough
    • Campaign Introduction
      • Looking 4 Guidance?
    • Dead Center
      • Dead Center Overview
      • Vannah Hotel Floor 8
      • Vannah Hotel Floor 7
      • Vannah Hotel Lobby
      • CEDA Quarantine & Overpass
      • Walkway To Whitaker’s
      • Maul Near Liberty Mall
      • Mall: Kappel’s and Middle Mezzanine
      • Mezzanine Mayhem
      • Security and Safe Rooms
      • Filling Up the Blue 22
    • Dark Carnival
      • Dark Carnival Overview
      • Highway & Off-Ramp
      • Whispering Oaks Ravine
      • Fairground Entrance
      • Chaos in Kiddieland
      • Murder at the Merry-Go-Round
      • Tunnel of Love
      • The Screaming Oak
      • The Barns
      • Barn Storming
      • The Concert
    • Swamp Fever
      • Swamp Fever Overview
      • Plank Country
      • Alligator Sanctuary
      • Rudimentary Pathways
      • Waterlogged Wade to Crash Site
      • Tracks Past the Shacks
      • Shanty Town Center
      • Shanty Town Bridge and Outskirts
      • Plantation Village
      • Plantation Mansion
    • Hard Rain
      • Hard Rain Overview
      • Burger Tank
      • Streets of Rage
      • Entrance and Refinery 1
      • Refinery 2, Plant Ruins, and Cane Field
      • Backtrack through Field, Plant, and Refinery
      • Retreat to the Safe Room
      • To the Safe Room on Second Street
      • Town Escape
    • The Parish
      • The Parish Overview
      • Bienville District
      • Bienville Park
      • Bedlam at the Bus Depot
      • Urban Flight
      • Sam’s Hot Impound Lot
      • The Cemetery of Saint Roche
      • One-Way Street and Jazz Club
      • Slaughter in the Quarter
      • Mayhem on the Mean Streets
      • A Bridge Too Far
      • Attack at the Military Evac
    • Scavenge Mode
      • Scavenge Mode: Basics
      • Dead Center: Atrium
      • Dark Carnival: Motel
      • Swamp Fever: Plank Country
      • Hard Rain: Milltown
      • Hard Rain: Sugar Mill
      • The Parish: Park
    • Survival Mode
      • Survival mode: Basics
      • Dead Center: Atrium
      • Dark Carnival: Motel
      • Dark Carnival: Stadium Gate
      • Dark Carnival: Concert
      • Swamp Fever: Plank Country
      • Swamp Fever: Plantation
      • Hard Rain: Burger Tank
      • Hard Rain: Sugar Mill
      • The Parish: Bus Depot
      • The Parish: Bridge
  • DLC
    • The Passing
      • New Features
      • Campaign: The Riverfront
      • Campaign: Streets & Alleyway
      • Campaign: The Park
      • Campaign: Pool Hall
      • Campaign: Pipe works
      • Campaign: River Tour
      • Campaign: The Sewers
      • Campaign: The Port
      • Scavenge Maps
      • Survival Maps
  • Video
    • The Basics: Top Ten Tips
    • Know Your Enemy (Part 1)
    • Know Your Enemy (Part 2)
    • Leave Them Dead: Weapons Detail
    • Tips Scavenge and Survival Modes
    • Campaign Tactics: Dead Center
    • Campaign Tactics: Dark Carnival
    • Campaign Tactics: Swamp Fever
    • Campaign Tactics: Hard Rain
    • Campaign Tactics: The Parish

Left 4 Dead 2 Guide › Walkthrough › The Parish

Bedlam at the Bus Depot

The Doomed Evacuation

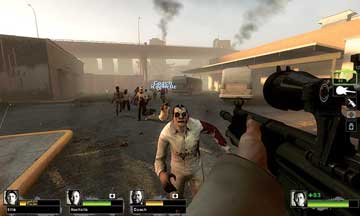
Exit the alleyway into a stretch of scrubland behind the row of houses under the freeway, where the general public was left to die or mutate into the disgusting forms you’re currently cutting your way through (picture 1).

3A

Slaughter everything that isn’t a Witch (in the melee and wide-open theater of combat, it is often difficult to spot a Witch until it’s too late, so listen for the weeping). Push onward, hugging the buildings on the left side so foes can only attack in a 180-degree area to your right, and so you can pick up any items left in doorways or on the ground. Continue moving over or around the strewn barricades toward a giant pile of suitcases and rotting corpses (picture 2).

Safety in the CEDA Trailer?

Run into the initial corner of a large bus depot that has been turned into a quarantine area. This massive forecourt has been segmented by a winding, fenced pathway that ends at a scaffold structure (Location 3F).

3B

You may be able to see (and cut down) a few foes behind these fences, but to enter the area you must board the CEDA trailer. The trailer has a one-way locking mechanism, so everyone on your team must be inside before the door behind you is sealed, and the other one is opened. During this time, stock up on any vital items.

Caution

This CEDA security trailer looks tough, but has an incredibly fatal flaw: an open skylight that Special Infected (and even a Tank) can drop down through and decimate your team! Be very aware of this fact and flee the trailer if this should occur.

Perimeter Breach

Follow the pathway shown on the guide map: The only way is to head left and then immediately right, moving down the long, straight sidewalk. You’re given instructions to deactivate the alarm to open the exit doors out of this quarantine area, which is suspiciously deserted.

3C

It becomes rather more crowded entities as soon as you reach the end of the sidewalk corridor and turn right, passing the sign marked “Warning Restricted Area.”

Caution

Warning! As soon as you step off the sidewalk into the restricted area, the alarm sounds and the Horde arrives. Be sure you’re ready to reach the alarm switch (3F) and have planned the route!

Restricted Area Rampage

Enter the restricted area between the two green wall sections and make the most rapid inspection of the items under the green tent as you can. The Horde has arrived! You must immediately battle back and forth through the fenced corridors as you gradually work your way toward the scaffold platform in the middle of the quarantine parking lot (3F). Sprint forward, optionally using Adrenaline to increase your speed (picture 1).

3D

Continue to run forward, around 180 degrees, and down the third (inner) fenced corridor, which has the scaffold structure on your right. A Melee Weapon is handy because it doesn’t slow you down (picture 2).

3E

At the end of this corridor section are two ladders (picture 3). At least two of you need to ascend to the scaffold platform overlooking the entire area (picture 4). There’s constant threat of attack by clambering Common Infected and Special Infected, too.

Shrug these off and deactivate the alarm switch as quickly as possible. When you reach the two ladders, ignore any wails of your teammates until that alarm is off! You can’t effectively end this nightmare until the Horde stops reacting to that alarm!

3F

Tip

Adept and quick Survivor movement is particularly important because Special Infected (especially Smokers) can grab or pull you from the other side of the fences, impeding your movement and stalling progress severely.

If you can all take Adrenaline at the same time, arm yourselves with Melee Weapons or close-combat guns (Shotguns are great), and run the corridors without stopping, you stand a chance. Only stop if a huge mass needs quick culling, or one of you is stopped by a Special Infected. Don’t split up!

Back of the Bus Depot

While two of you guard each other on the upper scaffold and shut off that damn alarm, your friends should preoccupy the enemies on the ground below. If that means lobbing a Pipe Bomb, Molotov, or Bile Bomb, so be it. When the frenzy is over, drop down and help nullify any Infected remnants (picture 1).

3G

Watch for foes dropping down from the main bus station rooftop. You may now inspect the vicinity. There’s a gruesome collection of body bags near a dead-end warehouse interior inside the red brick building. Don’t head in there during combat as you may be surrounded.

3H

Move inside the bus station via the main entrance (visible on picture 1) and through the interior until you reach the bus stops in the back (picture 2). So that you won’t be not swarmed by Infected as you head around the next corner and escape, move into the large tarmac parking lot behind the buses (picture 3) so you can effectively deal with any remaining foes in the area.
Safe and Sound

3I

You’re almost at the Safe Room, so jog to the corner, past the last parked bus, and turn right. Run along the sidewalk between the mesh fence and rear of the bus station. Although you’re only feet away from safety, don’t get complacent because a Special Infected attack could occur at any moment (picture 1). Those buses are easy for your freaky foes to lurk behind. Dash for the easily spotted Safe Room (picture 2) and nurse your wounds.

Effective Infected

The bus depot is another excellent area for the Special Infected to wound, delay, split up, and eventually defeat the Survivors, as long as you plan attacks accordingly. Before the CEDA Trailer (3A), attack with the Common Infected, following the foes from the alleyway because they don’t usually look behind during this combat. The long, thin road makes Chargers a good option (picture 1). As always, attack if a Witch is nearby.

When your Survivor foes are in the CEDA Trailer (3B) and you’ve spawned as a Tank, break through and drop in from the skylight to really harm them.

The fenced quarantine area is a fantastic place to tether a human to a wall (picture 2) and let the Horde do their job. Splitting the team up is easy, and you have the benefit of dropping down from rooftops, climbing over the fences, and massing near the ladders to prevent foes from ascending to stop the alarm. Concentrate your forces here.

Keep reading with a free account

The first 3 sections of Left 4 Dead 2 are open to everyone. An account opens the rest of it, and every other guide in the archive. It's free, and there's nothing to buy.

Bought guides on the old Prima Games site? Your account and every guide you own moved here, so there's nothing to buy again. Sign in.

Create a free account Or browse our free guides

PreviousBienville Park NextUrban Flight