
Prima Games eGuides
primagames.com Browse Redeem a code Help
Left 4 Dead 2 eGuide
Sign in My Guides

Sign in or create an account

We'll email you a link. No password needed, and if you don't have an account yet, the link makes one.

By creating an account or signing in, you agree to our Terms of Service and Privacy Policy.

Have a password?

Had an account on the old eGuides site, or a code from a printed guide? Help and troubleshooting

Sign in with a password

By signing in, you agree to our Terms of Service and Privacy Policy.

Check your email

A sign-in link is on its way. It works once and expires in 15 minutes. Open it and you're in, with an account if you didn't already have one.

Contents

  • Essentials
    • Display
      • The Screen
    • Game Modes
      • Introduction
      • Campaign
      • Realism
      • Versus
      • Survival
      • Scavenge
      • Single-Player
    • The A.I. Director
      • How It Works
    • Game Difficulty
      • About
    • Movement and Combat
      • On Maneuvers
      • Taking a Stance
      • Ranged Combat
      • Melee Combat
      • Health and Life
      • The Environment
    • Survival Tips and Tricks
      • Survivor General Tips
      • Infected General Tips
    • Survivors
      • The Cast
    • The Infected
      • Common Infected
      • Uncommon Infected
      • The Boomer
      • The Charger
      • The Hunter
      • The Jockey
      • The Smoker
      • The Spitter
      • The Tank
      • The Witch
    • Weapons and Equipment
      • Primary Weapons
      • Secondary Weapons
      • Mounted Weapons
      • Projectile Weapons (Belt Items)
      • Weapon Enhancements (Backpack Items)
      • Explosive Objects (Carry Only)
      • First Aid (Backpack Items)
      • Health Enhancements (Belt Items)
    • Achievements Appendix
      • Achievements
  • Walkthrough
    • Campaign Introduction
      • Looking 4 Guidance?
    • Dead Center
      • Dead Center Overview
      • Vannah Hotel Floor 8
      • Vannah Hotel Floor 7
      • Vannah Hotel Lobby
      • CEDA Quarantine & Overpass
      • Walkway To Whitaker’s
      • Maul Near Liberty Mall
      • Mall: Kappel’s and Middle Mezzanine
      • Mezzanine Mayhem
      • Security and Safe Rooms
      • Filling Up the Blue 22
    • Dark Carnival
      • Dark Carnival Overview
      • Highway & Off-Ramp
      • Whispering Oaks Ravine
      • Fairground Entrance
      • Chaos in Kiddieland
      • Murder at the Merry-Go-Round
      • Tunnel of Love
      • The Screaming Oak
      • The Barns
      • Barn Storming
      • The Concert
    • Swamp Fever
      • Swamp Fever Overview
      • Plank Country
      • Alligator Sanctuary
      • Rudimentary Pathways
      • Waterlogged Wade to Crash Site
      • Tracks Past the Shacks
      • Shanty Town Center
      • Shanty Town Bridge and Outskirts
      • Plantation Village
      • Plantation Mansion
    • Hard Rain
      • Hard Rain Overview
      • Burger Tank
      • Streets of Rage
      • Entrance and Refinery 1
      • Refinery 2, Plant Ruins, and Cane Field
      • Backtrack through Field, Plant, and Refinery
      • Retreat to the Safe Room
      • To the Safe Room on Second Street
      • Town Escape
    • The Parish
      • The Parish Overview
      • Bienville District
      • Bienville Park
      • Bedlam at the Bus Depot
      • Urban Flight
      • Sam’s Hot Impound Lot
      • The Cemetery of Saint Roche
      • One-Way Street and Jazz Club
      • Slaughter in the Quarter
      • Mayhem on the Mean Streets
      • A Bridge Too Far
      • Attack at the Military Evac
    • Scavenge Mode
      • Scavenge Mode: Basics
      • Dead Center: Atrium
      • Dark Carnival: Motel
      • Swamp Fever: Plank Country
      • Hard Rain: Milltown
      • Hard Rain: Sugar Mill
      • The Parish: Park
    • Survival Mode
      • Survival mode: Basics
      • Dead Center: Atrium
      • Dark Carnival: Motel
      • Dark Carnival: Stadium Gate
      • Dark Carnival: Concert
      • Swamp Fever: Plank Country
      • Swamp Fever: Plantation
      • Hard Rain: Burger Tank
      • Hard Rain: Sugar Mill
      • The Parish: Bus Depot
      • The Parish: Bridge
  • DLC
    • The Passing
      • New Features
      • Campaign: The Riverfront
      • Campaign: Streets & Alleyway
      • Campaign: The Park
      • Campaign: Pool Hall
      • Campaign: Pipe works
      • Campaign: River Tour
      • Campaign: The Sewers
      • Campaign: The Port
      • Scavenge Maps
      • Survival Maps
  • Video
    • The Basics: Top Ten Tips
    • Know Your Enemy (Part 1)
    • Know Your Enemy (Part 2)
    • Leave Them Dead: Weapons Detail
    • Tips Scavenge and Survival Modes
    • Campaign Tactics: Dead Center
    • Campaign Tactics: Dark Carnival
    • Campaign Tactics: Swamp Fever
    • Campaign Tactics: Hard Rain
    • Campaign Tactics: The Parish

Left 4 Dead 2 Guide › Essentials › Display

The Screen

Tip

This training session presupposes you’ve already figured out how to begin an online game, know how to access Lobbies, chat to friends, and set up Multiplayer matches. You should also be familiar with your controller or keyboard functionality, and have set up your in-game options to your liking. This knowledge is contained in the Instruction Manual that came with your game. You are advised to read it before continuing.

These four pictures show the following information: The HUD during Campaign, Realism, Versus, and Survival Modes; the HUD when playing as a Special Infected during Versus and Scavenge Modes; the HUD during Scavenge Mode; the HUD during Survival Mode. Here’s what all those icons mean:
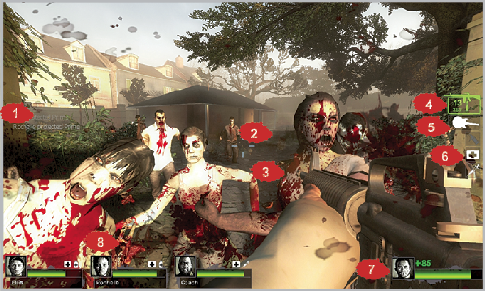
This shows a sample campaign match from a Survivor’s-eye view.

1. Information: Whenever a major occurrence happens, it is listed here. Keep track of who has rescued who, those who startled the Witch, and who is being attacked by Special Infected.

2. Aiming Reticle: This crosshair icon is superimposed on your HUD. Place the icon over your target to shoot it. The size of the reticle differs depending on the weapon type. The reticle expands during movement and recoil, and shrinks when you are walking or crouching.

3. Death and Dismemberment: A particularly unpleasant zombie takedown is occurring. Prepare for many of these.

4. Primary Weapon: This shows a silhouette of your chosen ranged weapon, how many bullets/shells you have in the clip/chamber, and the total ammunition you are carrying for that weapon.

5. Secondary Weapon: This shows a silhouette of your chosen secondary weapon, whether it is a Pistol variant or a Melee Weapon. These weapons have infinite “capacity.”

6. Inventory: (PC version shown) This shows the projectile you have equipped on your belt (top), the Backpack Item (middle), and the health-related Belt Item (bottom) you have stored on you. Select and use them at any time. The Xbox 360 version shows this in a cross pattern with a Flashlight icon, allowing you to turn the Flashlight on and off.

7. Avatar Information: A portrait of the Survivor you’re playing as, along with your current Health.

8. Teammate Information: Portraits of your teammates, along with their general health and the Inventory they are currently carrying. The inventory is particularly useful, as you can request Health and know who has a spare First Aid Kit or Pain Pills to use.
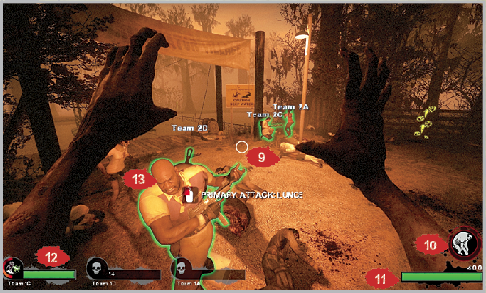
This shows a sample Versus match from an Infected’s-eye view.

9. Aiming Reticle: This shows where your Special Infected’s Primary attack will strike.

10. Attack Power: The red circle shows the power, which quickly depletes when used and slowly regenerates if you haven’t been killed.

11. Health: Your Health, which is likely to be depleted very quickly.

12. Infected Teammates: The type of Infected your brethren have spawned as, and their general Health.

13. Intended victim: This is a Survivor you’ve picked on to die, and ideally you have a second Special Infected to help you. As you can see, the Survivors have a glow around them, which indicates one of the following conditions:

Green: Healthy

Orange: Wounded

Red: Near death (usually the preferred Survivor to attack)

Purple: Puked on by a Boomer

Blue Outline: Behind a wall (you are unable to accurately see either teammate’s condition)
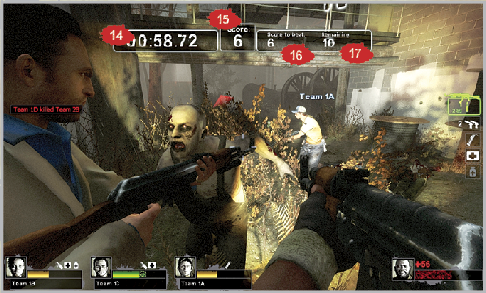
This shows a sample Scavenge match from a Survivor’s-eye view.

14. Time: This shows the remaining time in a round; extra time is added after each successful pour.

15. Score: This shows how many Fuel Cans have been successfully poured into a generator or car.

16. Score to Beat: This shows the total Fuel Cans the rival team managed during a previous match.

17. Remaining: This shows the number of Fuel Cans remaining in the stage you are playing in.
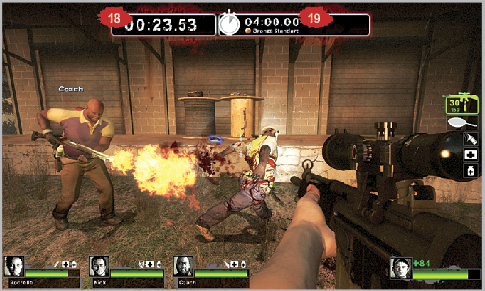
This shows a sample Survival match.

18. Time: This shows how long your team has lasted during a Survival game; the higher this number is, the better!

19. Time to Beat: This shows the time to beat for a medal, or your team’s best time, so you know the time to aim for.

NextIntroduction