
Left 4 Dead 2 Guide Essentials Weapons and Equipment
Primary Weapons
By now, you should have some rudimentary knowledge about the weapons you enjoy utilizing. However, it is always advisable to check out information on all the available ordnance as well as equipment. Many of these weapons feature statistics (such as the damage, range, and reload time of a weapon); use these when comparing different Primary Weapons so you know which is better at specific functions.
Ammunition
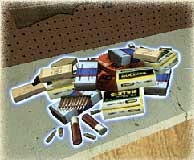
Ammunition is found in small or large piles, always in Safe Rooms, and randomly throughout the game. Ammunition, when taken, completely restores your Primary Weapon’s ammunition back to its maximum level. Be sure to reload so you have a chamber full with the maximum the weapon can hold. The ammo pile is never used up.
It is imperative you use ammo cunningly, such by as swinging open a Safe Room door at the start of a stage, blasting foes while staying inside the Safe Room, and then grabbing more ammunition before you leave.
When you’re low on ammunition, it is usually better to figure out where your next Safe Room is and rely on Pistols or Melee Weapons, or drop the weapon and pick up a new one.
Weapons
You'll be killing Infected with a variety of ranged weapons most of the time, although only one Primary Weapon may be carried at once. Primary Weapons come in two general varieties: Standard and Enhanced. Although both are recommended for zombie annihilation, Enhanced weapons (which are generally more potent versions of their Standard counterpart) represent a better overall choice. Of course, Standard weapons are much more common (and likely to be in a Safe Room), but all weapons are distributed completely randomly.
Autoshotgun
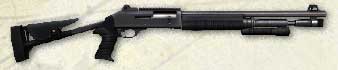
Damage: High
Penetration: High
Accuracy: Low
Range: Short to intermediate
Rate of Fire: High
Reload Time: Slow
Fire Mode: Automatic
Magazine Capacity: 10
Total Ammo: 90
Enhanced Variant: SPAS Shotgun
SPAS Shotgun
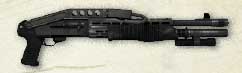
Damage: High
Penetration: Low
Accuracy: Low
Range: Short
Rate of Fire: High
Reload Time: Medium
Fire Mode: Automatic
Magazine Capacity: 10
Total Ammo: 90
Standard Variant: Autoshotgun
Both of these weapons offer very similar performance and are extremely impressive at tearing large, meaty sections out of zombie torsos or groins. But the SPAS Shotgun has a faster reload time, although you’ll run out of ammunition quicker, too.
For house-to-house investigations, action in narrow or small enclosed spaces, or alleyway action, this weapon is a fantastic choice. It is a less fantastic choice when aiming at medium or long ranges, as the blast radius widens.
Due to the Shotgun’s automatic nature, you can reload single bullets even when the capacity is empty. This doesn’t give you the same quick firing, but is a good stop-gap measure if you’re being attacked while reloading. Combine this with Melee Shoving.
Pair either Shotgun with a Melee Weapon so you can blast away at enemies as they close and then (in Horde situations) swap to a Melee Weapon, instead of being ravaged while you attempt to reload.
Although the SPAS Shotgun fixes this problem, shells are still being loaded one at a time, which means a long period of inactivity as you refill the weapon. You can cancel the SPAS Shotgun reload, unlike other weapons (the Hunting Rifle, for example).
Also, use either of these weapons to blast away at a narrow gate or hatch out of which enemies are spilling. These weapons are also great to use on Special Infected, including Tanks and Witches, because the damage they inflict is excellent.
The main disadvantage of these weapons is apparent when you encounter only a few enemies. All weapons usually drop a Common Infected with a single shot, so a weapon with a much larger capacity is more economical.
Chrome Shotgun
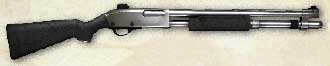
Damage: Medium
Penetration: Low
Accuracy: Low
Range: Short
Rate of Fire: Slow
Reload Time: Long
Fire Mode: Single-shot, Pump action
Magazine Capacity: 8
Total Ammo: 56
Enhanced Variant: Pump Shotgun
Pump Shotgun
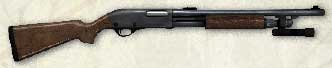
Damage: High
Penetration: High
Accuracy: Low
Range: Short to intermediate
Rate of Fire: Slow
Reload Time: Slow
Fire Mode: Pump-action
Magazine Capacity: 8
Total Ammo: 56
Standard Variant: Chrome Shotgun
The combat Shotgun made of chrome and the military-spec Pump Shotgun both inflict a huge amount of pain on a foe, as their blasts spread out to encompass multiple foes in a single spray. The Pump Shotgun offers greater damage, penetration, range, and ammunition, but it certainly isn’t as shiny.
These weapons offer you the ability to blast foes running at you adjacent to one another. The Shotgun has a wider area of effect than most other weapons. Make up for the slow reloading of both variants by reloading constantly. Don’t wait until you run out of shells in your chamber. Make sure your team knows you’re good for only a few, devastating blasts.
If Melee Weapons aren’t available, you can at least push the Infected back with a Melee Shove, then fire a blast followed by another Shove. Repeat this technique during periods where you’re being swarmed. Shoving while reloading is an excellent trick.
Run to the front of your team when tackling foes, checking to make sure interior locations are secure, and investigating unexplored areas—that way you can utilize the weapon’s short-range strengths more easily. These weapons favor aggressive play. They also are adept at dropping Special Infected, including Witches before they are startled.
Be extremely careful blasting this weapon when attempting to help a downed or immobile player, or if one of your teammates crosses your field of vision. The wide spray of the shot makes friendly fire incidents common.
Hunting Rifle
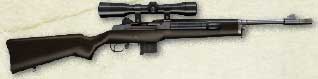
Damage: High
Penetration: High
Accuracy: Very high
Range: Intermediate to long
Rate of Fire: Slow
Reload Time: Very slow
Fire Mode: Semi-automatic
Magazine Capacity: 15
Total Ammo: 150
Enhanced Variant: Military Sniper Rifle
Military Sniper Rifle
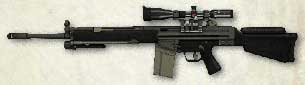
Damage: High
Penetration: High
Accuracy: High
Range: Long
Rate of Fire: Medium
Reload Time: Medium
Fire Mode: Semi-automatic
Magazine Capacity: 30
Total Ammo: 180
Standard Variant: Hunting Rifle
For those seeking long-range takedowns, the Hunting Rifle and its military spec equivalent are both exceptional choices. The Hunting Rifle has incredible accuracy, but the Military Sniper Rifle has better range, quicker firing and reloading, and a larger capacity.
If you have an excellent vantage point and you’re covering your teammates who are likely to be tackling foes within your field of fire, you can target multiple Infected and send a single bullet through them. Bullets also travel through some walls, which allows an accurate retaliation without a specific visual on a target (for example, if a teammate is struggling behind cover).
Both weapons are scoped, which further improves an already optimal accuracy. (Scoped combat is the way to utilize this weapon, despite its limiting your maximum speed.) A skilled sharpshooter can tag a number of foes quickly by moving from target to target, including Special Infected, to due to the high bullet damage. Special Infected foes that use range and height has an advantage, such as the Smoker, are nullified with these Rifles.
You can even knock back a Witch with the force of a sniper bullet (usually prior to her waking and dispatching her before she becomes a problem). Tanks are tackled with headshots from range; you have only their concrete-throwing to worry about.
Of course, the weapon is next to useless in close combat with a Tank, and even worse when it needs reloading, which takes a long time. If the rate of fire is too slow, try to find the military variant.
With single shots, friendly fire becomes less of an issue, but if a teammate strays into your target zone, they can be badly wounded. It is also extremely easy to be ambushed when using a Sniper Rifle. Keep a teammate near you to prevent this.
SMG
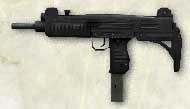
Damage: Low
Penetration: Low
Accuracy: Medium
Range: Short to Intermediate
Rate of Fire: Very high
Reload Time: Fast
Fire Mode: Automatic
Magazine Capacity: 50
Total Ammo: 650
Enhanced Variant: Silenced SMG
Silenced SMG
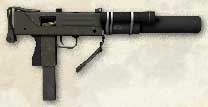
Damage: Low
Penetration: Low
Accuracy: Medium
Range: Medium
Rate of Fire: High
Reload Time: Short
Fire Mode: Automatic
Magazine Capacity: 50
Total Ammo: 650
Standard Variant: SMG
If you require a low-damage, rapid-firing weapon in either noisy or almost-silence variants, the SMG and Silenced SMG are both excellent choices. The Silenced SMG is obviously better to use when you don’t want to attract enemy attention (near Witches, or when you’re racing through a campaign), but the silencer slows the firing speed slightly.
Both SMG variants are great to use, but Assault Rifles are more powerful and considered a better bet, if you can find one. However, you can’t beat the rate of fire of an SMG, which naturally means you need to keep a watchful eye on your ammunition depletion.
The SMG is good alternative to any of the Shotguns when you’re moving through building interiors and you’re facing close- to mid-range combat. Due to its automatic firing nature, shoot the SMG in bursts so you don’t kill a foe and continue to rake the corpse needlessly with valuable bullets.
Liaise with the rest of your teammates so that you can keep as much of the weapon’s ammunition conserved for as long as possible. Let a Shotgun-wielding friend take point, move and crouch so foes fire above your head, and whip out a Melee Weapon when facing more than three foes at close-combat range.
Continue to perform with pairs of weapons that work well together, such as arming yourself with an SMG for interior takedowns and alleyway strafing, while your friend wields an Assault Rifle and tackles foes a longer distance away. Also remember the Silenced SMG can allow you to pass through areas where foes haven’t seen you without causing a ruckus—a great help if your team is low on items.
M-16 Assault Rifle
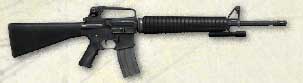
Damage: Medium
Penetration: High
Accuracy: High
Range: Short to long
Rate of Fire: High
Reload Time: Fast
Fire Mode: Automatic
Magazine Capacity: 50
Total Ammo: 360
Enhanced Variant: Desert Rifle
Desert Rifle
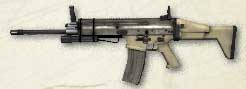
Damage: Medium
Penetration: Medium
Accuracy: Medium
Range: Medium
Rate of Fire: Medium
Reload Time: Medium
Fire Mode: 3-round burst
Magazine Capacity: 60
Total Ammo: 360
Standard Variant: M-16 Assault Rifle
If Shotguns are excellent in close combat and Sniper Rifles are advantageous at long range, the M-16 and Desert Assault Rifle variants are fantastic, multifunctional, general-purpose Primary Weapons that are useful at most ranges.
The M-16 and Desert Rifle serve this purpose well. The M-16 is perfect for every situation, while the Desert Rifle is great for quick bursts of bullets designed to cut a Common Infected or weaker Special Infected down without having to manually fire two to three shots, which is how many it usually takes to drop an enemy.
The Desert Rifle is great because you can fire the single, three-shot bursts quickly, cutting a Common foe down no matter what the range (assuming accurate strikes are inflicted), before rapidly retargeting and repeating the process.
These weapons are mainly used to tag foes at medium range, but with similar penetration potential as the Hunting Rifle and no accuracy problems at range like you have with the Shotgun, the Assault Rifles can be used with a steady aim to bring down foes from long range.
This versatility means the weapon can be used to cut down foes in narrow, close, or interior combat situations as well. Because it can rattle off shots faster than other weapons and the damage impact is high, this is a good choice for tackling foes with higher toughness, too, such as Chargers and Tanks.
Because these Rifles are useful in almost every situation, be careful not to expend too much ammunition. With the M-16 or Desert Rifle, you usually run out of bullets at a faster rate than other with weapons. Conserve your ammo by using Melee Weapons during close-combat fighting, and aim at the heads of foes, especially at longer ranges.
AK47
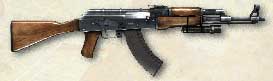
Damage: High
Penetration: Medium
Accuracy: Low
Range: Medium
Rate of Fire: Medium
Reload Time: Fast
Fire Mode: Automatic
Magazine Capacity: 40
Total Ammo: 360
Standard Variant: None
The AK47 is a great alternative to the M-16 and Desert Rifle, although it isn’t nearly as accurate, has a slower rate of fire, and a smaller clip size.
The AK47 shares many of the assets of the other Assault Rifles. It is flexible enough to be employed in a wide variety of situations (except for long-range shooting due to its inaccuracy). It is a good Special Infected-killing device at ranges closer than medium.
This weapon’s biggest strengths are the automatic firing mode and the damage it causes. It helps your team immensely if you saunter into a Tank battle using one of these to pepper the beast’s head with bullets. Firing without the need to pull the trigger again and again means you can rapidly rake foes until they fall or you run out of bullets, which doesn’t happen as quickly as you’d think, but is still an issue to worry about.
Grenade Launcher
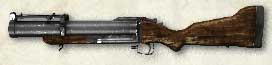
Damage: Very High
Penetration: N/A
Accuracy: Low
Range: Long
Rate of Fire: Very slow
Reload Time: N/A
Fire Mode: Single-shot
Magazine Capacity: 1
Total Ammo: 30
Enhanced Variant: None
Think of the Grenade Launcher as a multiple-shot, instantly exploding Pipe Bomb. It fires a single, arcing projectile grenade that lands with a “thunk” and promptly explodes. Point the weapon higher or lower before firing to increase or decrease the angle of the launch and, therefore, the distance the grenade travels.
The exploding grenade instantly liquefies Common Infected and usually delivers terminal blows to all Special Infected except Tanks or Witches, although it is incredibly effective against them as well.
The effectiveness of this weapon is completely dependent on the competence of the user. Because the grenade takes time to reach its target, you should fire at where the target will be, and not where it is when you launch the grenade. The grenade launcher uses a different ammo type than the other weapons. It can’t be replenished by ammo piles. Once it runs out, it’s done.
The Grenade Launcher is a mid- to long-range weapon only. You might as well point the weapon at your feet and blow your feet off—this is just as effective as attempting to fire a Grenade Launcher when you’re swarmed by foes. SWitch to a Pistol or Melee Weapon at once!
The Grenade Launcher is designed to provide hard-hitting supporting fire to the rest of your team. It doesn’t mean accidentally hitting your team, or you’ll be responsible for more Survivor deaths than the Infected. One good thing is that it isn’t easy to cause self-harm with this weapon.
The Grenade Launcher is useless (and extremely dangerous) in narrow, enclosed spaces. Use it in wider expanses with a good view and no scenery to block your grenade’s path.