
Left 4 Dead 2 Guide Essentials The Infected
The Charger
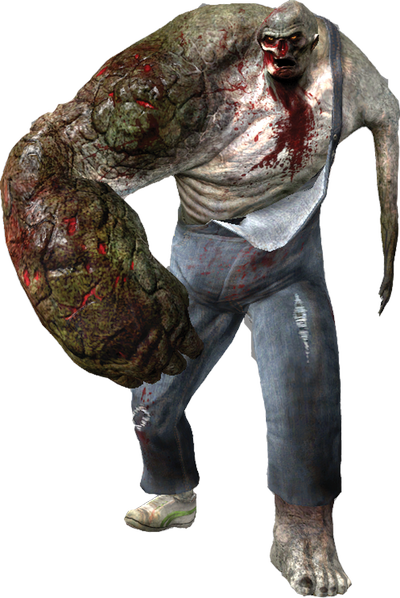
Primary Attack: Charge (any range)
Secondary Attack: Claw (short range)
Strengths: Quick; Devestating in straight lines; inflicts powerful and painful strikes quickly
Weaknesses: The charge itself is a straight-line rampage. You cannot steer to the left and right, and therefore must line up your charge early and be accurate. Otherwise you’re just another mutation dashing about, waiting to be peppered with gunfire.
Audible Clues: Trumpeting (the Charger is picking up speed and heading your way)
Description: Horrifically mutated, the Charger uses its oversized right arm to its advantage, serving as an Infected battering ram. The Charger is an effective class for scattering huddled Survivors, separating them for attacks by other Infected. In addition to knocking over Survivors, the Charger also grabs Survivors and carries them away from their teammates, where it will then smash the humans into the ground until they are dead or can be saved by a teammate. The Charger favors its right side as its shrivelled left arm is a useless appendage.
Tactics For Survivors
- A mixture of trumpeting and baying can be heard when a Charger is nearby and accelerating toward your team. This sound is easily distinguishable, and you should look for a place to move to and gain a visual on the Charger.
- Use whatever defensive maneuvers you can to dive out of the way as the Charger rampages forward. A simple strafe is usually all you need to avoid this attack, as long as you notice it coming early enough.
- When you witness a Charger building up for its run, split your team up. If they are grouped together, the Charger may be able to hit multiple teammates, knocking them like bowling pins and damaging them all, as well as possibly carrying one away from the others.
- You are most prone to charges while moving through long, narrow streets with no room to strafe left or right. Because Chargers tend to pick these areas to launch their attack, you can at least expect it.
- The Charger is a large mass and easily struck. Usually, it’s advisable to aim at the head of your foe, which is fine unless the Charger is manhandling one of your team after a charge. In that case, attack it from its right side, so you’re blasting it in the back (or better yet, hitting the head from the side). That way, there’s less chance of striking your friend after the Charger is downed (and your friend isn’t damaged by your attacks during the rescue attempt).
- Save your friend! Like you would with other Special Infected that end their attack with a stationary finishing melee (such as the Hunter and Smoker), surround the foe and blast them from different angles. Shoot the Infected in the head if you can, but avoid the victim as much as possible. The Charger is at its most vulnerable after just missing a charge. Unload on it as it passes.
- Where you position yourself is incredibly important when trying to survive a Charger attack. Don’t simply wander out in the open (allowing the Charger to carry you far away), or position yourself on the edge of a ledge (or you’ll be struck and plummet to your death). When the trumpeting sounds, move to a location with a wall, vehicle, or scenery behind you to foil the Charger’s initial attack and keep you close to your friends if you’re struck.
Tactics For Infected
- The Charger serves to split up the quartet of Survivors, which is extremely helpful for other Special Infected types, who can then choose a lone human straggler and inflict damage on them that is likely to be much more effective.
- You can withstand a blast or two as you race forward toward a victim, but you’re not impervious to pain. Remember that simply running into a human won’t start the charge. You must actually start your Primary Attack.
- The Charge, which is accompanied by a trumpeting that would wake the dead, needs a specific area for best results. Separate the Survivors as much as possible. So charging into a nearby wall isn’t nearly as effective as waiting for your human foes to reach a long street, and then carrying one of them right to the far end for a pummeling.
- The charge itself is a straight-line rampage. You have very limiting steering to the left and right, and therefore must line up your charge early and be accurate. Otherwise you’re just another mutation dashing about, waiting to be peppered with gunfire.
- After the Charge, the pummeling you do is similar in many ways to the Hunter’s pounce-and-pin attack, although you are standing up and therefore easier to see and shoot at over vehicles. Try charging with your victim into an area where there’s a number of Common Infected that can add to the attack and shield you from the other Survivors, who are fighting their way to stop your pummeling. It takes around ten seconds to fully incapacitate a victim, although this varies depending on the length of the charge and the victim’s initial Health.
- Additionally, you can ignore Common Infected between you and your ally. Your charge knocks them away as you focus on ramming and crushing that Survivor. In fact, Horde attacks are actually helpful, as they keep your victims stationary and easily visible.
- Charger attacks are more frightening when attempted at higher elevations. If there’s a weak barrier (such as in the Dead Center mall) or none at all (such as the bridge in the Parish), the charge is all you need to send both of you off the edge!