
Prima Games eGuides
primagames.com Browse Redeem a code Help
Left 4 Dead 2 eGuide
Sign in My Guides

Sign in or create an account

We'll email you a link. No password needed, and if you don't have an account yet, the link makes one.

By creating an account or signing in, you agree to our Terms of Service and Privacy Policy.

Have a password?

Had an account on the old eGuides site, or a code from a printed guide? Help and troubleshooting

Sign in with a password

By signing in, you agree to our Terms of Service and Privacy Policy.

Check your email

A sign-in link is on its way. It works once and expires in 15 minutes. Open it and you're in, with an account if you didn't already have one.

Contents

  • Essentials
    • Display
      • The Screen
    • Game Modes
      • Introduction
      • Campaign
      • Realism
      • Versus
      • Survival
      • Scavenge
      • Single-Player
    • The A.I. Director
      • How It Works
    • Game Difficulty
      • About
    • Movement and Combat
      • On Maneuvers
      • Taking a Stance
      • Ranged Combat
      • Melee Combat
      • Health and Life
      • The Environment
    • Survival Tips and Tricks
      • Survivor General Tips
      • Infected General Tips
    • Survivors
      • The Cast
    • The Infected
      • Common Infected
      • Uncommon Infected
      • The Boomer
      • The Charger
      • The Hunter
      • The Jockey
      • The Smoker
      • The Spitter
      • The Tank
      • The Witch
    • Weapons and Equipment
      • Primary Weapons
      • Secondary Weapons
      • Mounted Weapons
      • Projectile Weapons (Belt Items)
      • Weapon Enhancements (Backpack Items)
      • Explosive Objects (Carry Only)
      • First Aid (Backpack Items)
      • Health Enhancements (Belt Items)
    • Achievements Appendix
      • Achievements
  • Walkthrough
    • Campaign Introduction
      • Looking 4 Guidance?
    • Dead Center
      • Dead Center Overview
      • Vannah Hotel Floor 8
      • Vannah Hotel Floor 7
      • Vannah Hotel Lobby
      • CEDA Quarantine & Overpass
      • Walkway To Whitaker’s
      • Maul Near Liberty Mall
      • Mall: Kappel’s and Middle Mezzanine
      • Mezzanine Mayhem
      • Security and Safe Rooms
      • Filling Up the Blue 22
    • Dark Carnival
      • Dark Carnival Overview
      • Highway & Off-Ramp
      • Whispering Oaks Ravine
      • Fairground Entrance
      • Chaos in Kiddieland
      • Murder at the Merry-Go-Round
      • Tunnel of Love
      • The Screaming Oak
      • The Barns
      • Barn Storming
      • The Concert
    • Swamp Fever
      • Swamp Fever Overview
      • Plank Country
      • Alligator Sanctuary
      • Rudimentary Pathways
      • Waterlogged Wade to Crash Site
      • Tracks Past the Shacks
      • Shanty Town Center
      • Shanty Town Bridge and Outskirts
      • Plantation Village
      • Plantation Mansion
    • Hard Rain
      • Hard Rain Overview
      • Burger Tank
      • Streets of Rage
      • Entrance and Refinery 1
      • Refinery 2, Plant Ruins, and Cane Field
      • Backtrack through Field, Plant, and Refinery
      • Retreat to the Safe Room
      • To the Safe Room on Second Street
      • Town Escape
    • The Parish
      • The Parish Overview
      • Bienville District
      • Bienville Park
      • Bedlam at the Bus Depot
      • Urban Flight
      • Sam’s Hot Impound Lot
      • The Cemetery of Saint Roche
      • One-Way Street and Jazz Club
      • Slaughter in the Quarter
      • Mayhem on the Mean Streets
      • A Bridge Too Far
      • Attack at the Military Evac
    • Scavenge Mode
      • Scavenge Mode: Basics
      • Dead Center: Atrium
      • Dark Carnival: Motel
      • Swamp Fever: Plank Country
      • Hard Rain: Milltown
      • Hard Rain: Sugar Mill
      • The Parish: Park
    • Survival Mode
      • Survival mode: Basics
      • Dead Center: Atrium
      • Dark Carnival: Motel
      • Dark Carnival: Stadium Gate
      • Dark Carnival: Concert
      • Swamp Fever: Plank Country
      • Swamp Fever: Plantation
      • Hard Rain: Burger Tank
      • Hard Rain: Sugar Mill
      • The Parish: Bus Depot
      • The Parish: Bridge
  • DLC
    • The Passing
      • New Features
      • Campaign: The Riverfront
      • Campaign: Streets & Alleyway
      • Campaign: The Park
      • Campaign: Pool Hall
      • Campaign: Pipe works
      • Campaign: River Tour
      • Campaign: The Sewers
      • Campaign: The Port
      • Scavenge Maps
      • Survival Maps
  • Video
    • The Basics: Top Ten Tips
    • Know Your Enemy (Part 1)
    • Know Your Enemy (Part 2)
    • Leave Them Dead: Weapons Detail
    • Tips Scavenge and Survival Modes
    • Campaign Tactics: Dead Center
    • Campaign Tactics: Dark Carnival
    • Campaign Tactics: Swamp Fever
    • Campaign Tactics: Hard Rain
    • Campaign Tactics: The Parish

Left 4 Dead 2 Guide › Essentials › Weapons and Equipment

Projectile Weapons (Belt Items)

Projectile Weapons

These three objects fit on your Belt with a Health enhancement item. Only one of them can be carried at a time. The projectiles are thrown and cause three interesting, and usually disgusting effects:

Molotov

Molotovs are useful for lobbing into an area you want to clear (such as a building that you suspect contains multiple foes or Special Infected), into a group of foes to set them on fire instantly, or into a location you want to prevent attacks coming from. The most strategic use is to figure out where a Horde is about to appear from (or spot it), lob the Molotov, and watch the Infected burn!

Of all three projectiles, the Molotov can be the most damaging if it impacts near your team. But it is excellent for removing Special Infected threats—watch a Witch stumble and fall, or a Tank quicken his pace. There’s no need to fire on flaming foes; they are burning to death without additional help.

Molotovs are extremely effective, unless you’re wading through parts of Swamp Fever or Hard Rain. The fire doesn’t burn well in water that isn’t very shallow. It also doesn’t affect CEDA Agents during Dead Center.

You can actively use the fire from a Molotov attack if you’re playing as Infected during Versus matches. Pull a Survivor through the flames when playing as a Smoker, steer or charge into fire with a Survivor in tow when playing as a Jockey or Charger, or rush into fire and then into a Survivor if you’re a Boomer, which forces your foes to get covered in your innards.

Pipe Bomb
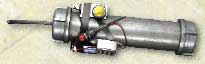
The Pipe Bomb is a densely packed explosive with a short fuse and a blinking light that emits a beeping sound. When thrown, even into water, the Pipe Bomb attracts all types of Common and Uncommon Infected, with the exception of Road Crew zombies in Hard Rain. Special Infected are unaffected by the sound; use explosive objects, Molotovs, or Bile Bombs.

After 5 to 10 seconds, the Pipe Bomb detonates, and the assembled zombies are torn apart in a fountain of blood and offal. Naturally, you want the most bang for your buck, so throw these when you’re being, or are about to be, swarmed by a Horde.

Mop up any Infected that were incoming at the time of the explosion. They are likely to be temporarily stunned. Special Infected (including Tanks) can be stunned, too, providing the explosion occurs when the Tank is nearby, but this is a rare occurrence.

This weapon is incredible for clearing out Common Infected, but it can also be used as an escape tool, with the dismemberment of foes as a secondary consideration. Clear an escape route, Safe Room entrance, or other location you wish to reach, if foes are blocking your path.

Bile Bomb
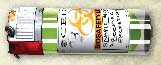
Also known as Boomer Bile, Bile Vial, or Vomit Jar, this small sample of Boomer Bile is perfect for attracting a Horde of Common Infected. Lob it far from your group and once the vial lands, it shatters, creating a small green cloud of Bile. Drop it at your feet, and it acts just like a Boomer vomit—so don’t.

Bile Bombs are found on the corpses of CEDA Agents (Dead Center), or randomly scattered throughout the stages you venture through.

Bile Bombs are incredibly useful for moving Common and Uncommon Infected away from a route, a downed friend, or other location you don’t want them to be in. After 15 to 20 seconds of the group scrabbling, the Bile cloud dissipates and the Infected turn on you again.

If you haven’t escaped, slaughter them all with your favorite (and usually ranged) weapons, thrown in a Pipe Bomb, or Molotov, or set off a Fuel Can or other explosive object.

Those Survivors with accurate throwing arms should lob these at Special Infected, who are then stormed and attacked by their usually friendly Common brethren. As you can imagine, this makes fighting more dangerous foes, such as Chargers, Tanks and Witches, much less frenzied.

The only downside is that Bile doesn’t harm the Common Infected, so you must expend ammunition to rake through the assembled group.

Keep reading with a free account

The first 3 sections of Left 4 Dead 2 are open to everyone. An account opens the rest of it, and every other guide in the archive. It's free, and there's nothing to buy.

Bought guides on the old Prima Games site? Your account and every guide you own moved here, so there's nothing to buy again. Sign in.

Create a free account Or browse our free guides

PreviousMounted Weapons NextWeapon Enhancements (Backpack Items)