
Tom Clancy's Ghost Recon Future Soldier Guide Walkthrough Ember Hunt
Extract with Osadze
Extract with Osadze

While moving back through the chapel, Kozak notices a red laser sight centered on his chest—Ambush! Kozak moves out of the way, taking cover behind a pillar on the left just before the bullets start flying. These enemies aren’t standard Russian soldiers. These are elite Raven’s Rock spec-ops units known as Bodarks. They’re equipped with a variety of weapons, including sniper rifles. Multiple snipers are in the chapel along high perches on the walls and ceiling. Locate and mark these enemies with focus-fire orders. Avoid taking on these snipers by yourself, because one sniper round can knock you flat on your back, requiring you to be healed by a teammate. It’s important to eliminate every sniper during your escape if you wish to complete the Countersniper Tactical challenge.
Enemy Profile: Bodark

Bodark snipers aren’t the only threat in the church. Keep an eye on the floor to spot Bodark infantry closing in on your position. These guys are equipped with Optical Camo, which makes them difficult to spot, especially if they’re not moving. Since the Cross-coms are down, you must rely on your own eyesight and Magnetic view to locate these threats. Sensors won’t work without the Cross-coms. Bodark troops are relentless, attacking aggressively along the church floor while attempting to flank your team. Advance to the altar using the cover swap method, then help your team clear the floor. Keep scanning the left and right sides of the church to watch for flanking maneuvers attempted by Bodarks armed with shotguns—don’t let these guys get behind you. From the altar, you can also spot more snipers. Issue focus-fire orders on them, and let your team take them out.
Weapon Challenge: Tight Burst


Wait for your teammates to advance before following suit. Always use the cover swap method to move from one piece of cover to the next. For best results, zigzag across the central aisle, rushing between the pillars on the left and right. As you near the exit, watch for more snipers posted on ledges above. While behind cover, issue focus-fire orders on these dangerous threats. Avoid engaging these guys on your own, as you’re likely to lose. Hold behind cover and help your teammates clear out the church before moving toward the exit.


Upon exiting the church, the fountain in the center of the courtyard is slammed with an incoming RPG round. Sprint toward the fountain and take cover next to it. Just ahead there’s a sniper and RPG soldier on a distant rooftop. Immediately mark both enemies for your teammates and open fire—take out the RPG soldier before he can fire another rocket in your direction. Next, turn to the right to locate two more snipers on another rooftop. Once again, issue a focus-fire order on both enemies and help your teammates take them out.

Once all four rooftop threats are eliminated, cross the courtyard and drop down onto the street. Take cover behind the nearby concrete barrier and look for another RPG soldier on the rooftop ahead. Issue a focus-fire order on him, then open fire before he can send a rocket in your direction. While your team focuses their attention on enemies advancing along the street, cut through the alley on the right. Be prepared to gun down a Bodark moving through this alley, not far from the ammo crate. While in the alley, activate your Magnetic view. This allows you to spot snipers and RPG soldiers posted on the nearby buildings without exposing yourself to them. Issue focus fire orders on these enemies, and wait for your team to take them out before stepping back out onto the street.


Rejoin your team in the street and continue the advance toward the extraction site. Just ahead, a couple of GAZ-2330 light vehicles appear in the road and unload some Bodarks. Take cover behind the large concrete block on the right side of the street and open fire on the new arrivals. With the Cross-coms down, it makes it difficult to spot these enemies, especially as they hide behind the vehicles and other pieces of cover. So activate your Magnetic view to reveal enemy locations. With sustained automatic fire, you can even destroy the vehicles they’re hiding behind.

Next, swap cover to the concrete barrier in the middle of the street, not far from the two GAZ-2330s. Here you can attack more Bodark troops further down the street. But the most significant threat are a few RPG soldiers in the distance. Activate the Magnetic view to get a better read on the smoke trails left behind from each incoming rocket. Trace the smoke trails of the rockets back to each shooter’s location and issue a focus-fire order. While being attacked by rockets, stay clear of the vehicles parked along the sides of the street. All it takes is one RPG hit to cause these vehicles to explode.

Tactical Challenge: Counter Sniper


Continue advancing through the street, swapping cover along the way while engaging the remaining Bodarks. When Sergeant Osadze races ahead, the path is clear. Regroup with your team at a set of double doors on the right side of the street—you must advance through this damaged building to reach the extraction point. Follow your team through the building, hopping over low walls and crawling through small gaps. Along the way, look for a weapon box on the left. This box contains an L22A2 PDR, an Mk40GL Explosive grenade launcher, an Ultimax Mk5 LMG, an Mk48 LMG, and a PDR-C PDR. Consider swapping out your secondary weapon for the Mk40GL grenade launcher. The extra firepower afforded by this grenade launcher will come in handy later. Suppressors are no longer necessary.
Extraction Point
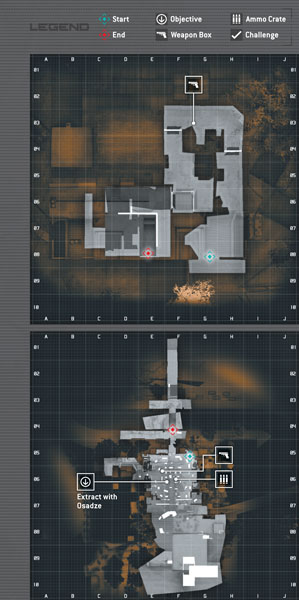


Exit the building and head toward the extraction point in the middle of the plaza. Overlord reports that a Georgian helicopter is on its way. The Ghosts deploy a flare in an effort to guide the helicopter through the mist. But instead, the flare attracts an incoming RPG. Overlord reports that multiple hostiles are closing in on the extraction point. Immediately take cover and open fire on the incoming Russian troops. The Cross-coms are still offline, so you need to rely on your eyesight and Magnetic view to keep tabs on these enemies. Watch out for flanking maneuvers as the enemies fan out across the plaza. If necessary, retreat within the small shelter in the center of the plaza to avoid being flanked. The Mk40GL grenade launcher is perfect for taking out large groups of enemies. It can also explode vehicles, like the incoming GAZ-2330s, with one hit. When you’re not blasting enemies with the grenade launcher, open up with your LMG. If you haven’t completed the Tight Burst Weapon challenge yet, this is a good spot to score five kills with one burst. For best results, target large groups of enemy riflemen as they advance through the street. If you run low on ammo or grenades, you can get more from the ammo crates in the center of the plaza.

Shortly after eliminating the Russian attackers, the Georgian helicopter pilot advises that he’s near the extraction point. But due to enemy activity, he can’t loiter long. After the helicopter flies into view, it hovers near the edge of the plaza. Suddenly an RPG round streaks toward the chopper, causing it to explode. It looks like the Ghosts and Osadze will need to find another way out.