Prima Games eGuides
primagames.com Browse Redeem a code Help
Titanfall eGuide
Sign in My Guides

Sign in or create an account

We'll email you a link. No password needed, and if you don't have an account yet, the link makes one.

By creating an account or signing in, you agree to our Terms of Service and Privacy Policy.

Have a password?

Had an account on the old eGuides site, or a code from a printed guide? Help and troubleshooting

Sign in with a password

By signing in, you agree to our Terms of Service and Privacy Policy.

Check your email

A sign-in link is on its way. It works once and expires in 15 minutes. Open it and you're in, with an account if you didn't already have one.

Contents

  • Titans
    • Introduction
    • Titan Customization
    • Chassis
    • Primary Weapons
      • Triple Threat
      • Arc Cannon
      • Plasma Railgun
      • XO-16 Chaingun
      • Quad Rocket
      • 40mm Cannon
      • Introduction
    • Titan Ordnance
      • Multi-Target Missile System
      • Cluster Missile
      • Slaved Warheads
      • Rocket Salvo
      • Introduction
    • Titan Tactical Abilities
      • Tactical Abilities
      • Tier 1 Kits
      • Tier 2 Kits
    • Advanced Titan Customization
  • Quick Reference
    • Scoring
    • Progression and unlocks
    • Gen Progression
    • Challenges
    • Burn Cards
    • Achievements
    • Developer Tips
    • Meet The Pros
  • Behind the Scenes
    • Titanfall: Behind the Scenes at Respawn Entertainment
    • Starting from Scratch: Vince Zampella
    • Community: Abbie Heppe
    • Art: Joel Emslie
    • Game Design: Justin Hendry
    • Animation: Paul Messerly
    • Weaponry: Ryan Lastimosa
    • Audio: Erik Kraber
    • Source Engine and Matchmaking: Jon Shiring
    • Campaign: Steve Fukuda
  • Video
    • Training Ground (video)
    • Smuggler's Cove (video)
    • Rise (video)
    • Relic (video)
    • Overlook (video)
    • Outpost 207 (video)
    • Nexus (video)
    • Lagoon (video)
    • Fracture (video)
    • Corporate (video)
    • Colony (video)
    • Boneyard (video)
    • Angel City (video)
    • Airbase (video)
  • DLC
    • Frontiers Edge
      • Whats New
      • DIG SITE
        • Map Overview
        • Capture the Flag
        • Hardpoint
        • Last Titan Standing
      • HAVEN
        • Map Overview
        • Capture the Flag
        • Hardpoint
        • Last Titan Standing
      • EXPORT
        • Map Overview
        • Capture the Flag
        • Hardpoint
        • Last Titan Standing
    • Expedition
      • WAR GAMES
        • Last Titan Standing
        • Hardpoint
        • Capture the Flag
        • Map Overview
      • SWAMPLAND
        • Last Titan Standing
        • Hardpoint
        • Capture the Flag
        • Map Overview
      • RUNOFF
        • Last Titan Standing
        • Hardpoint
        • Capture the Flag
        • Map Overview
  • Training
    • Introduction
    • Controls
    • Interface
    • Welcome to the Frontier: Training
    • Pilot Fundamentals
    • Titan Fundamentals
    • Game Modes
    • Persistence and Progression
    • Advanced Combat Tactics
  • Introduction
    • The Frontier
    • History of the Conflict
    • The Militia
    • The IMC
    • Titanfall Tech
    • Campaign
  • Maps
    • Introduction
    • Demeter
      • Introduction
      • Map Overview
      • Attrition
      • Capture the Flag
      • Hardpoint Domination
      • Last Titan Standing
      • Pilot Hunter
    • Corporate
      • Introduction
      • Map Overview
      • Attrition
      • Capture the Flag
      • Hardpoint Domination
      • Last Titan Standing
      • Pilot Hunter
    • Colony
      • Introduction
      • Map Overview
      • Attrition
      • Capture the Flag
      • Hardpoint Domination
      • Last Titan Standing
      • Pilot Hunter
    • Boneyard
      • Introduction
      • Map Overview
      • Attrition
      • Capture the Flag
      • Hardpoint Domination
      • Last Titan Standing
      • Pilot Hunter
    • Angel City
      • Introduction
      • Map Overview
      • Attrition
      • Capture the Flag
      • Hardpoint Domination
      • Last Titan Standing
      • Pilot Hunter
    • Airbase
      • Introduction
      • Map Overview
      • Attrition
      • Capture the Flag
      • Hardpoint Domination
      • Last Titan Standing
      • Pilot Hunter
    • Relic
      • Introduction
      • Map Overview
      • Attrition
      • Capture the Flag
      • Hardpoint Domination
      • Last Titan Standing
      • Pilot Hunter
    • Overlook
      • Introduction
      • Map Overview
      • Attrition
      • Capture the Flag
      • Hardpoint Domination
      • Last Titan Standing
      • Pilot Hunter
    • Outpost 207
      • Introduction
      • Map Overview
      • Attrition
      • Capture the Flag
      • Hardpoint Domination
      • Last Titan Standing
      • Pilot Hunter
    • Nexus
      • Introduction
      • Map Overview
      • Attrition
      • Capture the Flag
      • Hardpoint Domination
      • Last Titan Standing
      • Pilot Hunter
    • Lagoon
      • Introduction
      • Map Overview
      • Attrition
      • Capture the Flag
      • Hardpoint Domination
      • Last Titan Standing
      • Pilot Hunter
    • Fracture
      • Introduction
      • Map Overview
      • Attrition
      • Capture the Flag
      • Hardpoint Domination
      • Last Titan Standing
      • Pilot Hunter
    • Rise
      • Introduction
      • Map Overview
      • Attrition
      • Capture the Flag
      • Hardpoint Domination
      • Last Titan Standing
      • Pilot Hunter
    • Runoff (Expedition)
      • Last Titan Standing
      • Hardpoint
      • Capture the Flag
      • Map Overview
    • Smugglers Cove
      • Introduction
      • Map Overview
      • Attrition
      • Capture the Flag
      • Hardpoint Domination
      • Last Titan Standing
      • Pilot Hunter
    • Swampland (Expedition)
      • Last Titan Standing
      • Hardpoint
      • Capture the Flag
      • Map Overview
    • Training Ground
      • Introduction
      • Map Overview
      • Attrition
      • Capture the Flag
      • Hardpoint Domination
      • Last Titan Standing
      • Pilot Hunter
    • War Games (Expedition)
      • Last Titan Standing
      • Hardpoint
      • Capture the Flag
      • Map Overview
  • Pilots
    • Introduction
    • Pilot Customization
    • Primary Weapons
      • Introduction
      • R-101C
      • EVA-8 Shotgun
      • Smart Pistol MK5
      • R-97 Compact SMG
      • Longbow-DMR Sniper
      • G2A4 Rifle
      • Hemlok BF-R
      • C.A.R. SMG
      • Spitfire LMG
      • Kraber-AP Sniper
    • Sidearms
      • B3 Wingman
      • Hammond P2011
      • RE-45 Autopistol
      • Introduction
    • Anti-Titan Weapons
      • Charge Rifle
      • Mag Launcher
      • Sidewinder
      • Archer Heavy Rocket
      • Introduction
    • Ordnance
      • Arc Mine
      • Satchel Charge
      • Arc Grenade
      • Frag Grenade
      • Introduction
    • Pilot Tactical Abilities
      • Tier 2 Kits
      • Tier 1 Kits
      • Tactical Abilities
    • Advanced Pilot Customization
  • Patch Notes
    • Patch Notes

Titanfall Guide › Maps › Airbase

Capture the Flag

Note

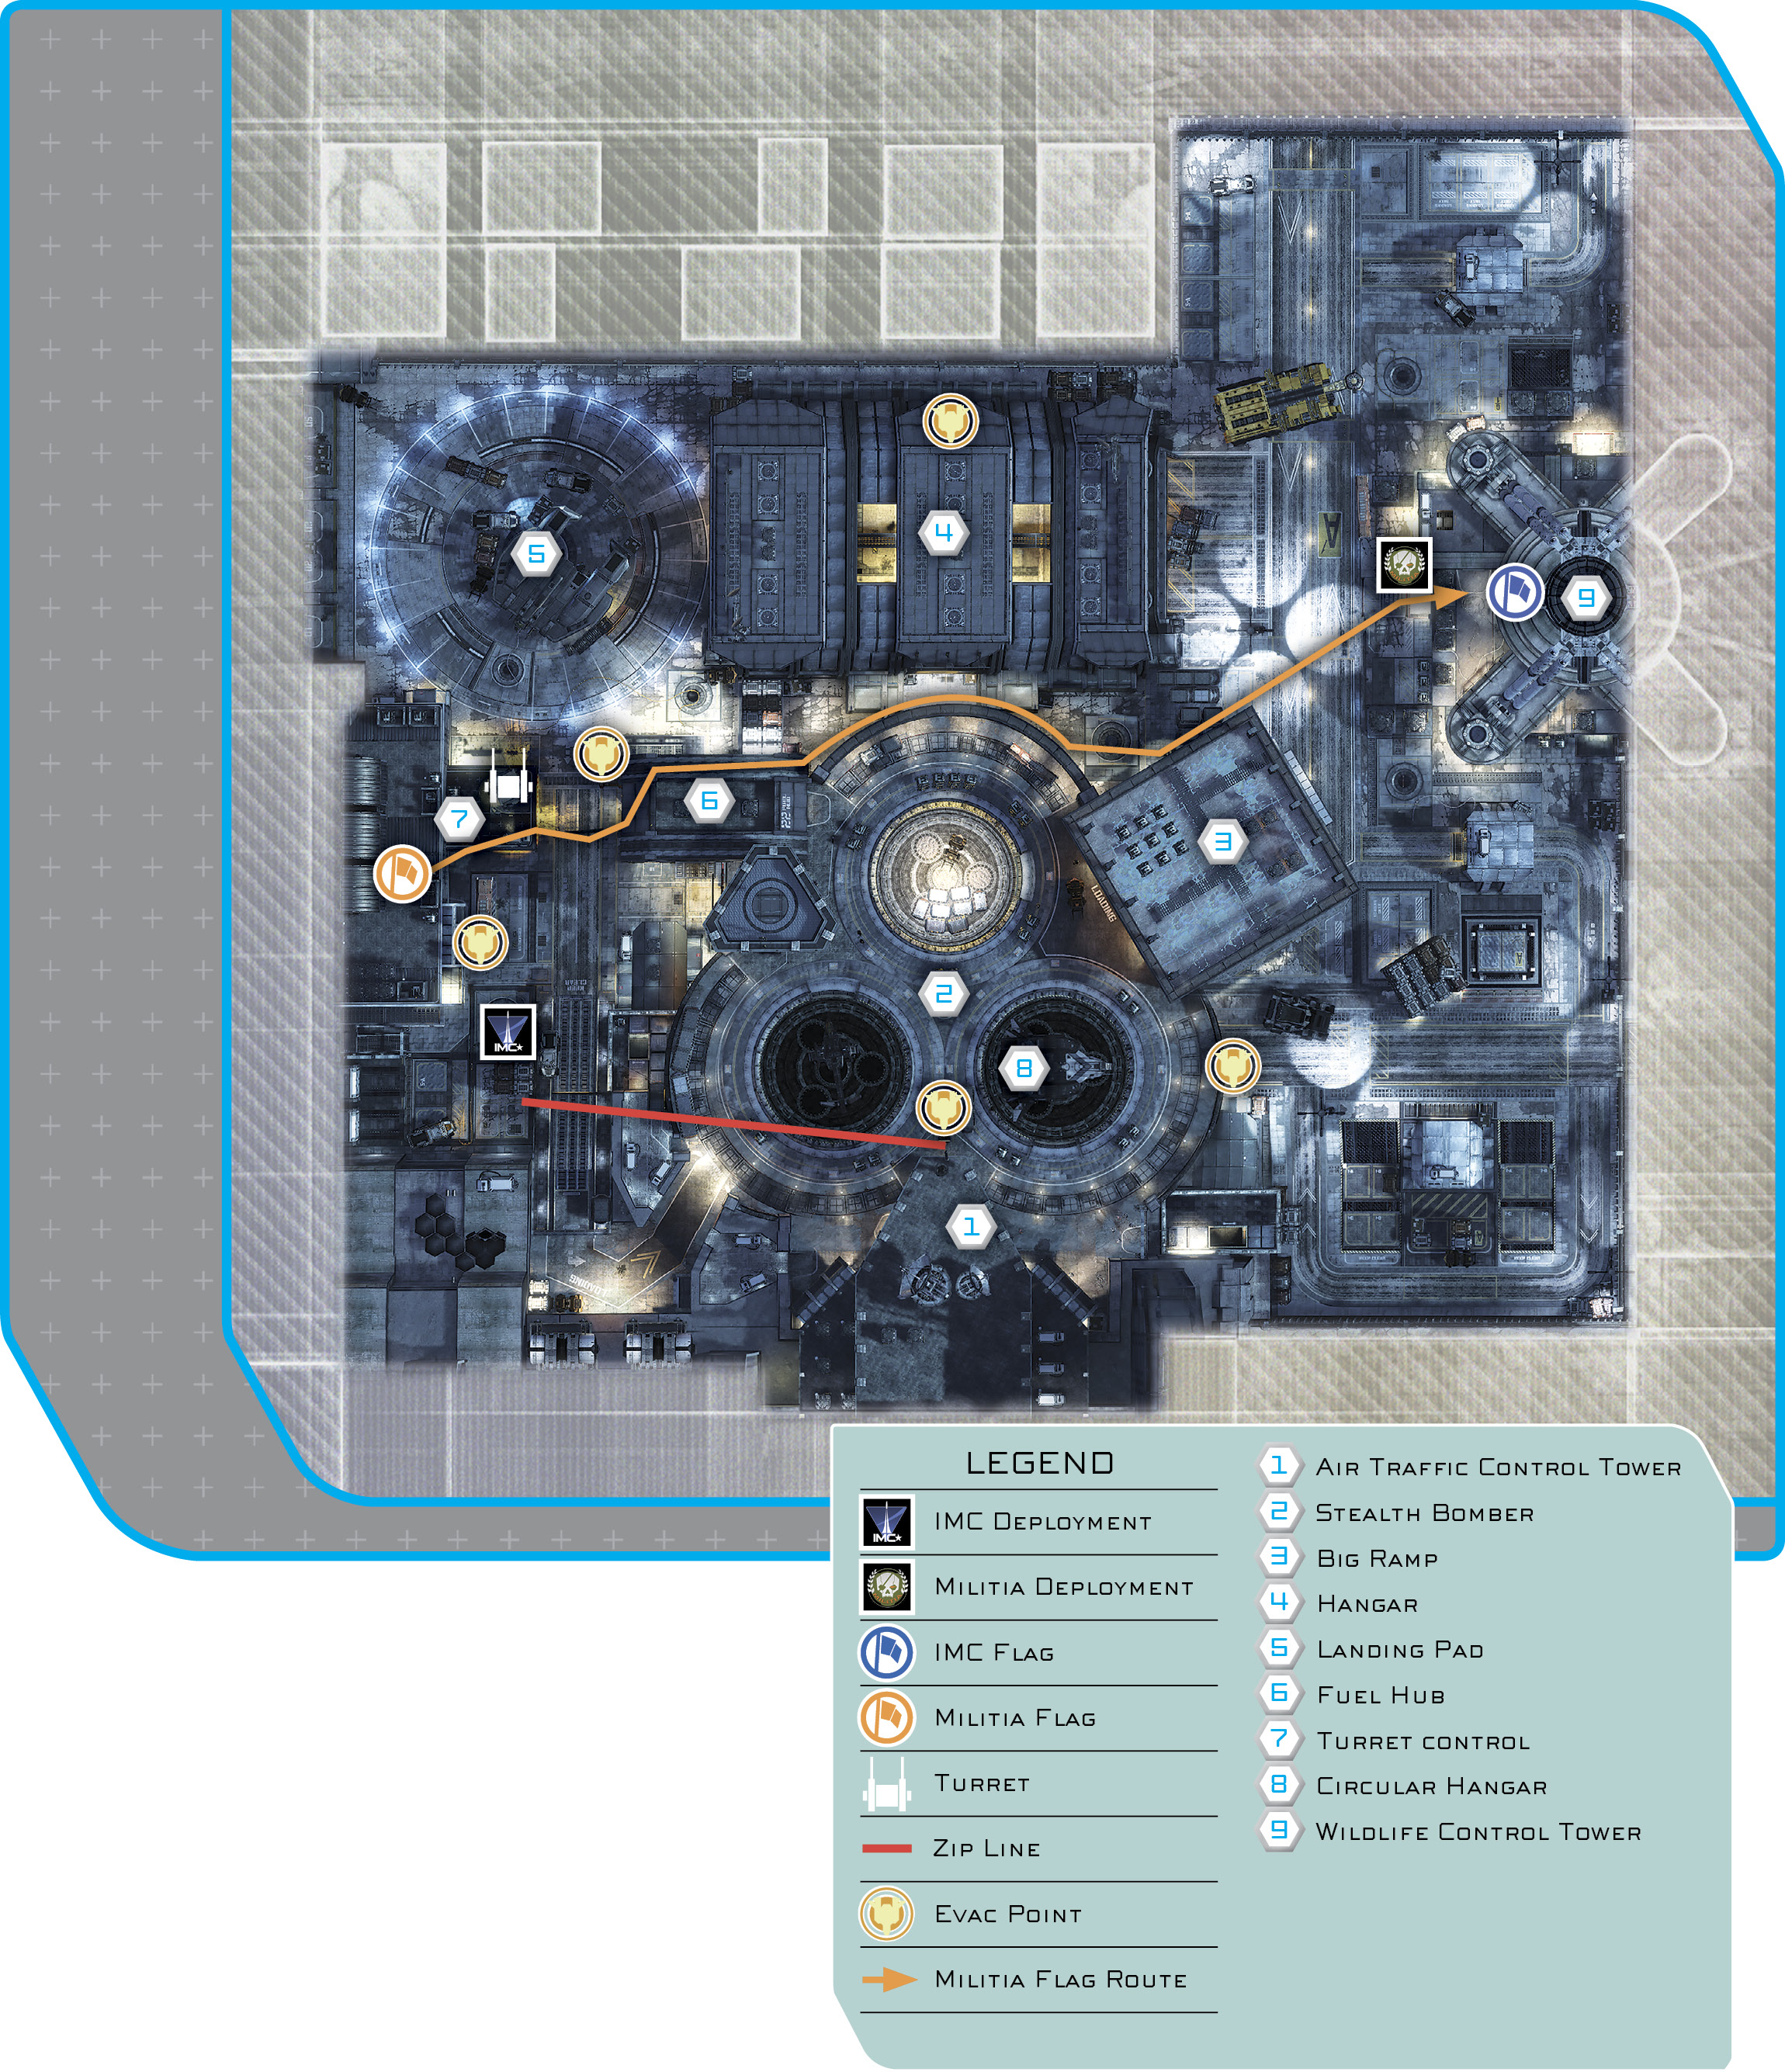
Initial flags, routes, and deployment areas shown. Factions switch sides at halftime.

Tactics

  • Each flag is placed within structures promoting close-quarter combat. One flag is inside the Turret Control while the other is inside the Wildlife Control Tower. Since they are placed in these structures, throw Arc Mines around the area to weaken or kill enemies who sneak in. Remember, it takes two Arc Mines to kill a enemy Pilot, but if an enemy Pilot is sprinting by, a Pilot will survive the blast sometimes.
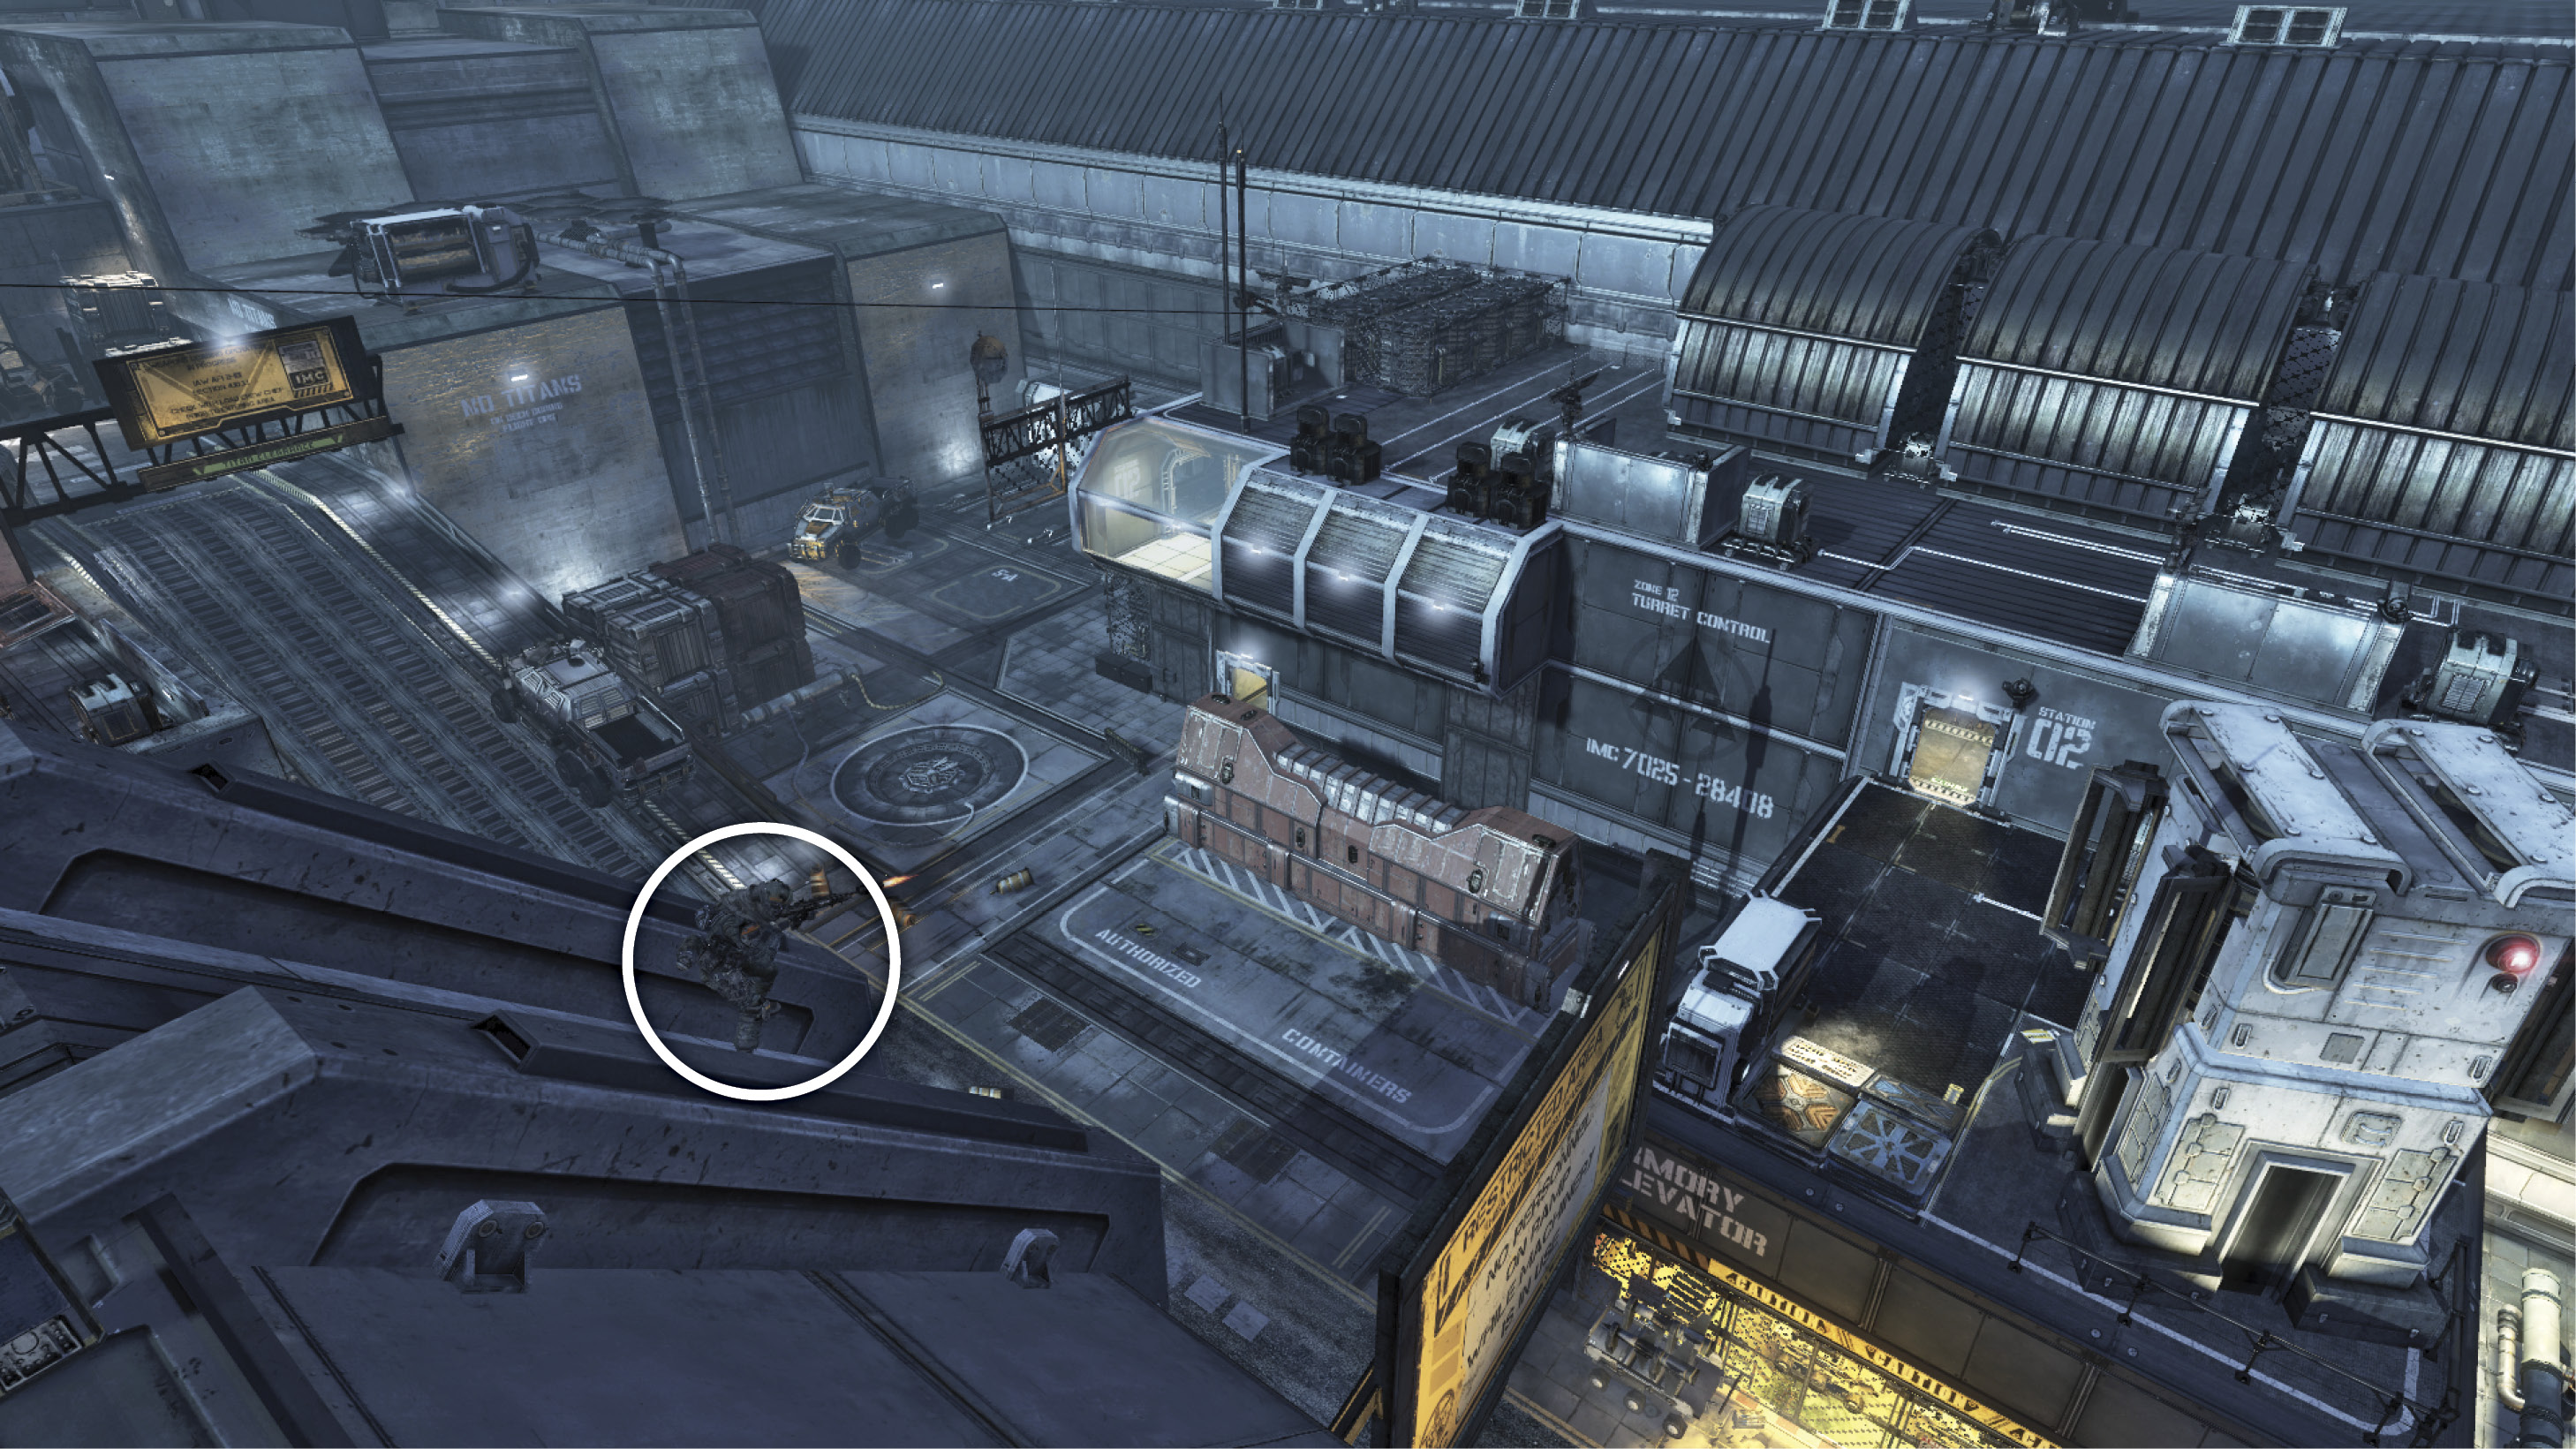
  • A great location to defend the flag inside the Turret Control is the top of the Fuel Hub. The roof of the Fuel Hub has metal slants that provide you with cover and a view to spot enemy Pilots entering or exiting the flag area. If you move to the very top, you can spot enemies at a distance and take them out before they get close to the Turret Control.
Pro Tip: StrongSide

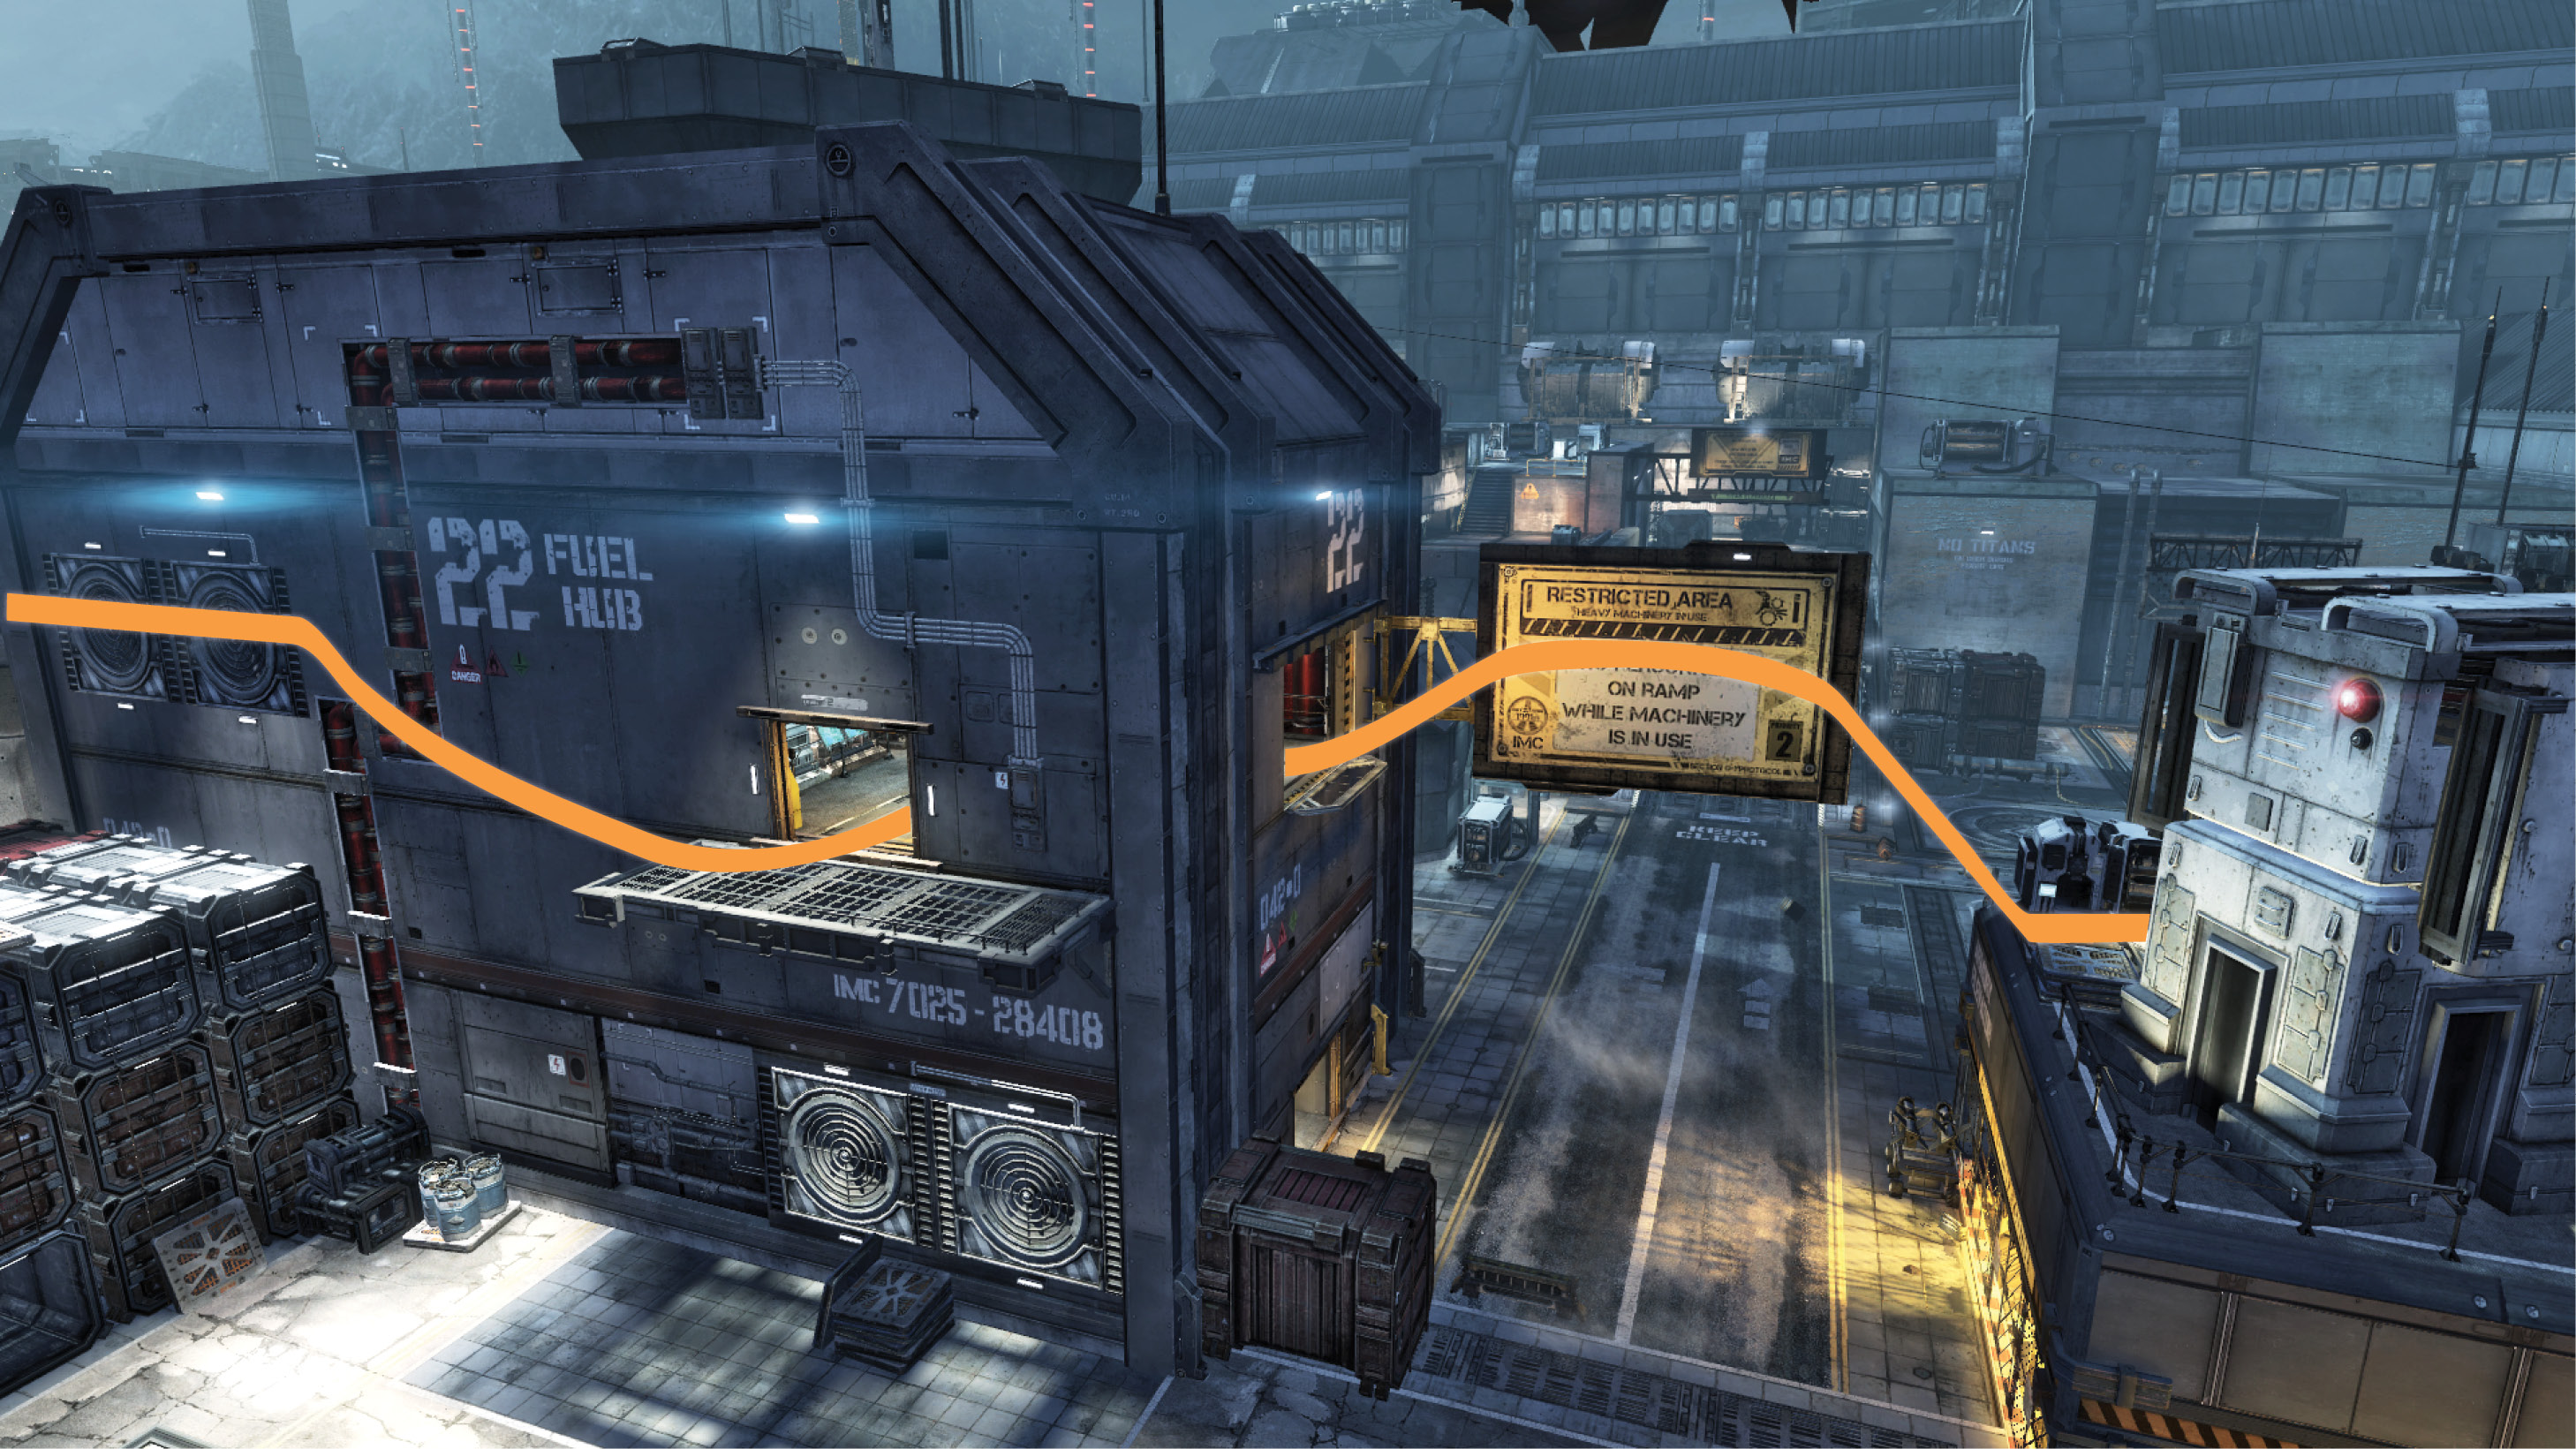
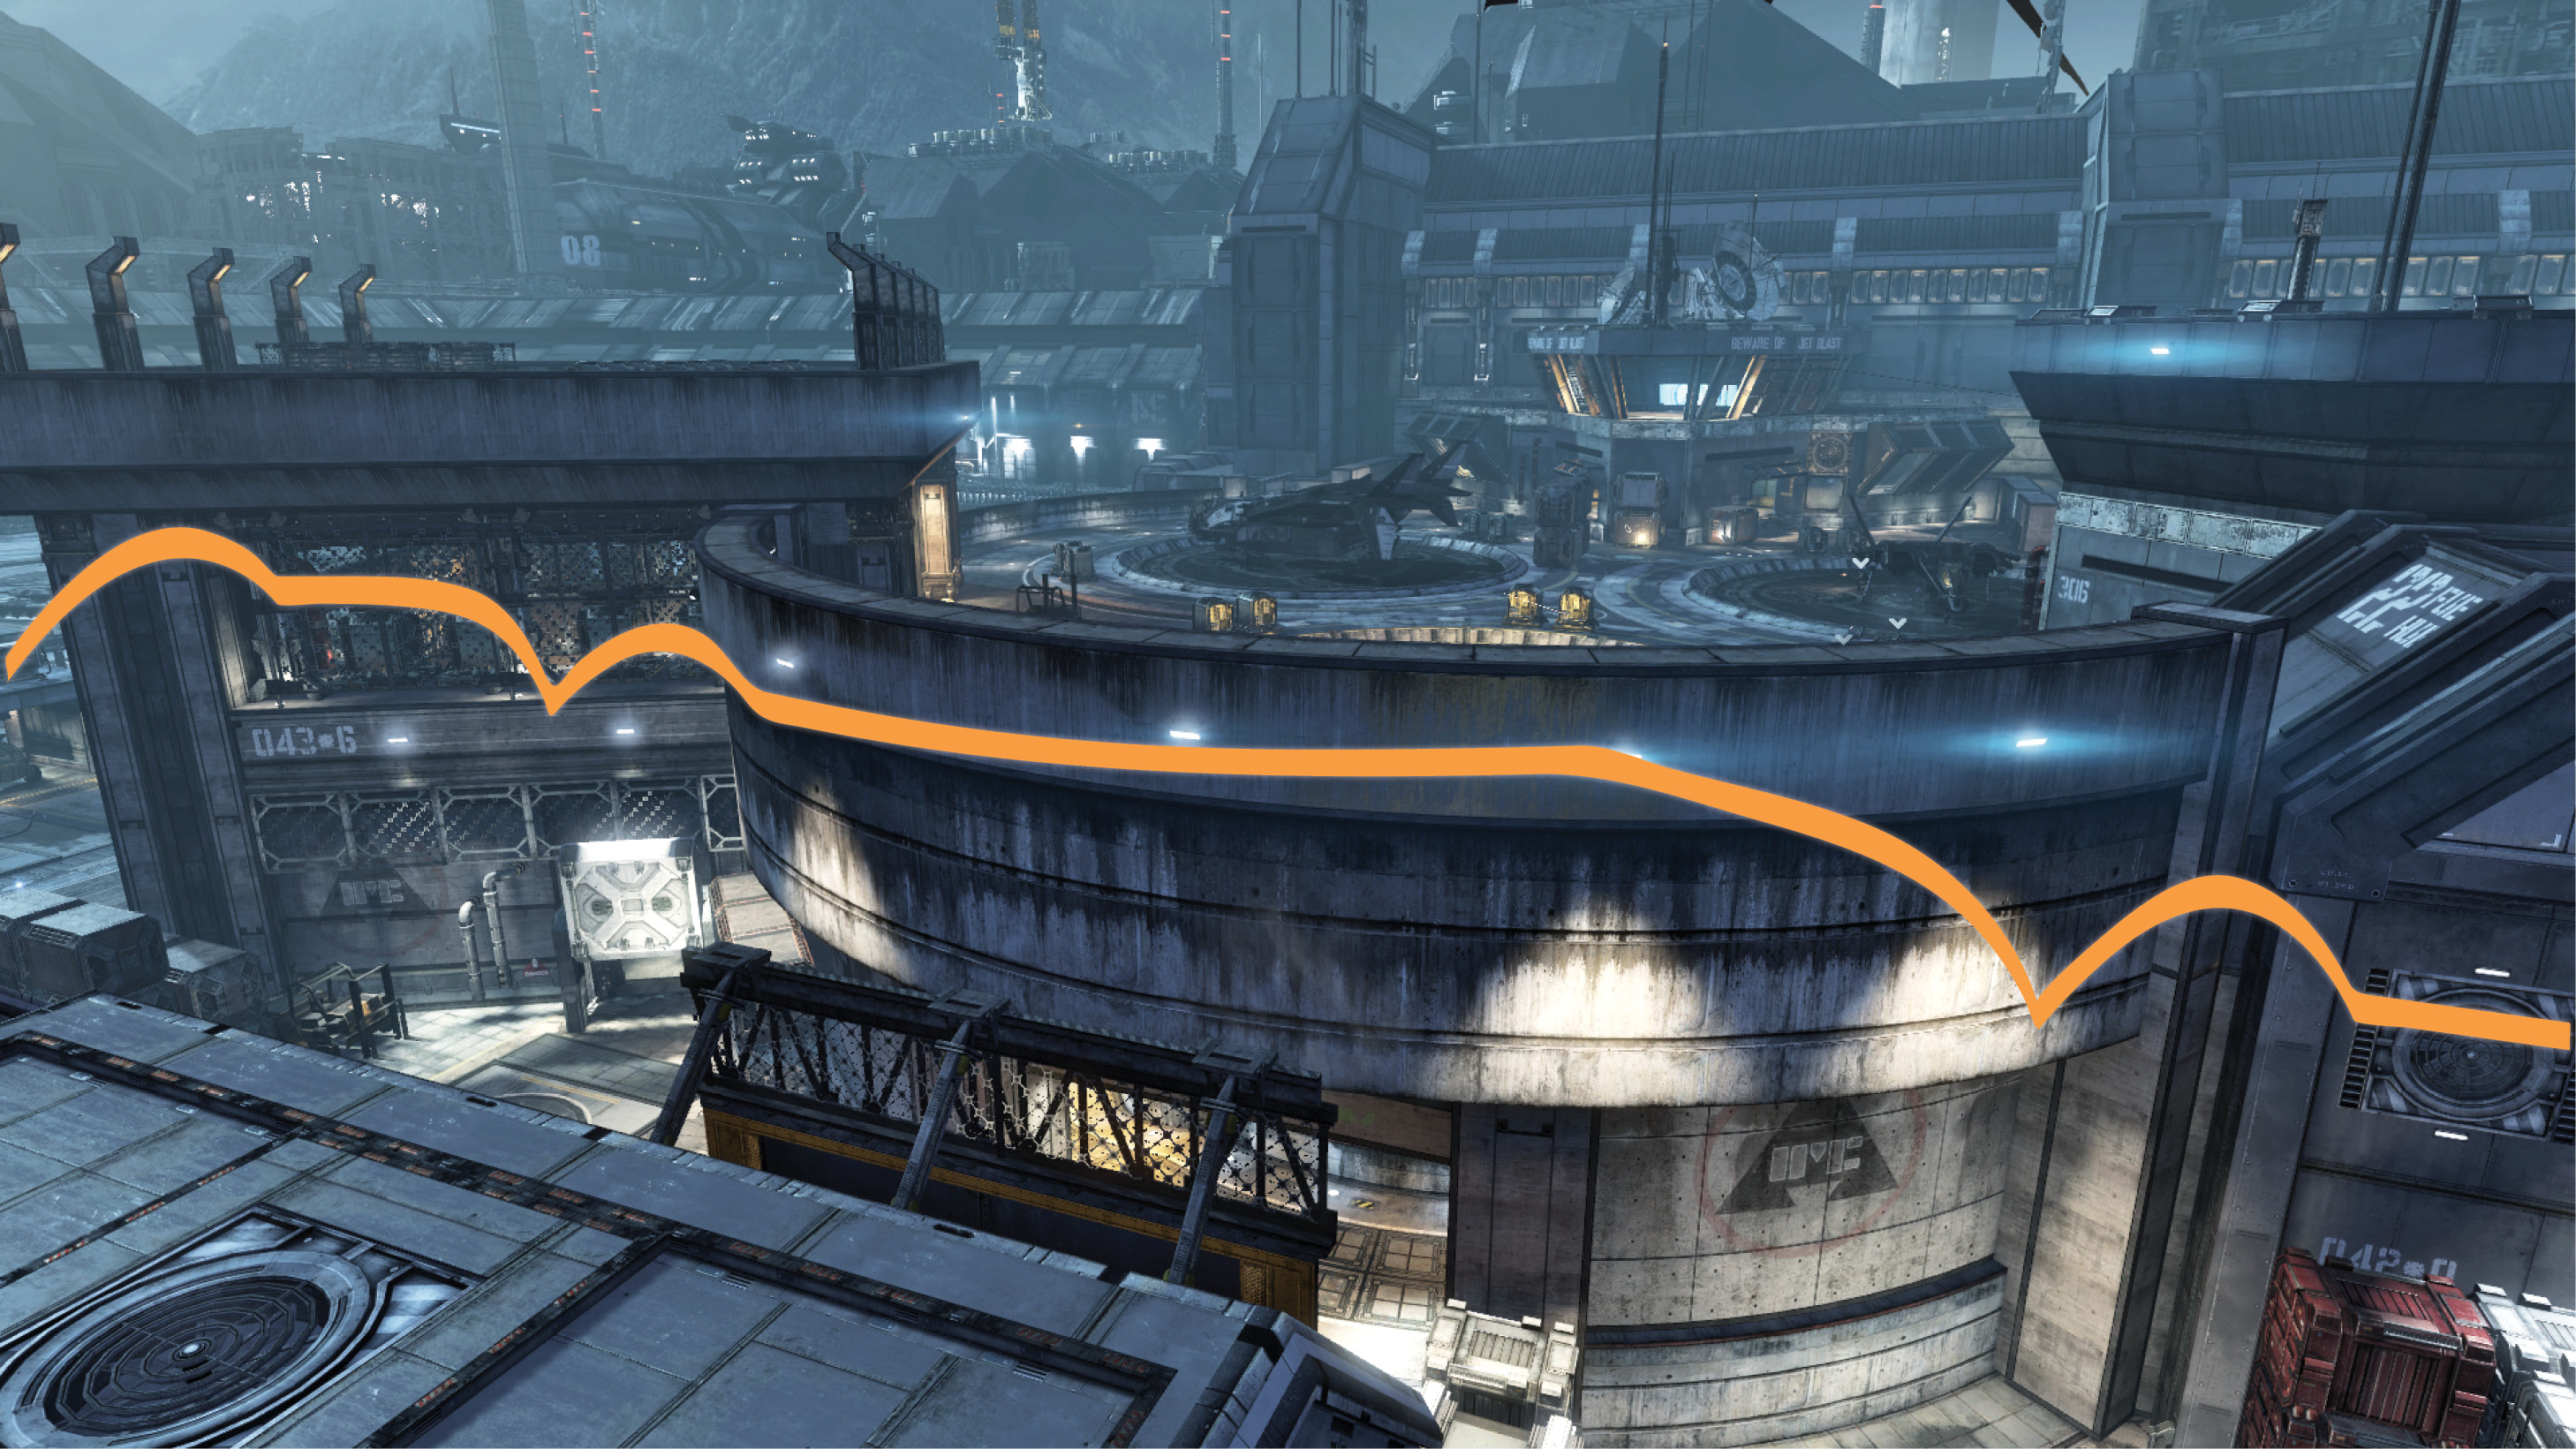
While having Enhanced Parkour equipped, using these wall runs will lead to an extremely fast flag route to run the flag from the Turret Control back to your base. Start out by wall running onto the yellow sign and then running into the Fuel Hub. Now make your way out the other balcony facing the Hangar. Make your next wall run on the wall of the Fuel Hub towards the Landing Pads. Jump and wall run onto the wall of the Landing Pads and wall run all the way to the Big Ramp. Once you’re wall running on the Big Ramp, wait until the last second to jump off, allowing you to get more distance towards your base. Your team should be near the base to assist you if any enemies are nearby.

Pro Tip: Flamesword

Position your Pilot on the roof of the Big Ramp with a sniper when going for the flag in the Wildlife Control Tower. A Pilot will be able to get easy kills and communicate to the team where enemies are moving to. Locking down this area allows your team to move in and grab a flag. Enemy Pilots will forget about you to kill the player with the flag. Take advantage of this and shoot the enemies as they turn their backs to you.

  • Having a Titan nearby when grabbing the flag inside the Turret Control can lead to a very fast capture. Grab the flag, immediately board your Titan, and take the passage underneath the Landing Pads. Underneath the Landing Pads provides a covered area and that is a good location for a one-on-one Titan battle if you have Particle Wall equipped. Kill any pursuing enemies and then continue back to your base for the capture. If you get caught underneath the Landing Pads in the Storage area, take your Titan underneath the landing pad with an opening. Here you’ll want to eject from your Titan out through the opening of the landing pad and land on top of the roof of the Big Ramp. On top of the Big Ramp, you’ll be able to wait for your teammates who will then assist you back to your base.
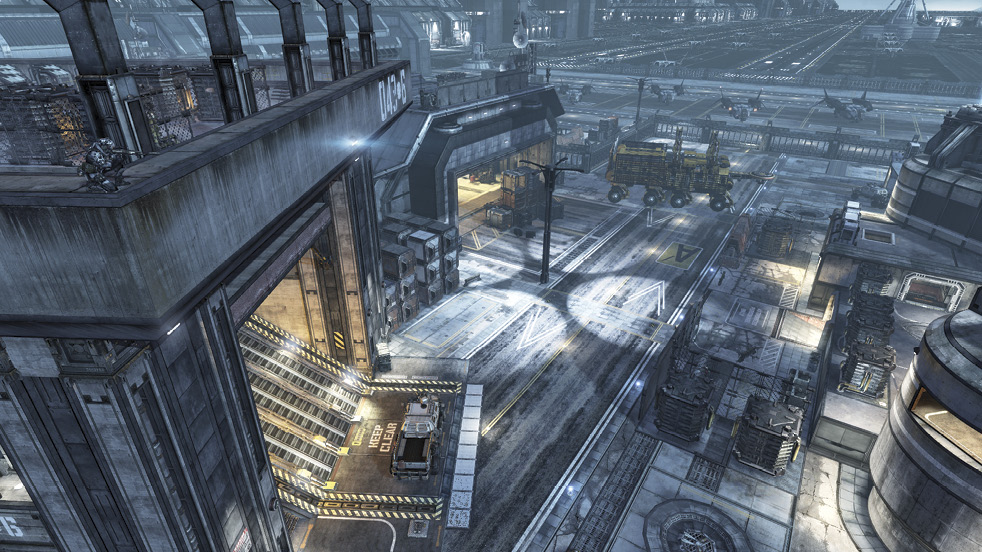
  • When defending the flag within the Wildlife Control Tower, a Titan equipped with the XO-16 Chaingun can easily guard the objective. Keep your focus towards the Hangar and the Big Ramp to ensure no enemy Pilots sneak by. Patrol back and forth from these locations to pick off enemies at the top of the Big Ramp or running through the Hangar.

Keep reading with a free account

The first 3 sections of Titanfall are open to everyone. An account opens the rest of it, and every other guide in the archive. It's free, and there's nothing to buy.

Bought guides on the old Prima Games site? Your account and every guide you own moved here, so there's nothing to buy again. Sign in.

Create a free account Or browse our free guides

PreviousAttrition NextHardpoint Domination