Prima Games eGuides
primagames.com Browse Redeem a code Help
Darksiders II eGuide
Sign in My Guides

Sign in or create an account

We'll email you a link. No password needed, and if you don't have an account yet, the link makes one.

By creating an account or signing in, you agree to our Terms of Service and Privacy Policy.

Have a password?

Had an account on the old eGuides site, or a code from a printed guide? Help and troubleshooting

Sign in with a password

By signing in, you agree to our Terms of Service and Privacy Policy.

Check your email

A sign-in link is on its way. It works once and expires in 15 minutes. Open it and you're in, with an account if you didn't already have one.

Contents

  • Maps
    • Maps
      • Map Listing
  • Essentials
    • Exploration and Combat
      • Controls
      • Exploring
      • Combat
      • Leveling Up
      • Equipping Gear
      • Death’s Attributes
    • Skills and Combos
      • Skills
      • Moves and Combos
    • Appendix
      • Legendary Items
      • Secret Chests
      • Boatman Coins
      • Book of the Dead Pages
      • Stonebites
      • Relics
      • Soul Arbiter's Scrolls
      • GnoMAD Gnomes
      • Achievements
  • Walkthrough
    • The Keeper of Secrets
      • The Veil
      • Boss Battle: War’s Shade
    • The Fire of the Mountain
      • Forge Lands
      • Tri-Stone
      • Stonefather’s Vale
      • The Weeping Crag
      • Baneswood
      • East Trail
      • The Charred Pass
      • Passing Through
      • The Cauldron
      • Boss Battle: Gharn
    • Tears of the Mountain
      • Stonefather’s Vale
      • Shadow Gorge
      • The Fjord
      • The Drenchfort
      • Boss Battle: Karkinos
    • To Move a Mountain
      • The Nook
      • The Lost Temple
      • Boss Battle: Construct Hulk
    • Heart of the Mountain
      • The Foundry
      • The First Heart Stone
      • The Second Heart Stone
      • The Third Heart Stone
      • Boss Battle: Corrupted Custodian
    • The Tree of Life
      • Boss Battle: The Guardian
      • The Verdant Hollow
    • The Kingdom of the Dead
      • The Tree of Death
      • Leviathan’s Gorge
      • Breach
      • Breach Exterior
      • The Maw: West Valley
      • Serpent’s Peak
      • Eternal Throne
    • The Toll of Kings
      • Gilded Arena
      • The First Animus Stone
      • The Second Animus Stone
      • The Third Animus Stone
      • Boss Battle: Gnashor
    • Court of Bones I: Phariseer
      • Gilded Arena (Exterior)
      • The Maw
      • Phariseer’s Tomb
      • Boss Battle: Phariseer
    • Court of Bones II: Judicator
      • The Spine
      • Judicator’s Tomb
      • The First Soul
      • The Second Soul
      • Boss Battle: Tormentor
      • The Third Soul
      • Boss Battle: Bone Giant
    • Court of Bones III: Basileus
      • Gilded Arena
      • Psychameron
      • Boss Battle: Basileus and Achidna
    • The City of the Dead
      • The City of the Dead
      • Boss Battle: The Wailing Host
    • The Key to Redemption
      • Lostlight
      • The Crystal Spire
    • The Rod of Arafel
      • Earth
      • Boss Battle: The Noss
    • Stains of Heresy
      • The Ivory Citadel
      • Boss Battle: Jamaerah the Scribe
      • Boss Battle: Archon
    • The Lord of the Black Stone
      • Shadow’s Edge
      • The Black Stone
      • Boss Battle: Samael
    • The Well of Souls
      • Final Boss: Avatar of Chaos
    • Side Quests
      • The Crucible
      • Thane’s Side Quests
      • Muria’s Side Quests
      • Alya’s Side Quest
      • Vulgrim’s Side Quest
      • Blackroot’s Side Quest
      • Oran’s Side Quest
      • Ostegoth’s Side Quest
      • The Chancellor’s Side Quest
      • Nathaniel’s Side Quest
      • Uriel’s Side Quest
    • Side Areas
      • The Weeping Crag
      • Boss Battle: Gorewood
      • The Shattered Forge
      • The Scar
      • Boss Battle: Ghorn
    • Side Quests and Areas
      • Lair of the Deposed King
      • Boss Battle: Argul
      • Sentinel’s Gaze
      • Boneriven
      • Soul Arbiter’s Maze
      • Boss Battle: The Soul Arbiter
  • Extras
    • Behind the Scenes
      • Darksiders II Behind the Scenes
      • Creating Death
    • Behind the Scenes Videos
      • Video Interviews

Darksiders II Guide › Walkthrough › Stains of Heresy

Boss Battle: Archon

Boss Battle: Archon

The Archon attempts to explain his motives for tricking Death, but his excuses fall on deaf ears. Only the Reaper’s wrath will be enough to wrest the key from its twisted guardian.

Armed with the Rod of Arafel, the Archon is a force to be reckoned with. He unleashes a number of blistering energy attacks that inflict heavy damage, and he can withstand vast amounts of punishment. Make use of skills such as Unstoppable and Aegis Guard to lend Death extra strength throughout this trying battle.

The Archon commonly takes flight during the fight, and often maintains an impenetrable shield while airborne. Simply evade to dodge his rhythmic energy attacks at these times.

After casting several energy blasts from midair, the Archon raises his Rod, lowers his shield, and begins to build up power. Quickly jump and Deathgrip the Archon to zip close, and then unleash a midair combo to score damage.

The Archon soon comes crashing back down, sending out a wide shockwave of damaging force. Leap to avoid this attack, performing a midair combo to maintain height if need be.

Attacking the Archon in midair will eventually stun him and cause him to fall. When this occurs, close in and strike hard until an Action button prompt appears. Then, press the Action button to chop off the Archon’s wings.

Now the Archon is forced to battle Death on the ground. Do your best to avoid his wide energy blasts as you close in and pile on more damage. When the Archon begins to block, quickly tap the Evade trigger to backflip away from him before he unleashes a concussive blast that knocks Death backward.

When the Archon is near death, he’ll sprout wings of Corruption and take to the sky once more. Dodge his linear flying charges, and then Deathgrip the Archon and assault him until he begins to block. Again, backflip away to avoid his defensive blast, and then dodge his next flying charge. Repeat this sequence until you’re at last able to finish off the Archon with a press of the Action button.
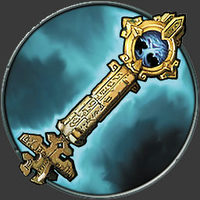
Angel Key

Into the Shadows

With the mighty Archon slain, Death has finally managed to acquire the Angel Key. Fast-travel back to the Tree of Life and speak with the Crowfather to learn of your next destination: the demonic realm of Shadow’s Edge. It is there that the Horseman will find the Demon Key, but obtaining it won’t be easy. Proceed through the portal that the Crowfather opens to begin your search for the final key.

Voidwalker Ventures

Now that you’ve obtained the Voidwalker, a number of optional side areas can be fully explored. Here’s the rundown—refer to the “Side Quests and Areas” chapter for more details:

  • The Weeping Crag: Armed with the Voidwalker, you can now fully explore this optional side area. If you’ve yet to explore the Crag, you can slay a special enemy here to complete one of Thane’s side quests. Even if you’ve previously run through the Crag, use the Voidwalker to open a pair of portals that lead you to a special treasure room, where plenty of loot and a Gnomad Gnome are found.
  • The Fjord: Swim to Vulgrim’s area in the Fjord harbor and travel through the portals to claim a Book of the Dead page and a rare Stonebite. You’ll need to toss a Shadowbomb through the portals to clear out some Corruption crystals.
  • The Nook: Return to the Nook and use the Voidwalker to open the portals in the basement, which lead to a pair of treasure chests. If you haven’t revisited the Nook since your initial trip to the Lost Temple, you can also use the Deathgrip to claim a Book of the Dead page from the lower courtyard area, as well as a Boatman Coin from the lava cavern, where another special enemy can be defeated as part of Thane’s side quests.
  • Breach Portals: Return to the Breach and use the Voidwalker to open the portals in the area with the switch and bridges. Travel through the portals to reach a pair of chests.
  • The Spine's East Tower: Scale the tower to the east of the Judicator's Tomb and use the Voidwalker to travel through the portals and raid more chests.
  • Psychameron Portals: Fast travel to the Psychameron and open the basement portals in the room with the three switches and Skeleton Key. The portals lead to a pair of chests.
Boatman Coin 94
Book of the Dead 35
Gnomad Gnome 2
Stone of Resistance 9

Keep reading with a free account

The first 3 sections of Darksiders II are open to everyone. An account opens the rest of it, and every other guide in the archive. It's free, and there's nothing to buy.

Bought guides on the old Prima Games site? Your account and every guide you own moved here, so there's nothing to buy again. Sign in.

Create a free account Or browse our free guides

PreviousBoss Battle: Jamaerah the Scribe NextShadow’s Edge