Prima Games eGuides
primagames.com Browse Redeem a code Help
Darksiders II eGuide
Sign in My Guides

Sign in or create an account

We'll email you a link. No password needed, and if you don't have an account yet, the link makes one.

By creating an account or signing in, you agree to our Terms of Service and Privacy Policy.

Have a password?

Had an account on the old eGuides site, or a code from a printed guide? Help and troubleshooting

Sign in with a password

By signing in, you agree to our Terms of Service and Privacy Policy.

Check your email

A sign-in link is on its way. It works once and expires in 15 minutes. Open it and you're in, with an account if you didn't already have one.

Contents

  • Maps
    • Maps
      • Map Listing
  • Essentials
    • Exploration and Combat
      • Controls
      • Exploring
      • Combat
      • Leveling Up
      • Equipping Gear
      • Death’s Attributes
    • Skills and Combos
      • Skills
      • Moves and Combos
    • Appendix
      • Legendary Items
      • Secret Chests
      • Boatman Coins
      • Book of the Dead Pages
      • Stonebites
      • Relics
      • Soul Arbiter's Scrolls
      • GnoMAD Gnomes
      • Achievements
  • Walkthrough
    • The Keeper of Secrets
      • The Veil
      • Boss Battle: War’s Shade
    • The Fire of the Mountain
      • Forge Lands
      • Tri-Stone
      • Stonefather’s Vale
      • The Weeping Crag
      • Baneswood
      • East Trail
      • The Charred Pass
      • Passing Through
      • The Cauldron
      • Boss Battle: Gharn
    • Tears of the Mountain
      • Stonefather’s Vale
      • Shadow Gorge
      • The Fjord
      • The Drenchfort
      • Boss Battle: Karkinos
    • To Move a Mountain
      • The Nook
      • The Lost Temple
      • Boss Battle: Construct Hulk
    • Heart of the Mountain
      • The Foundry
      • The First Heart Stone
      • The Second Heart Stone
      • The Third Heart Stone
      • Boss Battle: Corrupted Custodian
    • The Tree of Life
      • Boss Battle: The Guardian
      • The Verdant Hollow
    • The Kingdom of the Dead
      • The Tree of Death
      • Leviathan’s Gorge
      • Breach
      • Breach Exterior
      • The Maw: West Valley
      • Serpent’s Peak
      • Eternal Throne
    • The Toll of Kings
      • Gilded Arena
      • The First Animus Stone
      • The Second Animus Stone
      • The Third Animus Stone
      • Boss Battle: Gnashor
    • Court of Bones I: Phariseer
      • Gilded Arena (Exterior)
      • The Maw
      • Phariseer’s Tomb
      • Boss Battle: Phariseer
    • Court of Bones II: Judicator
      • The Spine
      • Judicator’s Tomb
      • The First Soul
      • The Second Soul
      • Boss Battle: Tormentor
      • The Third Soul
      • Boss Battle: Bone Giant
    • Court of Bones III: Basileus
      • Gilded Arena
      • Psychameron
      • Boss Battle: Basileus and Achidna
    • The City of the Dead
      • The City of the Dead
      • Boss Battle: The Wailing Host
    • The Key to Redemption
      • Lostlight
      • The Crystal Spire
    • The Rod of Arafel
      • Earth
      • Boss Battle: The Noss
    • Stains of Heresy
      • The Ivory Citadel
      • Boss Battle: Jamaerah the Scribe
      • Boss Battle: Archon
    • The Lord of the Black Stone
      • Shadow’s Edge
      • The Black Stone
      • Boss Battle: Samael
    • The Well of Souls
      • Final Boss: Avatar of Chaos
    • Side Quests
      • The Crucible
      • Thane’s Side Quests
      • Muria’s Side Quests
      • Alya’s Side Quest
      • Vulgrim’s Side Quest
      • Blackroot’s Side Quest
      • Oran’s Side Quest
      • Ostegoth’s Side Quest
      • The Chancellor’s Side Quest
      • Nathaniel’s Side Quest
      • Uriel’s Side Quest
    • Side Areas
      • The Weeping Crag
      • Boss Battle: Gorewood
      • The Shattered Forge
      • The Scar
      • Boss Battle: Ghorn
    • Side Quests and Areas
      • Lair of the Deposed King
      • Boss Battle: Argul
      • Sentinel’s Gaze
      • Boneriven
      • Soul Arbiter’s Maze
      • Boss Battle: The Soul Arbiter
  • Extras
    • Behind the Scenes
      • Darksiders II Behind the Scenes
      • Creating Death
    • Behind the Scenes Videos
      • Video Interviews

Darksiders II Guide › Walkthrough › Court of Bones II: Judicator

Boss Battle: Tormentor

A monstrous villain known as the Tormentor appears after the Prowlers and Champions have been slain. Strive to evade this hulking terror’s fast and devastating blows, and strike hard from behind while it slowly turns to face you. Use your best abilities to bring down the Tormentor as quickly as possible. Teleport Slash is particularly effective, helping you slip past the brute just before he strikes.

Prison Prizes

When the Tormentor is no more, open the chest in one of the south cells, and then search the southeast cell to discover writing on the wall that bestows a Soul Arbiter’s Scroll. Smash the northeast crates as well to claim a hidden Boatman Coin. The east door is locked, so proceed through the north door instead.
Boatman Coin 63
Soul Arbiter's Scroll 5

Area 8: East Wing

Acrobatic antics are required for the Pale Rider to reach the tower that houses the second lost soul.

Use the Summoning Circle to call forth Phariseer as you enter the room.

Go right and order Phariseer to stand atop the pressure plate that lies beyond the gate. This causes two pegs to appear on the surrounding walls.

Return to the room's entrance and run along the outside wall. Jump the corner and vault from a peg to reach a small ledge with a chest.

Plunder the chest and equip the Deathgrip before wall-running toward Phariseer, vaulting off of another peg.

Jump off the wall as you near Phariseer, and then Deathgrip the Dead Lord to zip over to solid ground.

The passage that follows features a long pit. Collect the Book of the Dead page from atop the north bone pile.
Book of the Dead 18

Run and jump out over the pit. Quickly Deathgrip the distant hoop to zip across and scale the far wall.

Sprint upstairs and pull a lever to lower a gate and reveal another wall hoop.

Two Treasures

Your map reveals a chest in a nearby passage, directly above Phariseer. Go east from the lever and scale a few hand holds to enter the passage. Make your way over to the far chest.

Next, carefully drop down into the nearby hole to land in a lower passage where a lost Relic is found.
Relic of Etu-Goth 8

Drop down into the hole after claiming the Relic and fall to the bottom passage. Immediately look up and Deathgrip the overhead hoop to soar up to the top passage’s hand hold and shimmy back out of the passage. Sprint past the lever you recently pulled and head through the west door.

Area 9: Dungeon Balcony

You’ve made your way back to the Dungeon area, but you’re now on a high balcony. Go north and loot a small chest, and then head south and crack open a larger chest to acquire a Skeleton Key. You’ll encounter a Skeletal Champion and a few Undead Prowlers along the way.
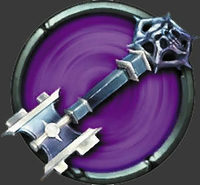
Skeleton Key

With the key in hand, backtrack to the previous area and drop down through a small hole in the floor near the lever. You land near the East Wing’s entry door; continue backtracking to the Prison area, and then use your newfound key to unlock its east door.

Area 9: East Tower

At last, you’ve reached the tomb’s East Tower. As before, you’ll need to work your way up to the imprisoned lost soul at the tower’s apex. Before beginning your ascent, dive into the water and collect an underwater Boatman Coin.

Boatman Coin 64

Scale the first flight of stairs, and then Deathgrip the central hoop to bound up to a hand hold.

Climb up to the central platform, and then Deathgrip the Book of the Dead page from the tip of the broken staircase. Run, jump, and Deathgrip the north hoop afterward to reach another hand hold.

Book of the Dead 19

Perform a 180 leap from the hand hold and Deathgrip an overhead hoop to swing toward the south wall.

Quickly Deathgrip the south wall's hoop before you fall. Death will then scamper up the south wall; jump off and Deathgrip another hoop behind you to reach a high hand hold.

Shimmy around the corner and 180 leap toward a final hoop. Deathgrip this to scale the west wall, and then 180 leap to the tower's apex.

Lost Soul II

Beware: Collecting the second imprisoned soul causes two Skeletal Champions and a horrific Undead Stalker to materialize behind you. The Stalker is one of the most deadly opponents you’ve encountered to this point, becoming increasing fierce as the battle wages on. Cut down the Skeletal Champions first, and then focus on slaying the Stalker.

Enemy: Undead Stalker

  • Class: Brute

These ultimate renditions of the Stalker are by far the most deadly. At first, their attacks largely resemble those of previous Stalkers—however, as the Undead Stalker suffers more and more damage, it begins to unleash longer and more furious claw strike combinations. These lengthy claw combos can quickly spell the Reaper’s demise, so it’s wise to slay all other present adversaries before facing off against an Undead Stalker. This prevents the fiend from unleashing its longer claw combos until it’s the only threat left to deal with.

When the last of the undead have fallen, carefully drop down from the tower’s southeast corner to land on the broken stairs below, not far from a chest. Claim your plunder, and then exit the tower and find your way back to the Judicator. Return the second soul for judgment, and the south door unbars. Only one soul left to go!

Keep reading with a free account

The first 3 sections of Darksiders II are open to everyone. An account opens the rest of it, and every other guide in the archive. It's free, and there's nothing to buy.

Bought guides on the old Prima Games site? Your account and every guide you own moved here, so there's nothing to buy again. Sign in.

Create a free account Or browse our free guides

PreviousThe Second Soul NextThe Third Soul