
Reading Frame Data
Frame data details the duration and specifics of all the game’s attacks. While an intimate knowledge of frame data is not necessary for playing Street Fighter—most real knowledge comes from experience and feel—it can be a great help for planning, finding counters, and theorizing new tactics. Frame data helps explain why something either works or doesn’t work. This guide details frame data for the full cast of Street Fighter V. Every effort was made to compile this data accurately using a pre-release, but more or less final, version of SFV. Any inaccuracies present should be minimal.
Reading frame data can take some getting used to. Here are some guidelines to remember:
The game runs at 60 frames per second. One frame is 1/60th of a second. Five frames equal 1/12th of a second, 30 frames equal half a second, and so on.
The frame data in this guide assumes that the first active frame of an attack is the one that hits. The remaining active frames become, in effect, the first part of the recovery period. Strike “meaty” (late in the active period) and total recovery is shortened, leading to more advantage on hit or block.
Attacks performed in midair don’t have recovery periods like grounded attacks. For air attacks, recovery is simply how long it takes to land and go through landing recovery, so a value for recovery is not listed for jumping attacks. Because of the amount of variables that go into jump-ins and cross-ups, figures for advantage on hit/on block are also not listed. Air attacks may be done high up during a jump, or very deep, just before landing. Whether high or deep, air attacks may also hit with their first active frame,
or they may hit meaty. The defending character may be standing when struck by the jump-in (so the attacker in effect has more recovery, having to fall farther before landing frames), or they may be crouching (leading to less recovery for the attacker because they don’t have as far to fall after contact). All these variables come up during every jump-in, making the pinning down of an absolute advantage figure for a given jump attack somewhat arbitrary.
However, for unique jumping attacks where this data is crucial, like dive kicks (such as Cammy’s Cannon Strike or Dhalsim’s Drill Kick), a maximum value of advantage is listed, based on perfect positioning. (This usually entails hitting the target in the shins with the dive kick just before landing.)
Startup Frames
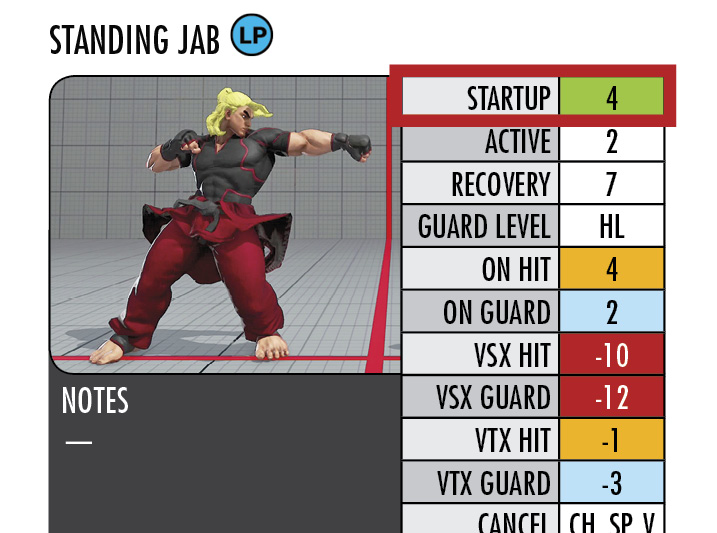
This is the animation that an attack goes through before actively striking or grabbing. Faster is better, of course. The fastest normals and specials in the game strike on the third frame, so they have a startup of 3; Zangief’s Critical Art strikes even earlier, on the second frame. Most useful normals are in the 4-8 frame startup range, with sweeps and particularly far-reaching pokes usually hitting a little slower. The game’s fastest non-Critical Art throws have five frames of startup.
Eating an incoming hit during startup frames leads to a counter-hit, increasing hitstun and damage taken. This makes mashing a bad idea; exploiting someone who always hits buttons to score lots of counter-hits is a great strategy.
The startup figures included throughout this guide include the first frame of the active period. The reason for this is that it’s less abstract to try to find links and come up with frame traps; you can simply compare the lead-in move’s advantage on hit to the follow-up move’s startup and see how they line up. The only negative consequence is that if you add up a move’s startup, active, and recovery periods, the sum you’ll get is one frame more than the actual total frame count of the move.
During V-Trigger activation and the beginning of Critical Arts, there is a screen-freezing effect at the beginning while a little cutscene plays out. The character about to unleash their ultimate attack or mode poses while the camera swoops in, and then the action snaps back to the normal view and time resumes. Not counting any freeze frames where neither character can actually move, V-Triggers and Critical Arts have some of their startup frames before this screen freeze and some of them afterward. This is expressed in frame data as two figures with a plus sign. A Critical Art with one frame of startup before the freeze and six more frames after will have startup expressed as 1+6.
Active Frames
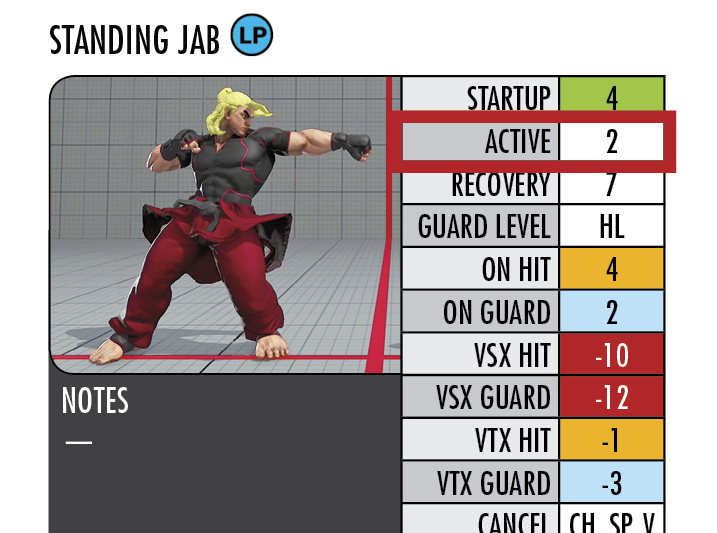
This is the period where a strike or throw can actually hit or grab. This is almost always the shortest portion of a move by far, with most moves only active for two or three frames.
For multi-hit moves, there may be inactive gaps between active hits, expressed in frame data with parentheses. A two-hit attack with a three-frame gap between two-frame active periods would be expressed as 2(3)2.
Some multi-hit moves have no gap, in which case the cut-off between active portions is expressed with a slash. A hypothetical three frames active hit followed by a four frames active follow-up would be expressed in frame data as 3/4.
Hits timed to connect late during active frames are called meaty attacks. Meaty attacks are frequently used against targets waking up from being floored or landing from air recovery to ensure that the victim rises or falls into the end of the active frames. This has the effect of making the move’s functional recovery shorter because the hitstun a move creates is the same no matter when in the active period it hits. Many moves that do not allow for links if they connect with the first active frame can lead to links when they strike meaty. Some moves are also unsafe if you use them in the neutral game but are great when used meaty.
Projectiles don’t have a number of active frames listed with the other data. The startup of a projectile attack takes you to the first active projectile frame, and then (since the projectile becomes a threat separate from the thrower’s body) the rest of the move is simply recovery. If a projectile dissipates after a set number of frames (rather than traveling an infinite distance until it moves off screen, as most projectiles do), this will be indicated in the Notes column.
Meter Gain
The Meter Gain column is arranged by activation/hit/guard. So 20/40/20 would mean 20 EX Gauge gained for activating the move, then an additional 40 for a hit, or 20 if guarded. Contextually, there may only be two numbers. Neither normals nor unique attacks gain meter when whiffed, so they’ll just have two numbers: hit/guard. Most heavy attacks will list 50/25 for 50 meter gained on a hit, 25 if guarded. And throws can’t be blocked, so they’ll also only list two numbers, though for throws it’s activation/hit. 40/80 here would mean 40 upon activation, and an additional 80 if the grab succeeds.
Recovery Frames
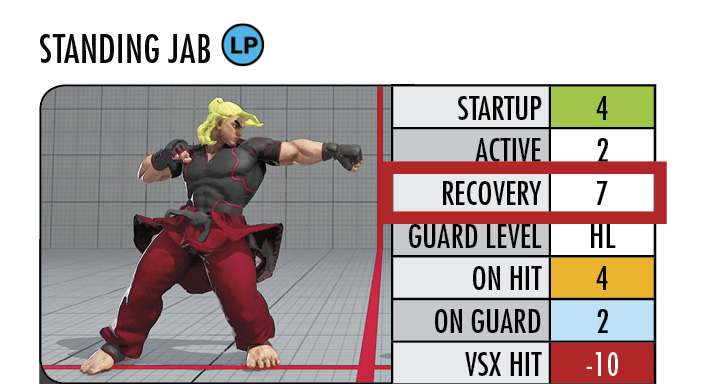
The retracting frames of an action before you’re back to a neutral state, ready to act again. When you cancel moves, it’s the recovery that you’re skipping. It’s also this portion of a missed attack that is targeted by whiff-punishing footsies. Shorter recovery is obviously better. Some moves, like Shoryukens, have an aerial recovery period after the active frames end, followed by an abnormally long landing recovery period on the ground. Most reversals that have honest-to-goodness invulnerability are also vulnerable to counter-hits even during recovery frames, as explained in the Primer at the beginning.
Frame Advantage/Disadvantage (On Hit/On Guard)
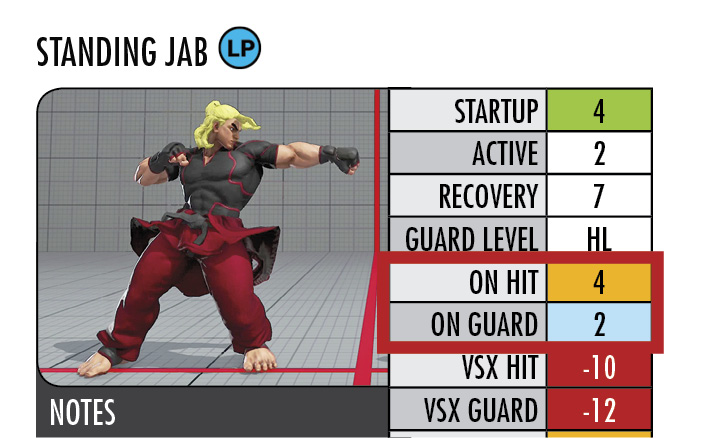
After a move makes contact, the attacker’s remaining active frames (if any) and recovery frames must play out before they can act again; meanwhile, the defender’s blockstun or hitstun must play out. The character who can act first has frame advantage, and this can be expressed numerically by how many frames ahead they are. An advantage of +4 means you’ll be able to act four frames earlier than the opposition; a disadvantage of -4 means the opposition will be able to act four frames before you. This part of frame data can help you find interesting potential links, blockstrings, and frame traps.
Advantage is expressed differently on hit or on guard; on hit, almost every attack produces more frame advantage than on block. Extra advantage on counter-hit isn’t explicitly listed, but it’s +2 for almost all attacks, with rare exceptions explained in the Notes column. Crush Counters also produce much more bonus frame advantage than the standard +2, also explained in Notes.
Grounded normals and certain specials can be canceled into V-Trigger activation. Ken, Laura, and Birdie’s special-cancelable normals can also cancel into their V-Skill attacks. These actions change the post-hit or post-guard frame situation quite a lot. To detail these extra frame data situations involving cancels, we’ve included extra columns where relevant in character chapters:
Extra On Hit / On Guard Columns:
| VTX On Hit and VTX On Guard | Frame situation after canceling a move into V-Trigger. |
| VTX2 On Hit and VTX2 On Guard | Frame situation after V-Trigger-canceling the second hit of a multi-hit attack. |
| VSX On Hit and VSX On Guard | Frame situation after canceling a move into V-Skill |
| Sappo On Hit and Sappo on Guard | Karin only. Frame situation after canceling a move into Sappo command dash. |
| LM-A On Hit and LM-A On Guard | Laura only. Frame situation after canceling into Linear Movement – Avante. |
| SM-HX On Hit and SM-HX On Guard | Nash only. Frame situation after canceling a move into the grounded version of his V-Trigger, Sonic Move – Hide. |
| STNC On Hit and STNC On Guard | Vega only. Frame situation after canceling a normal into Switching Claw. |
Creating Links and Frame Traps from Frame Data
| Move 1 (must be positive value) | Relationship | Move 2 | Result | Note |
|---|---|---|---|---|
| On Hit | ≥ | Startup | Link | The closer the values, the tighter the timing. If they’re identical, it’s a one-frame link, but the input buffer makes it functionally a three-frame link. The bigger the gap between the figures, the easier the link. |
| On Guard | ≥ | Startup | True blockstring | See the above note about timing. Use the same formula to build true blockstrings (which are quite rare in SFV). |
| On Hit | < | Startup | Failed combo (or reset) | Not enough advantage for a link. If the gap here is two frames or fewer, check and see if it works on counter-hit. |
| On Guard | < | Startup | Frame trap | Once you’re leaving a gap on block, it’s just a question of the desired size of the gap. For button mashers and aggressive foes, you want the smallest gap possible. For more cautious or reactive opponents, you’ll likely have to use wider, more deceiving gaps. |