
Far Cry Primal Guide Appendices Wildlife
About Wildlife in Oros
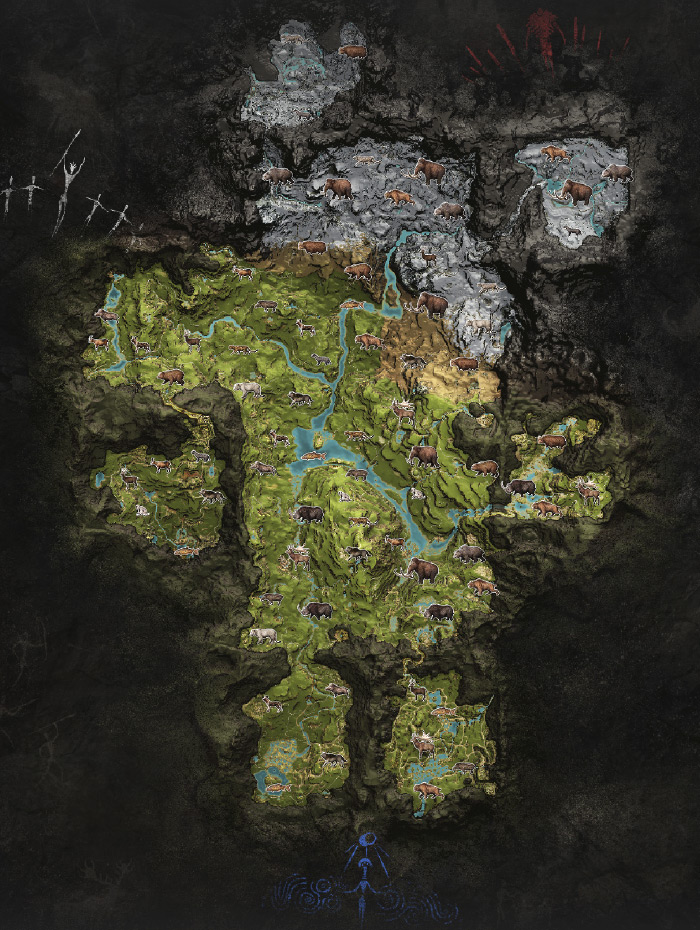
A variety of wildlife makes Oros their home. From the venomous Adders to the giant Elder Mammoths, animals of all types wander the land and many present a danger, but not all. Always beware of the animals around you, as some tend to come out of nowhere and attack. There are a number of ways to lessen the danger. Take along a beast to protect you from surprise attacks; eat a scent camouflage to lessen the likelihood of being detected; or tame a Badger to scare the creatures away.
The health and damage ratings of each animal found in Oros, as well as whether they are tamable, are given in the following table. Skinning animals can give animal fat, meat, and animal hide. Plus most animals give a specific skin, which is used in crafting and upgrading. The skin received and difficulty to hunt each animal is also given. Stats are based on a ranking system of 0 to 5. For example, a “-” in damage translates to an animal that does not hurt you. A health of “1” means one hit kills it. A “5” is given to the most powerful beasts and means you need a plan and possibly a tough beast companion to take it out. The Notes column gives extra details for the wildlife.
Oros Fauna
| Animal Name | Skin | Hunting Difficulty | Health | Damage | Tamable? | Note |
|---|---|---|---|---|---|---|
| Adder |
- |
Very Easy | 1 | 2 | No | Snakes are tough to spot unless Hunter Vision is enabled. They poison if allowed to attack. |
| Badger | Badger Skin | Hard | 3 | 2 | Yes | Catch a Badger and take it along on your hunts to keep unwanted predators at bay. These guys are tough for their size so do not underestimate them. They do not fear fire. |
| Beehive | Bee Cluster | Very Easy | 1 | 2 | No | Beehives are only an issue if you decide to attack. If the bees swarm you, hold the Heal button to shoo them away. Simply interact with the hive to grab a bee cluster for your resources. |
| Bitefish |
Bitefish Skin |
Medium | 2 | 2 | No | Scan water before going for a swim to avoid being bitten by a Bitefish. Use a spear on the fish and then dive in for the skin. |
| Bloodfang Sabretooth | Sabretooth Tiger Skin | Very Hard | 5 | 5 | Yes | Tame this powerful beast after completing the Bloodfang Sabretooth Hunt. Once tamed, it may never leave your side. |
| Bloodtusk Mammoth | Mammoth Skin | Very Hard | 5 | 5 | No | The Bloodtusk Mammoth is the only Beast Master Hunt that doesn’t result in a tamed beast. Refer to our Secondary Quests chapter for details on the hunt. |
| Brown Bear | Brown Bear Skin | Hard | 4 | 3 | Yes | The Brown Bear is another great addition as a beast, but it does pose a danger for low to medium level players. They can swim and are not afraid of fire. |
| Boar | Boar Skin | Medium | 2 | 2 | No | Boars will attack unprovoked, but they are fairly easy kills. |
| Cave Bear | Cave Bear Skin | Very Hard | 5 | 4 | Yes | Tame the Cave Bear at first chance for a strong beast companion. If you decide to fight it, bring along a strong animal of your own. They can swim and do not fear fire. |
| Cave Lion | Cave Lion Skin | Hard | 3 | 3 | Yes | These felines are quick so be ready to switch to your melee weapon when one approaches. They are able to climb short ledges. |
| Crocodile | - | Easy | 2 | 3 | No | Crocodiles lie in wait in bodies of water. Use Hunter Vision to make sure there isn’t one in your path. Shoot an arrow in its big head to get an easy kill and collect the skin. |
| Deer |
Deer Skin |
Medium | 2 | - | No | Deer are fairly easy kills and they do not attack, but they are quick to flee a scene. Sic your fast cat on it or take a Scent Camouflage to sneak up on it. |
| Dhole |
Dhole Skin |
Easy | 1 | 1 | Yes | Dholes are also quick, but they are even easier takedowns. Just one or two hits with your club will do it. They are aggressive and come to you. Early on though, packs of Dholes can be overwhelming. |
| Eagle |
Feather |
Medium | 1 | 2 | No | Eagles only bother you at high locations. If you hear its screech, spot it in the air and ready your bow or club. Time your shot to knock it out of the air. Dealing with these guys is a must for The Peak of Oros mission. |
| Elder Mammoth |
Mammoth Skin |
Very Hard | 5 | 5 | No | Do not provoke the Elder Mammoths unless you are ready for a big fight. Take along a powerful beast like a Bear or Sabretooth. They do not fear fire. |
| Fish | - | Very Easy | 1 | - | No | Besides the Bitefish, the fish in the waterways are passive. |
| Goat | Goat Skin | Easy | 1 | - | No | Goats are found everywhere in Oros. They do not attack and are easy kills. |
| Great Scar Bear | Very Hard | 5 | 5 | Yes | Complete this hunt quest to tame the beast. This animal is a very powerful asset. | |
| Gull | Feather | Very Easy | 1 | - | No | |
| Jaguar | Jaguar Skin | Medium | 2 | 2 | Yes | Jaguars are quick and stealthy. Be ready to quickly switch to your club if one attacks. They can also climb. |
| Leopard | Leopard Skin | Hard | 3 | 2 | Yes | Leopards are tougher kills than Jaguars. Be ready for their attacks. Having the Badger beside you or taking the Scent Camouflage helps keep them away. They are very stealthy and can climb. |
| Lizard | - | Very Easy | 1 | - | No | |
| Mammoth | Mammoth Skin | Hard | 4 | 3 | No | Similar to the Elder Mammoth but they are smaller, have less health, and less damage. These young Mammoths are able to call an Elder Mammoth for help, so beware. They do not fear fire. They can be ridden with the Mammoth Rider skill. |
| Monkey | Monkey Skin | Easy | 1 | - | No | Monkey skins are required for an upgrade, so you need to kill a few of these guys. They quickly run away, so try a stealthy approach. |
| Rare Black Jaguar | Rare Black Jaguar Skin | Medium | 3 | 3 | Yes | The rare version of the Jaguar. Look for it in packs of the regular cats. |
| Rare Black Lion | Rare Black Lion Skin | Hard | 3 | 3 | Yes | The rare version of the Cave Lion. |
| Rare Dhole | Rare Black Dhole Skin | Easy | 2 | 1 | Yes | Look for the Rare Dhole in packs of the dogs. |
| Rare Red Bitefish |
Rare Red Bitefish Skin |
Easy | 2 | 3 | No | The Rare Red Bitefish is the subject of The Biter in the Deep mission. The skin gained from that quest helps in building Roshani’s hut. |
| Rare Red Elk |
Rare Red Elk Skin |
Very Hard | 4 | 3 | No | The rare version of the Tall Elk, required for Roshani’s hut. |
| Rare Stripe Wolf |
Rare Stripe Wolf Skin |
Medium | 3 | 3 | Yes | Search for this rare canine in Wolf packs. The Wolf Beast Kill quest guarantees at least one. |
| Rare Two Horn Rhino | Rare Two Horn Rhino Skin | Hard | 4 | 4 | No | Look for this rare Rhinoceros in packs of the Rhinos. Look out for its charge attack which can do serious damage with its two horns. Jump out of the way to avoid it. |
| Rare White Deer | Rare White Deer Skin | Medium | 2 | - | No | The rare version of the Deer is just as easy to kill as the regular one, but you may have to chase it down. |
| Rare White Wolf | Rare White Wolf Skin | Medium | 2 | 3 | Yes | Another rare Wolf, found within packs of the canines. Your first tamed beast is a White Wolf in the Beast Master mission. |
| Rare White Yak |
Rare White Yak Skin |
Medium | 3 | 2 | No | Just like the regular Yak, the rare white one is weak, but it does take a few hits with a spear to take it down. |
| Rat |
- |
Very Easy | 1 | - | No | Rats are tiny targets and only supply meat upon their death. |
| Raven |
Feather |
Very Easy | 1 | - | No | A Raven kill is necessary in the Fly Like a Bird mission. Otherwise, they can be ignored…unless you need feathers. |
| Sabretooth Tiger | Sabretooth Tiger Skin | Very Hard | 4 | 4 | Yes | The Sabretooth Tiger is the most powerful regular feline. Watch out for its pounce and tame one right away. They are able to climb, so keep that in mind when fleeing their attack. |
| Small Bitefish | Bitefish Skin | Easy | 1 | 2 | No | A smaller Bitefish, but it can still hurt you with its bite. Use Hunter Vision to spot them in the water. |
| Snowblood Wolf | Wolf Skin | Very Hard | 4 | 4 | Yes | Another epic animal that must be defeated in a Beast Master Hunt quest. It attacks with a big pack of Wolves, so be ready with your torch. |
| Snow Bird | Feather | Very Easy | 1 | - | No | A Snow Bird kill is necessary in the Fly Like a Bird mission. Otherwise, they can be ignored…unless you need feathers. |
| Tapir | Tapir Skin | Easy | 2 | - | No | These boar-like mammals are passive and do not flee very fast, making them a very easy kill. These animals only come out at night. |
| Tall Elk | Tall Elk Skin | Very Hard | 3 | 3 | No | The Tall Elk is hunted in Jayma’s second mission. Its charge attack does serious damage and it takes some abuse. Pull out the spear for this one and send your beast after it. It will flee, so use Hunter Vision to pick up its trail if necessary. Watch out as it switches between passive and aggressive very quickly. |
| Tortoise | - | Very Easy | 1 | - | No | Tortoises are very easy kills with your club, though they tend to hide in their shell. A few hits knock it out even through the armor. They only provide meat, so not a required kill, except for Fly Like Bird quest. |
| Wolf | Wolf Skin | Medium | 2 | 2 | Yes | Wolves tend to run around in packs, but each one is an easy kill with the club. They are easily tamed. |
| Woolly Rhino | Woolly Rhino Skin | Hard | 4 | 4 | No | Get out your spear for this beast. He is relatively passive until provoked, so be careful. His horn can cause some damage and he does not fear fire. |
| Yak | Yak Skin | Medium | 2 | 2 | No | Yaks are fairly weak for their size, but can still do some damage with their charge. |