
Hyrule Warriors Legends Guide Warriors & Weapons
Twili Midna
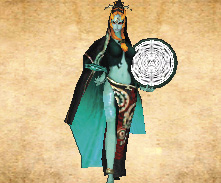
During the Era of Twilight, Midna, the Twilight Princess herself, joined the legendary hero in saving both worlds of light and darkness. With the battle won and the curse lifted, Midna regained her true form, displaying her mysterious beauty once more. As one of royal Twilight blood, she has powers known only to the Twili people. The ancient Mirror she wields strengthens her Twilight powers even further, meaning she no longer has to rely on the Fused Shadow to devastate her enemies on the battlefield.
How to unlock
You can find this Warrior in Scenario A-16 in the Adventure Map. You must first use an Item Card in the Search Screen to locate her, and then complete the Scenario to unlock her.
Twili Midna’s Weapons
Mirror
In her uncursed form, Twili Midna channels her vast magic through a Mirror, summoning objects of all shapes and sizes from the Twilight Realm to batter baddies about. During her Regular Attack combo, the Twilight Princess casts out a giant hand to slap and squash foolish foes in front of her. At the same time, her Regular Attacks also fill up her Twilight gauge—when this gauge is full, pressing the Combo Attack button instantly unleashes a powerful attack that devastates everything around Twili Midna in a wide area. This is arguably Twili Midna’s best attack, and it can be used even before the Twilight gauge is filled—just hold the Combo Attack button to charge up the attack ahead of time. The Twilight Princess’s more complex combos, such as Regular-Regular-Regular-Combo Attack, summon more advanced Twilight Realm arms—including a giant cannon!
 Mirror of Shadows
This is Twili Midna’s starting weapon.
 Mirror of Silence
You can find this weapon in Scenario D-1 of the Great Sea Map. You must first use an Item Card in the Search Screen to locate it, and then get an A-Rank to unlock the weapon.
 Mirror of Twilight
You can find this weapon in Scenario A-16 of the Master Quest Map. You must first use an Item Card in the Search Screen to locate it, and then get an A-Rank to unlock the weapon.
Mirror of Twilight +
You can find this weapon in Scenario A-14 of the Termina Map. You must first use an Item Card in the Search Screen to locate it, and then get an A-Rank to unlock the weapon.
Twili Midna’s Badges
Attack Badges
| Name | Description | Materials Required | Cost | |
|---|---|---|---|---|

|
Kokiri Sword I (Unlocks Din’s Fire I) | New Combo Attack for the Mirror: Regular Attack ×6 | Monster Tooth ×1 | 100 |

|
Kokiri Sword II (Unlocks Stamina Fruit I) | New Combo Attack for the Mirror: Regular Attack ×4, then press Combo Attack | Fiery Aeralfos Leather ×1, Monster Tooth ×1 | 500 |

|
Kokiri Sword III (Unlocks Digging Mitts I) | New Combo Attack for Hylian Sword: Regular Attack ×7 | Stalmaster Wrist Bone ×1, Monster Tooth ×1 | 1,000 |

|
Kokiri Sword IV | New Combo Attack for Hylian Sword: Regular Attack ×5, then press Combo Attack | Gibdo Bandage ×1, Monster Tooth ×1 | 3,000 |

|
Din’s Fire I (Unlocks Hover Boots I) | Makes the Special Attack gauge fill slightly faster. | Piece of Darknut Armor ×1, Monster Tooth ×1 | 500 |

|
Din’s Fire II (Unlocks Fierce Deity’s Mask I) | Makes Special Attack gauge fill moderately faster. | ReDead Bandage ×1, Monster Tooth ×1 | 1,000 |

|
Din’s Fire III | Makes the Special Attack gauge fill a lot faster. | Cia’s Staff ×1, King Dodongo’s Claws ×2, ReDead Knight Ashes ×2 | 3,000 |

|
Stamina Fruit I | Makes the Weak Point gauge diminish slightly quicker. | Gibdo Bandage ×1 | 500 |

|
Stamina Fruit II | Makes the Weak Point gauge diminish moderately quicker. | Cia’s Bracelet ×1, King Dodongo’s Claws ×1, Gibdo Bandage ×3 | 1,000 |

|
Stamina Fruit III | Makes the Weak Point gauge diminish a lot quicker. | Cia’s Staff ×1, King Dodongo’s Claws ×2, ReDead Knight Ashes ×2 | 3,000 |

|
Hover Boots I | Slightly lengthens the duration of Focus Spirit. | Gibdo Bandage ×2 | 500 |

|
Hover Boots II | Moderately lengthens the duration of Focus Spirit. | Cia’s Bracelet ×1, King Dodongo’s Claws ×1, Gibdo Bandage ×3 | 1,000 |

|
Hover Boots III | Greatly lengthens the duration of Focus Spirit. | Cia’s Staff ×1, King Dodongo’s Claws ×2, ReDead Knight Ashes ×2 | 3,000 |

|
Digging Mitts I | Allows the warrior to inflict minor damage to enemies with their guard up. | Gibdo Bandage ×3 | 2,000 |
|
|
Digging Mitts II | Allows the warrior to inflict moderate damage to enemies with their guard up. | Cia’s Bracelet ×1, King Dodongo’s Claws ×1, Gibdo Bandage ×3 | 3,000 |

|
Digging Mitts III | Allows the warrior to inflict heavy damage to enemies with their guard up. | Cia’s Staff ×1, King Dodongo’s Claws ×2, ReDead Knight Ashes ×2 | 5,000 |

|
Fierce Deity’s Mask I | Gives the warrior a second Special Attack gauge. | Essence of Icy Big Poe ×1, Monster Tooth ×1 | 2,000 |

|
Fierce Deity’s Mask II | Gives the warrior a third Special Attack gauge. | Cia’s Staff ×1, King Dodongo’s Claws ×2, ReDead Knight Ashes ×2 | 3,000 |
Defense Badges
| Name | Description | Materials Required | Cost | |
|---|---|---|---|---|

|
Empty Bottle I (Unlocks all other tier I badges in Link’s Defense Badge tree) | Allows a warrior to use a potion once per battle. | Old Rag ×1 | 100 |

|
Empty Bottle II (Unlocks Nayru’s Love I) | Allows a warrior to use a potion twice per battle. | ReDead Bandage ×1, Old Rag ×1 | 1,000 |

|
Empty Bottle III | Allows a warrior to use a potion three times per battle. | King Dodongo’s Crystal ×1, Cia’s Bracelet ×2, ReDead Knight Ashes ×2 | 3,000 |

|
Hornet Larvae I | Slightly increases the healing effect from hearts picked up in battle. | Gibdo Bandage ×1 | 500 |

|
Hornet Larvae II | Moderately increases the healing effect from hearts picked up in battle. | Cia’s Bracelet ×1, King Dodongo’s Claws ×1, Gibdo Bandage ×3 | 1,000 |

|
Hornet Larvae III | Greatly increases the healing effect from hearts picked up in battle. | King Dodongo’s Crystal ×1, Cia’s Bracelet ×2, ReDead Knight Ashes ×2 | 3,000 |

|
Goron Tunic I | Slightly reduces damage taken on fire-element-recommended stages. | Gibdo Bandage ×2 | 1,000 |

|
Goron Tunic II | Moderately reduces damage taken on fire-element-recommended stages. | Cia’s Bracelet ×1, King Dodongo’s Claws ×1, Gibdo Bandage ×3 | 3,000 |

|
Goron Tunic III | Greatly reduces damage taken on fire-element-recommended stages. | King Dodongo’s Crystal ×1, Cia’s Bracelet ×2, ReDead Knight Ashes ×2 | 5,000 |

|
Zora Tunic I | Slightly reduces damage taken on water-element-recommended stages. | Gibdo Bandage ×2 | 1,000 |

|
Zora Tunic II | Moderately reduces damage taken on water-element-recommended stages. | Cia’s Bracelet ×1, King Dodongo’s Claws ×1, Gibdo Bandage ×3 | 3,000 |

|
Zora Tunic III | Greatly reduces damage taken on water-element-recommended stages. | King Dodongo’s Crystal ×1, Cia’s Bracelet ×2, ReDead Knight Ashes ×2 | 5,000 |

|
Magic Armor I | Slightly reduces damage taken on lightning-element-recommended stages. | Gibdo Bandage ×2 | 1,000 |

|
Magic Armor II | Moderately reduces damage taken on lightning-element-recommended stages. | Cia’s Bracelet ×1, King Dodongo’s Claws ×1, Gibdo Bandage ×3 | 3,000 |

|
Magic Armor III | Greatly reduces damage taken on lightning-element-recommended stages. | King Dodongo’s Crystal ×1, Cia’s Bracelet ×2, ReDead Knight Ashes ×2 | 5,000 |

|
Sacred Shield I | Slightly reduces damages taken on light-element-recommended stages. | Gibdo Bandage ×2 | 1,000 |

|
Sacred Shield II | Moderately reduces damage taken on light-element-recommended stages. | Cia’s Bracelet ×1, King Dodongo’s Claws ×1, Gibdo Bandage ×3 | 3,000 |

|
Sacred Shield III | Greatly reduces damage taken on light-element-recommended stages. | King Dodongo’s Crystal ×1, Cia’s Bracelet ×2, ReDead Knight Ashes ×2 | 5,000 |

|
Mirror Shield I | Slightly reduces damage taken on darkness-element-recommended stages. | Gibdo Bandage ×2 | 1,000 |

|
Mirror Shield II | Moderately reduces damage taken on darkness-element-recommended stages. | Cia’s Bracelet ×1, King Dodongo’s Claws ×1, Gibdo Bandage ×3 | 3,000 |

|
Mirror Shield III | Greatly reduces damage taken on darkness-element-recommended stages. | King Dodongo’s Crystal ×1, Cia’s Bracelet ×2, ReDead Knight Ashes ×2 | 5,000 |

|
Naryu’s Love I | Nullifies knock-back on the first hit taken from enemies. | Gibdo Bandage ×3 | 1,000 |

|
Nayru’s Love II | Nullifies knock-back on the first two hits taken from enemies. | Cia’s Bracelet ×1, King Dodongo’s Claws ×1, Gibdo Bandage ×3 | 3,000 |
|
|
Nayru’s Love III | Nullifies knock-back on the first three hits taken from enemies. | King Dodongo’s Crystal ×1, Cia’s Bracelet ×2, ReDead Knight Ashes ×2 | 5,000 |
Assist Badges
| Name | Description | Materials Required | Cost | |
|---|---|---|---|---|

|
Farore’s Wind I (Unlocks Goron’s Bracelet I) | Slightly speeds up the process of taking keeps. | Metal Plate ×1 | 500 |

|
Farore’s Wind II | Moderately speeds up the process of taking keeps. | Cia’s Bracelet ×1, King Dodongo’s Claws ×1, Gibdo Bandage ×3 | 1,000 |

|
Farore’s Wind III | Greatly speeds up the process of taking keeps. | Cia’s Staff ×1, Cia’s Bracelet ×2, ReDead Knight Ashes ×2 | 3,000 |

|
Goron’s Bracelet I (Unlocks Hawkeye I) | Slightly increases the duration of bomb power-ups. | Gibdo Bandage ×2 | 1,000 |

|
Goron’s Bracelet II | Greatly increases the duration of bomb power-ups. | Cia’s Staff ×1, Cia’s Bracelet ×2, ReDead Knight Ashes ×2 | 2,000 |

|
Hawkeye I (Unlocks Beetle I) | Slightly increases the duration of bow and arrows power-ups. | Gibdo Bandage ×2 | 1,000 |

|
Hawkeye II | Greatly increases the duration of bow and arrows power-ups. | Cia’s Staff ×1, Cia’s Bracelet ×2, ReDead Knight Ashes ×2 | 2,000 |

|
Beetle I (Unlocks Whip I) | Slightly increases the duration of boomerang power-ups. | Gibdo Bandage ×2 | 1,000 |

|
Beetle II | Greatly increases the duration of boomerang power-ups. | Cia’s Staff ×1, Cia’s Bracelet ×2, ReDead Knight Ashes ×2 | 2,000 |

|
Whip I (Unlocks Bug Net I) | Slightly increases the duration of Hookshot power-ups. | Gibdo Bandage ×2 | 1,000 |

|
Whip II | Greatly increases the duration of Hookshot power-ups. | Cia’s Staff ×1, Cia’s Bracelet ×2, ReDead Knight Ashes ×2 | 2,000 |

|
Bug Net I | Slightly increases the duration of hammer power-ups. | Gibdo Bandage ×2 | 1,000 |

|
Bug Net II | Greatly increases the duration of hammer power-ups. | Cia’s Staff ×1, Cia’s Bracelet ×2, ReDead Knight Ashes ×2 | 2,000 |
Twili Midna’s Costumes
| Name | Location |
|---|---|
| Standard Outfit | This is Twili Midna’s starting costume. |
| Standard Outfit (Great Sea) | E-14 in the Great Sea Map; need to use Item Card. |