
Hyrule Warriors Legends Guide Legend Mode
Boss Fight: Manhandla
Manhandla is definitely on the harder side of the Giant Boss spectrum. It rarely leaves itself open to attack, so getting its Weak Point Mark out is often a pain. Also, it can rampage across the field in an unpredictable manner, which does a good bit of damage and is unblockable. It also continuously pelts the Allied Base with seed mortars whenever you’re not near it. Lucky for you, we have extensive knowledge about this prickly plant, so we’ll help make this fight as easy as possible.
Manhandla has a varied set of moves. Here are the moves you need to look out for the most: the ones that reveal its Weak Point Mark. The first and most common of these two attacks is Manhandla’s seeding spitting assault. All of its heads aim at you, but in a specific tiered pattern (use above screenshot for reference).
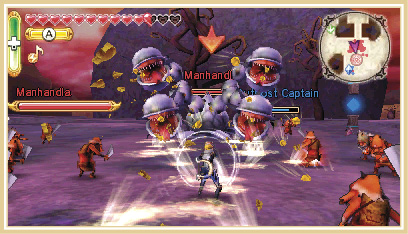
When you see this, block immediately. You’ll be pelted relentlessly by seeds for a few seconds. Watch for when Manhandla’s Stalks turn green; this is the time to attack. Don’t bother with normal attacks: Hit Manhandla with your Boomerang instead. Make sure you’re good and close before throwing it, because the Boomerang doesn’t have a great range and it also can’t be aimed. When you hit one of Manhandla’s heads, it retracts into its body. As soon as you knock all four of its heads with the Boomerang Manhandla’s Weak Point Mark shows up.
The second move is when all of the heads aim at you again, but arrange themselves in a horizontal line. This means that Manhandla is about to try to take a bite out of you with all of its heads, one at a time. Instead of blocking immediately, throw your Boomerang and you’ll likely knock all of them down at once, revealing the Weak Point Mark. If you missed any of the heads on either attack, you can use you Regular Attacks to finish them off.
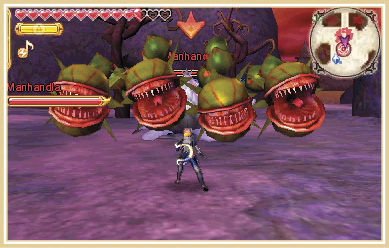
Manhandla has a few more moves that don’t reveal the Weak Point Mark, but you should watch out for their devastating power. The first of these is the aforementioned rampage attack. The Manhandla pulls itself out of the ground and begins thrashing around the area violently. Blocking doesn’t work against this attack, as the Manhandla can just break through the block. Instead, focus on rolling away from the monster man-eater.
Manhandla can also unleash a poison attack that is exactly the same as the one the Deku Babas did in the Faron Woods. If Manhandla’s heads look straight into the air, roll away from it to avoid the attack.
Once you’ve damaged half of Manhandla’s health, it flees underground. Manhandla Stalks pop up all over the south half of the battlefield and you must find the real one by cutting down each of the Stalks. We’ll save you the trouble and tell you which Stalks Manhandla always hides under.
Attack either the southwestern or southeastern Stalks to get the Manhandla to come back up again and ignore the others. Once Manhandla resurfaces, the other Stalks disappear.
Hard Gold Skulltula OpportunityGet Manhandla down to half health to cause it to flee, then make it come back up from the ground by defeating the correct Manhandla Stalk. Once you do, head straight for the central ruins’ stairs. The Skulltula is sitting on the other side of the gate. |
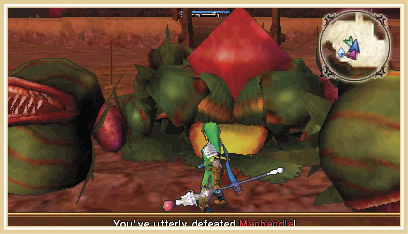
The second half of the fight is the same as the first. Just follow our suggestions and watch for Manhandla’s cues to figure out how to dodge its attacks. For added swiftness, Manhandla is actually quite susceptible to Special Attacks and Focus Spirit. You can almost always reveal its Weak Point Mark if you hit it with the Focus Spirit finishing attack or a Special, regardless of what move it’s using at the time. Make sure to use those moves during this second half and Manhandla will be hung out to dry in no time. Just note that this doesn’t work 100 percent of the time with all Warriors—Link can make it happen almost every time with both moves, but Lana’s Special struggles to hit all of the Manhandla Stalks. That doesn’t mean you shouldn’t try anyway, however.
Beating Manhandla ends the Scenario. Your side is victorious.
A Link Between Worlds
Cia fled from the Valley of Seers, but her plan has become obvious: She’s trying to grab all three pieces of the Triforce by traveling through different eras of Hyrule’s history! At this point in Legend Mode, the Scenarios branch, meaning you can travel to different Hyrules from across The Legend of Zelda series and you’ll get to choose what order you want to visit them in. You are free to select whichever Scenario you want to do first, but you’ll get more unlockables if you follow our path. If you’re fine on holding off on getting some extra treasures for the time being, pick the Scenario that interests you most and flip to that Scenario in this section of the guide.
If you’re looking to follow our path, turn the page; we’re starting this strange journey with Scenarios in the world of Twilight Princess.