
Hyrule Warriors Legends Guide Warriors & Weapons
Linkle
Yoot! Linkle started as a “What if Link was female” concept, but quickly turned into her own adorable, deadly, hilarious character with personality that can even outshine our favorite silent protagonist. Her crossbows give her more natural range of attack that other Warriors and her Combo Attacks are truly devastating. Few Warriors in the game can be called true staples that you can always rely on to conquer anything, and Linkle definitely fits into that group.
How to unlock
Linkle is unlocked after completing “Sorceress in the Woods” in Legend Mode.
Linkle’s Weapons
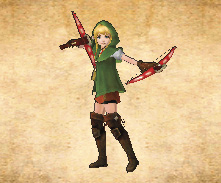
Crossbows
The Regular Attacks on the crossbows are excellent; maybe even some of the best in the game. You can easily get by with just mashing Regular Attack, but thankfully you don’t have to; Linkle’s Combo Attacks are just as deadly. Hitting Regular-Regular-Regular-Combo forces Linkle to jump into the air and do a diagonal kick. If she hits an enemy Warrior, Captain or Giant Bosses, she bounces back into the air. From there, if you mash Regular, Linkle lets out a string of airborne attacks, followed by a drop kick that clears out enemies within a small radius around her. The kick itself is excellent for defeating Captains and Warriors, as well as depleting Giant Boss Weak Point Marks. Generally, if you use Regular Attack enough, a Captain or Warrior begins to block, but Linkle spends exactly the right amount time in the air before coming down with her kick that her enemies almost always drop their guard just in time for her to continue the combo. Her other excellent Combo Attack comes after hitting Regular-Regular-Regular-Regular-Regular-Combo. This causes her to charge forward while firing a volley of arrows at anything ahead of her, absolutely devastating groups of enemies. Linkle’s crossbows have everything you need for any situation. If you’re ever struggling to select a Warrior, remember: When in doubt, Linkle out.
 Simple Crossbows
This is Linkle’s Starting weapon.
 Hylian Crossbows
You can find this weapon in the Sealed Weapon in “Linkle’s Tale: The Demon Lord’s Plan” in Legend Mode.
 Legend’s Crossbows
You can find this weapon in Scenario B-5 of the Master Quest Map. You must first use an Item Card in the Search Screen to locate it, and then get an A-Rank to unlock the weapon.
Legend’s Crossbows +
You can find this weapon in Scenario D-6 of the Twilight Map. You must first use an Item Card in the Search Screen to locate it, and then get an A-Rank to unlock the weapon.
Linkle’s Badges
Attack Badges
| Name | Description | Materials Required | Cost | |
|---|---|---|---|---|

|
Kokiri Sword I (Unlocks Din’s Fire I) | New Combo Attack for the Crossbows: Regular Attack ×6 | Monster Tooth ×1 | 100 |

|
Kokiri Sword II (Unlocks Stamina Fruit I) | New Combo Attack for the Crossbows: Regular Attack ×4, then press Combo Attack | Dinolfos Fang ×1, Monster Tooth ×1 | 500 |

|
Kokiri Sword III (Unlocks Digging Mitts I) | New Combo Attack for the Crossbows: Regular Attack ×7 | Shield-Moblin Helmet ×1, Monster Tooth ×1 | 1,000 |

|
Kokiri Sword IV | New Combo Attack for the Crossbows: Regular Attack ×5, then press Combo Attack | Goron Armor Breastplate ×1, Monster Tooth ×1 | 3,000 |

|
Din’s Fire I (Unlocks Hover Boots I) | Makes the Special Attack gauge fill slightly faster. | ReDead Bandage ×1, Monster Tooth ×1 | 500 |

|
Din’s Fire II (Unlocks Fierce Deity’s Mask I) | Makes Special Attack gauge fill moderately faster. | Shield-Moblin Helmet ×1, Monster Tooth ×1 | 1,000 |

|
Din’s Fire III | Makes the Special Attack gauge fill a lot faster. | Twili Midna’s Robe ×1, Skull Kid’s Hat ×2, Large Darknut Sword ×2 | 3,000 |

|
Stamina Fruit I | Makes the Weak Point gauge diminish slightly quicker. | Piece of Darknut Armor ×1 | 500 |

|
Stamina Fruit II | Makes the Weak Point gauge diminish moderately quicker. | Twili Midna’s Hairpin ×1, Skull Kid’s Hat ×1, Piece of Darknut Armor ×3 | 1,000 |

|
Stamina Fruit III | Makes the Weak Point gauge diminish a lot quicker. | Twili Midna’s Robe ×1, Skull Kid’s Hat ×2, Large Darknut Sword ×2 | 3,000 |

|
Hover Boots I | Slightly lengthens the duration of Focus Spirit. | Piece of Darknut Armor ×2 | 500 |

|
Hover Boots II | Moderately lengthens the duration of Focus Spirit. | Twili Midna’s Hairpin ×1, Skull Kid’s Hat ×1, Piece of Darknut Armor ×3 | 1,000 |

|
Hover Boots III | Greatly lengthens the duration of Focus Spirit. | Twili Midna’s Robe ×1, Skull Kid’s Hat ×2, Large Darknut Sword ×2 | 3,000 |

|
Digging Mitts I | Allows the warrior to inflict minor damage to enemies with their guard up. | Piece of Darknut Armor ×3 | 2,000 |
|
|
Digging Mitts II | Allows the warrior to inflict moderate damage to enemies with their guard up. | Twili Midna’s Hairpin ×1, Skull Kid’s Hat ×1, Piece of Darknut Armor ×3 | 3,000 |

|
Digging Mitts III | Allows the warrior to inflict heavy damage to enemies with their guard up. | Twili Midna’s Robe ×1, Skull Kid’s Hat ×2, Large Darknut Sword ×2 | 5,000 |

|
Fierce Deity’s Mask I | Gives the warrior a second Special Attack gauge. | Shield-Moblin Helmet ×1, Monster Tooth ×1 | 2,000 |

|
Fierce Deity’s Mask II | Gives the warrior a third Special Attack gauge. | Twili Midna’s Robe ×1, Skull Kid’s Hat ×2, Large Darknut Sword ×2 | 3,000 |
Defense Badges
| Name | Description | Materials Required | Cost | |
|---|---|---|---|---|

|
Empty Bottle I (Unlocks all other tier I badges in Link’s Defense Badge tree) | Allows a warrior to use a potion once per battle. | Monster Tooth ×1 | 100 |

|
Empty Bottle II (Unlocks Nayru’s Love I) | Allows a warrior to use a potion twice per battle. | Shield-Moblin Helmet ×1, Monster Tooth ×1 | 1,000 |

|
Empty Bottle III | Allows a warrior to use a potion three times per battle. | Majora’s Mask ×1, Twili Midna’s Hairpin ×2, Large Darknut Sword ×2 | 3,000 |

|
Hornet Larvae I | Slightly increases the healing effect from hearts picked up in battle. | Piece of Darknut Armor ×1 | 500 |

|
Hornet Larvae II | Moderately increases the healing effect from hearts picked up in battle. | Twili Midna’s Hairpin ×1, Skull Kid’s Hat ×1, Piece of Darknut Armor ×3 | 1,000 |

|
Hornet Larvae III | Greatly increases the healing effect from hearts picked up in battle. | Majora’s Mask ×1, Twili Midna’s Hairpin ×2, Large Darknut Sword ×2 | 3,000 |

|
Goron Tunic I | Slightly reduces damage taken on fire-element-recommended stages. | Piece of Darknut Armor ×2 | 1,000 |

|
Goron Tunic II | Moderately reduces damage taken on fire-element-recommended stages. | Twili Midna’s Hairpin ×1, Skull Kid’s Hat ×1, Piece of Darknut Armor ×3 | 3,000 |

|
Goron Tunic III | Greatly reduces damage taken on fire-element-recommended stages. | Majora’s Mask ×1, Twili Midna’s Hairpin ×2, Large Darknut Sword ×2 | 5,000 |

|
Zora Tunic I | Slightly reduces damage taken on water-element-recommended stages. | Piece of Darknut Armor ×2 | 1,000 |

|
Zora Tunic II | Moderately reduces damage taken on water-element-recommended stages. | Twili Midna’s Hairpin ×1, Skull Kid’s Hat ×1, Piece of Darknut Armor ×3 | 3,000 |

|
Zora Tunic III | Greatly reduces damage taken on water-element-recommended stages. | Majora’s Mask ×1, Twili Midna’s Hairpin ×2, Large Darknut Sword ×2 | 5,000 |

|
Magic Armor I | Slightly reduces damage taken on lightning-element-recommended stages. | Piece of Darknut Armor ×2 | 1,000 |

|
Magic Armor II | Moderately reduces damage taken on lightning-element-recommended stages. | Twili Midna’s Hairpin ×1, Skull Kid’s Hat ×1, Piece of Darknut Armor ×3 | 3,000 |

|
Magic Armor III | Greatly reduces damage taken on lightning-element-recommended stages. | Majora’s Mask ×1, Twili Midna’s Hairpin ×2, Large Darknut Sword ×2 | 5,000 |

|
Sacred Shield I | Slightly reduces damages taken on light-element-recommended stages. | Piece of Darknut Armor ×2 | 1,000 |

|
Sacred Shield II | Moderately reduces damage taken on light-element-recommended stages. | Twili Midna’s Hairpin ×1, Skull Kid’s Hat ×1, Piece of Darknut Armor ×3 | 3,000 |

|
Sacred Shield III | Greatly reduces damage taken on light-element-recommended stages. | Majora’s Mask ×1, Twili Midna’s Hairpin ×2, Large Darknut Sword ×2 | 5,000 |

|
Mirror Shield I | Slightly reduces damage taken on darkness-element-recommended stages. | Piece of Darknut Armor ×2 | 1,000 |

|
Mirror Shield II | Moderately reduces damage taken on darkness-element-recommended stages. | Twili Midna’s Hairpin ×1, Skull Kid’s Hat ×1, Piece of Darknut Armor ×3 | 3,000 |

|
Mirror Shield III | Greatly reduces damage taken on darkness-element-recommended stages. | Majora’s Mask ×1, Twili Midna’s Hairpin ×2, Large Darknut Sword ×2 | 5,000 |

|
Naryu’s Love I | Nullifies knock-back on the first hit taken from enemies. | Piece of Darknut Armor ×3 | 1,000 |

|
Nayru’s Love II | Nullifies knock-back on the first two hits taken from enemies. | Twili Midna’s Hairpin ×1, Skull Kid’s Hat ×1, Piece of Darknut Armor ×3 | 3,000 |
|
|
Nayru’s Love III | Nullifies knock-back on the first three hits taken from enemies. | Majora’s Mask ×1, Twili Midna’s Hairpin ×2, Large Darknut Sword ×2 | 5,000 |
Assist Badges
| Name | Description | Materials Required | Cost | |
|---|---|---|---|---|

|
Farore’s Wind I (Unlocks Goron’s Bracelet I) | Slightly speeds up the process of taking keeps. | Metal Plate ×1 | 500 |

|
Farore’s Wind II | Moderately speeds up the process of taking keeps. | Twili Midna’s Hairpin ×1, Skull Kid’s Hat ×1, Piece of Darknut Armor ×3 | 1,000 |

|
Farore’s Wind III | Greatly speeds up the process of taking keeps. | Twili Midna’s Robe ×1, Twili Midna’s Hairpin ×2, Large Darknut Sword ×2 | 3,000 |

|
Goron’s Bracelet I (Unlocks Hawkeye I) | Slightly increases the duration of bomb power-ups. | Piece of Darknut Armor ×2 | 1,000 |

|
Goron’s Bracelet II | Greatly increases the duration of bomb power-ups. | Twili Midna’s Robe ×1, Twili Midna’s Hairpin ×2, Large Darknut Sword ×2 | 2,000 |

|
Hawkeye I (Unlocks Beetle I) | Slightly increases the duration of bow and arrows power-ups. | Piece of Darknut Armor ×2 | 1,000 |

|
Hawkeye II | Greatly increases the duration of bow and arrows power-ups. | Twili Midna’s Robe ×1, Twili Midna’s Hairpin ×2, Large Darknut Sword ×2 | 2,000 |

|
Beetle I (Unlocks Whip I) | Slightly increases the duration of boomerang power-ups. | Piece of Darknut Armor ×2 | 1,000 |

|
Beetle II | Greatly increases the duration of boomerang power-ups. | Twili Midna’s Robe ×1, Twili Midna’s Hairpin ×2, Large Darknut Sword ×2 | 2,000 |

|
Whip I (Unlocks Bug Net I) | Slightly increases the duration of Hookshot power-ups. | Piece of Darknut Armor ×2 | 1,000 |

|
Whip II | Greatly increases the duration of Hookshot power-ups. | Twili Midna’s Robe ×1, Twili Midna’s Hairpin ×2, Large Darknut Sword ×2 | 2,000 |

|
Bug Net I | Slightly increases the duration of hammer power-ups. | Piece of Darknut Armor ×2 | 1,000 |

|
Bug Net II | Greatly increases the duration of hammer power-ups. | Twili Midna’s Robe ×1, Twili Midna’s Hairpin ×2, Large Darknut Sword ×2 | 2,000 |
Linkle’s Costumes
| Name | Location |
|---|---|
| Standard Outfit | This is Linkle’s starting outfit. |
| Standard Outfit (Great Sea) | F-3 in the Great Sea Map; need to use Item Card. |